Running a successful horror scenario in a roleplaying game can be a unique challenge, but it’s not the impossibility that some feel it to be.
There is one baseline requirement, though: The players have to be invested in the game world. They have to CARE about something. Their own PCs at a minimum. The whole group is better. Other stuff in the game world is ideal.
And, as a horror GM, you want to be aware of what your players actually care about: If they don’t care about something, then they cannot fear its loss. Target what the players care about, which may not be the same thing as what their characters care about.
The thin line of distinction here can often be found in joking around the table: It’s okay if the players are using jokes to try to distract themselves from the danger. That’s part of horror! It actually shows that they’re invested in the world.
But if the players are using jokes to distance themselves from the game world, that’s a problem: Those jokes de-invest the players’ engagement in the game world. It’s the difference between Buffy cracking wise with Willow and the MST3k crew mocking a movie.
The distinction between these two forms of humor at a gaming table – where roleplaying, meta-game discussion, and meta-commentary often flow around each other seamlessly – can be very subtle, but it’s important.
Long story short: If you’re trying to run a horror game and you’re having problems with disruptive behavior (i.e., players disrupting the table’s investment in the scenario), then it’s useful to step back and have a group discussion about expectations. However, it’s easy for this conversation to misdirect towards things like “no laughing” or “horror is serious business, so everyone put on their frowny faces.” In my experience, this is often ineffective and it can be more useful to drive to the heart of the matter: Why don’t you care?
Fixing that issue may be a much more complicated issue (and beyond the scope of this essay), but the frank discussion is usually a good place to start.
In any case, let’s lay this digression aside and assume that you have a group invested in their characters and the game world.
What next?
THE CORE OF HORROR
Regardless of medium, achieving true horror is a vague and unspecific art. But you’re generally looking for some combination of danger, anxiety, helplessness, and enigma.
These qualities are often associated with the lack of power, and this can lead to the assumption that horror becomes impossible if characters have a certain amount of power: You can’t do horror with superheroes. Or D&D characters. Or colonial marines in a warship armed with nuclear weapons.
In general, however, the objective amount of power you have is only relevant because it influences your RELATIVE power. And even relative power is only meaningful insofar as it affects PERCEIVED power.
If you perceive yourself to be overpowered by something that wants harm you (or, often more effectively, those things and people you care about), then you are in DANGER.
If you see no way to escape or redress the imbalance of power, you are HELPLESS.
If you are concerned that such danger or helplessness could happen, you are ANXIOUS.
Finally, when confronted with an ENIGMA, players will perform an act of closure. With proper circumstance and priming, their closure will create the threat of danger or helplessness, either heightening the sense of anxiety or creating anxiety even in situations where it isn’t necessary.
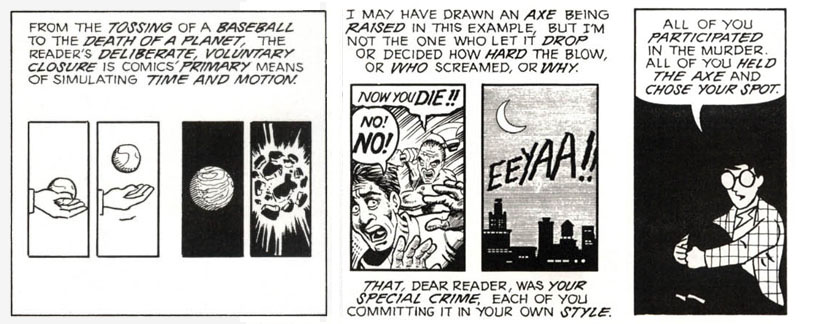
Scott Mccloud – Understanding Comics
SHORTCUTS & MULTIPLIERS
There are a number of shortcuts and multipliers you can use to create or enhance horror.
PHOBIAS have various sources, but they are all pre-trained fear responses. They bypass rational threat assessment and immediately trigger a sense of overwhelming danger.
Making the players fear for something other than their PCs (i.e., themselves) allows you to place the endangered thing or person at a distance. This DANGER AT A DISTANCE reduces the perceived ability to do anything about the danger, thus reducing perceived power and enhancing helplessness.
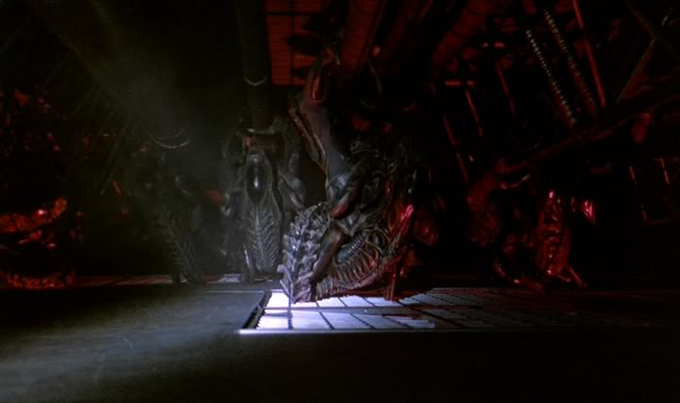
Conversely you can endanger PCs from a distance or in a way they don’t understand. If they can’t figure out how to apply their power to MYSTERIOUS DANGER, they also lose perceived power. (I used this technique in The Complex of Zombies with the bloodsheen ability to create a terrifying mystery.)
You can achieve similar effects via DILEMMAS. If multiple things the PCs care about are simultaneously put in danger (preferably in different locations), being forced to choose which one to help or save can create helplessness. (Or it can force the party to split up, which is also great for horror: It reduces the perceived power of the characters and it lets you put isolated characters at risk, presenting danger at a distance for the rest of the group.)
You can use PRIMING to direct how players perform closure on the enigmas you present. (There are a lot of ways to do this. Horror movies actually do it with their soundtracks: Specific music cues or types of music or the lack of music prime the audience to literally imagine the worst possible outcomes from otherwise innocuous interactions – like opening a door – a thousand times over.)
You can use the UNEXPECTED to create quick enigma, disrupt the perception of relative power, or maximize the effectiveness of a phobia. (Jump scares are a simple example, but so are xenomorphs climbing through the ceiling when you expected them to come through the doors.)
It can also be effective to ESTABLISH RUTHLESSNESS. In order for horror to exist, the threat of loss cannot simply be performative: The audience (i.e., the players) must believe the threat to be real. And the easiest way to make that happen is if the threat is real, which can be demonstrated by actually pulling the trigger (or swinging the axe, as the case may be).
This can be very effective when dealing with the problems created by genre expectations: There are all kinds of genres in which the main characters are placed in jeopardy, but are never in actual danger of being killed. This is particularly true of the pulp genres and TV procedurals that many RPGs are based on.
Modern design ethos, for example, has ingrained the belief in many groups that game play is supposed to be a predictable series of “fair” encounters. The expectation is thus that the PCs will constantly be placed in the perception of “danger,” but will never actually be at risk. You’re obviously never going to feel helpless if you know every encounter has been designed for you to triumph, nor are you going to feel anxious about the possibility of facing the next “dangerous” encounter. Horror, of course, is completely impossible under these conditions, and often the only way to break that long-held belief is to bluntly demonstrate that, no, you and/or the things you care about are NOT safe.
CONCLUDING THOUGHTS
Let’s wrap up with a couple things you should NOT do.
First, don’t tell the players that their characters are scared. While it’s true that we have an empathetic model of mind (i.e., if we see someone smiling we often reflect that emotion and become happy ourselves because we have circuitry in our brains specifically designed to recreate the emotions seen in others) and that horror fiction – particularly film – leverages that to create fear in an audience by showing a character in fear, instructing players what their characters are feeling can often psychologically distance them from those characters and have the opposite effect.
(What you CAN do is vividly describe the emotional reaction of NPCs. Particularly NPCs that you know the players care about. The bandwidth is still limited compared to a film, but the technique can be effective.)
You should also not allow this imprecation to discourage you from using tools like sanity mechanics, assuming you’re using them correctly, of course. (Note that, when used correctly, sanity mechanics create enigma and use priming to frame player closure through foreshadowing without disrupting their emotional engagement with both their character and the moment. This is obviously not a coincidence.)
Second, never railroad the players into danger.
As the Railroading Manifesto tells us, railroading is never a good idea. But it sure can be tempting in a horror scenario! After all, if helplessness is one way of creating horror, what could make the players feel more helpless than forcing them into a preconceived outcome?
The problem is that this helplessness is not diegetic; instead of being focused on the game world (and the things that the players care about in that game world) it’s focused on you. This emotional redirection can disconnect the players from the game world, causing them to lose the investment that is foundational to the horror experience. In other words they stop caring. And often the fear you want them to be feeling is replaced with anger.
Conversely, true autonomy often heightens the horror: It’s only when choices matter that enigmas are fully engaged with (because they know the outcome of those enigmas are not predetermined; in the most simplistic form, if they could solve this puzzle faster then they might be able to save Lisa’s life). Furthermore, when players feel true responsibility for what happens (because it’s the result of the choices they made), the guilt they feel for those outcomes – and, importantly, the fear of experiencing that guilt if things go wrong – will enrich their emotional response to danger and helplessness.
That kind of emotional engagement, of course, will heighten the players’ investment in the game world, expanding the depth and breadth of the horror itself.
 about cyphers at greater length in Numenera: Identifying Items, but the core concept is that they let the PCs do something cool once and then they’re cycled out for another cypher. Examples of cyphers include stuff like: