The Avernian hex key is going to be one of the “hands on” sections of the Remix: We’re going to set up the scaffold here, but there’ll be some finishing work you’ll probably want to do before running it.
To stock the Avernian hexcrawl, I will be:
- drawing locations from Descent Into Avernus,
- pulling material from a variety of Avernus-related supplements on the DMs Guild, and
- creating original content.
Most of the locations in Descent Into Avernus were originally and primarily designed to be part of the Choose Your Railroad structure that the campaign is built around. The key below assumes that you’ll have access to the Descent Into Avernus book, but will be providing notes focused on how these locations should be adapted in the absence of this railroad.
In cases where I’m using material from the DMs Guild, you will similarly need to either obtain the original supplement or swap those hexes out for your own creations. The notes below, once again, focus primarily on how you can adapt the published material to good effect. (Harvesting published scenarios like this is something I almost always do when stocking hexcrawls.)
Original content is also unlikely to be a in a play-ready state, but should be sufficiently detailed that you’ll be able to flesh out the details.
Throughout these locations we will be seeding:
- The four components required to repair the dream machine.
- Clues related to Lulu’s memory mystery.
- Clues related to the Avernian Quest.
INDEX
Hexes A1 thru B6
Hexes C1 thru D6
Hexes E1 thru F6
Hexes G1 thru H6
Hexes I1 thru J6
A1. AVERNIAN TARPIT
A vast tarpit several hundred feet across. The is hot enough to burn (1d6 fire damage) and it is constantly bubbling. Dangers include:
- A large gas bubble explodes, spattering those within 10 feet with hot tar. DC 12 Dexterity saving throw or 1d6 fire damage.
- Getting stuck in the tar. (It counts as difficult terrain and requires a DC 14 Strength check to pass safely or a DC 18 Strength check to escape once stuck. If stuck, the victim will slowly sink into the tar, becoming submerged 3d6 rounds later.)
- Jets of flame spontaneously erupt from particularly strong outgassing.
- The gas itself can be toxic, requiring a DC 16 Constitution saving throw. On a failure, characters are affected as per a confusion spell, rolling on the custom table below once per minute to determine their actions. At the end of each minute, they can attempt another saving throw.
There are several small outcroppings of rock and solid-ish land dotted throughout the tarpit. On one of these is a giant boulder of gold that gleams in the strange, reddish light of Avernus. (The boulder is actually pyrite; fool’s gold.)
| d10 | Tar Confusion Effect |
|---|---|
| 1-2 | Uncontrollable laughter, as per a Tasha's hideous laughter spell |
| 3-5 | Believes the tar is delicious food and will attempt to eat it. (The tar inflicts 1d6 fire damage, or 3d6 fire damage if swallowed. It is also poisonous, requiring a DC 12 Constitution saving throw to avoid an additional 2d6 damage accompanied by vomiting.) |
| 6-7 | Move in a random direction (possibly motivated by hallucinations). |
| 8 | Takes no actions. |
| 9-10 | Attacks a random nearby creature. |
A2. OBELISK OF UBBALUX
- Descent Into Avernus, p. 98.
A set of astral pistons within the obelisk are intrinsic to Ubbalux’ prison. The pistons can only be accessed if Ubbalux is freed.
FREEING UBBALUX:
- As described in Descent Into Avernus, Ubbalux has heard of the Mirror of Mephistar (Hex I1) and believes Mephistopheles can unravel the riddle.
- Bel built the prison and could free him. Ubbalux can also point them towards Bel’s Forge (Hex H2). (If it seems reasonable, Ubbalux might still be under the impression that Bel is the Archduke of Hell.)
- You can also solve Bel’s original “riddle” (see below).
INVESTIGATING THE STONES: Bel told Ubbalux that the secret to escaping the prison was hidden in the arcane runes etched across the standing stones. The trick is that crucial information is located on the outside of the stones, where Ubbalux can’t see it.
- A DC 12 Intelligence (Arcana) check indicates that each of the outer standing stones is associated with one of the schools of magic.
- A character who speaks Infernal or succeeds on a DC 18 Intelligence (Arcana) check will notice that each standing stone has a cartouche containing two syllables, one of which is either the first or second syllable of the associated school of magic in Infernal and the other appears to be a nonsense syllable.
- A similar cartouche appear on the inside of the stone (where Ubbalux can see it, although you can also look across the circle and see them from outside) with a similar pairing of the first or second syllable of the associated school of magic in Infernal (whichever one isn’t on the outside) and a nonsense syllable.
SOLVING THE RIDDLE: Combining the two “nonsense” syllables on each stone forms a command word associated with that stone. You can intuit the correct order of the syllables by looking at the matched syllable from the school of magic. (So the syllable in the cartouche with the first syllable of the school of magic should be the first syllable of the command word and the second syllable should be the second.)
To release Ubbalux, you need to place your hand on each stone and speak the associated command word (suffering the effect described on pg. 98 of Decent Into Avernus). Once this has been done with all eight stones, the energy field drops: Ubbalux is freed and the central obelisk can be accessed.
| Stone (by School) | Outer Cartouche (Infernal) | Inner Cartouche (Infernal) | Outer Cartouche (Translated) | Inner Cartouche (Translated) | Command Word |
|---|---|---|---|---|---|
| Abjuration | TOZ / BO | DRIK / XUUN | AB / BO | JUR / XUUN | BOXUUN |
| Conjuration | ATH / LA | DIG / KRI | JUR / LA | CON / KRI | KRILA |
| Divination | LA / ITH | ROT / IFE | DIV / ITH | IN / IFE | ITHIFE |
| Enchantment | THOS / UN | DRER / ECK | CHAN / UN | EN /ECK | ECKUN |
| Evocation | OOD / LE | WAR / ARG | CAT / LE | EVO / ARG | ARGLE |
| Illusion | THRUN / JAO | ZOG / KOUM | ILL / JAO | US / KOUM | JAOKOUM |
| Necromancy | DRIK / ARK | THAL / KIL | NEC / ARK | RO / IL | ARKIL |
| Transmutation | MAM / YA | OTH / ARK | MUT / YA | TRANS / ARK | ARKYA |
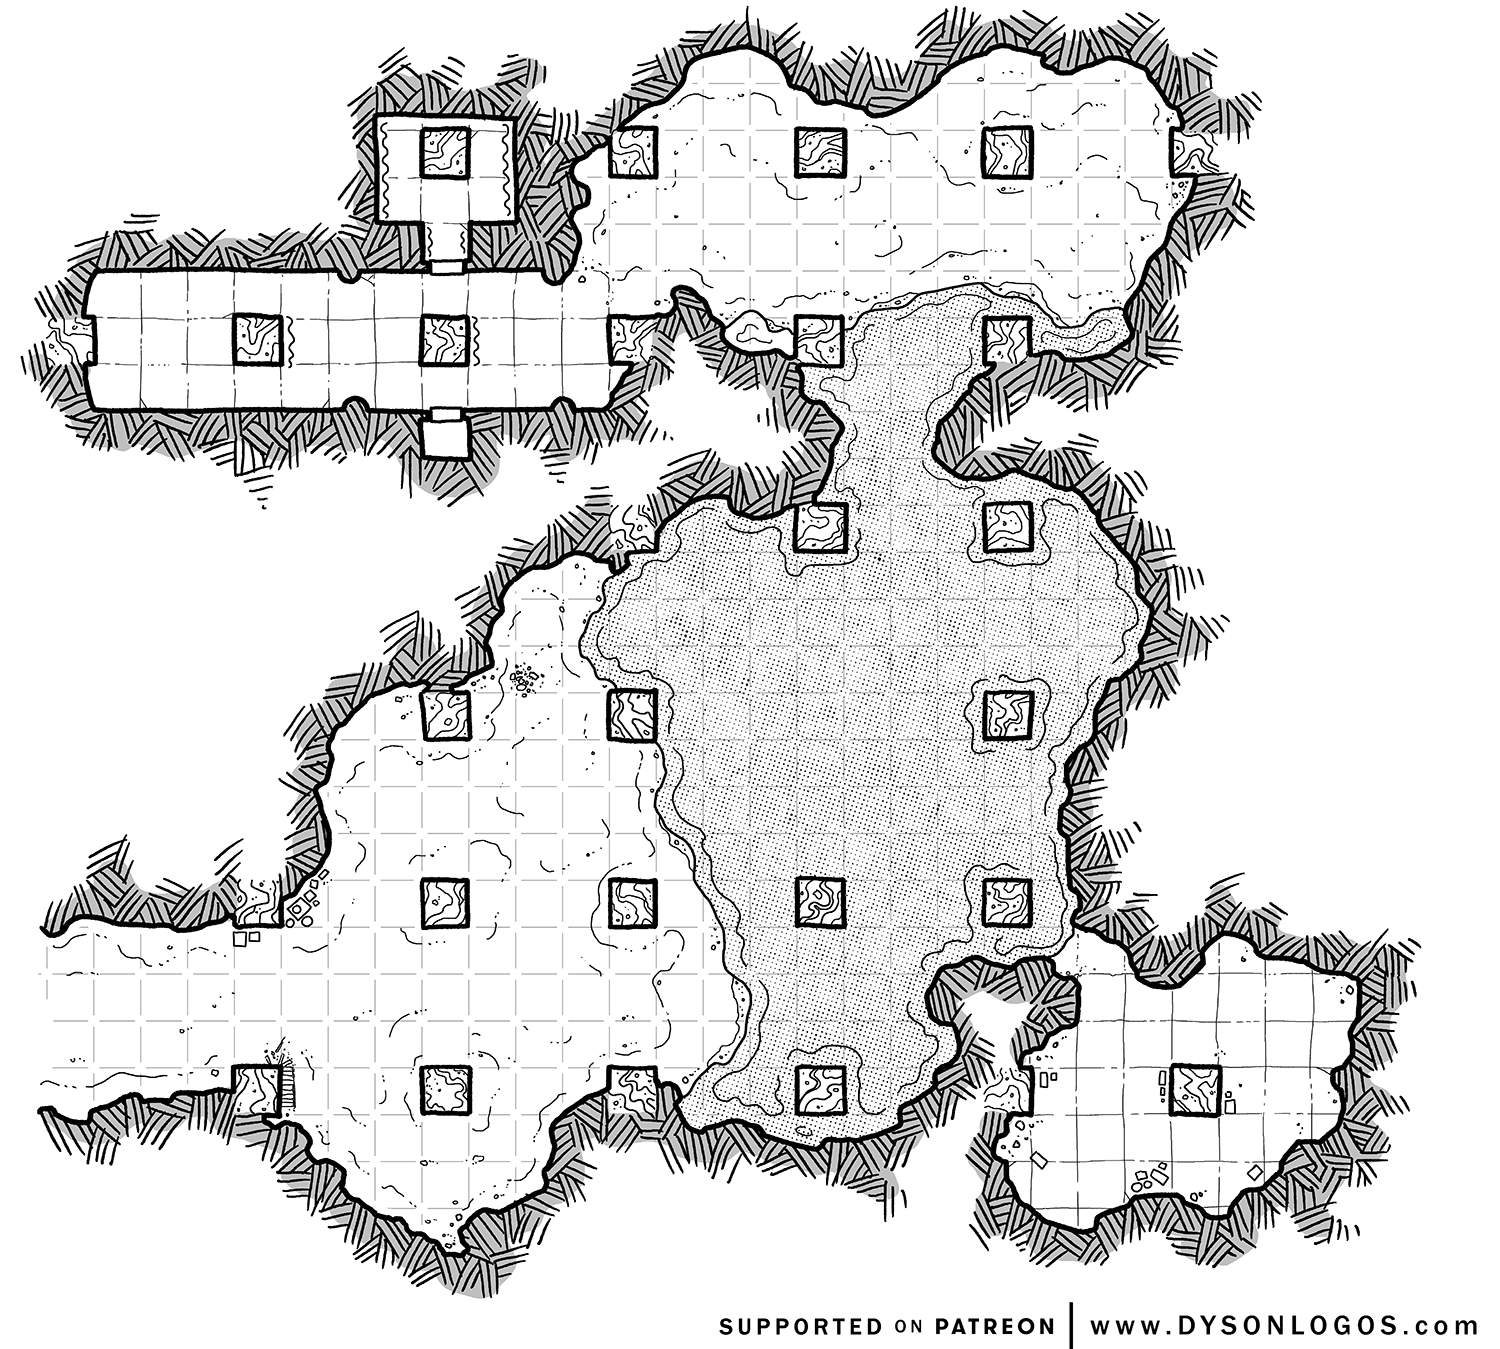
A3. OOZE HARVESTERS
- Pit of Shummrath
- Map by Dyson Logos
Treacherous stone steps are carved into the cliff face surrounding the Pit of Shummrath, leading down to a miserable village which has been built upon a shelf of rock that thrusts out into the green ooze.
A pair of piscoloths and a gaggle of sahuagin overseers dominate a population of enslaved half-fiend goblins who dredge sludge from the Pit and bottle it. These are shipped to the piscolothian cities in the dark waters beneath the ice of Stygia, where the oil-slick-like telepathic emanations of the sludge are a kind of delicacy used to spice food.
Asmodean Cavern: The mouth of a cave at the base of the cliffs in the goblin village leads to several chambers containing ancient fiendish pillars. The four faces of each pillar are covered with worn runes in an archaic form of Infernal and the bas reliefs of various devil faces. Touching the runes causes the devil faces on the matching pillar to animate and recite them. Collectively they tell of the Trial of Asmodeus and the rights given to Asmodeus under the First Law by the ruling of Primus, Lord of the Modrons. This site is recorded as being one of sixty-six such memorials erected to record this epochal event.
The goblins lived in these caverns, but several years ago they were flooded by a sudden undulation of the Pit. Shummrathian ooze still lingers in the depths of the cave, creating a hostile environment for the goblins who still squat here.
A4. ARCHES OF ULLOCH
- Descent Into Avernus, p. 103
The Arches of Ulloch allow the mass transport of entire armies, but they require the use of a tuned keystone (similar to the planar tuning fork required for a plane shift spell) to align them with a particular plane of existence.
One of the arches currently has an ancient Avernian keystone, allowing teleportation to anywhere within Avernus.
Creating a new tuned keystone requires:
- Either the original plans (located in Bel’s Fortress, Hex H2) or a DC 20 Intelligence (Arcana) check to reverse engineer the existing keystone.
- 50 soul coins worth of raw materials.
- An appropriate workshop (such as those located in Bel’s Fortress, Fort Knucklebones, or other Warlord armories).
Note: There is an unkeyed keystone in the Dump (Hex H1).
A5. WARLORD LAIR: THE LOST GOLGARI
This is the lair of Kolasiah, the Infernal Medusa, and the Lost Golgari, who have come to Avernus from Ravnica. Kolasiah seeks a way of returning home and would value any news of a powerful spellcaster not allied with Zariel.
Entrance Ramp: Infernal war machines come roaring down the ramp and are parked in a cluster around the central stone pillar.
Forge: In the central pillar of the rock at the bottom of the entrance ramp there is a forge and garage run by Malargan the Oni. See Forges of Avernus, p. 4. A set of astral pistons can be found here.
For more details on the Avernian warlords, see Part 7E of the Remix.
Design Note: As written in Warlords of Avernus, the Lost Golgari have been reduced to a fraction of their former strength. You can either lean into that (with chunks of their base here being deserted) or I would potentially go the other way and bolster her to have a larger number of infernal machines and riders.

A6. WARLORD LAIR: BITTER BREATH’S MARAUDERS
- Bitter Rivals, p. 5
- Descent Into Avernus, p. 90
For more details on the Avernian warlords, see Part 7E of the Remix.
B1. ARKHAN’S TOWER
- Descent Into Avernus, p. 110
For Arkhan’s Tower, we would like to prep:
- A complete map of the tower.
- An adversary roster of the denizens. (Descent Into Avernus, p. 110-11 does provide a comprehensive list of creatures to add to the roster.)
For the map, I will recommend PogS’ excellent original cartography.
B2a. FERRYMAN’S PORTS
- On River
There are charonadaemon ferry stations on both shores of the Styx here. There are commissions available for travel up- and downriver, but most regular travel simply crosses the river to the other station.
Sudok’s Mart: The station on the contra-Dis side of the river is larger and contains a small market overseen by a yugoloth named Sudok.
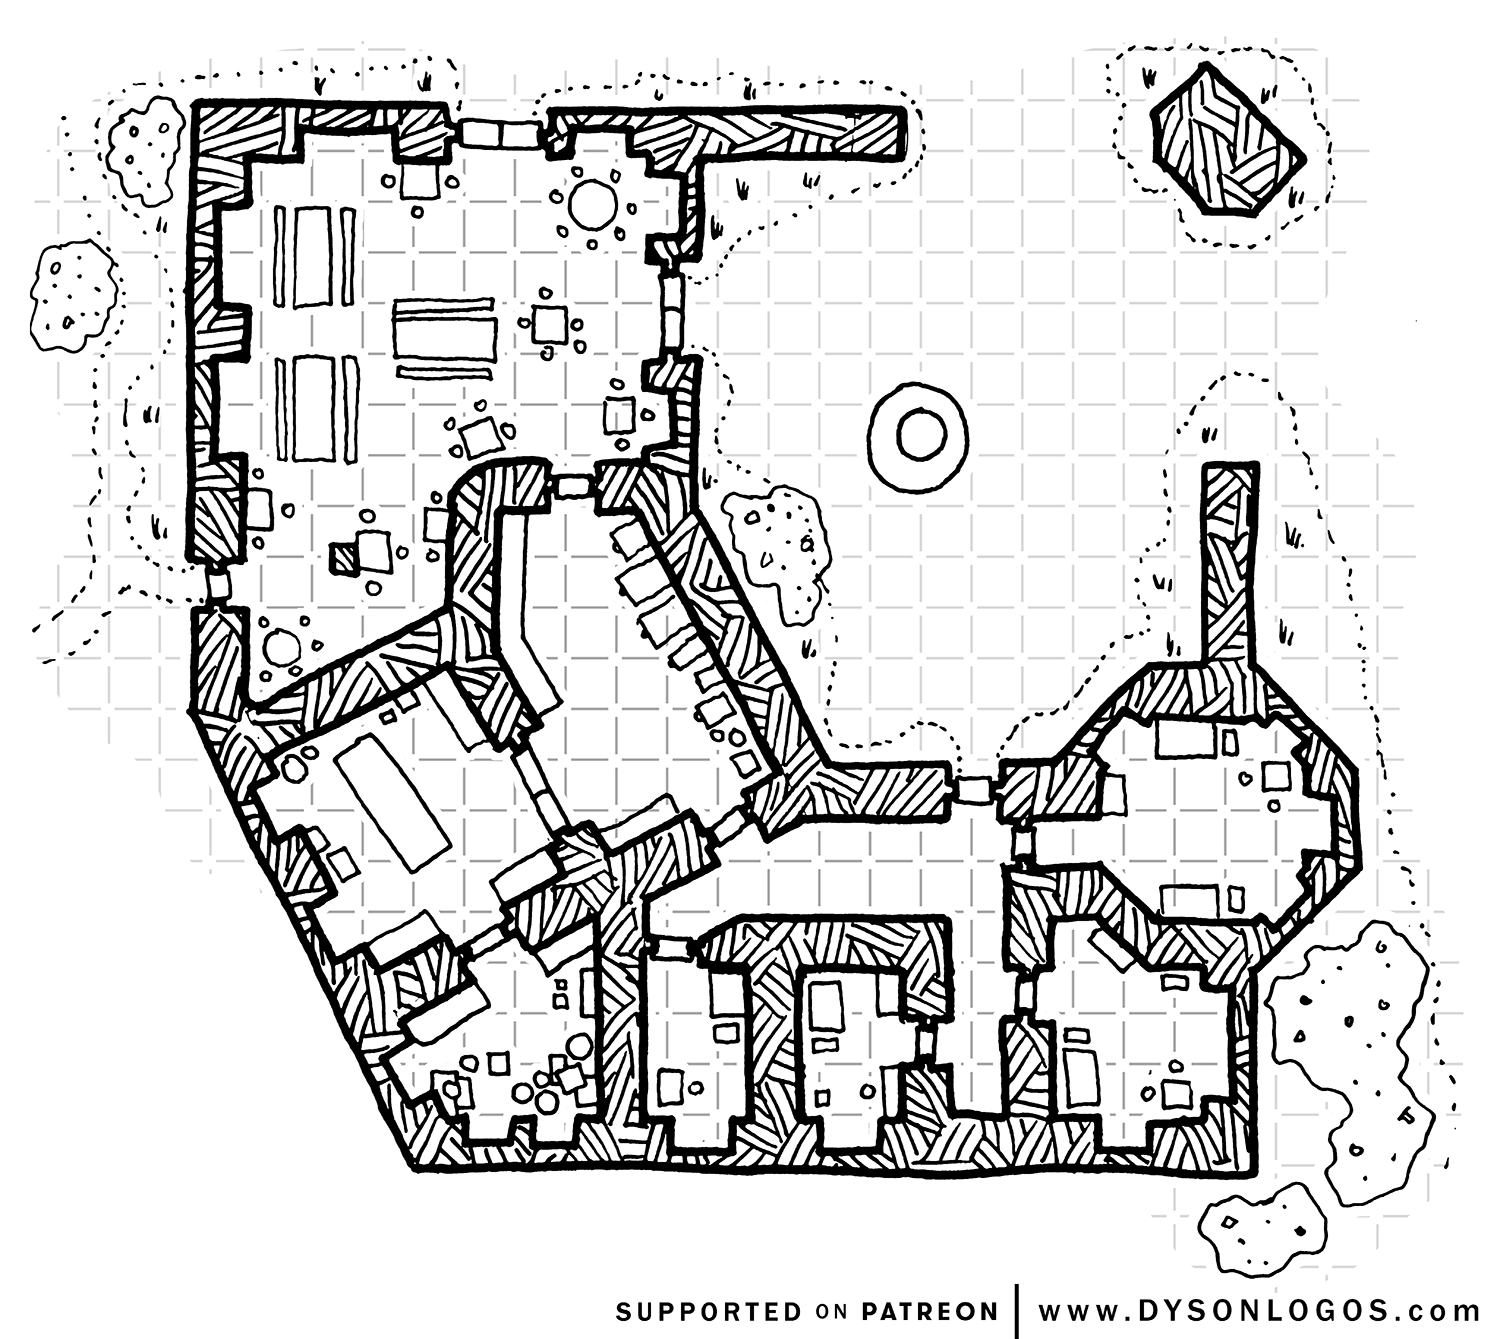
B2b. ALVSKRAEMA CARAVANSERAI
- Map by Dyson Logos
- On Bridge (Across Pit of Shummrath)
The Alvskraema caravanserai is located next to the bridge which crosses the Pit of Shummrath. It is jointly operated by Brarumoch, Haskari, and Meltrus.
Brarumoch: Operates the common room and runs the kitchen. The caravanserai’s specialty is elf meat. Brarumoch has a supplier who hunts and butchers elves on the Material Plane; here they are considered an expensive delicacy known as alvskraema.
(This doesn’t mean that any elf walking through the door will be set upon and butchered. That’s not the sort of thing you do to a customer.)
Haskari: Operates a weapons forge. He specializes in creating cacophonous weapons, which allow those wielding them to speak and understand Abyssal. (See Forges of Avernus.)
Meltrus: Specializes in repairing and building infernal machines. He and Haskari are constantly squabbling over shop space.
Design Note: Note that the name Alvskraema is more or less “Elfscream” in Old Norse. It’s designed to echo the Elfsong Tavern from Baldur’s Gate. Thanks to Flallen from my Twitch chat for the suggestion of Elfscream Tavern.
B3. WITCH-QUEEN’S ABODE
Tasha keeps a summer home in Avernus, as described in Dance of Deathless Frost. She is aware of Kostchtchie’s phylactery, knows that Baba Yaga knows its resting place, and is able to summon Baba Yaga’s hut.
B4. RED RUTH’S LAIR
- Descent Into Avernus, p. 107
Red Ruth has a heartstone.
B5. BONE CRATER
A large meteor impact crater formed by a huge skull (more than ten feet across) that’s partially embedded at the center of the crater.
B6. WARLORD LAIR: SOUL COLLECTORS
This is the lair of the warlord Algoran and his gang, the Soul Collectors.
Shrine to Eskarna: Algoran discovered an ancient shrine dedicated to the demon Eskarna. It was built countless aeons ago at a time during which the demons had pushed the front lines of the Blood War deep into Avernus. Long abandoned and forgotten, it was discovered by Algoran and converted into a gladiatorial arena.
Gladiatorial Arena: Watched over by the well-worn statue of Eskarna, Algoran hosts gladiatorial competitions here which attract a varied crowd of visitors and competitors.
Cogbox: Algoran recently acquired a modron slave as a wager during the gladiatorial fights. The modron has a Nirvanan cogbox. The modron might be willing to trade it for anyone who can help them gain their freedom; alternatively, if Algoran learns its value, he will seize it and try to make a deal (or wager) himself.
Shaaksuraar’s Armory: A “mountain of a sahuagin-werebear” called Shaaksuraar oversees a productive weapons forge for Algoran. This is located in the river cavern; Shaaksuraar goes on swims through the subterranean river and also quenches his fresh-forged weapons in the waters here. See Forges of Avernus, p. 3.
For more details on the Avernian warlords, see Part 7E of the Remix.
Design Note: The concept of Eskarna comes from Dyson’s original key for this map, although we have reduced it to an ancient ruin here. In Forges of Avernus, Shaaksuraar manages the Goregut Armory, but the Goreguts’ lair (Hex J3) in the Remix has been destroyed by Princeps Kovik (Hex J5). I’ve reassigned Shaaksuraar to Algoran, but you could also make this part of his backstory: That he worked for Raggadragga until his forge was destroyed by Kovik. (To add extra drama, perhaps Shaaksuraar betrayed Raggadragga to Kovik for a large payment of soul coins before transferring his services to his new forge here.)


Great work. Can’t wait to see the rest of it.
The Avernian hex key is finally complete! We’ll be serializing this over the next couple of weeks, but patrons of the Alexandrian can access the full thing in an Early Access PDF.
There are a few more posts to do to bring the Alexandrian Remix to its proper end, but this marks a major milestone because at this point anyone currently running the campaign should have a complete package of material to bring their Remix campaigns to a conclusion.
Thank you for your patience and your support!
@Justin: Would be nice to have on this post a list of the required books to run the hexcrawl. Like a shopping list for DMs planning on using the remix.
Good idea!
Here’s everything I used:
Descent Into Avernus
Warlords of Avernus
Forges of Avernus
Bitter Rivals
Dance of Deathless Frost
Vysianter’s Guide to the Red Wastes of Avernus
Tyrants of the Purple City
Encounters in Avernus
Infernal Encounters
Ruined Prospects
Diabolical Dive
Infernal Insurgency
Abyssal Incursion
Temple of the Broken Prince
Although many of these were used for a single location and could be swapped out if people don’t want to go whole hog.
Am I the only one unable to access the last two links?
Hexes G1 thru H6
Hexes I1 thru J6
@Jack: Those are just placeholders for articles that haven’t been finished yet.
Should we keep the original character’s quests? I mean, does Uldrak still need Tiamat’s blood in change of astral pistons?
Red Ruth’s Lair in the adventure as-written is in the heart of the Bone Brambles. However in the Remix, her lair is in Hex B4 while the Bone Brambles resides in Hex J5. Am I understanding this correctly?
Does this mean that The Eighth Remnant Lair replaces Red Ruth’s lair at the center, and the Bone Brambles are otherwise unchanged?
Also, does this mean that Red Ruth is no longer associated with the creation of the Bone Brambles, or does that lore remain? Perhaps the Eighth Remnant moved in and kicked her out?
@Cameron
In B4/A5 are Bone Brambles too.
Maybe the Plan from Ruth is, to make a big Area of Bone Brambles.
Thats why she change the Places to create new Spawn of Bone Brambles?
@Griessbart
Aha! I couldn’t see the forest for the trees. Thanks for clearing that up for me. I missed the Bone Brambles on the hex map when I was working prep last night. Now the gears are turning.
I’m thinking the way I’m going to spin it is that Red Ruth did indeed want to make a larger area of Bone Brambles. She was rather successful for a while at first, having spread it throughout much of J4 and J5, but then Princeps Kovik and the Eighth Remnant came in looking for a place to lay low from Signifier Hraxioch and the 9th Cohort. They decided they needed the place more than Red Ruth and ran her off.
Red Ruth escaped, and started work on a second expanse of Bone Brambles. I guess she hates dryads, or at least enjoys making them suffer. This happened more recently though, so her 2nd set of Bone Brambles is not as expansive. Needless to say, Red Ruth is none too fond of Princeps Kovik and the Eighth either.
Thanks again for pointing me in the right direction.
I’m noticing a lot of discrepencies between the Hex map and the key; The Stygian Dock in G3, and Haruman’s Hill appears in G2 in the hex map you provided. In your key, you have The docks in H4, and Haruman’s Hill in G3.
It was today when I realized in the original book not only there is no answer given to the riddle, but it comments that each stone represents one school of magic. In the book there are 7 stones. There are 8 schools of magic. Book does not elaborate this further.
Thanks Justin for making sense out of this.
Nirvanan Cogbox?
For A2, what happens if the PC’s try to enter the circle without solving the puzzle?
The original adventure says Ubbalux stole his form from a wizard that he ate after the Wizard strayed into his stones. So, entering seems possible.
Can the PC’s just kill Ubbalux and then take the pistons? He’s a CR5 monster, hardly a challenge for a party of 4 or 5 level 7 or 8 (or higher) characters.
Can they take the pistons without solving the riddle and without killing Ubbalux? (Maybe one party member engages him while the rest steals the pistons and then they just go outside the stones?
Thanks.
Some nitpicks
1 How can there be “archaic” Infernal? the guys who decide how you speak in hell haven’t really changed since Asmodeus’ trial.
2 In what way are the pistons a part of a magic circle? what is there to pump?
3 What species are the guys in Elfscream?
Are the arches guarded in any way? They sound like an important strategic asset.
(I remember old surces that claimed that permanent artificial planar portals could only be built on Toril, (thanks to some unique things that Mystra allowed) which was the reason why so many planar forces had tried to contest it in the past.)