The struggle for power in Avernus is eternal, and this struggle is not limited to the machinations of powerful dukes and archduchesses. In the Avernian wastelands, countless warlords squabble for territory, leading gangs riding infernal war machines.
In the area around the Dock of Fallen Cities, where Descent Into Avernus takes place, there are currently seven active, notable warlords. These warlords have been taken from the campaign book itself as well as the DMs Guild supplement Warlords of Avernus by Rodrigo Kuerten. The Warlord Reference, below, provides a comprehensive list and cross-references so that you can easily review and use the warlords.
There are several things that the PCs can gain from the warlords:
- Most importantly, information. Every warlord should be considered to know the location of at least one dream machine component. (Use Part 7I: Avernian Rumor Tables to determine what each warlord knows.) When asking other people about the components, the PCs should be frequently pointed towards either the warlords or their organizations (or both) as the “devils who know things” and might be able to help.
- Many of the warlords are mercenaries (or, at the very least, willing to fight if the price is right or the favor owed is great enough). They are potentially valuable allies whose force may be instrumental in the PCs carrying out various schemes.
- The warlords also have access to other resources. If the PCs decide that they need something, you can usually default to saying, “A warlord has it.” And then let them figure out how they’re going to get it.
Thematically, the warlords introduce the factional conflicts in Avernus into the campaign, mirroring the high-level faction politics of the plane which are likely to play a major role in how the campaign’s finale will play out and which will be detailed in Part 7F: Factions in Avernus. The Random Warlord Interaction Tables will help you portray their endless strife, and you should keep a few key ideas in mind:
- In order to get what they want from the warlords, the PCs will probably need to help them achieve their goals. (Many of these goals will be focused on jockeying for position with the other warlords.)
- The PCs cannot be friendly with every warlord. In fact, becoming friends with one will almost certainly mean making an enemy of at least one other (and more likely two or three). They can’t have their cake and it, too. They’ll need to make some hard choices about how they’re going to navigate the factional politics of the warlords (which will, in turn, help prepare them for the even more difficult choices they’ll make navigating the higher level politics of Avernus).
As the Avernian hexcrawl begins, make sure to establish the warlords early and often. The random encounter tables in Part 7H should help to make their presence pervasive, but make sure to have people mention them and talk about them, too.
Indicate early on that the warlords are a valuable source of information (for both the dream machine components and other aspects of the Avernian wastes). If the PCs are asking someone for information or about a particular resource and they don’t know anything, you’ll rarely go wrong having them suggest that a warlord might have what they need:
- A Nirvanan cogbox? Doesn’t ring a bell. But the Soul Collectors are always collecting junk like that.
- You want to blackmail Baron Tolmanen of the Purple City? Good luck with that! You know who might know something? Carol D’Vown. She knows all kinds of gossip.
- You need money? I heard Raggadragga is flush with soul coins and looking to hire some muscle. He’s been hanging around Fort Knucklebones of late.
You can just roll on the Random Warlord Table below and come up with a plausible suggestion. (It doesn;’t even necessarily need to be true.)
Finally, don’t just focus on the warlords. There’s a bias towards this in both Descent Into Avernus and Warlords of Avernus, but you’ll want to make a point of incorporating the members of their gangs into the campaign. Let the PCs bump into gang members throughout the wastes – whether at the Alvskraema caravanserai (Hex B2b), the Bloody Crescent (Hex D4), Fort Knucklebones (Hex I4), or just riding through the Ashlands. Being introduced to a gang through their common members will usually make the warlord seem more significant when the PCs get a chance to finally meet them.
Homework: Add a handful of specific gang members to each warlord’s gang. You probably don’t need more than 2-4, although you’re likely to end up adding more if the PCs begin interacting with a particular gang on a frequent basis.
WARLORD REFERENCE
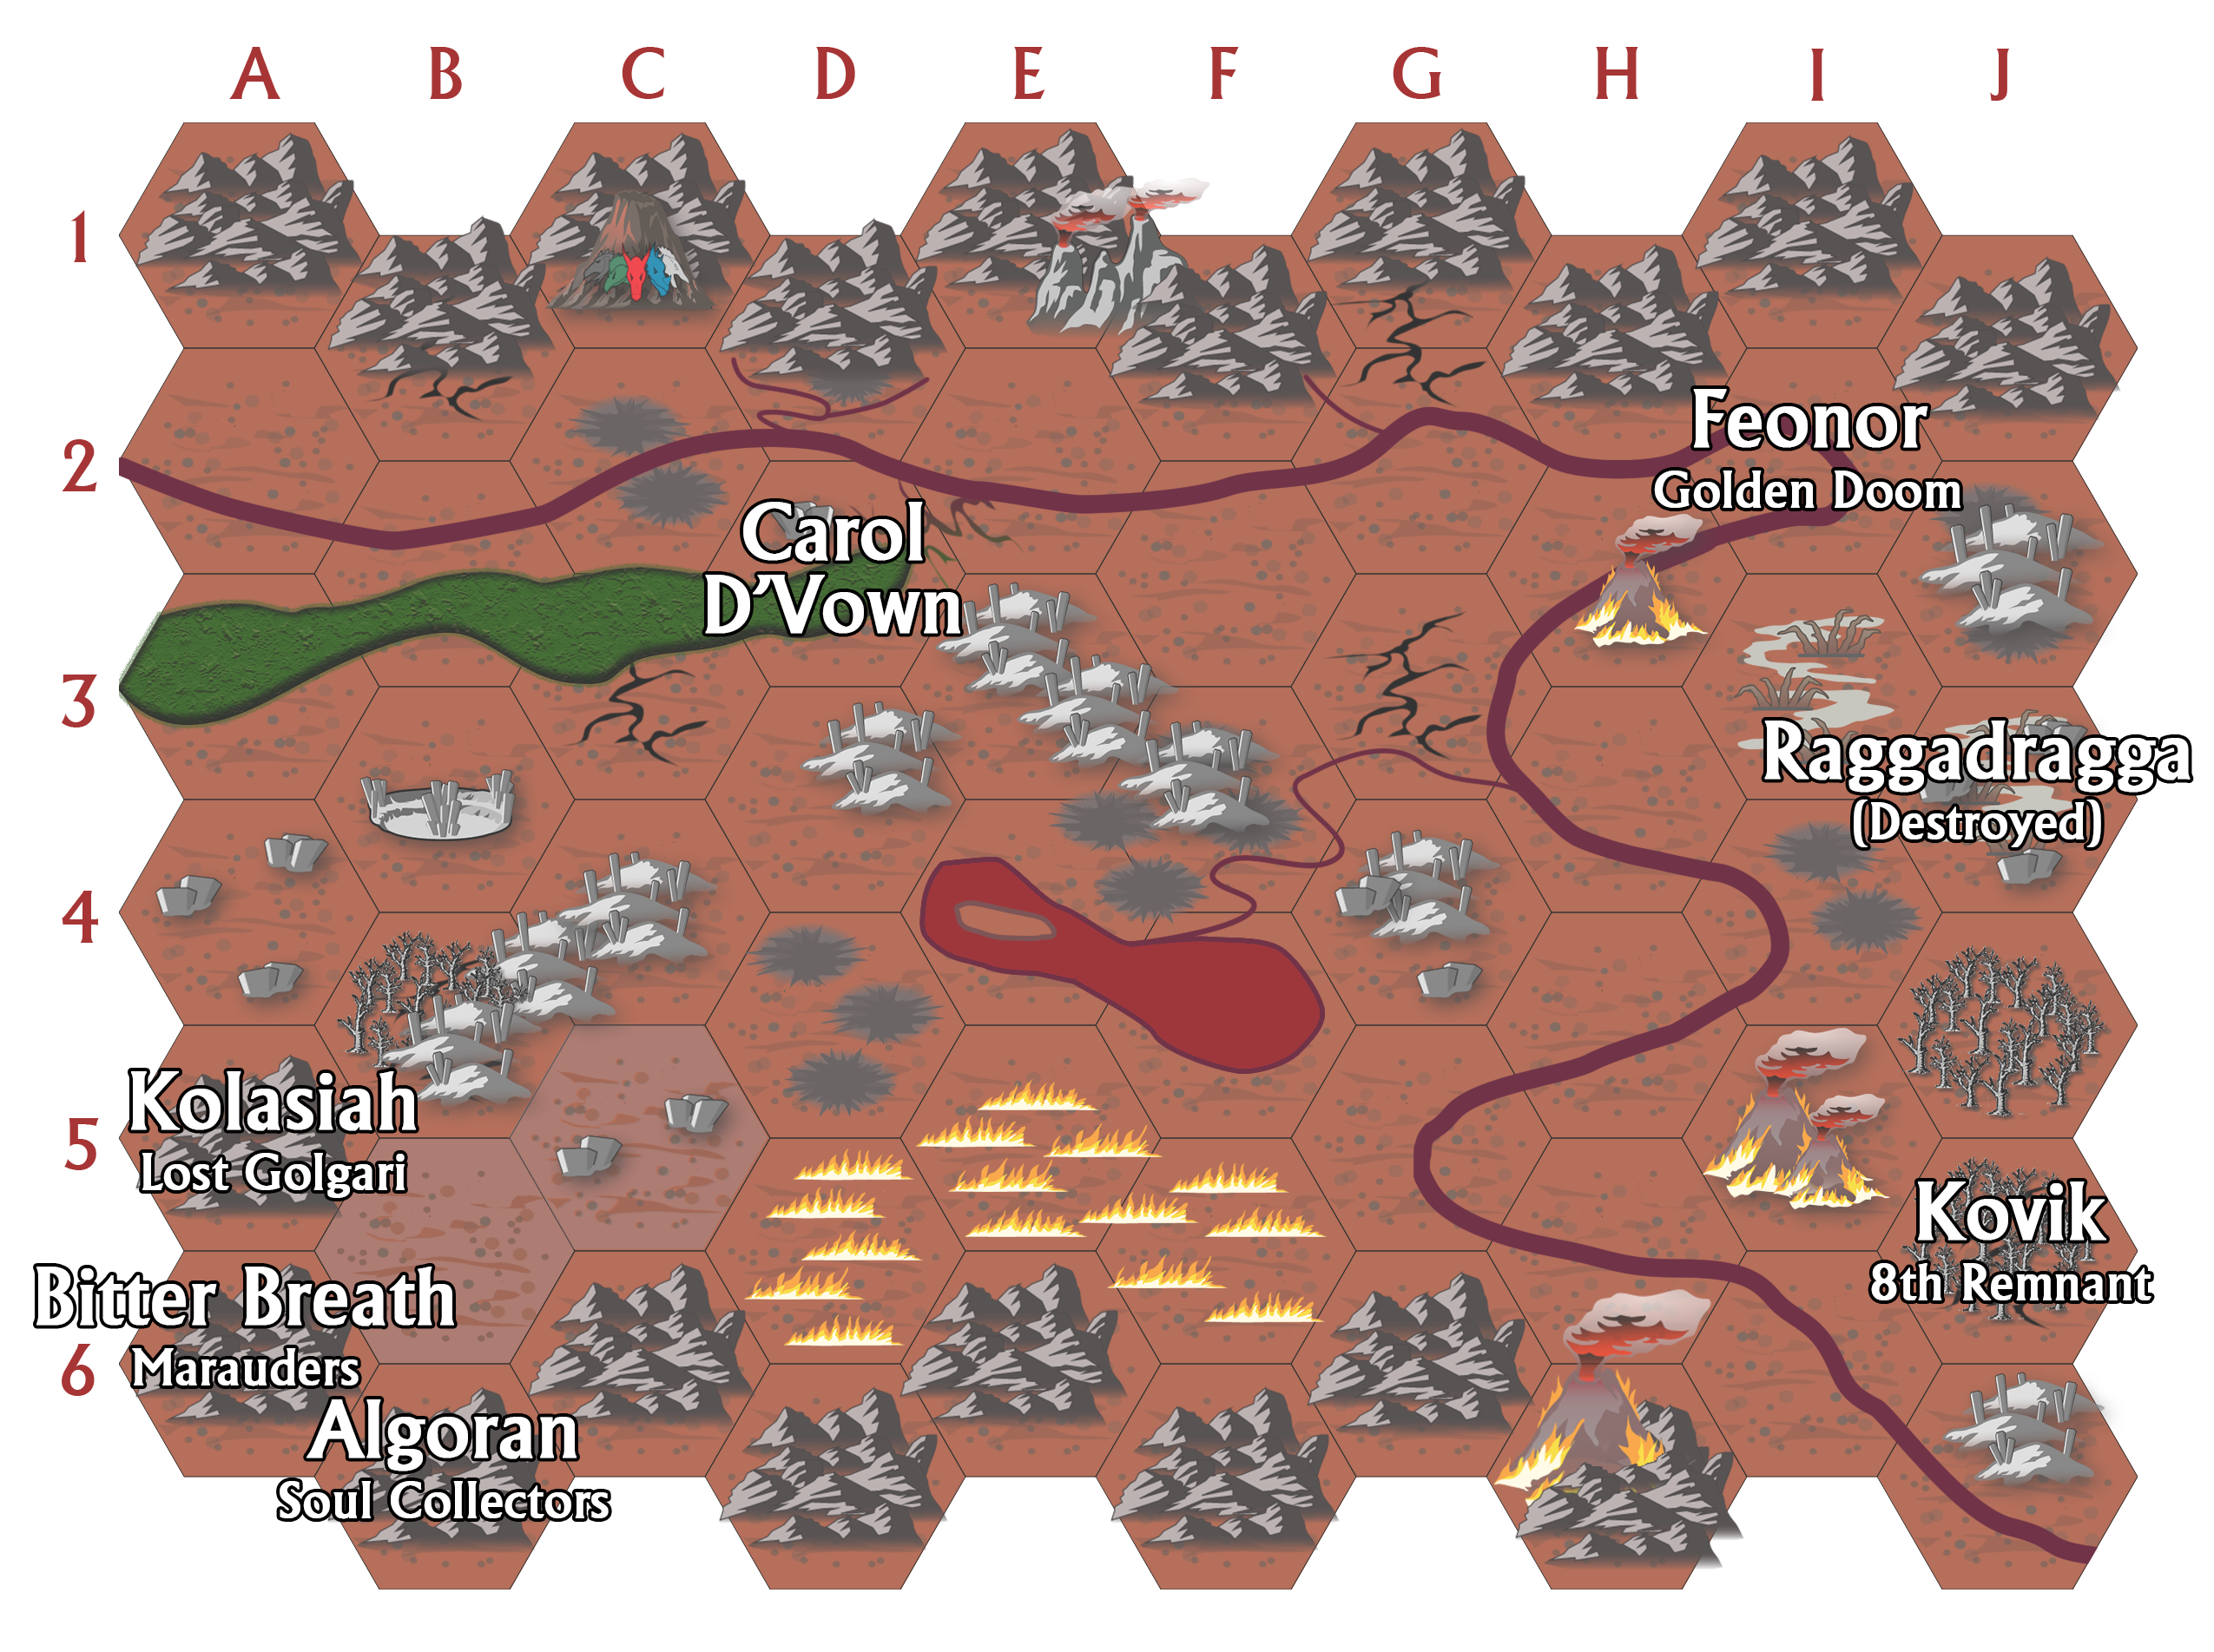
ALGORAN: A tulgar who has founded a gladiatorial arena which hosts well-attended competitions.
- Gang: Soul Collectors
- Lair: Hex B6
- One of the three warlords (along with Kolasiah and Bitter Breath) whose lairs lie in the mountains ringing the Ashlands. Recently allied with them to wipe out Smiler’s Defilers (DIA, p. 133).
- Recently acquired a modron slave who has a Nirvanan cogbox.
- Primary Reference: Warlords of Avernus, p. 2
Hooks:
- Always interested in new slaves for the arena. The more exotic and dangerous, the better.
- Wants to issue a challenge to another warlord to bring their “champions” to a gladiatorial showdown and might want to send the PCs to bear the message. (There’s only a slight chance the message might send the other warlord into a rage.) This might be another warlord of the Ashlands (Kolasiah or Bitter Breath), or perhaps he’s looking for someone willing to make the longer journey to challenge Feonor or Princeps Kovik.
BITTER BREATH: Formerly a pit fiend named L’zeth, Bitter Breath was demoted to a horned devil by Zariel shortly after the Archduchess claimed the rulership of Avernus.
- Gang: Marauders
- Lair: Hex A6
- One of the three warlords (along with Kolasiah and Algoran) whose lairs lie in the mountains ringing the Ashlands. Recently allied with them to wipe out Smiler’s Defilers (DIA, p. 133).
- Collaborated with Bel in an effort to overthrow Zariel in the first days of her rule.
- Attacked the group escorting the befuddled Lulu to Celestia (resulting in the amnesiac Lulu escaping and finding her way back to the Material Plane, see Part 6D).
- Primary Reference: Descent Into Avernus, p. 90 & Bitter Rivals, p. 5
Hooks:
- Although Bel distanced himself from Bitter Breath after her fall, she may still be able to arrange introductions (either with Bel or those highly placed in his circle).
- Bitter Breath may remember her encounter with Lulu, and be willing to trade for that knowledge.
- Bitter Breath once sought Kostchtchie’s phylactery and knows that the Witch-Queen (Hex B3) has secret lore relating to it.
CAROL D’VOWN: An alchemist and technomancer. Her “gang” consists of infernal constructs she has made.
- Lair: Hex D2a
- In a relationship with Feonor, having met her at Mahadi’s Wandering Emporium years ago.
- Primary Reference: Warlords of Avernus, p. 4
Hooks:
- Always searching for a suitable gift to show her affection to Feonor.
- Wants a sample of tissue from the Bloody Cyst (Hex F4) for her experiments.
- Needs a specially crafted crucible of Baatorian steel. (There’s a mine in Hex E2 and the crucible might be forged by Uldrak in Hex D5.)
- Has a heartstone, which she uses in her alchemical experiments.
FEONOR: A powerful human necromancer who gives the gift of undeath to many of her followers.
- Gang: Golden Doom
- Lair: Hex I2
- In a relationship with Carol D’Vown. Previously in a relationship with Mahadi (of the Wandering Emporium).
- Has a number of amphibious infernal machines.
- Primary Reference: Descent Into Avernus, p. 91
Hooks:
- Lady Bladeharrow, Feonor’s undead devil forgemaster, needs barrels of dryad-wood. (The PCs might be able to find some for sale at Mahadi’s Emporium.)
- If anyone were to hurt Carol D’Vown, Feonor would be interested in identifying the guilty party (and then wreaking vengeance upon them).
- Feonor is always in the market for corpses, particularly unusual ones, to continue her studies.
- Lady Bladeharrow has a supply of Phlegethosian sand.
KOLASIAH, THE INFERNAL MEDUSA: A member of the Golgari Swarm, Kolasiah and her gang have come to Avernus from Ravnica seeking power.
- Gang: The Lost Golgari
- Lair: Hex A5
- One of the three warlords (along with Bitter Breath and Algoran) whose lairs lie in the mountains ringing the Ashlands. Recently allied with them to wipe out Smiler’s Defilers (DIA, p. 133).
- Primary Reference: Warlords of Avernus, p. 8
Hooks:
- Seeking a way of returning home.
- Would value any news of a powerful spellcaster not allied with Zariel.
- She believes (falsely?) that Feonor has access to an artifact capable of interplanar travel.
- Her lair’s forge contains a set of astral pistons.
PRINCEPS KOVIK: A princeps in the 8th Infantry Legion. After the legion was devastated during the Blood War, the survivors went rogue under Kovik’s command.
- Gang: The Eighth Remnant
- Lair: Hex J5
- Hunted by Signifier Hraxioch’s cohort (Hex J6).
- Recently destroyed the lair of the Goreguts Gang (Hex J3).
- Primary Reference: Descent Into Avernus, p. 91
Hooks:
- Seeking to raise funds by selling weapons produced in the Kovik Fetterworks at Mahadi’s Wandering Emporium. Might be interested in caravan guards moving the weapons; or might even seek to have the PCs actually establish and run the emporium stall.
- Assassinating Signifier Hraxioch would be a good way to get in Kovik’s favor.
RAGGADRAGGA: A wereboar leading a gang of lycanthropes and lycanthropic devils.
- Gang: Goreguts
- Lair: Hex J3 (destroyed)
- The Goreguts got into a war with the Eighth Remnant and decisively lost; their lair was recently destroyed, leaving only a ragged band of survivors.
- Primary Reference: Descent Into Avernus, p. 87
Hooks:
- He’s actively seeking anyone with resources or skills who might help him rebuild the lair.
- He’s also looking for alternative locations for a lair (including the possibility of seizing one).
- He also would like to return to the lair long enough to bury his dead.
- He’d like to stage a raid on the 8th Remnant’s lair (Hex J5) to steal back the infernal war machines they took from him.
Homework: You may find it useful to create an authoritative reference collecting all of the information for each warlord in one place. I can’t do that here because it exceeds the limits of fair use, but it would be relatively easy to do and will likely make it a lot easier to juggle the warlords in active play.
OTHER WARLORD SITES
Alvskraema Tavern (Hex B2b): Although it serves a wider clientele, it’s not unusual to find a cluster of infernal war machines from a warlord’s gang parked in the courtyard of the Alvskraema. Haskari’s weapons forge and Meltrus’ expertise in repairing war machines also draw gang-related clientele.
Bloody Crescent (Hex D4): An enormous rock shaped like a semicircle, providing a sort of half-pipe. The Warlords of Avernus use it for stunt duels on their infernal war-machines.
Uldrak’s Grave (Hex D5): A tinker’s shop that serves as a pit stop for infernal machines that need cheap repairs.
Ruins of a Warlord’s Lair (Hex F6): Once belonged to Jevvka of Osternia, a local gang that was wiped out by Bel.
Fort Knucklebones (Hex I4): A sort of Port Royal for the Avernian warlords where they come for supplies, recreation, and repairs.
RANDOM WARLORD INTERACTION TABLES
The warlords are constantly contending with each other for position, territory, resources, souls, and power. Based on Factions in the Dungeon, these interaction tables can be used to procedurally generate conflicts between the warlords.
RANDOM WARLORD TABLE: This table can be used to randomly determine one of the warlords.
| Warlord |
|
|---|---|
| Algoran |
|
| Bitter Breath | |
| Carol D'Vown |
|
| Feonor |
|
| Kolasiah, the Infernal Medusa |
|
| Princeps Kovik |
|
| Raggadragga |
|
| Thalamra the Warlord Hunter |
|
Note: Thalamra’s role as a warlord hunter is detailed in Part 7G: The Devils of Baldur’s Gate.
WARLORD CONFLICT CHECK: Each time the PCs either (a) interact with a warlord or their gang or (b) visit a “hub” (e.g. Fort Knucklebones, the Purple City, Alvskraema, etc.) there is a 1 in 4 chance that a conflict has occurred between the warlords. Roll twice on the Random Warlord Table to determine which two factions have come into conflict. (If you roll the same number twice, either re-roll twice to create a multi-factional conflict or assume some sort of civil strife.) Then roll on the Warlord Conflict Table below.
| Outcome | |
|---|---|
| Stalemate/Skirmish | |
| 1 Faction Damaged | |
| 1 Faction Crippled | |
| 1 Faction Destroyed | |
| Both Factions Damaged | |
| Both Factions Crippled | |
| Both Factions Destroyed | |
| Factions Unite |
Stalemate/Skirmish: The gangs are largely unaffected by the conflict. They may be on high alert, you may wish to subtract one or two members from their ranks, and/or their members may have recent injuries or new scars. The conflict may leave them ripe for alliances against their recent foes.
Faction Damaged: A damaged gang has suffered losses equal to roughly 25% of their strength.
Faction Crippled: A crippled gang has suffered losses equal to roughly 50% of their strength.
Faction Destroyed: A destroyed gang has been eliminated. Their lair may lie empty, be occupied by the other faction involved in the conflict, or restocked randomly. Their population has been killed, driven off, or enslaved.
Factions Unite: The two gangs have allied with each other. (Possibilities include: One of the leaders may have been killed. The alliance may be for a short-term goal. They might be using both of their lairs or have collectively moved into just one.)
Design Note: The pacing mechanics here have not be been playtested. You may need to finetune the frequency of events based on how things are playing out in your campaign: On the one hand, you don’t want stuff happening so quickly that the warlords are just utter chaos and the PCs can’t profitably get involved with them. But you also don’t want it so slow that nothing happens before the campaign is over. If all else fails, just trigger a warlord event whenever it feels right and use the random tables as inspiration for what’s happening when you need them.
INTERPRET RESULTS: Like a random encounter table, the output here is designed to be flexibly interpreted. The tables will broadly describe the effect of what happened, but you’ll need to figure out what actually happened.
For example, if you roll a conflict between D’Vown and the Golden Doom, that might indicate that the romantic tryst between D’Vown and Feonor has come to an acrimonious end. But it might also mean that Lady Bladeharrow has suborned Feonor’s undead and seized control of the Golden Doom, forcing her to flee to D’Vown’s lair (and loving arms) for sanctuary.
Remember that these tables are generating conflicts between the gangs, which may or may not include the actual warlords. Even mortal gangs can be quite fractious, and the underlings of Avernian war machine gangs often squabble with each other. It’s not unusual for these squabbles to escalate, creating predicaments that the warlords want nothing more than to extricate themselves from. (“Two devil gangs, both alike in dignity…”)
INTERSECT RESULTS: The last thing you need to do is figure out how these events will intersect the PCs. Stuff that happens completely offscreen and that the players never learn about might as well have never happened at all, so you need to figure out how these events impact the PCs. Common techniques include:
- Rumors. NPCs have heard news about what happened and are passing the story along. The rumors may or may not be completely accurate. (e.g, “Did you hear that Lady Bladeharrow killed Feonor and took over the Golden Doom?”)
- Encounters. The PCs have a wandering encounter related to the evolving events. (e.g., the next time they see Golden Doom riders they notice they have a new signet brand; or they encounter Feonor fleeing across the Avernian wastes being pursued by members of her former gang)
- Scenario hooks. The change in the status quo might generate new opportunities for the PCs. The most straightforward approach is to have one of the warlords involved in the conflict approach the PCs or post a job offer related to the conflict or its outcome. It takes slightly more effort to make the PCs aware of an opportunity that they might proactively pursue. Remember that the warlords are not above (attempted) press-ganging. (e.g., Feonor wants someone to assassinate Lady Bladeharrow or Lady Bladeharrow is in the market for a new necromancer to maintain the Golden Doom)
You don’t need to have these events intersect the PCs at the exact instant that the check is made. You have the flexibility to place the intersection at the place which makes the most sense or which is most dramatically effective.
Similarly, the conflict doesn’t have to be completely resolved at the moment that it intersects the PCs. (Even though you’ve technically generated an outcome, that outcome only needs to “stick” if the PCs don’t get involved and change the course of events.) There are few things more compelling than stumbling into the middle of a fight and needing to figure out what’s going on and what you want to do about it.
Keep an eye out for opportunities to explain how the actions of the PCs have either directly or indirectly affected (or created) the conflict. It’s a great way for the players to feel like the actions of their PCs are having an impact on the world around them (because they are).
Finally, don’t limit yourself to only thinking about the primary parties involved in the conflict. If Raggadragga manages to get his revenge on Princeps Kovik and cripples the 8th Remnant, what effect does that have on the balance of power? With Kovik dealt with, what does Signifier Hraxioch of the 9th Cohort (Hex J6) turn his attention to?


Remixing Avernus posts are currently appearing out of sequence. My apologies for any confusion this may cause. I recommend using the table of contents for the Remix to orient yourself.
(If you’re reading this a few weeks from now, it probably no longer matters.)
Seconding Justin’s suggestion of a one-stop shop reference for yourself on the warlords. I personally like Google Docs, though I’m personally up to over a dozen different Google Docs to manage all of my keys and info for the Avernus section, because I’m a fiend for Google Docs.
At any rate, it’s really helpful to have all the info, NPCs, and warlord lair maps–especially when your PCs realize that Kolashiah’s problems are solved with the Banishment spell and can subsequently claim her lair for their own XD
The description of Kolosiah of The Lost Golgari and the Avernian Hex Key both reference that her forge has a set of astral pistons, but her forge isn’t explicitly mentioned in the Forges of Avernus – is the intent that she has a generic forge just making Prime Forge weapons with no forge-specific benefit/drawback? After all, they are (relatively) new to Avernus and may not have had as much time to hone their craft.
As an alternative, I’ve been toying around with the idea that the Golgari deal in mizzium, a Ravnican? metal. There are only oblique references to it being lightweight, strong, and fireproof but behaving oddly, for example liquifying at cool autumnal temperatures. I’m thinking that the Lost Golgari make medium and heavy metal armor with the following:
Flavor – Has a flat finish (no reflective surfaces for any medusa to worry about). Maybe -5 lbs to weight, which most parties don’t track anyway?
Benefit – Grants fire resistance, particularly useful in Avernus.
Drawback – If the wearer is hit by cold damage, their armor begins to liquefy. Mechanically this is either the wearer always has vulnerability to cold damage OR when hit, the wearer receives no bonus from their armor (just 8 + DEX mod) until the start of the enemy’s next turn. I can’t decide which is more fair and your mileage may vary based on how often you are giving your devils/demons cold damage abilities.
I have a few other comments/tweaks to the Forges of Avernus benefits/drawbacks, if anyone cares. I’ll keep it generic enough that I don’t think I’m giving away Mr. Alvarado’s IP.
Bitter Breath Smithy – Really flavorful, but the drawback is too great for the minor benefit. I’d change the drawback to “these weapons are so vicious that they cannot be used to apply non-lethal damage.” And for the Remix, the wacky contraption flavor works better for Algoran’s gladiatorial fights (from Warlords of Avernus) than Bitter Breath’s mobile lifestyle, IMO.
Goregut Armory – Love it. Mechanically, changing to smaller dice raises the average roll but penalizes the half-orc’s Savage Attacks feature. I’d bump the d12 step change in dice to either d14 (which is possible with digital dice rollers) or d10+d4 to minimize that penalty.
Kovik Fetterworks – Perfection. Change nothing.
Malargan’s Forge – Super cool idea, but mechanically is worse than regular silvered weapons they could have picked up in Baldur’s Gate or Elturel? I propose that Malargan weapons begin life as +2 silvered weapons BUT that when they fail their crit fail save, they decrease by -1, to a floor of regular silvered weapons.
Ossuary Arsenal – Awesome benefit with a similarly awesome drawback. If you don’t want to roll on the demon ichor table, you could swap the original Bitter Breath Smithy drawback in here instead.
Who is Lady Bladeharrow, When has she been mentioned i can’t find it anywhere in the remix or the module
@Tom:
Part 7c (I1-J6) briefly mentions that she comes from Forges of Avernus, which is content from DMs Guild.