SESSION 27C: THE SAINT OF CHAOS
September 7th, 2008
The 15th Day of Kadal in the 790th Year of the Seyrunian Dynasty
Tee didn’t argue with Ranthir. They returned to the Ghostly Minstrel and reconvened with the others, quickly describing what they had seen.
Elestra was more than happy to let the cultists fight amongst themselves. Agnarr, on the other hand, was still urging them to charge in the front door. “We’ll catch them by surprise!”
Tee was convinced that the insectoid creatures were going to be used in some sort of an attack on the Commissar, and their discussion turned to what their primary goal had become: Was it to shut down the project? To protect Iltumar? Or somehow do both?
Tor talked about his plans to take Iltumar out the next day. “If he’s looking for something more exciting, maybe we can offer that to him.”
“But isn’t tit possible he’ll just think we’re trying to control his life?” Ranthir asked.
“That’s right,” Elestra agreed. “Tell a boy not to do something and he’ll do it just to spite you.”
Tee, reflecting on the fact that Elestra was scarcely older than Iltumar, shook her head. “I got the impression that, if I left, I’d be hunted down and killed. Even if we could somehow convince Iltumar to quit, just pulling him out could still be dangerous.”
In the end, they decided to wait until the next day. Tee would take her shift in disguise at midnight. And if Tor could pull Iltumar away so that they could be sure he wouldn’t be on duty, they would try an assault on the complex.
“Without Tor?” Dominic asked.
“I’d prefer to have his sword,” Tee said. “But we need to make sure that Iltumar isn’t the line of fire.”
“Aren’t we worried about the giant insect things?” Dominic asked, clearly worried about the giant insect things.
“They were afraid of a moving curtain,” Tee said. “I’m not too worried about them.”
“If they’re easily startled, I’ve got a cantrip that can make dancing lights,” Ranthir said.
Dominic laughed. “Ah! Lights! Lights! Look out for the lights!”
Tee grinned. “Agnarr! Get away from those lights and hit those things!”
They all laughed. Even Agnarr.
MISSIVE FROM THE MIGHTY
There was a knock at the door.
Elestra answered it and found Tellith standing in the hall.
“Oh, good. Master Agnarr is with you,” Tellith smiled. “I have a message for him.” She held out a piece of folded parchment.
Agnarr came to the door, grabbed the letter, and grunted a thank you. Elestra thanked her as well and then shut the door.
As soon as the door was shut, Agnarr passed the parchment to Tee. She read it aloud to him.
Master Agnarr—
As we have not received word from you in several weeks, we are urgently seeking confirmation that you are not, in fact, dead. If this letter should reach your hand, please send us a couriered response indicating your continued good health.
The Order of Iron Might
Agnarr had no idea what this Order might be, but Tee was familiar with them. They were a guild of warriors based out of the Citadel of Might near the Arena in Oldtown. Tee had never been there, but she understood it to be a hiring hall of sorts for mercenaries, guards, and sellswords. She had some impression that Dorant Khatru, the Merchant Prince of House Khatru, served as the Order’s guildmaster.
“Do you think you joined them… before?” Elestra asked. “You know, when we lost our memories?”
Agnarr shrugged. “It’s possible.”
Links to their missing past had proven few and hard to come by. Tee was particularly enthusiastic about the prospect of following up on this one. She and Dominic both agreed to accompany Agnarr while he paid a visit to the Citadel of Might.
A KNIGHT’S TRAINING
Tor, meanwhile, had training to attend to. He headed into the Temple District. Sir Kabel met him at the entrance of the Godskeep and escorted him to the training field just outside the southern gate. There he was introduced to Sera Nara – a lithe and attractive woman with dark, copper brown skin. She wore her dark hair in a long braid down to her waist. The entire braid was tightly bound with bands of gold, and the tip was capped with a sharply-edged blade of mithril.
“Nara will be your instructor,” Kabel said. “I’ll have to leave Tor in your capable hands, Sera. I have to meet with Gemmell regarding the tourney rosters.”
Kabel went off about his business and Nara got down to hers. She adopted a practical, no-nonsense approach, but was clearly impressed with Tor’s ability with the blade.
“I practiced for many years,” Tor explained. “But these past few weeks it seems as if all that training suddenly makes sense.”
“Of course,” Nara nodded. “Your life has been at a risk. When the blood boils, the blade and body become as one. The heat of battle has made you a warrior. Now we will hone that ability into the skills of a knight.”
They worked hard. The session lasted for nearly two hours. Tor proved to be a fast learner, quickly mastering the rudimentary elements of the Order’s martial training.
“We perceive the world through sight and sound and touch,” Sera Nara said. “But all of us share a deeper connection with reality, as well. If you listen with your soul you can hear the Song of the World – the divine melody which links us all, man and god alike. Through the motions of his blade, a warrior’s body can harmonize with the Song. You will see your opponents without sight; hear them without sound; strike them without thought.”
When the training was nearly complete, Tor became aware that Kabel had returned. The knight stood a goodly distance from the practice field, but his attention was clearly focused on them.
Nara eventually finished. She complimented him again and told him to return to the field in two days. As Tor was gathering up his armor, Kabel made his way over to him.
“Master Tor. How was your training?”
“Exhausting.”
Kabel laughed. “Sera Nara is a demanding teacher. But these are demanding times. I think it’s more important than ever that you become a knight as quickly as possible.”
Tor smiled. “I would like that very much.”
“As would I.” Kabel returned his smile. “Now, a question. Do you know if Dominic has met with Rehobath again?”
Tor shook his head. “Not that I know of.”
“That’s to the good,” Kabel said. “Hopefully this dark chapter can be put behind us soon. If all goes well, I will have much to tell you when you return.”
Kabel made his farewells. Tor was curious about his enigmatic parting, but all he could really do was wait.
THE COMING OF TAVAN ZITH
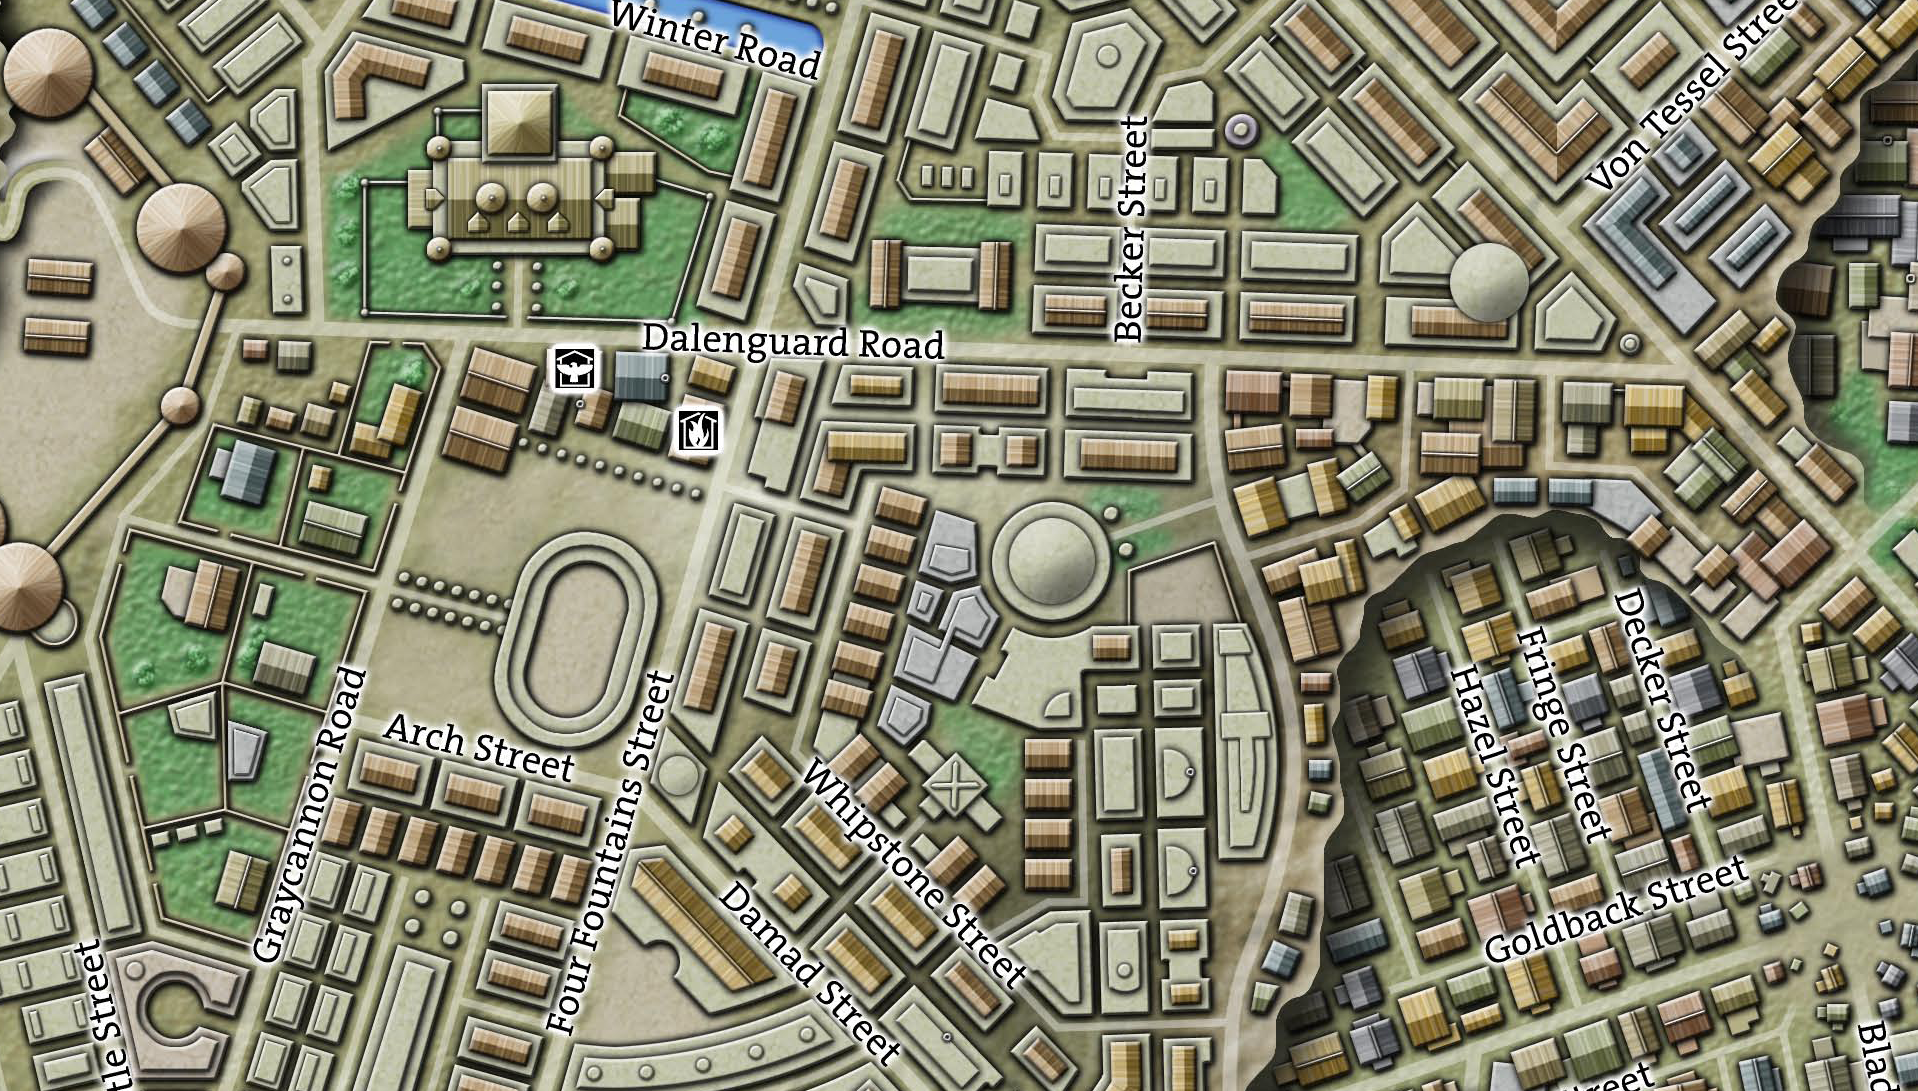
Agnarr, Tee and Dominic, meanwhile, had entered Oldtown on their way to the Citadel of Might.
They had just turned off Dalenguard Road onto Four Fountains Street when their ears were assaulted by sudden screams. They were crossing the mouth of Whipstone Street, and turning that way they could see the tightly packed crowd of the merchant road suddenly surging towards them. There were shouts of “Fire!” and “Run!”
Moments later, a half-orc tore into view. He was completely engulfed in flame, but – despite his own screams and the look of terror in his eyes – the flames didn’t seem to be hurting him. However, when the half-orc grabbed onto a woman near him – in what looked like desperation – the flames did burn her. Badly.
Their crisis instincts kicked in. Dominic threaded his way through the crowd, trying to reach the woman who had been burned. Agnarr, meanwhile, hurled a waterskin at the half-orc. This, however, simply burned away in a cloud of steam without having any effect on the fire.
Tee kept her distance, but shouted at the half-orc to stop. “How can we help? What’s happening?”
But the half-orc didn’t seem to hear her. “What’s happening to me? I’m burning! Help me! For the love of the gods, someone help me!” His voice was tortured with panic.
And then, suddenly, the half-orc’s flames pulsed brightly. Dominic, having drawn near in his efforts to help the woman, was scorched.
Agnarr, seeing Dominic hurt, lost his patience with the situation. He tried to knock the half-orc out. Unfortunately, his efforts only succeeded in making the half-orc even more panicky.
Tee could see that the situation was getting out of control. She ran down the street – getting close to the half-orc and practically shouting into his face. “Stop it! We’re trying to help you, but you have to stop it! You’re hurting people!”
Something in her sharply spoken words – or perhaps the sudden appearance of a lithe elfling directly in his path – shocked the half-orc out of his panic. He looked around the street, seeming to see the scene around himself for the first time. Then he sagged to his knees, his face taut with pain. “It hurts…”
But the flames still weren’t hurting him. Dominic, laid a soothing blessing on the woman who had suffered burns, and then – at Tee’s signal – moved in to examine the half-orc (albeit it from a safe distance).
Now that the half-orc was more of a curiosity than a threat, the crowd that had been scattering in a rapid retreat instead began to draw closer. But just as it seemed as if they had successfully calmed the situation, another man suddenly grabbed at his eyes. Bolts of blue lightning shot out of them, striking several people in the crowd. The thick stench of ozone filled the air. At least a half dozen people collapsed.
Panic erupted once again. In the midst of it, Tee was suddenly struck by the sight of a dark-cloaked man striding boldly down the street and seemingly oblivious to the chaos around him.
He seemed so incongruous that Tee’s suspicions were immediately tweaked. She headed in his direction and hadn’t gotten far before she saw him brush past an older woman in her fifties. The woman almost immediately started floating up into the air. “Help! Help me! The demons have me! They have me by the arms! Help!”
“Agnarr!” Tee called back over her shoulder. “The man in black! I think he’s doing something!”
Agnarr tried to push his way through the crowd, but didn’t seem to be catching up. Finally he lost his patience and bellowed. “OUT OF THE WAY!”
The crowd parted before him, allowing Agnarr to abruptly catch up to the mysterious figure and swing away with his greatsword.
“Oh!” Tee gasped. “But I’m not even sure if he’s actually causing… Never mind.”
With some preternatural sense, the man barely managed to duck out of the way of Agnarr’s blow. Then he whirled, revealing a muffled face, and cried out in an imperious voice, “You dare to molest me, miscreant?”
… but then he caught sight of Agnarr’s imposing figure and apparently decided that flight was the better part of valor. He whirled away and took off running down the street, displaying an amazing agility at slipping through the now near-riotous crowd trying to escape from the chaos in the street. An elf he passed suddenly screamed and collapsed to the ground.
Agnarr was momentarily startled at the abrupt flight. He was even more startled in the next instant to find himself beginning to secrete acid through his skin. It burned sharply, but he gritted his teeth through the pain and ran after the man, ducking narrowly to avoid one of the blasts of lightning scorching through the air with the scent of ozone.
Dominic, meanwhile, was studying the half-orc. The flames weren’t burning him, but there was no denying the pain that the half-orc was feeling. In fact, the flames seemed to be feeding on him in some way – consuming his fundamental vitality in much the same way that a soul-thirsting undead might.
Tee was having some success in following in Agnarr’s wake, but she was losing ground. In frustration she pulled up short, notched an arrow in her bow, and took a shot.
It clipped the dark-clad figure’s shoulder as he ducked around the corner at the far end of the street, still desperately trying to escape from Agnarr’s blows.
Tee renewed her pursuit. As she neared the corner herself, she came upon a dwarf staring at the wall. Globules of black energy poured from his eyes… and a giant octopus appeared half-embedded in the wall, its long tentacles thrashing limply. Tee cursed silently, but decided it was a problem she’d have to deal with later.
Dominic, meanwhile, had figured out how to sustain the rapidly deteriorating half-orc… but his efforts weren’t actually curing his condition, only alleviating it. While he was trying to figure out a more permanent solution, several members of the city watch came running up from Four Fountains Street. Spotting Dominic’s robes, one of the watchmen approached him. “Have you got that under control?”
Dominic looked up. “Umm… More or less.”
Agnarr finally caught up with his quarry. At the last possible instant, the dark-clad figure whirled in an effort to defend himself, but Agnarr’s blade cut too fast and too strong, viciously slashing through the figure’s chest.
Grasping at his bleeding torso, the man doubled over. “You would dare the wrath of Tavan Zith?!”
And then Tee’s arrow took him in the throat. Zith collapsed to the street, his breath gurgling and blood bubbling from his wounds.
THE AFTERMATH OF TAVAN ZITH
But the chaos he had wreaked did not abate: The half-orc still burned. The lightning-eyed man was still firing randomly in all directions.
And the dwarf Tee had passed before was still summoning fell creatures into their midst: A massive hound – standing taller than a man’s shoulder (although perhaps not as tall as Agnarr’s shoulder) and wreathed in living shadow – appeared suddenly at the corner of Whipstone Street. Directly behind Tee. The crowds started running in a new direction.
Tee cursed and ran down the street towards Agnarr.
Before she could get there, however, Agnarr had reached down and grabbed the dying Zith by his hair. Hauling him up he was shocked to discover the features of a dark-skinned elf – just like Shilukar. But the shock didn’t stop him from cutting off his head.
Tee came skidding to a halt next to him. “Agnarr! What are you doing?”
“It didn’t work!” Agnarr, gasping in pain, held up one of his acid-coated hands.
“We needed to question him!”
“And we will.” Agnarr took off the iron collar from Ghul’s Labyrinth and snapped it around the dark elf’s neck. “Dominic should be able to heal this.” He grimaced again at the pain from the acid. “I think you might need to kill me… Maybe that would stop it.”
“It’s not that I wouldn’t love to do that,” Tee said. “But—“
“But I have work to do.” Agnarr nodded. Then he grinned. He turned down the street and ran back towards where the hound of shadows was spreading panic.
Tee, meanwhile, grabbed Zith’s body and stuffed it into her bag of holding.
Meanwhile, back by Dominic, the city watchmen were spreading out. They formed a perimeter around the lightning-eyed man and – before Dominic realized what they were doing – shot him dead.
“For the glory!” Agnarr charged through the panicking throngs. The suddenly flaming sword had a less than calming effect on the crowd, but it caught and tore at the insubstantial flesh-stuff of the shadow hound.
The beast – in terrible pain – threw back its head and howled. It was a sound born from the stygian pits of utter darkness, carrying in its very note a primal terror. It echoed off the buildings of the city. At its passing, a wave of supernatural fear swept over the entire block. People began scattering in complete panic. Even Tee couldn’t resist its effects, joining the screaming throngs in mindless flight.
The dwarf responsible for summoning the strange creatures suddenly leapt onto Agnarr’s back. “No! Leave it alone you! You mustn’t hurt it!”
Agnarr managed to shrug off the frenzied dwarf. Then with a final swing of his greatsword he finished off the shadowy hound. He twirled back towards the dwarf— And found an axe swinging at his head.
He narrowly turned the blow so that it only cut lightly into his armored side and then slammed the flat of his own blade into the dwarf’s face. The dwarf slumped into unconsciousness, his face badly scorched from the flames of the blade.
Back at the other end of the street, the city watchmen had thrown a rope around the floating woman and were pulling her back down to earth. Once her feet touched the ground, her condition seemed to pass. But the half-orc was still burning and his condition was deteriorating rapidly.
Dominic, however, had seen that death seemed to have stopped the lightning-bolts being hurled from the eyes of the other man. He was able to heal the man’s wounds and return breath to his body. And when he did, the condition didn’t reappear.
As he was finishing, the commander of the watchmen approached him. “I know you… You’re the Chosen of Vehthyl.”
“Umm… Yes.” Dominic was already uncomfortable with this conversation and it hadn’t even properly begun.
“What caused this?”
“I’m not… really sure.”
Agnarr came trotting up. “I am.” He quickly explained about the “sorcerer” who had been responsible for releasing these dangerous abilities.
“And what happened to him?” the commander asked.
“He escaped,” Agnarr said without missing a beat. “He ran that way.” He pointed in a plausible direction.
Dominic thought that the only way to cure the half-orc might be to kill him and then bring him back from the dead. The half-orc was terrified by the idea, but agreed. Before Dominic could say anything else, Agnarr thrust his flaming sword straight into the half-orc’s chest—
And a massive explosion ripped its way out of the half-orc’s chest and gouted its way down the length of the entire block!
An unnatural pressure wave preceding the blast threw Agnarr clear of it. He sat up and shook his head. “What happened?”
Fortunately the street had already been virtually abandoned and the members of the city watch had been far enough away that they weren’t injured.
The only thing left of the half-orc, however, was a desiccated corpse… Which, thankfully, no longer burned. Dominic had to work for several minutes – stitching sinew and regrowing skin through the sheer lifeforce of his faith – but he was finally able to restore some semblance of life to the half-orc’s pain-wracked body.
Agnarr, meanwhile, was stripping out of his armor in an effort to prevent it from any further damage. The acid-scarring hadn’t caused any structural damage yet, but his clothes were already badly scarred in many places.
“We’ll have to get you some new clothes,” Dominic said.
“Why?” Agnarr said. “There’s just a few holes!”
“It’s… umm… more about where the holes are located.”
Like the half-orc, Dominic only saw one solution. In a controlled fashion he stopped Agnarr’s heart, killing him. Then he immediately used his skills and divine gifts to revive him.
It worked. The acid stopped oozing from Agnarr’s pores.
TEE RETURNS TO THE SCENE
By the time her head cleared, Tee found herself on High Road, looking down off the Oldtown cliffs towards the sea. She cursed under her breath.
After a moment’s thought, she set off at a running pace towards the Ghostly Minstrel. Once there she barged into Ranthir’s room.
“Mistress Tee?”
Without saying a word she pulled Zith’s corpse half out of her bag of holding and then stuffed it back in. He was on her heels as she turned and headed back out into the street.
They were able to grab a carriage in Delver’s Square. As they rode back towards Oldtown, Tee filled him in on what she’d seen. “We’re not sure what we’re dealing with. I’m hoping you’ll be able to figure it out.”
“I’ll do my best.”
By the time they reached the ramp leading up into Oldtown, however, the watch had sealed the upper city.
It turned out that the bay of the shadow hound had affected a wide swath of the city. And in the tightly-packed confines of Oldtown the effects had been devastating: Riotous crowds and madhouse conditions. There had even been some reports of people throwing themselves out of windows in blind panic.
Tee, however, managed to identify herself as an associate of the Chosen of Vehthyl. Fortunately the guards stationed on the roadblock had apparently heard reports that Dominic had been helping them at the source of the disturbance. They let Tee and Ranthir through the blockade.
When they arrived back at the scene, they discovered that Dominic and Agnarr had already left. Everyone who had been directly affected by Zith’s attack had been quarantined on Whipstone Street. Things were firmly under control, but the watch commander was more than glad to accept Ranthir’s mystical expertise.
After examining those affected, Ranthir identified the effect as an uncontrolled explosion of sorcerous potential. “We all have a connection to the same arcane forces that I use in the casting of my spells,” he explained. “In some that connection is stronger than in others. It appears that in these victims that connection has been exploited. In layman’s terms, it’s been ripped open – power flows through it in a completely uncontrolled fashion.”
This meant little to any of them, but Ranthir was able to confirm that all of them had been fully cured.
But the dwarf kept screaming about the voices whispering in his ears. And the elf who had collapsed was now babbling in what appeared to be glossolalic tongues.
“So what’s wrong with them?” Tee asked.
“There’s no lingering effect of a mystical nature,” Ranthir said. “But whatever happened to them must have broken their minds. Killing them won’t help.”
The commander of the watch nodded sharply and then turned to one of his men. “We’ll send them to Mahdoth’s Asylum, then.”
Suddenly, out of the elf’s mad gibberings, Tee’s sharp ears caught a meaningful phrase: “The lance… The lance is coming…”
She had said something like that herself once, as her mind emerged from madness. The similarity struck her to the soul.
There was nothing else to be done there. Ranthir and Tee returned to the Ghostly Minstrel, hoping to find the others there ahead of them.
NEXT:
Running the Campaign: Playing to the Crowd – Campaign Journal: Session 27D
In the Shadow of the Spire: Index

 “Flotsam” is a side trek featuring a couple of pirates who pretend to be legitimate merchants; they lure people onto their ship by offering legitimate passage and then rob them on the high seas. It doesn’t seem immediately appropriate for a forest hex key, but what if the PCs found this ship — and its weird, seemingly crazy crew — just sitting in the middle of the forest? Maybe it’s a witch’s curse or a strange haunting. Or just crazy people.