Dark Tower (1980) is a classic adventure module by Jennell Jaquays. Originally published by Judges Guild, it was one of several titles by Jaquays which revolutionized the genre.
In the hinterlands of the world where civilization grows dim, an isolated and seemingly innocent village has become dominated by cursed cultists of Set.
Beneath the village lies two towers – Mitra’s Fist, the first temple of the great god of good; and the Dark Tower, supernaturally raised by the black might of the serpent god Set as his forces overthrew Mitra’s temple. The titanic forces of this deific cataclysm triggered an avalanche which buried the two towers.
Centuries later, a new village was founded on the site and began excavating the old temples… only to discover that something inside had been digging its way out.
The Dark Tower module consists of four devilish dungeon levels beneath the village, pierced through by the twin towers which still stand as stalwart bastions of two faiths locked in eternal hatred.
What we have in this post is a very specific tool which I believe DMs looking to run Dark Tower will find absolutely invaluable. (It may also be of some passing curiosity to those who have read Xandering the Dungeon.)
The dungeons of Dark Tower are incredibly ingenious in their design, with myriad and varied connections between their levels. In practice, however, the presentation of the dungeon can be somewhat murky, and a DM can easily find themselves trying to riddle out the basic function of the dungeon.
Below, therefore, you’ll find an encyclopedic listing of every level connection in the dungeon.
DUNGEON OVERVIEW
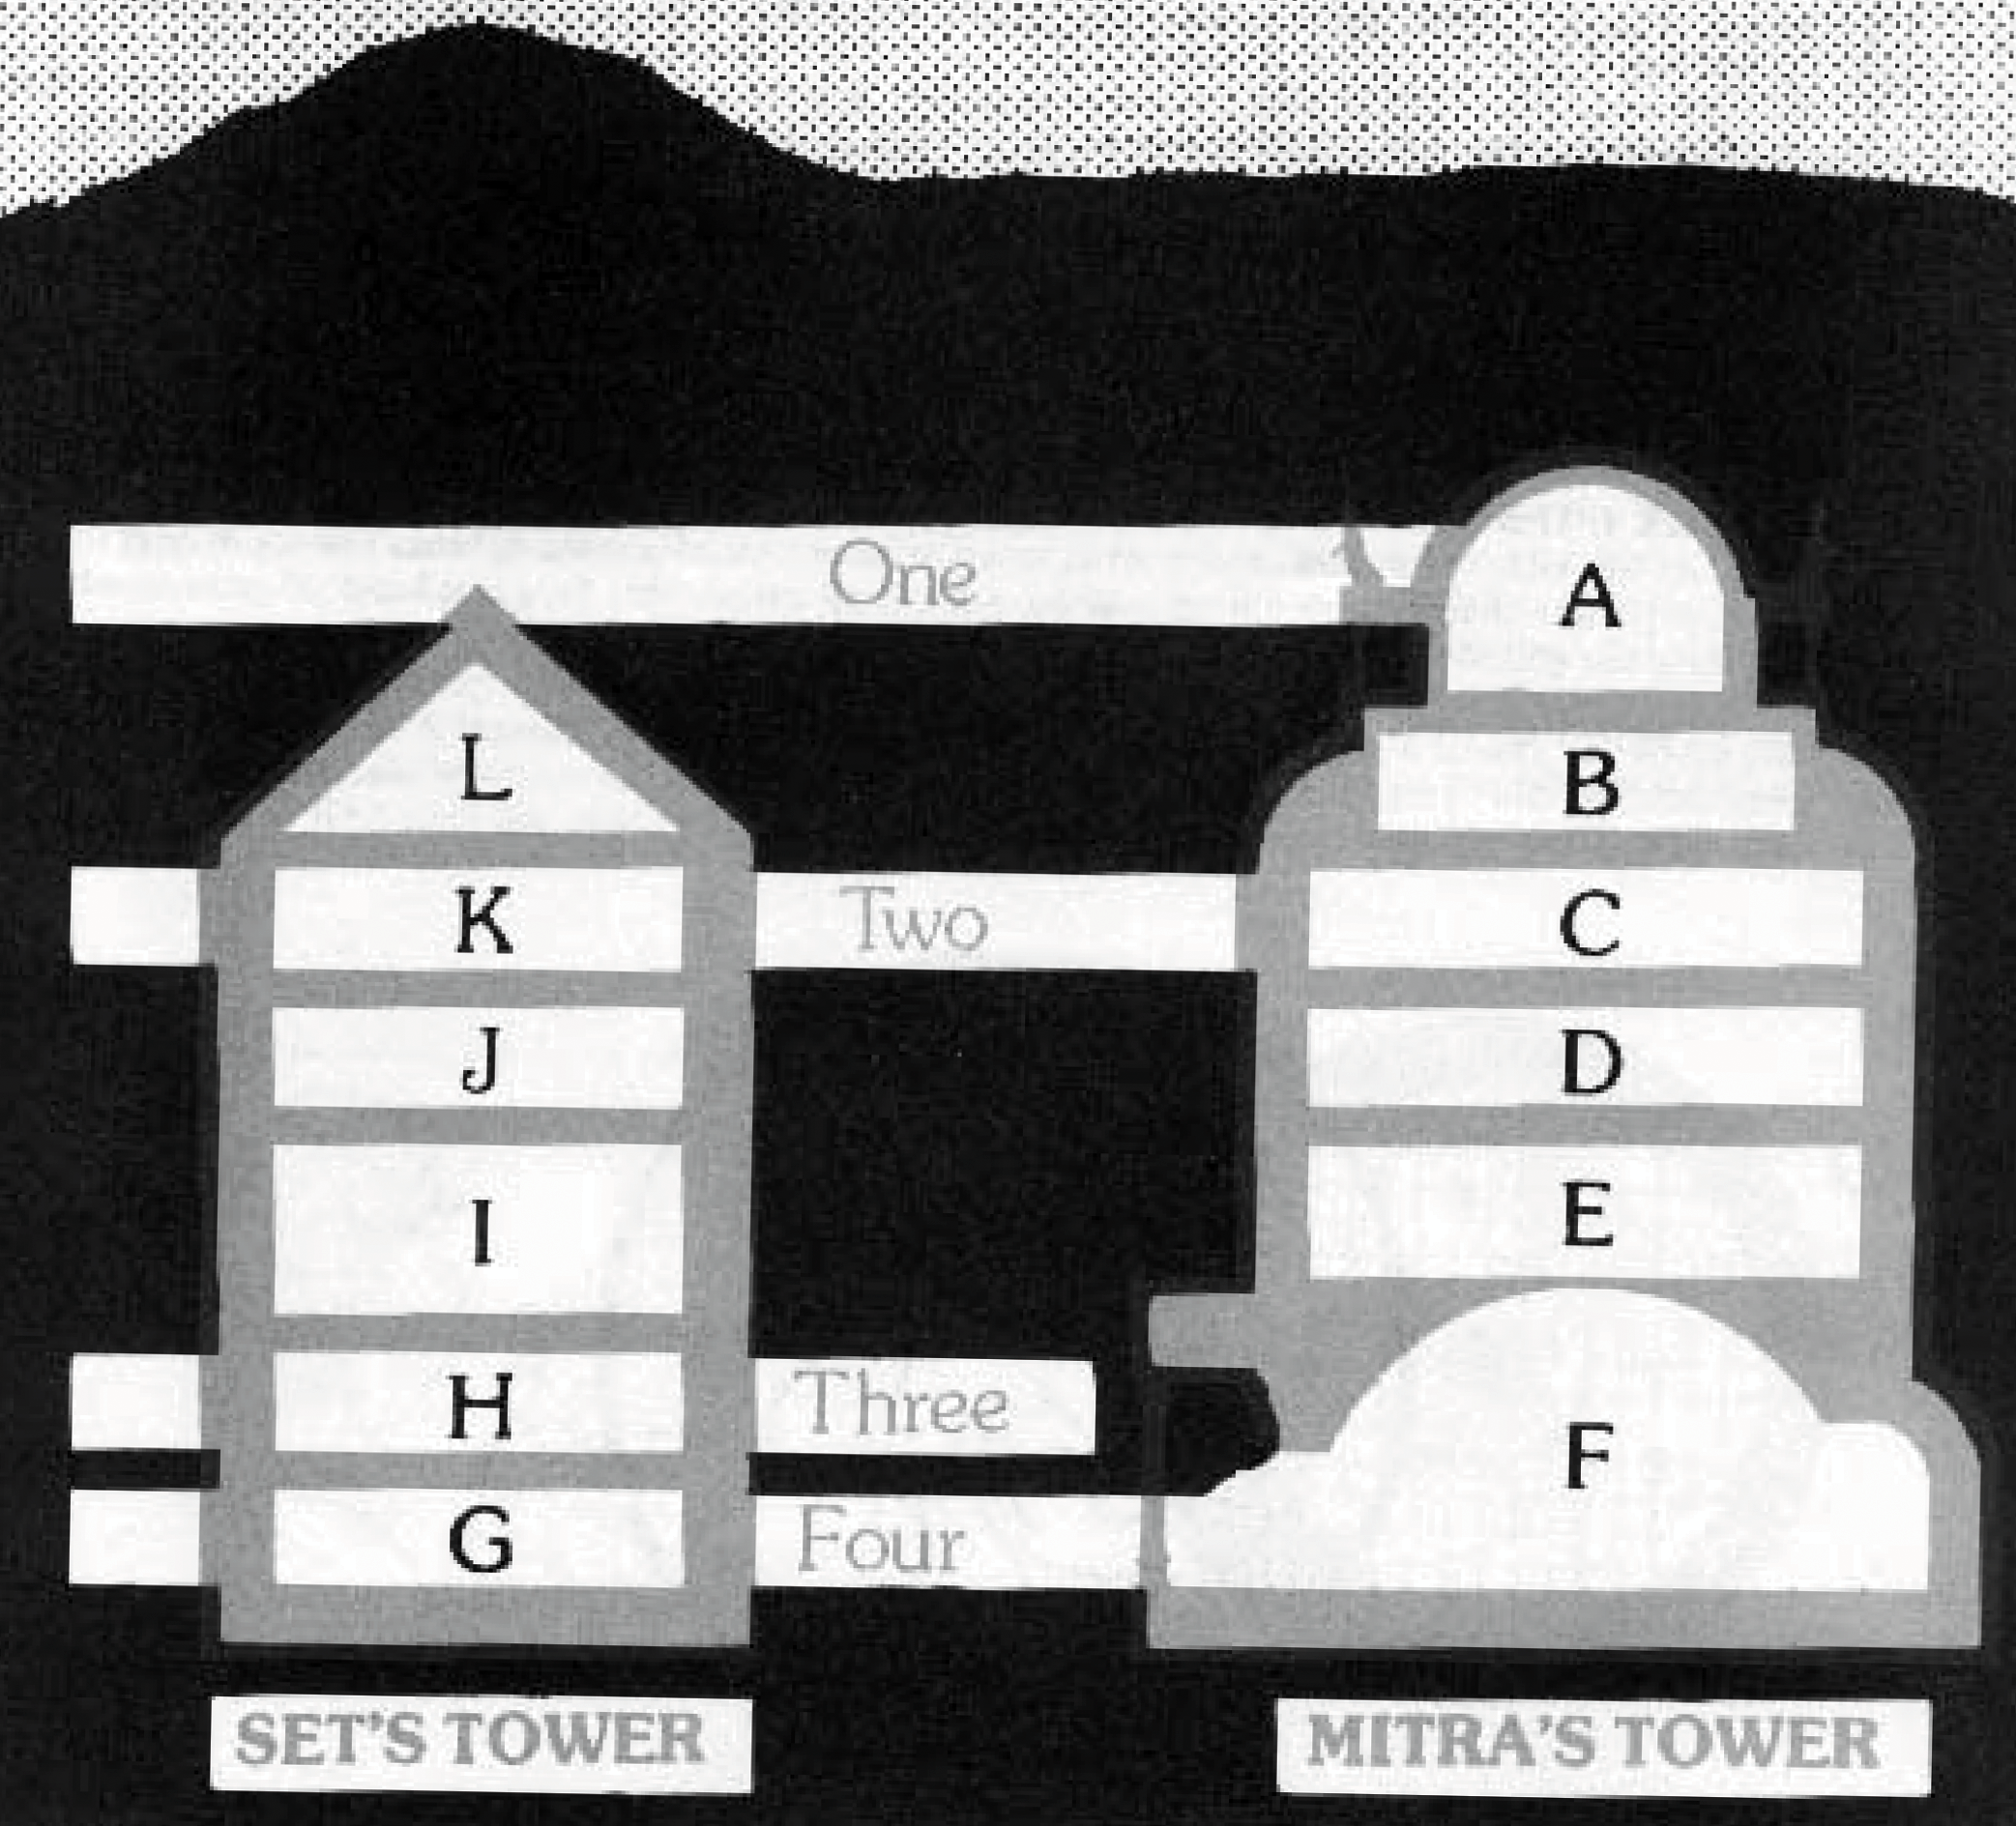
If you look at the side view of the dungeon above, there are a few key features and clarifications to immediately note.
First, there are multiple entrances leading from the village into the dungeon below.
Second, there are four levels to the dungeon. There are multiple connections between these levels, but the progression is linear (Level 1 has entrances to Level 2, which has entrances to Level 3, which has entrances to Level 4). However, although this is true of the DM’s maps, it is likely that the players will struggle to cleanly intuit this due to the dungeon’s design (including split levels, minor elevation shifts, and, of course, the nested towers).
Third, let’s consider the two towers. Broadly speaking, you can enter Mitra’s Tower at the top of the dungeon and exit it on the bottom. The entrance to Set’s Tower, on the other hand, is most easily entered from the bottom level and then climbed to its top.
Thus, one can broadly think of the towers as forming a large “U,” with the PCs most plausibly journeying down through Mitra’s Tower, crossing the fourth level of the dungeon, and then ascending Set’s Tower. (Any number of factors, not to mention the intersecting dungeon levels, will likely confound this in practice.)
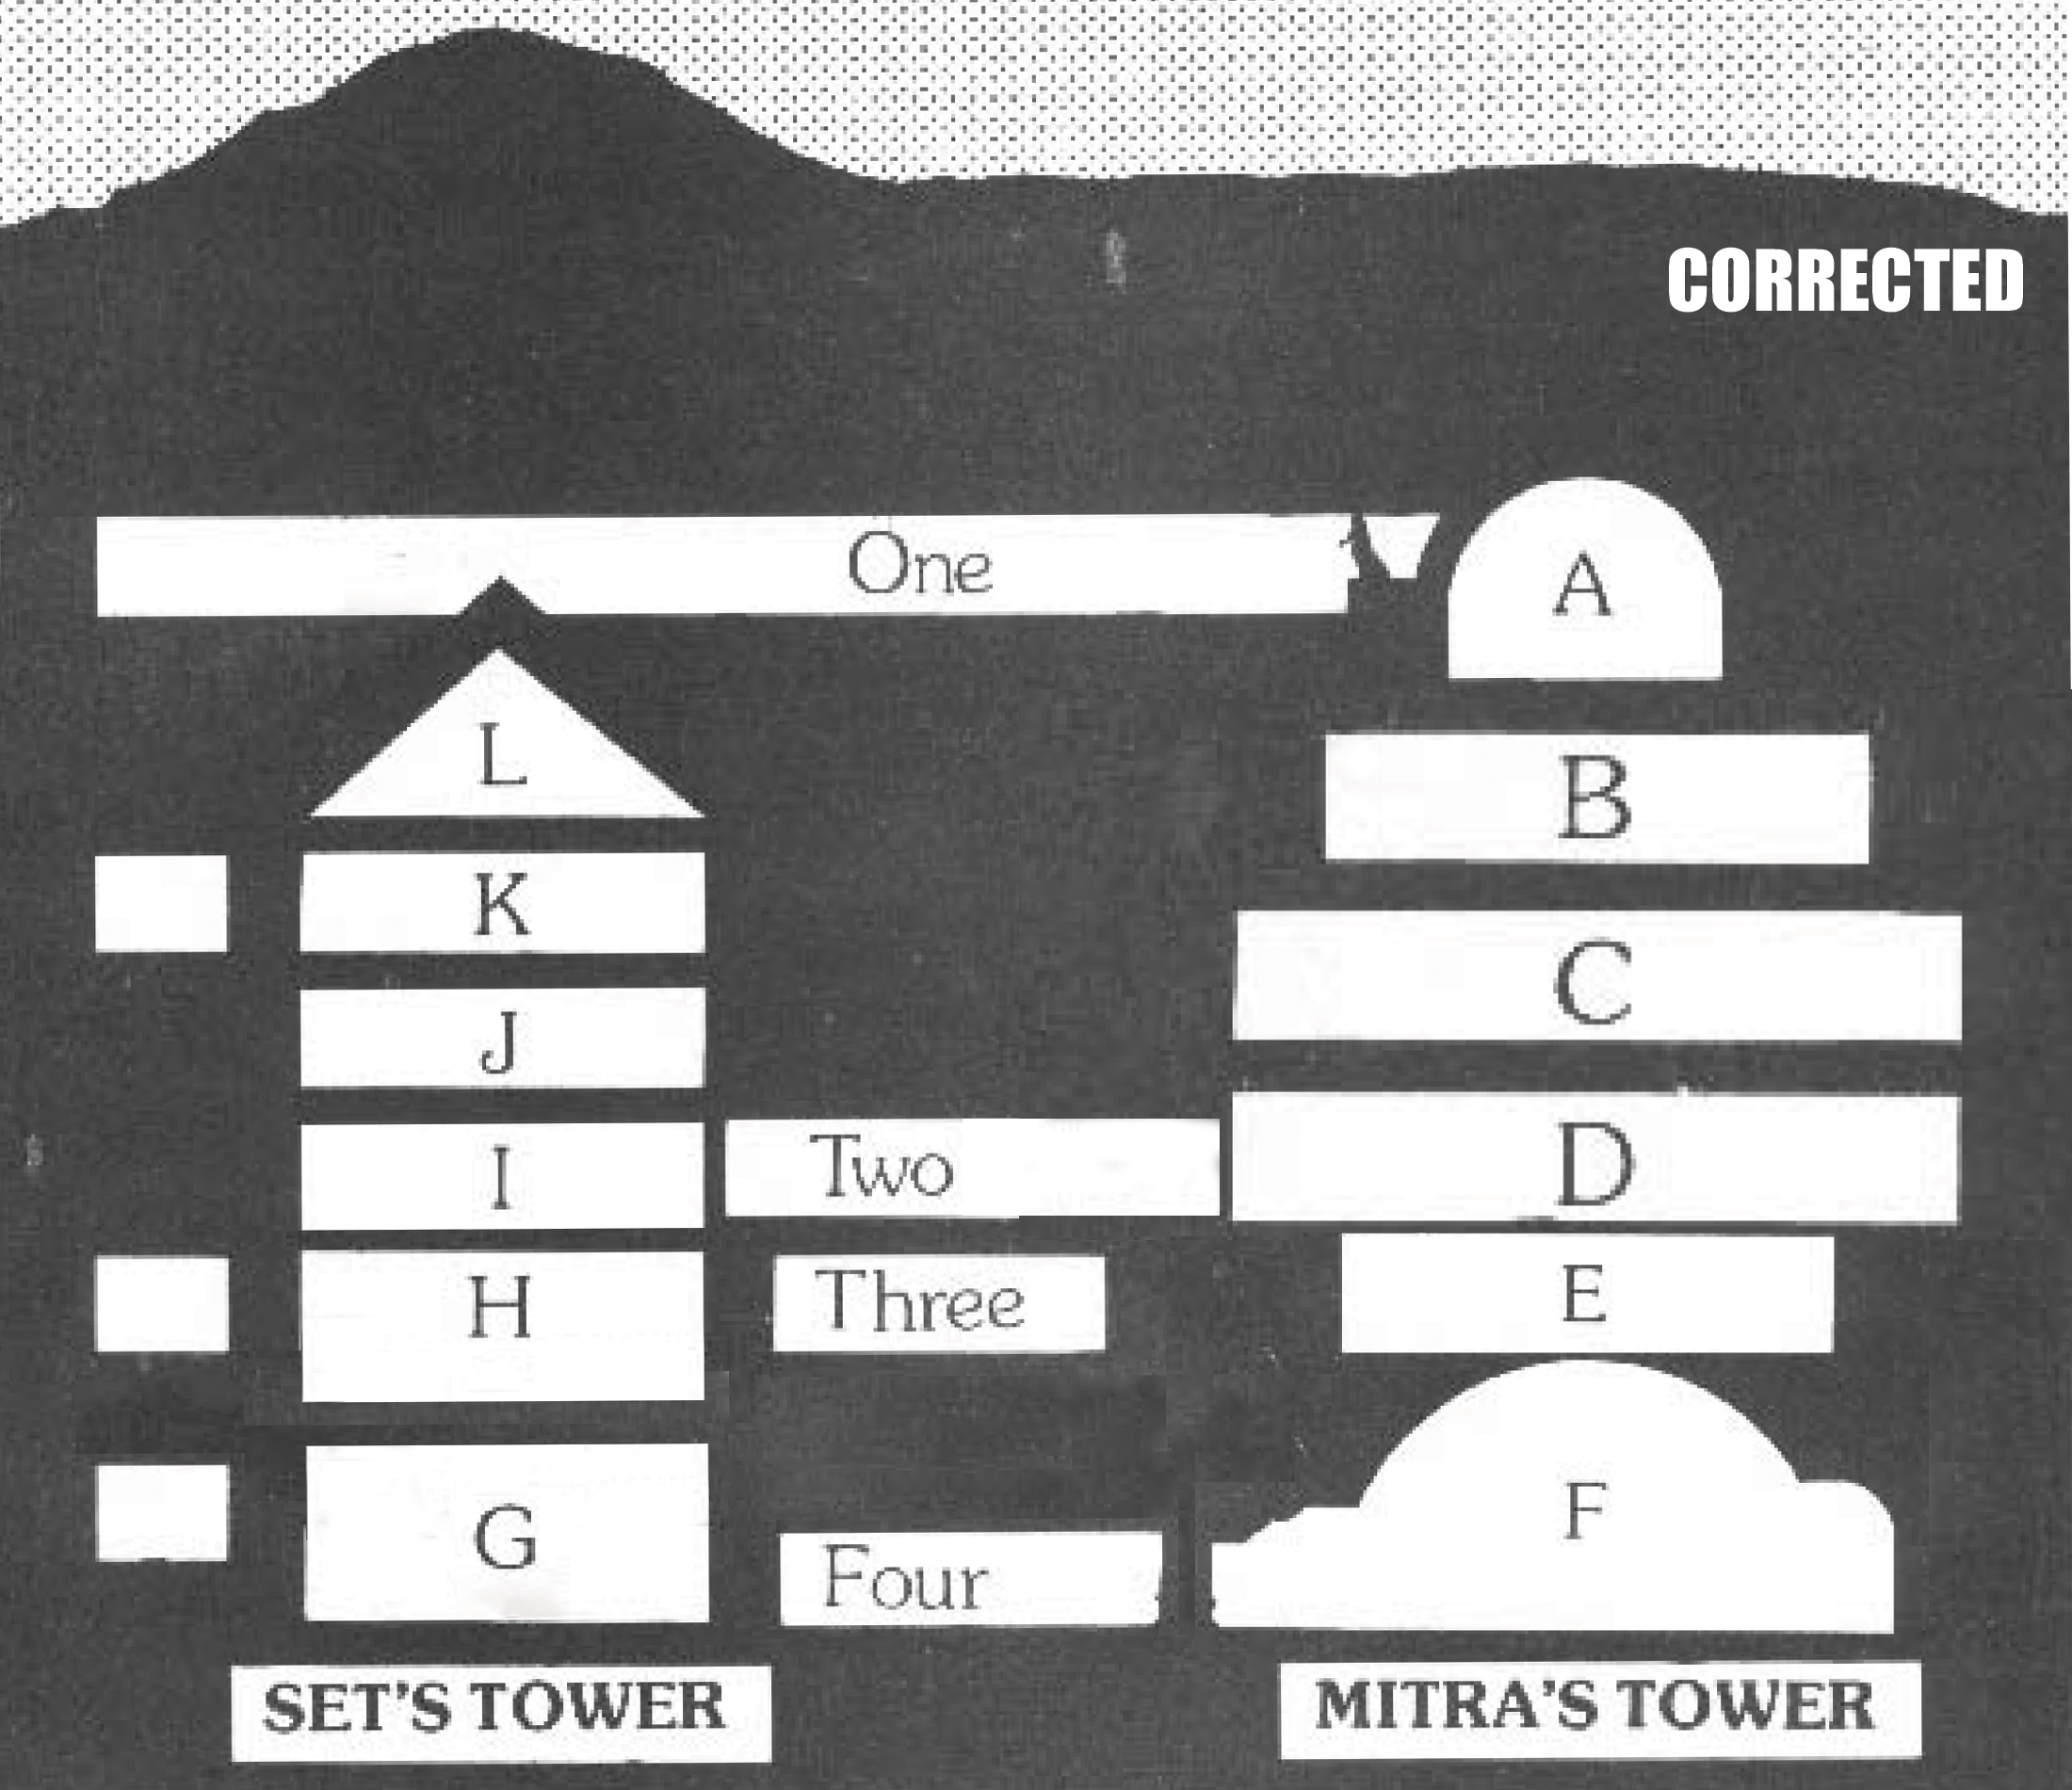
Finally — and this is of particular importance! — the side view of the dungeon is incorrect! Although Level 2 is depicted as intersecting Levels K and C of the towers, it actually intersects Levels I & D. The actual side view should look like this:
LEVEL CONNECTIONS
On the list below:
- X/Y indicates that the unkeyed level connection lies between area X and area Y.
- L-20A refers to the empty version of the top level of Set’s Tower described in the keys for areas L-20 and L-22.
- Connections which are one-way (teleportation traps, etc.) are indicated only from their point of origin.
- Tower stairs are only indicated in one direction, but are traversable in both (unless noted otherwise).
ENTRANCES TO LEVEL 1
V-2 Trapdoor to 1-1 (secret)
V-5 Trapdoor to 1-18 (secret)
V-7 Cellar Door to 1-21
V-10 Trapdoor to 1-46
V-11 Tunnel to 1-45 (secret, tower’s door has been buried)
V-11 Shaft to 1-36 (very secret, must break through mortar)
LEVEL 1 – EXITS
1-1 Trapdoor to V-2
1-1 Door to A-1/A-2
1-9 Tunnel to 2-2/2-7
1-18 Trapdoor to V-5
1-21 Cellar Door to V-7
1-27 Teleportation Gate to E-19 (one-way)
1-30 Window to L-22
1-31 Teleport Trap to 3-10 (one-way)
1-32 Stairs to 2-23
1-33 Capstone to L-20A (very secret, must break through capstone)
1-36 Shaft to V-11
1-41 Teleporting Mist to C-7 (two-way)
1-43 Teleporting Mist to 2-1 (one-way)
1-45 Tunnel to V-11
1-46 Trapdoor to V-10
NE Tunnel Tunnel to 2-18
Note: On the original map there is a “To 2nd Level” which appears to indicate a tunnel coming from area 1-13. This tunnel is, in fact, a dead-end and the text should properly be located next to the tunnel from area 1-9 (as indicated above).
LEVEL 2 – EXITS
2-2/2-7 Tunnel to 1-9
2-5 Hole to 3-2
2-12 Stairs to 3-19
2-14 Cave to 3-5
2-15 Teleportation Hall to 3-11 (two-way)
2-18 Tunnel to NE Level 1
2-22 Stairs to 3-11
2-23 Stairs to 1-32
LEVEL 3 – EXITS
3-1 Rafters of 4-10
3-2 Hole in Ceiling to 2-5 (not indicated in key)
3-5 Cave to 2-14
3-6 Stairs to 4-8
3-7 Stairs to 4-9
3-10 Hole to 4-25
3-11 Teleportation Arch (West Wall) to 2-15 (two-way)
3-11 Teleportation Arch (North Wall) to 3-16/3-17 (two-way)
3-11 Stairs to 2-22
3-13 Stairs to 4-18a
3-16/3-17 Teleportation Arch (North Wall) to 3-11 (two-way, not on map or in key)
3-16/3-19 Stairs to 4-14b
3-19 Stairs to 2-12
3-20 Open to 4-16
3-22 Stairs to 4-15
3-24 Hole to 4-13
Note: On the original map, there is a shaft or indicated in area 3-3. This is not indicated in the key, nor is there any corresponding connections on Level 2 or Level 3. It is omitted here as an assumed error.
LEVEL 4 – EXITS
4-1/4-2 Door to F-20
4-5 Door to G-1
4-8 Stairs to 3-6
4-9 Stairs to 3-7
4-14b Stairs to 3-16/3-17
4-15 Stairs to 3-22
4-16 Stairs to 3-20
4-18a Stairs to 3-11
4-25 Hole to 3-10
WHITE TOWER OF MITRA
A-1/A-2 Door to 1-1
A-1/A-2 Straight Stairs to B-3/B-4
B-4 Curved Stairs to C-5
C-5 Spiral Stairs to D-9
D-9 Spiral Stairs Up to C-5, Down to E-15/E-19
E-15/E-19 Spiral Stairs Up to D-9
E-17 Teleportation Ritual to F-20
E-19 Teleportation Arch to 1-1 (one-way)
F-20 Teleportation Ritual to E-17
F-20 Door to 4-1/4-2
SET’S TOWER
G-2 Stairs to H-6 (NE Stairs)
H-6 South Stairs to I-11 (South Stairs)
I-11 North Stairs to J-12
J-14 Stairs to K-17
K-18 Teleportation Ritual to L-20
K-18 Trap Door (Ceiling) to L-20A
L-20 Teleportation Ritual to L-20A
L-20A Trap Door (Floor) to K-18 (secret)


Do you have a list of recommended dungeons / adventures to run?
I know about https://thealexandrian.net/reviews-index but it might be helpful for people to just have a curated list.
Pinging/bumping this one. I second the above!