The Alexandrian

Posts tagged ‘xandering the dungeon’

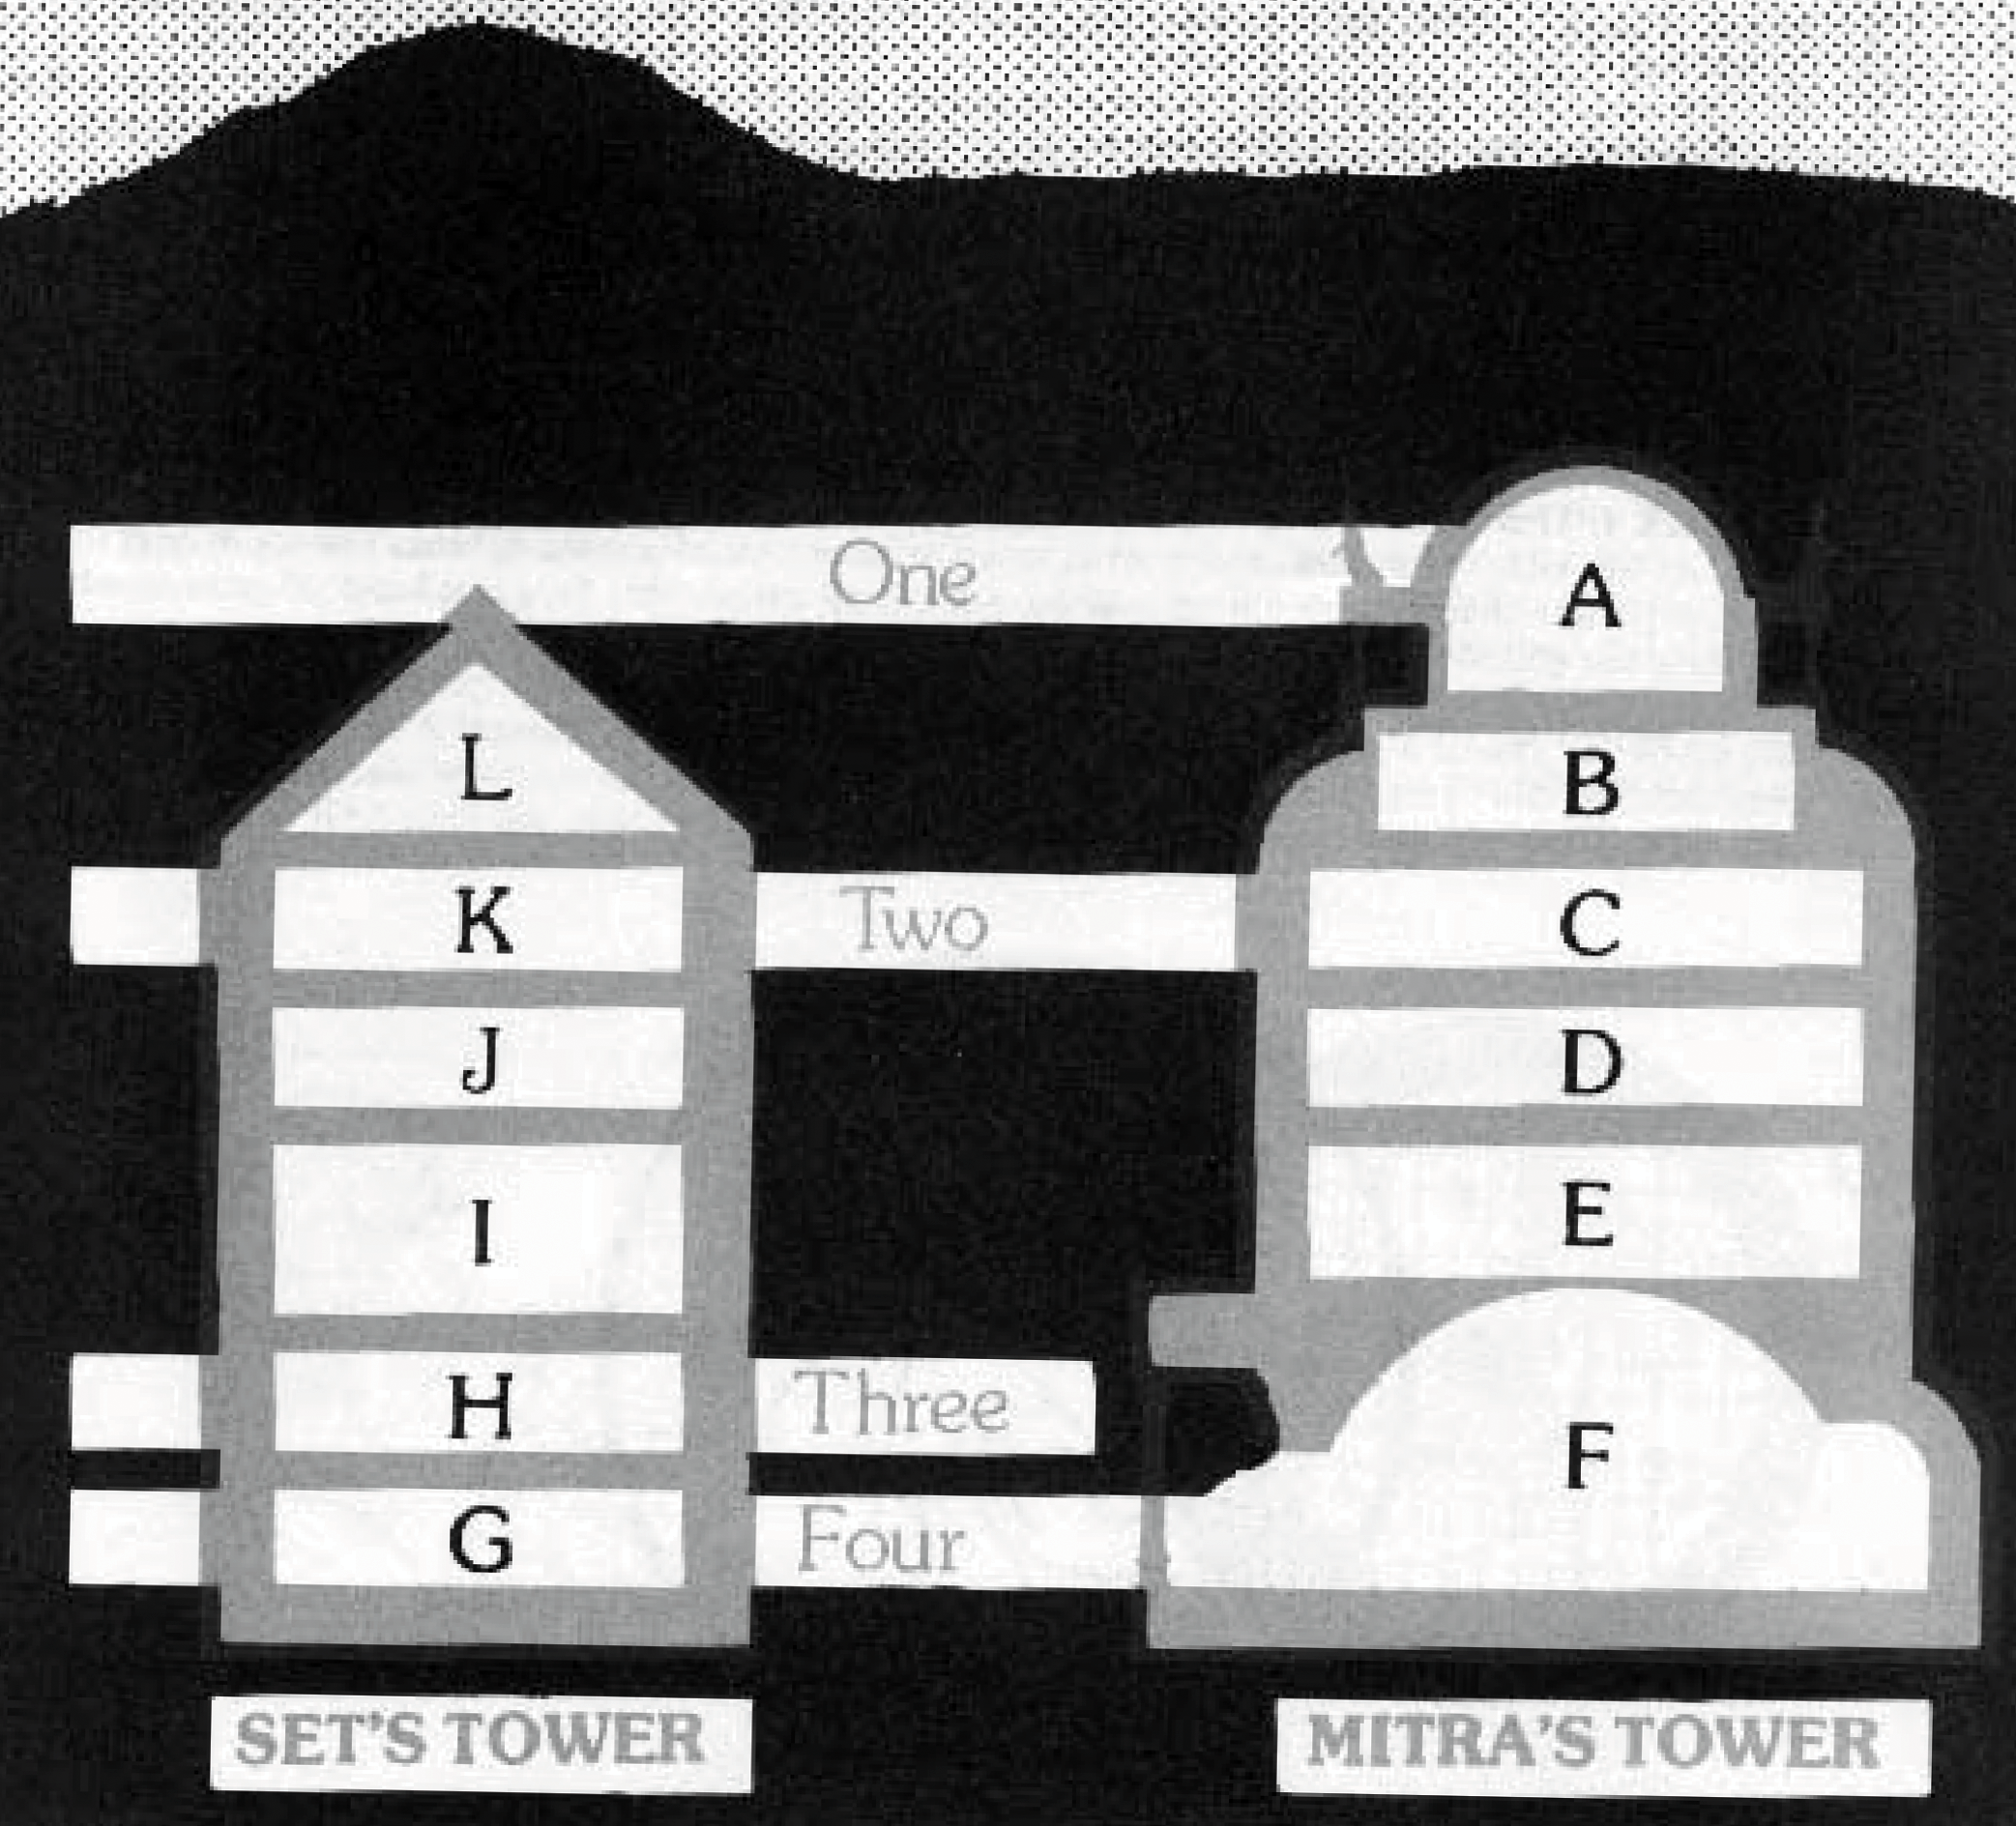
Dark Tower - Side View Map (Jennell Jaquays)

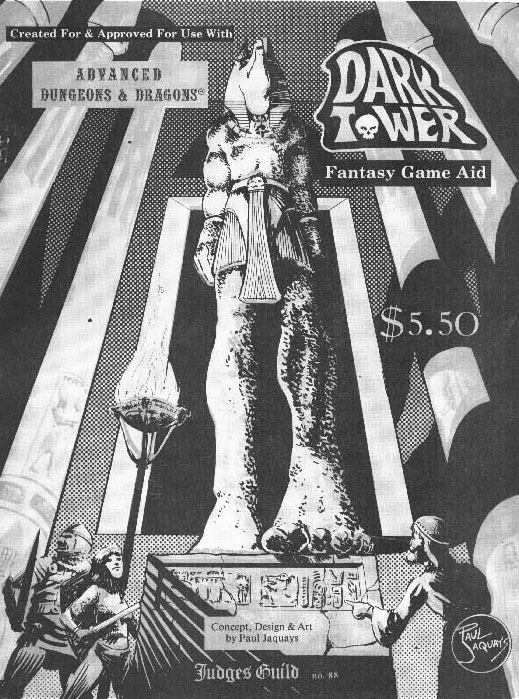
Dark Tower (1980) is a classic adventure module by Jennell Jaquays. Originally published by Judges Guild, it was one of several titles by Jaquays which revolutionized the genre.

In the hinterlands of the world where civilization grows dim, an isolated and seemingly innocent village has become dominated by cursed cultists of Set.

Beneath the village lies two towers – Mitra’s Fist, the first temple of the great god of good; and the Dark Tower, supernaturally raised by the black might of the serpent god Set as his forces overthrew Mitra’s temple. The titanic forces of this deific cataclysm triggered an avalanche which buried the two towers.

Centuries later, a new village was founded on the site and began excavating the old temples… only to discover that something inside had been digging its way out.

The Dark Tower module consists of four devilish dungeon levels beneath the village, pierced through by the twin towers which still stand as stalwart bastions of two faiths locked in eternal hatred.

What we have in this post is a very specific tool which I believe DMs looking to run Dark Tower will find absolutely invaluable. (It may also be of some passing curiosity to those who have read Xandering the Dungeon.)

The dungeons of Dark Tower are incredibly ingenious in their design, with myriad and varied connections between their levels. In practice, however, the presentation of the dungeon can be somewhat murky, and a DM can easily find themselves trying to riddle out the basic function of the dungeon.

Below, therefore, you’ll find an encyclopedic listing of every level connection in the dungeon.

DUNGEON OVERVIEW

If you look at the side view of the dungeon above, there are a few key features and clarifications to immediately note.

First, there are multiple entrances leading from the village into the dungeon below.

Second, there are four levels to the dungeon. There are multiple connections between these levels, but the progression is linear (Level 1 has entrances to Level 2, which has entrances to Level 3, which has entrances to Level 4). However, although this is true of the DM’s maps, it is likely that the players will struggle to cleanly intuit this due to the dungeon’s design (including split levels, minor elevation shifts, and, of course, the nested towers).

Third, let’s consider the two towers. Broadly speaking, you can enter Mitra’s Tower at the top of the dungeon and exit it on the bottom. The entrance to Set’s Tower, on the other hand, is most easily entered from the bottom level and then climbed to its top.

Thus, one can broadly think of the towers as forming a large “U,” with the PCs most plausibly journeying down through Mitra’s Tower, crossing the fourth level of the dungeon, and then ascending Set’s Tower. (Any number of factors, not to mention the intersecting dungeon levels, will likely confound this in practice.)

Finally — and this is of particular importance! — the side view of the dungeon is incorrect! Although Level 2 is depicted as intersecting Levels K and C of the towers, it actually intersects Levels I & D. The actual side view should look like this:
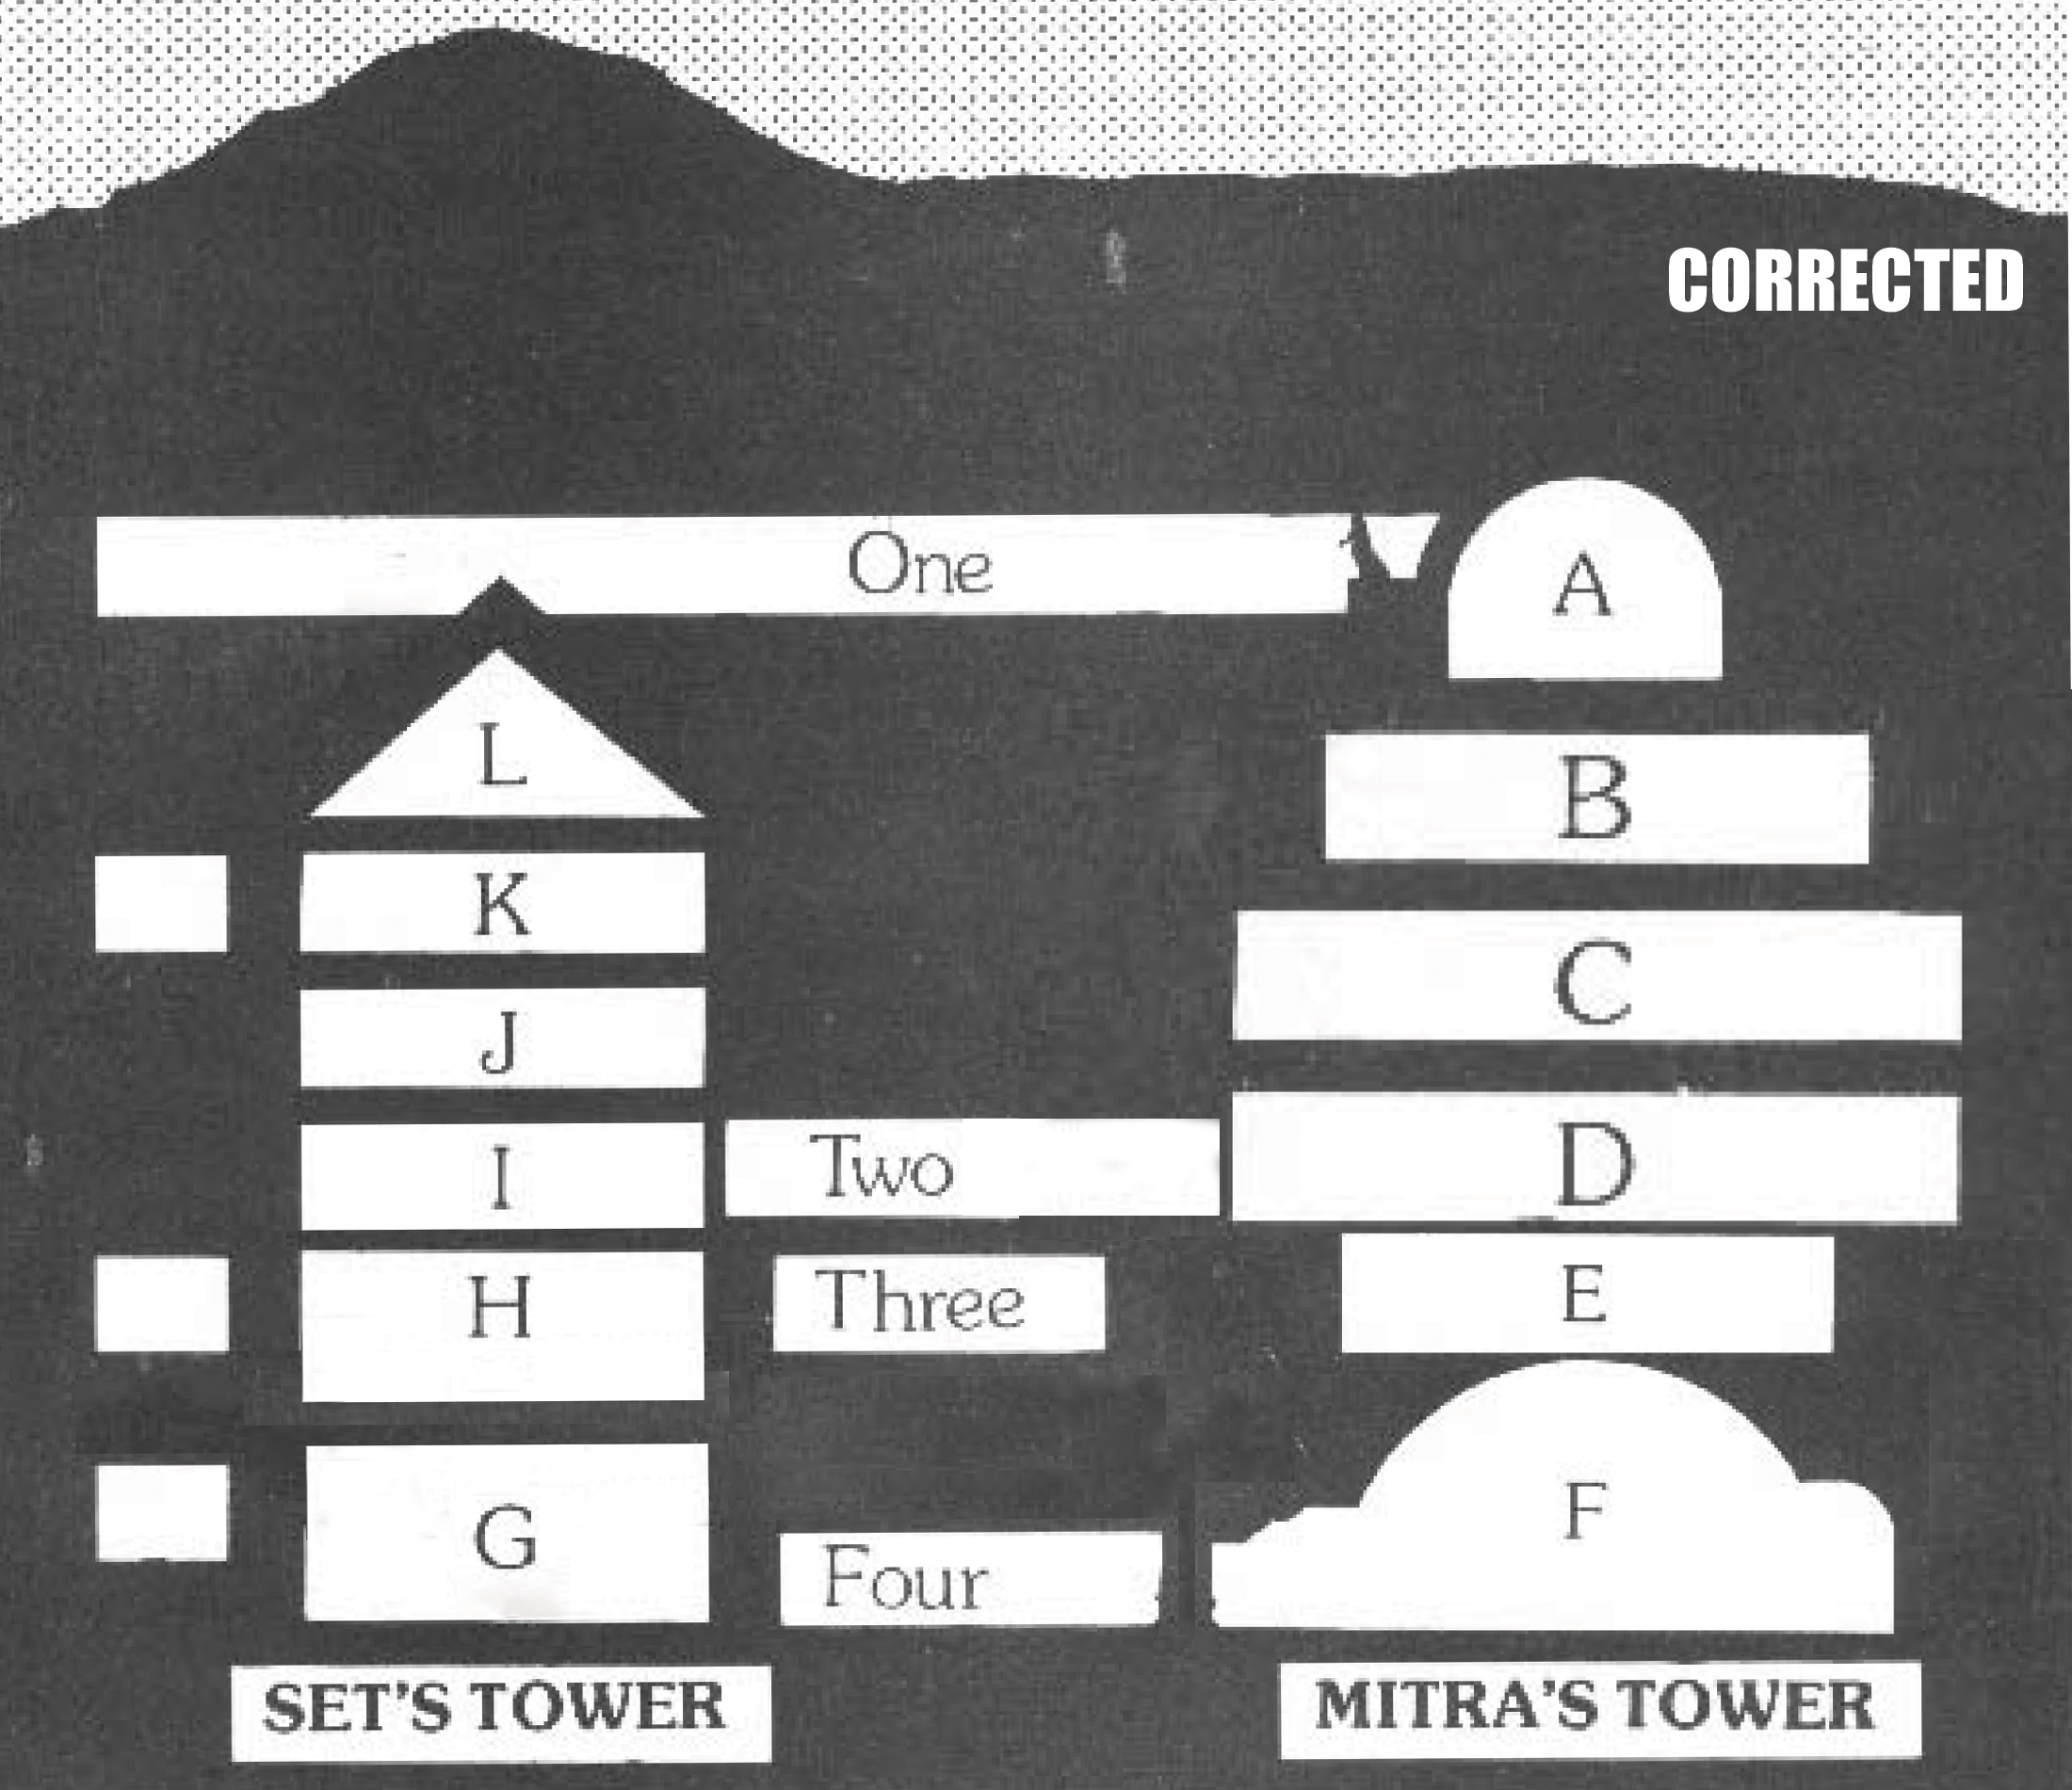
Dark Tower - Side View Map (Jennell Jaquays)

LEVEL CONNECTIONS

On the list below:

  • X/Y indicates that the unkeyed level connection lies between area X and area Y.
  • L-20A refers to the empty version of the top level of Set’s Tower described in the keys for areas L-20 and L-22.
  • Connections which are one-way (teleportation traps, etc.) are indicated only from their point of origin.
  • Tower stairs are only indicated in one direction, but are traversable in both (unless noted otherwise).

ENTRANCES TO LEVEL 1

V-2                       Trapdoor to 1-1 (secret)
V-5                       Trapdoor to 1-18 (secret)
V-7                       Cellar Door to 1-21
V-10                     Trapdoor to 1-46
V-11                     Tunnel to 1-45 (secret, tower’s door has been buried)
V-11                     Shaft to 1-36 (very secret, must break through mortar)

LEVEL 1 – EXITS

1-1                        Trapdoor to V-2
1-1                        Door to A-1/A-2
1-9                        Tunnel to 2-2/2-7
1-18                      Trapdoor to V-5
1-21                      Cellar Door to V-7
1-27                      Teleportation Gate to E-19 (one-way)
1-30                      Window to L-22
1-31                      Teleport Trap to 3-10 (one-way)
1-32                      Stairs to 2-23
1-33                      Capstone to L-20A (very secret, must break through capstone)
1-36                      Shaft to V-11
1-41                      Teleporting Mist to C-7 (two-way)
1-43                      Teleporting Mist to 2-1 (one-way)
1-45                      Tunnel to V-11
1-46                      Trapdoor to V-10
NE Tunnel          Tunnel to 2-18

Note: On the original map there is a “To 2nd Level” which appears to indicate a tunnel coming from area 1-13. This tunnel is, in fact, a dead-end and the text should properly be located next to the tunnel from area 1-9 (as indicated above).

LEVEL 2 – EXITS

2-2/2-7                Tunnel to 1-9
2-5                        Hole to 3-2
2-12                      Stairs to 3-19
2-14                      Cave to 3-5
2-15                      Teleportation Hall to 3-11 (two-way)
2-18                      Tunnel to NE Level 1
2-22                      Stairs to 3-11
2-23                      Stairs to 1-32

LEVEL 3 – EXITS

3-1                        Rafters of 4-10
3-2                        Hole in Ceiling to 2-5 (not indicated in key)
3-5                        Cave to 2-14
3-6                        Stairs to 4-8
3-7                        Stairs to 4-9
3-10                      Hole to 4-25
3-11                      Teleportation Arch (West Wall) to 2-15 (two-way)
3-11                      Teleportation Arch (North Wall) to 3-16/3-17 (two-way)
3-11                      Stairs to 2-22
3-13                      Stairs to 4-18a
3-16/3-17            Teleportation Arch (North Wall) to 3-11 (two-way, not on map or in key)
3-16/3-19            Stairs to 4-14b
3-19                      Stairs to 2-12
3-20                      Open to 4-16
3-22                      Stairs to 4-15
3-24                      Hole to 4-13

Note: On the original map, there is a shaft or indicated in area 3-3. This is not indicated in the key, nor is there any corresponding connections on Level 2 or Level 3. It is omitted here as an assumed error.

LEVEL 4 – EXITS

4-1/4-2                Door to F-20
4-5                        Door to G-1
4-8                        Stairs to 3-6
4-9                        Stairs to 3-7
4-14b                    Stairs to 3-16/3-17
4-15                      Stairs to 3-22
4-16                      Stairs to 3-20
4-18a                    Stairs to 3-11
4-25                      Hole to 3-10

WHITE TOWER OF MITRA

A-1/A-2              Door to 1-1
A-1/A-2              Straight Stairs to B-3/B-4
B-4                        Curved Stairs to C-5
C-5                       Spiral Stairs to D-9
D-9                       Spiral Stairs Up to C-5, Down to E-15/E-19
E-15/E-19           Spiral Stairs Up to D-9
E-17                      Teleportation Ritual to F-20
E-19                      Teleportation Arch to 1-1 (one-way)
F-20                      Teleportation Ritual to E-17
F-20                      Door to 4-1/4-2

SET’S TOWER

G-2                       Stairs to H-6 (NE Stairs)
H-6                       South Stairs to I-11 (South Stairs)
I-11                       North Stairs to J-12
J-14                       Stairs to K-17
K-18                     Teleportation Ritual to L-20
K-18                     Trap Door (Ceiling) to L-20A
L-20                      Teleportation Ritual to L-20A
L-20A                  Trap Door (Floor) to K-18 (secret)
Dark Tower - Jennell Jaquays (1980)

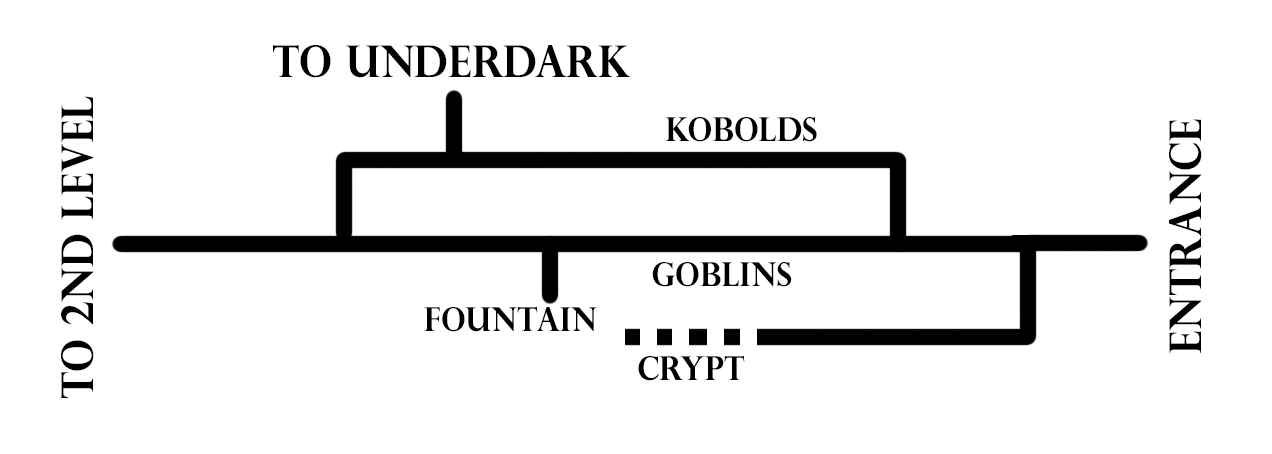
Melan Diagram - The Sunless Citadel

Ten years ago I wrote Xandering the Dungeon, a detailed look at the differences between linear and non-linear dungeons. In this essay I briefly used what I dubbed Melan diagrams — a technique created in 2006 by Melan for a thread on ENWorld where he discussed “map flow and old school game design.”

These diagrams are, unfortunately, not immediately intuitive to everyone looking at them, and because I used the diagrams in Xandering the Dungeon, I’m frequently asked how they’re supposed to “work.” In fact, I’ve been asked that question three different times in the last week… which brings us to today’s post.

You can see an example of what a Melan diagram looks like at the top of this post. It depicts the first level of The Sunless Citadel, designed by Bruce Cordell with original cartography by Todd Gamble. (Today, though, I’ll be using Mike Schley’s version of the map from Tales From the Yawning Portal.)

So… what’s the point of this thing? Well, as Melan said in his original post:

[They are] a graphical method which “distills” the dungeon into a kind of decision tree or flowchart by stripping away “noise.” On the resulting image, meandering corridors and even smaller room complexes are turned into straight lines. Although the image doesn’t create an “accurate” representation of the dungeon map, and is by no means a “scientific” depiction, it demonstrates what kind of [navigational] decisions the players can make while moving through the dungeon.

By getting rid of the “noise” you can boil a dungeon down to its essential structure. They also allow you to compare the structures of different dungeons at a glance.

It’s fairly important to note that you don’t actually use Melan diagrams for designing dungeons. They are an analytical tool, not a design tool: You use them to look at something which has already been created, not to create it in the first place.

But if you’re looking at a diagram what does it actually mean? How is the noise being stripped out and what does that tell you? How are you supposed to interpret the diagram? Or make one for yourself?

STRAIGHTEN THE LINE

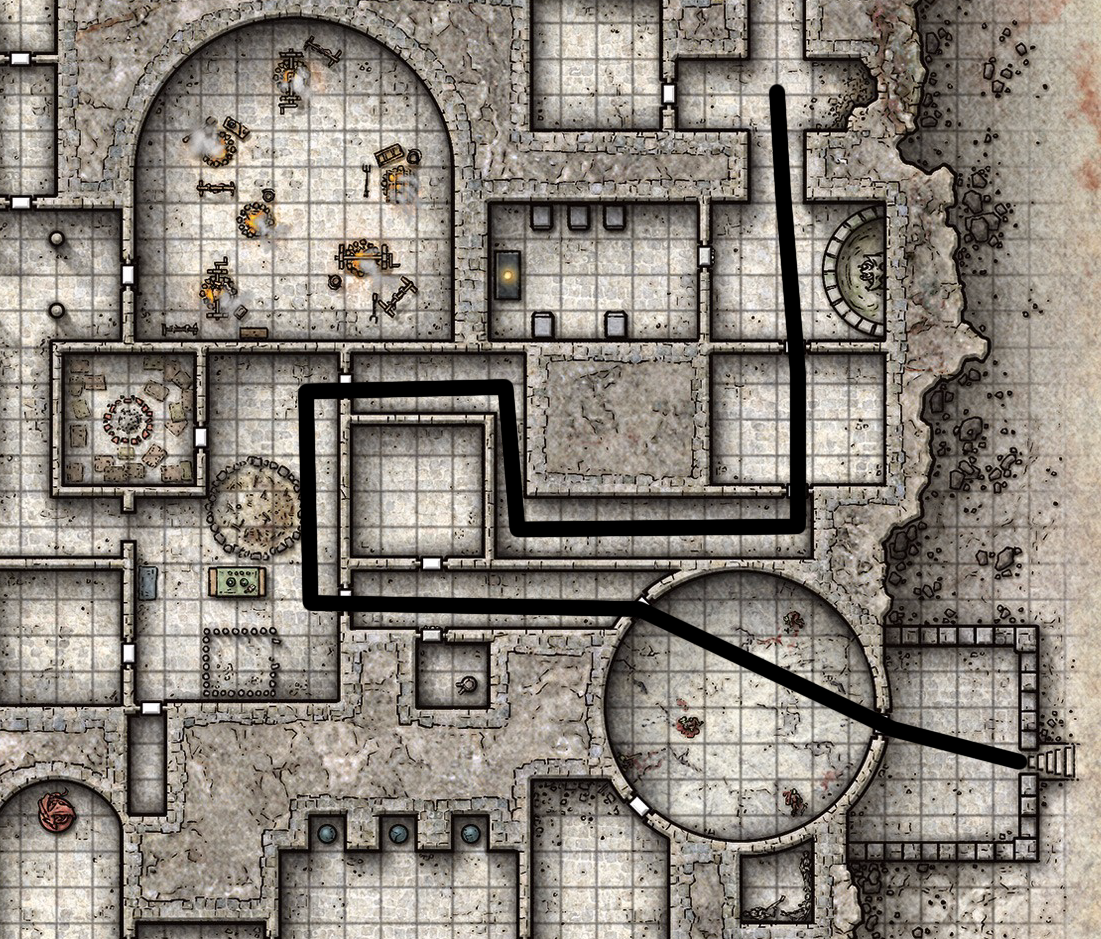
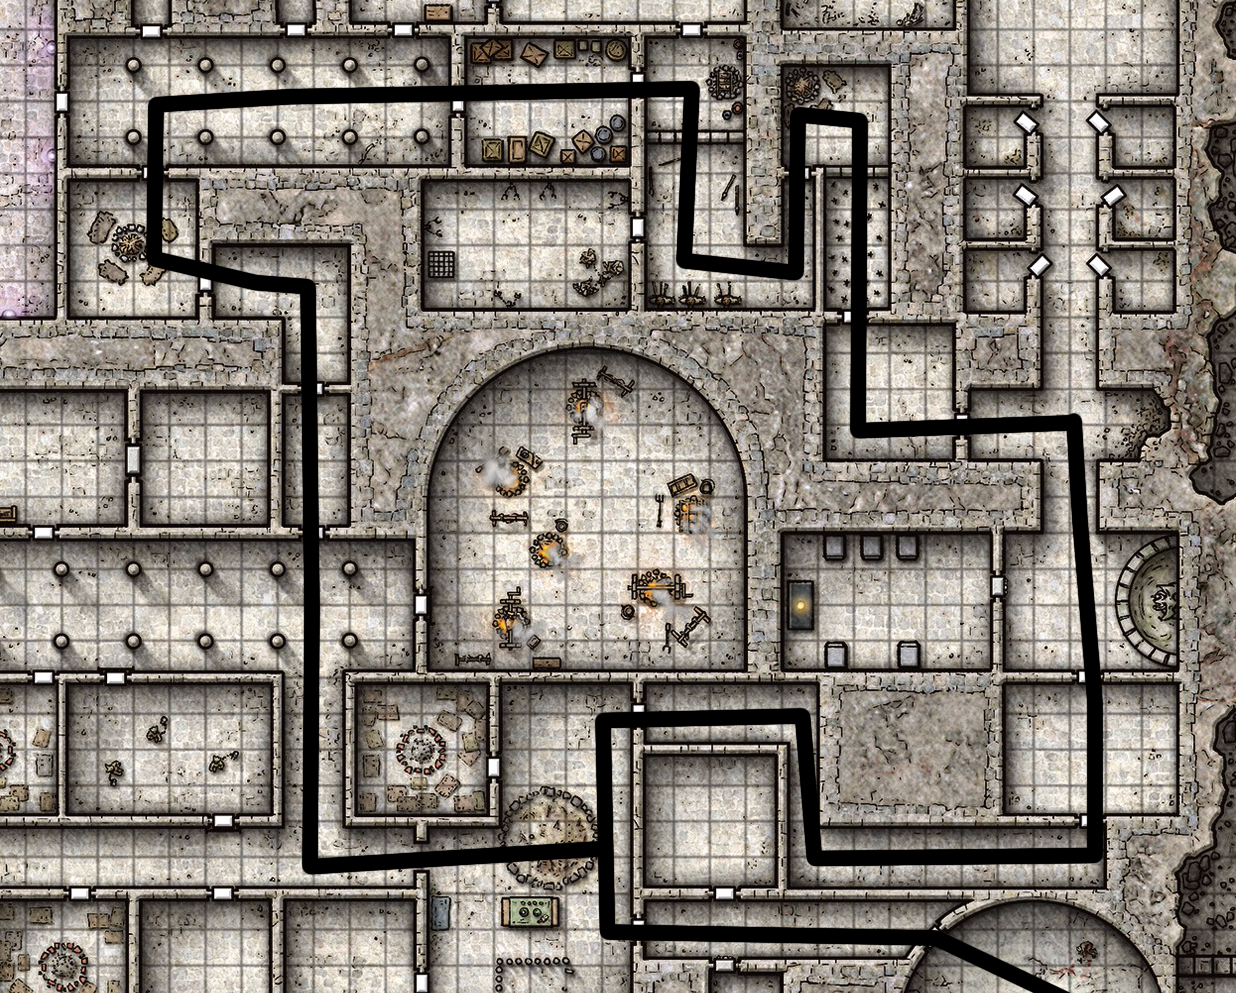
The first principle of making a Melan diagram is to eliminate all the irrelevant twists-and-turns on the map. For example, consider this path through the Sunless Citadel:

Sunless Citadel - Entrance Path

It looks really interesting, right? All kinds of turns. You went through multiple doors. You even reversed direction a couple of times!

But as far as the Melan diagram is concerned, this is a straight line: Following a corridor when it makes a turn isn’t a meaningful navigational choice. Same thing for going through a door if there’s no other exit from the room.

FORK THE PATH

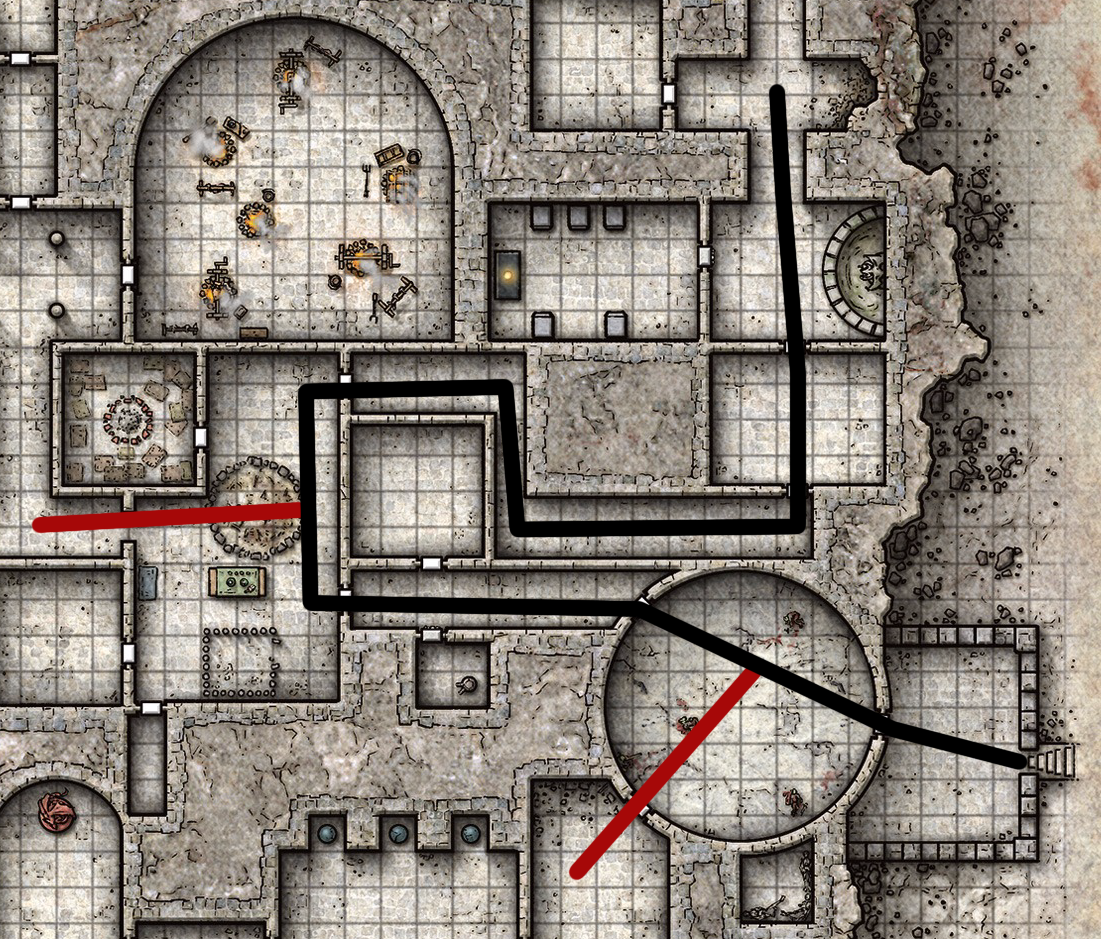
“But wait a minute!” you say. “In following this path the PCs did make choices! For example, in that first circular room the PCs had the choice of two different doors!”

You’re absolutely right! This is exactly what a Melan diagram is interested in looking at. On this little chunk of the Sunless Citadel, there are two forking paths:

Sunless Citadel - Entrance path with first two forks

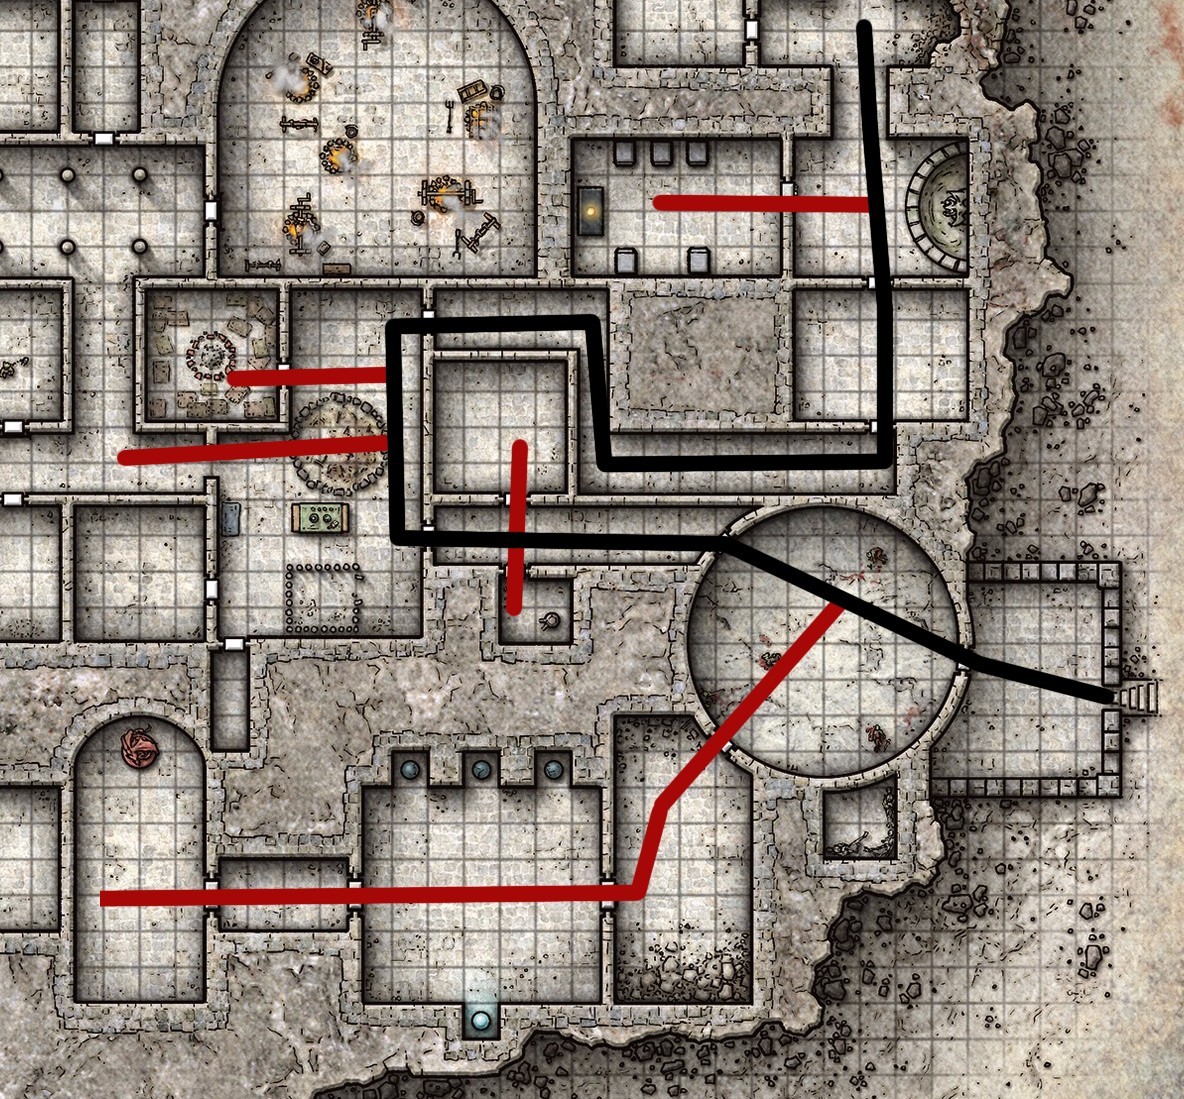
And so, on a Melan diagram, this section would look like this:

Sunless Citadel - Melan Diagram: Entrance path with first two forks

The black path is depicted as a straight line and the alternate paths are shown in red. (Melan diagrams typically aren’t color-coded like this since all paths are equally valid. We’re using the colors here for clarity.)

The length of each branch of the diagram, it should be noted, is roughly proportional to its length in the dungeon. (I don’t carefully measure this or anything, but you could if you wanted to.) In this case I’m showing them proportional per the section of map we’re looking at. (As we’ll see in a moment, these particular spurs are actually much longer.)

ELIMINATE SIDE CHAMBERS

“Wait another minute!” you cry. “I can see other doors that you’re ignoring!”

The second principle of a Melan diagram is that we are going to eliminate all paths that are only one chamber deep.

So we could take this chunk of dungeon:

Sunless Citadel - Entrance path with minor forks

And draw a diagram like this:

Sunless Citadel - Melan Diagram: Entrance path with minor forks

But the reason we don’t do this is because such a diagram becomes meaninglessly noisy. Furthermore, these side chambers largely don’t represent meaningful navigational choices on the macro-level of the entire dungeon: You might choose to bypass such doors, but if you open one of them the only “choice” is to go back to the path you were already following.

Note that you can actually see this when looking at the diagram: It’s immediately apparent that all those little spurs don’t really “go” anywhere.

(You can argue that the same thing is technically true of longer sidetracks, but in practice these longer paths tend to be more meaningful to the overall structure of a dungeon and the experience of playing it. With that being said, there’s nothing magically relevant about one room vs. two rooms and in larger dungeons you may find different thresholds for what constitutes a “meaningful sidetrack” to be useful.)

You’ll similarly want to eliminate very short dead end hallways if they exist.

DIAGRAMMATIC TURNS

“Hey! What’s with that turn in your diagram? I thought you said we weren’t mapping that sort of thing!”

That’s true. In practice, however, Melan diagrams will introduce superfluous ninety-degree turns in order to keep the diagrams relatively compact or to conveniently make room for other paths.

So if you see a turn on a Melan diagram that doesn’t have a second path branching from it, you’ll know that it’s purely cosmetic. It doesn’t actually reflect a “turn” in the dungeon; and, although the turn in our current example sort of resembles a turn in the dungeon itself, such turns on the diagram may be present even when there are no turns in the corresponding dungeon tunnel.

ELIMINATE FAKE LOOPS

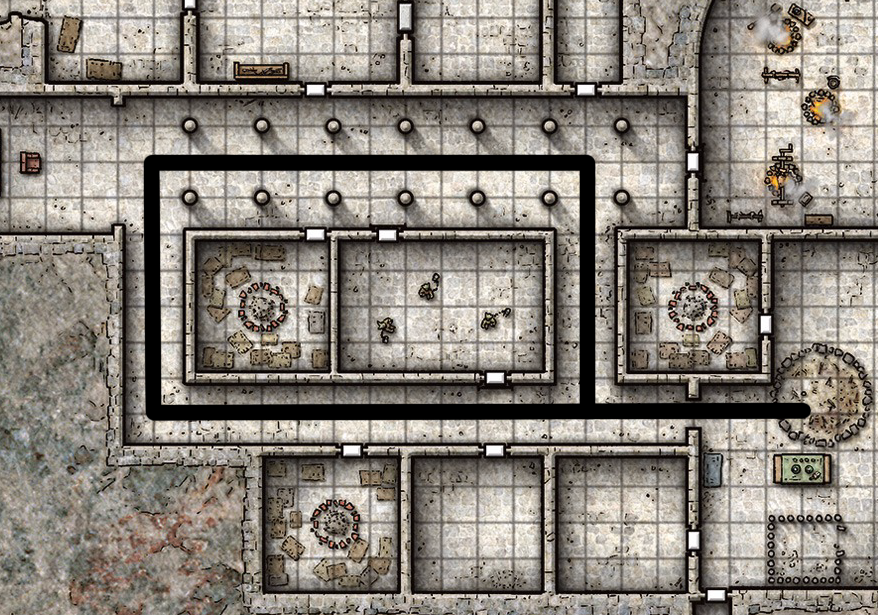
Dungeon paths will, of course, form loops. In fact, a well-designed, xandered dungeon will probably feature LOTS of loops. Ignoring routes that branch off from the loop for the moment, here’s one from the Sunless Citadel:

Sunless Citadel - Looping path on the first level of the dungeon

On the Melan diagram, it would look like this:

Sunless Citadel - Melan Diagram: Loop

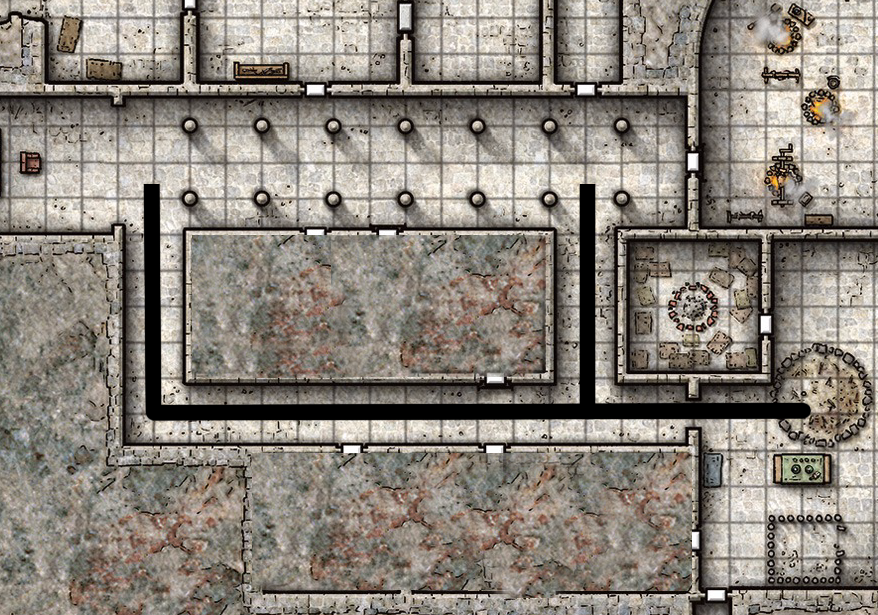
But what about this loop?

Sunless Citadel: Minor loop through Kobolds

Well, on a Melan diagram this would actually be depicted as a straight line. To understand why, let’s start by eliminating the side chambers:

Sunless Citadel: Kobold fork with side chambers eliminated

Viewed like this, you can clearly see that this is not a true navigational loop: It’s a fake fork. The navigational “choice” is a false one. After eliminating the side chambers, both paths lead immediately to the exact same place.

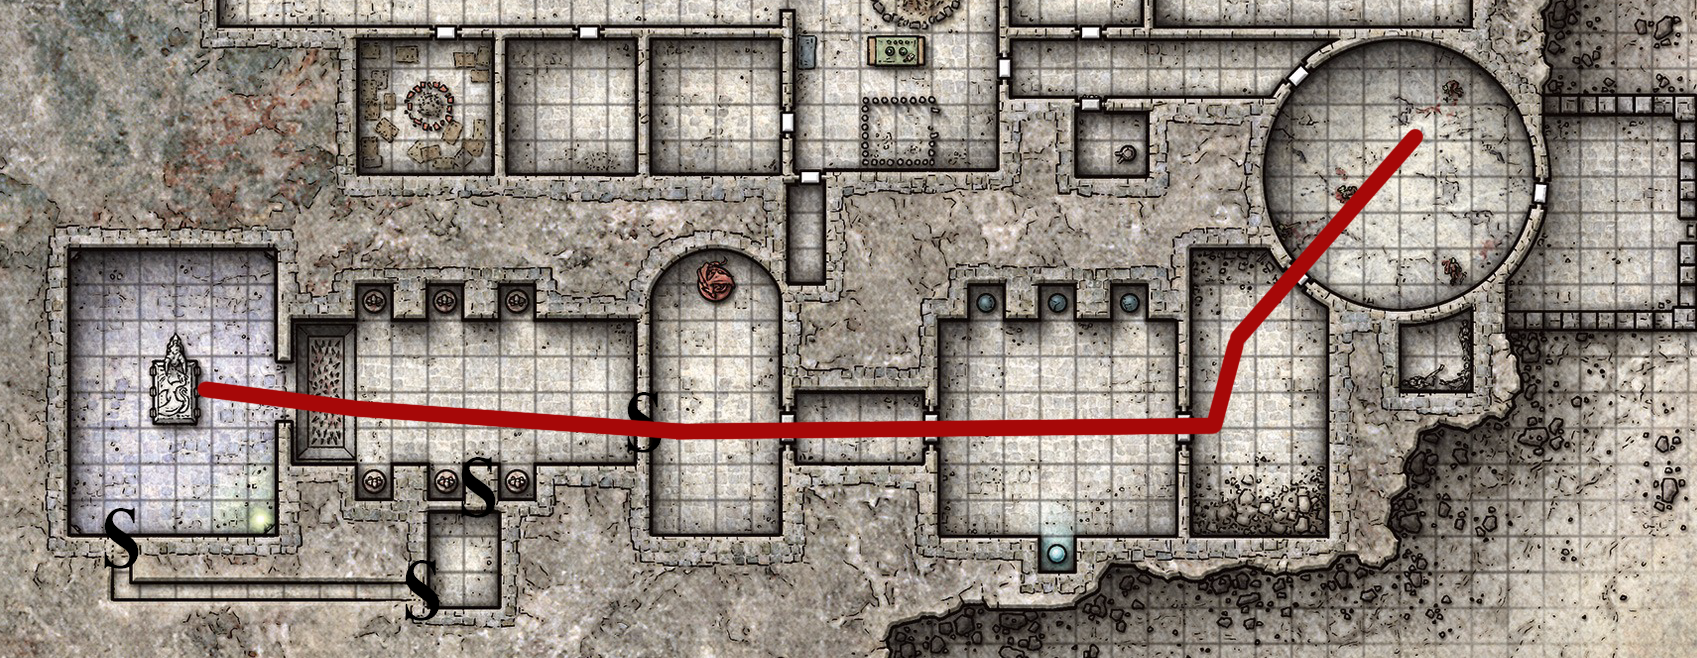
SECRET PATHS

Sunless Citadel: Secret door to the crypts

When a path like this one goes through a secret door, this is indicated with a dotted line on the Melan diagram:

Sunless Citadel - Melan Diagram: Secret door to the Crypt

(Note that the other secret doors are not represented here because they lead to side chambers, which are eliminated regardless.)

An area is ONLY depicted as secret on the Melan diagram if the ONLY way of reaching that area is secret. However, even a secret door that leads directly from one “public” area to another would still be shown on the diagram as a short dotted line. (The secret path exists and is significant, even if the “length” of the path is only the width of the secret door itself, so to speak.)

LEVEL CONNECTIONS

The last functional element of a Melan diagram are the connections between levels. When a path goes from one level of the dungeon to another (by stair, elevator, sloping ramp, teleporter, or whatever), this is indicated by a break in the line with terminating lines on either side:

Melan Diagram: Level connection

OTHER ELEMENTS

Melan diagrams may also include labels (e.g., “Goblins” or “Secret Lab” or “Teleportation Trap”). These are technically non-functional parts of the diagram, but can be useful to help readers orient themselves.

Some Melan diagrams of long, linear dungeons will be split into multiple columns, with the connection between the columns being indicated by a dotted line with an arrow.  (This is sometimes confused for a secret door, but it’s really just a tool for keeping the diagram relatively compact.)

CONCLUSION

If you’re reading this and still scratching your head over what the point of any of this stuff is supposed to be or what relevance the elements depicted by a Melan diagram are supposed to have, I’m going to do a full loop here and refer you back to Xandering the Dungeon, which is designed as an introduction to the sort of basic dungeon design techniques that the diagrams are designed to demonstrate.

Back to Xandering the Dungeon

Roger the GS over at Roles, Rules, & Rolls posted some interesting thoughts regarding the use of the techniques I described in Xandering the Dungeon in small, one-shot scenarios. This, in turn, prompted me to ruminate on the application of xandering techniques on small scales.

Xandering isn’t a cure-all. But, in my experience, it does scale to almost any size and it’s almost always useful to at least consider xandering as a potential tool even if you ultimately decide against it. (I might even go so far as to say that you should default to it unless you have a really good reason not to. In no small part because, as I mentioned in the original essay, this is actually the way the real world works 99 times out of 100.)

To demonstrate what I mean about using xandering techniques at any scale, let me give you an example at an extremely small scale to emphasize the point: A two-room “dungeon” that I just got done designing for an Eclipse Phase scenario.

The “dungeon” in this case is actually a warehouse: The first room is a small security office. The second room is the big warehouse floor itself. Since it’s only two rooms, there’s really no way that we could apply xandering techniques, right?

(Spoilers: That’s a rhetorical question.)

Let’s take a look at a few xandering techniques:

First, multiple entrances: Skylight(s) on the roof of the warehouse. The loading dock. A door leading into the security office. (From a tactical standpoint, this is infinitely more interesting than just having a single door leading into the building.)

Second, multiple paths: Rather than just having one connector between the security office and the warehouse, what if we include several? There’s the door. A ladder leading to a trapdoor in the roof that gives you access to the skylights. Let’s toss in a trapdoor leading to a crawlspace that’s used for electrical wiring; it’ll let you pop up right in the middle of the warehouse (or maybe in multiple places). (If that crawlspace is actually a tunnel that leads over to the exterior generator we could also add that as yet another entrance to the complex.)

That crawlspace would also qualify as a secret or unusual path (another of our xandering techniques).

This obviously isn’t the only way to design a warehouse. (It might even be overkill.) But it does demonstrate how you can use xandering techniques even on the tiniest scales can organically create interesting tactical and strategic choices.

Back to Xandering the Dungeon

Go to Part 1: Dungeon Level Connections

COMBO PLATTER: Elevators that lead to underground rivers. Ladders that take you through imperceptible teleportation effects. Stairs that end in a sloping passage.

Such combinations of multiple level connector types can be as complicated as you’d like: For example, an elevator shaft that has been blocked by the adamantine webs of a lavarach. This requires the PCs to climb down the shaft (like a chute), clear the webs (like a collapsed tunnel), and then reactivate the elevator mechanism (allowing it to be used as such in the future).

ONE CONNECTOR, MULTIPLE LEVELS: An elevator can stop at several floors. A flight of stairs can provide exits to many different levels. A single room might contain multiple teleportation devices, or a single teleportation device might lead to different locations at different times of the day.

INVISIBLE TRANSITIONS: The PCs swap levels without realizing that it’s happened. These can be the result of mundane effects (like a gently sloping passage), but are perhaps more frequently magical in nature (imperceptible teleportation effects). In dungeons rich with minor elevation shifts, the PCs may even baffle themselves by mistaking an obvious level connector (like a staircase) for a minor adjustment in the elevation on the same level.

FALSE STAIRS: In their section on “Tricks and Traps”, Arneson and Gygax refer to “false stairs” without any real explanation of what they mean. I’m going to use the phrase to mean the opposite of invisible transitions: False stairs are features of the dungeon which lead the players to believe they have moved to a new level of the dungeon when they haven’t actually done so. Minor elevation shifts frequently fall into this category, but so can more deliberate deceptions. (For example, an elevator wrapped in illusions to make the PCs believe they’re descending, but which actually releases them back onto the same level they started on.)

MISLEADING STAIRS: Connectors which initially look as if they’ll take you in one direction before actually heading in the opposite direction. For example, a flight of stairs that go up one level to a sloping passage that goes back down two levels.

ONE-WAY PATHS: Teleportation devices are perhaps the most common example of one-way paths, but more mundane traps and hazards can also have the same result. For example, a flight of stairs that turns into a slide. Or an underground river that sweeps PCs away in a torrential current.

REMOTE ACTIVATION: A path that only becomes available once it has been activated from some remote location. For example, a lever which opens a stone panel and provides access to a staircase. Or a teleportation system which must be properly aligned.

Remote activation also implies the possibility for remote deactivation, either stranding the PCs with no possibility of retreat or removing familiar paths that were taken in the past.

FURTHER READING
Node-Based Scenario Design
Hexcrawls
Gamemastery 101

This was originally written as part of the main sequence for the “Xandering the Dungeon” essay, but it rapidly grew to a size which proved disruptive to the essay as a whole. Nevertheless, I think it remains a useful resource and so I present it here as a separate addendum.

Many of the Xandering Techniques deal with elaborating, enumerating, or complicating the transitions between levels. So let’s take a moment to consider the many different ways in which levels can be connected to each other.

STAIRS: The very first level connector mentioned in all of D&D. They feature prominently on the “Sample Cross Section of Levels” dungeon map provided on page 3 of Volume 3: The Underworld & Wilderness Adventures in the original 1974 ruleset. (A map which also featured sub-levels, divided levels, multiple entrances, and elevation shifts.)

SLOPES: Similar to stairs, but without the stairs. Sounds simple enough, but in the absence of stairs long, gentle slopes can transition PCs between levels without them realizing that they’ve shifted elevation.

CHUTES: Vertical passages that cannot be traversed on foot. They require either climbing or flight.

LADDERS: Like a chute, but with a climbing aid already onsite. Variants of the ladder include ropes, poles, pre-driven pitons, and antigravity fields.

TRAPDOORS: Trapdoors may lead to stairs, slopes, chutes, or ladders, but they may also taunt PCs from the middle of a ceiling. Or drop down directly into a lower chamber.

WINDOWS: In Dark Tower, Jaquays gives us a window looking down into a lower level of the dungeon (with something looking back up at the PCs). One could also imagine a vertical dungeon in which PCs could fly up to a higher level and find an alternative entrance by smashing through a more traditional window.

TELEPORTS: Teleportation effects allow for rapid transit through larger dungeon complexes, but also have the potential to leave PCs disoriented until they can re-orient themselves at the other end. Teleports can be either one-way or two-way.

TRAPS: Pit traps that drop PCs into an underground river three levels below. One-way teleportation traps that leave them unexpectedly stranded in a far corner of the dungeon (or staring at a familiar entrance). Greased slides that send them shooting down to lower levels. Moving walls that shove them off subterranean cliffs.

Traps that force the PCs to enter a new level are usually designed to be one-way trips. But sometimes resourceful characters will find a way to reverse the journey nonetheless.

MULTI-LEVEL CHAMBERS: Large, vertical chambers can contain entrances leading to different levels within the dungeon. For example, one might imagine subterranean gorges and cliffs. Or an obsidian pyramid squatting in a massive cavern, its steps leading to a burial chamber connecting to an upper level.

ELEVATORS: In their most basic configuration elevators are chutes with a self-propelling means of passage, but taking a page from Star Trek’s turbolifts and Wonka’s Chocolate Factory suggests that elevators don’t always have to be limited to the vertical plane. Others may require the PCs to provide the means of propulsion. (A grinding wheel? Magical fuel? Blood sacrifices? Mystic keys?)

Gygax and Arneson also refer us to “sinking rooms”, reminding us that fantasy elevators don’t need to feel at home in the Empire State Building. And may not exist to serve the interests or comforts of their passengers.

BASKET AND PULLEY: These are similar to elevators in their operation, but have the distinction of allowing their passengers to directly observe their surroundings for the duration of their trip. (The small size of a “basket” might also serve to suggest that entire adventuring parties may not be able to take the journey at the same time.)

ETHEREAL TRAVEL: Sections of the dungeon in which normally solid obstacles (like the floor) can be moved through by way of the Ethereal Plane (or similarly transdimensional/non-Euclidian egress).

RIVERS: A natural variant of the slope. If the river runs flush with the walls, however, getting back upstream may require some tricky swimming. (And if it runs flush with the ceiling, navigating the river may require some deep breaths.)

UNDERWATER: In the real world, the fluid level in any connected system has to be the same, which means that underwater journeys will be most useful in moving PCs across divided levels, nested levels, or to sub-levels on the same horizontal plane of the dungeon.

However, magic, alchemy, and steampunk technology can provide any number of airlocks and semi-permeable barriers allowing for underwater dives to the depths of an otherwise dry dungeon.

Or possibly the PCs will be responsible for flooding those lower levels. (In a minor way if they just swum down a stagnant, submerged shaft. Or in a major way if they dump an entire subterranean lake into the 8th level of the dungeon.)

COLLAPSED PASSAGES: A variant on any chute, stair, shaft, slope, or passage. Or, rather, where there used to be a chute, stair, shaft, slope, or passage. Its former existence may be obvious or it may be obfuscated, but it’s going to require some excavation before the passage will be usable again.

A common variant on this theme is the doorway which has been deliberately bricked up or plastered over. It’s not unusual for such passages to be obvious from one side but not from the other.

TRANSPORT: Think Charon on the River Styx. Harpies willing to carry women (or men disguised as women, their eyesight is very poor) up a shaft. A PC being sucked bodily into a fist-sized ruby which is then carried aloft by a silver raven. The form has an essentially limitless variety, but the basic idea is that the PCs are being transported through the agency of an NPC or monster.

BEING SWALLOWED: “The cave is collapsing.” “This is no cave.” Esophageal jaunts to the lower reaches of the dungeon should probably be used sparingly, but will certainly be memorable when they are employed. (The vomitous method of ascension is less pleasant, but no less memorable.)

BRUTE FORCE: Tunneling through walls using a stone shape spell. Levitating or flying through “unreachable” vertical passages. Using gaseous form to traverse “impassable” air vents. Blind or scry-prepped teleports. Casting ethereal jaunt to phase through solid stone. Basically this is a catch-all for PCs finding paths where no paths were meant to be. This isn’t really something you can plan for (although you might be able to encourage it by giving the PCs maps as part of their treasure), but you should try to keep in mind that they’re not cheating when they do it. (An attitude which may be easier to hold onto if the dungeon already has multiple paths to success designed into its non-linear structure.)

Part 2: Tips and Tricks

Archives

Recent Posts


Recent Comments

Copyright © The Alexandrian. All rights reserved.