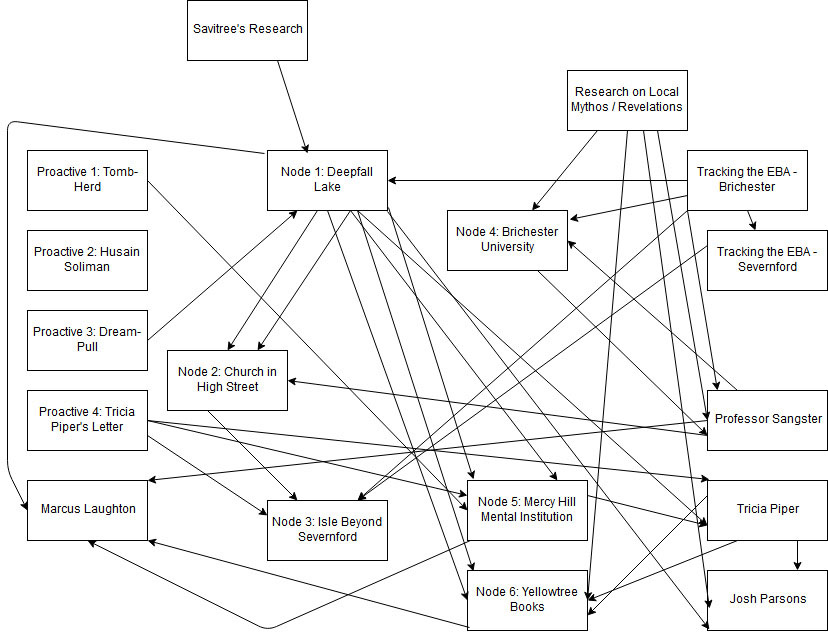
The Alexandrian

Revelation List - Eternal Lies: Severn Valley (Blank)

SPOILER WARNING!

If you click the image above, you will see the entire scenario structure for the Severn Valley scenario I designed for the Alexandrian Remix of the Eternal Lies campaign. If you do not wish to be spoiled on this scenario, DO NOT CLICK THE IMAGE. Its specific content is not essential for understanding the rest of this essay, and this essay contains no other spoilers for the Severn Valley scenario or the Eternal Lies campaign.

But I did want to show an example of an actual scenario structure that’s been used in actual play, and not just some deliberately over-the-top example.

What this image is specifically showing is a visual representation of the node structure of the Severn Valley scenario. If you’ve read Node-Based Scenario Design, you may recall that the essay features a number of explanatory diagrams that look like this:

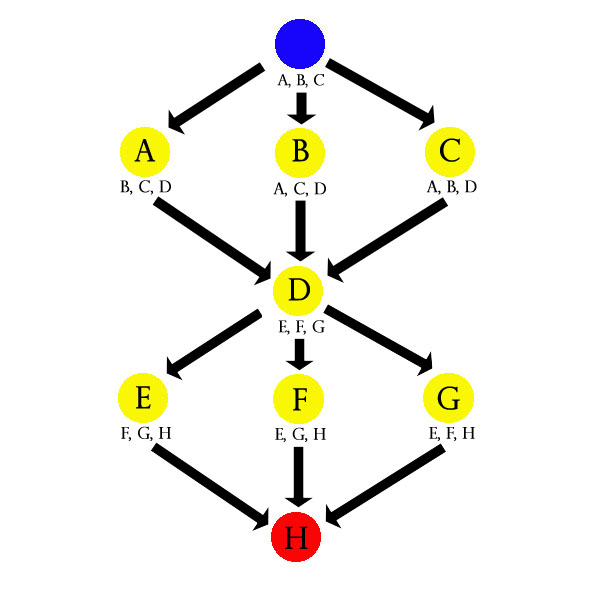
This has, for better or worse, created the misapprehension that I design scenarios using this visual motif. This is, almost without exception, not the case. (I do occasionally, during the outline stage for certain scenarios, sketch out a high-level organization to clarify the location of funnels.) And the primary reason I don’t bother with visual node diagramming is, in fact, overloaded diagrams like the one at the top of this post: That’s the structure of what I would consider a medium-complexity scenario, and the visual diagram for it is just noise… I can’t really process any meaningful data out of it and I’m the one who wrote it.

So how do I organize these scenarios?

Text-based revelation lists.

I discuss revelation lists in the Three Clue Rule: For each conclusion that you want the PCs to make, list the clues you’re including in the scenario for it. This functions as a checklist which allows you to track their progress and (importantly!) a diagnostic tool during actual play to make sure they’re on track.

In my scenarios, they look like this:

SCENE 1: ELVEN CORPSES

– The Duke’s Map (Scenario Hook)
– Encountering Mutilated Corpses (Adventure 3:The Old Forest)
– Reports of Mutilated Corpses (Adventure 2 – Scene 4)

SCENE 2: THE BLACK TREE

– Tracking Drow Scouts (Proactive 1: Drow Scouts / Scene 1)
– Map to the Black Tree (Scene 3: The Drow Camp)
– Elven Retaliation Scrolls (Proactive 2: Elven Retaliation Squad)

SCENE 3: THE DROW CAMP

– Tracking Drow Scouts (Proactive 1: Drow Scouts)
– Elven Retaliation Scrolls (Proactive 2: Elven Retaliation Squad)
– Map of the Old Forest (Scene 4: Drow Citadel)
– Questioning Prisoners (Scene 2: The Black Tree)

SCENE 4: DROW CITADEL

– Questioning Prisoners (Scene 2: The Black Tree)
– Subverting the Crystal Ball (Scene 3: The Drow Camp)
– Following the Slave Train (Scene 3: The Drow Camp)

CLUE LIST vs. REVELATION LIST

There’s basically two ways to organize lists like this: You can list all the clues a node contains or you can list all the clues that point to the node. For the sake of clearer discussion, I’m going to refer to the latter as a revelation list (like the sample above) and to the former as a clue list.

I’ll often use a clue list when outlining or developing a scenario. After coming up with the “big concept” for a scenario, my design process generally consists of writing down cool ideas for various nodes. Then I’ll think about what kind of information a node might naturally contain to point at the other nodes. For example, I might jot down:

SCENE 2: THE BLACK TREE

– Questioning Prisoners (to the Drow Citadel)
– Questioning Prisoners (to the Drow Camp)
– Drow Scouts might show up here (track to Scene 1 or Scene 3)

Once I’ve done that for all the nodes, I’ll do a quick audit for each node to make sure I’ve included three clues. If I haven’t, I’ll get proactive figuring out how I can creatively include more clues. As I actually write up the full version of each node, however, I’ll assemble the revelation list: Each clue I include in the full write-up gets listed in the revelation list under the node it’s pointing to (with a cross-reference back to where it’s found).

This allows me to double-check my design process to make sure I’ve got all the clues I need. But it’s also important because, when it comes time to actually run the scenario, it’s the revelation list that’s essential. (I’ll have long since thrown out the clue list.)

(1) I generally don’t care if the PCs have missed the clues in their current location, but I do care intensely about whether or not they’ve missed all the clues that would enable them to find a particular node. That’s what I need to track during actual game play, and it’s also the information that’s more difficult to glean on-the-fly without a properly organized list because…

(2) The information about which clues exist in a given node is already encoded in the text. The clues are listed in the description of the node, right? Because that’s where they are.

In terms of grokking how a particular scenario “works”, though, the revelation list can feel confusing if you’re not familiar with it. For some people, it’s simply more intuitive to look at the list of clues a node contains and then follow where they lead. (This is, after all, how the PCs will conceptually work their way through the scenario.) This is one reason why, when developing the design standard for Infinity scenarios of this type, I included the requirement for both a Revelation List and an Operational Summary (which would explain the sort of “guiding principle” of how the scenario was supposed to function in play).

You don’t necessarily need the Operational Summary, though. You can get the same basic effect from a revelation list: You just need to work backwards.

Look at a node and ask, “How would the PCs get there?” In other words, follow one of the clues on the revelation list back to its source node. Then repeat the process there.

For example, how would the PCs get to the Drow Citadel in the scenario above? Well, let’s pick a random clue: Following the Slave Train from Scene 3: The Drow Camp. So we look at Scene 3 and pick a random node there: Tracking Drow Scouts from their proactive scene. Since that’s a proactive scene, it’s essentially a scenario origin point. It’s the trail head, so to speak, and from the trail we’ve followed we can see that “tracking bad guys through the Old Forest” is one approach to the scenario.

Do it again: You can also get to the Drow Citadel by questioning prisoners from Scene 2: The Black Tree. You can get to the Black Tree by talking to (or stealing intelligence from) the Elven retaliation squads operating in the area. So here we have a path that follows a trail of demihuman misery.

Do this two or three times (or more for more complex scenarios) and you’ll get a pretty good feel for the contours of the scenario structure.

IN THE SHADOW OF THE SPIRE

Session 16C: Black Centurions

Serenity - I'm a Leaf on the Wind

And then it sublimated away into the black cloud of acid. Agnarr stumbled back. He tried to whirl to face the last remaining centurion. But the pain was too much. His legs failed him. He fell heavily to the floor and, as he lost consciousness, there was only one thought in his mind:

He had failed.

Twice during the course of Session 16 – and in relatively quick succession – the PCs ended up in very bad positions during a fight. Positions which, if things had gone a little differently, could have very easily ended up with all of them dead.

As a GM there’s going to come a moment when you’re looking at the evolving situation on the table and you’re looking at the stat blocks of the adversaries behind your screen and you’re going to think to yourself, “Oh shit. They might all die here.” Often the players themselves will realize their peril. The tension is going to ratchet up. The stakes riding on every action and every die roll are going to skyrocket. Everyone’s focus is going to tunnel in on survival. On how the day can be won.

And you, as the GM, are going to have to make a choice: Do you take the TPK gamble? Or do you pull back from the moment – fudge your dice rolls, pull your punches, nerf your damage rolls and health totals?

And speaking from years of experience, here’s what I have to say: Take the gamble.

Take the gamble every single time.

Because, in my experience, at least nineteen times out of twenty, the risk you’re seeing on the horizon won’t come to pass: The players will figure out a way to either save the day or escape their certain doom. Often you (and they) will be delighted to discover it’s something you never could have predicted! (We saw that back in Session 13 with the Tale of Itarek, right?)

And even when that twentieth time crops up and the party goes down, you’ll often discover that a total combat loss is not the same thing as a total party kill. That survival is possible without any nerfing or fudging or pulling of punches. (And we saw that in Session 7, right?)

Because the other option is to look at that incredible intensity; that focused passion; that pure adrenaline that’s pumping at the table… and choose to deflate it. To stare down the barrel of the impending TPK and lose your nerve.

Top Gun - It's Not Good. It Doesn't Look Good.

And I get it. It’s tough being under that kind of pressure. Round after round grinding away at you. You want to blink. You want to look away. You want a release.

But here’s the deal: These are the moments that make a campaign. The investment that happens in these kinds of moments – when the players are completely engage; when everyone is emotionally involved in what this very next dice roll could bring – is what makes a campaign come alive, and that investment will transition into every other aspect of the campaign. So buckle up and bring it home.

And to be clear, eminent TPKs aren’t the only way to achieve these heightened moments. But when you cheat in these moments – when you drain the tension instead of bringing it to a glorious crescendo of relief – it will have the exact opposite effect: It will poison the well. It will taint every other moment of the campaign.

“But I’ll just lie to the players and they’ll never know!”

Tell yourself whatever you need to, but what I’m telling you right now is that this is a gamble that’s even bigger than the TPK gamble. And it’s not a gamble that I’m willing to take: The payoff is nothing and the loss can be everything. Because once you lose the trust of the table – once your players no longer believe that what’s happening is really happening – it’s almost impossible to regain, and you will lose these rare and precious moments of magic forever.

But… they’ll never know… right?

Oh, it’s quite likely they’ll never say anything. But they’ll know. Anyone who’s spent a decent amount of time on the player’s side of the screen has experienced this truism. You might fool them once. You might fool them twice. But the odds get longer every time and eventually you’re going to lose your gamble. And unlike the TPK gamble, it’s one you only get to lose once.

A FEW PROVISOS, A COUPLE OF QUID PRO QUOS

Sometimes, of course, you take the TPK gamble and… the TPK happens. I’m not trying to pretend otherwise. I’ve had campaigns end that way, and it’s a real punch to the gut. But some of the best stories from my tables are the TPKs. There can be both a grace and a greatness in failure.

With that being said, games where death is irreversible have a much lower threshold of tolerance for this. You can lose five out of six D&D characters and the party will be back up and running 15 minutes later. Heck, you can actually have a TPK in Eclipse Phase and have the whole group back in play 5 minutes later. Take out a Trail of Cthulhu character, on the other hand, and that’s all she wrote.

So, that’s the first proviso: Know where your system’s danger zone is. The risk of irreversible consequences in D&D is different from Eclipse Phase is different from Trail of Cthulhu.

(It should be noted that this is why I prefer systems with a nice meaty barrier between “out of combat” and “totally dead”.)

Here’s the second proviso: If you’ve legitimately screwed up as the GM – you mucked up the rules; you used the wrong stat block; whatever – that’s a whole different kettle of fish. My recommendation here is to just come clean.

“Look, folks, I made a major mistake here and the consequences are looking irreversible. We need to fix it before it gets that far.”

You’re still going to lose that moment; the tension will artificially deflate and that’s going to be an anti-climactic disappointment. But (a) you won’t be taking big gambles at a rigged table and (b) you will keep the trust of the table. And that’s priceless. That trust is what everything else is built on.

Ptolus - In the Shadow of the Spire
IN THE SHADOW OF THE SPIRE

SESSION 16C: THE BLACK CENTURIONS

January 19th, 2008
The 6th Day of Kadal in the 790th Year of the Seyrunian Dynasty

Congratulations rained down on Dominic. Agnarr pounded him on the back with his blood-slicked hand. (Prompting Dominic to give him something of an uncertain look.)

With jubilance still in the air, Tee went back to work on the door. She quickly had it unlocked and Agnarr stepped forward to swing it open.

Beyond the door there was, as they had suspected, a short hallway that emptied out into the room with the pool. (The glowgems from that large chamber were casting their eery silvery light down the length of the hall.) But there were also four other hallways heading off in perpendicular directions.

They proceeded cautiously: Heading to the first intersection, Tee looked both left and right. She discovered two antechambers similar to those in which they had found the black cords and broken machinery… only these were occupied.

In each of the small rooms, a humanoid construct of pitch black metal was suspended from an elaborate half-cocoon of complicated machinery that hung from the wall. Each construct was utterly featureless – their faces flat black planes. And, Tee realized, the constructs were actually hovering inside their cocoons – the only connection a slack black cord that plugged into the back of their necks.

Ranthir had never seen anything like them. In fact, even the metal from which they were crafted defied his ken. He moved into the room on the left to take a closer look. Tee and Agnarr positioned themselves in the room across the hall, keeping a nervous eye on the construct there. Elestra and Tor stayed back in the torture chamber, but Dominic came down and stood in the hall between the two rooms – looking towards each in turn.

Unfortunately, no one went to check on the next set of hallways. There had been a cursory discussion, but the decision was made that they should make sure that these first two chambers were secure before attempting to advance. But the next hallway was only ten feet away, and so there was little or no warning when one of the black centurions suddenly raced around the corner with seemingly preternatural and silent speed.

Dominic caught the flash of movement from the corner of his eye and whirled in time to see the centurion’s arm transforming – literally melding itself into a long, pointed spear. He stumbled back and opened his mouth to cry out, but then the creature was upon him. The spear flashed out towards his abdomen, and Dominic only barely managed to turn aside so that the blow ripped into his flesh instead of disemboweling him completely.

Dominic retreated. The centurion pursued, its arm transforming again – this time into a sword that hacked down mercilessly towards Dominic’s head. Dominic cringed before the blow— Read more »

Blades in the Dark - System Cheat Sheet

(click here for PDF)

Blades in the Dark is a really cool little game with three major claims to fame:

  • A detailed system for running and developing a criminal crew.
  • An innovative system for running heist scenarios using a combination of flashbacks and an “engagement roll”.
  • A very unique approach to framing action resolution through a combination of setting position and level of effect.

As with my other cheat sheets, this cheat sheet is designed to summarize all of the rules for running the game — from Action Roll resolutions to Downtime activities. It is not, however, designed to be a quick start packet: If you want to learn how to play Blades in the Dark, you’ll want to read through the core rulebook. These cheat sheets are a long-term resource for both GMs and players, and can serve as a great tool for experienced players teaching newcomers, but it’s a cheat sheet, not a textbook.

These cheat sheets also do not include what I refer to as “character option chunks” (for reasons discussed here). You won’t find the rules for character creation, the character playbooks, or the crew sheets here. (Although you can find many of those resources at bladesinthedark.com.)

VERSION 3

My normal procedure for creating these cheat sheets is to (a) write them up, (b) use them in actual play for several sessions, (c) iteratively revise them as necessary, and only then (d) share them here on the Alexandrian. For Blades in the Dark, however, I posted a picture to Twitter of my table set-up for the game:

Blades in the Dark - Ready or Play

The sexy map (printed by ABC Sign & Graphic) drew a lot of attention, and the prominent positioning of the cheat sheets unexpectedly created a lot of demand for them. This sort of short-circuited my normal process and, after using them in only a single session, I rushed them up onto the site.

Since that time, however, I’ve used the sheets in almost a dozen more sessions and it became clear that there were not only a number of errors, but also some significant shortcomings with them. These new versions of the sheets, therefore, have reorganized the existing material to configure it more usefully, but also added several significant new chunks of information:

  • Duskvol District Modifiers: Getting these in front of the players has a really tangible effect on how they organize their affairs and run their scores.
  • Glossary of Strange Forces: I found that our group was getting a little too “fantasy generic” in my handling of the setting, so I wanted to refocus myself on the very specific “demonic steampunk ghost apocalypse” vibe of the game.
  • Action Ratings – Expanded Reference: I’d originally decided not to include this material and went with my normal “list of attributes/skills” method for cheat sheets. But the clear definition of what each action rating is for and, even more importantly, where those action ratings weakly overlap is actually really crucial to running Blades in the Dark correctly. During play we were constantly reaching for the rulebook to look this stuff up, which is exactly the material you want in the cheat sheet.

If you still want the original versions of these cheat sheets, they can still be found here.

HOW I USE THEM

I usually keep a copy of my system cheat sheets behind my GM screen for quick reference and I also place a half dozen copies in the center of the table for the players to grab as needed. The information included is meant to be as comprehensive as possible; although rulebooks are also available, my goal is to minimize the amount of time people spend referencing the rulebook: Finding something in the 8 pages of the cheat sheet is a much faster process than paging through the full rulebook. And, once you’ve found it, processing the streamlined information on the cheat sheet will (hopefully) also be quicker.

The organization of information onto each page of the cheat sheet should, hopefully, be fairly intuitive.

Page 1-2: Core Resolution. This includes all of the core rules for action resolution, including action rolls, resistance rolls, fortune rolls, consequences, harms, stress, and progress clocks (plus additional resources related to those topics).

Page 3-4: Scores & Crews & Factions. Re-sequencing this material made the cheat sheet more intuitive to navigate. I’ve also dropped Incarceration rules onto page 4.

Page 5-6: Downtime. And once your score is done, everything you need for downtime activities (including vices).

Page 7: Miscellanea. Collecting together rules for Coins, Rituals, and Crafting.

Page 8: Deep Reference. The new references for Duskvol District Modifiers, Glossary of Strange Forces, and the Expanded Reference for Action Ratings. (Obviously you’d want to swap out the Duskvol modifiers if you’re running with a different setting, such as U’Duasha from the special edition of the game.)

Page 9: Principles. This page includes the game’s “core loop”, the standards for who controls which types of decisions (Judgment Calls), and the best practices/goals for players and GMs alike.

MAKING A GM SCREEN

These cheat sheets can also be used in conjunction with a modular, landscape-oriented GM screen (like the ones you can buy here or here).

I usually use a four-panel screen and use reverse-duplex printing in order to create sheets that I can tape together and “flip up” to reveal additional information behind them. After some experimentation, this is the set-up I’m currently using for Blades in the Dark:

  • Panel 1: Action / Effect (with Deep References behind it)
  • Panel 2: Consequences / Progress Clocks / Magnitude
  • Panel 3: Scores (with Crews and Principles behind it)
  • Panel 4: Downtime (with Downtime Activities and Miscellanea behind it)

This allows you to reference roll results, consequences, and the magnitude table with a single glance to your left. You can intuitively flip up the Action Rating page to find the expanded Action Rating material behind it. To your right you’ll be able to flip through the material for Scores  & Downtime on the final two panels (with miscellaneous details tucked behind each).

Something else I experimented with was leaving a panel open and sliding in the one-page reference for the current District. But as the action in my campaign seems to frequently shift betweeen districts, this ended up being more finicky than valuable.

It’s likely that these sheets will continue to evolve through play. Recently, for example, I’ve realized that I really want a reference for the different hours of the day (Blades in the Dark, p. 240) so that I can set the time of night more accurately. (This is perhaps particularly notable because the setting’s eternal night disrupts my normal time descriptors.) You might jot those down on the currently blank sheet on Panel 1. Maybe it would be useful to pair that with a map of Doskvol you could flip up to reference quickly?

FURTHER READING
Advanced Starting Situations
Alternative Starting Situations
Progress Clocks
The Vultures


... ques faites-vous?

Check out L’Art du Rythme, Des Descriptions Évocatrices, and La préparation intelligente, the French translations of The Art of Pacing, Random GM Tips: Evocative Descriptions, and Smart Prep, respectively.

… que faites-vous? has also started translations of the GM Don’t List, under its English title. (For reasons I’m curious to understand.) English versions of the GM Don’t List can be found here.

Since I’ve been making some efforts to learn French this year, I’ve quite enjoyed my fairly inept efforts to read my own prose as rendered in a foreign language.

I’m actually a fair bit behind on sharing these international efforts, so if you’ve sent me an e-mail letting me know about a translation you’ve completed and it hasn’t been highlighted either here or on my Twitter account, I’ll be getting to it ASAP.

On that note, if you’re interested in writing translations of articles here on the Alexandrian, please contact me from the About page. I’m generally pretty easy going about giving permission unless there’s some specific reason why an article can’t be translated, and I appreciate knowing when the translations are available so that I can share them with other people.

Archives

Recent Posts

Recent Comments

Copyright © The Alexandrian. All rights reserved.