
CAVERNS
This is a diff key. To run these areas, you need to refer to the original key in Night of Dissolution (pgs. 82-85) and then either add or alter the elements listed here.
AREA 1 – THRALL QUARTERS
CHAOS PROPHECY: Scrawled on the wall of each of these areas (tapped out by the claws of the thralls, who don’t comprehend what they’re writing) is the Prophecy of the Saint of Chaos:
The Saint of Chaos shall return and the Banewarrens shall ope their maw. And the name of doom shall be Tavan Zith.
Not all of these are complete. Many instances are only random assortments from the middle of the prophecy.
DM Background: This prophecy refers to the scenario hook for the Banewarrens campaign.
AREA 5 – CHAOS STORAGE CUBES
SECRET COMPARTMENT: The secret area is a small shrine. The Prophecy of Black Rain is written on the wall, with black candles on a small altar in front of it:
 And there shall come a night of black rain. And the arts of magic shall have no power against it. And the Gods shall be silenced. And the rain shall wash away the world that we have known and end all bonds.
- DC 16 Intelligence (Investigation): Caldor’s Personal Journal and a chaositech siphon is hidden inside the shrine.
AREA 7 – SARYCAL MEDITATION CHAMBER
(This entry replaces the full key from the adventure.)
Three sarycal prepare the meditation rituals necessary to replace their brethren within the Machine (see Level 2). Three mock meditation chambers — looking like lozenges of steel thrusting up through the floor — stand at various points within an ornate arcane circle.
These meditation chambers are similar to those found within the Machine itself, but are not fully functional (nor linked to the Machine).
- DM Note: The intention here is that investigating this chamber should allow clever players to intuit the fact that sarycal rhodintor are sealed inside Level 2 of the Machine.
AREA 8 – LEGIRE’S CHAMBER
CHAOS LORE: The disheveled mess of notebooks, formulae, diagrams, and ranting includes:
- Excerpted Report from the Pit
- Greater Book of Chaos (chaos lorebook)
AREA 9 – HAO’S CHAMBER
CHEST: In addition to the other items in the chest, the PCs find:
- Oath of the Divided Eye (chaos lorebook)
- Skull of the Metal Eye
SKULL OF THE METAL EYE: A strange technomantic device is surgically grafted onto a skull. It includes an array of three crystals around a larger crystal in a plate on the skull’s forehead.
- This device is designed to be surgically grafted to one who has taken the Third Eye of the Destroyer feat (see Oath of the Divided Eye) to harness the energy of their darkvision and make it blindsight 60 ft.
- DM Note: Hao hasn’t perfected the Third Eye of the Destroyer, but keeps this device — still grafted to its former owner’s skull — for his personal use once he has done so.
AREA 10 – WORKSHOP
There is a chaos nodule from Level 5 being repaired here. There is also a chaos storage cube.
AREA 12 – THE MACHINE MAGE
DESK: Among the books and papers carefully arranged here are:
- Caldor’s Spellbook
- Caldor’s Work Journal
- Letter from Wuntad to Caldor
- Greater Book of Chaos (chaos lorebook)
- Vested of the Galchutt (chaos lorebook)
- Book of Mrathrach (chaos lorebook)
AREA 13 – ENTRANCE FROM THE CATACOMBS
The entrance of Area 13 opens onto the Machine directly facing the Face of Mrathrach.
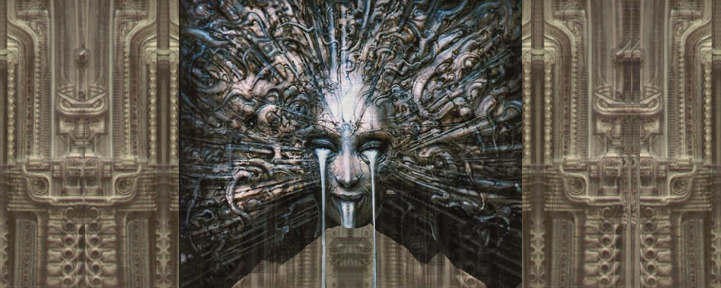
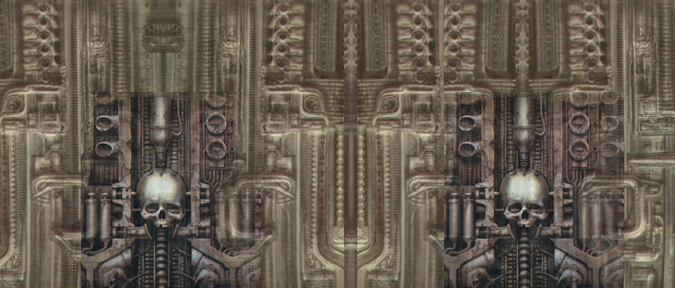
LEVEL 1 – THE FACE OF MRATHRACH
A living extrusion of proto-biological thrust out from the metal of the Machine. Streams of frozen tears hang from its pain-haunted eyes.
COLD AURA: Anyone starting their turn on the top level must make a DC 12 Constitution saving throw, suffering 2d6 cold damage on a failure.
ETHEREAL HOWL: Those on the Ethereal Plane can hear the Face of Mrathrach’s screams. Non-chaotic creatures hearing the scream must make a DC 15 Wisdom saving throw or suffer an ill effect:
- < Level/CR 5: Knocked unconscious for 1d10 minutes. Deafened for 3d6 hours.
- Level / CR 6-10: Stunned. Deafened for 1d4 hours.
- Level/CR 10+: Deafened for 1 hour.
DESTROYING THE FACE: AC 15, 300 hp. The face regenerates 5 hit points per round.
- Chaos Hammer: When reduced to 100 hp, the Face of Mrathrach hurls a multicolored explosion of leaping, ricocheting energy from its mouth. Non-chaotic creatures suffer 22 (5d8) psychic damage
- Prismatic Spray: When destroyed, the Face releases a prismatic spray that affects the top two levels of the Machine. (DC 17 saving throws. If the violet ray teleports a character, there’s a 90% chance they emerge from a random energy portal on Level 3 or Level 9; otherwise, they are teleported to a random location in Ptolus.
HOLOGRAPHIC ANALYSIS PROJECTOR
On the catwalk in front of the Face of Mrathrach a tripod with seven crystals surrounded by chaositech machinery has been set up.
ACTIVATING: A DC 15 Wisdom (Chaositech tools) check or DC 23 Intelligence (Arcana) check.
When the device activates, the crystals spin up and are struck by coruscant, plasmic light which refracts into a translucent projection before the surface of the tower where the Face extrudes itself.
The light forms a perfect image of the surface of the tower. In a somewhat jerky progression, you can see a disruption of the twisted pieces of machinery in the projection as the Face slowly emerges. As the projected Face comes to mirror the Face on the tower itself, additional beams of information sprout around and through the image: Lances of light join projection to reality, and strange garbled strings of text twist and resolve around various facets.
ANALYZING: After the projector is activated, an Intelligence (Chaositech tools) check can decipher the notation. Give the players the Analysis of the Holographic Projector handout.
LEVEL 2- WICKER RHODINTOR
The three wicker rhodintor are spiritual foci for three sarycal rhodintor who are forming a sympathetic meditation circle inside this level of the Machine. (These rhodintor are welded and sealed inside; inaccessible unless someone were to physically hack open the Machine.)
SARYCAL SPELLS: Each wicker rhodintor can manifest sarycal spells (Ptolus, p. 594) while drawing on the Machine’s power to remove daily limits. The range of the spells is limited to the first three levels of the tower.
- Initiative +2
- Spell Save DC 16
- At Will: magic missile
- Once per 1d3 rounds—hold person, levitate, ray of enfeeblement
- Once per 1d6 rounds—dispel magic, lightning bolt, slow
DESTROYING A WICKER RHODINTOR: AC 15, 150 hp. Vulnerable to fire.
LEVEL 3 – ENERGY PORTALS
CHAOTIC TELEPORT: Jumping through a portal on Level 3 allows one to emerge from a portal on Level 9 (and vice versa). Creatures without teleport stabilizers suffer chaotic disruption during teleport (2d6 points of necrotic damage, DC 16 Constitution saving throw negates).
ENTRANCE TO MUTATED THRALL CHAMBERS: Opening in the side of the shaft leads to Areas 1-3. This opening is not directly connected to the shaft, requiring characters to jump a 5 foot gap.
LEVEL 4 – ENTRANCE FROM THE LONG PASSAGE
DISABLE LEVEL: This is a complex skill check requiring 5 successes before 2 failures. DC 14 Wisdom (Chaositech tools) or DC 18 Intelligence (Arcana) checks.
LEVEL 5/6/7 – EBON MACHINES
EBON MACHINES: These machines serve as both collectors and amplifiers of the chaotic energies being gathered by the Mrathrach tables. They are also energy regulators and channelers.
CHAOS NODULES: Inside each ebon machine are ten oblong, silvery gray nodules roughly the length of a forearm.
- These are virtually identical to the ones found in the White House (Area 13), but careful examination will reveal that they are three-dimensional negatives of the nodules installed into Mrathrach tables around the city.
DESTROYING AN EBON MACHINE: AC 17, 100 points of damage.
LEVEL 7: Has an entrance to the Storage Level (Areas 5-7).
LEVEL 8 – CHAOSTECHNICIAN LEVEL
DISABLE LEVEL: This is a complex skill check requiring 5 successes before 2 failures. DC 14 Wisdom (Chaositech tools) or DC 18 Intelligence (Arcana) checks.
ENTRANCE TO CHAOSTECHNICIAN LEVEL: This level is connected to the Chaostechnician quarters (Area 8-10).
LEVEL 9 – ENERGY PORTALS
CHAOTIC TELEPORT: Jumping through a portal on Level 3 allows one to emerge from a portal on Level 9 (and vice versa). Creatures without teleport stabilizers suffer chaotic disruption during teleport (2d6 points of necrotic damage, DC 16 Constitution saving throw negates).
LEVEL 10 – SKULL FOCI
SKULL FOCI: A wide variety of humanoid skulls have been embedded into the machinery on this level of the Machine. Removing or destroying a skull foci opens a passage into the interior of the Machine. If all skull foci are removed or destroyed, it destabilizes this level.
- Destroy: AC 15, 10 hp
- Remove: DC 16 Intelligence (Chaositech tools) or DC 23 Intelligence (Thieves’ Tools)
RHODINTOR NESTS: A passage at the bottom of the shaft leads to the Rhodintor Nests (Areas 11-12).
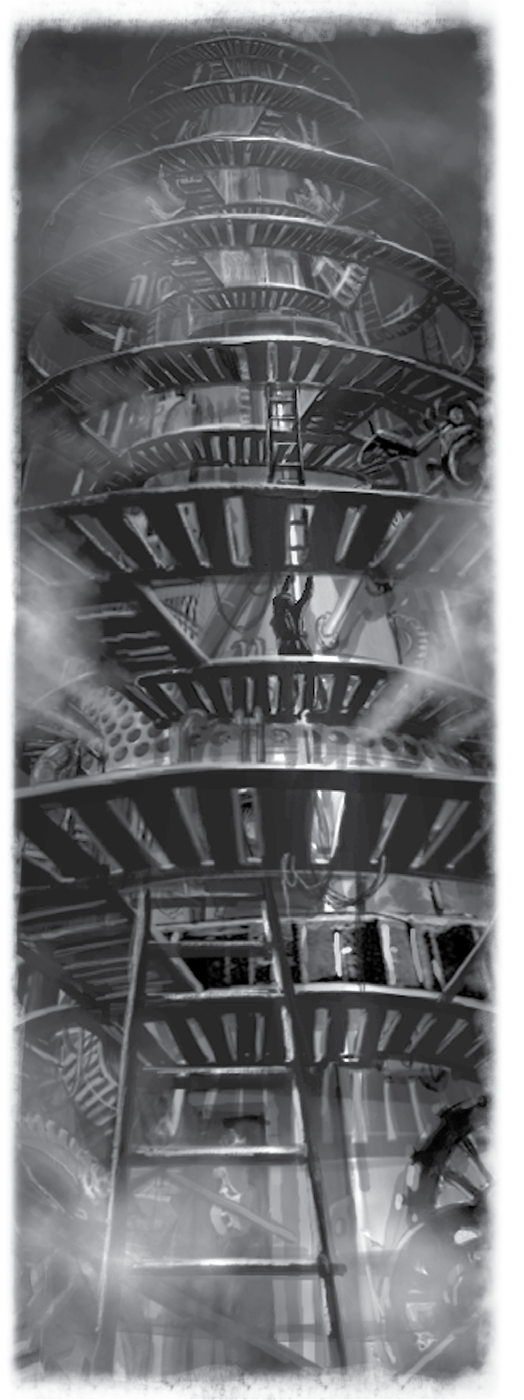
INSIDE THE MACHINE
TM and © 2022 Monte Cook Games, LLC
The inside of the Mrathrach tower is accessible from Level 10 (by removing or destroying the skull foci). It’s a hollow cylinder, but crisscrossed with pipes, wiring, gearworks, etc.
SEALED LEVELS: The interior of Level 2 is sealed and cannot be accessed from below. (It contains sarycal rhodintor.) The interior of Level 1 is just a solid mass of chaositech machinery.
ETHEREAL PLANE: The interior of the Mrathrach Machine has solidified on the Ethereal Plane.
INTERNAL RESONANCE: Each interior level of the Machine has 3d20+10 bloodsand rubies taken from Mrathrach’s Put. (These serve as sympathetic foci.)
- Disabling: Removing at least 10 bloodsand rubies from each level will disrupt the internal resonance of the Machine.
BLOODSAND RUBIES
A dark red in color, with murky depths like coagulated blood. The surface of a bloodsand ruby glitters with a multitude of facets and is gritty to the touch.
CONDITIONS:
- Difficult terrain due to the uneven floors, pipes, unstable paneling, etc.
- Ruby Beams: Shooting between the bloodsand rubies on each level. There’s a 1 in 6 chance per level of a beam strike, targeting a random character. If struck, a character suffers 4d6 force damage (DC 18 Constitution saving throw for half damage).
- Moving Between Levels: DC 16 Dexterity (Athletics) check to climb the interior walls. (There are lots of gaps between the pipes and the like, but also a lot of moving machinery which makes it quite difficult to maneuver thorugh.)
THE ZAUG: Located on Level 8. The zaug is hooked into the Machine with various tubes, etc. and cannot move. Killing the zaug destabilizes the machine.


