As part of my In the Shadow of the Spire campaign, I’ve developed a number of chaos lorebooks, some of which have featured in various Ptolus Remixes and others have appeared in the In the Shadow of the Spire campaign journal. They’re based around a network of chaos cults — an extensive node-based campaign campaign which incorporated adventures from Monte Cook’s Night of Dissolution along with almost two dozen original scenarios. These lorebooks delve deep into:
- chaos cults
- chaositech
- the demon court
- servitors of the Galchutt
- the elder brood
- the cults’ plans for the Night of Dissolution
The time has come to present the full collection, so that they can be used in your own campaigns and/or used as examples of how you can create your own lorebooks. I’m presenting them here exactly as they were written for my personal Ptolus campaign. This is important because I placed the city of Ptolus into my own campaign world and adapted its mythology. Notably, the Galchutt of Ptolus were integrated into the wider mythos of my Demon Court. If you use these chaos lorebooks in a standard Ptolus campaign, then you will find these lorebooks filled with many strange and apocryphal references… but perhaps that’s appropriate for chaos gods.
DISTRIBUTING CHAOS LOREBOOKS
For a detailed description of how and why I create lorebook handouts, check out Using Lorebooks. Lorebooks are one of my “secret weapons” as a GM, and I use them pretty extensively in my games. They can be prep intensive — although the technique is designed to minimize that as much as possible — but have a huge payoff at the table. As a result, in most of my games they tend to be relatively rare drops
But not always. In my Eternal Lies Remix I designed three huge lorebook dumps, each presented as a list of titles that the players could read by investing significant in-game time. This evoked the experience of actually researching in a library, with the players exploring the lorebooks via topic and cross-reference based on the needs of their current investigation. For the chaos lorebooks, on the other hand, I decided to scatter them throughout the chaos cults so that the players could discover them slowly over time, piecing together their understanding of the cults and the dark gods they worshiped.
The nice thing about lorebooks like this is that multiple copies exist: If the PCs miss the book in one location, they can still find a different copy in another location. Following something akin to the Three Clue Rule, therefore, I created a spreadsheet with a list of chaos lorebooks cross-referenced to the various scenarios I had planned for this section of the campaign. Then I simply charted where each lorebook could be found. My design philosophy here was:
- The chaos lorebooks should be spread around, without any scenario (except the big finale) including more than four or five at most.
- No two locations should have an identical set of lorebooks. This meant that, while the PCs would almost certainly find duplicate lorebooks over time, in any given scenario they were likely to find new lorebooks they hadn’t encountered yet (no matter what path they charted through the node-linked cults).
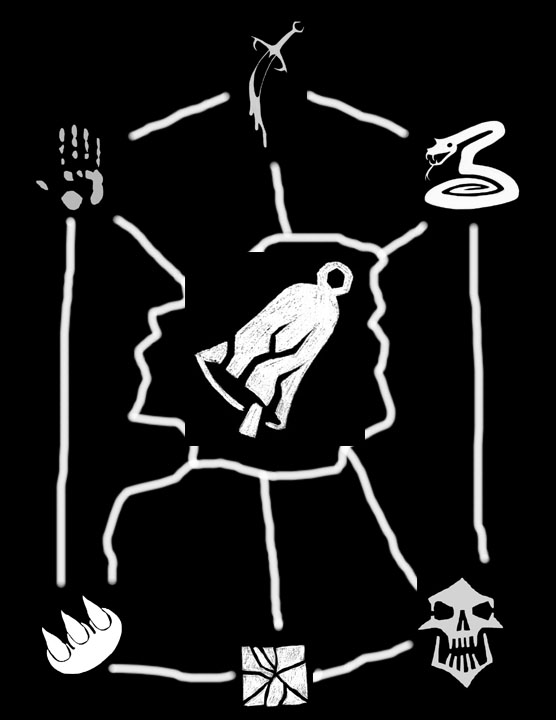
The Book of Faceless Hate serves as a kind of introductory text, although it’s not strictly necessary for it to be the first to fall in to the PCs’ hands. The other thing they received in the introductory cult scenario was the Cult Diagram, as seen above: Sketched as a mural on the wall, this diagram showed the icons of various cults while, importantly, not giving their names. This diagram served as a kind of checklist, cross-referenced to holy symbols and lorebooks as the PCs work to identify and locate each of the cults.
The original Night of Dissolution adventure included The Book of Faceless Hater, but presented it as a far more encyclopedic resource — a one-stop shop of all chaos cult lore. Because I had expanded the scope of the chaos cults — from four adventures to a couple dozen — I wanted to pace these revelations instead of presenting them as a single exposition dump: What were the chaos cults really doing? How many cults were working together? What was the true nature and secret history of the “gods” they worshiped?
I’ve organized the various chaos lorebooks into four categories:
- Chaos Cults, which describe various chaos cults (including some cults who were not actually part of the campaign; creating both the sense of a wider world and a sense of doubt about the exact scope of the cults’ activities in Ptolus).
- The Demon Court, detailing the various chaos gods.
- Servitors of the Demon Court, powerful servitors of the Demon Court.
- Book of the Elder Brood, describing the lesser demonic servants of the Demon Cult. Many become tools of the cults
I expanded the ranks of all these — cults, gods, servitors, and brood — so if you’re familiar with Ptolus, don’t be surprised to see a few unfamiliar names below.
CHAOS CULTS
The Book of Faceless Hate
Book of Venom’s Truth
Truth of the Hidden God
The Masks of Death
Touch of the Ebon Hand
Eschatonic Visions (Tolling Bell)
Whispers of the Beast
Song of Chaos
Words of the Plague
The Scarlet Oath
The Worm of the Void
Oath of the Divided Eye
THE DEMON COURT
Lore of the Demon Court
The Source of All Filth (Abhoth)
Eyes of Legion (Bhor Kei)
Mouth of the Void (Dhar Rhyth)
The Shapeless Codex (Jubilex)
The Writhing Obelisk (Kihomenethoth)
The Shepherd of Malignancy (Merihim)
The Beast Without Shadow (Ravvan)
The Shadow That Never Passes (Shallamoth Kindred)
The Hand of Gellasatrac
SERVITORS OF THE DEMON COURT
The Assassins of Chaos (Carach)
The Earthbound Demons (Rhodintor)
The Magi of Chaos (Shaddom)
The Grey Veiled (Vreeth)
The Bloated Lords (Zaug)
BOOK OF THE ELDER BROOD
Book of the Elder Brood – Akop
Book of the Elder Brood – Bulugon
Book of the Elder Brood – Essyat
Book of the Elder Brood – Gadacro
Book of the Elder Brood – Marbassik Spawn
Book of the Elder Brood – Nintha
Book of the Elder Brood – Nyogoth
Book of the Elder Brood – Obaan
Book of the Elder Brood – Solesik
Book of the Elder Brood – Sscreeth
Book of the Elder Brood – Tesk
Book of the Elder Brood – Tilaxic