A hexcrawl is one way of looking at a game world.
Like other scenario and campaign structures, a hexcrawl can be broadly understood as a method for organizing prepped material paired to a complementary procedure of play: A dungeon procedure provides structure for PCs moving between rooms and exploring their contents, and it’s logically paired to a prep structure in which rooms are positioned on a map (to make them easy to reference) and keyed with the information needed to explore them.
A hexcrawl, similarly, creates a map of the world broken down into hexes because those hexes provide a convenient structure for keying content and managing overland exploration.
But one must not mistake the map for the territory.
One way to think about this is to consider the howling wilderness of the typical hex: We generally key no more than a single point of interest in each hex. But whether we’re talking about a 5-mile hex, a 6-mile hex, or the Alexandrian 12-mile hex, if there was really only one point of interest in a hex, it would mean a vast and desolate place.
Lay a hex grid to scale over a map of your local county, shire, or district and you’ll see what I mean. For example, consider Brown County in Minnesota, which I picked by basically clicking randomly on a map. It would consist of roughly eight 12-mile hexes, but it contains seven cities, a couple dozen townships, fifteen major lakes, three major parks and wildlife preserves, multiple scientific outposts, and forty different sites on the National Register of Historic Places. Whichever eight of those you pick, you’re obviously going to be leaving a lot of stuff out of your hex key.
That’s how the real world works. It’s also how your game world works: Whether consciously or otherwise, you’re choosing to key the most important or significant thing in each hex, while overlooking the others. This isn’t a problem, of course, unless you forget the conceit and begin to believe that what you’ve keyed is everything the game world has to offer.
(This is also why the Alexandrian Hexcrawl uses random encounters to procedurally generate new locations — e.g., lairs — on the hexmap. The more time the players spend in a particular region, the more of these “overlooked” details they’ll have a chance to discover precisely in the area of the game world they’re spending the most time in.)
The hexcrawl also has a procedural bias: The material is structured and keyed for the PCs to discover it through geographical exploration (e.g., “We walk north until we see something interesting.”). But this is not, of course, the only way that PCs can explore or interact with an area. It’s also pretty easy to imagine interesting elements of the game world that are largely or entirely inaccessible to simple geographic movement.
What I’ve found useful is to think of different structures as being “layers” of the game world. A hexmap, for example, is one “layer” — one method of keying and describing the game world — and it’s often more than enough to run an entire campaign. But it’s not a complete picture of the game world, and you can add more layers, each describing the world in a different way and each conducive to different types of PC actions.
Furthermore, since these layers are all describing the same world, they will also overlap or intersect with each other in different ways. While the PCs are exploring and interacting with the world in one way, you’ll be able to use the appropriate layer to run the game for them. Then, when they discover something new and/or set a new goal that will lead them to begin exploring the world in a new way, you’ll be able to shift to a new layer — a different scenario or campaign structure — to adjudicate what happens next.
And you can also, as the GM, design your world with these phase shifts in mind!
NODE-BASED LAYER
For example, consider node-based scenario design, in which nodes are linked to each other by clues.
Each node is a person, organization, event, activity, or, crucially, location. This means that each location keyed to your hexmap can also be thought of as a node and linked to other locations on your hexmap (i.e., other nodes) via clues.
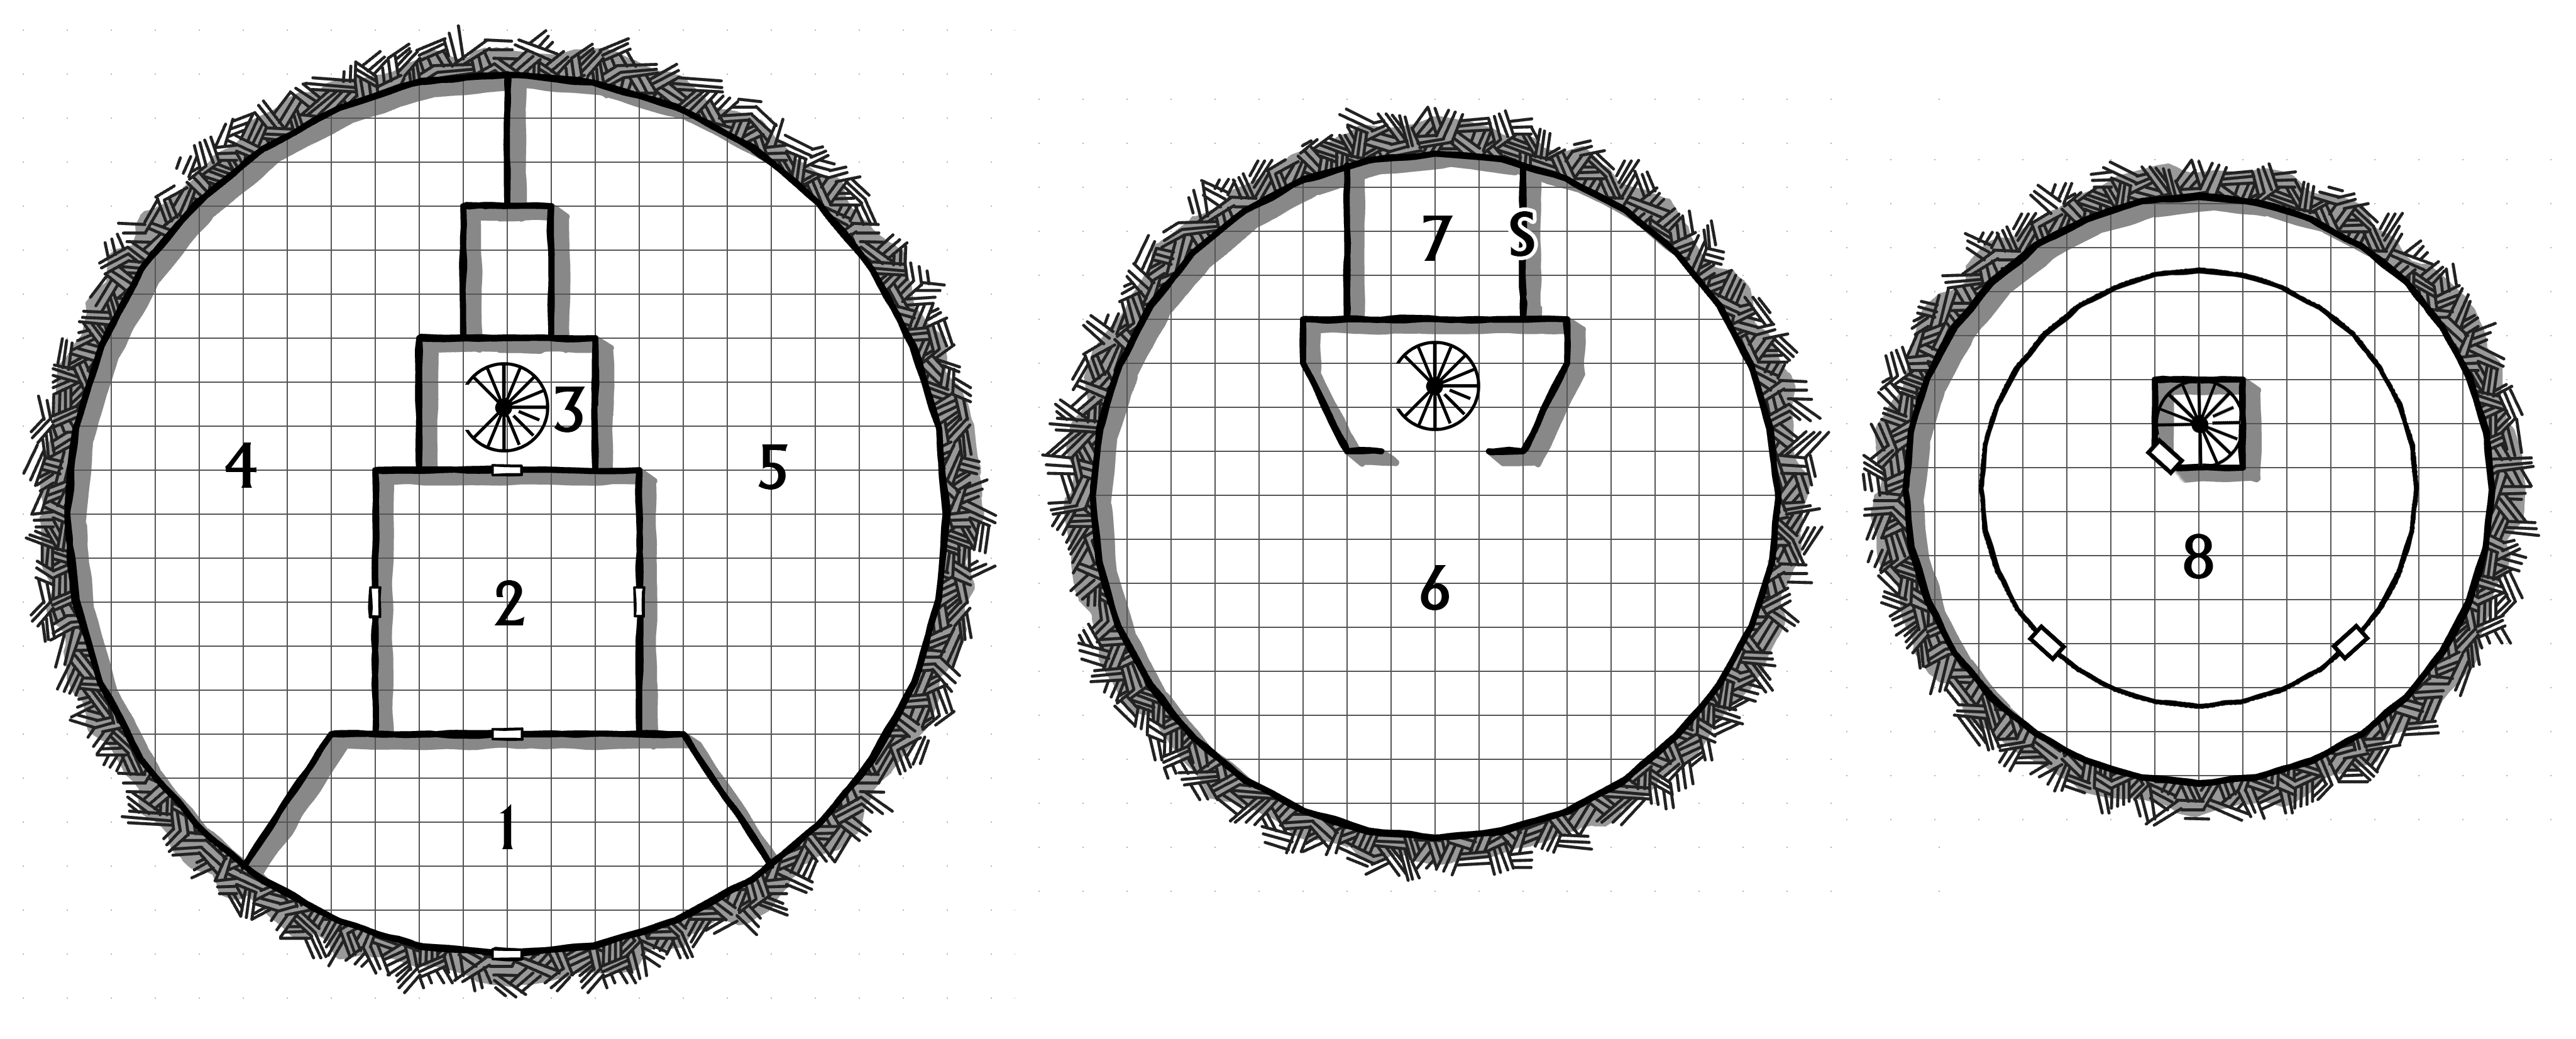
For example, the hobgoblin bandits lairing in the ruins of the Black Baron’s Keep may have been sent by the Necromancer to spy on the elves of Silverwood. When keying the Black Baron’s Keep, therefore, it would be perfectly natural to include clues pointing to both the elven village in Silverwood and the Necromancer’s Tower.
If you want to start experimenting with this technique in your own hexcrawls, I recommend getting started with some simple loops:
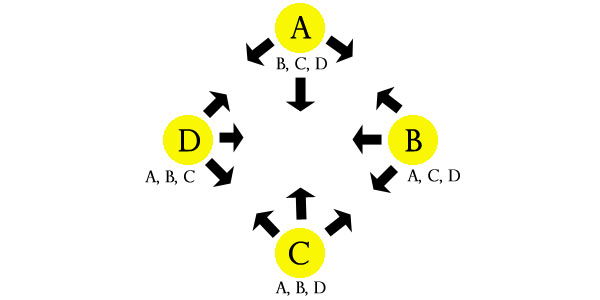
The Black Baron’s Keep has clues pointing to the Necromancer’s Tower, the Elven Village, and the Hobgoblin Village.
Meanwhile, the Necromancer’s Tower has clues pointing to the Black Baron’s Keep, the Elven Village, and the Hobgoblin Village.
And so forth.
The advantage of this design is that it creates compact little scenarios that can be naturally explored no matter which of the nodes the PCs encounter first: Whether they’re attracted by the strange lights in the Black Baron’s Keep, hear reports of hobgoblin raids from the elves of Silverwood, or stumble across the hobgoblin village, they’ll be able to follow the clues and discover the other nodes.
To add additional complexity to these simple setups, consider linking a single node to multiple loops. For example, spying on the Silverwood may be only one of the Necromancer’s current schemes, with her tower acting as a sort of crossroads between different node-based scenarios.
As you become more comfortable with adding node-based layers to your hexcrawl, you’ll likely end up gravitating towards freeform design in the cloud, with your various hex-keyed locations pointing to each other freely in whatever manner makes the most sense. In doing so, you may also discover that you can use these same techniques without necessarily creating fully robust node-based scenarios.
What I mean is that, with the hexcrawl structure as a backstop, you don’t need to strictly obey the Three Clue Rule or Inverted Three Clue Rule. Or, to put it more simply: You can include a single clue from Hex A to Hex B, and it’s just fine if the PCs don’t find it, because the hexcrawl structure means they can just geographically navigate their way to Hex B with or without the clue.
Note that you can also plant clues into other structures of your hexcrawl campaign:
- Rumor tables, for example, are basically just big lists of free-ranging clues.
- Random encounters can also include clues pointing to hex locations. (This can even be true of procedurally generated clues. Tracks, for example, are inherently clues that point you to the locations that creatures are coming from or going to.)
- Even random treasure can be used to plant clues. (Random treasure maps are a classic example of this.)
All of these links add depth to your campaign. They actually feed back into the hexcrawl structure itself, giving the PCs’ the information they need to set goals that will guide their exploration, allowing them to travel with purpose instead of just wandering around the map aimlessly.
However, we’re still only scratching the surface here, because so far we’ve only been linking locations that also appear in our hex key (and are, therefore, also accessible via the hexcrawl). There’s no reason that we need to limit ourselves like this: Locations discovered through the hexcrawl can link us to nodes — people, events, organizations, activities, and even other locations — that DON’T appear in the hex key and could never be discovered by simply moving around the hex map. They literally exist on a completely separate “layer” of your campaign world.
I frequently find this approach useful for cities located in my hexcrawls. Like Maernath, for example:
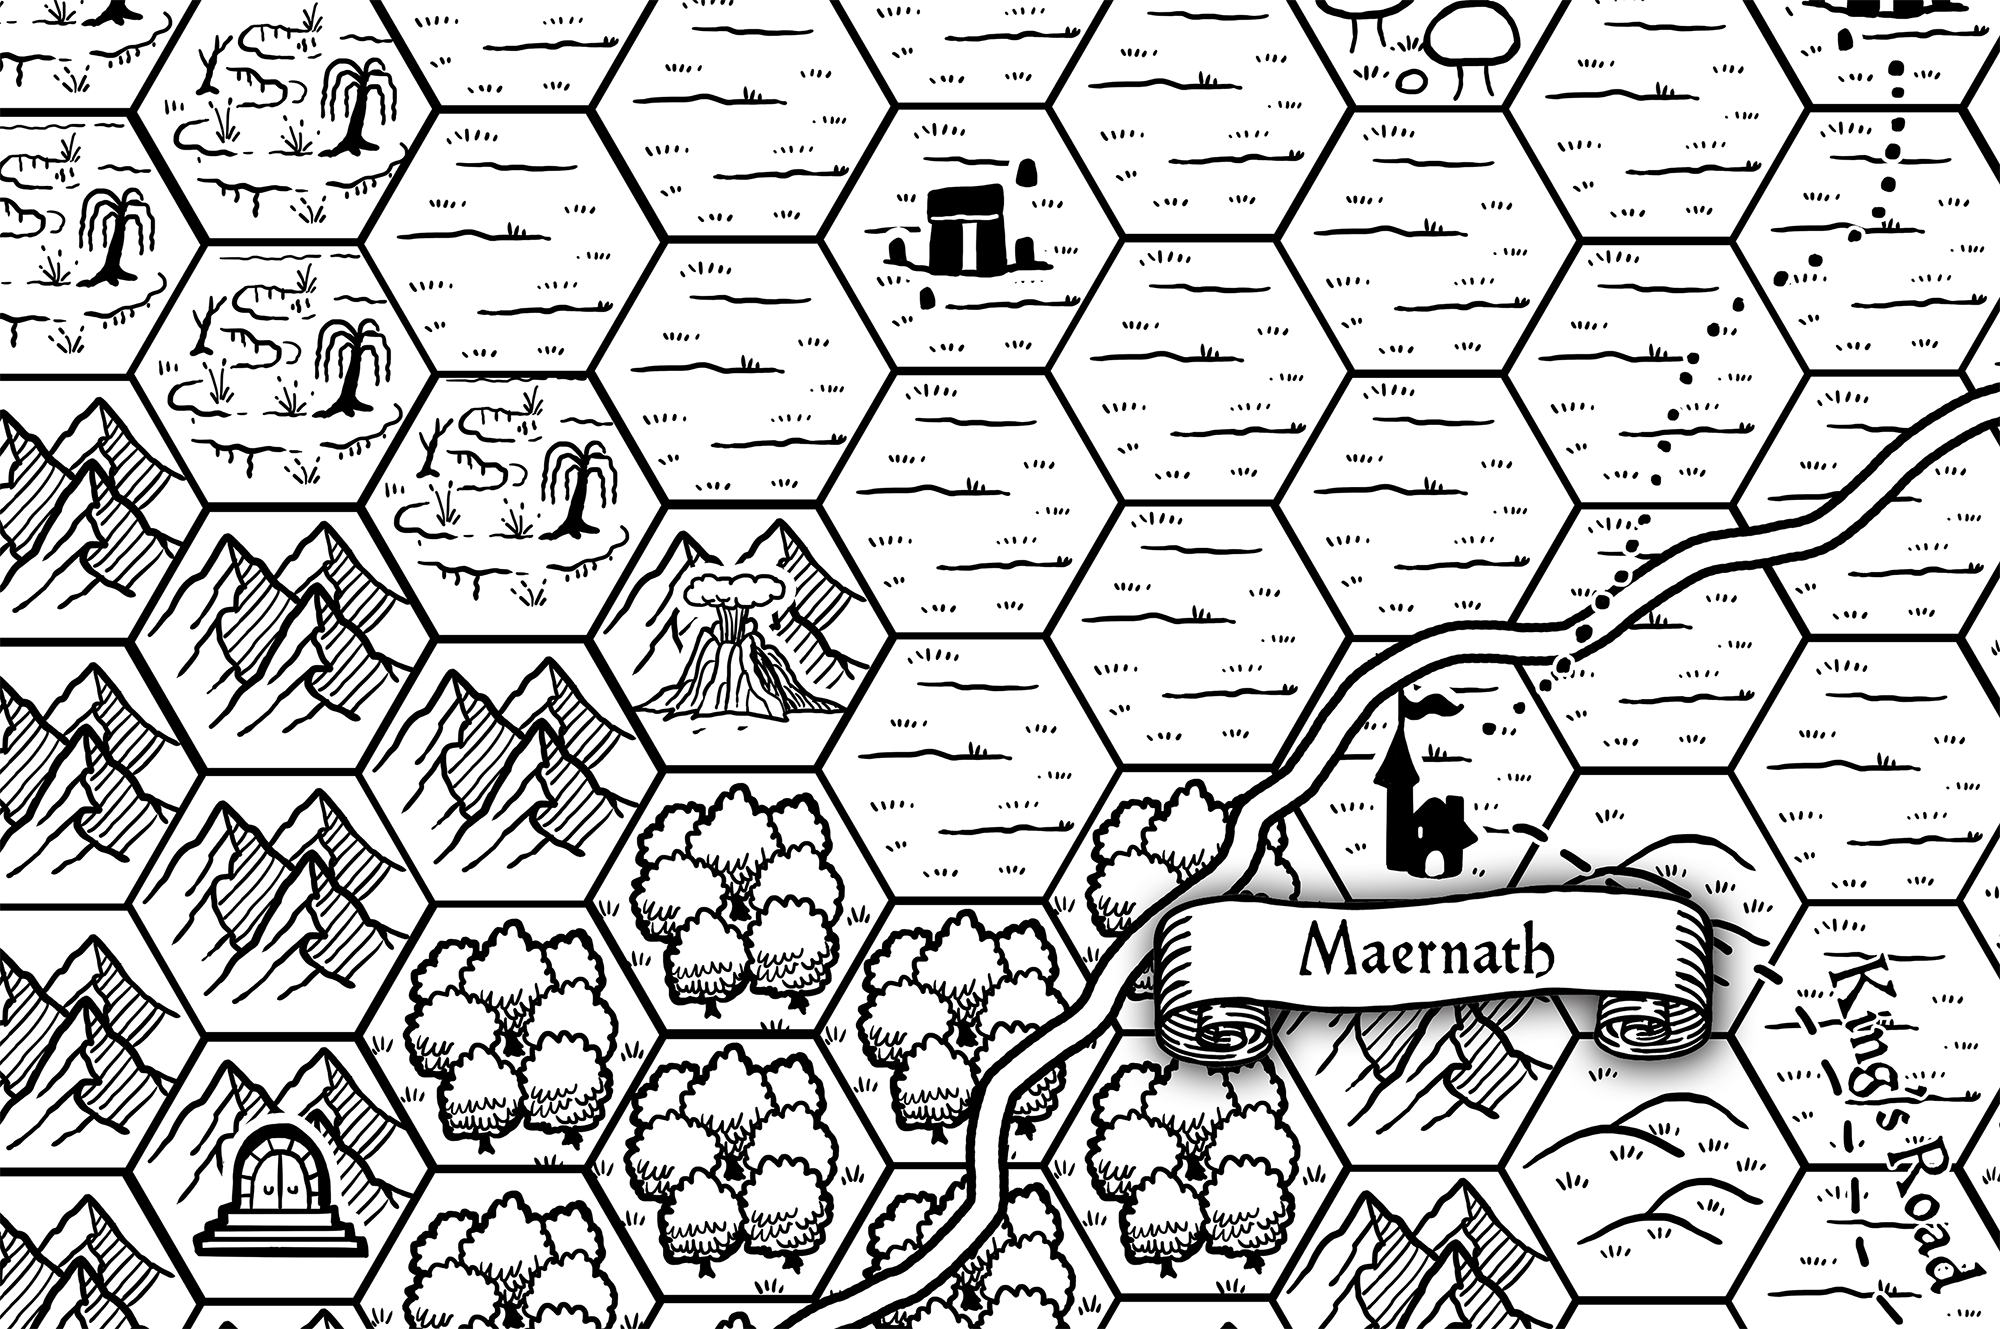
Maernath might be the PCs’ homebase for the hexcrawl, or it might be a city they discover while exploring the region. Either way, it’s easy to see how the city itself could be encountered through the hexcrawl structure.
But simply seeing a city on the horizon isn’t going to reveal all of its secrets to you. For example, what if a scion of one of the noble families is collaborating with the Necromancer? They might be just one node in a much larger conspiracy scenario that’s infesting the city, but the PCs are unlikely to stumble onto this conspiracy just because they walked through the city gates.
(What I also like about this is that it connects the urban environment to the surrounding wilderness, and you can obviously do the reverse, too. It weaves your campaign together, not only adding depth, but also making everything feel interconnected.)
Another fun technique is to stock your hexcrawl with rituals, allowing the PCs to piece together the clues and supplies they need to figure out what, where, and possibly when they need to perform the ritual. These rituals, in turn, might unlock unique spells and abilities; empower magic items; summon mystic allies; or even open portals to extradimensional adventuring sites.
The region described by your hexcrawl might also include traveling elements, like a touring carnival, merchant caravan, or mystic phoenix. These are, obviously, not keyed to specific locations. You might include such elements on your random encounter table as one way of integrating them into the hexcrawl structure, but node-based design can provide another path for the PCs to discover them and track them down.
Note: You can also use node-based scenario design to provide links to location nodes far away from the region covered by the hexcrawl (e.g., you’ll need to take a ship south to pursue the political backing of the local privateers; or you’ll need to go to the Imperial City to follow the Cult of the Black Eye). This isn’t quite same thing as thinking of the campaign in terms of “layers,” but it IS an example of how you can use shifts in structure to present or handle different types of scenarios. Your structure should never feel like a straitjacket; it should be a tool that liberates you.