In general, an expedition can navigate through the wilderness by landmark or they can navigate by compass direction.
NAVIGATING BY LANDMARK
Generally speaking, it’s trivial to follow a road, river, or other natural feature of the terrain. It’s similarly easy to head towards any visible landmark. The landmark or terrain feature will determine the route of travel and there’s no chance of becoming lost, so you can simply track the number of miles traveled.
IDENTIFYING LANDMARKS: If the PCs are unsure of a landmark but have had previous experience with it, it may be possible to identify it with a Wisdom (Survival) check, at the DM’s discretion. The accuracy and detail of the identification will depend on prior experience.
Example: A ranger is passing through the woods when they encounter a river. If it’s a river they’ve walked up and down before, the Wisdom (Survival) check might let them confirm that it is, in fact, the Mirthwindle. If they’re less familiar with the region, the check might tell them that this is probably the same river they crossed earlier in the day – it must be taking a southerly bend. If this is the first time they’ve ever seen this river in an area they’re not familiar with, the Wisdom (Survival) check won’t tell them much more than “this is a river.”
NAVIGATING BY COMPASS DIRECTION
Characters trying to move in a specific direction through the wilderness must make a navigation check using their Wisdom (Survival) skill once per watch to avoid becoming lost. The DC of the check is primarily determined by the terrain type the expedition is moving through, although other factors may also apply.
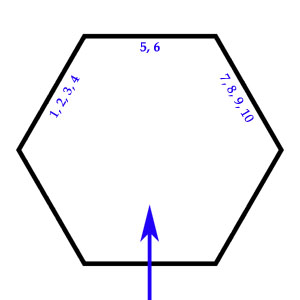
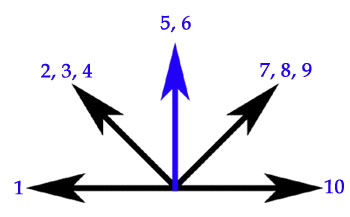
BECOMING LOST: Characters who fail the navigation check become lost and may veer away from their intended direction of travel, as indicated by a 1d10 roll on the diagram below. When lost characters exit a hex, they will exit through the face of the hex indicated by the die roll.
Characters who are lost remain lost. In the new hex neither their intended direction of travel nor their veer will change.
If characters who are already lost fail another navigation check, their veer can increase but not decrease. (If they have not yet begun to veer – i.e., they rolled a 5 or 6 on their initial veer check – then their veer can increase in either direction.)
Example: A lost party is already veering to the left when they fail another navigation check. A roll of 1-4 on 1d10 would cause them to exit the next hex two hex faces to the left of their intended direction, but any other result would not change their veer at all.
ALTERNATE VEERS: These alternate methods of determining veer may be useful, particularly if you are adapting these rules to be used without a hex map.
Absolute Degree: Roll (1d10 – 1d10) x 10 to determine the number of degrees off-course.
Compass Direction: Roll 1d10 and consult the diagram below. (The blue arrow indicates the intended direction of travel.)
USING A COMPASS: Compasses grant advantage to navigation checks. In addition, they automatically eliminate veer at hex borders even if the user doesn’t recognize that they were lost. (Even if you don’t recognize that you ended up off course, the compass constantly reorients you towards your intended direction of travel.)
LOST CHARACTERS
Once a character becomes lost, there are several factors to consider.
RECOGNIZING YOU’RE LOST: Lost navigators continue making a navigation check once per watch. If the check succeeds, they will recognize that they are no longer certain of their direction of travel.
Navigators who encounter a clear landmark or unexpectedly enter a distinctly new type of terrain can make an additional navigation check to realize that they’ve become lost.
Note: Some circumstances may make it obvious to the characters that they have become lost without requiring any check.
REORIENTING: A navigator who realizes that they’ve become lost has several options for reorienting themselves.
Backtracking: A lost character can follow their own tracks (see the Tracking watch action). While tracking allows them to retrace their steps, they must still recognize the point at which they went off-track. If a character is successfully backtracking, they may make a navigation check (using the Navigation DC of the terrain) each watch. If the check is successful, they’ll correctly recognize whether they were previously on-track or off-track. If the check is a failure, they reach the wrong conclusion.
Compass Direction: It requires a DC 10 Wisdom (Survival) check to determine true north without a compass or similar device. On a failed check, randomly determine the direction the navigator thinks is true north.
Setting a New Course: A lost navigator can attempt to precisely determine the direction they should be traveling in order to reach a known objective by making a navigation check at the Navigation DC of the terrain + 10. If the navigator fails the check, they immediately become lost. Determine their direction of travel like any other lost character.
CONFLICTING DIRECTIONS: If several characters in a single party all attempt to determine the correct direction of travel, make their Wisdom (Survival) checks separately. Tell the players whose characters succeeded the correct direction in which to travel, and tell the other characters a random direction they think is right.
Alternative Rule – Group Check: Alternatively, you can use the rules for group checks. If at least half the group succeeds on their Wisdom (Survival) checks, they have determined the correct direction of travel. If not, they immediately become lost.
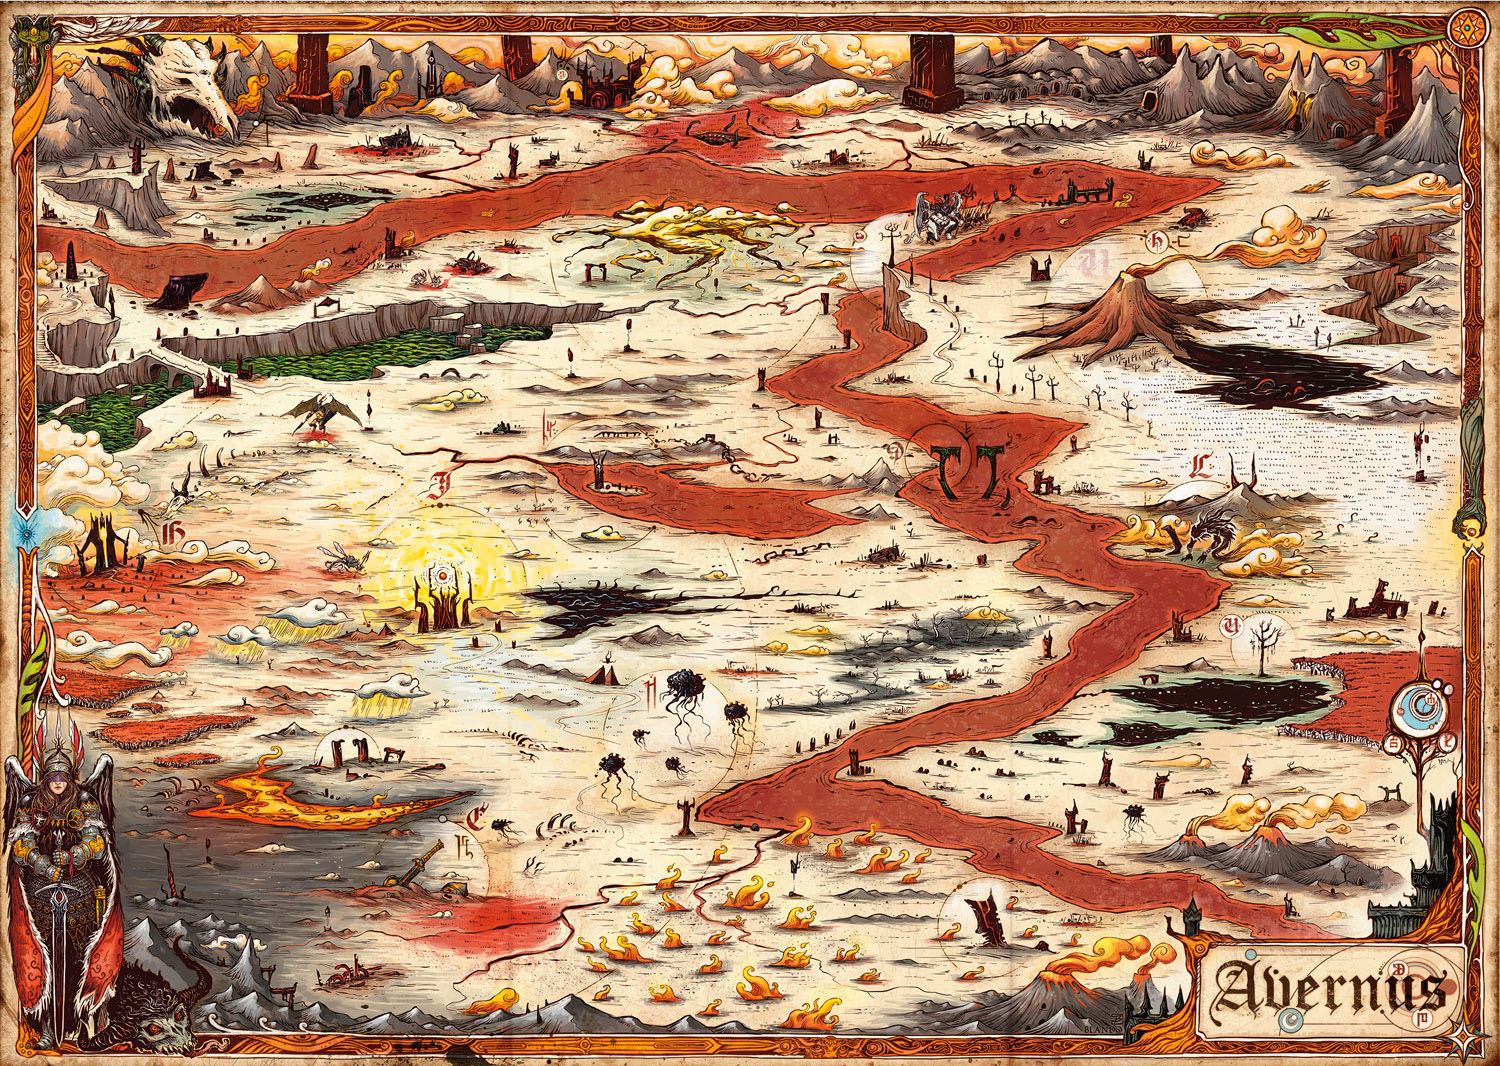
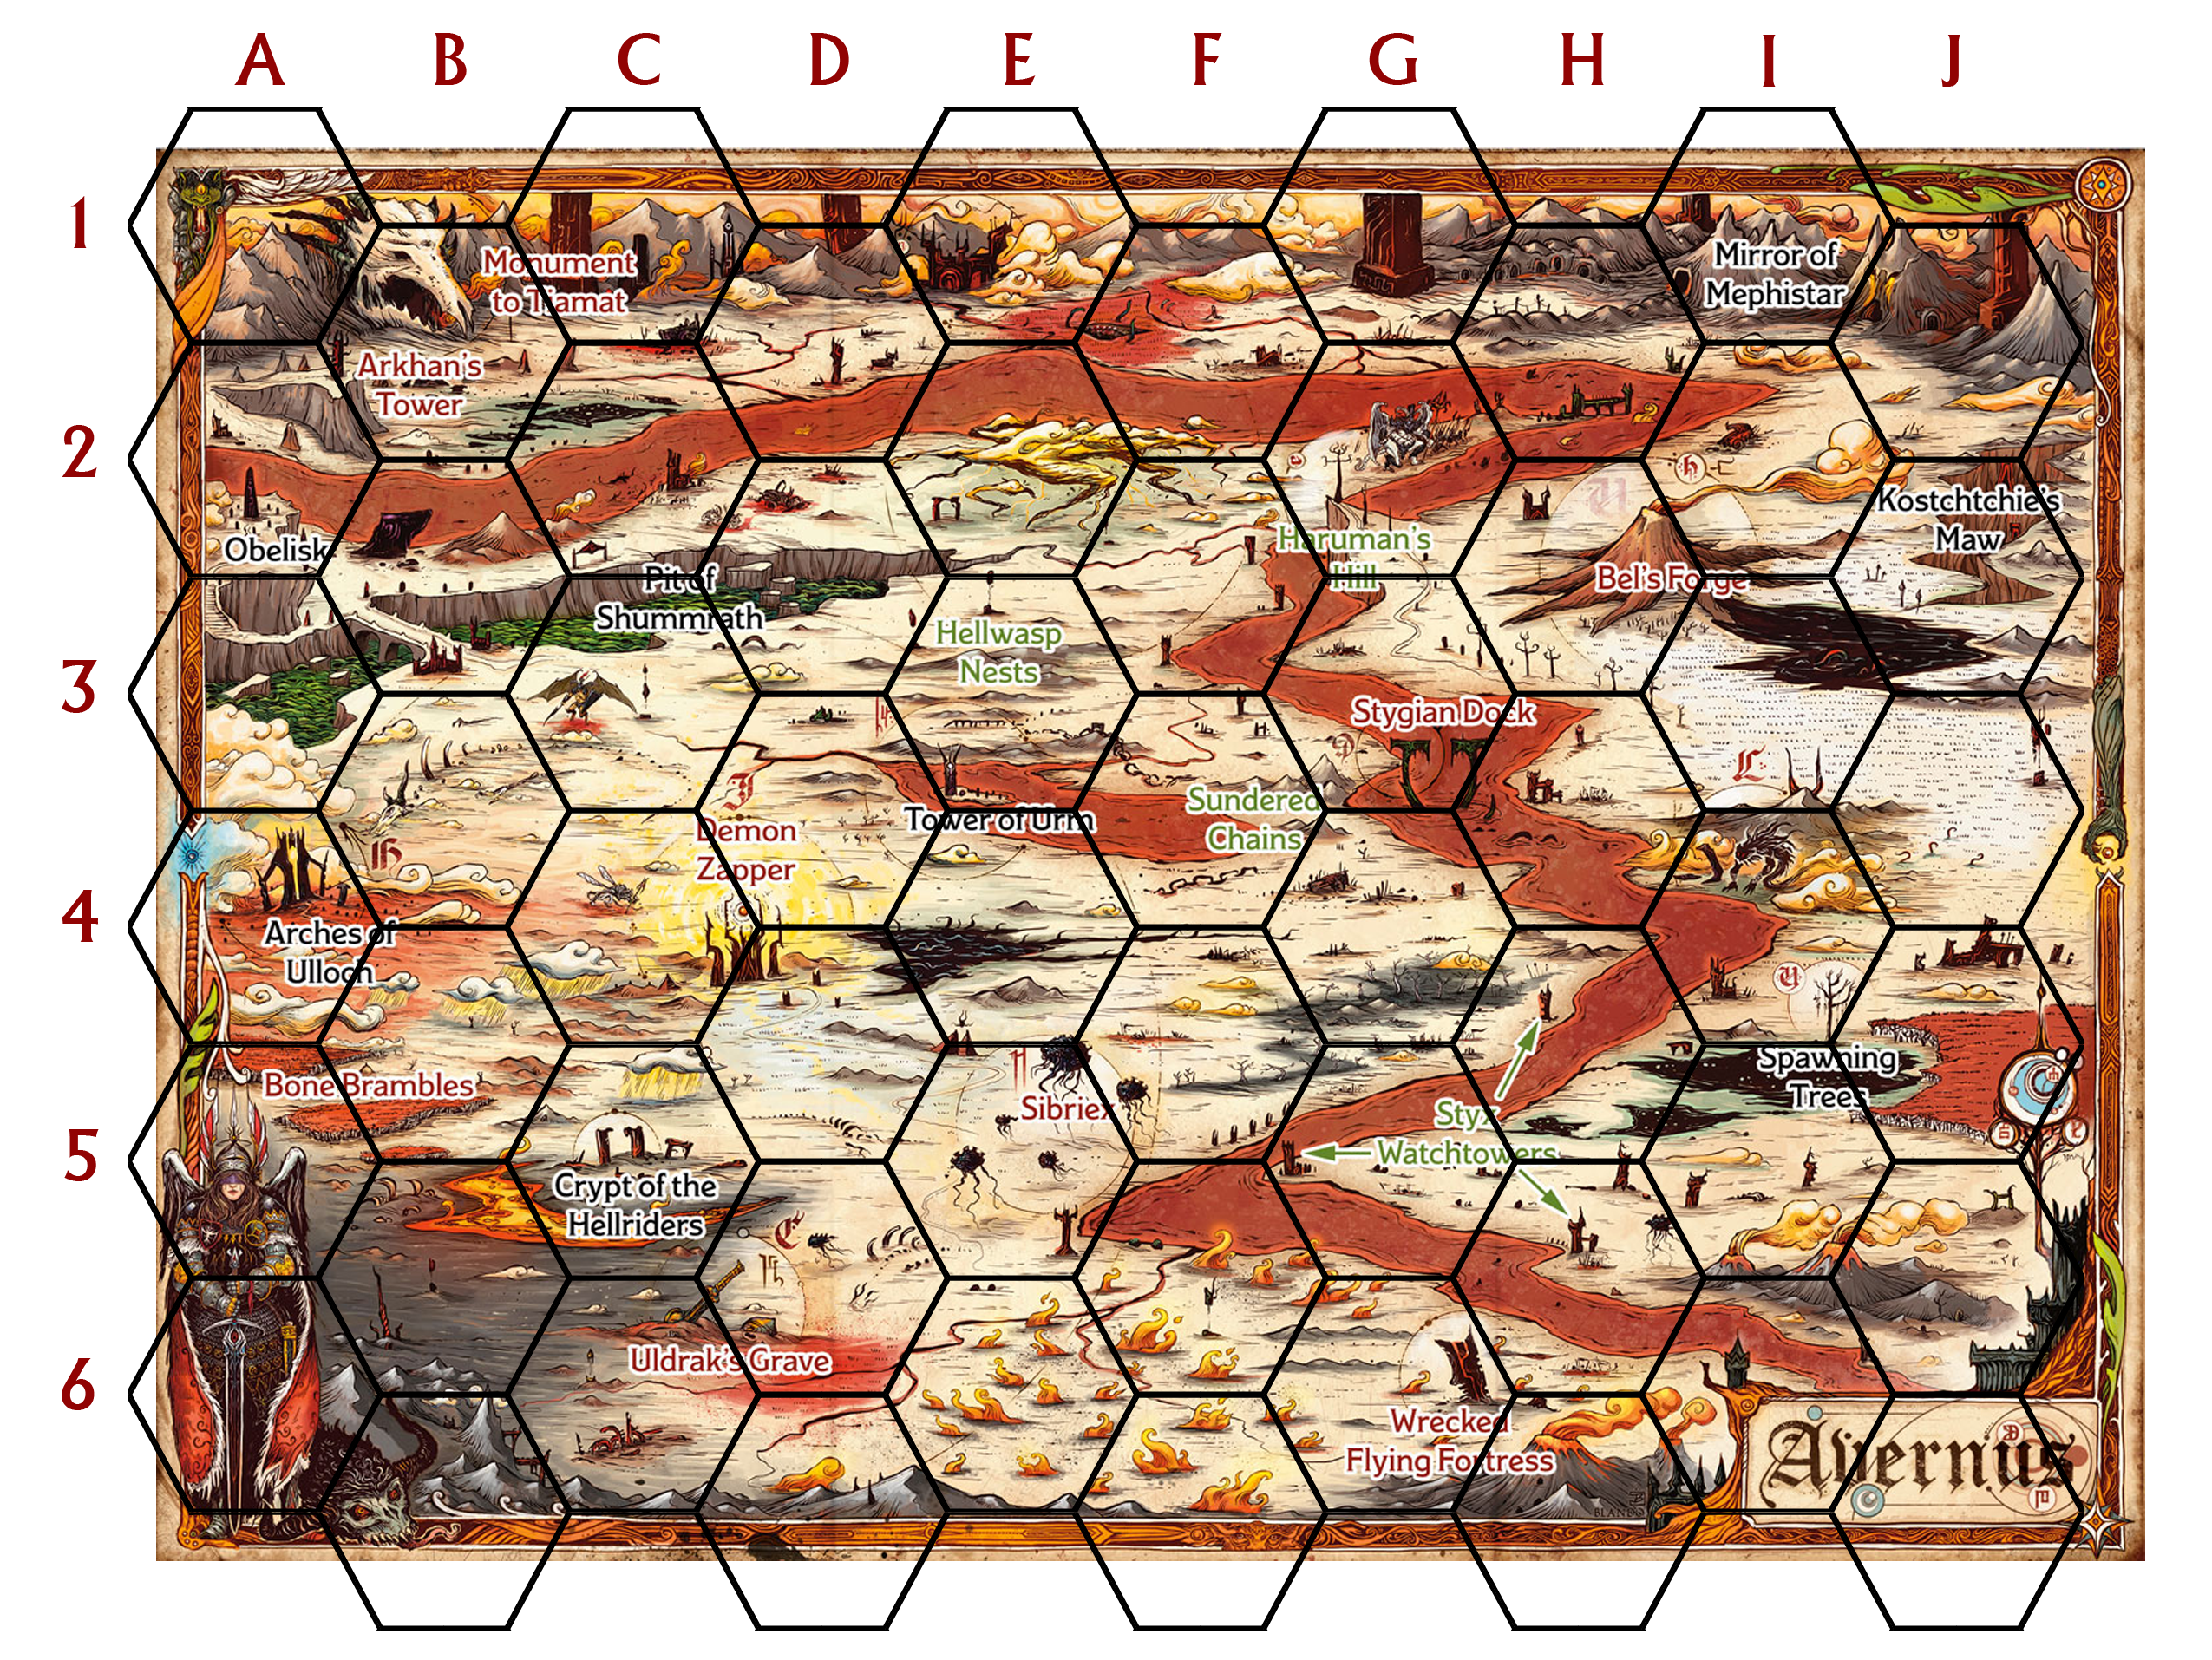
FINDING LOCATIONS
The difficulty and complexity of finding a specific location within the wilderness varies depending on the character’s familiarity and approach.
Visible Locations: As described in Part 5: Encounters, some locations are visible from a great distance. Characters within the same hex as the visible location (or within a certain number of hexes, as indicated by the key) automatically spot a visible location.
On Road: If a location is on a road, river, or trail, then a character following the road, river, or trail will automatically find the location. (Assuming it isn’t hidden, of course.)
Familiar Locations: Familiar locations are those which a navigator has visited multiple times. Navigators within the same hex as a familiar location can be assumed to automatically find the location. (Within the abstraction of the hexmapping system, they’ve demonstrated sufficiently accurate navigation.) Under certain circumstances, navigators may also be considered “familiar” with a location even if they’ve never been there. (Possibilities include possessing highly accurate topographic maps, receiving divine visions, or using certain types of divinatory magic.)
Note: If navigators are flailing about in their efforts to find a familiar location – by repeatedly “missing the hex,” for example – the GM can decide to treat the location as being unfamiliar until they find some way to reorient themselves.
Unfamiliar Locations: Unfamiliar locations (even those a navigator has been to previously) are found using encounter checks.
In other words, when the navigator has gotten the expedition into the correct hex and a location encounter is generated, that indicates that the navigator has found the location they were looking for. Expeditions can also spend time to specifically search an area in order to increase the odds of finding a location. See Part 7: Hex Exploration.