The revised background for the Dungeon of the Dead Three is covered in Part 3B: Lore of the Vanthampur Investigations. Short version: Duke Vanthampur discovered an ancient temple dedicated to the Dead Three under the Heapside neighborhood. She sealed off the connections to the sewers and built the Frolicking Nymph bathhouse on top of it in order to create a secret entrance. She has most recently offered the temple to the Dead Three cultists in exchange for their assistance (which currently takes the form of murdering refugees).
There are a number of elements in the Dungeon of the Dead Three that we’re going to be adjusting, polishing, or enhancing. We’ll start by looking at those issues in detail, then present a revised key, and round things out with an adversary roster.
THURSTWELL’S IMP SPIES
We’ll start in the very first room of the dungeon: D1, the Courtyard.
An invisible imp is perched on the southeast fountain. If the characters look as though they intend to cause trouble, the imp observes them quietly until they enter the bathhouse, then flies to Vanthampur Villa in the Upper City to alert Thurstwell Vanthampur, the oldest of Duke Thalamra Vanthampur’s sons. Thurstwell instructs the imp to return to its post but takes no further action, hoping that the characters dispose of his brother, Mortlock
Thurstwell’s imp spies actually turn up several times and they almost always do the same thing: They invisibly watch the PCs while taking no action. Then they fly to Thurstwell and report what they saw. And then Thurstwell doesn’t do anything with that knowledge.
Ever.
My first instinct when seeing an element that’s designed so that the PCs never become aware of it and which has no impact on anything the PCs will do or experience is to just delete it. (It’s actually kind of amazing how many published adventures include this sort of thing.) But there are a couple of clever imp interactions and the central idea of Thurstwell as a crippled spider stuck in his home, able to exercise his will upon the world only through his imp servitors while jealously observing his able-bodied siblings going out and about in the world, is a really great character beat.
So what we really need here is for the imp spies to become meaningful. Which primarily means that Thurstwell needs to take meaningful action in response to what the imps see. A few possibilities:
- He sends an imp to barter with the PCs. (He’d probably like them to kill one or both of his brothers. If he’s feeling daring, or if the PCs have already succeeded at eliminating his brothers, he might even ask them to kill his mother so that he can take her place at the head of the family. If the PCs were to go all in on this, you could have an alternate trajectory where, the job done, he asks them to take the infernal puzzlebox to Candlekeep and have it opened.)
- He sends a murder squad of Dead Three Cultists (Descent Into Avernus, p. 28) to kill the PCs.
- He sends an abduction squad to kidnap a refugee that the PCs care about so that he can use them as leverage. (Maybe to leverage them into an alliance. Maybe to force them to back off.)
Basically, if you play Thurstwell as proactive and Machiavellian, he can either become an unexpected ally or a hated enemy (or both).
WATER LEVELS
There are several text-to-map mismatches in the dungeon, but the most significant are those related to the flooding in the dungeon.
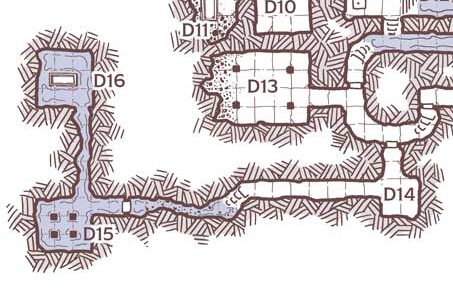
First, Area D8 is described as a “dry alcove”:
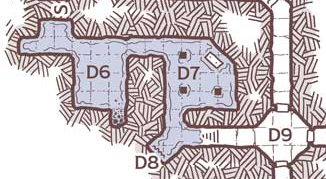
In addition to the coloring, the stairs should be placed NORTH of D8, not east.
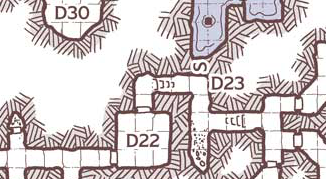
The design of the dungeon actually does a good job of having the flooded portions of the dungeon consistently lower than the rest of the dungeon. Which is why the failure to color in Area D23 (which is correctly described as flooded in the text) is also an error:
You may want to mark your copy of the map to make sure you get these details right while running the adventure.
THE DEAD THREE DOORS
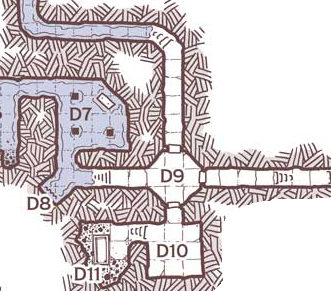
Let’s take a look at Area D9. There are four passages that lead out of this area: One comes from the entrance, while the others lead to cultists/shrines belonging to one of the Dead Three Gods (Bhaal, Bane, Myrkul).
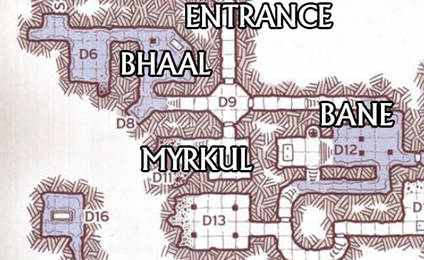
There are also three doors in Area D9:
- East: Bane
- North: Bhaal
- South: Myrkul
Am I crazy or should the door to the north actually be to the west so that all of the themed doors match the themed content behind them?
In practice, this would mean that the PCs are likely to come in from the entrance and be presented with three creepy doors that they have to interpret and choose and between. Not only is this a cool moment that would set the tone for the entire dungeon, it’s also an opportunity for a meaningful choice. Instead, there’s just a random choice stripped of meaning.
The simple solution here is to just move the door (and you’ll see that in the revised key below), but we’ll also be delving more deeply into the possibilities here in Part 3G: Xandering the Dead Three.
DUNGEON GAS
Area D18 is filled with explosive gas.

The gas has these properties:
- Invisible
- Lighter than air
- Smells like rotten eggs
These are the properties of modern natural gas (which is actually odorless, but since 1880 has had the smell added through the use of an odorant called mercaptan). I’m fairly certain this is not a coincidence, and the designers probably just defaulted to the explosive gas they were most familiar with.
But it’s a choice worth examining. For example, D18 is actually the lowest point in the complex, so it might make more sense to go with a heavier-than-air gas that could CONCENTRATE here, rather than a lighter-than-air gas that dissipates. This would allow you to describe the faint smell elsewhere in the complex where the gas is entering the area (D13, D17, and D19 would be good choices).
This is about more than just being “logical” or having an “accurate simulation” (the layout of the dungeon is designed; you can design it however you want). It’s about meaningful choice and problem-solving: If the PCs can detect the presence of gas leaks before entering Area D18, it gives them the opportunity to gather information and then use that information.
(The adventure kind of does this by saying that any character approaching D18 detects the smell and can make a skill check to recognize its significance. But that’s just a bang-bang interaction; not an opportunity to think, analyze, and make meaningful choices.)
Similarly, D18 is a chokepoint. You have to walk through it to get from one side of the dungeon to the other. “Bringing a lit torch or other open flame into the gas-filled room triggers an explosion…” But: “Followers of the Dead Three carry torches…” Hmm.
The adventure notes that the cultists will extinguish their torches before passing through Area D18, but it’s probably a stronger choice to go one step further here and give them light sources that reflect the environment: Safety lamps or light spells, for example. PCs, seeing this, could realize the danger of an open flame.
In addition to problem-solving, this type of thing also gives the dungeon the feeling of a complete environment rather than just a bunch of disconnected, individual rooms.
So what we’re looking for is a gas with these properties:
- Invisible
- Heavier than air
- Has a distinctive smell (naturally, without the addition of odorants)
In researching safety lamps I discovered that the word dampf, in German, means “vapour.” In England, the term became used to describe a variety of gases encountered during mining:
- Firedamp refers to a flammable gas, most often methane.
- Whitedamp refers to a smothering, toxic gas (usually carbon monoxide resulting from burning coal). This is the gas which canaries were famously used to detect.
- Stinkdamp is hydrogen sulfide. Poisonous, corrosive, and very flammable, with the foul odor of rotten eggs.
- Afterdamp, the toxic mixture of gases left in the aftermath of an explosion. Could be any mixture of the above.
So we can look at that list and identify stinkdamp as the gas we’re looking for.
In remixing the dungeon, however, there are a few more things I’d consider.
First, the risk of an explosion in Area D15. (Looking at the map it seems logical that gas flowing down to D18 would also flow down to D15.) Whether the PCs encounter D18 or D15 first, even if they trigger one explosion they’ll have an opportunity to apply that lesson and avoid the next one. (Or, if they’ve figured out how to avoid the explosions, they potentially get twice the pay-off for it.)
Second, there should be some clear indications that the cultists are trying to fix the gas leak problem. (And probably the sewage flooding the place, too. Yuck. They’re not Moander worshippers.)
Third, I think it would be cool if the cultists were USING the gas for something. Experiments in the Morgue (D13) seem cool. So rather than using stinkdamp, we’re going to use corpsedamp. Usually extracted by necromancers from rotting corpses, corpsedamp can be useful to their work in a number of different ways. I’ve previously written about corpsedamp here, including stats for corpsedamp zombies. So we’ll also swap out some of the skeletons and replace them with these experimental undead.
ELUSIVE MORTLOCK
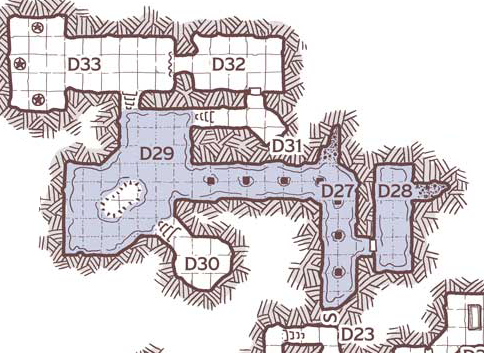
We’ll talk about this in more detail in Part 3G, but looking at the dungeon on a macro-level it’s relatively easy to see that it’s fairly linear: There are a couple of side branches and a couple of loops, but the design strongly funnels you through the full dungeon to Area D29, where the essential encounter with Mortlock that links you to the next scenario is located.
We talk about some of the other problems with this encounter in Part 3 of the Remix, but the thing to note here, once you identify D29 as the essential Must Have Encounter™ for the adventure to continue, is that the only way to get to Area D29 is through the secret door in Area D23:
I was initially going to describe this as a weird choice, but I think we can realistically describe it as simply being a bad choice. This is something I’ve talked about before, but you’ve created a chokepoint here which makes your scenario very fragile: If the PCs don’t find/go through that secret door, you literally have to toss out the next 232 pages of the book. So a secret door is a bad choice.
But they’ve also sort of tripled down on this bad choice:
- The secret door is in a weird location: Just sitting in the middle of a hallway. That actually makes it far more likely that the PCs will simply never think to look for a door there.
- They’ve put a cultist guard here who, upon spotting the PCs, runs off to a different area. This will have the effect of making the PCs chase him, making it even more likely that they won’t take the time to search this random chunk of hallway.
- They go to oddly great lengths at several points in this dungeon to specifically prevent the PCs from learning about this secret door. (Which, again, is absolutely necessary for the entire campaign to happen.) For example, in Area D14 there is a rat. They actually take the time to specifically tell the DM that if the PCs use speak with animals, this rat DEFINITELY won’t tell them about the secret door.
I’m not a big fan of this kind of needless stonewalling in any case, but here it’s basically perverse.
Now, the work we’ve done revising the revelation lists for the Vanthampur Investigations (see Part 3C) has greatly reduced the fragility of Act I of Descent Into Avernus overall, and this is no longer a Must Have Encounter™. However, it’s still structurally ideal for the PCs to confront Mortlock here: You don’t need to force it to happen, but it also doesn’t make a lot of sense to go out of your way to prevent it from happening.
One way we could remove the fragility of this secret door would be to use the same solution we’ve applied everywhere else: The Three Clue Rule. Simply add three clues pointing to the existence of the secret door, giving the players a robust opportunity to have the revelation that it exists and then track it down.
Another solution might be making it explicit that (a) Mortlock Vanthampur is in the dungeon and (b) you need to confront/kill him. That way if the PCs have seemingly cleared the entire dungeon but HAVEN’T found Mortlock yet, they’ll know that there must be a secret door and they can scour the place until they find it.
But in this case the solution is considerably simpler:
Get rid of the secret door.
There’s absolutely no reason for this door to be a secret door, so just make it a regular door.
CRAMPED CORRIDORS
This is actually not a complaint which I have about the scenario, but one which I’ve seen expressed by a number of GMs (including several who have contacted me directly about it): The Dungeon of the Dead Three is filled with 5-foot-wide corridors and relatively small rooms, and this results in unsatisfactory combat encounters.
I haven’t actually run the scenario (so take this with a grain of salt), but I’ve run enough similar dungeon compounds over the years that my initial reaction to this complaint is strong skepticism. The claustrophobic conditions of a dungeon like this present unique strategic challenges, but it behooves the players to turn those strategic challenges to their advantage (rather than vice versa).
With that being said, to make a dungeon like the Dungeon of the Dead Three really come alive, you need to break the preconception (that’s been subconsciously ground into you by dozens, hundreds, or thousands of encounters from published scenarios) that fights “belong” to a particular keyed room.
For example, if you look at the necromite fight keyed to Area D10:

… that looks like a really boring fight. A 15’ square? With three of those squares being occupied by NPCs?
But what you need to do is recognize that THIS is the real encounter area for the fight:
It’s particularly important to understand this if you’re using a battlemap! It’s very easy to hamstring an interesting encounter by artificially limiting what you actually draw or present as the battlemap for it.
(I talk about these issues more in Running the Campaign: Dungeon as Theater of Operations if you’re interested.)
With all that being said, if this is an issue that concerns you, it looks to me like you can just interpret the map as being drawn at a 10 foot scale instead of a 5 foot scale. Nothing seems to go particularly wonky in doing so.
CULTISTS DOING WEIRD SHIT
Is it weird that one of the cultists has decided to stand guard in D23 “standing in the water” when he could go up the nearby stairs and not have his feet rot off? Yes.
But the cultists down here are doing all kinds of nonsensical shit that I don’t really understand, so maybe it’s just a gimmick that I don’t grok. For example, two days ago they killed a guy and just left his corpse floating in the water for no apparent reason. Or there’s the room where three cultists are lying on the floor “pretending to be dead”… just for fun? On the off-chance somebody chooses this precise moment to stop by?
I don’t get it. Maybe you do. But if you don’t, it’s something you might want to think about before running the dungeon.
DEAD THREE LEADERS
One subtle thing that I almost forgot to talk about because I actually did it subconsciously: Although the local leaders of the Dead Three cults do appear to be named in Descent Into Avernus (Yignath, Flennis, and Vaaz), only one of them is explicitly identified as such. The Remix not only calls particular attention to their identity for the benefit of the DM, it also gives some methods for the PCs to learn their identities.
Identifying the leaders isn’t strictly essential, so I didn’t bother doing a full Three Clue Rule work up for it, but you’ll note that I’ve dropped their names into various pieces of correspondence and you should also make a point of having cultists blabber them out when questioned.
Giving the players an opportunity to figure out the bad guys’ hierarchy here will give them a target list to aim for. This not only gives them the satisfaction of figuring something out, it also gives the Dungeon of the Dead Three a structure in play that’s just slightly more meaningful than “clear the dungeon” (even if, in actual practice, they still end up clearing every room).
TIAMAT TREASURE
There’s this weird little, somewhat abortive subplot here where the Vanthampurs have somehow stolen treasure from the hoard of Tiamat in Avernus. Some of the treasure is here in the Dungeon of the Dead Three and some of it is in Vanthampur Manor. As the PCs leave the dungeon, they encounter Tiamat cultists who have come to retrieve the treasure.
 The original intention appears to have been for this stolen treasure to be a significant plot point (Descent Into Avernus, p. 6): “By returning her stolen treasure, characters can convince Tiamat to break Elturel’s chains.” But it seems to have been dropped at some point during development (although mentioned in this opening summary, the treasure doesn’t actually factor into any negotiations the PCs have with Tiamat later in the scenario), leaving only some weird vestigial bits.
OPTION #1: My initial inclination was to basically finish expurgating the material from the adventure by removing the encounter with the Tiamat cultists and just not caring about where the cultists’ treasury came from. It feels like very little (if anything) is lost if you do this, and you can easily just excise the encounter if you’d like.
ESTABLISHING LORE: However, I did see an opportunity to use the Tiamat relic in the treasury to establish the key piece of lore that Tiamat is imprisoned in Avernus (since she will factor into the Avernus section of the campaign).
WHERE DID THE TREASURE COME FROM? The explanation (and significance) of how and why the treasure was stolen from Tiamat’s hoard appears to have been lost at some point during the campaign’s revision. Rebuilding all of that from scratch is probably more complication than I’m interested in dealing with, and if you’re going with Option #1 it’s largely irrelevant.
However, some of the additional material added to the Remix established that the Dead Three cult leader Yignath is easily distracted and may be pursuing projects other than the refugee murders. I decided this would include a burglary at Hhune Manor, in which he stole this treasure and also kidnapped Satiir Thione-Hhune. Mortlock allowed Yignath to keep the money, but has sent Satiir to Vanthampur Manor to be used as political leverage.
(Because the Shield of the Hidden Lord is no longer stolen from the Hhunes in the Remix, this also explains Satiir’s presence in Vanthampur Manor.)
OPTION #2: Having done all this, I realized that the Tiamat cultists had suddenly become both relevant and interesting again. In this option, the Hhune treasures included a number of Tiamat-related artifacts, including two pieces — a mask and a crown (see relevant lore below) — that were deeply desired by Arkhan the Cruel. Wards of the Hhune vaults had long hidden them from Arkhan’s sight, but once they were removed from the vault they became vulnerable and the cultists were sent to retrieve them.
- The cultists’ interest in the artifacts will direct or redirect the PCs attention to them, allowing us to emphasize the key piece of lore.
- If the PCs are aware that the mask has been removed from the cache and taken to Vanthampur Manor, they may be able to convince the Tiamat cultists to assist them in raiding the manor.
- Alternatively, the Tiamat cultists might figure out where the mask is independently and complicate the PCs’ raid by executing their own raid at the same time.
- If the PCs assist the cultists in retrieving the artifacts, they are thanked “on behalf of Arkhan the Cruel.” If they encounter Arkhan when they travel to Avernus, he will be more inclined to aid them.
RELEVANT TIAMAT LORE: The full history of Tiamat is a twisted knot that I’m not going to attempt to unravel at the moment. There are three key facts:
- She once ruled Avernus, but the evil dragons born of the vast spawning pits she created proved ineffective in the Blood War and Asmodeus deposed her. (This epoch of Avernus would have predated even Gargauth’s rule by eons.)
- Tiamat is somehow imprisoned in her lair, which also guards the entrance from Avernus to Dis, the second layer of Hell.
- In the Year of the Bloodbird (1346 DR), Untheric cultists successfully summoned an aspect of Tiamat in the form of the Dark Lady. When the Dark Lady first appeared, she wore a simple crown and mask. It is, in fact, this crown and mask which the cultists seek. (They have no magical powers; they are merely historical curiosities held in great reverence by those who have pledged their fealty to the Dragon Queen.)


My group saw some of the items in the treasure hoard at the end of the dungeon and agreed that they probably shouldn’t take it as it looks like it belongs to… someone else.
When the Tiamat cultist’s showed up back at the entrance, my group said, “Your treasure is in the dungeon down there. Everything else is dead.”
Tiamat Cultist: “… Thanks, buddy.” And walks past the party into the dungeon. End scene.
XD
Justin has amply (and impressively) pointed out across a series of posts in Twitter and in the blog that they have re-written the back history of things for this hardcover adventure and wasn’t even consistent with what they had previously published for 5e.
This creates headaches (among other things) for those of us who have followed this “world” setting as it has changed over many editions.
I wonder though: Should any of that matter to someone who is running this particular adventure?
If the GM and/or some of the players have played campaigns in the past that have touched on Avernus, Tiamat, or these Devils in particular, it could matter a lot … but if you haven’t is it really worth the effort to fix that part of the adventure?
I don’t agree with the re-writing of major and minor details of setting lore between editions, but WotC did that anyway. It is great when a GM can show players from past campaigns this is how the world is/was impacted by the previous campaign. And yet … if I’m telling a new campaign that isn’t linking into past stories that I’ve run in this world setting why spend my effort to link in past lore about the political situation of Avernus? Maybe it would be more worthwhile just trying to make what they drafted up make logical sense and be consistent for the campaign I’m now trying to run.
For me this is more a thought exercise and another opportunity to see Justin make use of all of the tools available to a GM to make this into something worth running. I rarely tell enough stories in a particular world story that I can even link to what was done in previous campaigns.
You’ve got the right of it, forged. Several people think I’m delving into lore and commenting on the inconsistencies (and how to resolve those inconsistencies) because I’m obsessing over canon. That’s not really my bag.
I dive into the lore, because I find depth valuable.
For example, I spent a bunch of time researching Gargauth and establishing what will be, for my version of the campaign, a definitive version of his back story. Why? Because he’s a character in the campaign! And not just a walk-on. It’s quite likely that the PCs will be carrying him around and interacting with him more or less constantly in every single session. I want to know who Gargauth is and have a well-developed foundation for playing him.
Why research Tiamat? In the immediate case because I wanted to root the Tiamat relics in some meaty context. (Tiamat also features prominently later in the campaign, so getting some groundwork in here is valuable.)
And so forth.
Of course, rather than diving into the existing lore for these characters I could just make stuff up. (And, inevitably, I will. I already have in the examples above.) But using the lore is the primary reason to use a pre-made campaign setting in the first place! I talk about this a bit in The Grok Threshold: Running a Published Setting, but it’s through the lore that you reduce prep time, leverage the expectations/knowledge of the players, create a sense of shared community, and reap the benefits of injecting someone else’s creative vision into your own.
(For example, I never would have had the cool image of the Dark Lady manifesting in a mask and crown as part of the rites of the Untheric cults if not for my deep dive into Tiamat lore.)
Very nice work with the gas! The changes should make it pretty fun for the players (and the GM XD)
BOOM!
Does the interaction with Vaaz change since Mortlock would be in charge of him? Because as is, the Dead Three Dungeon can be deadly for players if they try and fight Vaaz, and the players have to confront Mortlock(even if they don’t try to kill him). Not to mention there’s a CR 4(Master of Souls) and a bunch of mobs that are still encountered with not a lot of chance for rests.
So is Vaaz weakened or anything? Or Mortlock more willing to cut a deal?
A quick question:
In your remix, if the Shield of the Hidden Lord wasn’t stolen from the Hhunes, how did the shield go from being in the Hhune’s possession (they had it in Elturel as they are inner members of the Knights of the Shield (Part 3B)) to being in the dungeon underneath the Vanthampur’s manour in Baldur’s Gate with Kreeg and Duke Vanthampur?
See here. Member of the Hhune family took it to Elturel at some point in the early 15th century.
@Justin
But how did it go from being in the Hhune’s possession in Elturel to being in the dungeon under the Vanthampur’s manour in Baldur’s Gate?
Kreeg brought it. In this continuity, Gargauth, as Zariel’s agent, orchestrated the Fall of Elturel, working with the Cult of the Companion (the Elturian Zarielites). As such he was working closely with Kreeg (the current head of the Cult of the Companion) and Kreeg brought the Shield to Baldur’s Gate where, before the PCs get involved, Gargauth is planning to begin work with the Vanthampurs to similarly orchestrate the Fall of Baldur’s Gate.
Cool, thanks for the clarification
Justin,
Great Remix! I just have a question about using Thurstwell. Without him actively communicating with the players, how would they know of him being an entity at all before they get to the manor? If he operates using only invisible imps and sending murder or abduction squads, it seems to me the PCs have no way of knowing where these squads are coming from and their ire will be with the cult on a whole, not with him. Once they do find him, the moment just has them going “oh cool. crippled guy with some imps” with no knowledge that he was the one sending the squads as they don’t ever see the imps. I want to include him as a constant thorn in their side but I am having trouble finding a way to including him without it seeming unnecessary.
Alex; I plan on going with the “murder squad” route; Thurstwell sees the party as a threat to his own goals and safety, so it’ll be in his best interest to see them defeated or chased away. My party arresting Amrik before the DotD3 on charges of forgery and humanoid trafficking (they can’t prove he’s tied with the Cult just yet) will be the last straw for Thurstwell; he’ll send a squad after the party the night they arrest Amrik, and the leader of the group will have a letter from Thurstwell. That night is also the night Thurstwell and Amrik will decide to have Vaaz assassinate Mortlock; an Imp will visit Amrik in the Seatower dungeon and deliver the message to Vaaz, who will attempt to carry out the killing the next night…the night the PCs decide to assault the DotD3 and take out the cult leadership once and for all.
This is great stuff, I’m using it in my campaign and the players are loving it!
To double down on the Tiamat subplot:
After the Battle of Dragons 4 years ago at the Well of Dragons, the Masks were recovered from the Cult of the Dragon, and kept at Elturel for safe keeping. (from Tyranny of Dragons).
The mask at Vanthampur Manor was probably originally meant to be one of the masks. The other four are sealed at Elturel, now in Hell, and recoverable by agents of Tiamat.
While in Hell, Arkhan the Cruel could send the players back to Elturel to recover the masks in return for Tiamat’s support…
So I just read the book again and realized the secret doors are just totally useless features entirely in this dungeon.
You pass within 5 feet of it and it has a passive perception DC of 10. So if you have a light source every PC with even an 8 In wisdom automatically notices something in the wall there.
If the whole party has terrible wisdom and is also completely in the dark with -5 perception, that doesn’t matter at all either because the rescued tiefling with dark vision notices it immediately and presumably says “hey look a door!”
If the whole party is in the dark and has terrible perception AND killed the tiefling, then the cultist that transforms into an old woman says “hey I think there’s a door over there in that wall!”
So the fragility is really an illusion- it’s basically a regular normal door. Except for being needlessly complicated and whatnot .
This is great stuff – thanks so much for doing this Remix Justin!
Something I was wondering about though – this first part of the campaign (levels 1-4) has a lot of “dead-end” lore. By that I mean lore that that is used once and then discarded. In this case, the PCs will spend a couple of sessions learning all about the Dead Three and fighting its cultists only for them to clear the dungeon and promptly forget about them.
I find that reusing lore throughout the campaign makes my life easier and rewards players who take notes – its a win-win! I’m not sure how to reuse the Dead Three, however. Rekeying the dungeon to feature Zarielite cultists feels like it narrows the campaign too much – we already see a ton of Zariel. But I’m not sure how to make the Dead Three show up later. Maybe have another faction in Hellturel?
“WHERE DID THE TREASURE COME FROM?” – I think it’s meant as a direct tie in to the published adventure Tyranny of Dragons which seems to to precede the events in descent. Basically, dragon cultist are trying to to resurrect Tiamat to the material plane and part of the ritual requires a large sum of money which cultist literally stole from surrounding areas. So it’s money stolen by the dead three cult from the dragon cult who stole the money from the sword coast.
One of the players – a Druid – noticed the invisible Imp in the bath house court yard after a fight with a Murder Squad I had waiting for them when they returned from their first entry. I really liked the twist introduced above so I came up with this dialog for the Imp:
My master has sent me to offer you a bargain, a deal, a fair trade.
He has taken something of interest to you – the Nuska girls are being held at his house, in his dungeon.
Your friends at the flaming fist are actually his friends at the flaming fist.
(The party had freed the girls at the Posideon and sent them to the Fist for their statements)
He will release the ladies if you complete two tasks – Kill Mortlock, and Amrick.
For proof of each death, he will release one of the girls.
Both of these men are directly involved with the cultists here, and the murders of the refugees.
Mortlock is here, and I can lead you to Amrick once you have dispatched him.
You and the fist must leave my master harmless, he is not connected with these matters.
If you agree, simply sign this contract and I will wait here for proof of Mortlock’s death.
Our Flaming Fist officer signed the contract in blood since he didn’t have a red ink stamp pad to use with his official seal, and since it was written in Infernal, took the Imps word for it’s details. Mortlock surrendered after a brutal fight and they decided to take him to the fist for questioning – trial and execution later. Ending Mortlock wasn’t happening speedily enough for Thurstwell so the Imp returned to threaten them – Mortlock identified his brother Thurstwell as the Imp’s likely master.
Here is the Imp’s dialog when he encounters the party in the bathhouse gardens on their way to the Fist office to interrogate Mortlock:
I return to remind you of your contract with my master… (pointing to the document he holds)
Perhaps you did not read the fine print? (written in Infernal)
It says that neither you or Mortlock may leave this bath house unless he is dead.
Are you going to fulfill the contract now?
(The Imp snaps his fingers and a Pit Fiend appears from a billowing cloud of greasy black smoke)
My friend here has just returned to Avernus from 1001 days in the Pit of Flames.
He understands all the details of contract law from the nine hells, by which you are bound here (pointing to the contract) signed in blood.
The Fiend nods at the Flaming Fist lieutenant (who must make a DC 21 wisdom save or be held.)
If held, the Fiend then waves his hand and a wall of fire scorches the fist officer for one round. (5d8 – dex save automatically fails)
The fiend then claps his hands and the flames dissipate and the fist officer is released.
I will take Mortlock’s head to my master, Conclude your business here with the cultists, and wait for my return.
I will take you to Amrick next.
Too bad their cleric was unconscious from the fight with Mortlock. Since only the Fist officer and Mortlock were required to stay, they sent the cleric and the Spy off to find a healer and the Tiefling sorcerer flew off to the Fist office for reinforcements. The Fist officer and Mortlock barricaded themselves in the bath house and Mortlock escaped back into the catacombs. The Spy and Cleric returned fully healed (they found a street faith healer the slapped his palm on her forehead and shouted “You are healed!”. The Tiefling returned with 4 third level fist guards and they proceeded to hunt down Mortlock and he was eventually separated from his head.
This was the first time I had to force them down a path, but they needed a lesson in Hellish contract law.
One of the things I did in my run of this module was to change the Elfsong tavern sahuagin priestess into a priestess tied to the hoard of treasure.
I ran this module in the wilderlands of high fantasy setting, swapping out Baldur’s Gate and Elturel for the City-State and Warwik.
so when it came time for the sahuagin priestess in the Elfsong tavern, I changed her to an priestess of Armodad Bog seeking leads to missing treasure stolen from Viridistan and the Green Emperor by the Vanthampurs to solidify their claim to the throne with the disappearance of the Invincible Overlord, which explains why she’s hanging out in the Elfsong tavern (to intercept/locate kidnappers-treasure thieves) and why she shows up once the players clear out the Dungeon of the Dead Three. It was fun for playing up the political aspect of the cultists as now the rival power of Viridistan is sticking its nose in the City-State’s business, and an extra patron the PCs can work for or consult, especially since Armodad Bog’s followers (being generally evil) could give insight into the nature of the cultists and the Vanthampurs’ conspiracy against the City-State.