Should the PCs be able to buy magic items? Should your fantasy cities have magic item markets? It’s not just how common magic is, it’s how common different TYPES of magic are. The answers you choose can utterly transform your D&D, Pathfinder, or other fantasy RPG campaign.
Advanced Gamemastery: Magic Item Markets
July 8th, 2024
The Vladaam Affair – Part 14: Guild – Surveyor’s Headquarters
June 29th, 2024
This company of mapmakers rose to prominence nearly three centuries ago when they began producing incredibly detailed maps of the Serpent’s Teeth archipelago based on the exploration ships that were sent into the southern reaches of the island chain by Yrkyth Vladaam. These charts greatly expanded trade throughout the Whitewind Sea during the decades leading up to the Great Sea War.
The Red Company of Surveyors still uses as its mark the great seal Yrkyth used when he was head of the household. The company’s influence considerably declined following Yrkyth’s disappearance in 651 IA, but continues to be known for their accurate navigation charts.
The company’s chart-making workshop is located in Oldtown. Their apprentices work as boy messengers on the Docks, purchasing interesting chart data from docking ship captains. (Some of these apprentices are part of Part 18: Vladaam Drug Running.)
The guild uses a diamond-feather badge (representing the quills of the cartographers, but also having deeper meanings for the Brotherhood of Yrkyth).
| DENIZENS | Location |
|---|---|
| Guildmaster Essetia | 1st Floor (25%), Area 8 (25%), Inner Sanctum (10%), or not present |
| 2d6 Chartmakers | 1st Floor |
| Captain of the Iron Fleet | Area 4 (10%) |
Chartmakers: Use artisan stats, Ptolus, p. 606.
- Proficiency (+2): Cartographer’s tools
- Equipment: diamond-feather guild badge, Vladaam deot ring
Guildmaster Essetia: Use mage stats, MM p. 347. AC 16 (bracers of defense, ring of protection).
- Proficiency (+3): cartographer’s tools, Arcana, History, Insight, Persuasion
- Combat Equipment: wand of magic missile (1d6+1 charges), portion of superior healing, dagger, light crossbow (20 bolts)
- Magic Items: dust of dryness (x2), scroll of identify, bracers of defense, headband of intellect, ring of protection
- Other Equipment: backpack, rations (x6), scroll case, spellbook, spell component pouch, pearl (x3, 100 gp each), 100 gp, Vladaam deot ring, diamond-feather guild badge
Cantrips (at will): dancing lights, light, mending
1st level (4 slots): alarm, comprehend languages, detect magic, identify, shield
2nd level (3 slots): detect thoughts, invisibility, web
3rd level (3 slots): clairvoyance, dispel magic, fly4th level (3 slots): locate creature, stoneskin
5th level (1 slot): bigby’s hand
Oldtown
Ridge Road – E5
EXTERIOR
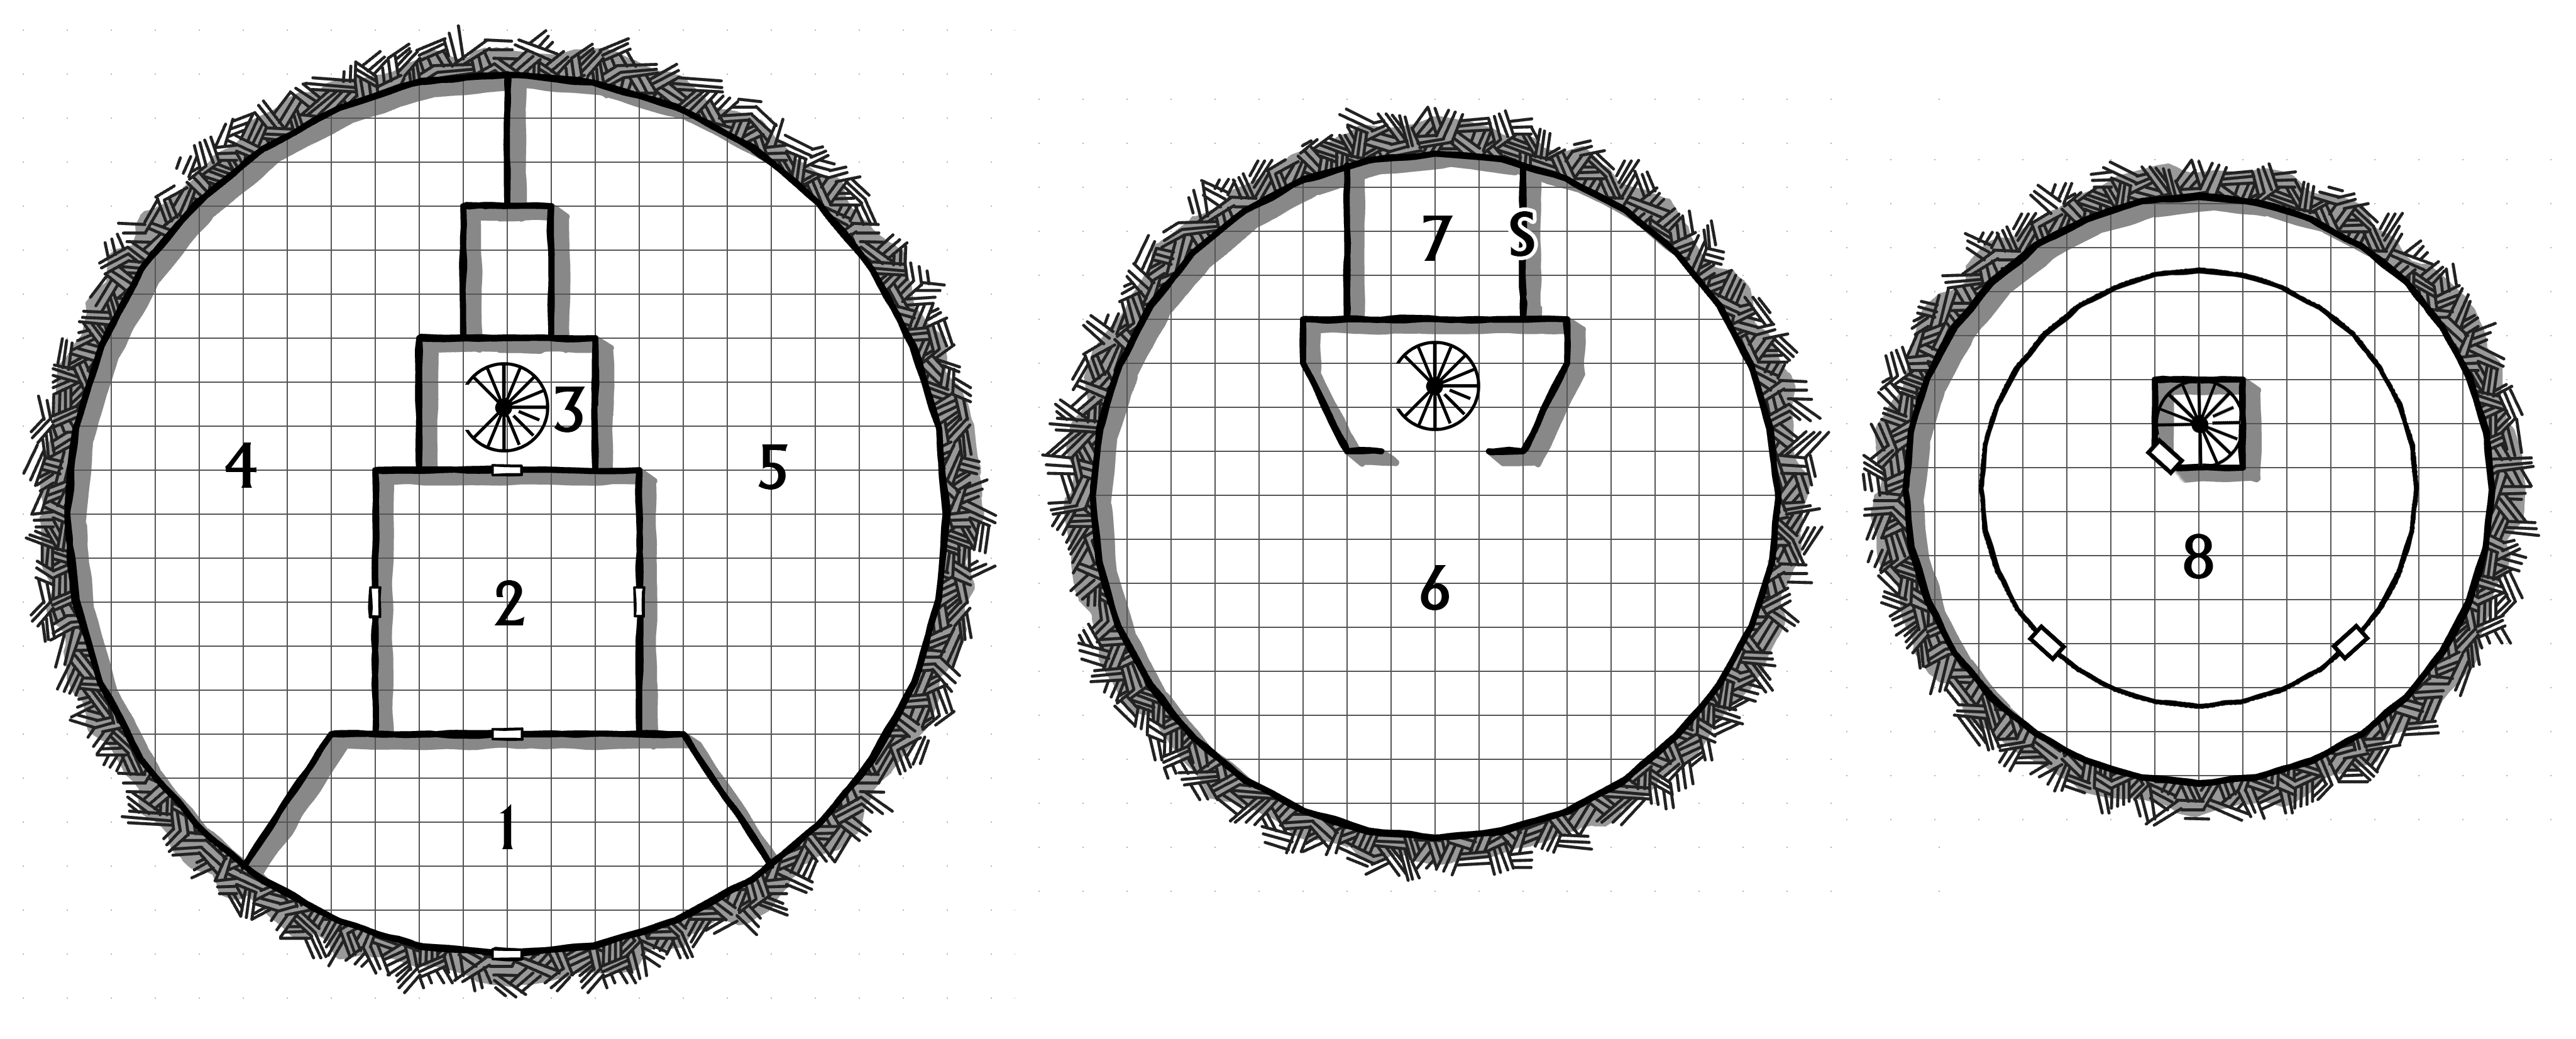
A three-storey, stepped tower. A balcony runs around the perimeter of the third floor. Red and gold banners hang around the circumference of the second floor.

AREA 1 – ENTRY
A small writing desk off to one side of the chamber is typically manned by a guildmember who will inquire after the business of anyone entering.
FIRST MAP OF THE GUILD: Hanging on the wall to the left of the entrance there is an old map of Ptolus. A DC 10 Intelligence (History) check can note the major departures from the modern city:
- Oldtown is nearly in its current state.
- The Nobles’ Quarter is present, but the estates are smaller and less luxurious.
- There are no bridges to Rivergate, and there’s only a single large, walled manor there.
- North of the river, where the Temple District is today, there’s a small cluster of buildings around the Cathedral.
- There’s an area labeled “Guildsman District” clustered around the top of the ramp leading down to the Docks. (Today, this area would be considered the easternmost part of Midtown.)
- South of the river, Oldtown seems to spill out off the mesa and into the western reaches of what’s today the South Market, but the buildings don’t even reach as far as Emerald Hill.
CHART OF THE WHITEWIND SEA: Hangs on the wall to the right of the entrance. Clearly archaic. Drawn by the surveyor who founded the Brotherhood of Yrkyth. (The letters of his name have been cleverly crafted to resemble the diamond-feather symbol of the guild.)
AREA 2 – GREAT SEAL OF YRKYTH
The marble floor of this entry chamber is tiled to form the Great Seal of Yrkyth.
AREA 3 – STAIRS UP
These stairs lead up to Area 6 and the door to Area 8.
AREA 4 – GUILD GATHERING HALL
A long, mahogany dining table runs down the center of this room. The benches to either side of it are padded with purple velvet.
FIREPLACE: On the right-hand wall, there’s a large fireplace. It’s cleverly designed to pump heat under the stone bench which lines the curve of the outer wall.
BOOKCASE: Holds journals and logs donated (or purchased) from various ship captains over the past several centuries.
AREA 5 – CHARTMAKER’S ROOM
This room is filled with drafting tables and associated tools. Most of the guildmembers here are engaged in simply copying maps from the guild’s library (Area 6), but occasionally there will be a new map being drafted.
DC 12 Intelligence (Investigation): Among the mapmaking equipment there is a table with financial records.
- This includes a Tithe Payment of Rent: The boy apprentices of the Red Company of Surveyors are housed in the Vladaam apartments on Crossing Street in Oldtown.
- GM Note: This is not the apartment building occupied by chaos cultists in Night of Dissolution, but one of the neighboring buildings. See Part 15: Oldtown Apartments.
AREA 6 – MAP LIBRARY
This library contains detailed charts of the Whitewind and Southern Seas, but also maps of Palastan, Cherubar, the Plains of Rhoth, the Sea Kingdoms, Ren Tehoth, the Plains of Panish, the Prustan Peninsula, and even the distant lands of Uraq.
ACCESS: The guild charges 100 gp for access to the map room. There is an additional copying charge per map. (These maps represent valuable commercial intelligence.)
LIBRARY: The library grants a +2 bonus to navigation- and geography-related checks.
TREASURE HUNT: A conjoined DC 16 Intelligence (Investigation) and DC 20 Wisdom (Survival) check requiring 1d6 days per check can allow a researcher to turn up a map to a potentially interesting location.
- Use Grim’s “All the Dice” Treasure Map Generator, with a 50% chance of generating a treasure hoard.
HIDDEN SWITCHES: There are six hidden switches located around the room. If activated in the correct sequence, they open the 4-ft. thick stone wall leading to Area 7. If activated in an incorrect order, a magical trap is triggered which summons a chain devil and sends a mental alarm to Guildmaster Essetia.
- DC 10 Intelligence (Investigation): To find one of the six hidden switches.
- DC 14 Intelligence (Investigation): To find two of the six hidden switches.
- DC 20 Intelligence (Investigation): To find all six hidden switches.
- DC 25 Intelligence (Investigation): To realize there’s a trap triggered with an incorrect activation sequence. A second DC 25 Intelligence (Investigation) or a DC 16 Intelligence (Thieves’ Tools) check can determine the correct sequence.
AREA 7 – ENTRANCE TO THE INNER SANCTUM
Lit with red everburning torches, this stairwell hidden within the wall of the guildhouse leads down to Area 1 of the Inner Sanctum.
AREA 8 – GUILDMASTER’S QUARTERS
DOOR – MAGIC MOUTH: A gargoyle on the door will animate and speak to anyone approaching, passing messages to Essetia if she’s inside. If Essetia is not present, the gargoyle will “take a message” and give it to her when she returns.
- Door (Strong Wood): AC 15, 27 hp, DC 24 Dexterity (Thieves’ Tools)
SITTING AREA: Comfortable chairs with griffon-carved backs and a bed of luxurious feather-down. Large windows look out onto the balcony.
WRITING DESK: The top is closed and locked, requiring a DC 14 Dexterity (Thieves’ Tools) check. The desk contains:
- Correspondence Regarding the Hand of Malkith
- Report Concerning the Erthuo/Sadar Affair
- An engraved box of oak containing a cutting from a tree (papery-thing, silver-grey bark and white wood) and Letter from Essetia to Ulloth.
- A red pouch containing 150 pp and Letter of Thanks from Godfred Vladaam.
DC 12 Intelligence (Investigation): A chest is hidden under the bed.
- 469 gp
- potion of fire shield
- scrolls (see invisibility, mage hand, feather fall)
- Oath of the Brotherhood of Yrkyth
IRON COFFER: 10% chance of being present.
- 500 gp
- 40,000 sp
- 50,000 cp
- Instructions to have the Ithildin Couriers ship to the Red Company of Goldsmiths on Gold Street (see Part 12).
AREA 9 – GUILDMASTER’S BALCONY
The balcony encircles the entire third floor of the guildhouse. A beautiful view of the city and out across the Whitewind Sea on one side, and across Oldtown towards the Nobles Quarter and the Spire in the other direction.
TRIPODS: There are two tripods set up on this balcony. One contains a sextant, the other a telescope. The guildmark on each of them marks them as creations of the Red Company of Founders (sees Part 11).
NBA Tools – Opposing Forces Cheat Sheet
June 28th, 2024
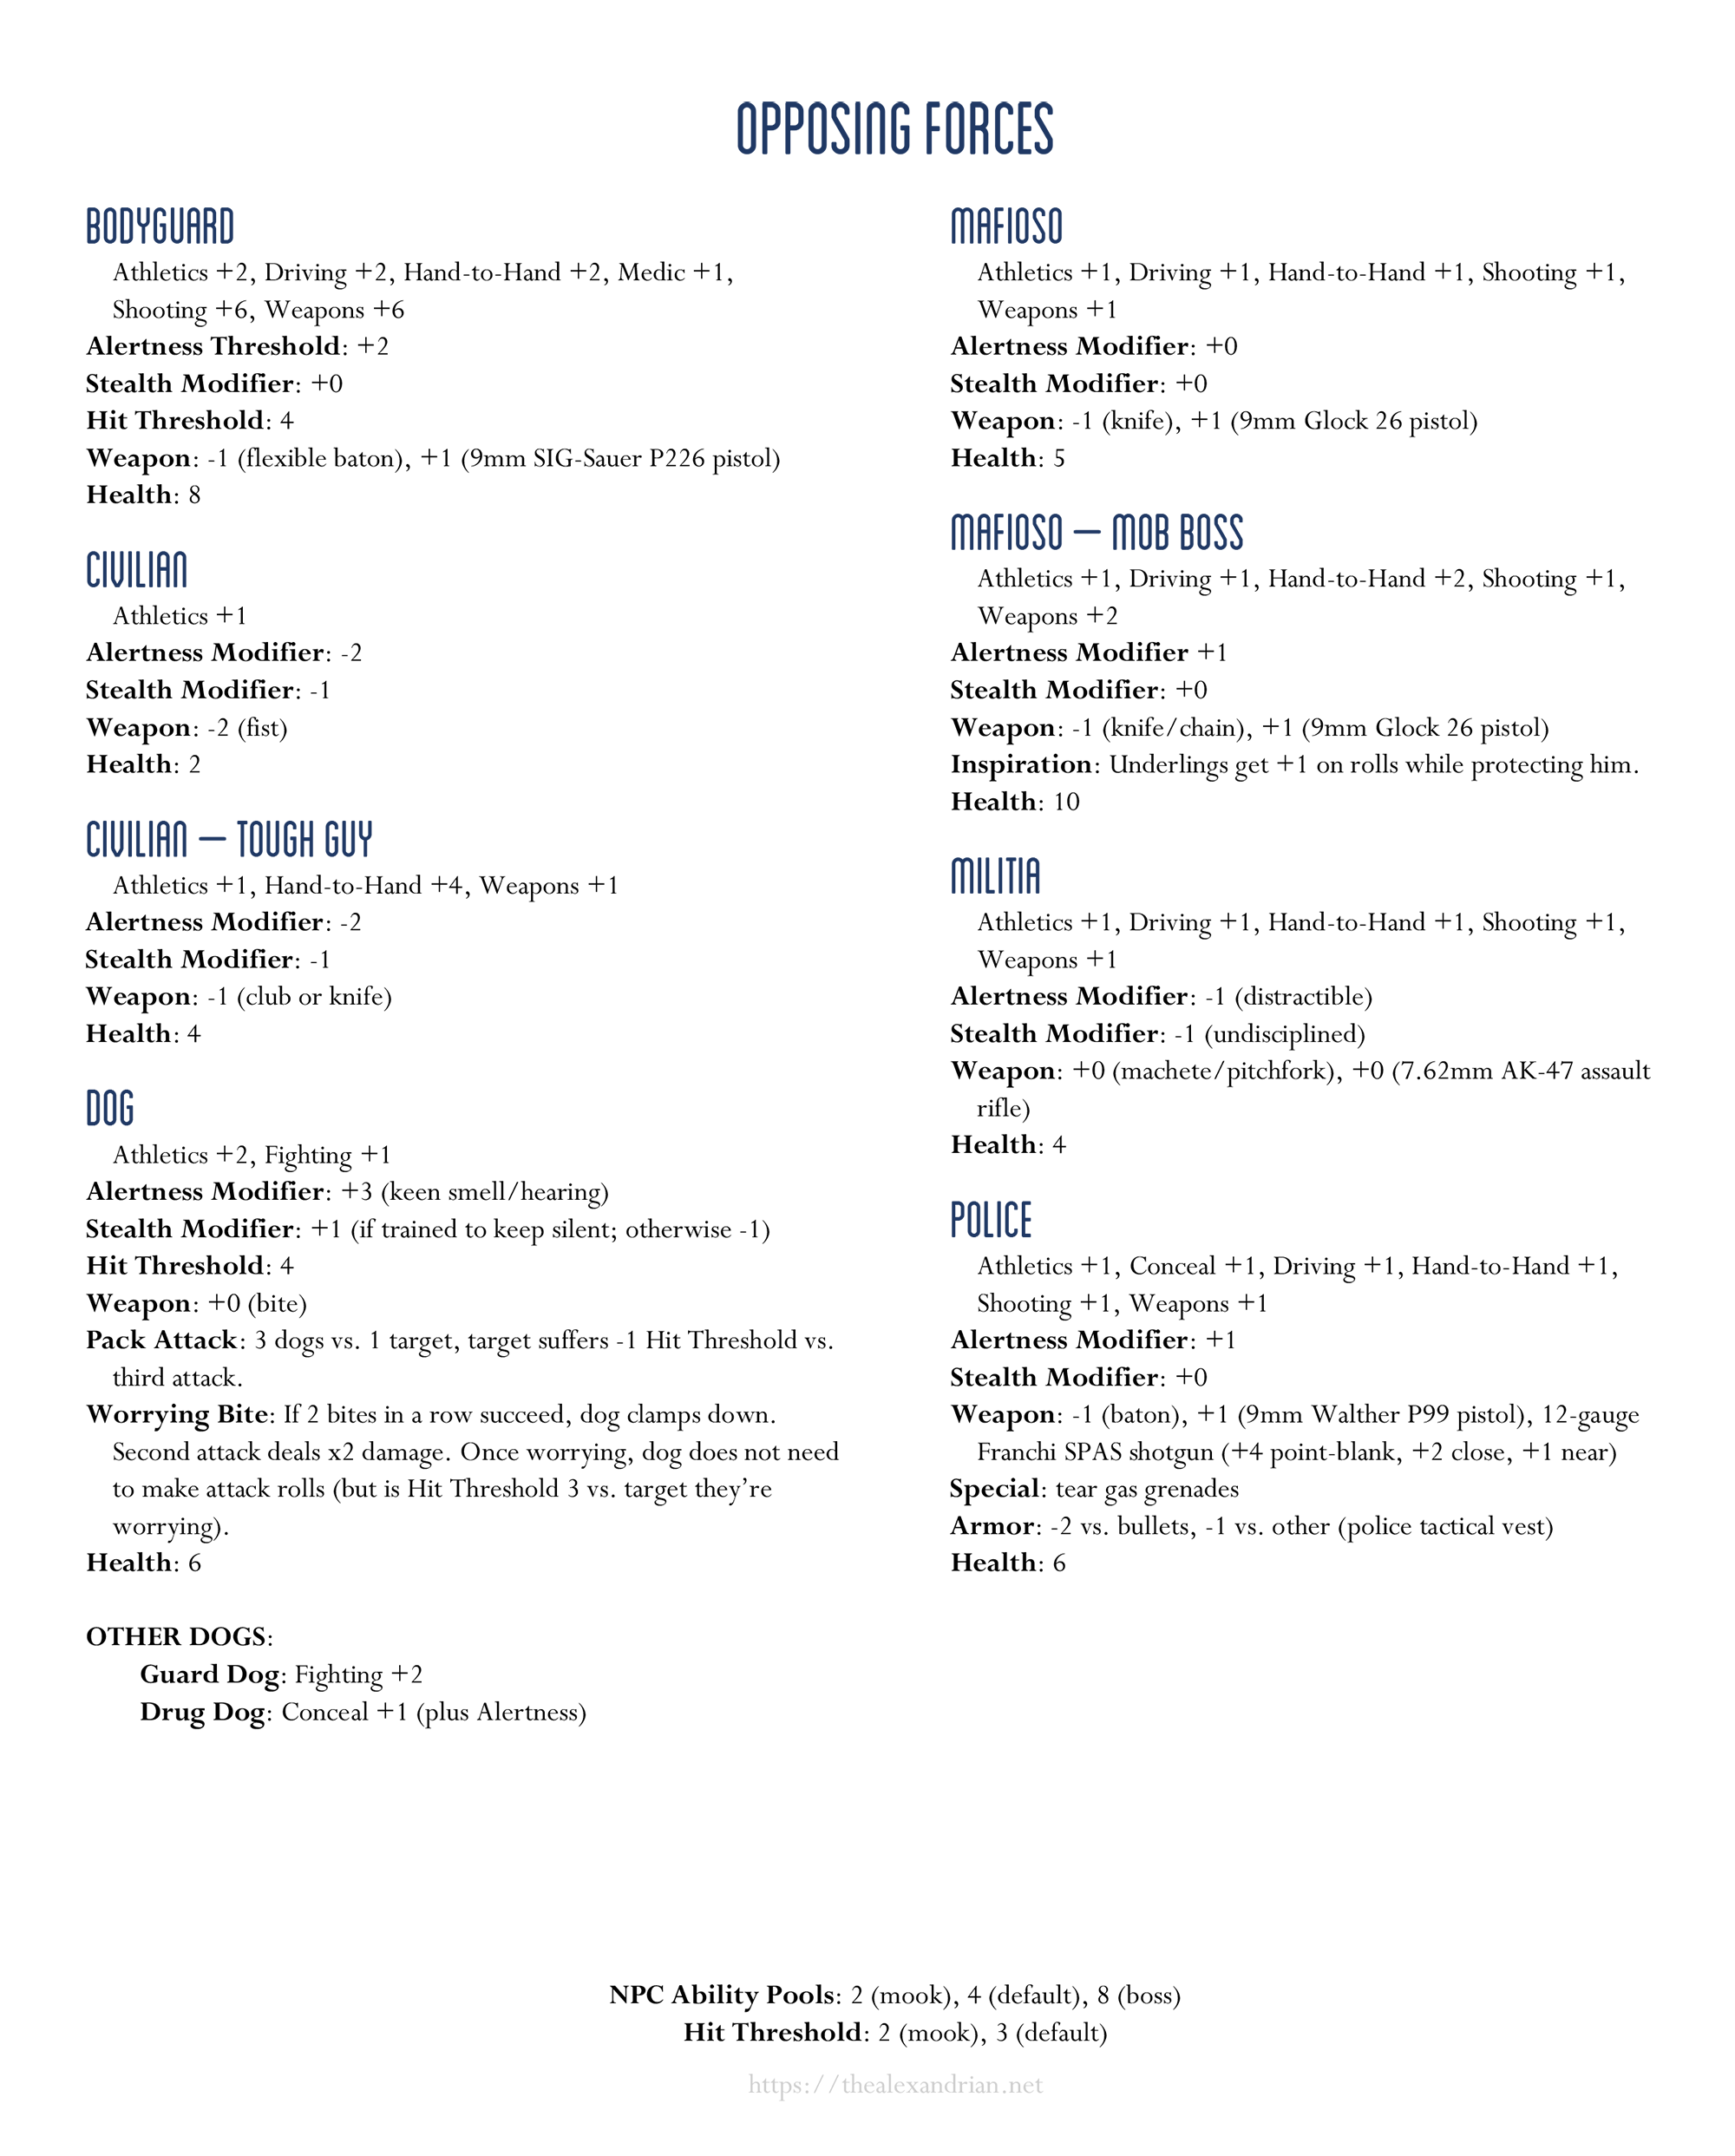
While running Night’s Black Agents, I’ve been using my GUMSHOE house rules for NPC ability modifiers: The short version is that rather than giving NPCs general ability pools, they’re instead given ratings that can be flexibly used to either modify their own rolls or the rolls of the PCs. (You can check out the original post for a more detailed discussion of how the house rule works and why you might want to use it in your own GUMSHOE games.)
OPPOSING FORCES CHEAT SHEET
I’ve also prepped an Opposing Forces Cheat Sheet featuring stat blocks using NPC ability modifiers.
This cheat sheet compiles information from the core rulebook, the Resource Guide, Double Tap supplement, various adventures, and my own prep notes. The goal is to have a fast reference for “standard” NPCs so that I can quickly cast improvised fight scenes, chases, and other derring-do. Having these as standard references also means that I can create more efficient prep notes by just referencing the cheat sheet instead of creating brand new stat blocks.
During play, I simply keep the cheat sheet on the table next to me, so that it’s easy to grab and reference whenever I need it.
The cheat sheet is split into OPPOSING FORCES (the more typical cannon fodder) and OPERATIVES, who are more elite or specialized role players. Splitting the references like this has a slight disadvantage, because if I forget which list a given stat block appears on I may have to check in both places to find it. But I’ve found separating out the less used stat blocks leaves the more common opposing forces less cluttered and, therefore, easier to use at the table.
Tip: Instead of creating full stat blocks for NPCs that don’t quite fit these archetypes, you can also just reference the archetype and then list the differences. The cheat sheet itself does this in a few places — e.g., guard dogs and boss thugs.
NBA Tools – Revised Agent Tracking Sheet
June 27th, 2024
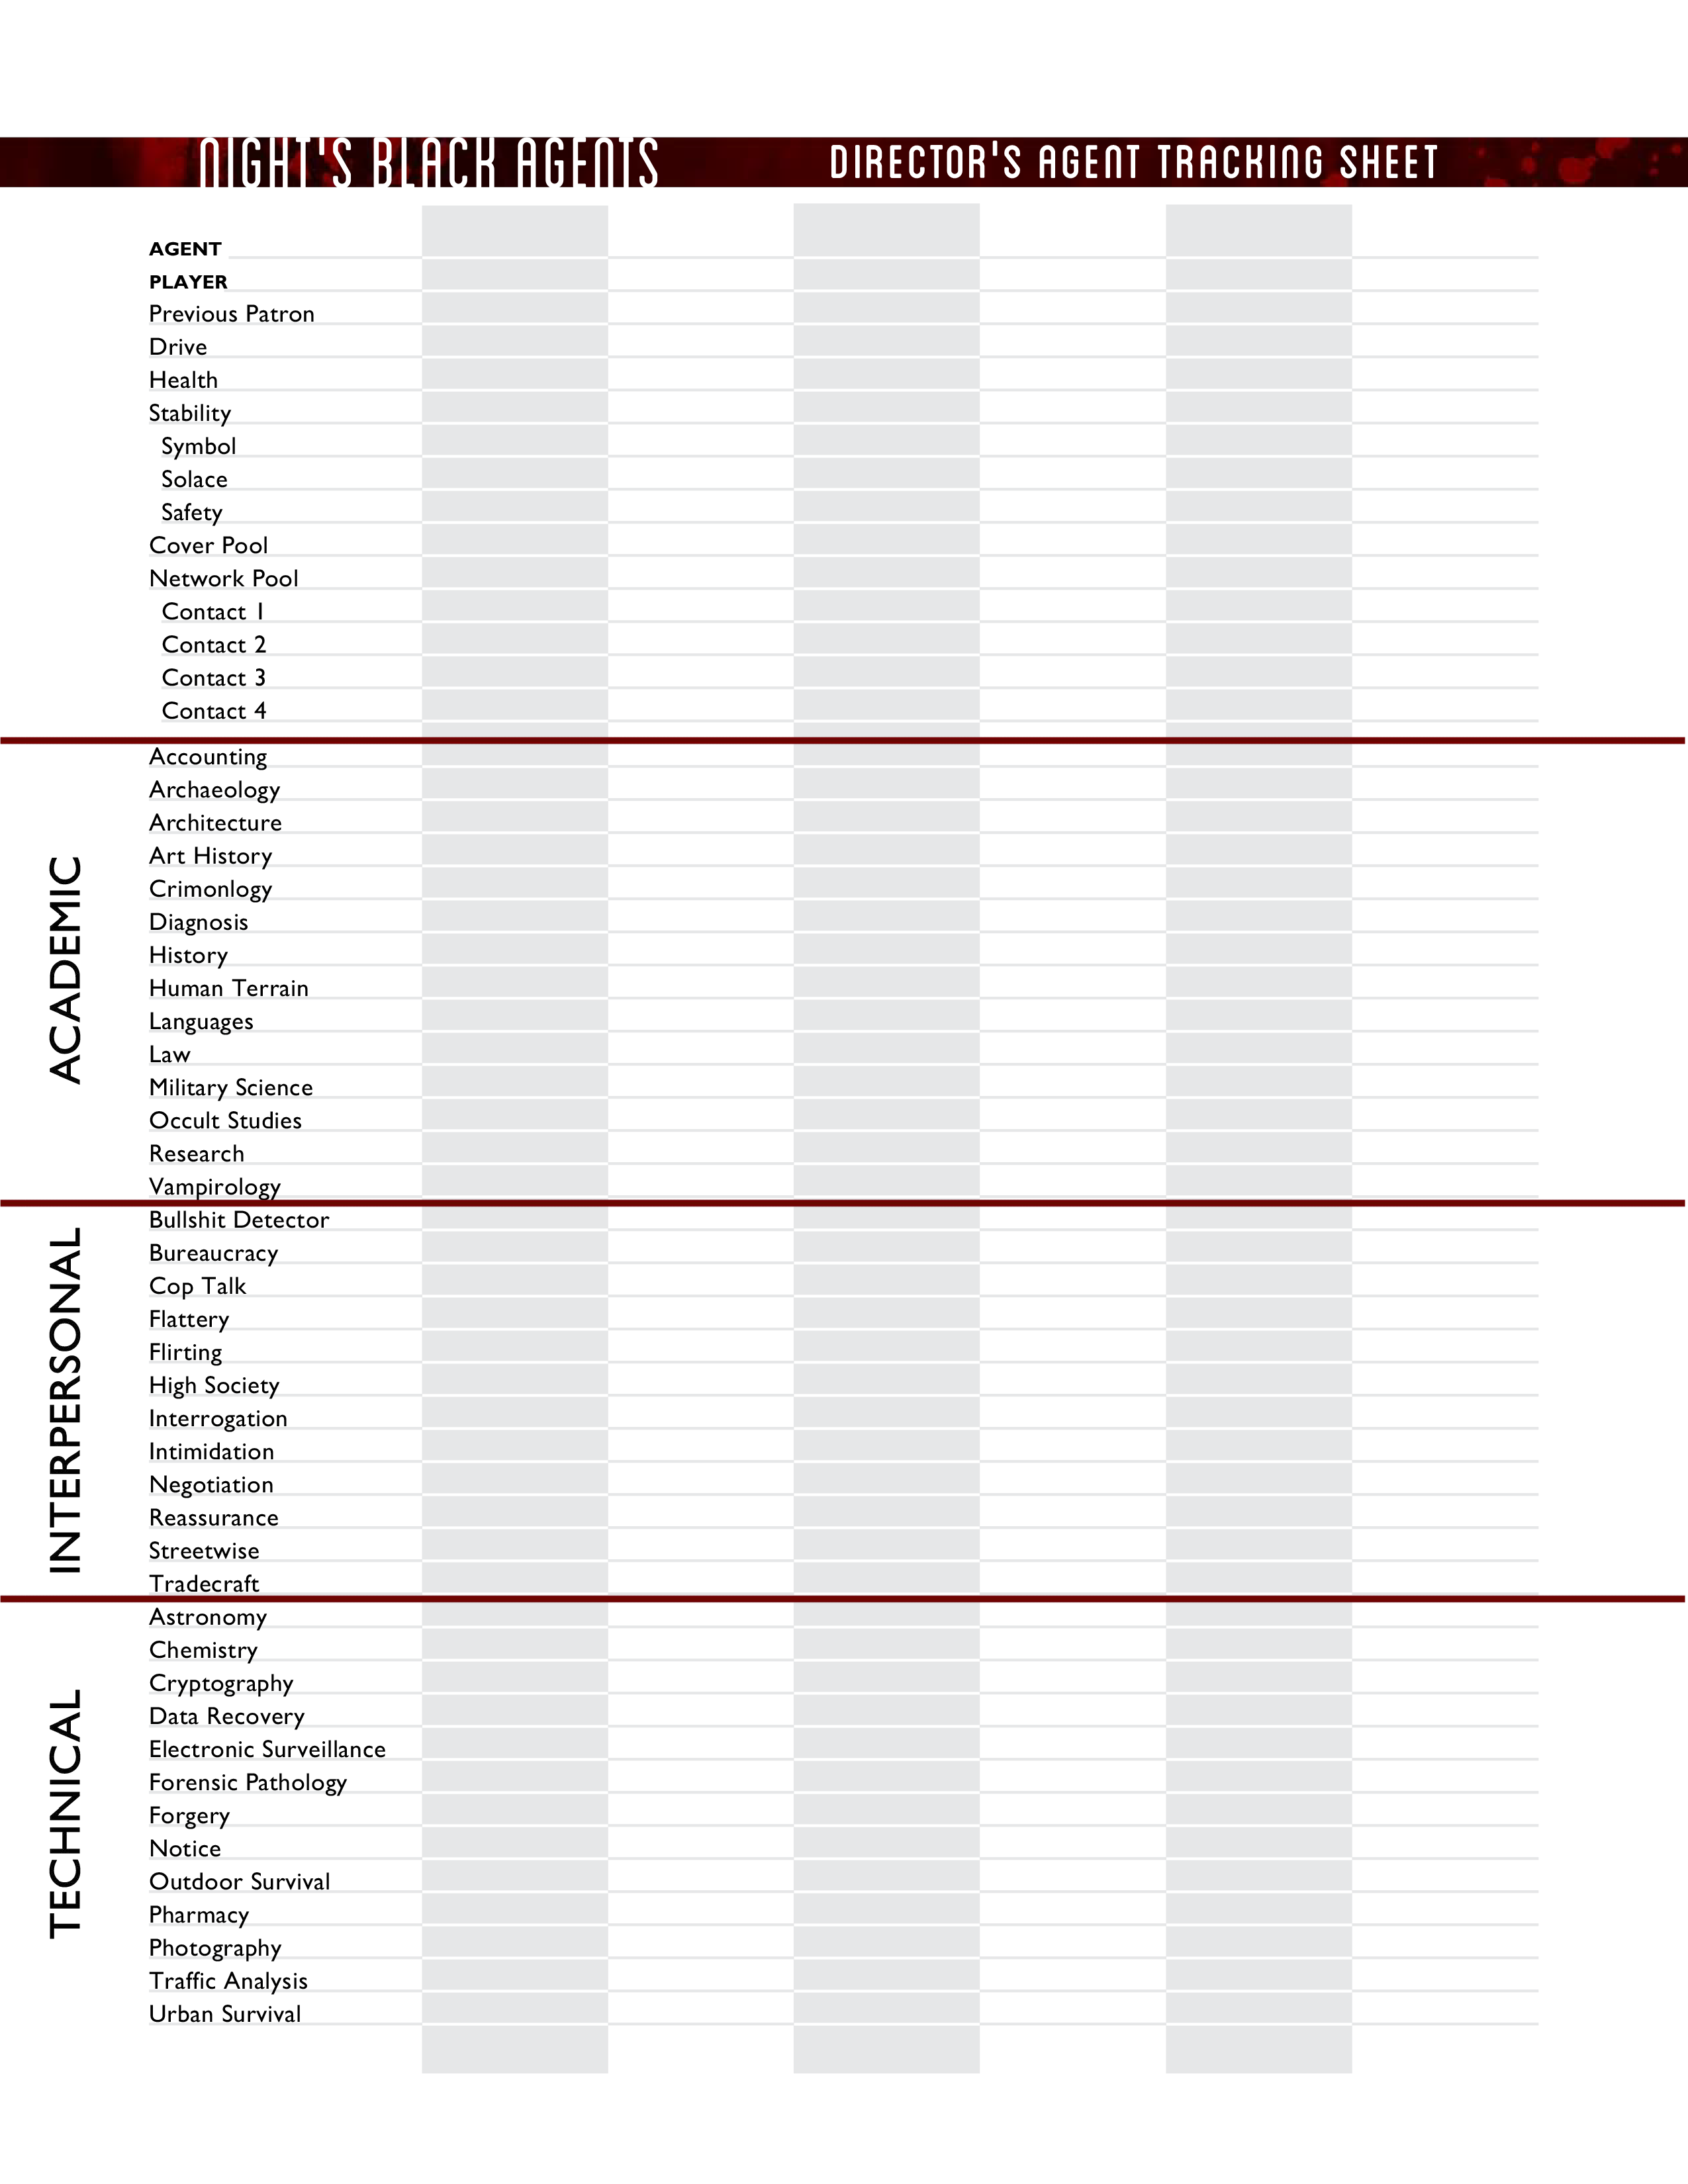
One of the most valuable tools for a Night’s Black Agents GM to have behind their screen is the Agent Tracking Sheet. As with similar sheets from other GUMSHOE games, this tracking sheet allows you to record the ratings for all of the PCs’ investigation abilities.
USING THE SHEET
In most RPGs, I generally prefer — as the GM — to let the players manage their own character sheets: Its their responsibility to master their character; it’s mine to master everything else. (If we’re running into problems with that, for whatever reason, then we can audit, consult, and collaborate. But, generally speaking, the long-term goal remains getting the player to a point where they’re in charge of their character.)
So why, in the case of GUMSHOE, is it so valuable for the GM to duplicate this bookkeeping?
It basically boils down to a very specific implementation of the techniques described in Random GM Tip: The Numbers That We Say. In GUMSHOE, if the players look for a clue and have the appropriate investigation ability, they automatically find the clue. By having a list of which PCs have which investigative abilities, we can turn this conversation:
Player: I want to spend the evening studying the strange journal.
GM: Do you have Cryptography?
Player: Yes.
GM: Great. While studying the journal, you notice some strange symbols in the marginalia. You’re able to figure out that they’re some kind of substitution code.
Into this one:
Player: I want to spend the evening studying the strange journal.
GM: While studying the journal, you notice some strange symbols in the marginalia and, with your code-breaking skills, you recognize them as some kind of substitution code.
And this might seem like a very small difference in theory, but in actual practice the difference in flow at the table is significant, particularly when repeated over and over and over again across the entire session. (This is, after all, the central mechanic of GUMSHOE.)
You can, of course, take this a step further and use the sheet to keep track of the players’ spends during the session (so that you know where their pool points are getting thin), but for me, personally, this is the point where I prefer to let the players take care of their own bookkeeping so that I can stay focused on other stuff.
INTERPERSONAL ABILITY
Where I find having the PCs’ investigative abilities at my fingertips MOST valuable is in interpersonal scenes: While roleplaying their conversation with an NPC, it’s just so much smoother and more immersive to simply glance at the sheet and check to see if they have an ability to back up their play (or offer a spend to push things further) than it is to interrupt the dialogue to ask, “Do you have Bullshit Detector? Do you have Flirting?”
This becomes even more true when you have players who get in tune with the system and will naturally flow the scene through their investigative abilities. With everyone on the same page, the result can be a beautiful, silent dance running under and strongly supporting the roleplaying.
And this is where I find that the official agent tracking sheet comes up a little short: It organizes ALL of the investigation abilities — Academic, Interpersonal, and Technical — into a single big list organized alphabetically. I understand the unifying impulse, but in my experience there’s a really good reason why these abilities are split into three categories. I don’t want one giant list; I want three targeted lists where I can much more quickly and accurately find the relevant abilities for the current scene (particularly in interpersonal scenes).
So I reorganized sheet into categories. While doing this, I also took the opportunity to make it form-fillable. If you prefer the original version (with all abilities in alphabetical order), I went ahead and made that form-fillable, too.
I’m not sure who did the original graphic design for the sheet, but I’m guessing Chris Huth (who did the interior layout of the book). All credit to them, obviously. All I’ve done is reorder the information.
REVISED AGENT TRACKING SHEET
(form-fillable)
ORIGINAL AGENT TRACKING SHEET
(form-fillable)
Untested D&D: Hardcore Opportunity Attacks
June 25th, 2024

Most RPGs use turn-based combat because it can provide a simple method for clearly resolving the chaotic realities of the battlefield. (Simultaneous action resolution, for example, can work really well with very small numbers of combatants, but then breaks down rapidly as the number of combatants increases.)
Turn-based combat, however, creates mechanical oddities: If you were in a swordfight with someone and they were like, “Hang on a sec. I’m just going to grab a pint and have a quick drink,” you’d just stab their dumb ass. But because we’re using an abstract mechanical structure in which everyone resolves their actions one at a time — even though, in reality, everything is happening simultaneously — suddenly you’re just supposed to stand there watching me take my drink because it’s not your turn.
To deal with this, we add off-turn mechanics that allow characters to react to things that they should, logically, be able to react to, even if it isn’t their turn. In D&D 5th Edition, these mechanics include the Ready action, reactions, and opportunity attacks.
We can add one more level to this by adding mechanics that allow you to, for example, avoid opportunity attacks. We might want to do this because a character is super-skilled at drinking in the middle of combat, or maybe just because it’s a bad-ass moment. (The Disengage action in D&D 5th Edition is technically one example of this. In D&D 3rd Edition you could make Tumbling checks to avoid attacks of opportunity from movement and Concentration checks to avoid provoking while casting a spell.)
D&D 3rd Edition sought to implement a lot of mechanics from previous editions of the game in ways that were both more consistent and comprehensive. This included inventing the term “attacks of opportunity” and classifying which actions would “provoke an attack of opportunity.” This made sense, but in practice it had a major drawback: It created a huge list that filled nearly two full pages of actions detailing which actions did (and did not) trigger attacks of opportunity, and you either had to reference that list constantly during play or you had to memorize it. Even if most of this list boiled down to common sense, the result was still Byzantine and arcane.
As a result, after 3rd Edition, there was a practical impulse to avoid this “grand and unwieldy list” of actions. In D&D 5th Edition, this simplification has been taken to an extreme: An opportunity attack is triggered only when a combatant you can see moves out of your reach, unless they take the Disengage action.
This eliminates the complexity of the list by boiling the mechanic down to a single trigger, but it allows a lot of immersion-breaking shenanigans on the battlefield. And even the implementation of the movement-based trigger is kinda wonky: You can literally run circles around an opponent while firing arrows at someone on the opposite side of the battlefield, but you can’t walk past them while swinging your sword at them. And, bizarrely, this means that creatures with longer reach are actually less effective at attacking people around them.
In my opinion, if you wanted to simplify opportunity attacks, it would be preferable to either (a) eliminate the mechanic entirely (can’t get simpler that that!); or (b) go the other direction.
HARDCORE OPPORTUNITY ATTACKS
By default, any action you take provokes an opportunity attack from any combatant who can reach you.
There are three exceptions:
- Any attack action
- Dodge
- Disengage
In addition, Ready doesn’t provoke, but the action you’re readying may provoke when you take it.
Bonus actions, reactions (other than readied actions), and your free object interaction never provoke opportunity attacks.
Movement provokes opportunity attacks normally.
OPTION: BETTER MOVEMENT OAs
When using this option, movement provokes an opportunity attack whenever a character moves more than 5 ft. within your reach on their turn or moves out of your reach.
Note: Disengage still cancels all movement-based opportunity attacks during your turn. You also don’t provoke an opportunity attack when you teleport or when someone or something moves you without using your movement, action, or reaction.
OPTION: DAMAGE SPELLS
Spellcasters can use their bonus action to avoid the opportunity attack triggered by casting a spell if the spell deals damage.
Note: This rule may be useful to make some 5th Edition spells work properly. It avoids needing to make all of those spells special case exceptions. Our goal remains One Rule to Rule Them All.
OPTION: HARDCORE RANGED ATTACKS
Using this option, only melee attack actions avoid opportunity attacks. Ranged attacks still provoke.
Note: As with a spellcaster, you might allow a ranged attacker to use their bonus action to negate the opportunity attack.
DESIGN NOTES
Positioning in combat should matter. You want your rogue to pick the lock on the door so you can all escape? Cover their back! You want your spellcaster to rain hellfire down on your foes? Form a defensive line and give them the space they need to do it.
By allowing characters to just do whatever wherever, the 5th Edition opportunity attack rules cheapen positioning.
Beyond making the battlefield a more interesting space for tactical challenges, I also want things to make sense: If you’re going to do something that isn’t directly focused on fighting, I want you to think to yourself, “Should I really be doing this where the guy with the pointy metal can stab me?”
At the same time, we want to avoid a bunch of Byzantine complexity. We don’t want a big list of what does and does not trigger an opportunity attack: What we want is a simple, straightforward rule that we can easily memorize and apply. We want One Rule to Rule Them All. By flipping things around and listing the very small list of things that DON’T provoke, we achieve that goal.
From a practical point of view, if we end up in a situation where this One Rule to Rule Them All doesn’t make sense, it’s much easier for me as a DM for me to “break” the rules with a ruling that’s more permissive to the PCs than one that isn’t. In other words, saying, “Actually, it would make a lot of sense if this thing you’re doing that would normally provoke doesn’t provoke in this situation,” the players will be much happier accepting that than if I have to say, “Actually, this thing you thought wouldn’t be bad for you is actually going to be bad for you.” A restrictive framing, therefore, can paradoxically give us a greater liberty to make bespoke rulings when and if they’re needed.
ADVANCED DESIGN NOTES
Taking a step back from opportunity attacks, there are two different broad approaches to modeling the idea that you can’t just run willy-nilly around a battlefield or do a crocheting project in the middle of a melee without consequences.
First, you can try to mechanically enforce it: Thou shalt not.
Thou shalt not move past someone threatening you with a melee weapon. Thou shalt not drink a potion if someone has marked you as their target. Thou shalt not run through an area under the effects of suppressive fire.
(My house rules for combat in 1974 D&D, where the procedure effectively makes melee “sticky,” is another approach to this.)
You can also mitigate this approach: Thou shalt not X, unless Y.
For example: “You can move through a threatened space if you succeed on an Acrobatics check.” Or, “If you get hit with an opportunity attack, you have to stop moving.” (If you can avoid the attack, then you can ignore the Thou Shalt Not.)
The other approach is that you can impose a cost for doing it — e.g., “You can do X, but you’ll suffer a penalty.” Or risk getting hit by an extra attack. Or lose an action.
This approach gives more flexibility: If you really want or need to do something, you can still do it. You just have to pay the cost.
And, once again, you can add conditionals that allow characters to mitigate or entirely avoid these costs.
Of course, the higher the cost becomes, the greater your need or desire would need to be to endure it. Conversely, the more negligible the cost becomes, the less influence it will have over the characters’ decisions.
If you think about opportunity attacks within this design paradigm, 5th Edition’s opportunity attacks are clearly aiming for the second method, and my argument is that they have become so trivial that you would be better off either (a) eliminating them entirely in order to streamline combat and encourage even more movement on the battlefield or (b) using the hardcore opportunity attacks house rules (or something like them) to make them actually matter.
Alternatively, you could abandon that paradigm entirely and maybe try to implement something of the Thou Shalt Not variety.

Acting Resume
ROLEPLAYING GAMES Gamemastery 101
RPG Scenarios
RPG Cheat Sheets
RPG Miscellaneous
Dungeons & Dragons
Ptolus: Shadow of the Spire
Alexandrian Auxiliary
Check These Out
Essays
Other Games
Reviews
Shakespeare Sunday
Thoughts of the Day
Videos
Patrons
Open Game License
Archives
Recent Posts
- Ex-RPGNet Review: A3 – Assault on the Aerie of the Slave Lords
- Chaos Lorebook: The Shepherd of Malignancy
- Chaos Lorebook: The Shapeless Codex
- Ex-RPGNet Review: A2 – Secret of the Slavers Stockade
- Deathbringer – Featuring an Adventure by Justin Alexander!
Recent Comments
- on Ex-RPGNet Review: A2 – Secret of the Slavers Stockade
- on Mothership Adventure Sphere Reviews – Part 8: More Trifolds!
- on Mothership Adventure Sphere Reviews – Part 8: More Trifolds!
- on Deathbringer – Featuring an Adventure by Justin Alexander!
- on Deathbringer – Featuring an Adventure by Justin Alexander!
- on Deathbringer – Featuring an Adventure by Justin Alexander!
- on Deathbringer – Featuring an Adventure by Justin Alexander!
- on Mothership: Thinking About Combat
- on Deathbringer – Featuring an Adventure by Justin Alexander!
- on Ex-RPGNet Review: A1 – Slave Pits of the Undercity


Copyright © The Alexandrian. All rights reserved.