In part 6, we made it easier to run G1 Steading of the Hill Giant Chief by putting a room key on the map — a sort of cheat sheet for quickly orienting yourself geographically while running the adventure. As part of that discussion, I talked about the dire wolf encounter in area 22 and asked an important question:
“Who might hear this?”
The layout of the complex gives us some clue to this, but wouldn’t it be even easier if we could look on the map and actually see where the monsters are?
To do this, we’ll need a symbol. Let’s try something like this:

Using this symbol we can quickly indicate “Here There Be Monsters!” But let’s say we wanted to include more information than that. It’s pretty easy to numerically key the symbol:

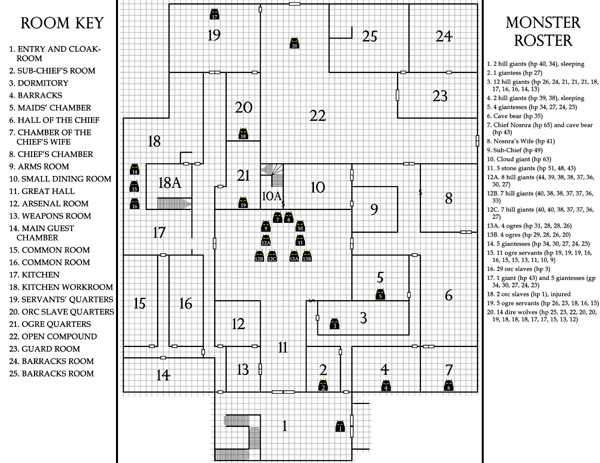
We could use that number to simply indicate the number of monsters present, but I think it would be more useful to use the number as a reference to a roster of monsters. And we can put that on the dungeon map right next to the room key:
(click for a larger version)
For this, I’ve basically just grabbed the info from the module. But it wouldn’t be too hard to tap the Monster Manual and include stat lines.
If we wanted to get a lot fancier, we could also use double-encoding here by preparing a different silhouette for each type of monster. They would let us tell in a glance where, for example, all the goblins are located.
Another option would be to color code the monster symbol to represent factions within a dungeon. (This could be really great for something like the Temple of Elemental Evil, for example.)
In any case, the “life” of the complex almost immediately jumps out at you. You could almost play the adventure from this single sheet alone (although you’d miss out on a lot of the detail to be found in the full key), and it shouldn’t be hard to see how a map like this makes it virtually unnecessary to look at any key except for the room the PCs are currently exploring.
THE GM’S TABLEMAT
I coined the term “GM tablemat” to refer to “roll-on” tables. But for years now I’ve been using dungeon maps as tablemats in combination with monster rosters to run truly living dungeon complexes.
Before explaining what I mean by that, let me back up for a second.
In prepping the monster roster shown above, I simply listed every single creature in the steading. If I were prepping G1 for my home campaign, however, there are several monsters I would have skipped:
- #5: The giantess maids are unlikely to leave their chambers during an assault.
- #6: The pet cave bear isn’t going anywhere unless someone fetches him.
- #14, 15, 16: The cooks and servants in the kitchen are unlikely to go anywhere.
- #17: Iffy. Based on the description in the module, these guys are unlikely to go anywhere. But they might (particularly if loud noises attract their attention from area 22). I’d probably list ’em just to be on the safe side.
- #18: The injured orcs definitely aren’t going anywhere.
- #20: Iffy. The dire wolves won’t go anywhere on their own, but they’re more likely to be fetched to aid in the defense of the steading. Again, I’d probably list ’em.
As you can probably tell, my methodology is simple: If a monster will never be encountered outside of a specific keyed location, I won’t bother including them on the roster. (Like the other details of that keyed location, I’ll notice ’em when the PCs reach that area.)
When I’m prepping my own adventures, I’ll actually go one step further: Monsters that appear on the roster won’t appear in the encounter key at all. That way, if I see a monster in the encounter key I know that it’s definitely there and nowhere else. (Meanwhile, I’m keeping track of the rostered monsters independently.)
At this point, we’ve got the steading down to a fairly manageable 14 roster groups. When it comes time to run the adventure, this is what you want to do:
- Lay the adventure map out as a tablemat in front of you.
- Take counters numbered 1-14 and place them on the map in the “starting location” for each roster group.
- You are now ready to manage your monsters in real time. Just move them around the map as the situation demands.
(Note: Numbered counters are easy to find on the cheap. It’s also pretty easy to make your own by printing out the numbers and then affixing them to washers or quarters or something of the like.)
This is why the monsters in area 11 were broken into several smaller groups: To make them more manageable if the giants need to split up.
The rostered approach also makes it really easy to re-arrange the denizens of a compound on a cycle. For example, you could prep one roster for the day and a different roster for the night.
Personally, however, my limit for this sort of thing is usually around 12-15 roster groups. Larger complexes can sometimes be broken down into smaller sections to make them manageable, but if that doesn’t work then that’s the point where I’ll swap from a “living complex” approach and start using random encounter tables to simulate a compound’s life.
This post is part of the RPG Blog Carnival for Cartography.


Yeah I’ve always done this exact thing. I think the only thing left that you need to do is to have all your monster stat blocks ready on another, single page, and finally to make little notes to yourself in the margins of your map about the special features of a few particularly important rooms. Things like pertinent treasures, complex/unique traps, clues/other important things your characters might need to know. Writing small in point form and sticking to the hard to remember bits only (like exact numbers) is enough for me. Map keys are for reading and familiarizing yourself with pre-game. I haven’t actually referenced a map key in-game in years now.
Have you checked out the Gryphon’s Legacy module? It uses a table that lists where the monsters hang out at different points in the day and where they go when the alarm is sounded.
I DM’d this and it was quite entertaining and fairly easy to run. It would have been even easier with your tablemat idea.
I just wish Gaslight Press had put out more stuff from this line.
I just found this series and have been reading with interest. I have used a map (on a computer) and “counters” (Powerpoint shapes) when players got involved in a complex underground war between kobold tribes.
http://rolesrules.blogspot.com/2011/01/kobold-wars.html
I used the size of the square to show unit size, letters and numbers in it to show race or armament and numbers, and color coded for sides and kobold army vs. allies.
If I were doing this for the Steading I would definitely consider having wargame-style counters and little grayed-out versions of them to show starting positions.
One thing you might want to consider in your map scheme is using letters instead of numbers to key the monsters. I immediately got confused between the room and monster key.
In part 6 comments, Telecanter says: As far as connecting the rooms to the module text, the numbering here seems pretty random. I mean, 1 leads to 11 or a hallway. Seems there should be a clearer way to do this.
I agree. Instead of listing the monster roster in a straight ascending numerical list, match the monster #s to the encounter key #s. Example: the wolves in key #22 appear as #20 in your monster roster; if you change the monster # to match they #, it’s much easier to connect the dots between the map location and the monsters in it (if any).
Allan.
I know this is an old post of yours, but I’m working on a “module heavy” campaign, and I love the ideas you put out. Have you experimented more with this in later games? Also, what tools did you use to create the map/tablemat? I’d like to whip up something like that myself, but I’d be stuck either recreating the map in dungeographer or snipping it from the PDF.
You can see an example of one my actual player rosters as part of the Sunken Temple of the Arn.
Rosters are pretty much exclusively how I run any small, location-based crawl now. On the rare occasions where I end up dealing with a “monsters are keyed in this room” information format, I find it incredibly painful and clunky.
I created the map in Dundjinni using the Old School Map Pack. After exporting, I loaded it into Photoshop and printed it there.
For home use, just print the map and your roster and put them down on the table.
I’ve also got a nascent plan to get a magnetic surface and then use numbered, magnetic tokens to track the different opponent groups. (Bingo tokens with magnetic stickers seem like they’d be potentially useful here.)
What size paper do you use when you print it out? Standard 8.5″x11″? 11″x17″?
I just draw stick figures…..
Wow, this is a great idea! The map immediately comes to life. G1 is obviously not a monster zoo where PCs can walk from room to room, separately killing the inhabitants in each… and I always found it difficult to grasp the nature of the complex and what should happen as the PCs are noticed. You solution solves this so elegantly!