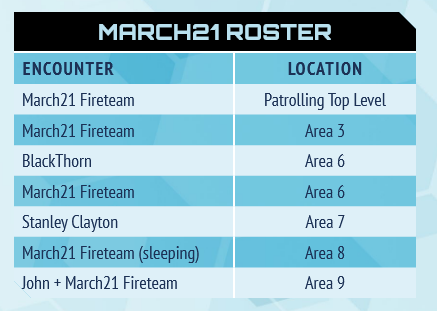
Adversary Roster from Infinity: Quantronic Heat
Adversary rosters are one of the essential tools in my GM’s kit. In 2016, I wrote that I considered them my greatest “secret weapon”:
They allow me to run dynamic scenarios of considerable complexity on battlefields that can easily sprawl across a dozen areas with a relative simplicity which still leaves me with enough brainpower to manage varied stat blocks and clever tactics […] permanently disrupting the staid rhythms of “kick in the door” dungeoncrawling in your campaign. Adversary rosters are also a great way for running stealth missions, heists, and covert ops.
Of course, I have no interest in actually keeping them secret. Since writing that essay in 2016, I’ve introduced them to an even larger audience through my remixes of Dragon Heist and Descent Into Avernus; taught them as an essential tool in the Infinity Roleplaying Game core rulebook; and used them prominently in Over the Edge: Welcome to the Island.
I’d first mentioned the concept of the adversary roster here on the Alexandrian all the way back in 2011, referring to them as a “monster roster” and using G1 Against the Giants as an example of how they could be used. But by that point I’d already been using them for years.
While discussing this history with Robb Minneman on Patreon, I ended up delving into my old game notes in an effort to figure out when I’d first used an adversary roster: I knew that Against the Giants had actually been one of the earliest rosters I’d developed (which is one of the reasons I’d used it as the example in my 2011 post). And I also remembered using them in Forge of Fury around the same time.
As I sifted through my notes, though, I discovered (or, I guess, re-discovered) a far more nuanced development process. Adversary rosters are, in many ways, such a simple concept that one might think they would have sprung full-blown from the brow of Zeus. That was even more-or-less how I remembered it happening, but it wasn’t true.
So I thought it might be interesting to take a detailed look at the actual development process to see how this concept evolved.
THREE DAYS TO KILL
Around 2000-02 I was running (or attempting to run) three D&D 3rd Edition campaigns:
- The Quest of the Seals was a fetch-quest campaign using a mixture of original and published adventures. I launched the campaign with John Tynes’ Three Days to Kill (Atlas Games).
- Freeport was a heavily modified version of Chris Pramas’ Freeport Trilogy (Green Ronin), placed at the northern tip of the Teeth of Light (a chain of islands in my home campaign setting) and studded with some island-hopping adventures.
- The War of the Giants, was a campaign I wanted to run that would start with G1 Against the Giants, but rather than transitioning to drow-related shenanigans, it would have instead escalated into a full-scale humans vs. giants war on the northern frontiers. (This never really got off the ground and didn’t progress beyond Against the Giants).
If you’re familiar with the history of D&D, then you’ll know that Three Days to Kill and Death in Freeport were the first two third-party adventures published for 3rd Edition, both being released on the exact same day the Player’s Handbook was released. It’s not really a coincidence that my first two full-fledged 3rd Edition campaigns launched with those scenarios: I’d scooped them up at Gen Con 2000.
In terms of how adversary rosters developed, The Quest of the Seals was the most important of these campaigns.
I’ve talked previously about how John Tynes, in Three Days to Kill, boils down the essential elements of a raid-type scenario. As noted in that discussion, part of a raid-type scenario is that “the defensive forces should be designed to respond as an active opposition force.” This is what that looked like in Three Days to Kill:
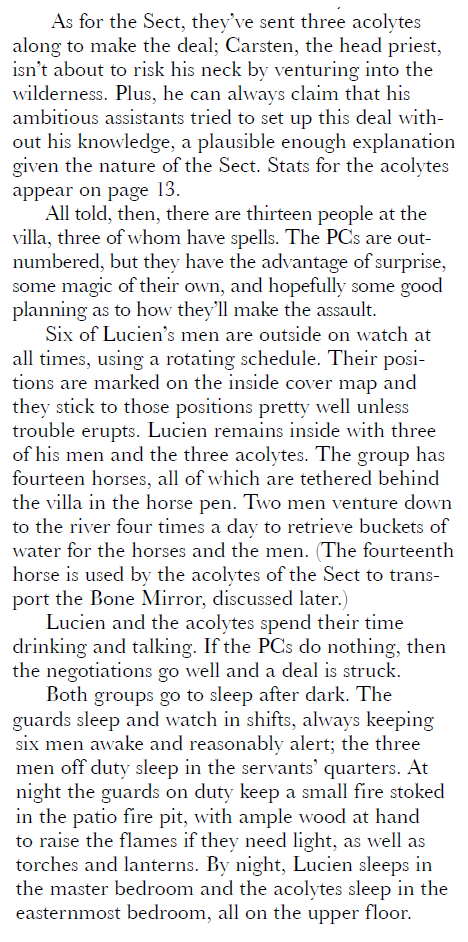
Now, this is not an adversary roster. But what it does do is separate the bad guys from the room key and, once again, emphasize that they’re going to be actively moving around the place.
When I prepped the adventure, I created a cheat sheet for the villa:
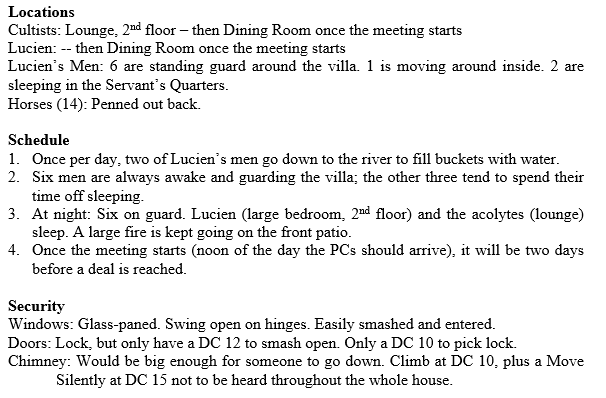
You can see that this is also not an adversary roster: It’s just a brief summary of the information from the module. When I ran the adventure, though, I really liked this: I liked the dynamic foes. And I liked having this information all on a cheat sheet that I could easily reference.
THE SUNLESS CITADEL
Three Days to Kill ends with someone (probably the PCs) accidentally opening a portal to Hell. For the purposes of my campaign, I basically upped the ante on this. As I noted in the campaign journal:
Behind you, the Blood Temple crouches upon the side of the mountain, pulsing and screaming into the night. A fiendish red light floods the heavens, obscuring the pale stars which shine down upon your retreating forms. The maw of Hell has been opened, and if there is a power which can shut it… you do not know what it might be.
The Quest of the Seals was, in fact, a quest for the three seals required to shut the portal to Hell: I placed one in The Sunless Citadel, another in the Forge of Fury, and the third in a homebrew module called the Monastery of Light. I then positioned these locations at opposite ends of my campaign world, so that the PCs would have to criss-cross the map on their epic journey.
But I digress. The important bit is that the next adventure on the docket was The Sunless Citadel.
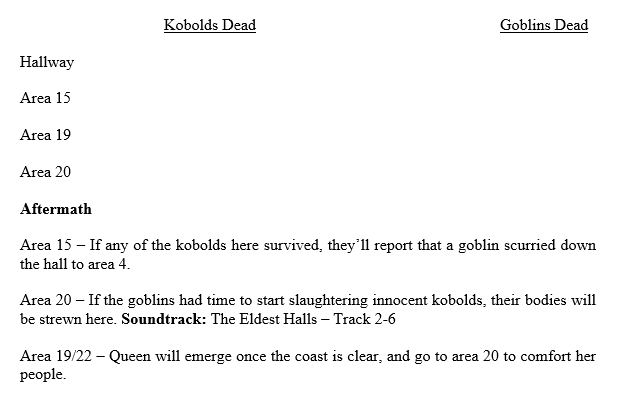
And in my prep notes for The Sunless Citadel there’s this page:

Now, this looks a lot like an adversary roster. But this is only partly true. Do you see the entries for “Total Kobolds” and “Total Goblins”? That’s because this was actually a worksheet for tracking casualties.
See, The Sunless Citadel is occupied by a clan of kobolds and a clan of goblins at war with each other. As written, this conflict is kind of a cold war (with the kobolds occupying one set of rooms and the goblins occupying a different set of rooms). But I wanted to make this an ACTIVE conflict, with the goblins and kobolds actively feuding, raiding, and fighting. The casualty sheet was designed so that I could track this in real time.
This becomes even clearer with some stuff I designed for the group’s second session in the Citadel. The PCs had allied with the kobolds and fallen asleep in a side chamber. I decided to launch the second session with them being awakened by a major goblin raid on the kobolds.
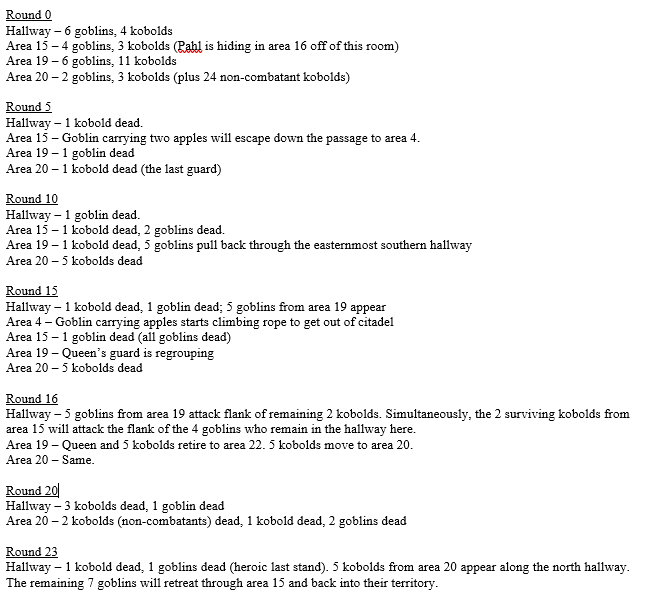
I actually prepped the outcome of the entire fight if the PCs didn’t get involved. This was sort of like prepping a scenario timeline, but mostly misguided because it continued far past the point where the PCs were likely to intervene and change everything. (On the other hand, it was really four separate timelines — one for each room which had been assaulted — so this was mitigated somewhat: If the PCs intervened in Area 15, for example, I could use the timeline to easily keep track of what was happening in other rooms. Looking back with 20+ years of experience with 3rd Edition, though, it would have made a lot more sense to reduce the number of rounds involved here by at least a third.)
In concert with this timeline, I also had a more specific casualty tracker:
In practice, that cheat sheet listing the locations of every goblin and kobold in the place did result in me beginning to haltingly use it like a proto-adversary roster (moving goblins and kobolds around to reinforce various areas), but the concept hadn’t fully gelled yet.
THE DEPTHS OF RAGE
As the PCs left The Sunless Citadel and headed west towards The Forge of Fury, one of the adventures they had along the road was “Depths of Rage,” a scenario from Dungeon Magazine #83 by J.D. Wiker that I combined with some material from Carl Sargent’s Night Below campaign.
Wiker’s “Depths of Rage” is a really cool scenario where the PCs delve into a goblin lair and then, when they’re at the deepest point of the dungeon, an earthquake hits and causes large parts of the dungeon to collapse. Now, with the dungeon completely transformed, the PCs need to crawl back out!
So this is a really cool, dynamic dungeon where the key entries and monster locations shift pre- and post-quake.
Night Below, on the other hand, includes notes in its key about how the monsters will dynamically react to the PCs’ presence and attempt to alert monsters in other locations (and also how the current location will be different if they have been previously alerted). For example
5. Thief Guards
[…]
If the wyvern watch at area 4 goes off, alerting them to the presence of intruders, Tinsley slips away towards area 10 to alert the fighter guards in the lower caverns (area 12), while Caswell hides behind one of the many columnar rocks.
I kind of combined these two ideas in an effort to make the dungeon even more dynamic and reactive. What I ended up with was an adversary cheat sheet that looked like this:
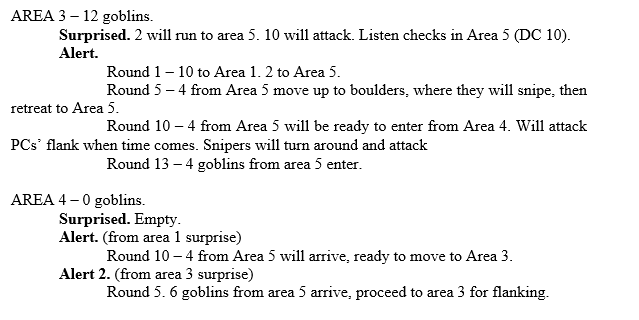
Which was… interesting.
No, not really. I mean, it worked. The adventure was great. But trying to program my prep notes like a computer game was a terrible idea — pure contingency prep instead of tool prep.
The last thing I prepped as part of this adventure, though, was a tracking sheet. Basically just a list of every area in the scenario so that I could actively track which goblins were where as a result of the various Alerts being triggered:
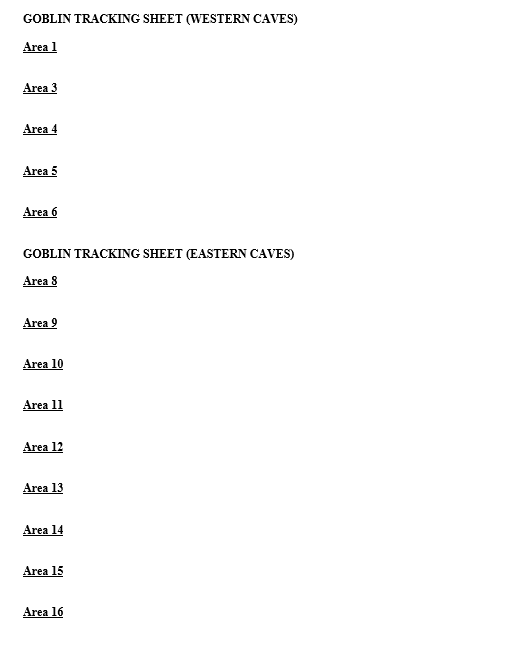
When I’d filled out this tracking sheet, what I had, of course, was something that looked a lot like the proto-adversary roster from The Sunless Citadel (i.e., Area 16 – 4 goblins), with the key difference being that this had been specifically developed to move the goblins around.
You’ll also notice that I had chunked the dungeon into sections: the Western Caves and the Eastern Caves. This was a natural division in Wiker’s design of the caverns, and breaking the goblin forces into these two separate chunks I kept each chunk to a manageable level of complexity.
THE FORGE OF FURY
Which brings us, finally, to my prep notes for a radically expanded Forge of Fury. It’s here that all of these ideas gel into the adversary roster. It looked like this:
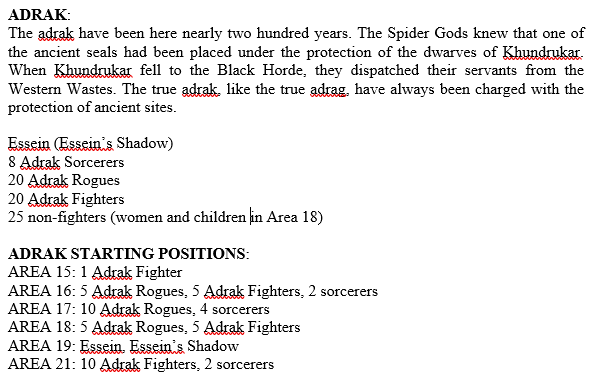
Following in the footsteps of the goblins & kobolds of The Sunless Citadel and the east & west caves of “Depths of Rage,” you can see that I’ve chunked Forge of Fury into factions. This, obviously, is the adrak faction.
You can see that I’m still including a separate list of everyone in the faction. I did this for the purpose of tracking casualties, just as I had done in the previous two adventures. (Shortly thereafter I realized I could just track casualties directly on the area roster so that I wasn’t trying to do double-entry bookkeeping in the middle of a session.)
You might also note that I was indexing by AREA instead of by ACTION GROUP. (Compare to the roster from Quantronic Heat at the beginning of this article.) This is really a legacy of how the adversary roster evolved out of a traditional dungeon key (i.e., I’m literally going through the module and listing all the monsters in Area 15, then all the monsters in Area 16, etc.) and it persisted in my notes for many years even when I wasn’t adapting published adventures.
Reviewing my other campaign notes, it looks like I made the swap around 2009, probably as part of the In the Shadow of the Spire campaign.
(Why is the swap important? Conceptually it puts the focus on the adversaries you’re actively playing rather than the area they’re currently in. More importantly it makes it A LOT easier to use advanced techniques like variable areas, patrols, and the like. It also makes doing roster updates easier. See Art of the Key – Part 4: Adversary Rosters.)
In any case, the pay-off for these adversary rosters in Forge of Fury was immediate and spectacular at the table: Things kicked off with a truly epic siege as the PCs sought to break through the goblin defenses at the Mountain Door. After getting through the door itself, the PCs were able to strategically test the goblin defenses, while the goblins were able to move their reinforcements around.
Later, the PCs became trapped in the depths of the dungeon, cut off by the movement of enemy troops on the levels above them. You can read the conclusion of those adventures in Tales from the Table: In the Depths of Khunbaral.
The whole thing remains one of the coolest and most memorable dungeon adventures I’ve ever run, and the experience immediately cemented the adversary roster as a technique for creating awesome games. Having run hundreds of sessions since then using adversary rosters, I have only become more convinced that this is the case.


I’ve found it really interesting to get an insight into how adversary rosters have developed over time for you. I’m interested to see how you will refine the idea further over time.
I’m thinking there’s maybe something to be worked on regarding multiple rosters for different times of day / alert levels, without having to create duplicate rosters for the location… but I’m not sure what this could look like.
To be honest, adversary rosters revolutionised my gaming table and my prep.
As someone who didn’t start with D&D, and only got into it properly with Pathfinder, I had no idea how to properly run a dungeon until I started reading your blog.
For me, every room was a set piece. Enemies stayed in their rooms, waiting for the door to be kicked in. They would follow the tactics in the modules, with me having the niggling feeling “Would they not try to mount a proper defence? Wouldn’t they hear fireballs blasting in the adjacent room?” but not knowing how I could cope with all that information during play.
Adversary rosters have helped make my dungeons come alive, becoming reactive spaces filled with intelligent beings who are able to plan and react to the player characters. Not only that, but the rosters make this process easier than what I was doing before – better results for less work!
However, it wasn’t until I started an open table that my love for adversary rosters really took hold. Sure they are amazing during play, but one of the greatest strengths is the ease of repopulating locations. Gone are the struggles of updating every single area with its own updated notes of what monsters are where. All I have to do is look at what I striked out during play, roll my repopulation table and put them onto the roster.
If anything I’m too in love with the concept. I found myself making a roster for a 2 room location, just because! Obviously this is going too far in the other direction and really not necessary… I deleted it and laughed at myself. Yet, adversary rosters have become an integral part of my prep for every game. I can’t wait to see what you do next with them.
A sidenote, but the concept of the adversary roster has some overlap with the idea of the order of battle. This kinda ties into the military analogy in your Dungeon as Theater of Operations article. Perhaps the conceptual similarity is a legacy of D&D having been built up off of a tabletop wargame?
Continuing the above thought, a GM might profit a bit from some good military science and military history reading to get inspiration for how to run combat.
To questwriter: I consult “The Monsters know what they are doing” https://www.themonstersknow.com/ when setting up my adversary rosters. That helps me figuring out the tactics for them. If somebody has a good tip for (medieval, roman, greek) small unit tactics, I take it gladly.