The Alexandrian

Search results for ‘street crawl’

Go to Table of Contents

These tools are designed to augment the streetcrawling scenario structure used in Part 5B of the Remix. Most of them are procedural content generators that will help you fill in details of the city as the PCs crawl through it.

RANDOM BUSINESSES

The Random Businesses table is not designed to generate every single building in the city. Instead, roll on the table once per street and use the result to contextualize the street as the PCs move down it (e.g., “You turn right at the corner. On the next street you see the remains of a goldsmith’s shop on the right. A fire has gutted it.”). You might interpret the result as a single notable business, or as characterizing the type of business done on the street (e.g., a street with several blacksmiths).

Make sure to record the results on your map, in case the PCs double back.

The table found here is a fairly crude tool. It most notably excludes businesses likely to be found in specific areas of the city (like the Docks) that the PCs aren’t starting out in. (You won’t find chandlers or fishermen here.) You could also improve it by:

  • Expanding the table to include more types of businesses.
  • Customizing the results by neighborhood.
  • Adjusting the results to more accurately model the likelihood of encountering different types of businesses.
  • Perhaps biasing the results of your next roll by the previous roll. (So that, for example, the tanneries are less likely to be crowded in right next to the perfumers.)

I recommend checking out Midkemia Press’ Cities or Chaosium’s Thieves’ World as premiere resources if you want more sophisticated tables while having someone else do the work for you.

d%Business
01-20No Businesses
21-25Baker
26-30Tavern/Inn
31-35Butcher
36-40Market
41-43Blacksmith
44-46Cartwright
47-49Public Bath
50-52Weaver
53-55Cobbler
56-58Dyer
59-61Fishmonger
62-64Potter
65-67Rope/Net-Maker
68-70Stable
71-72Stonecutter
73-74Miller
75-76Chiurgeon
77-78Bowyer/Fletcher
79-80Tannery
81-82Scribe/Notary
83-84Carpenter
85-86Glassblower
87-88Tinker
89Scholarium
90Alchemist
91Theater
92Painter/Sculptor
93Goldsmith/Silversmith
94Jeweler
95Spice Merchant
96Cartographer
97Perfumer
98Religious Chapel
99Distiller
00Moneylender

No Businesses: This usually means a purely residential street. It could also mean a green space of some kind.

Alternative: For a busier and more cosmopolitan feel, continue rolling on the table until you generate a “No Businesses” result.

BUILDING DAMAGE: Roll on the Building Damage table to determine the condition of a building. You can roll on a table whenever the PCs enter or inspect a particular building. You should also roll on the table when generating a street.

d8Building Damage
1-4No Damage
5-6Fire
7Looted
8Boarded Up / Fortified

When generating a street, you can additionally roll a d6 to determine if the damage generated on the Building Damage table applies to the specific business you generated, a separate building on the street, or if the entire street has been effected. (If the original building generation roll resulted in a residential street with no businesses, then any result of 1-5 means that a specific residence has been damaged.)

d6Extent of Damage
1-3Specific Business
4-5A residence on the street
6The entire street

Tip: I specifically designed these tables to use different types of dice. This makes it easy to generate an entire street in a single throw of the dice: Simply roll a d%, d8, and d6 simultaneously and then walk through the results using the appropriate die type for each table.

RANDOM FLOORPLANS

One of the challenges of running a streetcrawl is that the PCs may decide at any time to enter a random building. Here’s a quick method for generating simple floorplans on the fly.

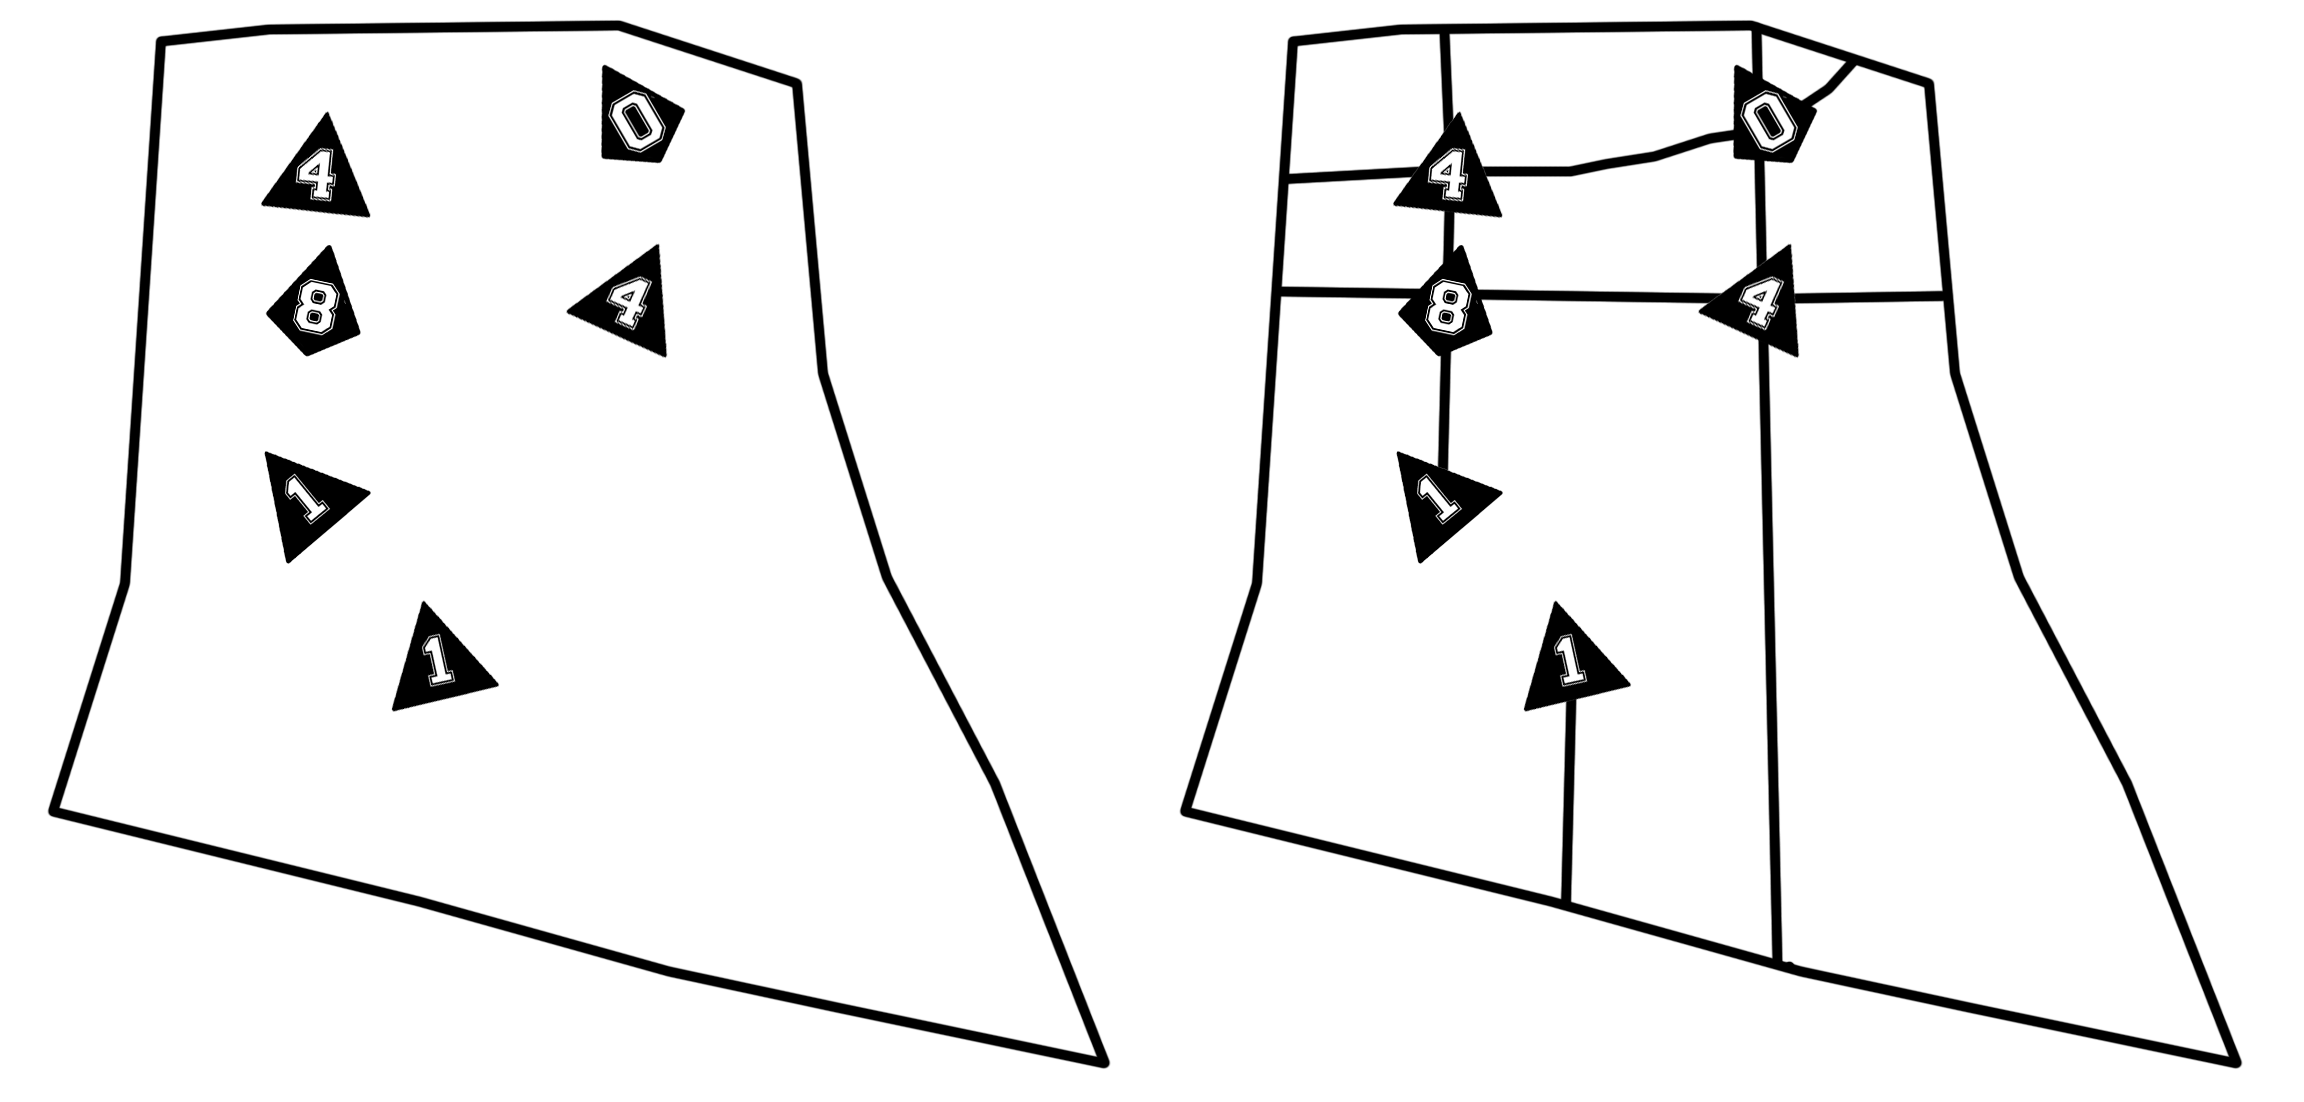
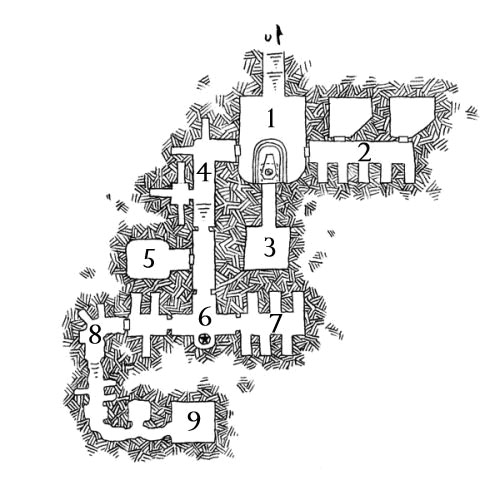
ROLLING THE DICE: As with the street generator, this is a tablemat system. Take a handful of d4’s and roll them onto a sheet of paper. Most buildings are square, so you can just consider the edges of the paper to be the outer walls of the building.

The location where each die lands is a corner with a number of walls extending from that corner equal to the number rolled on the dice. The more dice you roll, the more complicated the interior of the building will be (and complexity generally equates to size). For simple cottages, a single d4 is often sufficient. Here’s an example using 3d4:

Random Floorplan - Rolling Dice

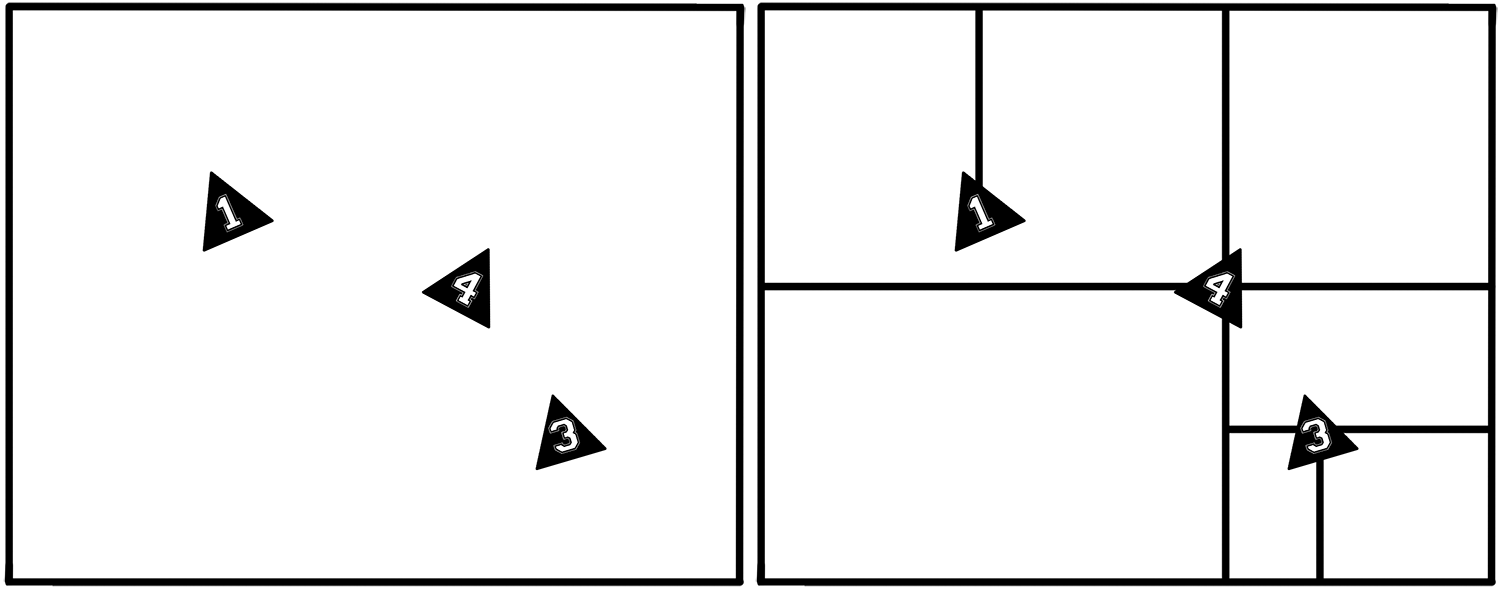
Tip: If a die rolls outside the “walls” of your building, you can ignore it, reroll it, or use it as an indicator of an irregularity in the otherwise square profile of your building. Whatever works.

After drawing your walls, you can remove the dice and add doors wherever it seems appropriate. For example:

Random Floor Plans - Adding Doors

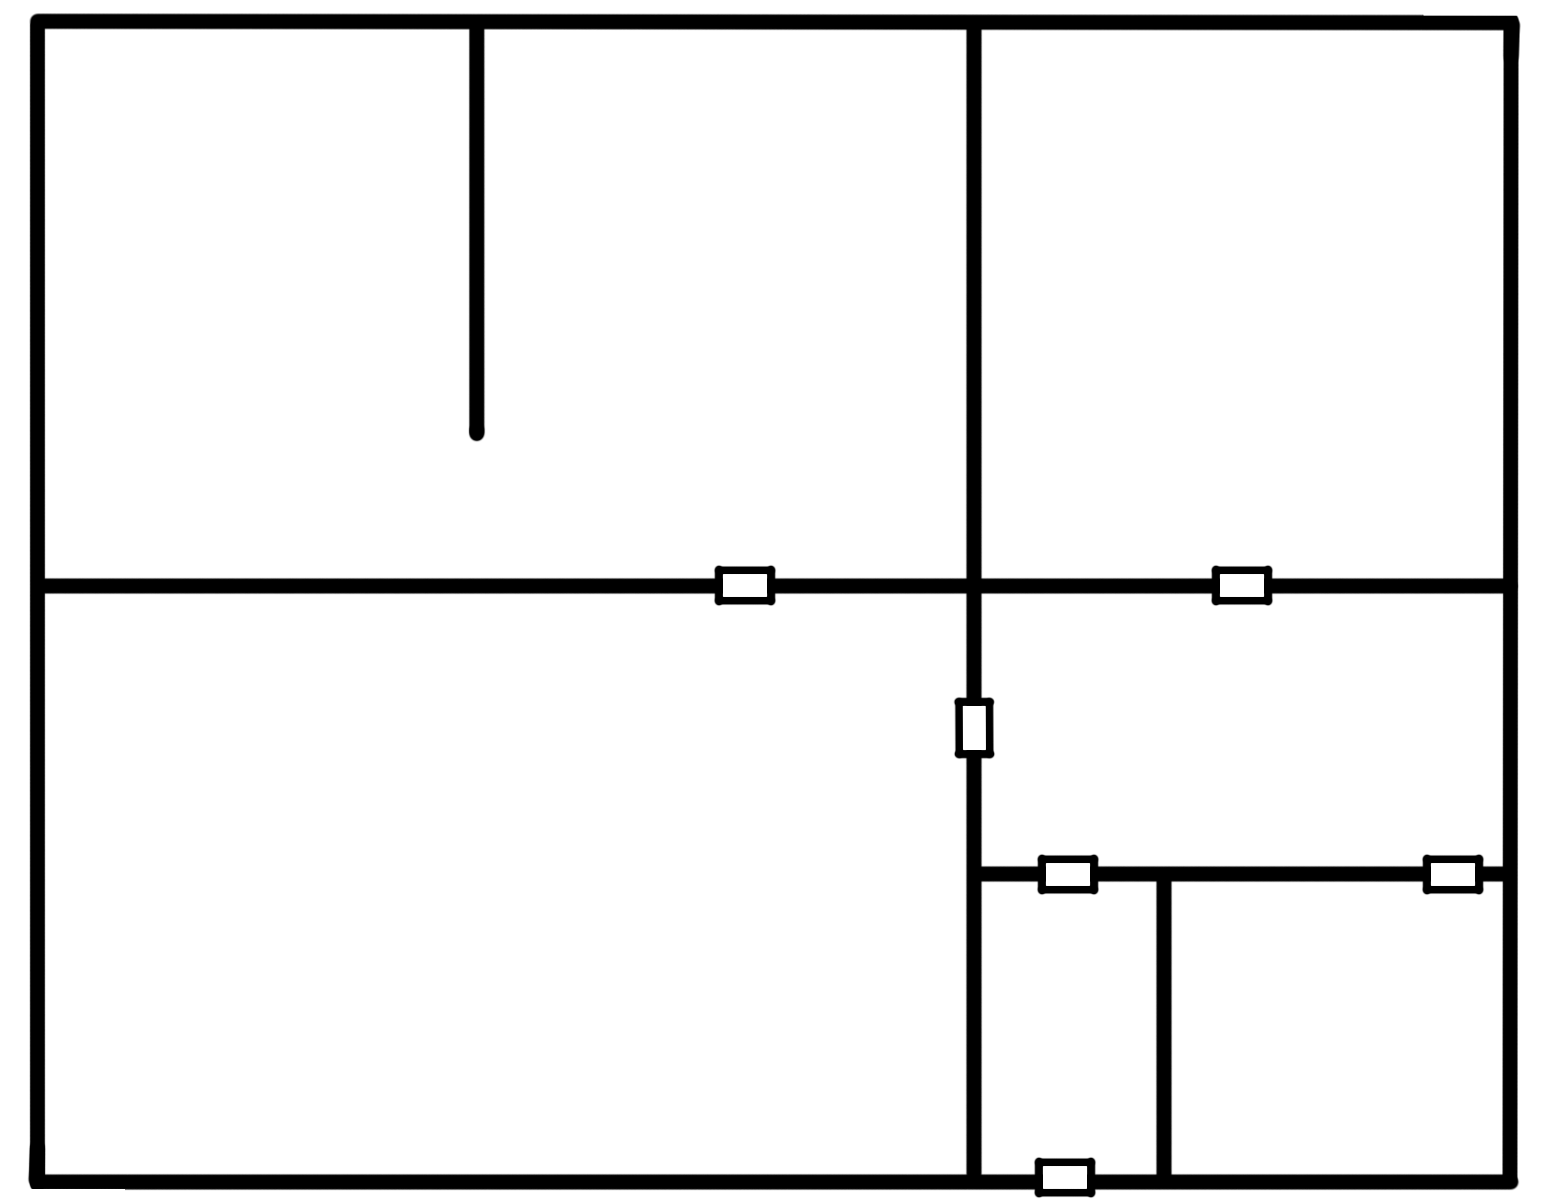
I placed the doors here while imagining a residence (with a short entry hall leading from the front door and a master suite in the upper left corner; you can fill in the other rooms easily). But we could imagine randomly rolling a 77 on the Random Businesses table and then needing to generate the layout for a bowyer:

Random Floor Plan - Bowyer Doors

Here you can see how the same randomly generated walls can just as easily give us a shopfront with a door leading into a private residence at the back of the building. The master suite remains in the upper left, but here we find a bedroom with a large closet in the lower right. (Or maybe your imagination might make that a kitchen with attached larder.)

STAIR DICE: Roll a six-sided die as a d3 in addition to the intersection dice to determine the number of floors in the building. If there are multiple floors, where the die lands can be treated as the location of the staircase. If the raw number on the d6 is odd, then the building has a basement (included in the total number of floors). If it is even, then it does not.

You can increase the maximum number of floors, of course, by increasing the size of the die used and interpreting the results in the same way. (Rolling a d8 as a d4, a d10 as a d5, a d12 as a d6, and so forth.)

Rolling 2d3-1 produces a nice bell curve for the number of floors and a building with multiple stairs. (You can limit the number of buildings with multiple stairs by including multiple stairs only if the dice roll doubles, and otherwise placing the stairs at whichever die rolled higher.)

Rolling 2d3-2 (min. 1) produces the homes found in a mid-20th century American suburb if you assume there’s always a basement.

RANDOM NPCs

If you need a random NPC:

  1. Roll on the Random Businesses table to generate their profession.
  2. If you get a result of “No Businesses,” roll on the Other Jobs table below.
  3. Pull a name from the Elturian Names list.

Tip: This is, once again, a fairly crude tool. If you want the gold standard for this sort of thing, try to track down a copy of Central Casting: Heroes of Legend by Jennell Jaquays.

d20Other Jobs
1-4Farmer
5-7Servant
8-9Fisherman
10-11Street Vendor
12-13Beggar
14Sailor
15Soldier
16Spy
17Assassin
18Thief
19Courtier
20Lawyer

GENERATING A CRISIS: Roll on the NPC Crisis table below to see what type of crisis the NPC is facing (if any) due to Elturel’s fall into Hell. If the PCs run into an entire group of NPCs, you can probably just roll once to determine the entire group’s need.

d12Crisis
1-4No Current Crisis
5Food
6Water
7Injured
8Trapped
9Escort
10Under Attack
11-12Roll Again Twice

No Current Need: The NPC probably isn’t happy, but they have a place of safety and they’re well-supplied.

Food & Water: Self-explanatory.

Injured: The NPC has been injured by collapsing structures, fires, looters, devils, or some other form of misadventure.

Trapped: Most likely due to a building collapsing on or around them.

Escort: The NPC needs to get some place (a place of sanctuary, to rejoin their family, etc.) and wants the PCs to escort them there safely. If in doubt, use one of the locations in Part 5C (the NPC effectively becomes a hook for that location).

Under Attack: The NPC is currently being attacked (or hunted) by criminals, devils, or something else.

Roll Again Twice: I’d recommend against stacking this result.

Tip: Structurally, these crises are a way of drawing the PCs deeper into the city. The more need they see, the more important what they’re doing becomes. The more people they help, the more emotionally invested they become. And the act of solving these problems will force them to explore the city and draw them towards the major locations.

FRACTAL STREET LAYOUT

An advanced technique while streetcrawling is to treat the system as having fractal complexity.

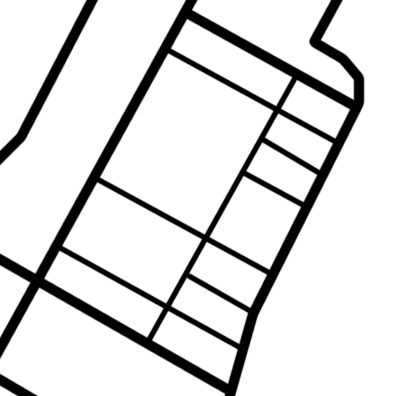
By default, you can just think of the system as generating and navigating specific streets. But you could also use it to generate the “major streets” of a larger neighborhood. (For example, this could be useful when the PCs are navigating towards a Distant Goal, as described in Part 5B.) Within each of these “major blocks” you can imagine myriad side streets, and, in fact, you can drill in and generate those side streets by treating each major block as the boundaries of a locality.

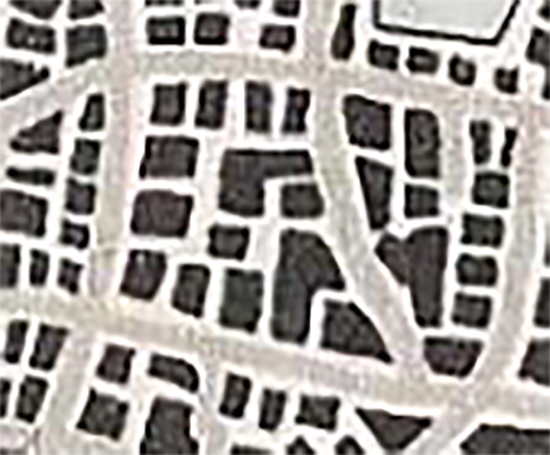
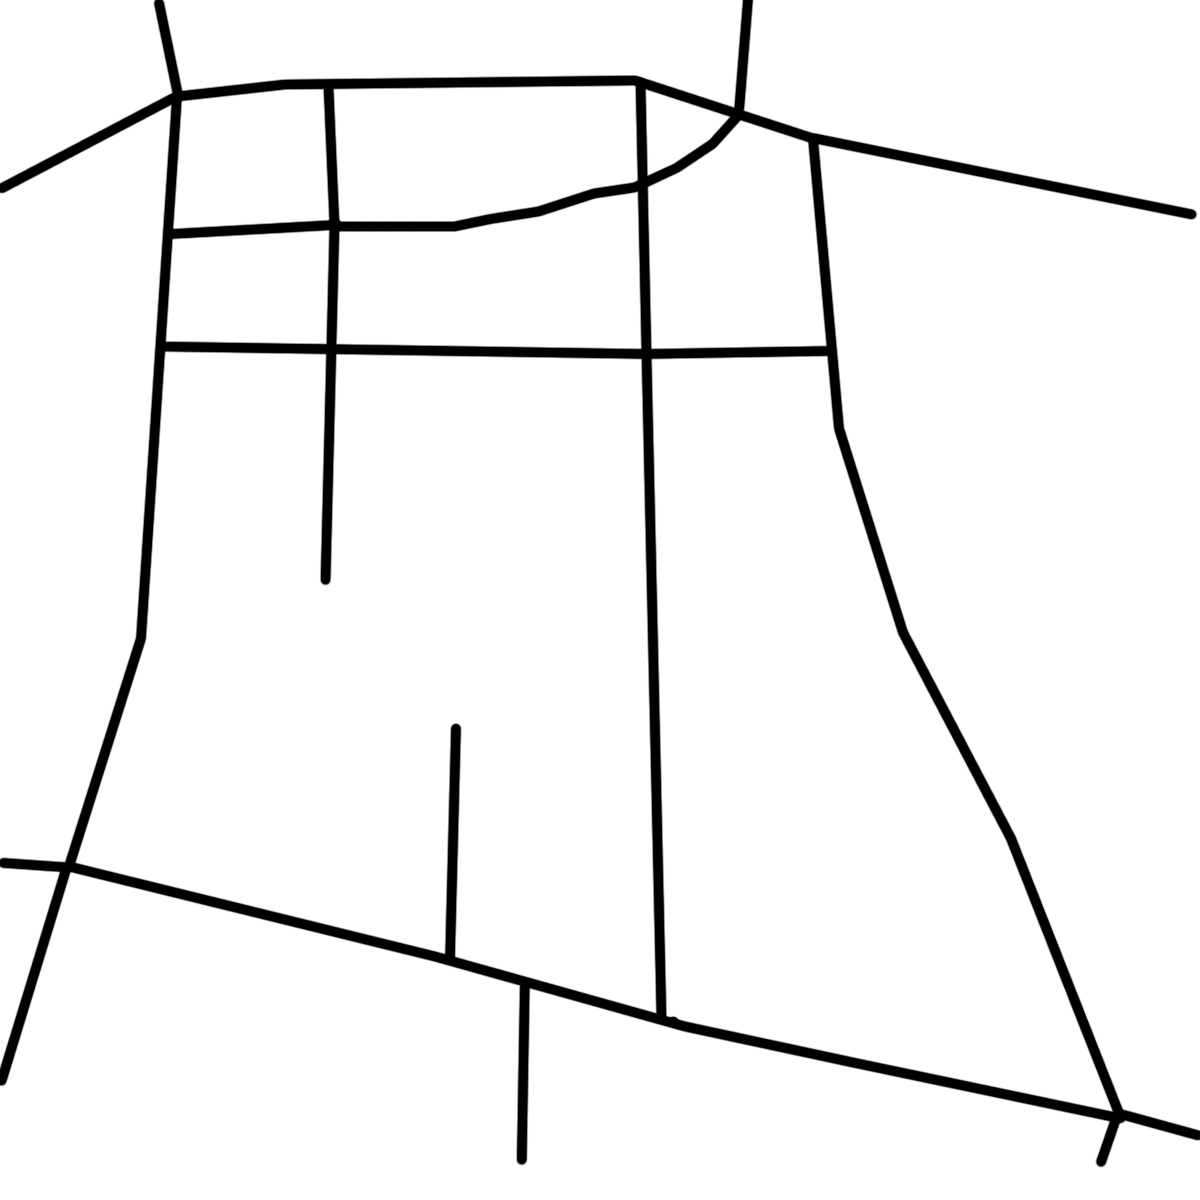
For example, you might start by generating a street map that looks like this:

Fractal Street Generator - Major Blocks

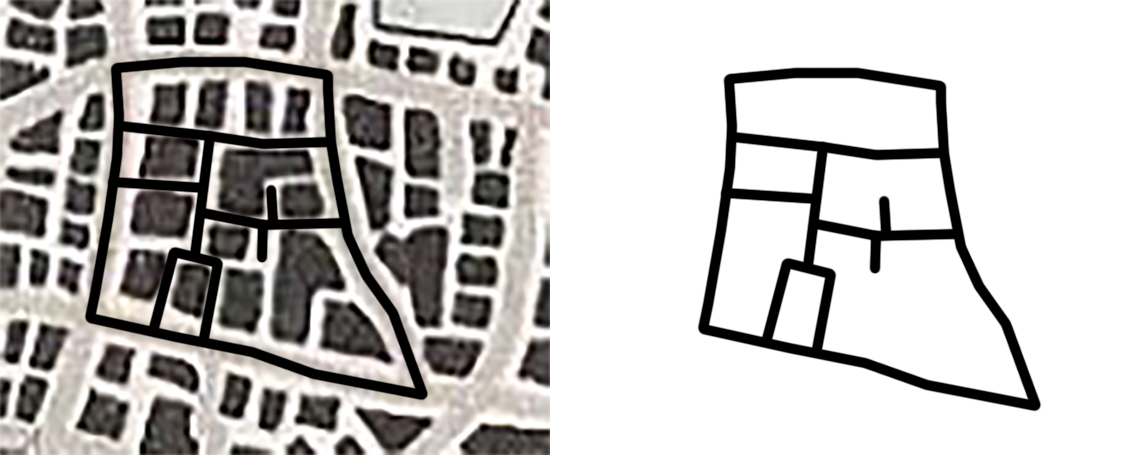
You could then select one of those major blocks and generate the local side streets:

Fractal Street Generator - Side Streets

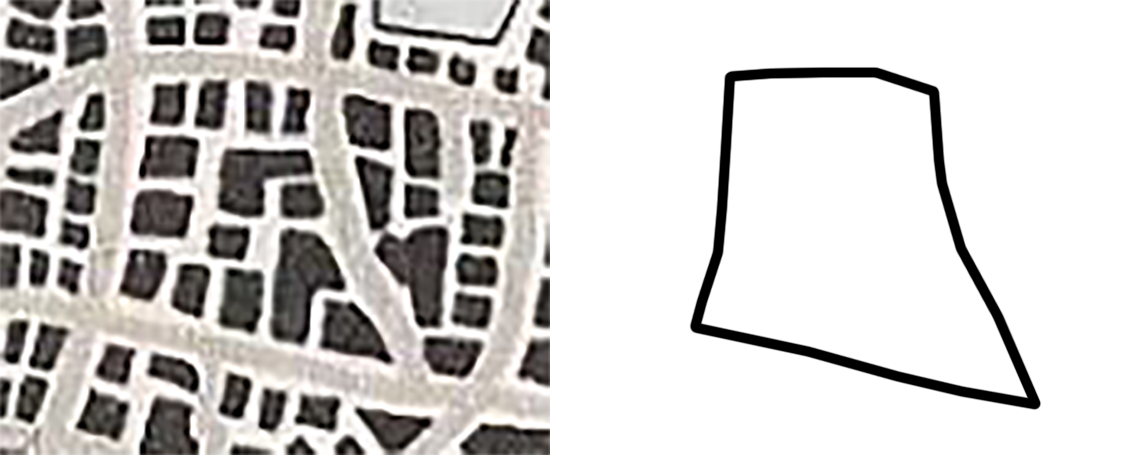
And you can take this even further, using the same system to generate footpaths, alleys, or even the outlines of specific buildings on an individual block. (The latter is a great way of getting non-standard building outlines that you can then use as a seed for random floor plans.) If you did that here, it might look like this:

Fractal Street Generator - Footpaths

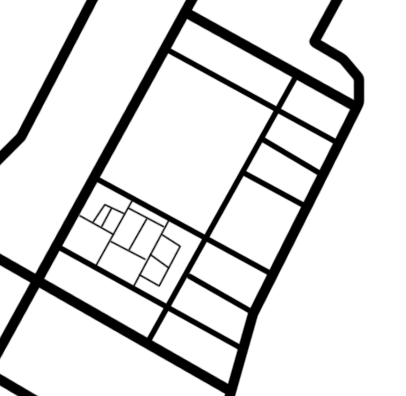
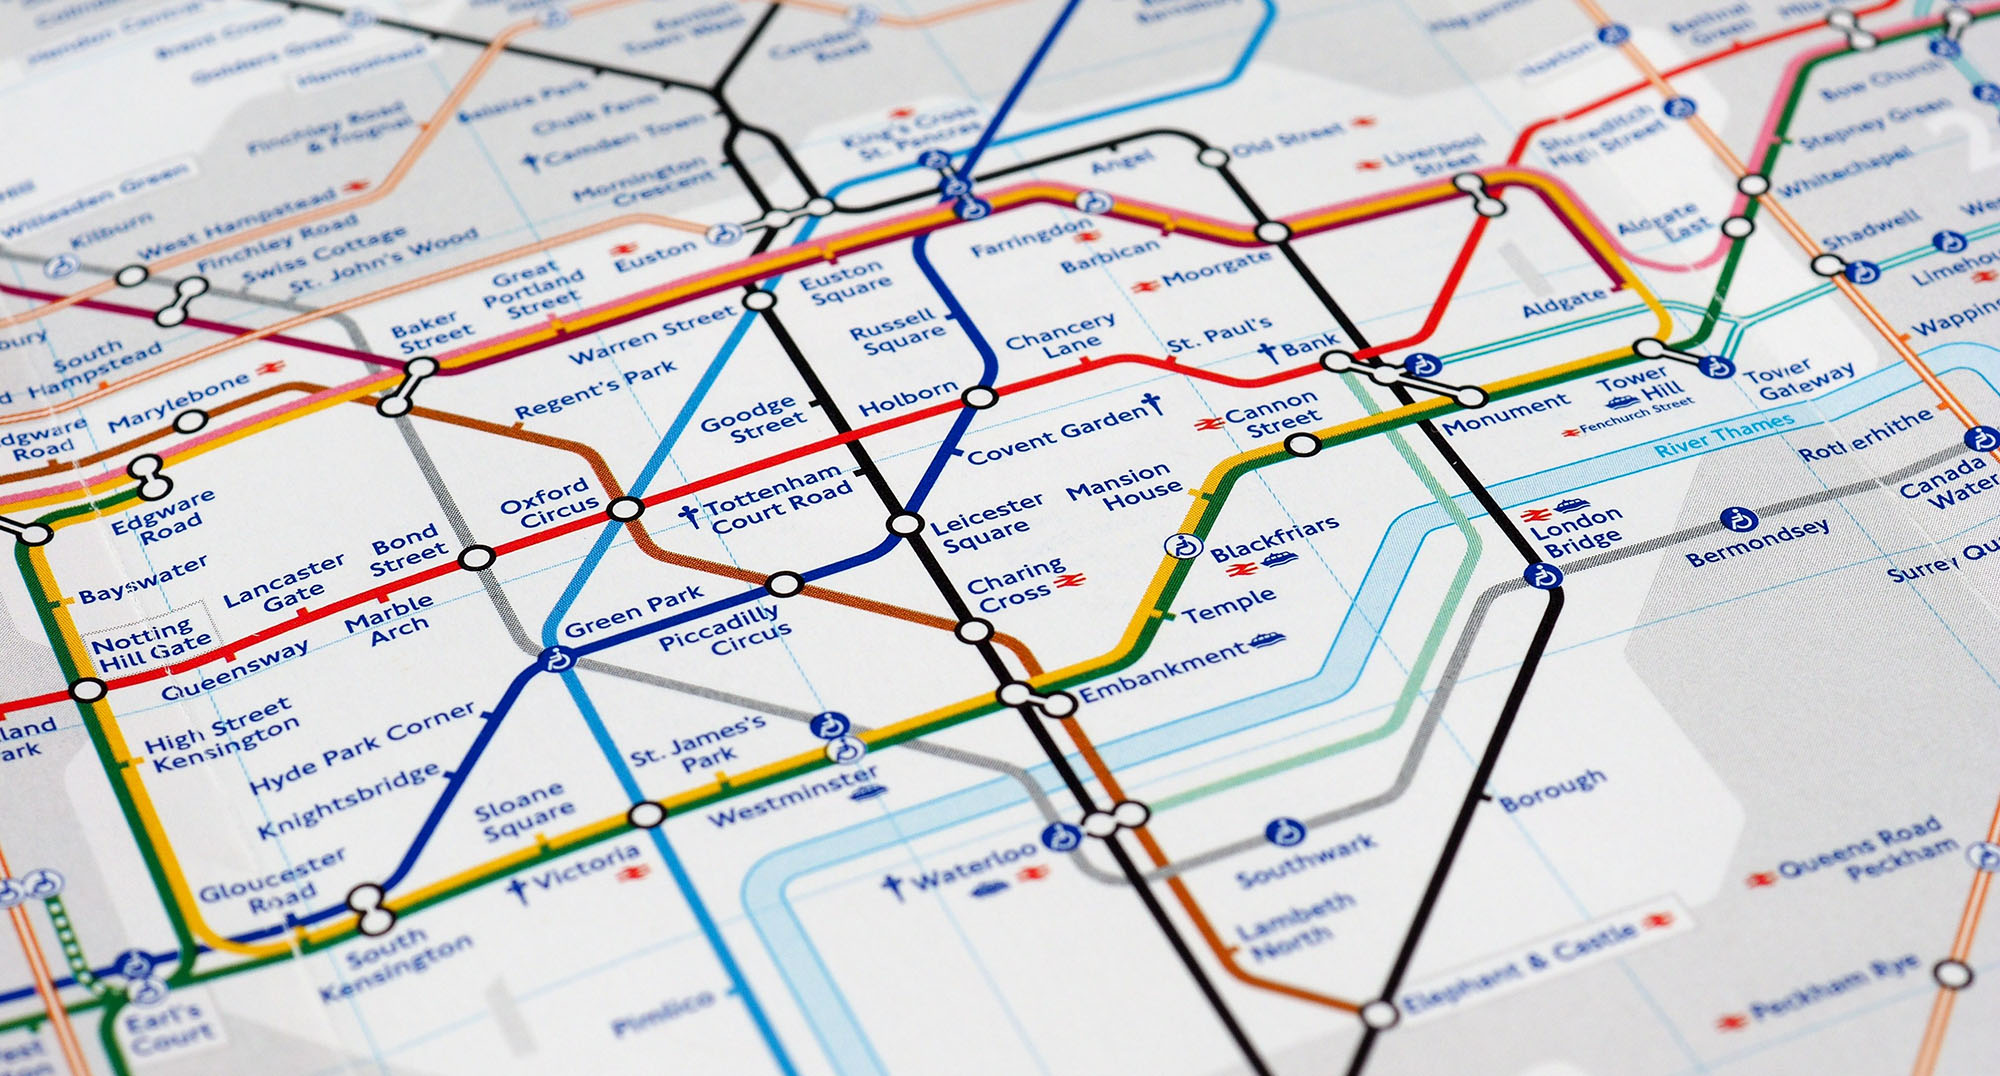
When I demonstrate this system for new GMs, I’m sometimes told that this fractal approach isn’t realistic. “Cities don’t work like this,” one gentleman told me. If you’re feeling the same way reading this, then you might want to know that I pulled a fast one here. Although these are street layouts which could be trivially created using the street generator, in this case I didn’t actually use the generator: I just traced the streets for Morningside Heights in Manhattan.

Fractal Street Generator - Morningside Heights

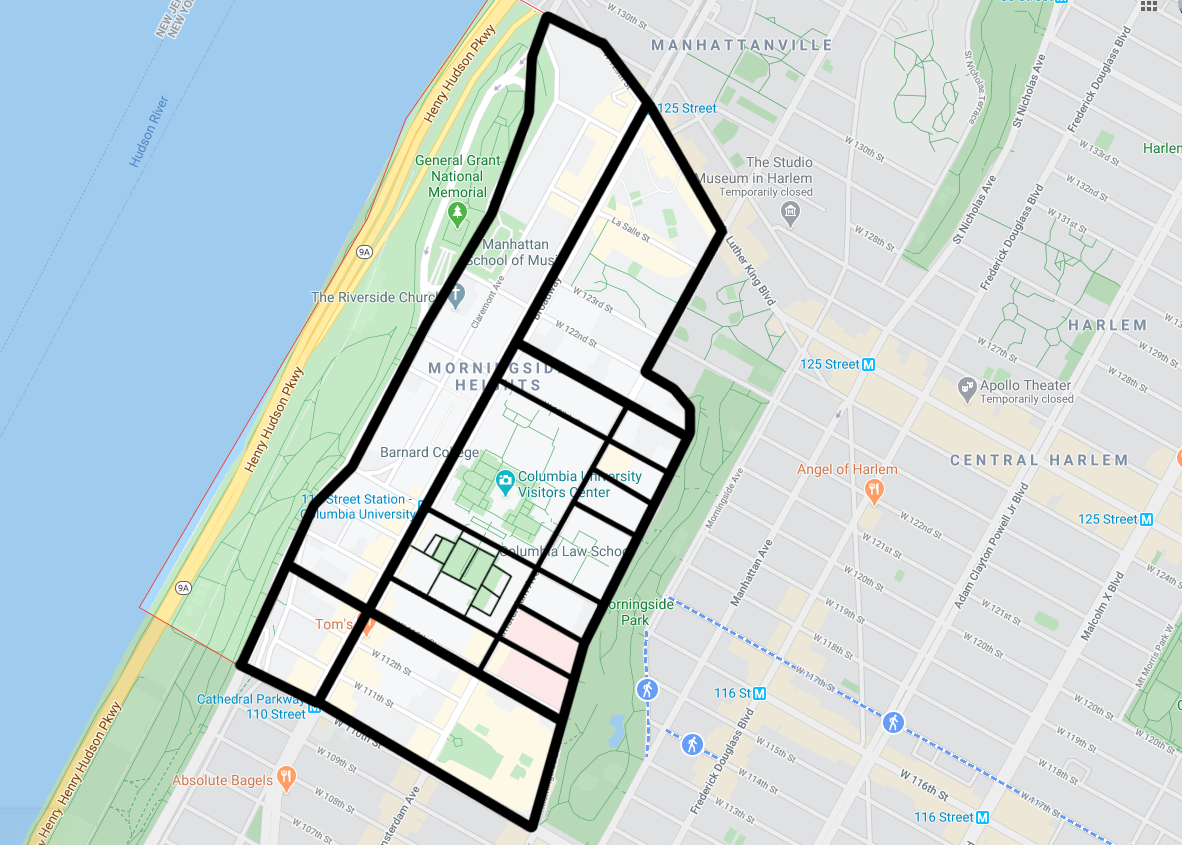
And you can see, looking at that map, how the other individual blocks have similar levels of detail hidden away inside of them. (And that’s even before we crack open the satellite view and street views and really start looking at the details.) This is a good reminder that the real world is always an endless font of inspiration, even for our most audaciously fantastical creations.

Go to the Avernus Remix

Burning Uden Church - Gert Jan Dergroot

Go to Table of Contents

We’re going to use a game structure called streetcrawling. You rarely want to track movement in an urban environment street by street (see The Art of Pacing), but there are occasions where the city is perilous, confusing, difficult, and/or treacherous enough that the PCs have to crawl through the streets (in much the same way that they might crawl through a dungeon or explore a hexcrawl). Lost in a post-apocalyptic city trapped in Hell definitely counts.

STEP 1 – SET GOAL: Establish the goal the PCs are trying to reach. This goal can be either specific (e.g., Helm’s Shieldhall) or generic (e.g., ‘someone who knows what’s going on’ or ‘a source of clean water’).

STEP 2 – GENERATE STREETS: Use the Street Generator (below) to determine the local street layout and the relationship between where the PCs are and where their goal is located.

STEP 3 – ORIENT: The PCs need to figure out how to go to where their goal is located. Options include:

  • Their goal can be spotted from a distance. (For example, if they look around for a high tower to climb, they’ll probably be able to spot one.)
  • They can ask the locals for directions.
  • They can attempt an appropriate skill check to make an educated guess.
  • They could use magic (like a locate object spell).
  • They know the city (or have a map) and they know where their goal is.

If they can’t figure out how to go to their goal, then their first goal is actually going some place where they CAN figure that out. Or they’re randomly wandering (see below) and just hoping to stumble across something that will point them in the right direction.

STEP 4 – RANDOM ENCOUNTER: Check for a random encounter (see below).

STEP 5 – ARRIVAL: The PCs arrive at their goal.

If their goal was figuring out a way to get their bearings, then this will likely conclude the streetcrawling and transition to pointcrawling (see Part 5C: Pointcrawl in Elturel).

Design Note: What if the players don’t make orienting themselves a priority? What if they want to achieve some other goal? That’s fine. Use the streetcrawl structure to resolve whatever goal or goals they set for themselves.

In the process of pursuing other goals, they may unintentionally get their bearings. (For example, one of them might fly up into the air for some completely unrelated reason and see the city spread out below them.) That’s great. An equally likely outcome is that they’ll get frustrated trying to navigate the city when they really don’t know where they’re going and eventually figure out that they need to do something to get their bearings.

STREET GENERATOR

If you have a highly detailed map of your city, you can just grab a chunk of the streets depicted on the map and use those for your crawl. If you don’t have a map of the city or if that map is not particularly detailed, however, you can use this simple system to generate local street maps. (For a lengthier discussion of this, check out Random GM Tip: Visualizing City Block Maps.)

In the case of Elturel, the maps we have for the city arguably straddle the line between these two types of depiction. For example, look at this chunk of map:

Elturel - Locality Map

You might look at that and clearly see streets, like this:

Elturel Locality Map

If you do, great. You can just sketch those local streets out on a sheet of paper and use that for your crawl.

For the sake of argument, however, I’m going to instead focus on the shape of the major streets which define the borders of this particular locality and sketch that onto a sheet of paper:

Eltural Locality Map

If you don’t have a city map at all to base these outlines on, you can either arbitrarily sketch the major streets bordering the area or just treat the edges of the current sheet of paper as the locality’s edge.

ROLLING THE DICE: This is a tablemat system, so you are now going to take a handful of street dice and location dice and roll them directly onto the sheet of paper. The locations where these dice land on the paper are as important (or more important) than the numbers they roll. If a die rolls off the paper, you can either re-roll it or ignore it.

Tip: You generally want to have the dice spread out across the available space, not clustered together.

STREET DICE: Take an arbitrary number of d4’s to be street dice. The larger the number of street dice, the larger the number of streets and the more convoluted the street plan you’ll generate. I’ve generally found that rolling 4d4 produces a good result.

The location where each die lands is an intersection and the number of streets attached to that intersection is equal to the number rolled on the dice.

LOCATION DICE: Location dice are d10’s. You roll a number of location dice equal to the number of locations where the PCs’ goal can be achieved in the current locality. If this is the beginning of the streetcrawl, add an additional location die (and the lowest die rolled will be the PCs’ starting location).

Tip: Streets can curve. Adding a curve when one is necessary for a street to intersect with a location die is a good prompt for adding a little variety to your street map.

For example, using the block outline from above to start our streetcrawl, we’re going to roll four street dice and two location dice (one for a goal location and one for the PCs’ starting location):

Elturel Locality Map - With Dice Rolls

That’s not the only set of streets that could have been generated from that particular die roll. There is no “right answer.” The point is to be able to very quickly generate local street maps during the session by tossing some dice on the table and sketching out a few lines.

Here’s what the final locality map looks like with the dice swept aside (and surrounding streets added for context):

Elturel Locality Map - Streetcrawl Version

RANDOM ENCOUNTERS

If you’re familiar with using random encounters in dungeons, you’ll want to make a mental adjustment for streetcrawls for several reasons:

  • Cities are usually filled with a lot more activity and encounters should be more common.
  • Navigational choices in the city are usually trivial or random, which makes them less inherently interesting.
  • There are no rooms keyed with interesting content in a streetcrawl; the encounters need to carry more of the weight.

For example, in an old school dungeon a random encounter often happens 1 in 6 times per check. In a streetcrawl, you might want to have encounters 1 in 4, 1 in 2, or even 2 in 3 times.

Tip: For a short, simple streetcrawl like the one we’re most likely using for the PCs’ arrival in Elturel, I’d recommend just automatically slotting in an encounter. You might actually want to take the initial “woman running from devils” encounter (DEVILS!) and use it as the encounter for their initial streetcrawling move.

ELTUREL RANDOM ENCOUNTERS: I’m going to discuss the random encounters we’ll be using for Elturel in more detail in Part 5C.

DISTANT GOALS

If the goal the PCs are trying to reach is not local, then the immediate goal is actually ‘move one chunk of city closer to the goal.’ When generating streets, only roll one location die to determine the PCs’ starting location. Their immediate goal can obviously be achieved by reaching the appropriate edge of the current crawl map. (You’ll want to determine the number of chunks necessary to reach the locality of their goal.)

Note: When dealing with distant goals it will often be more appropriate to exit the streetcrawling structure while the PCs travel to the general vicinity of their goal and then resume crawling. (Imagine the PCs in a city they’re familiar with. If they’re in Oldtown and know that Old Tom is hiding somewhere down by the Docks, they don’t need to crawl their way across the whole city: They can just go to the Docks and then start crawling to find Old Tom.) In the case of Elturel, the point where this would become appropriate is likely also the point where we’ll be switching to a pointcrawl structure (see Part 5C). But it is possible for the PCs to strike out before getting their bearings (for example, they might head straight towards the High Hall after spotting it towering above the city).

CRAWLING WITHOUT A GOAL

If the PCs don’t have a goal:

STEP 1: Use the street generator to determine the local street layout, rolling a location die only to determine the PCs’ starting location.

STEP 2: The PCs choose a direction to walk. (Presumably at random.)

STEP 3: Check for a random encounter on each street they walk down.

If they reach the edge of the local map, use the street generator again to extend the map and continue crawling.

Generally speaking, this style of play should not persist for long. Context should prompt the PCs to begin setting goals. (Even if they’re just “wandering around looking for something to do,” the random encounters or street descriptions should eventually give them something to do or become interested in pursuing.)

RANDOM WANDERING

If the PCs are hoping to find something but have no idea where it might be or how they might get there, they are randomly wandering. Follow the same procedure as crawling without a goal, but roll location dice normally to determine the location(s) of what they’re looking for.

At any time, of course, they may be able to figure out how to orient themselves (running into an NPC they can ask for directions, etc.), at which point they’ll no longer be randomly wandering.

Note: Wandering randomly is generally a terrible way of finding a specific location. (Since you can easily go in completely the wrong direction and never find it.) It works better if they’re looking for a generic type of thing, since even if they miss one such thing they can stumble across another. (For example, there are any number of hardware stores you could hit up for supplies during a zombie apocalypse.)

WANDERING THE CITY: Some goals can be found almost anywhere you look in a city (e.g., someone to talk to). Other goals might be rare or found in only certain locations of the city. As the GM you can arbitrarily decide this based on your understanding and knowledge of the city (there’s one local alchemist nearby; the alchemists are over in the Dewberry neighborhood and they’ll have to crawl there; etc.). Alternatively, you can make a ruling for how likely they are to find the thing they’re looking for in a particular chunk of city and then roll to randomly determine if there’s one local to them. Examples include:

  • 1 in 100 chance (for perhaps a specific location that they know is somewhere in the city, but have no idea where or if they’re even close to it).
  • 1 in 6 chance (for something that is known to be “around here somewhere”; or that’s relatively rare in the city)
  • 1 in 4 chance (for something that’s fairly common in the city, like a public fountain)
  • 1d4-1 per locality (for something that can be found almost anywhere in the city, like bodegas in Manhattan)

And so forth.

CONCLUSION

I’ve dropped an entirely new scenario structure on you. That may be a lot to process, so let’s take a step back and do a quick recap on how this is likely to work out in play:

  • The PCs show up in Elturel.
  • They look around for a high place to get their bearings from.
  • You generate a local street map.
  • As they walk from their current location to the location of the tower they’ve spotted, you trigger the “woman running from devils” encounter (contextualizing the encounter based on the street map you’ve generated).
  • After that (likely a fight) scene, they continue on their way, reach the tower, climb the tower, look around (WE ARE FLOATING IN THE GODDAMN AIR!), receive the poster map, and transition to pointcrawling (see Part 5C).

That’s it.

So what’s the deal with the whole streetcrawling structure? Isn’t it overkill? Couldn’t we just prep a locality street map of the area where the PCs appear with the location of the tower indicated? Possibly. But the reason we want the structure is because this might NOT be the way it goes in play: Players are fickle and unpredictable generators of random chaos. As we’ve already discussed, they might go in any number of unexpected directions.

This structure can easily generate the likely outcome described above, but it can just as easily handle anything that the players choose to throw your way.

Without this kind of structure (either formal or informal), your only option would be to have a GMPC tell the PCs what to do. (And then get frustrated when they don’t.)

Go to Addendum: Streetcrawling Tools Part 5C-A: Pointcrawl in Elturel

Stellar Cluster Pointcrawl Map - The Alexandrian

Go to Part 1

Here are a few advanced pointcrawl techniques you may find useful. Or you can ignore them entirely. Or mix-and-match them. They’re tools. Use the right ones for the job.

Some of them may be more immediately obvious in player-known pointcrawls (where the players can directly invoke them), but they can also be useful for GMs looking to interpret PC actions into a player-unknown pointcrawl.

Some of these advanced procedures include suggested mechanics. For clarity, I’ve chosen to present these as they might be used in a D&D 5th Edition campaign, but they can be easily adapted to other RPGs by simply using the appropriate skills and difficulty numbers for your system of choice.

PATH TYPES

The paths in a pointcrawl can be differentiated by type. Examples might include:

  • Roads (including further distinctions between highways/thoroughfares vs. byways/side streets)
  • Tracks
  • River
  • Landmark chain
  • Supernatural (portals, fairy paths, etc.)
  • Stairs/Shafts
  • Mazes

On your pointmap, these types might be indicated by color, line type (dotted, double, etc.), labels, or other iconography. They can be useful for purely descriptive purposes (“you follow the River Wyth as it wends its way through the Forlorn Hills”), but might also be distinguished by:

  • Modifying travel time (this could also be done for terrain type)
  • Requiring skill checks
  • Requiring (or preferring) certain types of vehicles, mounts, or spells

Not every pointmap, of course, needs to feature every single type of path. Think about which paths are most useful and relevant to the pointcrawl you’re designing, and then see if there’s a way that you can make the different types of paths clear and significant.

PARALLEL PATHS: Once you have multiple types of paths in your pointcrawl, it opens the possibility of having two points connected by not just one, but two (or more) paths simultaneously. If you do this, the key thing is to make sure that the paths are distinguished by choice and not just calculation. (For example, if you have two paths and the only difference is that one is faster than the other, the PCs will always take the faster path. Just don’t bother including the other one. On the other hand, if one path is faster but you need to make a skill check to traverse it safely, you now have a meaningful choice in which path to take. Thinking About Wilderness Travel takes a more detailed look at this issue.)

HIDDEN ROUTES

A hidden route in a pointcrawl is simple a connection between two points that is not immediately obvious; i.e., the PCs have to find the route before they can use it. In a wilderness this might be illusory druid paths. In a city it might be linked teleportation circles or perhaps the sewers.

Hidden routes are often discovered as part of a scenario or while exploring a particular location (i.e., you’re looking around the crypts beneath the Cathedral and discover a tunnel heading to the Harbor). In some cases, discovering the hidden route might be as easy as making an Intelligence (Investigation) or Wisdom (Perception) check to find the route.

SHORTCUTS & SIDE ROUTES

The PCs want to move from one point to another without moving through the points between. (For example, they want to go directly to the Trollfens without first passing by the weird red rock. Or they want to go south to the Docks without passing through Shiarra’s Market.) What happens?

In some pointcrawls this might not be possible. (You can’t walk through solid rock.) In a typical wilderness it might require trailblazing (using the procedure below). In a typical, safe city, on the other hand, it usually just means getting off the major thoroughfares and circling around on side streets, and probably just happens automatically.

SIMPLE SIDE ROUTES:

  • Determine an appropriate base time. (If they’re trying to go the long way around to bypass something, you can probably set this to whatever the travel time would have been going the normal way. If they’re trying to save time by using an unorthodox shortcut, eyeball the best case scenario.)
  • Make a random encounter check.
  • Make an appropriate skill check. (This is probably a Wisdom-based check. Perhaps Wisdom (Stealth) if their goal is to avoid attention, or Wisdom (Survival) if they’re trying to cross a trackless waste.)
  • If the check is successful, they arrive at their intended location.
  • If the check is a failure, then they’re lost and will need to make another check. If they were trying to avoid trouble, the trouble finds them. Either way, they’ll need to repeat the random encounter check and the skill check until they succeed.

TRAILBLAZING

Trailblazing reduces the party’s speed by one-half (adjust the base time of the journey appropriately), but also marks an efficient trail through the wilderness with some form of signs — paint, simple carvings, cloth flags, etc. Once blazed, a trail is effectively added to the pointmap.

Note: If the strata you’re using for your pointcrawl is a wilderness hexcrawl map, you can alternatively use the hexcrawl trailblazing mechanics to create these new trails.

HIDDEN SIGNS: The signs of a trail can be followed by any creature. When blazing a trail, however, the character making the signs can attempt a Wisdom (Stealth) check to disguise them so that they can only be noticed or found with an opposed Wisdom (Perception) or Intelligence (Investigation) check.

You don’t need to make a check to follow your own hidden signs (or the hidden signs of a trail you’ve followed before). Those who are aware of the trail’s existence but who have not followed it before gain advantage on their skill check to follow it.

OPTIONAL RULE – OLD TRAILS: Most trail signs are impermanent and likely to decay over time. There is a 1 in 6 chance per session that a trail will decay from good repair to weather worn; from weather worn to poor repair; or from poor repair to no longer existing.

Someone traveling along a weather worn trail can restore it to good repair as long as they are not traveling at fast pace. Trails in poor repair require someone to travel along them at the trailblazing travel pace to restore it to good repair.

Note: You might use these same guidelines for similar trails on your original pointmap. But it can be assumed that any trails in regular use — whether by the PCs or otherwise — either won’t decay or won’t decay past poor repair.

TRAVEL PACE

You can use D&D 5th Edition travel pace in a pointcrawl fairly easily. I recommend simplifying/fudging the normal travel distances:

  • Slow Pace: 1 interval per watch
  • Normal Pace: 2 intervals per watch
  • Fast Pace: 3 intervals per watch

(You can replace “watch” with whatever timespan is most useful for the pointcrawl.)

ALTERNATIVE 1: Indicate the connection length in standard intervals, but then separately indicate interval duration for normal, slow (¾), and fast (x1.5) travel paces.

You may also want to reduce the chance of a random encounter for fast travel paces. (Slow travel paces would theoretically result in more checks, but in 5th Edition this is usually cancelled out by the reduced encounter chance due to the extra caution being taken.)

ALTERNATIVE 2: Reference the pointcrawl’s strata and calculate the actual distance (and terrain modifiers). Then simply use the standard rules for travel pace to calculate time, making encounter checks per watch. (The disadvantage here is that you’re adding a lot of unnecessary complexity to your pointcrawl procedure.)

ADDENDUM
Depthcrawls

Pointcrawls

November 12th, 2022

London Underground Tube Map

Pointcrawls are a pretty straightforward scenario structure: You create a map with locations which are connected with paths, forming a node map. If you want to get more clinical in your descriptions, you can also refer to the locations as points (hence the first half of the name) and the paths as connectors. During play, PCs in a location can choose one of the paths connected to that location and travel along it to another location. They can thus crawl (there’s the other half of the name) through the pointmap.

The concept of the pointcrawl was first formalized by Chris Kutalik on his Hill Cantons blog in 2014, although antecedents can be found. For example, Dragons of Hope, the third Dragonlance Chronicles module, features a proto-pointcrawl of linked regions. Even the famous, multicolored tube map of the London Underground first designed by Harry Beck (and seen above) displays similar properties.

THE MANY-HEADED POINT

What makes the pointcrawl so versatile as a scenario structure is that each “point” can be literally any point of interest. It might be extremely specific, like “that strange red rock outside of town.” Or it could be very large, like “the city of Warnock” or “the Kingdom of Catalac.” The structure can even be adapted to other milieus entirely, with points like “the VR server of Thunderdome, MLC.”

The structure is quite flexible, with points of different “scale” easily coexisting. (For example, “that strange red rock outside of town” and “the city of Warnock” could easily both appear on the same pointmap.) It can also be trivially fractal, with the point on one pointmap being an entirely self-contained pointcrawl in its own right.

LITERAL vs. ABSTRACT PATHS

A pointcrawl exists within a strata, and to truly understand, design, and run the pointcrawl, you need to have an understanding of that underlying reality. For example, the city of Warnock and our strange red rock aren’t just floating nebulously in a hypothetical node map: The red rock lies east of Warnock in the Forest of Arden. Or maybe it instead lies to the west on the far side of the Daggerpoint Mountains.

Understanding this will allow you to answer questions like:

  • Which connections exist (and don’t exist) in the first place?
  • How long does it take to travel from point to another?
  • How should you describe the journey along the path?

And so forth.

The most literal application of a pointcrawl system is to model wilderness travel along a trail system (i.e., the connections between points are literally wilderness trails or roads running between those locations). These are examples of literal paths, and are almost always a player-known structure: The pointmap has a one-to-one correspondence with the game world, and the characters can see the trails or roads that they’re following.

But pointcrawls can also work with abstract paths, which seek to capture the conceptual navigation of an environment in a way that allows you to focus prep and structure play. An example of this is an urban pointcrawl, where a pointcrawl would not for example, include every single street and building in the city. Instead, the connections of an urban pointcrawl represent the way we think about traveling through a city.

This can be a bit harder to get your hands around than literal paths, so how does it actually work?

When the players indicate a navigational intention, the GM basically acts as an “interpreter” who translates that intention into the pointcrawl system, uses the pointcrawl system to resolve it, and then describes the outcome to the players in terms of the fiction.

This works because we naturally think of navigating a city in broad terms. “We need to head west to Lyndale Avenue and then take that south into Edina.” What was the exact route we took to get to Lyndale? Did we take 36th or 38th or 42nd or 46th? We don’t really care. Particularly in a pre-GPS era, navigation was even more likely to funnel into landmarks and major thoroughfares: Cross the river at such-and-such bridge, head east to the cathedral, and then cut south through Littlehut… and so forth.

The points of the pointcrawl match the mental model we use to navigate through a city.

For example, consider this map of the hellish city of Elturel from the Alexandrian Remix of Descent Into Avernus:

You can see how this navigation works most clearly at Torm’s Bridges (Area 9). Here the conceptual and literal geographical navigation of the city are basically unified; the funnel effect is as literal as possible: If you want to cross the gorge between the western and eastern halves of the city, you’re going to have to cross those bridges.

But this conceptually remains true even when the literal geographical funnel is not so precise: If the PCs decide to head south Area 1, for example, they’re going to pass through Shiarra’s Market (Area 2). Yes, it’s technically possible to take a different route that narrowly avoids the market, but in the absence of intentionality the point-map represents the general “flow” of the city.

You can also see from this example how literal and abstract paths can coexist in the same pointmap: Torm’s Bridges are quite literal; “you’ll pass through Shiarra’s Market on your way to the Docks” is more abstract. The same thing could hold true in our hypothetical wilderness pointcrawl from before (“you can follow all these literal roads, but if you try to cut through the Forest of Arden you’ll bump into the weird red rock”).

So you can really think of this as more of a spectrum options than a hard choice.

EXPLORATION vs. ROUTE-PLANNING

Another finesse to consider here is whether the PCs are exploring the pointmap (i.e., they don’t know what points are available and/or what paths they can take until they discover them) or if they have some sort of map or comparable knowledge which allows them to plan their journeys.

This may or may not be related to whether or not the pointcrawl is a player-known structure. (For example, the PCs might have a diegetic map of Elturel even if the players don’t know that the GM is using a pointcrawl.) Hybrid approaches are also quite common, with some routes or points being known while others remain secrets to be discovered. And, of course, an exploration model will naturally turn into route-planning as the PCs make their discoveries and create their own maps.

THINGS YOU’RE LIKELY TO SAY

Things you’re likely to say while running a pointcrawl include:

  • “Crossing Waterloo Bridge, you head south past the London Eye to Lambeth Palace.” (The PCs are leaving a vampire den somewhere near Covent Garden. Waterloo Bridge, the London Eye, and Lambeth Palace are all locations on the pointmap. In this case, the players already have some familiarity — or perhaps a great deal of familiarity — with the city, recognizing these locations without the GM needing to
  • “Following the bonsai turtles, you pass through an arch in the hedgerow and find yourselves standing at the top of an ancient amphitheater. Benches of worn stone descend to a circular area where three of the bonsai turtles have already gathered. On the far side of the amphitheater you can see two other arches like the one you’ve just come through, leading to other paths through the Maze.” (The amphitheater is a location the PCs have just discovered. The GM is indicating the existence of two other paths, leading to other locations, that the PCs could follow.)
  • “You’ve been following the deer path for a couple of hours when Lavid hears the distinctive hooting call of the local goblin tribe. It sounds like they’re coming down the path from the opposite direction.” (The PCs are currently traveling along a connection and a random encounter has been triggered.)
  • “You take Nephranter’s Street through the Court of the White Bull and then south to the Caravan Court.” (The nodes here are the Court of the White Bull and Caravan Court. “Nephranter Street” is a way of contextualizing the journey; it’s pulled from the strata of the Waterdeep city map to describe the abstract path. The GM could just as easily say “…passing through the bustling crowds of River Street before reaching Caravan Court” or simply “…you cross the Trade Ward to Caravan Court.”)
  • “You’ve reached the weird red rock. Do you want to head north towards the Trollfens or south towards the Black Bog?” (The weird red rock, Trollfens, and Black Bog are obviously all points which the PCs are familiar with.)

Although the examples vary, in each case the basic structure of connection-point-connection-point becomes a comfortable framework for the GM to describe the journey, and for the players to understand it and make choices during it.

BASIC POINTCRAWL PROCEDURES

The basic procedures for a pointcrawl are very simple.

STEP 1 – FOLLOW A PATH. The PCs choose one of the paths connected to their current point and follow it.

Time: The length of time it takes to follow a path may be standardized for an entire pointcrawl. (For example, you may assume it always takes 10-15 minutes to move from point to another in an urban setting.) Alternatively, different connections may take different amounts of time. If so, this can be indicated directly on the map using either small numbers or dots (with each dot representing one standard interval of time). In setting these times, you’ll most likely be taking the strata of the pointcrawl into account (e.g., traveling one mile down an open road will take less time than traveling ten miles through the tangled bracken of a wild forest).

STEP 2 – RANDOM ENCOUNTER. Check for a random encounter.

Procedure: Any number of random encounter procedures could be employed here. I discuss these options in more detail in Part 5 of the 5E Hexcrawls series. If you are using standard time intervals for your connections, you might consider making one check per interval.

STEP 3 – ARRIVAL. The PCs arrive at the next point.

If the PCs are in a point on the pointmap, you can simply follow this procedure. If for some reason they’ve slipped “off” the pointmap, simply funnel them logically into the pointmap and continue from there. (You might be able to assume they’re “at” the nearest point on the map; e.g., they may not be at the cathedral, but they’re close enough that they’re basically “coming from the cathedral” as far as other points are concerned. Alternatively, if you want to get all formal with it, you can think of their current location as a “temporary point” and think about how it would attach to the pointmap.)

Go to Part 2: Advanced Pointcrawl Procedures

Castle Construction - Asanee (Modified)

One of the principles of the Alexandrian Hexcrawl is that you key geography. In other words, your hex key features locations, not encounters. (Encounters are handled separately.) The distinction between a “location” and an “encounter” can get a little hazy if you stare at it for too long, but in practice it’s usually pretty obvious: If your key reads “an ogre walking down the road,” then the next time the PCs pass along that road the ogre will presumably be gone (particularly if they’ve killed it). If your key instead reads “an ogre living in a shack,” then even if the PCs kill the ogre, the shack will still be there.

Of course, one might argue that the PCs could do some quick demolition work on the shack and make it disappear, too. (That would be an excellent example of staring at the distinction for too long.) But the general point remains: You’re looking to key permanent geography, not ephemeral events.

Another key principle is that every hex is keyed. This can be a daunting prospect. When I created my Thracian Hexcrawl, for example, I started with a 16 x 16 hex map. That meant I needed to key 256 individual hexes.

My experience with that hexcrawl taught me that you can (and almost certainly should!) start with a smaller map. I generally recommend a 10 x 10 hex map, for a total of 100 hexes, with the PCs’ home base in the center of the map. The key thing, though, if you’ll pardon the pun, is that you want enough hexes so that the PCs can head in any direction and NOT fall off the edge of your map in the first session. Based on my practical experience, that distance appears to be roughly 5 hexes.

In the Avernian Hexcrawl, for example, I used a 10 x 6 map. I could get away with this because:

  • There were mountains on the northern and southern edges of the ‘crawl, acting as natural obstacles that would tend to focus PCs on the large valley between them; and
  • This hexcrawl features a map of the region which is given to the PCs. Although the PCs are not prohibited from moving beyond the edge of the map, such maps tend to also focus the PCs’ explorations.

The advantage, of course, is that I only needed to prep 60 hexes.

Similarly, Ben Robbins’ West Marches campaign featured an explicit limit: The home base was located on the western edge of civilization, and the PCs could go anywhere they wanted… as long as it was west into the unknown. If you used a similar set up for your campaign, you could effectively halve the number of hexes you need to key.

But whether we’re talking about 50 or 60 or 100 or 256 hexes, that’s still a lot of hexes. How can you get all of them prepped? It seems like a lot of work!

First, to be brutally honest, it is a lot of work. The prep for a hexcrawl is frontloaded: It’s a structure that requires you to put a lot of work in up front, with the pay-off that it requires very little prep to keep the campaign in motion once you start playing. (For example, with my Thracian hexcrawl I spent 2-3 intense weeks prepping the hex key, but then ran dozens of sessions with no additional prep beyond 5-10 minutes at the beginning of each session. Your mileage may vary.)

Second, because of that frontloaded prep, you should make sure that a hexcrawl is really the right structure for what you’re trying to do. There is a perception that “wilderness travel = hexcrawl” and that’s not really true. The hexcrawl structure is designed for exploration, and is really only appropriate if you expect the PCs to be constantly re-engaging with the same region. (This can make them ideal for an open table, where you’ll have multiple groups engaging the same region.) If the PCs are only traveling through a region or exploring it once or twice, then you’re going to end up prepping lots and lots of hexes that never get used, and that’s not smart prep.

Third, with all that being said, it may not be as much work as you might think. There’s a couple secrets to that.

The first secret is that, when you’re prepping material for yourself, polish is overrated. (Details are also overrated, with the proviso that essential details and awesome details should always be jotted down.) For example, if I were writing up a dungeon behind a waterfall for someone else to use, I’d probably take the time to mention how wet and slick the stairs leading down into the dungeon are; the damp moistness in the air of the first chamber (providing a slight haze that can be burnt away dramatically by a fireball trap); and the way the dampness gives way to a chilled condensation that hangs in glistening drops from the rough hewn walls as you descend into the dungeon.

But since I’m prepping this for myself, I don’t need to write that down.

Trust your own voice as a GM. During play, based on your intrinsic understanding of the scenario and the environment, it will provide the logical and evocative details you need to flesh things out. And by placing trust in yourself, you can save yourself a ton of prep time.

The second secret is that the amount of detail required to key a hex can vary quite a bit. You can use minimal keys. Just because something is geography, it doesn’t mean that it has to be elaborate. Something can be brief without being ephemeral. There can be a perception that every hex “should” have a 20-room dungeon in it. But remember that ogre’s shack? Your key doesn’t have to be any more complicated than that. Some times, it can be even less complicated!

SAMPLE HEX KEYS

We’re going to take a look at some actual hex keys I’ve prepped for my own hexcrawls. The goal here is to demonstrate the range of different key types that I use, so let’s start with the shortest:

B4. RED RUTH’S LAIR (Descent Into Avernus, p. 107)

Red Ruth has a heartstone.

This one is pretty simple: I’ve grabbed a location from a pre-existing adventure (in this case, Descent Into Avernus) and plugged it straight into the hexcrawl. If the PCs encounter this hex, I can just pull out the appropriate book and start running it.

In this case, I’ve also included a short note modifying the original adventure. (The NPC named Red Ruth has a heartstone.) You may not need such notes at all. In other cases, you might have several such notes. Whatever works.

Here’s another simple one:

K13 – RUINED TEMPLE OF ILLHAN

See hex detail.

This location was too detailed to include in my primary hex key. (Generally, I’ll bump anything longer than a single page out of the primary hex key. In my experience, it keeps the hex key cleaner and much easier to use.)

Much like the published adventure, I’m telling myself to go look somewhere else for the detailed adventure. In this case, it’s an adventure I wrote myself.

I keep these detailed adventure notes in a separate file folder, labeled and organized by hex number. For shorter published adventures, I’ll keep print outs of the adventures in the same file folder.

The details of the Ruined Temple of Illhan were previously posted here on the site. They can be found here. (The presentation there is slightly more polished than what would have been found in my original notes, but is substantially similar.)

B5 – BONE CRATER

A large meteor impact formed by a huge skull (more than ten feet across) that’s partially embedded in the center of the crater.

This is an example of what I think of as a landmark. Sometimes these landmarks are more involved or have hidden features to them, but generally they’re just single points of interest distinct from the surrounding wilderness. Regardless of their other characteristics, they’re almost always useful for PCs trying to orient their maps.

N15 – RECENT FOREST FIRE

Landscape is scorched. No foraging is possible in this hex.

Another short one. This is basically similar to a landmark, but it covers a vast swath of territory. (In this case, an entire hex.)

C2 – WYVERN SHAFT

60 foot deep shaft that serves as the lair of a wyvern. The wyvern has dug an escape tunnel that emerges from a hill a quarter mile away.

Wyvern: Has a large scar on its left side from a spear wound; has preferred to stay away from intelligent prey ever since. (MM, p. 303)

Treasure: 7,000 sp, 5 zircons (50 gp each)

A simple monster lair. I usually don’t bother with maps for this sort of thing: It’s easy enough to improvise a cave or shack or, in this case, a shaft. In fact, many smaller complexes with a half dozen rooms or less can also be managed without difficulty. (Assuming there’s nothing radically unusual about them, of course.) Alternatively, you might use a random floorplan generator or similar tool.

(Note the page reference. I know Wizards of the Coast is terrified of page numbers on the off-chance that they get changed in a future printing, but why not make life a little easier for your future self?)

F15 – SKULL ROCK (on river)

Skull Rock - Based on Dyson Logos' Peridane's Tomb

A rock shaped like a skull thrusts out of the river. Crawling through the mouth leads to a crypt.

AREA 1: Mummified red dragon’s head (huge). Breathes flame that fills most of the room (fireball, DC 14). Secret entrance to treasure chamber lies under the head.

AREA 2: 5 wights, 50% in lair (MM, p. 300). The two rooms off this area have been pillaged.

AREA 3 – BURIAL OFFERINGS: 3000 gp, 3 golden spinels (200 gp each)

AREA 4: Trapped hallway. Arrows shoot from wall and alchemist’s fire from nozzles in the ceiling. (Chamber to the left has an incense burner in the shape of a squat, fat man worth 70 gp.)

AREA 5: Wight (MM, p. 300), no life drain but can detect magic, life, and invisibility. (Sniffs out magic and lusts for it.)

AREA 6: Bas relief skull. Insane. Asks incredibly bad riddles. (“What flies in the air?” “A bird.”), but then blasts those who answer with 1d6 magic missiles regardless.

AREA 7: Slain wights.

AREA 8: Staked vampires.

AREA 9: A lich (MM, p. 202) has been chained to the wall. Arcs of purple electricity spark off him in eternal torment. (Stripped of spellcasting and legendary actions.)

Notice the “on river” designator next to the key title here. That indicates that this location is on the river flowing through this hex on the map: If the PCs are following the river, they’ll automatically encounter this location.

This sort of fully-keyed “mini-dungeon” represents pretty much the upper limit of what I’ll handle in a hex key entry before bumping it into a separate document.

The map here is taken from Dyson Logos’ website. His site has repeatedly proven invaluable to me when stocking hexcrawls.

Go to Part 2: Stocking Your Hexes

Archives

Recent Posts


Recent Comments

Copyright © The Alexandrian. All rights reserved.