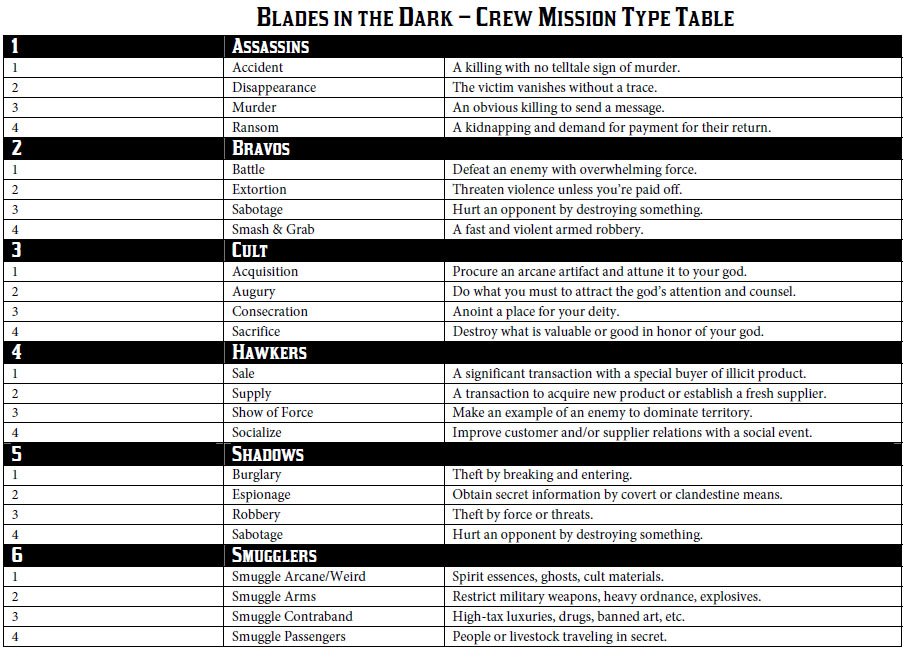
The Alexandrian

Posts tagged ‘blades in the dark’

Blades in the Dark - System Cheat Sheet

(click here for PDF)

UPDATE: These cheat sheets have been revised and improved. I recommend checking out Version 3.

As those who follow me on Twitter already know, I’m in the early stages of a Blades in the Dark campaign. As I do with virtually every RPG that I run, I’ve prepped a cheat sheet for the game, and now that it’s been put through its paces a few times it’s ready to be shared with all of you.

Blades in the Dark is a really cool little game with three major claims to fame:

  • A detailed system for running and developing a criminal crew.
  • An innovative system for running heist scenarios using a combination of flashbacks and an “engagement roll”.
  • A very unique approach to framing action resolution through a combination of setting position and level of effect.

I’ll likely be discussing all of these in more detail at some point as I get a more experience with actually running/playing the game. (The last bullet point, in particular, is almost certainly going to be discussed as part of the Art of Rulings, because it bends your brain by pushing different paradigm in the way that you mechanically perceive and define action in the game world.)

As with my other cheat sheets, this cheat sheet is designed to summarize all of the rules for running the game — from Action Roll resolutions to Downtime activities. It is not, however, designed to be a quick start packet: If you want to learn how to play Blades in the Dark, you’ll want to read through the core rulebook. These cheat sheets are a long-term resource for both GMs and players, and can serve as a great tool for experienced players teaching newcomers, but it’s a cheat sheet, not a textbook.

These cheat sheets also do not include what I refer to as “character option chunks” (for reasons discussed here). You won’t find the rules for character creation, the character playbooks, or the crew sheets here. (Although you can find many of those resources at bladesinthedark.com.)

HOW I USE THEM

I usually keep a copy of my system cheat sheets behind my GM screen for quick reference and I also place a half dozen copies in the center of the table for the players to grab as needed. The information included is meant to be as comprehensive as possible; although rulebooks are also available, my goal is to minimize the amount of time people spend referencing the rulebook: Finding something in the 8 pages of the cheat sheet is a much faster process than paging through the full rulebook. And, once you’ve found it, processing the streamlined information on the cheat sheet will (hopefully) also be quicker.

The organization of information onto each page of the cheat sheet should, hopefully, be fairly intuitive.

Page 1-2: Core Resolution. This includes all of the core rules for action resolution, including action rolls, resistance rolls, fortune rolls, consequences, harms, stress, and progress clocks (plus additional resources related to those topics).

Page 3: Crews & Factions. I’ve also dropped the rules for Incarceration onto this page.

Page 4: Scores. All the rules for running a score.

Page 5-6: Downtime. And once your score is done, everything you need for downtime activities (including vices).

Page 7: Miscellanea. Collecting together rules for Coins, Rituals, and Crafting.

Page 8: Principles. This page includes the game’s “core loop”, the standards for who controls which types of decisions (Judgment Calls), and the best practices/goals for players and GMs alike.

MAKING A GM SCREEN

These cheat sheets can also be used in conjunction with a modular, landscape-oriented GM screen (like the ones you can buy here or here).

I usually use a four-panel screen and use reverse-duplex printing in order to create sheets that I can tape together and “flip up” to reveal additional information behind them. I’m currently still experimenting with how I want to arrange the pages for my own personal screen. My initial arrangement did not work very smoothly, so I’m going to reorganize and try a different approach. (I’ll post an update when I figure it out.) At the moment, I’m fairly certain that Page 1 and Page 2 should be on top (visible at all times by default) so that I can quickly reference roll results, consequences, and the magnitude table at a glance. Beyond that, I still need to play with it a bit.


Blades in the Dark - Progress Clocks

Blades in the Dark uses progress clocks to “track ongoing effort against an obstacle or the approach of impending trouble.” Actions, consequences, fortune rolls, and the natural evolution of the game state can all cause the clocks to accumulate ticks (or, more rarely, lose ticks). When the clock fills up, the thing it was tracking — the state of alert in the general’s compound, a faction’s goal, the sinking of a ship — happens. Progress clocks are a quick and effective way of visualizing and tracking persistent and/or impending activities, allowing the GM to juggle more of them (allowing Blades in the Dark - John Harperfor the creation of more complicated and Byzantine scenarios), clearly communicating the current state of affairs to players, and (rather crucially) giving a flexible mechanical structure that the players can engage with in order to affect those game states.

I’ll probably have more to say about progress clocks and countdown clocks and similar mechanics at the some point in the future (probably as part of the Art of Rulings), but at the moment I’m gearing up to a run a Blades mini-campaign and so I’m focused on the actual tools involved in using them. I like to do my campaign prep primarily on my computer (I think best with my keyboard), and since like 90% of Blades in the Dark is either assigning a progress clock or tracking a progress clock, I wanted digital resources for doing so. And I was actually surprised to discover that these resources did not, in fact, already exist. (Or, at least, my Google-fu was unequal to the task of locating them.) So I ended up creating them scratch, and now I’m sharing them here.

IMAGES

Blades in the Dark uses a 4-segment clock for complex obstacles, a 6-clock for more complicated obstacles, and an 8-clock for daunting obstacles.

The zip file below contains a full set of images in both both SVG and PNG formats for each clock (ranging from empty to full).

FONT

The file also contains a TTF, EOT, and WOFF font files for the clocks. Use the following characters with the fonts, from empty clock to full clock:

4-CLOCK: A B C D E

6-CLOCK: a b c d e f g

8-CLOCK: 0 1 2 3 4 5 6 7 8

(This information is also contained in a text file in the zip.)

Permission is granted to use these resources for all commercial and non-commercial use, as long as credit is given.

PROGRESS CLOCKS – FONTS AND IMAGES

(zip file)

A common form of mapping for RPG cities is the block map. For example, here’s the city of Kintargo from the Hell’s Rebels adventure path:

Kintargo - Sample Map (Hell's Rebels - Paizo)

A common mistake when looking at such a map is to interpret each individual outline as being a single building. For example, when I posted a behind-the-scenes peek at how I developed the map for the city of Anyoc years ago, a number of people told me I’d screwed up by leaving too much space between the buildings. Except the map didn’t actually depict any individual buildings: Each outline was a separate block, made up of several different buildings.

When people look at a block map and interpret it as depicting individual buildings, how far off is their vision of the city?

Well, we can actually see this exemplified in a few cases where artists have (in my opinion) misinterpreted block maps. Blades in the Dark, for example, has a block map for the city of Duskwall. Below you can see a sample of that block map (on the left) next to a block map of a section of Paris (on the right).

Block Maps - Duskwall & Paris

If it was not self-evident, the interpretation of the Duskwall map as a block map is supported by this description of the city from the rulebook:

The city is densely packed inside the ring of immense lightning towers that protect it from the murderous ghosts of the blighted deathlands beyond. Every square foot is covered in human construction of some kind — piled one atop another with looming towers, sprawling manors, and stacked row houses; dissected by canals and narrow twisting alleys; connected by a spiderweb of roads, bridges, and elevated walkways.

You can see that if you interpret Duskwall’s map as detailing individual buildings, the layout of the city actually becomes far more organized and well-regulated than seems intended by the text. This is, in fact, a common problem when GMs misinterpret block maps: Their vision of the city, and the resulting descriptions are heavily simplified.

For example, when Ryan Dunleavy decided to develop a large version of the Duskwall map, he interpreted each block on the map as being an individual building (or, occasionally, two). Compare the resulting illustration of a single block in Duskwall (on the left) to what a single block in Paris (on the right) actually looks like:

Duskwall Block vs. Paris Block


(Please don’t interpret this as some sort of massive indictment of the artist here. Ryan Dunleavy’s cartography is gorgeous, and I recommend backing his Patreon for more of it.)

You can see another example of this with Green Ronin’s Freeport. When first revealed to the world in 2000’s Death in Freeport module, the city was depicted using a rough block map:

Freeport - Merchant District (Death in Freeport)

In 2002, for the original City of Freeport, this was redone with most of the blocks being represented as individual buildings:

Merchant District - Freeport (City of Freeport - Green Ronin)

The map was redone again for The Pirate’s Guide to Freeport, this time reinterpreting the original outlines as a block map:

Freeport - Merchant District (Pirate's Guide - Green Ronin)

I pull out this example primarily to point out that sometimes a block map outline IS, in fact, a single building. Because some buildings are really big. Or, in other cases, they might represent walled estates, as shown here with the estates along the western edge of the map.

And here’s a real world example of this from Paris with both the Grand Palais and the Petit Palais:

Paris - Grand Palais & Petit Palais

(click for larger size)

The north-south cross section of the Grand Palais is fairly comparable to the Parisian block shown above.

CONCLUSION

My point with all this basically boils down to don’t mistake the map for the territory. One of the great advantages of the block map approach to city mapping is that it leaves so much to the imagination, allowing both you and your players to lay in immense amounts of fractal complexity onto a simple geometric shape.

(Which is not to say that block maps are the be-all or end-all of utility at the gaming table. You can take my copy of Ed Bourelle’s Ptolus map when you pry it from my cold, dead hands.)

And when you miss that opportunity — when your mental image of the block map reduces each geometric shape to a single building — you’re robbing the city of its grandeur, its complexity, and its flexibility.

Take a moment to go back and look at the map of Kintargo, for example. Imagine what that city would look like if each block were, in fact, a single building. What you’ll probably end up with is a modest city still possessed of some good degree of size. But what you should actually end up with in your mind’s eye is this:

Kintargo - Hell's Rebels (Paizo)

Archives

Recent Posts


Recent Comments

Copyright © The Alexandrian. All rights reserved.