The Alexandrian

Posts tagged ‘art of the key’

Go to Part 1

One of the great things about a well-executed location-based scenario is that each keyed area is effectively “firewalled” from the other areas: The GM generally only needs to process and manage a single chunk of material (the current area) until the PCs move on to the next area (at which point the GM can simply look at the new chunk of material). This makes a location-based scenario very easy to run, particularly if the key is well-organized, because everything you need is right there at your fingertips.

The drawback of this approach, however, is that it results in static scenarios. The firewall works both ways: It limits the amount of information the GM needs to process at any given time, but it also isolates each chunk of content. Furthermore, because the PCs generally control when they decide to move into a new area, this approach also grants the players near-perfect control over the pace of the scenario (which not only results in monotony, but can also create all kinds of tack-on problems like the fifteen minute adventuring day).

What’s needed is a dynamic element. Sometimes you can accomplish that with some sort of gimmick (moving chambers or the like). Random encounters, particularly those on a regular and aggressive schedule, also work. Ideally, though, we’d like to have the location come alive in an organic way that can allow for strategic depth. We want the ogre in Area 20 to call out for help and have the goblins in Area 21 to hear it and come running.

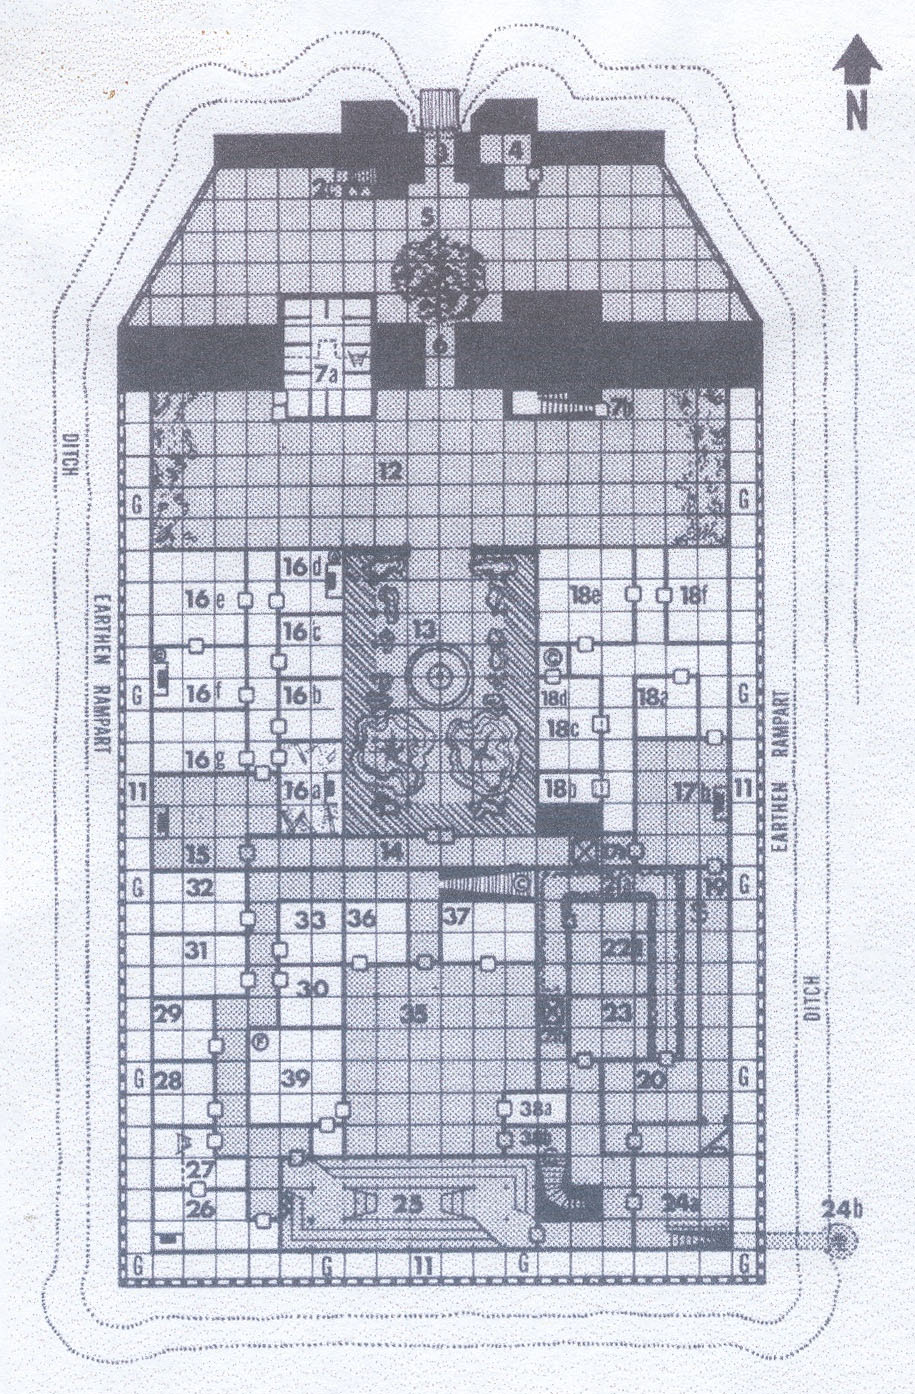
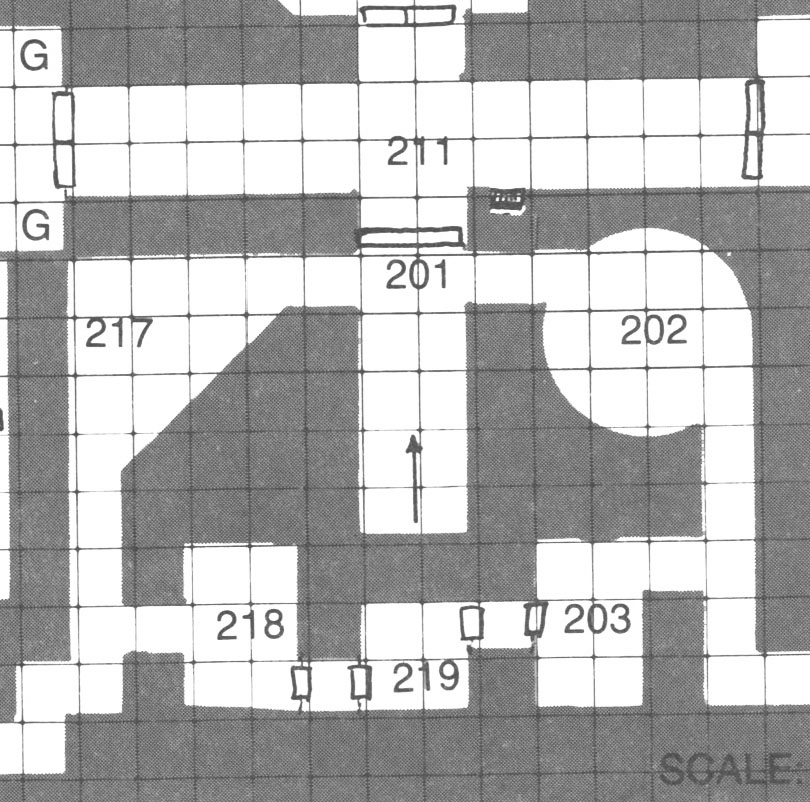
That seems easy enough. You can just slide your eyes down from Area 20 and notice that there are goblins in Area 21. It gets complicated, though, when you’ve got, say, seven or eight locations within earshot. And it gets even more complicated if you hit those sections of the map where non-sequential numbers bump up against each other:

Sample Map - Temple of Elemental Evil (Gary Gygax)

This area from the Temple of Elemental Evil, for example, would involve flipping back and forth between 8 different pages in the published module. At this point you’re trying to juggle a lot of different information, and you’ve probably lost almost all of the advantages normally offered by the “firewall” of the location key.

And this is still a relatively simple example: What happens when the alarm goes up and the entire compound begins mobilizing to hunt the PCs down?

For example, here’s the map from Secret of the Slavers Stockade:

Secret of the Slavers Stockade (David Cook)

(click for larger version)

This is a fortified facility with a well-trained guard and a clear chain of command. If someone mounted an assault on the stockade, you would expect a well-coordinated response. But in order to run that response, a GM would need to smoothly manage information from basically all thirty-five keyed locations. It’s impossible.

ADVERSARY ROSTERS

The solution is to separate the occupants of a location from the location key: If they can move from one area to another, then they don’t belong in the key for any specific area.

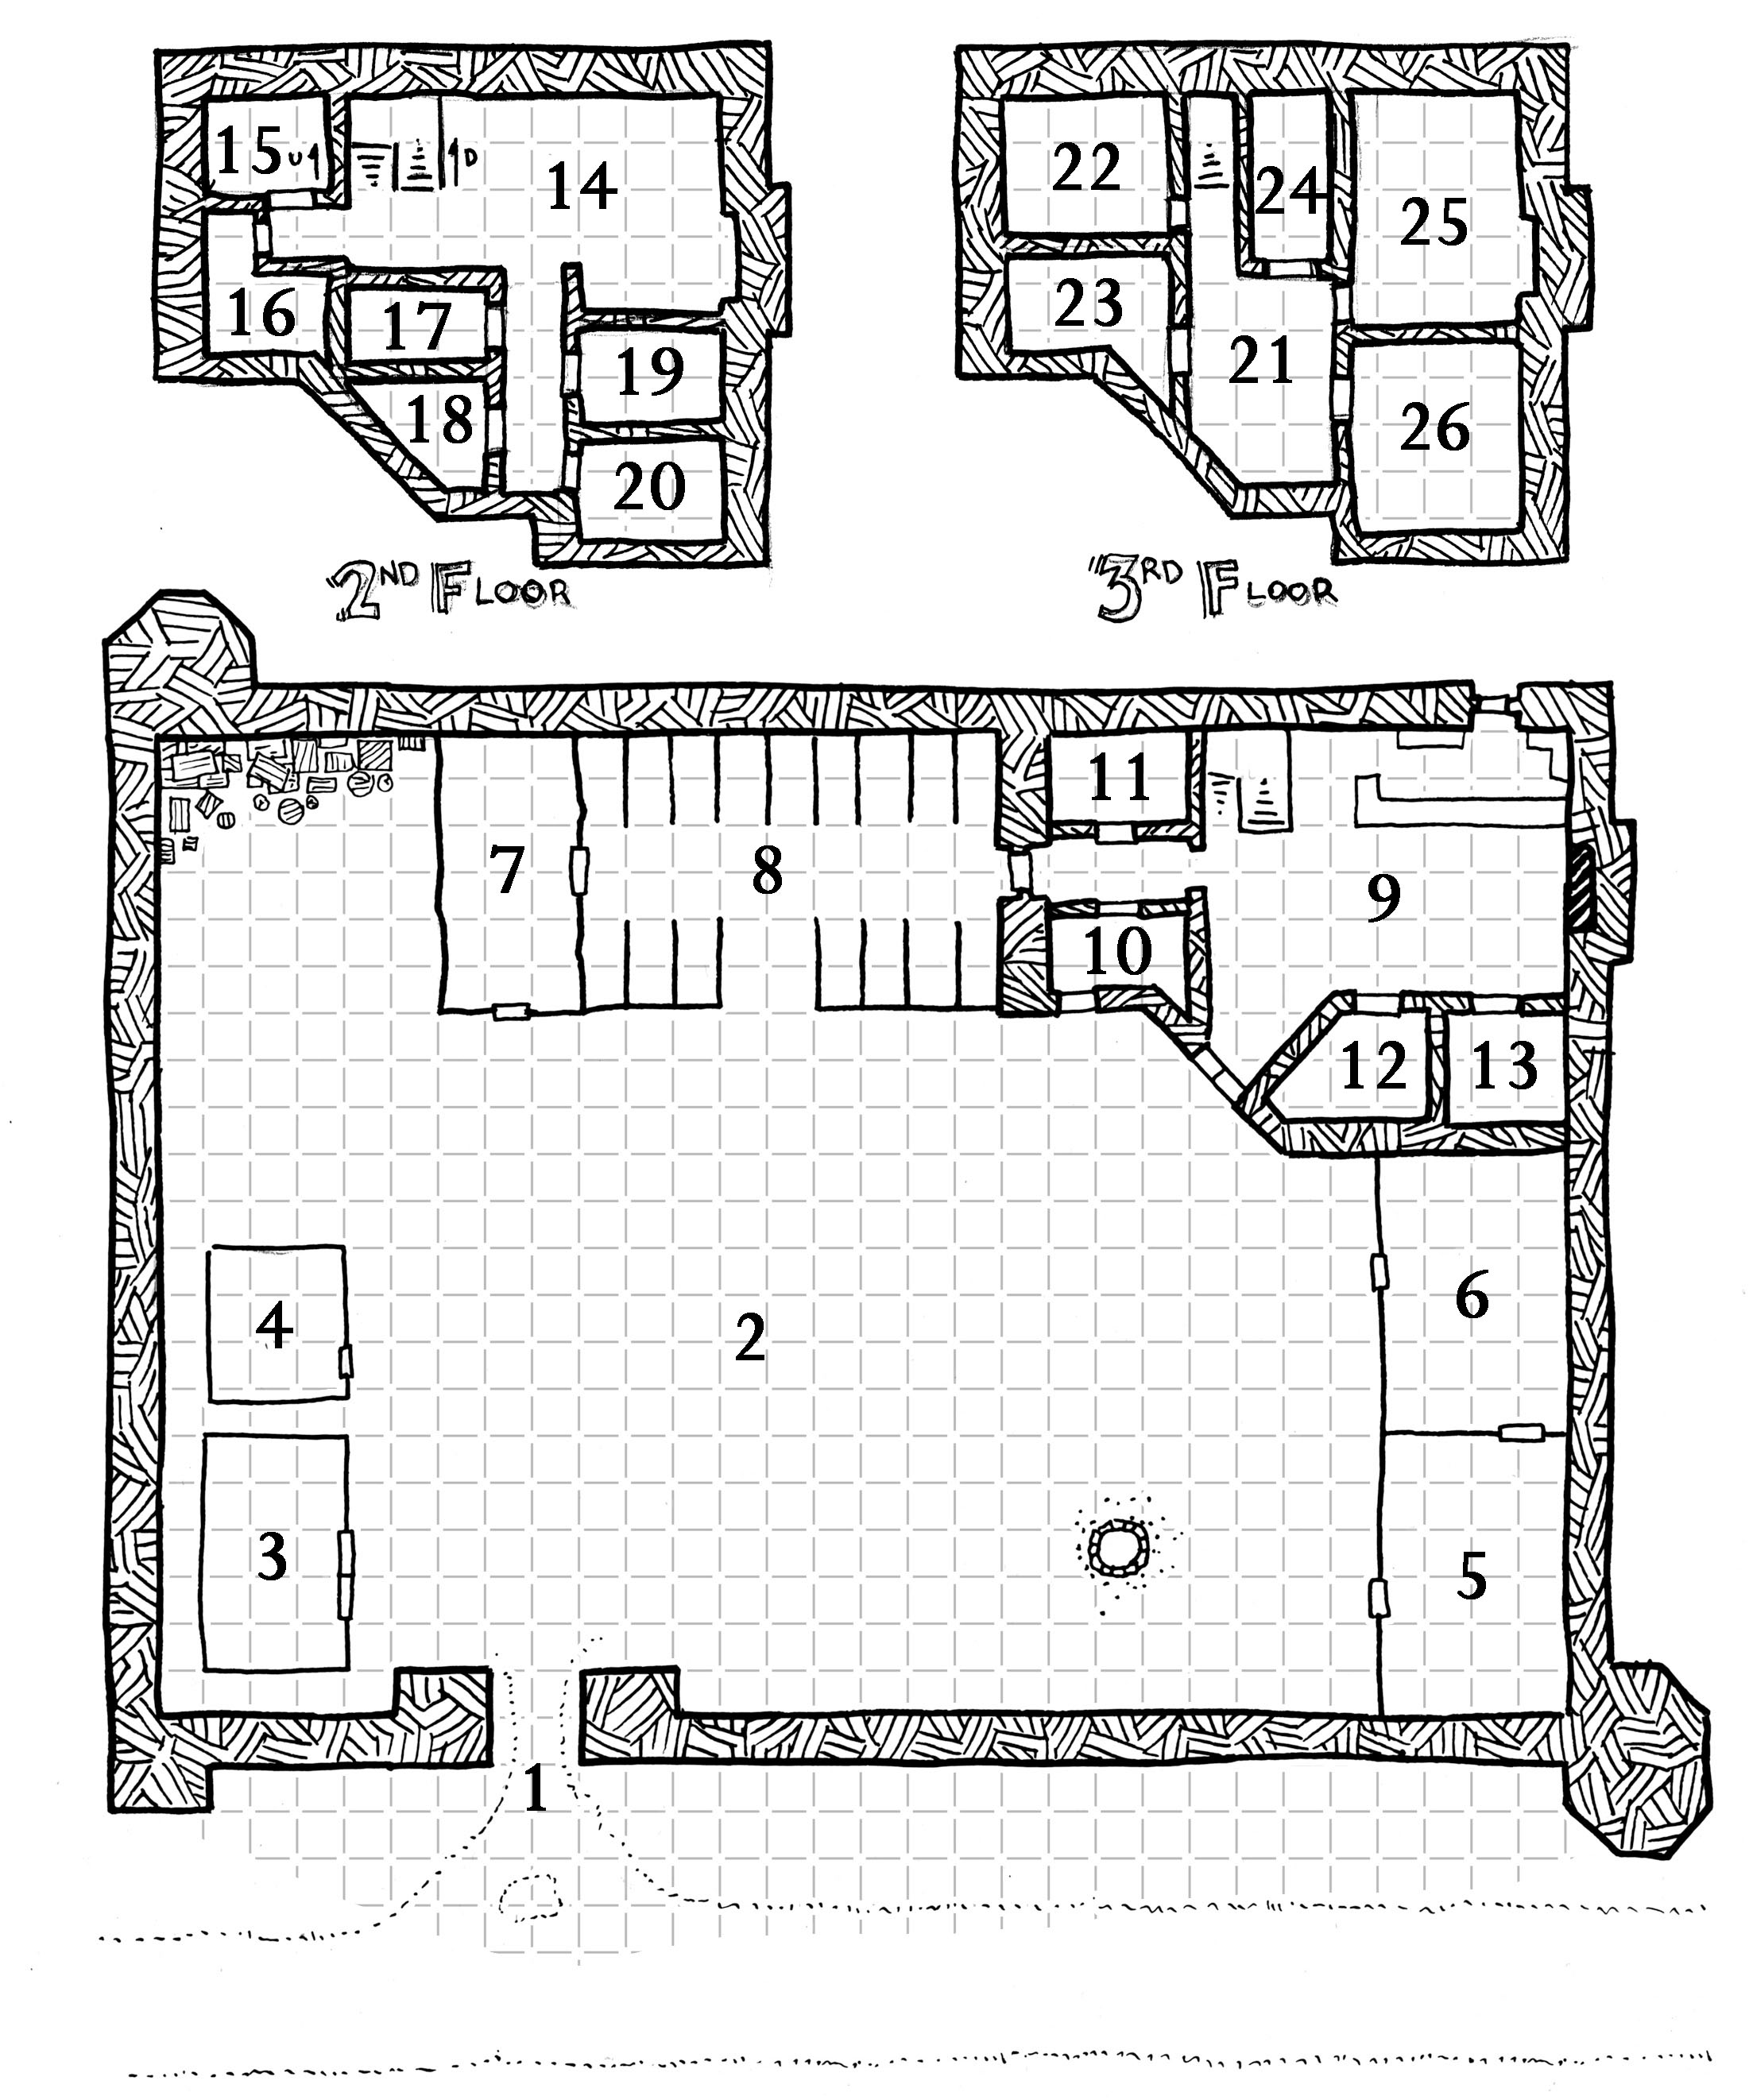
This can be achieved through the use of an adversary roster (with a map from Dyson Logos for reference):

2 Orc GuardsArea 1(disguised as humans)
4 Common OrcsArea 2(playing dice at well)
4 Orc GuardsArea 3

6 Orc Guards

Area 4*

2 Goblin Stableboys

Area 8

4 Common Orcs + 4 Orc Guards

Area 9(drunk)
Captain GnarltoothArea 9 or Area 16
Lieutenant UggtuskArea 11 (day) or Area 15 (night)
2 Orc Guards + 8 Common OrcsArea 14
Eyegrasper (Orc Wizard)Area 19 (80%) or Area 6 (20%)
Eyegrasper's Coterie: 3 orc apprentices(with Eyegrasper)

Fingerwaggler (Orc Wizard)

Area 20*
4 Caravanserai GuardsArea 21
Lady StarhuoArea 23
Brother JamestonArea 25

4 Caravanserai Guards

Area 25(injured)

The Caravanserai - Dyson Logos

(click for larger version)

This does increase the complexity of running the scenario, but it’s not an exponential increase like the one seen in trying to run the Slavers Stockade. The GM is no longer looking strictly at the current location key, but rather than trying to cross-reference thirty-five location keys all at once they can generally limit themselves to looking at just the current location key and the adversary roster. Two discrete chunks of organized information instead of a multitude.

The fundamental building block of the adversary roster is the ACTION GROUP. Generally speaking, you don’t want to track every single goblin individually, so you group them together for easy management. (Although some of your action groups will probably consist of a single individual.) Most of the time, an action group will consist of all the adversaries in a single location. In some cases, however, you may want to split a large group up into smaller units. You can think about this purely in utilitarian terms: Do you think that the group is likely to split up and take independent action? Then it should be two action groups. (For example, if you’ve got twenty orcs bunking in a barracks, you might split them up into four action groups with five orcs each so that they can split up or be sent as guards to different areas of the compound.)

For ease of use and reference, you can also LABEL and/or NUMBER each group. A label is mostly useful as a keyword and reminder: If you see a “Death Squad” and a “Perimeter Guard” on your adversary roster, it’ll be a helpful reminder of how each group will behave and respond. You might also find it useful to prep a Death Squad stat sheet and a Perimeter Guard stat sheet: When the PCs run into one of these action groups, simply grab the matching stat sheet.

Numbering the action groups can make it easier to keep track of where they’re at during play:

  1. Lay the adventure map out as a tablemat in front of you.
  2. Take numbered counters and place them on the map in the “starting location” for each action group.

You are now ready to manage your adversaries in real time. Just move them around the map as the situation demands.

Note: Numbered counters are easy to find on the cheap. It’s also pretty easy to make your own by printing out the numbers and then affixing them to washers or quarters or something of the like.

ADVANCED ROSTER OPTIONS

In addition to that basic functionality of the adversary roster, there are a few additional embellishments you can use to enhance it.

VARIABLE AREAS: Characters on the roster don’t need to be limited to a single area. The club owner might be in his office, or he might be out on the floor. A wizard might be studying in the library or working in his laboratory. An orc sergeant might rotate through the barracks of his minions. There are a few different ways to handle this:

  • Area 21 or Area 40: This approach simply states the options and lets the GM interpolate the result. (Or maybe they’ll just be in whichever area the PCs affect or explore first.)
  • Area 21 (40%) or Area 40 (60%): Percentile chances can be used to randomize the group’s location.
  • Area 21 (day) or Area 40 (night): The group’s location may be dependent on the present circumstances (and those conditions can be listed in parentheses). A night/day division is one I’ll commonly use.

One thing to keep in mind is that you can often simulate the activities of a compound without complicating the roster. For example, if the bouncers at a club might work eight hour shifts and then get relieved you probably don’t need to include all three shifts of bouncers on your roster. Functionally speaking, the club has one bouncer (although the name of that bouncer might be different depending on what time of day the PCs show up).

ACTION GROUP TYPES: I’ve found that there are four different categories of action groups, defined by their behavior.

  • Patrols: Patrols make regular circuits through a location. They’re indicated by keying their route (Patrol Areas 1, 5, 7, 8, 9, 2, 1). In some cases I find it useful to create a separate “Patrol Roster” (if there are multiple patrols or if their routes are particularly complicated for some reason).
  • Mobile: The default action group type. These are keyed to a specific location, but are generally willing and able to respond to the activities of the PCs.
  • Mostly Stationary: Some action groups are unlikely to leave the area they’re keyed to. This might be a choice on their part (they won’t respond when the alarm is raised for whatever reason) or it may not (they’re dire wolves locked in a cell). Adversaries waiting in an ambush are another common variety. However, there is a possibility that these action groups might become active (most commonly because someone has gone to specifically fetch them). Therefore I include them on the adversary roster, but indent their entries to clearly distinguish them from the more active elements.
  • Stationary: These adversaries will never leave the location they’re in. As a result, these adversaries are NOT included on the roster and instead appear in the location key. (Because they will only be encountered in that location, there’s no reason to clutter up the roster with them.) This might include literally immobile creatures, those simply uninterested in the rest of the complex, or creatures who are sealed away until the PCs disturb them (at which point, if they aren’t immediately destroyed, you might add them to the roster).

These distinctions – particularly those between Mostly Stationary and Stationary – are entirely utilitarian in nature. They don’t represent some deep or universal truth about the game world. Think about how you want to use a particular group of adversaries during actual play and then classify them appropriately. (If it turns out you were wrong, it’s easy enough to simply ignore the indentation, right?)

NOTES / FOOTNOTES: You can include notes as a third column on the roster and/or you can use footnotes to include additional information or cross-referencing. This can include:

  • Adversaries carrying a specific item or piece of equipment. (This is useful when you’ve got a bunch of different bad guys all using the same stat block but only some of them – or one of them – is carrying X, Y, or Z. Otherwise, of course, you’d just list the item(s) in their stat block.)
  • Brief tactical notes. (Stuff like “can be telepathically summoned by the mind flayer” or “will generally wait to launch prepared ambush” or “can see through walls”.)
  • If they’ve been classified as Mostly Stationary, why they’ve been classified that way (sleeping, in ambush, indifferent, etc.).
  • Other notes regarding their activities (polymorphed to look like prisoners, playing poker, torturing Sebastian, etc.)

I generally use a notes column if the notes are brief enough to fit on one line. I use footnotes for longer stuff.

MULTIPLE ROSTERS

It’s also possible to prep multiple rosters for a single location. I often find having one roster for Day and another for Night is useful. Normal and Alert statuses are also common, but any similar division that’s logical for the location can be used.

Multiple rosters are usually only worth the effort if the location radically shifts. If the differences are minor or isolated to a handful of characters, then you can use conditionals for individual action groups. It’s only once the conditionals get sufficiently complex that you need to switch to multiple rosters.

ROSTER UPDATES

Another great advantage of using an adversary roster is that you can trivially update a location as bad guys are killed, replaced, or retasked without needing to revisit the entire key. (This separation of NPC from location is why I’ll use a roster even if there are only a handful of characters present.)

This can also be massively useful in an open table campaign (or any other campaign) where you want to be able to revisit locations: With little or no change to a location’s key, you can completely restock it with new adversaries. For examples of this in play, see (Re-)Running the Megadungeon, Juggling Scenario Hooks in a Sandbox, and Prepping Scenario Timelines. (Reading along with the adversary roster technique in mind, you should be able to immediately see how simple the updates become.)

SIMPLE ROSTER

Sometimes you don’t need a roster with all the bells and whistles. For small, highly active complexes with a limited number of inhabitants (a half dozen or so) you may be able to just list the inhabitants and then improvise where they are and what they’re doing when the PCs show up.

(I label this simple, but it actually requires slightly more skill with improvisation when you’re running it.)

I most often use this technique if there’s a mansion (or similar living space) occupied by a number of different people. Trying to program out their ordinary, day-to-day living usually means a lot of complexity for a result that still isn’t realistic.

A hybrid approach can also work here: For example, each character might have a default location where they’re often found (their bedroom? office?) and then a percentage chance that they’re instead just “somewhere else in the house” (and you can figure that out in the moment).

ADAPTING PUBLISHED MODULES

It’s incredibly easy to use the adversary roster technique with published scenarios: Simply skim through the module and list where each occupant is keyed. Ta-da! You’re done. Simply ignore the rostered adversaries when you see them in the key.

Tip: Since ALL monsters will appear in the published key, you may find it useful to include a separate list of Stationary monsters on the same sheet as your adversary roster in order to quickly discern when you should still be using the monster listed in the encounter.

FOG OF WAR

One pitfall that a GM can easily fall into when using an adversary roster is having everybody in the dungeon immediately swarm the PCs. Sometimes that’s the logical outcome of the PCs’ actions and that’s fine (they’ll quickly learn to take approaches that don’t result in that outcome and to retreat and regroup if it does happen). But you should bear the fog of war in mind: Even if the PCs attack one action group, it doesn’t necessarily mean that everyone in the location will immediately know it’s happening. And even if the alarm does go up, some action groups may be assigned to guard other areas or simply have no idea exactly where the crisis is happening.

The adversary roster gives you the opportunity to roleplay the entire compound. So take advantage of it.

Since we’re discussing adversaries swarming the PCs, however, you may also want to take a moment to review Revisiting Encounter Design: If you’re using an active adversary roster, you need to keep in mind that multiple action groups can end up joining a single encounter.  If you’ve been building your encounters to exist on a razor’s edge of survival-or-death, then you’ll need to revise that approach. (How To Use Published 3rd Edition Modules may also be useful.)

ROSTER LIMITS

There is, however, a practical limit to an adversary roster: Once you get a sufficiently large enough number of action groups, it becomes difficult to manage them. Generally, I find that number to be around 15-20 (and by the time I’m pushing it to 25, I’ve reached my limit). Your mileage may vary.

Larger complexes can sometimes be broken down into smaller sections to make them manageable. (The different levels of a dungeon are an obvious example of this if there’s limited movement between them by the denizens. You might also choose to model that limited inter-level traffic as a random encounter check.) But if that doesn’t work, then that’s the point where I’ll swap from a “living complex” (with an adversary roster where I’m managing the actions of the NPCs in real time) and start using random encounter tables to simulate the compound’s life.

It should also be noted that the adversary roster is a technique for locations with active bad guys. Not every dungeon needs a roster. Sometimes you really are cracking open dusty tombs which have lain undisturbed for centuries and you have only yourself to blame when you awaken the eldritch horrors which lie within. Variety is the spice of life.

(Another example from my own table was the Bloodpool Labyrinth: There were a limited number of monstrous patrols in the labyrinth, but the focus of the scenario was on navigating the labyrinth and its many non-mobile hazards. As a result, I chose to run the patrols using a random encounter table instead of trying to track them in real time.)

CONCLUDING THOUGHTS

I consider adversary rosters to be my greatest “secret weapon” as a GM. They allow me to run dynamic scenarios of considerable complexity on battlefields that can easily sprawl across a dozen areas with a relative simplicity which still leaves me with enough brainpower to manage varied stat blocks and clever tactics.

You’ll also find that, as the players warm up to the greater depth offered by these scenarios, they’ll rise to the challenge and respond with remarkable strategic creativity both in combat and outside of it.

And all of this will feed back on itself, permanently disrupting the staid rhythms of “kick in the door” dungeoncrawling in your campaign. Adversary rosters are also a great way for running stealth missions, heists, and covert ops.

The life and motion of a living compound will unlock a rich variety of new gameplay, keep your players on their toes, and invest them deeply into the fabric of the campaign world.

FURTHER READING
The Art of Rulings
The Art of Pacing
Xandering the Dungeon
Gamemastery 101
Design Notes: Adversary Rosters

Go to Part 1

I’ve previously dismissed the dogmatization of the old delve adventure format due to the limitations of its one-size-fits-all approach. (Both in Part 1 of this series and, at greater length, in Are We Really This Stupid?) But the delve format does have one really good idea:

Everything you need is on the page.

When you’re using the delve format, you don’t have to open your Monster Manual to find a creature’s stat block and then open the Player’s Handbook to figure out how one of their spell-like abilities works: It’s all right there on the page.

This is great from a utility standpoint, and can really smooth out the experience of running things at the table (because the GM can focus on running the encounter instead of flipping pages). It’s also a good rule for layout. (Whenever possible, try to arrange your layout so that information that needs to be referenced at the same time doesn’t require a page turn. For my keys I’ll frequently use page breaks to place the entire description for a room entirely on one page even if it means leaving a ton of unused white space on the previous page.)

When you’re working on a project destined for publication and a general audience, figuring out what needs to be referenced and what doesn’t can be a tricky balancing act. When implementing a similar method of simulating system mastery for the sidebar reference system used in Legends & Labyrinths, I dealt with this issue by defining a very small set of “core concepts” that didn’t need to be referenced because it was assumed that players would be familiar with them, and then including a single page explaining those core concepts that new players could reference when they needed to. You can achieve a similar effect at your game table by using system cheat sheets.

When prepping material for your own use, however, you should be able to very precisely calibrate your personal level of system mastery. For example, I know how the magic missile and fireball spells work in D&D, so I can just jot down their names. But if I’ve plucked an obscure spell I’ve never used before, I’m going to include a reference for it.

I’ve actually spent more than 15 years now prepping material for the 3rd Edition of D&D, and when I look back over that material I can clearly track my growing mastery of the system. For example, my earliest scenarios feature monster stat blocks with text like this frequently appended to them:

SPRING ATTACK Can move both before and after attacking without AoO. (PHB, pg. 85)

It didn’t take long before I no longer had to remind myself how the Spring Attack feat works. But when I recently ran an adventure with monsters which extensively used new feats from Monte Cook’s Book of Experimental Might, I was still using the same technique:

Elude Blows: Subtract number from melee damage rolls and add it to AC vs. melee attacks (up to BAB). (Book of Experimental Might, pg. 36.)

And these references can be terribly esoteric and entirely personal in nature. For example, even after 15 years for some reason I constantly forget to take advantage of the Point Blank Shot feat for my NPCs. For some reason my eye skips right past it in a list of feats. So I’ll frequently drop it into the special abilities reference section I include after stat blocks even thought I know what it does.

THE HIERARCHY OF REFERENCE

In general, there’s a hierarchy of reference:

  • Include the full text.
  • Include a brief summary of the most important factors (and probably a page reference if you end up needing specific clarifications).
  • Include just a page reference.
  • List the keyword, spell name, feat, etc.

Basically, you move down the hierarchy as you gain more and more mastery over the system you’re running. It’s like the vocab cards you use for learning a new language (except you never need to spend time memorizing them; playing the game does that for you organically) – as you master each concept you cycle them out of rotation.

Including the full text for something has become really easy in an era of copy-and-paste. But having such a large bulk of text is not always the best option for quickly referencing something during play. And if you’re dealing with lots of different abilities or effects, including the full text for every single thing will often bloat your content to the point where it becomes more difficult to use (because, for example, you’re having to flip between multiple pages in order to run an encounter).

UTILITY OF REFERENCE

In addition to streamlining your reference material, you can also manage this bloat by keeping in mind how you’ll actually use your scenario notes (and the references within it) and then organizing it accordingly.

We’ve already broached this subject by talking about using page breaks to keep entire key entries on a single sheet. But you can accomplish a similar effect by “outsourcing” blocks of information onto separate sheets that you can reference simultaneously at the game table.

When I’m GMing, I’ll frequently have my end of the table organized so that I can lay out multiple sheets of paper out in front of me. I’ll also use folding tray tables set up to my left, right, or both sides to hold additional reference material (including rulebooks and the like). I’ll occasionally be asked how I manage to keep the game running so smoothly when I’m juggling all these different pieces of paper, but the reality is that the game is running smoothly because I’m using all of those sheets: My eyes can skip rapidly from one reference to another, making it trivial to (for example) run an encounter featuring a half dozen different complicated stat blocks which would become a massive headache if I was instead trying to flip back and forth between six different pages in a Monster Manual.

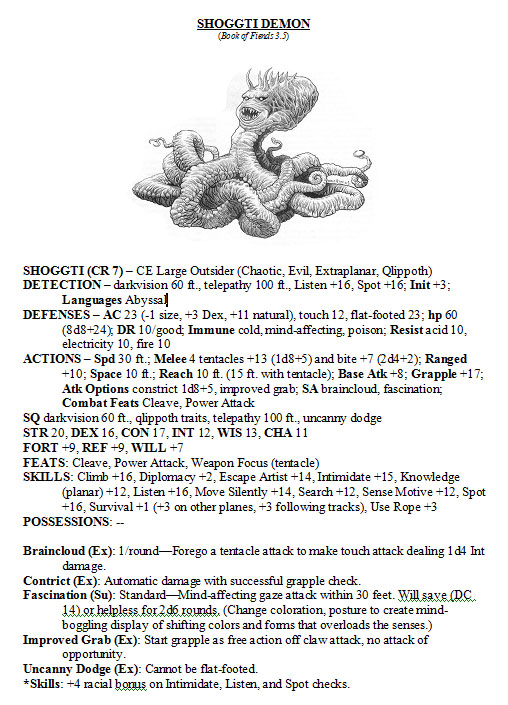
Monsters are, in fact, one of the easiest things to outsource onto their own sheets. (Often, of course, you can fit multiple such stat blocks onto a single sheet.) I’ll even include a quick visual reference when I can, which is both useful for describing the creature and also makes it really easy to quickly find the stat block I need to reference. Here’s a typical one:

Shoggti Demon - Sample Monster Reference Sheet
 

Outsourcing monsters like this is also an essential component of using the advanced technique of adversary rosters, which is what we’ll be discussing next.

Go to Part 4: Adversary Rosters

Go to Part 1

Palace of the Vampire Queen - Wee WarriorsThere are, in my opinion, two big lessons to take away from our review of the history of location keys:  First, there is an obvious need to separate information that should be immediately available to the PCs from the more detailed information in the room.

Second, there is a clear and logical desire to break up and organize the information in the key so that the GM doesn’t have to wade through a wall of text in order to pluck out the information that they need at any given moment.

The real question, of course, is how the information in the key can be effectively organized for the GM’s use. We’ve already rejected the idea of a rigid or dogmatized format, but there has to be something better than just puking everything out onto the page and hoping you can pick out the useful bits later.

The ultimate solution, in my experience, is to focus on the sequencing of information: How the information will flow (or is likely to flow) at the actual gaming table.

TITLE OF THE ROOM

Start with the title of the room. Technically, this is optional, but I find that a good title instantly orients you: It tells you what type of room it is and can also serve as a valuable reminder and touchstone if you’ve familiarized yourself with the adventure.

BOXED TEXT

We start with boxed text which conveys the common information that anyone walking into the room would immediately perceive. (“You see a box in the corner with a weird symbol painted on it.”)

This doesn’t have to literally be text in a box, of course, but it should be clearly delineated from the rest of the key and contain all of the information that should be immediately conveyed when the PCs first enter the room. I also think of this section as seen in a glance.

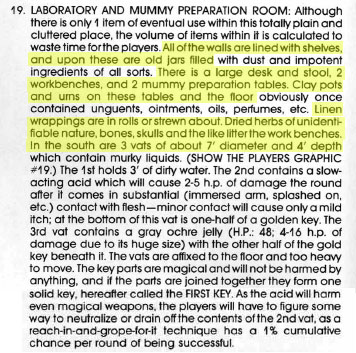
Brendan over at Necropraxis makes the interesting point that if you’re confronted with a wall of text in a published module, you can often yank out a useful “seen in a glance” section by strategically using a highlighter. Here’s an example from the Tomb of Horrors:

Tomb of Horrors (Area 19) - Gary Gygax

It was actually while attempting to run the Tomb of Horrors that I first realized how important it was to clearly segregate the “initial player briefing” for an area from the general description of that area. (And also the importance of making sure that the initial briefing is complete and accurate.) This is actually what led me to create a complete revision of the Tomb specifically designed to make it easy for the GM to run it.

REACTIVE SKILL CHECKS

Directly after the boxed text are the reactive skill checks which should be made immediately by anyone entering the room. These are typically perception-type checks, but they might also be knowledge checks. (For example, a See Hidden roll to notice that there are small spiders crawling all over the box. Or a History check to recognize the symbol on the box as the royal seal of Emperor Norton.)

It’s actually surprising to me how often I see this type of information mishandled in published adventure keys. For some reason you’ll get six paragraphs describing the room in detail and then, buried somewhere near the bottom, the author will suddenly reveal that the PCs should have made a Spot check to see if they notice that the ceiling is coated in flammable oil. (What this usually means at the table is that the PCs will have spent several minutes exploring all the stuff described in those first six paragraphs before I notice that a Spot check should have been made 10 minutes ago. Whoops.)

SIGNIFICANT ELEMENTS

At this point, each significant element in the room is independently described with additional details that will become important if characters investigate or interact with it. (“Inside the chest is a ruby which has been cracked in half. You can see that the inside of the ruby is filled with empty spider’s eggs.”)

What constitutes a “significant element”? Basically anything that the GM needs more information about. Most of the time that means anything that the players are likely to interact with or investigate.

This is usually pretty self-evident. For example, look back at that highlighted example from Tomb of Horrors. If you started grabbing significant elements from the “seen in a glance” stuff, you’d end up with something that looks like this:

Old Jars: Filled with dust and impotent ingredients of all sorts.

Clay Pots/Urns: These obviously once contained unguents, ointments, oils, perfumes, etc.

Vats: Each of these vats contains murky liquid. They are affixed to the floor and too heavy to move.

Notice that the bold title makes it easy to find the information you need. It also makes it easy for the GM to quickly process what the room contains and how it “works” in play. (What’s in this room? Old jars, clay pots, urns, and some vats. What happens when they look in the jars? They see that they’re filled with dust and impotent ingredients.)

DEVELOPING SIGNIFICANT ELEMENTS

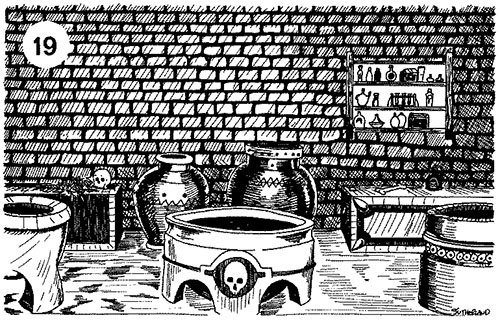
Tomb of Horrors - Illustration 19

Let’s focus on those vats a bit more.

Obviously I’m cheating with the key above because there’s a lot more information about those vats in Gygax’s original key. We could certainly just plop all that info into a big paragraph:

Vats: Each of these vats contains murky liquid. The 1st holds 3’ of dirty water. The 2nd contains a slow-acting acid which will cause 2-5 h.p. of damage the round after it comes in substantial (immersed arm, splashed on, etc.) contact with flesh – minor contact will cause only a mild itch; at the bottom of this vat is one-half of a golden key. The 3rd vat contains a gray ochre jelly (H.P.: 48; 4-16 h.p. of damage due to its huge size) with the other half of the golden key beneath it. The vats are affixed to the floor and too heavy to move. The key parts are magical and will not be harmed by anything, and if the parts are joined together they form one solid key, hereafter called the FIRST KEY. As the acid will harm even magical weapons, the players will have to figure some way to neutralize or drain off the contents of the 2nd vat, as a reach-in-and-grope-for-it technique has a 1% cumulative chance per round of being successful.

But it’s pretty easy to see how we just end up with a wall of text again doing that.

What we need to do is break that information down even further. I typically do that with bullet points, although really any sort of hierarchical structure will work just fine. More important than the particular method, however, is the methodology behind it: What you want to do is to move from the general to the specific while paying particular attention to how the players are gaining that information.

There’s some useful reading on this topic over at Courtney Campbell’s Hack & Slash: “On Set Design”. The specific method Courtney lays out over there is pretty heavily dogmatic and far too limited in its application for my tastes, but the specific way that he conceptually breaks down a room key is useful. Expanding on his basic thoughts, I would say something like this:

  • List all the visible items in the room (i.e., vats).
  • Beneath those items, list information that would be gained by simply looking more closely at the object (i.e., the vats have liquid in them). Then list information that requires specific actions to be taken to discover (i.e., the liquid in the 2nd vat is acid). (This latter category notably includes items which are found within a container.)
  • Now do the same thing for items or features of the room which are not immediately visible (i.e., a secret door that requires a Search check).

The logic here should be fairly obvious: In interacting with a room, the players are most likely to start by asking questions about the things they’ve just been told about (so put information about those items up front). They’ll start with general questions and then proceed to detailed investigation (so put the information in that order).

The point, of course, is not to say “this is the order in which they must search the room”. You’re just organizing the information in the way that makes the most sense. And if it makes more sense to put information about some hidden element of the room first because it provides important context for the other stuff… well, do it. We’re just discussing a useful way of thinking about how to organize the information, but actual adventures are idiosyncratic so break down and organize the features of the room in whatever order makes sense to you.

GM BACKGROUND TAG

Over the past few years, I’ve found one other distinction particularly useful in my location keys: The “GM Background” tag.

Here’s a simple example from a recent adventure in my Ptolus campaign:

9. UNFINISHED ANTI-FEAR DEVICES

Four unfinished clockwork devices atop copper rods lie on the floor or lean against the walls.

Fear-Cleansing Devices: These are partially completed fear-cleansing devices (see area 1).

  • Arcana (DC 30): To reverse engineer them and complete them (1d4 days).
  • GM Background: These were to be installed in this area and north of area 20, but the work was never completed.

The point of the tag is to include details that can provide important context for the current location without cluttering up the functionality I want to be able to quickly reference during play. For example, this same key without the GM Background tag would look like this:

9. UNFINISHED ANTI-FEAR DEVICES

Four unfinished clockwork devices atop copper rods lie on the floor or lean against the walls.

Fear-Cleansing Devices: These are partially completed fear-cleansing devices (see area 1). These were to be installed in this area and north of area 20, but the work was never completed.

  • Arcana (DC 30): To reverse engineer them and complete them (1d4 days).

It’s a minor example, but hopefully you can see how the primary description of the fear-cleansing devices is now slightly more cluttered and a little more difficult to process quickly.

The tag is particularly useful for information of the “this is what this ruined room used to be” and “this is what the NPCs use this room for” variety. Instead of saying “the room is filled with broken, ruined furniture” and then providing a lot of details about the furniture in your key, it’s a lot easier to say “the room is filled with broken, ruined furniture (and it used to be a barracks)”. If the PCs start poking around the broken furniture, the background information gives you enough context to improvise the details.

A word of caution with the GM Background tag: It should be brief, to the point, and infrequently needed. If you find your room keys becoming dominated by background information it’s likely that you’re doing something wrong: Refocus your attention on the stuff that PCs can actually learn (and how they can learn it).

THE FULL KEY

And now we can put it all together.


19. LABORATORY AND MUMMY PREPARATION ROOM

All of the walls in this chamber are lined with shelves and upon these are old jars. There is a large desk and stool, two workbenches, and two mummy preparation tables. There are clay pots and urns on these tables and the floor. Linen wrappings are in rolls or strewn about. Dried herbs of unidentifiable nature, bones, skulls, and the like litter the workbenches. In the south are three vats of about 7’ diameter and 4’ depth.

Spot (DC 15): To notice a lack of dust around the third vat.

  • GM Background: This lack of dust is due to the presence of the grey ochre jelly.

Old Jars: Filled with dust and impotent ingredients of all sorts.

Clay Pots/Urns: These obviously once contained unguents, ointments, oils, perfumes, etc.

Vats: Each of these vats contains murky liquid. They are affixed to the floor and too heavy to move.

  • Vat 1: Filled with 3’ of dirty water.
  • Vat 2: Filled with slow-acting acid. Minor contact will cause a mild itch. Substantial contact with flesh (immersed arm, splashed on, etc.) will cause 2-5 hp per round. The acid will harm even magical weapons.
    • Golden Key Part: Beneath the acid is ½ of a golden key. A reach-and-grope-for-it technique has a 1% cumulative chance per round of finding the key.
  • Vat 3: Contains a gray ochre jelly (48 hp, 4-16 hp of damage due to its size).
    • Golden Key Part: Beneath the grey ochre jelly is ½ of a golden key.

Golden Key Parts: The key parts found in the vats are magical and will not be harmed by anything. If the parts are joined together they form one solid key, hereafter referred to as the FIRST KEY.


Of course, not every location key needs to be this complicated. But if you compare this to the “wall of text” version from the original module, I think it should be fairly obvious how much easier it will be to navigate and use this key in actual play: Read (or summarize) the boxed text. Scan the bolded points of interest. Follow the players’ lead.

I find that when I’m working with keys in this format I can generally pick up material and run it on-the-fly even if I haven’t reviewed it in weeks or months. With the types of keys being published in the industry today, however, I can’t do that: There’s no easy way to efficiently parse and run keys featuring multiple paragraphs (and often multiple pages) of poorly organized and undifferentiated material.

HOMEBREW vs. PUBLISHED

The final thing that should be mentioned here is that there’s been a certain degree of “polish” attendant to most of my discussion of the location keys so far. This is a natural consequence of trying to communicate clearly with you, but it’s not necessarily a great example of how you should actually do it at home.

When you’re prepping location keys for your own campaign, you don’t need to be so neat and tidy (nor so loquacious). Bullet point your boxed text; jot down quick notes. Whatever works for you. Complete sentences are overrated: Get the information across in the most efficient fashion possible.

Remember: Your location key is not the work of art. It is a tool that you use to create awesome stuff at the gaming table.

Hone that tool, treat it well, and it will pay you back a hundredfold.

Go to Part 3

The Art of the Key

May 19th, 2014

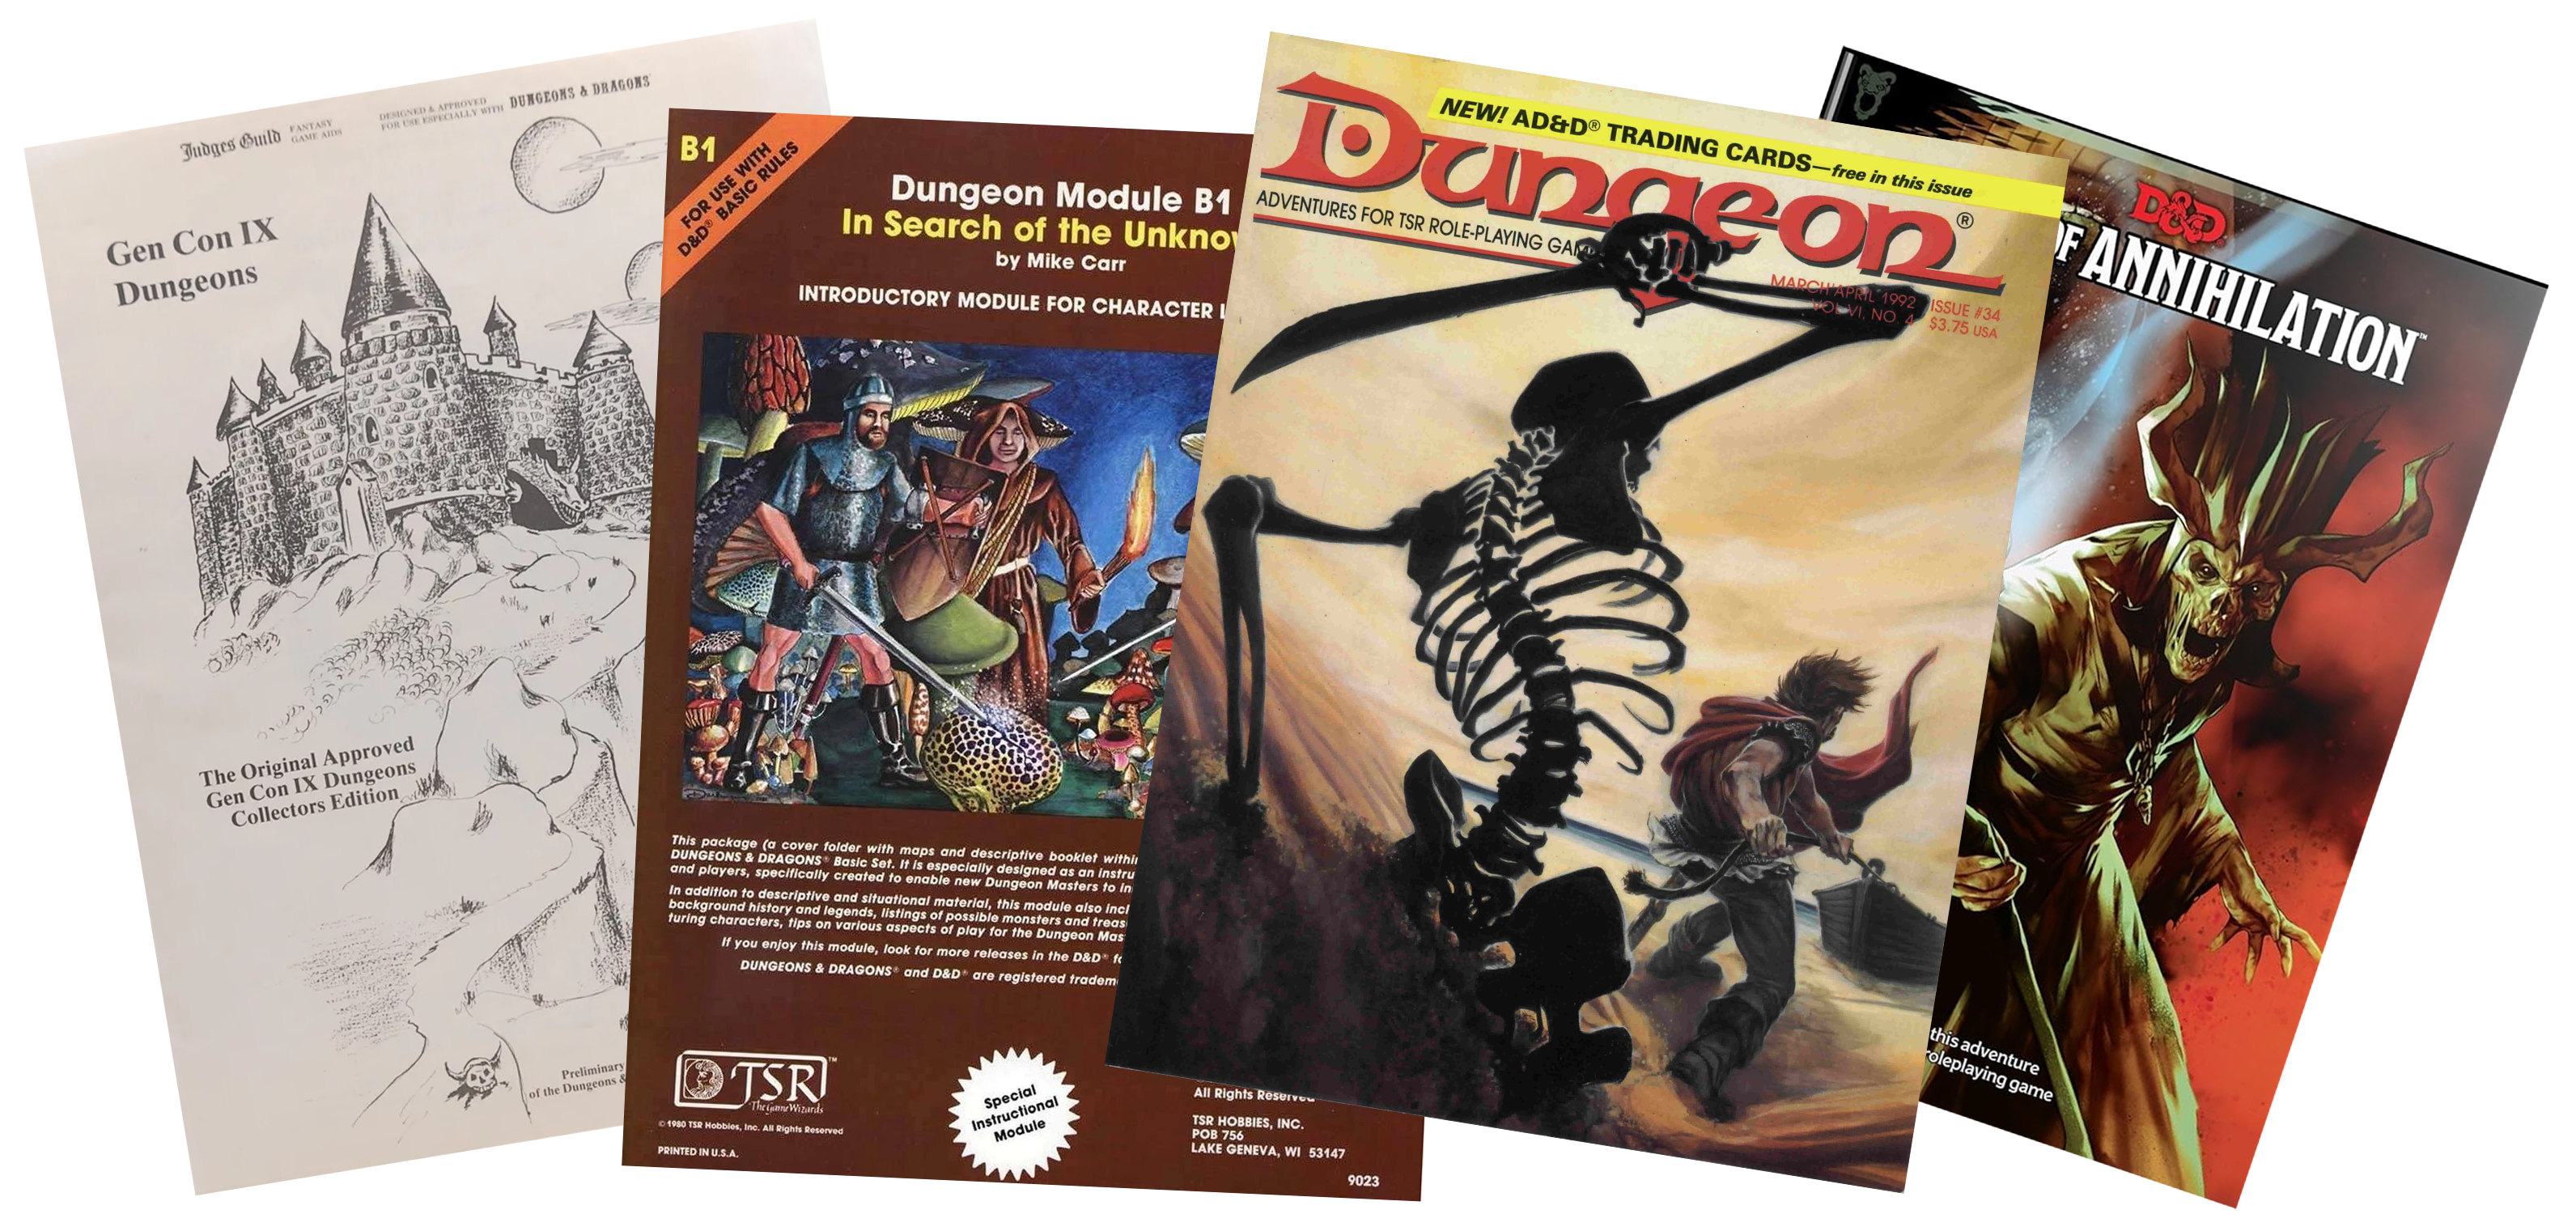
Gen Con IX Dungeons - B1 In Search of the Unknown - Dungeon Magazine #34 - Tomb of Annihilation

Location-based adventures are a staple of the GM’s art and form a kind of bedrock for scenario design. Even if a scenario isn’t primarily about ‘crawling a specific location, you’ll still find yourself frequently keying a map to describe wherever the action is taking place.

Which is why I find it fairly surprising that the location keys in published adventures are almost universally terrible.

A BRIEF HISTORY OF THE KEY

In 1974, the original edition of D&D included a “Sample Map” keyed with both numbers and letters. The description of the key, however, was instructional rather than practical. For example:

5. The combinations here are really vicious, and unless you’re out to get your players it is not suggested for actual use. Passage south “D” is a slanting corridor which will take them at least one level deeper, and if the slope is gentle even dwarves won’t recognize it. Room “E” is a transporter, two ways, to just about anywhere the referee likes, including the center of the earth or the moon. The passage south containing “F” is a one-way teleporter, and the poor dupes will never realize it unless a very large party (over 50’ in length) is entering it. (This is sure-fire fits for map makers among participants.)

Skip ahead a couple of years to 1976, though, and we’ve reached Year One for published adventures: Arneson’s “Temple of the Frog” appeared in Supplement II: Blackmoor; Wee Warriors released Palace of the Vampire Queen; Metro Detroit Gamers released the original Lost Caverns of Tsojconth; and Judges Guild released Gen Con IX Dungeons and City-State of the Invinicible Overlord.

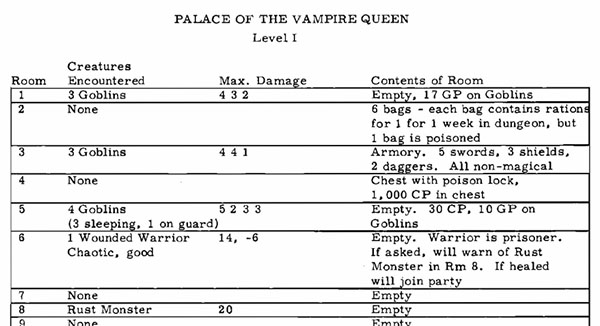
Palace of the Vampire Queen featured a completely tabular key that looked like this:

Palace of the Vampire Queen - Wee Warriors

The Lost Caverns of Tsojconth, on the other hand, featured the Gygax “wall of text” key which would become a staple at TSR for the better part of a decade:

K. COPPER DRAGON: HP: 72. Neutral, intelligent, talking, has spells: DETECT MAGIC, READ MAGIC, CHARM PERSON, LOCATE OBJECT, INVISIBILITY, ESP, DISPEL MAGIC, HASTE, and WATER BREATHING. It is asleep but will waken in 3 melee rounds or if spoken to or attacked. It will bargain to allow the party to pass on to the east if given at least 5,000 GP in metal and/or gems/jewelry – deduct 1,000 GP for each magic item offered instead. It will tell the party nothing, but it will ask about the fire lizards. If the party has slain these creatures, the dragon will attack them. 30,000 CP, 1,000 GP, 36 100-GP gems, 42 500GP gems, 13 1,000-GP gems, 9 pieces of jewelry (9,7,7,6,5,4,,4,3,3 in 1,000’s each). A jeweled sword (quartz), non-magical, will be hated by party’s swords at first, value is 783 GP. An ivory tube with contact poison contains a scroll of 3 spells (MONSTER SUMMONING III, LIMITED WISH, SYMBOL). Several pieces of jewelry radiate magic (they have a magic mouth spell on them with a nearly impossible speak command) for a 10th piece of jewelry is a necklace of missiles (5), with each missile globe encased in an ivory block (which can be pried open along a hairline seam to reveal the missile).

In Gen Con IX Dungeons, meanwhile, Judges Guild was way ahead of the curve (as was so often the case). Bob Blake had recognized that a key with better organization would make it easier for DMs to run the adventure, and he introduced that organization by including a “DM Only” section in each key entry:

13. 30’ N-S, 30’ E-W. Enter by secret door in center of W Wall. There is a blackened firepit in the center of the room, and a barred opening into 10’x10’ opening in the center of the E Wall.

DM Only: The firepit contains nothing of value. The portcullis may be easily raised by pulling on a chain hanging from a small hole in the wall next to the portcullis. There is a secret door in the E Wall of the alcove.

Although not technically boxed text, this format was effectively accomplishing the same thing on a structural level. (Particularly interesting are the keys which feature two separate “DM Only” sections – one before the player section and detailing information necessary when entering the room and one after the player section detailing information on what investigating the room will reveal.)

Unfortunately, although Blake used this format through 1977, Judges Guild eventually abandoned it and also moved to “wall of text” keys.

In 1978, B1 In Search of the Unknown effectively created the idea of separating the key into distinct sections:

30. ACCESS ROOM. This room is devoid of detail or contents, giving access to the lower level of the stronghold by a descending stairway. This stairway leads down and directly into room 38 on the lower level.

Monster:

Treasure & Location:

Although this division superficially resembles later “adventure formatting guides” (which we’ll get to momentarily), it was actually an accidental by-product of In Search of the Unknown being designed as a training tool for beginning DMs: The adventure included prepared lists of monsters and treasures which the neophyte DM was supposed to assign to various rooms throughout the dungeon. (Which is why those sections are blank in the example above.)

THE ERA OF BOXED TEXT

In either 1979 or 1980, depending on how persnickety you want to get with definitions, boxed text — prewritten text designed to be read aloud by the GM — arrived for the first time in Lost Tamoachan: The Hidden Shrine of Lubaatum, a tournament module by Harold Johnson & Jeff R. Leason that was originally printed for the Origins game convention.

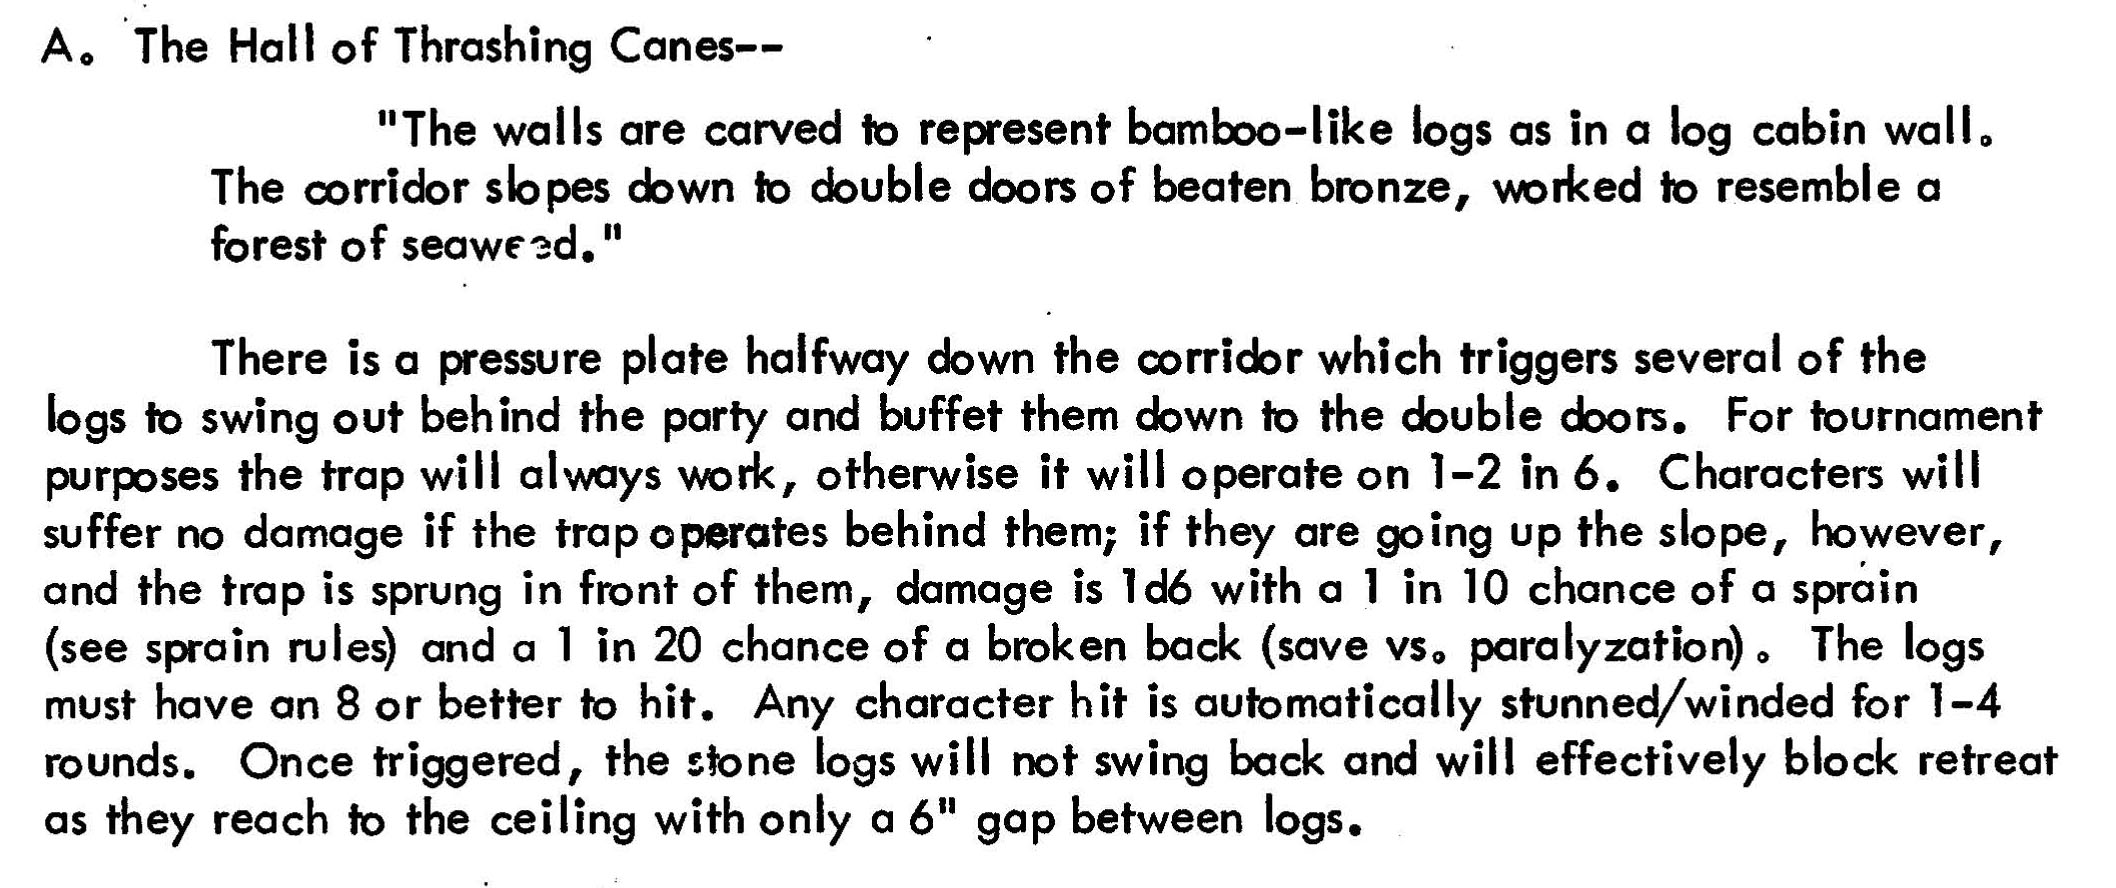
In the original version of the module, the text was not yet boxed, instead appearing between quotation marks:

Ao The Hall of Thrashing Canes--

But in 1980, TSR reissued the module as C1 The Hidden Shrine of Tamoachan, placing the prewritten descriptions in a box for the first time:

2. The Hall of Thrashing Canes:
[BOXED TEXT] The sides of this corridor are carved to resemble walls of bamboo-like logs. The passage slopes down from a single door on its western leg, the lintel of which has been crafted to represent a stylized cavern entrance, to double doors of beaten bronze, worked to resemble a forest of seaweed. [END BOXED TEXT]

There is a pressure plate halfway down the hallway which triggers a trap. Several of the logs will swing out from either wall and buffet the party towards the double doors. For tournament play, the trap will always work. For campaign adventure, the trap will be triggered on a 1 or 2 in 6.

Like Blake’s “DM Only” section from earlier in the decade, the boxed text clearly delineated the elements of a given area that should be immediately shared with any PC entering the area.

Later, of course, the role of boxed text would be expanded to include any sort of “read-aloud” text intended for the players, but its function as a narrative device is beyond the scope of location keying. In this context, however, an honorable mention should perhaps be given to Quest of the Fazzlewood, a 1978 “head-to-head” tournament module designed to be played with just one DM and one player. In addition to a lengthy introduction designed for the player to read, the finale of the adventure is presented with read-aloud text:

When Felspel returns, read to the player:

(photo from Explore: Beneath & Beyond)

The formatting is quite similar to the later Lost Tamoachan, and one could argue that this is, in fact, the first example of “boxed text” (albeit of the not-yet-boxed variety).

In any case, at this point, things basically settle down: When Dungeon #1 appeared in 1986, it still featured the familiar boxed text paired with a “wall of text” key for the DM. In 1988, monsters and NPCs in the magazine received a standardized stat block that gets clearly delineated from the text. But that basic format can still be seen in The Apocalypse Stone in 1999 (the very last adventure produced for 2nd Edition).


ADVENTURE FORMATTING GUIDES

When 3rd Edition arrived, however, an effort was made to introduce a new “standard format” for published adventure modules. First appearing in The Sunless Citadel, this format had the familiar boxed text and wall of text, but supplemented this with a specific set of bold-faced sections:

  • Traps
  • Creatures
  • Tactics
  • Development
  • Treasure

Not all of these appeared in every location, but if they did appear then they appeared in that order and no other.

As noted above, this format recalls B1 In Search of the Unknown. There were also a handful of other examples between 1978 and 2000, most notably 1982’s I3 Pharaoh which featured headings for:

  • Play
  • Lore
  • Monster
  • Character
  • Trap/Trick
  • Treasure

Tracy and Laura Hickman, the authors of Pharaoh, also dedicated a full page to explaining what each section of their key was designed to accomplish. For example:

Play: This outlines the general sequence of events that may take place in the room. For example: “Players entering the room from the door must first encounter the Trap, which releases the Monster. Only by defeating the Monster can the Treasure be found.” Play explains the general order that the sections should be used. Additional size and dimension information about the area is also included here.

And that largely explains what the intended purpose of the standardized adventure format is: To break up the wall of text and clearly communicate to the DM where they should look for a given piece of information.

It’s a noble intention, but the problem with this specific approach to adventure writing is that it tends to encourage writers to “fill the format”. You probably don’t really need to tell a DM that the orcs attack people using their swords (since that’s the only weapon they have)… but the format says you should have a “Tactics” section, so you might as well write two or three paragraphs about it.

An even bigger problem, in my experience, is that of sequencing information: A room with an ogre standing in the middle of it should talk about the ogre first; a room with a goblin hiding behind a tapestry, on the other hand, shouldn’t lead off with the goblin.

This sort of one-size-fits-all formatting becomes both a straitjacket and an excess. And the culmination of this approach is the infamous “delve” format, which I’ve talked about extensively elsewhere.

The fundamental problem (which the delve format simply metastasizes) is that the rigid adventure format forces information to be presented out-of-sequence or breaks that information up in a way that doesn’t make sense during actual play. Instead of making the information easy to parse and reference, a rigid format ends up having the opposite effect.

Go to Part 2

THE ART OF THE KEY
Part 2: The Essential Key
Part 3: Hierarchy of Reference
Part 4: Adversary Rosters

Archives

Recent Posts

Recent Comments

Copyright © The Alexandrian. All rights reserved.