The Alexandrian

Archive for the ‘Roleplaying Games’ category

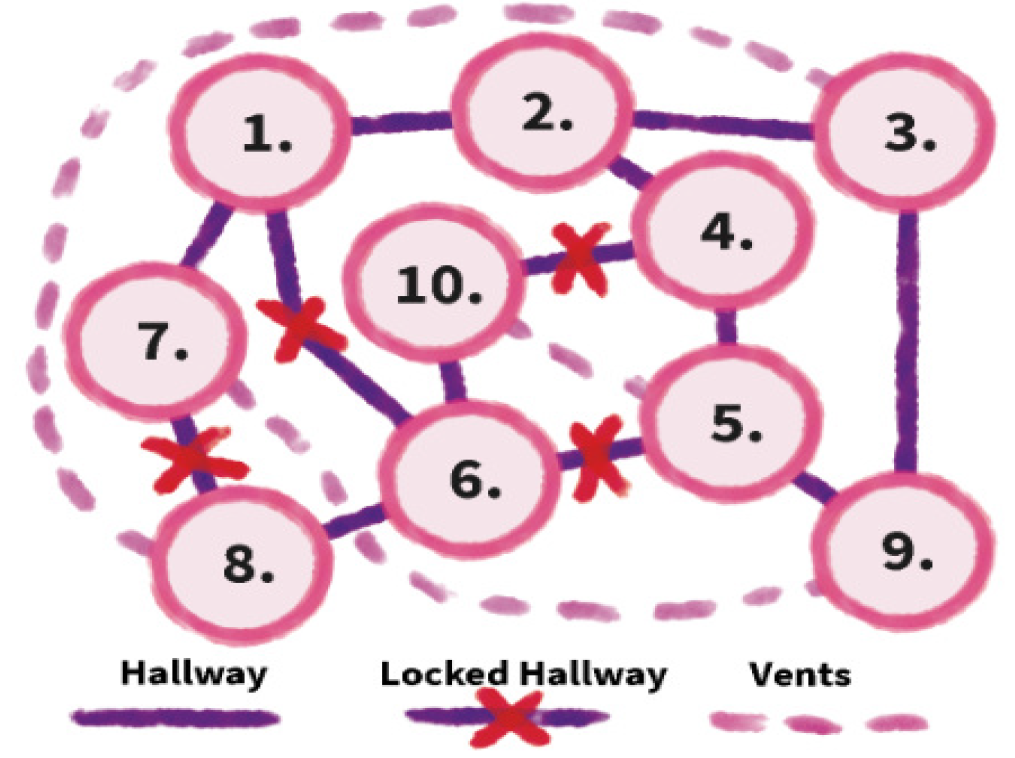
Curse Den - Rivergate District (Map)

Go to Table of Contents

StaffLocation
Vladaam GuardArea 1
1d3 Hostesses + BartenderArea 2/3
Peacock (Vladaam Advanced Guard)Area 3
CookArea 4
Vladaam Advanced GuardArea 6
Vladaam Advanced GuardArea 9
1d4 HostessesArea 10
2 HostessesArea 11
Vladaam Mage + Journeyman AlchemistArea 14 (75%)
Den Master Corellius1Area 14 (75%)
1d3 HostessesEach room on 2nd Floor
2 Vladaam GuardsPatrolling 2nd Floor

1 Carries key for the safe in Area 14.

Curse Den - RIvergate District

Curse Den – Rivergate
Outer Ring Row – E2

AREA 1 – ENTRANCE

Stairs of blue marble lead through doors ornately carved in a yin-yang composition of a dragon and unicorn pursuing each other.

AREA 2 – SALOON

A cluttering of chairs around a handful of low tables. The warm, dark glow of polished mahogany gleaming from every surface.

TO AREA 10: A bouncer stand guard at the archway leading to the short hall past Area 9: The Main Stairs or into Area 10: Snakeweed Lounge.  Passing requires approval and the payment of a 10 gp cover. (Or no approval and a large bribe.)

AREA 3 – BAR

A well-stocked bar, mostly focused on ales.

THE PEACOCK: A pet peacock roosts on the bar here. It spreads its tail in a beautiful display whenever someone tips.

The peacock is actually a Vladaam agent who has been polymorphed. In this form, the agent can eavesdrop surreptitiously on conversations, gleaning potentially valuable intel from bar chatter.

AREA 4 – KITCHEN

A well-stocked kitchen.

AREA 5 – FOOD & LIQUOR STORAGE

Pretty much what it says on the tin.

AREA 6 – REAR ENTRANCE

The rear entrance is primarily used by those interested in the more exclusive upstairs lounges. It also allows access to the curse den “after hours.” It requires a password or a 100 gp fee.

AREA 7 – DRUG STORAGE

REINFORCED DOOR: AC 19, 300 hp, DC 25 Dexterity (Thieves’ Tools)

Neatly organized in small wooden boxes on shelves:

  • 15,000 doses of snakeweed
  • 5,000 doses of shivvel
  • 75 doses of agony

AREA 8 – REAR STAIRS

These stairs go up to Area 12. They’re used by staff and the “rear entrance” clientele (see Area 6).

AREA 9 – MAIN STAIRS

The walls of the main stairs have a marvelous set of Ascent of Dragons murals. (Similar to the “Ascent of Man,” but showing a red dragon progressing from a wyrmling to an ancient dragon atop his treasure horde.) The final image of the treasure horde is on the wall opposite the top of the stairs in Area 17.

DC 18 INTELLIGENCE (INVESTIGATION): There are a pair of small amethysts set into the stairs about halfway up. These are the focal points for a pair of alarm spells that are activated after hours. (Audible alarm. Cast at a higher level in order to increase its volume.)

AREA 10 – THE SNAKEWEED LOUNGE

Filled with snakeweed smoke. A number of magical, ceramic sculptures resembling slowly writhing masses of tentacles also a serve as standing hookahs from which anyone can take a hit of snakeweed smoke.

SKULLRATTLE: The tables in the northern chamber are set up with several low-stake skullrattle games using a variety of young dragon skulls.

BETRANT TABLES: The tables in the southern chamber host low-stakes bertrant games.

SECRET DOOR: DC 12 Intelligence (Investigation). A simple secret door spins around to grant access to the high-stakes bertrant tables. (Any observation of the chamber during business hours will notice hostesses and high-roller coming and going through this door.)

AREA 11 – HIGH-STAKES BERTRANT

These are all high-stakes bertrant games. Minimum bets at most tables are 100 gp, but there’s also a 1,000 gp bet table.

AGONY HOSTESSES: Agony is available for sale in this room. Hostesses carry 1d6 doses each.

AREA 12 – STAIN-GLASSED WINDOW

The window at the top of the rear stairs is a beautiful piece of stained glass depicting a black dragon. A plaque beneath the window reads, “THE WYRM ORACTHON.”

The Wyrm Oracthon

AREA 13 – SHIVVEL LOUNGE

A number of comfortable chairs where shivvel smokers congregate.

AREA 14 – CURSE JEWEL WORKSHOP

DOOR: Oak-veneer over iron core. AC 19, 300 hp, DC 24 Dexterity (Thieves’ Tools)

WINDOW: The window is made of diamond crystal. AC 19, 300 hp.

A desk of dark-stained oak is positioned near the center of the room with a chair angled to look out the window. A workshop for creating magical items is arrayed around the perimeter of the room.

DESK: Includes Report on the Debts of Dilar. (The “CS” referred to in the letter is Celadore Silverwood of Dark Leaf. The Runshallot warehouse is the Vladaam’s slave trade warehouse, see Part 16: Slave Trade.

WORKSHOP: Includes Instructions for Creating Curse Jewels and a set of jeweler’s tools.

  • DC 15 Intelligence (Arcana): Provide players with the properties of a curse jewel.

HIDDEN SAFE: Located in the floor. DC 22 Intelligence (Investigation), DC 30 Dexterity (Thieves’ Tools).

  • 15d10 x 10 platinum pieces, mostly in gold and silver coins.
  • IOU from Korben Trollone.

IRON COFFER (10% chance): If present, contains 500 gp, 40,000 sp, and 50,000 cp with instructions to have the Ithildin couriers ship it to the Red Company of Goldsmiths on Gold Street.

AREA 15 – CURSE JEWEL LOUNGE

A richly-accoutered lounge, with rounded divans of red velvet circling a central area raised in a dais. A bulging aumbry with dragon’s claw feet stands against one wall.

AUMBRY: Contains 10 doses of agony, 40 doses of abyss dust, and 4 curse jewels.

SECRET DOOR: DC 18 Intelligence (Investigation).

DAIS: DC 20 Intelligence (Investigation) to discover a secret compartment in the dais. Pushing a concealed button causes a panel to slide aside and a curse globe to rise into view.

DM Background: This room is rented by individuals or small groups. Slaves are led in from Area 16 and curse jewels are used on them.

AREA 16 – SLAVE CHAMBERS

This room has a permanent silence spell cast on it. It contains 1d4+1 slaves, usually beautiful young women.

SLAVES: These slaves were originally brought to Ptolus aboard the Sarathyn’s Sail (see Part 9: Fleet of Iron Sails) and then sold through the Ennin slave market (Ptolus, p. 399).

AREA 17 – DRAGONSCALES TABLE

Three tables, each set up with a set of dragonscales tiles.

DRAGONSCALES: All three tables have gold dragonscales sets. A trained eye can price two of the sets at 1,500 gp each. At a casual glance, the third set is just as nice, but is actually slightly cheaper in its craftsmanship (and is only worth 250 gp).

  • The cheaper dragonscales set has the word “Yarrow” carved into the edge of its board.
  • DM Background: A dragonscales set was stolen from this curse den several months ago. It was replaced with a set from the Oldtown curse den (on Yarrow Street) until a permanent replacement set is procured.

DM Background: This chamber is rarely used, but very exclusive.

AREA 18 – HIGH-STAKES SKULLRATTLE

This table has the skull of an ancient red dragon accoutered for skullrattle. It’s a high-stakes game requiring 500 gp minimum bets. The entire room is under the effects of an antimagic field to prevent magical cheating.

AREA 19 – SNUFF CHAMBER

The mahogany table in the center of this room is equipped with large manacles designed to bind someone firmly to its surface.

AUMBRY: Contains 20 doses of agony, 100 doses of abyss dust, and 12 curse jewels.

TABLE – DC 20 INTELLIGENCE (INVESTIGATION): The table has a hidden compartment where a slave manacled to its surface can be quickly dropped out of sight. (The compartment has a permanent silence spell cast on it.)

DM Background: Groups (or, more rarely, individuals) will employ his room to use curse jewels on a single slave bound to the surface of the table. This often results in the death of the slave and the groups pay extra for their murderous delights. The “ritual” is often accompanied with doses of agony.

This particular snuff chamber is rarely used. Those looking for this sort of “entertainment” are more likely to use the curse den in Oldtown, but the relative privacy and exclusivity attracts a very particular type of client.

HANDOUTS

REPORT ON THE DEBTS OF DILAR

Den Master Corellius—

I understand your concern, but Dilar’s affiliation with the Dark Leaf doesn’t offer him immunity. These debts you’re describing from the Oldtown Curse Den are disturbing and simply cannot be tolerated. In fact, this only contributes to a pattern of irregular behavior which is particularly alarming in light of his duty to provide security at the warehouse on Runshallot.

If you deem it wise, set spies upon him. It’s possible his loyalties have become divided and this matter may give us fair excuse to investigate without raising any possible alarm if other eyes have been placed on him.

In any case, if the matter of the debt is not resolved, you should feel empowered to contact CS directly and resolve it permanently.

                                                                                                Godfred V.

IOU FROM KORBEN TROLLONEI owe personally, upon my honor and to the hand of Master Corellius, the sum of 8,250 gp. Korben Trollone abiding at Edarth's Loans the 8th of Noctural, 790

Go to Part 9: Fleet of Iron Sails

Night's Black Agents - The Persephone Extraction (Pelgrane Press)

At the moment, there are three major published campaigns for Night’s Black Agents. I’ve previously reviewed The Zalozhniy Quartet, and The Dracula Dossier is a beast still awaiting its time in the sun for me. (If you’ll forgive either the least or the most appropriate metaphor of all time). So today let’s take a peek at The Persephone Extraction.

At first glance, this looks like an adventure anthology: Five adventures. Five authors (each presumably writing one of the scenarios). And, in its first paragraph, the book does kind of limply wave its hand in the direction of “they can be played individually.”

In reality, however, this is definitely a mini-campaign. In fact, it’s virtually impossible to imagine running this in any other way: The continuity between the scenarios is tightly woven and all of them are pretty immutably bound to the specific vampiric mythology of the campaign.

STRUCTURAL ISSUES

The Persephone Extraction is also pretty wedded to the idea that you can play most of its scenarios, after the introductory scenario, in any order.  Which is good in theory, but in practice you can’t have a big finale adventure with a bunch of continuity dependent on the PCs’ having played the other scenarios in a wide-open node structure where the PCs could head to the finale at literally any time.

Well… you can. It just won’t end well.

(Pun intended.)

With that being said, The Persephone Extraction repeats the gimmick from The Zalozhniy Quartet where the clues pointing to other scenarios are listed in the “Aftermath” section at the end of the scenario, instead of being mentioned in the locations where the clues would actually be discovered. So the idea may be less that the players are free to pursue the scenarios in any order, and more that the GM is free to choose the order in which they will be played and can choose which clues to seed into each scenario to force that to happen. (Which is such an anathema to me, that it’s difficult to understand why anyone would want such a functionality, but maybe they exist.)

Either way, I’m fairly certain the number of GMs who will get to the end of one of these scenarios and go, “Crap. I forgot to include the clues they need for the next scenario,” will be non-zero. It’s just such an unfriendly way of organizing material for actual play.

On a similar “unfriendly for actual play” note, some of the authors also have a deep desire to title every scene as if it were a short story:

  • When the Wind Blows
  • The Thin Red Line
  • Guerilla Gardening
  • Going Viral
  • City on the Edge of Nowhere

I get the impulse, because they sound cool and feel evocative. In practice, sadly, it just makes it incredibly tough to simply flip through the book and find what you’re looking for.

CONSPYRAMID & VAMPYRAMID

The fact that the book is titling individual scenes has probably also made you suspicious that they’re once again prepping plot instead of Conspyramid nodes. This is, unfortunately, true. Unlike The Zalozhniy Quartet, however, The Persephone Extraction does include a Conspyramid.

If you’re not familiar with the concept, Night’s Black Agents features a campaign structure called the Conspyramid. It consists of various nodes — the cults, front companies, sources of blood, and other infrastructure of the vampire conspiracy — arranged into a pyramid diagram and connected to each other.  The result is a model of the conspiracy that the PCs can navigate through using both clues from their investigations and the games’ proactive investigation mechanics.

The Conspyramid in your Night’s Black Agents campaign, therefore, is also the structure of play.

The Conspyramid in The Persephone Extraction, on the other hand, is largely incoherent because it’s so utterly divorced from the tightly-plotted, linear scenarios that fill the rest of the book and are the actual structure of play. This actual structure of play is perhaps better represented by the “scene flow diagrams” that are jammed in at the back of the book, although only somewhat.

Of far more use, however, is The Persephone Extraction’s custom Vampyramid.

The Vampyramid in Night’s Black Agents is a parallel structure to the Conspyramids and is basically a system for managing the conspiracy’s reactions to the PCs’ actions. Unlike the Conspyramid, which is unique for each campaign, the core rulebook includes a standard Vampyramid that can be used in every campaign. The Persephone Extraction, however, eschews the standard Vampyramid, and instead offers a heavily customized version for use with the adventures in the book.

This is really cool tech: It’s a cool enhancement for this campaign specifically, and it’s a great model for doing the same thing in your other Night’s Black Agents campaigns.

(The only quibble being that the Vampyramid is designed to be used in conjunction with a fully functional Conspyramid, and since The Persephone Extraction isn’t actually structured around the Conspyramid, you can’t actually use the Vampyramid procedures. Whoopsie. But the material is nonetheless useful, even if you’re going to have to improvise a bit to make it work.)

SPOILER WARNING

Let’s lay all these structural problems aside and assume that you’re just going to run The Persephone Extraction as the lightly branch-plotted experience it’s primarily designed to be.

What is this campaign, exactly?

We’ll be revealing some spoilers here. Proceed at your own risk, wanderer!

THE SPIRITS OF HADES

The vampires of The Persephone Extraction are Orphic in nature: The Greek legends of Hades reflect a dark truth and the tale of Orpheus, in particular, is the refracted memory of a vampire origin story. A mortal descends into a strange realm filled with the souls of the dead, and as they return one of those souls follows them out. One might even say that the dead was shadowing them… literally, because that dead spirit was hidden within their shadow.

Destroyed by the sun, just like any vampire of the non-glittery variety, these undead spirits can become bound to the shadows of their hosts as companion spirits and thus escape their purgatory. Nonetheless, they remain terribly diminished, little more than a memory of their mortal selves; reduced physically to a vaporous spirit and even mentally to an often confused and dazed state.

… until blood is spilt near them.

From the lifeblood of mortals, the vampiric spirit can draw strength. The more blood spilt, the more powerful it becomes. Powerful enough to escape its host shadow. Powerful enough to taste life again. Powerful enough to forge a global conspiracy to ensure that the blood will always flow.

The classical, Greco-Roman mythological inspiration for these vampires is basically straight up my alley. I love everything about them: I love how you can pull source material from mythologies across the globe, give it a twist, and end up with a new scenario. I love that they feel utterly alien to what we think of when somebody says “vampire,” but are nonetheless so firmly rooted in vampiric traditions as to leave no doubt to their right to bear the name. I love how the mythology provides an easy mechanism for ramping up threat and difficulty (increase the available blood = increase the difficulty of the vampire). I love that it takes what we know about history and mythology and warps it through a lens of “truth” that leaves your faith in reality deeply shaken.

These vampires are so cool, they almost sell The Persephone Extraction all by themselves.

I do, unfortunately, have to ruin things with a few more quibbles.

First, the mechanical implication of the concept – which features a triptych of bulky stat blocks – feels pretty clunky and very finicky. But, to be fair, I have not actually run a game with these stat blocks, so perhaps they work better in actual practice than it would seem.

More problematic, in my opinion, is that the handling of the vampiric metaphysics in The Persephone Extraction is pretty sloppy. For example: What can a vampire do while it’s hiding in its host’s shadow? Depending on the adventure, the answer seems to vary from complete impotence to a poorly defined grab bag of supernatural chicanery.

I suspect the problem here boils down to the multiple writers working on the book. I’m only assuming that each of them worked on a separate scenario, but it would neatly explain these inconsistencies. (Of course, that doesn’t mean you won’t have to figure out how to fix things up at your own table.)

THE PALE AGENDA

The vampires atop the conspiracy move at a different pace from the modern world: They sleep long and awaken rarely, leaving their day-to-day affairs in the hands of their philomeli; their hosts. As technology and communication have sped up, the ancient spirits become more disoriented and confused. Some have withdrawn into permanent torpor.

Others, however, have concluded that the herd is out of control and it’s time for a culling.

To this end the conspiracy has spent several years experimenting with the Marsburg virus, creating the experimental MAR-VX variant. This is the apocalypse in a bottle, capable of wiping out 99% of the human race and returning the population base to a level that the vampires feel they will be able to control.

This is known as the Pale Agenda. Originally initiated as a safety contingency, part of the conspiracy has decided it’s time to put the plan into motion. This has created a schism, however, between the Loyalists (“we do whatever our lords and ladies tell us to do”) and the Dissidents (“we like being rich and powerful, and our money and our power depends on modern civilization existing”). This division within the conspiracy creates a lovely dynamic, which is reflected in both the scenario design as well as the variant Vampyramid.

The Pale Agenda is, obviously, horrific almost beyond the scope of imagination. It’s a great way of cranking up the campaign stakes: It’s not just a vampiric conspiracy you’re struggling against; it’s the literal end of the world.

The only drawback, unfortunately, is that the continuity is, once again, a little sloppy.

For example, in the opening scenario the Loyalists frame the PCs for destroying the MAR-VX virus and all the research that would allow the conspiracy to recreate it. Which kinda undermines the campaign stakes I was just lauding, but then there’s a scenario where the PCs have to stop the vampires from getting their hands on a sample of the MAR-V virus that the MAR-VX virus was based on. (But I thought all the research showing how to turn MAR-V into MAR-VX was destroyed?) And then later none of that actually matters, because in the final scenario “the last surviving canister of augmented MAR-VX” just shows up no matter what the PCs have done.

THE SLOW DECAY

I read The Zalozhniy Quartet and The Persephone Extraction back-to-back to see which campaign I would be running this summer.

For the first half of the book, I was terribly excited about The Persephone Extraction and it was easily outpacing the Quartet: The overall design was far stronger and more coherent. The concept for its vampires electrifyingly original. The scenarios interesting and varied.

In the back half of The Persephone Extraction, unfortunately, the promise of the pomegranate blossom wilted pretty fast. As the campaign moves forward, both the mythology and the logistics of the conspiracy seem to melt down into an inchoate mess.

Some of this is the result of the myriad continuity errors we’ve already discussed, but another factor seems to be the designers’ desire to prep heaping mounds of contingencies on top of a vaguely defined mythology.

The failure to achieve a coherent metaphysic for the mythology is perhaps best exemplified in the second-to-last scenario, which is designed to allow the PCs to pass through a gate and into the Underworld from which the vampiric spirits come. This Orphic journey is insanely ambitious and the excitement I experienced in reading the initial pitch for this scenario was immense. Unfortunately, the book just can’t nail down what’s actually happening to the PCs and, like the dog who’s just caught a car and has just realized that they don’t know what happens next, the designer seems to have no idea how to actually realize the epic scope of what they’re grasping for, and so we end up with a weird railroad built on top of amorphous geography.

Contingency-based-prep, on the other hand, is when you “try to second-guess your players and develop mutually contradictory material for every possible choice they might make.” The Persephone Extraction’s plot-based prep combined with the directive that the scenarios should be playable “in any order” (or skipped entirely) unfortunately takes the perfectly legitimate desire to have the PCs’ actions in the previous scenarios impact the final scenario and makes it cancerous.

They still might have pulled off this nigh-impossible juggling act if they weren’t balancing on the house of cards formed from their ill-defined mythology. The result is a final scenario that just doesn’t really make much sense: Baffling stuff just sort of arbitrarily happens while the GM is awkwardly shoving the PCs around. This becomes a feedback loop, because the less stuff makes sense, the more confused the players will become, and the more the GM will need to shove them into situations they don’t (and can’t) understand.

Sadly, despite so much of this confusion being in service of “making the PCs’ actions matter,” the designers — trapped in their plot-based prep — ultimately can’t even deliver on that promise (as evidenced by the aforementioned canister of MAR-VX that materializes out of thin air because the plot requires it).

So, ultimately, we are left with the incredible concepts at the heart of the campaign and the very strong opening giving way to a disappointing finale, with my own opinion slipping from “must run ASAP” to “maybe I’ll fix this some day.”

Hopefully this review has captured this dichotomy — not only reflecting my ultimate disappointment, but also my excitement at The Persephone Extraction’s very real strengths.

In the end, I give The Persephone Extraction a cautious recommendation. But my own decision, ultimately, was to run The Zalozhniy Quartet, and that’s also what I’d recommend to anyone else trying to figure out which Night’s Black Agents mini-campaign they should check out first.

Grade: C+

Story Design: Gareth Ryder-Hanrahan
Designers: Heather Albano, Gareth Ryder-Hanrahan, Emma Marlow, Will Plant, Bill White

Publisher: Pelgrane Press
Cost: $29.99
Page Count: 160

Curse Den - Oldtown

Go to Table of Contents

StaffLocation
1d2 Hostesses + BartenderArea 1
Vladaam MageArea 1 (25%) or Area 3 (50%) 1
2 Vladaam Advanced GuardsArea 3 2
2 Vladaam GuardsArea 4
HostessArea 5
CustomersLocations
4d6 CustomersArea 1
Dilar 3Area 1 (25% chance)
2d8-1 Customers + HostessArea 2 (10%)
3d8 CustomersArea 5

1 Carries key for the safe in Area 2, Letter from Marcus Corellius, and Imperium from Archmage Ustallo.
2 Carries dreadwood quiver and 10 dreadwood arrows. A small note inside one of them reads “courtesy of Bloodfury on Vanguard Street.” (See Part 10: Guild – Dreadwood Grove.)
3 See Part 16: Slave Trade – Warehouse and also Night of Dissolution, p. 37.

Curse Den - Oldtown

Curse Den – Oldtown
Yarrow Street – D9

AREA 1 – DRAGONSCALES TABLES

This main chamber appears to be an upscales dragonscales parlor. The bar serves a selection of fine wines (ranging in price from 10 gp per bottle to 500 gp per bottle).

DC 22 INTELLIGENCE (INVESTIGATION): The secret door to Area 2 is part of the finely polished wood paneling lining the room. It’s operated by a hidden switch under the bar.

DRAGONSCALES: Most games are Green or Blue Dragonscales, although occasional large matches of Red, Silver, or even Gold Dragonscales are not unknown.

DRAGONSCALE SETS: This room contains ten Gold Dragonscales sets. Each is worth 250 gp.

AREA 2 – SLAVE SNUFF

The mahogany table in the center of the room is equipped with large manacles, designed to bind someone firmly to the surface. A large, bulging aumbry is set against the far wall.

AUMBRY: Contains 20 doses of agony, 100 doses of abyss dust, and 12 curse jewels.

  • DC 20 Intelligence (Investigation): The aumbry has a secret compartment which contains a curse globe.
  • DC 24 Intelligence (Investigation): On the wall behind the aumbry, there is safe containing 8d10 x 10 pp in mostly gold and silver coins. (DC 35 Thieves’ Tools)

TABLE – DC 25 Intelligence (Investigation): The table has a hidden compartment where a slave manacled to its surface can be quickly dropped out of sight. (The compartment has a permanent silence spell cast on it.)

DM Background: Groups (or, more rarely, individuals) will use this room to use curse jewels on a single slave bound to the surface of the table. This often results in the death of the slave and the groups pay extra for their murderous highs. The “ritual” is often accompanied by doses of agony.

AREA 3 – DRUG STORAGE

This room contains:

  • 10,000 doses of abyss dust
  • 50 doses of agony
  • 6,000 gp worth of fine wines

DC 18 INTELLIGENCE (INVESTIGATION): There’s a secret compartment under a number of barrels leading to a small basement containing 2d4 slaves. (There’s also a 50% chance that it contains an additional 1d2 corpses of slaves killed in Area 2 that have not yet been disposed of.)

Slaves here can described where they came from: Shipped in on the Eye of the East (see Part 9: Fleet of the Iron Sails) out of the slave pits of Amsyr. They were taken to the Slave Trade Warehouse (see Part 16: Slave Trade) before being shipped here.

AREA 4 – REAR COURTYARD

There are usually a few horses tied up to a fencing post.

  • Note: Oddly the horses are left there even in inclement weather despite the stable doors.

DM Background: If the password “Wyvern” is given here, one is sold abyss dust by the “stablehands” and led through the door to Area 4.

AREA 5 – ABYSS DUST COTS

The old stables have been retrofitted with a number of cots designed for blitzed abyss dust users.

HANDOUTS

LETTER FROM MARCUS CORELLIUS

Galos,

I want a full accounting of Dilar’s debts sent to me at the den on Outer Ring Row as soon as possible, but leave him unmolested. At least for the moment. He still enjoys the protection of our mutual friends, after all.

Thank you for bringing this matter to my attention.

Marcus Corellius

DM Note: The “den on Outer Ring Row” is the Rivergate curse den.

IMPERIUM FROM ARCHMAGE USTALLO

Brother Galos,

I have heard sterling reports of your performance from Marcus. You will have to regale me with the tale of petrifying the pickpocket. The Den Master was able to entertain me greatly with his telling of it, but I want to savor every delightful detail of what ensued.

When you do return to the guild house, also bring with you ten doses of abyss dust. I am sure it will enhance your tale. (Leaving him to rot in the stables! Superb!) What a wonderful message to send to Knapp and his lackeys.

Imperium of the Archmage Ustallo
Red Company of Magi

DM Note: “Marcus” is Den Master Marcus Corellius. “Knapp” refers to Haymann Knapp of the Longfingers Guild (Ptolus, p. 123). Archmage Ustallo and the guildhouse on End Street can be found in Part 13: Red Company of Magi.


Go to Part 8C: Curse Den – Rivergate


Curse Den - Guildsman District

Go to Table of Contents

StaffLocation
4 HostessesArea 1
2 HostessesArea 4
4 Guards + 2 Advanced GuardsArea 5
Vladaam MageArea 5 (75%)1
SlavesArea 2 (see text)
CustomersLocation
4d6 Customers 2Area 1
2d8 CustomersArea 4 (75% -1d8)
2d8-2 CustomersArea 2 - Drug Dens
2d8-2 CustomersArea 3 - Slave Chambers

1 Carries key for the safe in Area 5.
2 One of these customers is an apprentice from Alchemical Lab 1: Bodyworks. Wears a Vladaam deot ring.

Curse Den - Guildsman District

Curse Den – Guildsman District
Nethar Street – U7

AREA 1 – HALL OF THE CURSE GLOBE

Sweet-scented incense burners in the form of copper phoenixes with smoke pouring from their mouths flank the doors, filling this long, gloomy hall with a multi-colored haze.

Various divans and curved couches covered with rich, darkly-hued velvets have been pleasingly arranged in small groupings around the chamber.

In the center of the room, dominating the décor, four brass dragon claws curl up to support a large, crystalline sphere filled with murky, swirling shadows. The sphere is eerily lit from below by an arcane circle that glows with an effervescent blue light.

CUSTOMERS: Most of the users in this central chamber are snakeweed smokers, with a few shivvel smokers mixed in.

GLOBE: This is a curse globe. The “arcane circle” is entirely decorative.

AREA 2 – DRUG DENS

DOORS: The doors to these rooms seal tightly to prevent abyss dust from escaping.

INTERIOR: Some of these chambers have low couches, but others are basically “drug barracks” with two or three cots where drug users can simply collapse into their stupors.

AREA 2A: On the wall here, a drug user has scrawled a twisted, charcoal mosaic of dark, shadowy figures threatening a city represented by a warped (almost demonic) skyline.

AREA 3 – SLAVE CHAMBERS

DOORS: The doors to these rooms seal tightly.

SLAVES: Each chamber has a slave. Some are bound to the beds. Others are kept in drugged stupors. Some are chained to the walls or suspended from the ceiling. They are rented out so that people can use curse jewels on them, although additional forms of (non-lethal) torture can also be obtained if the appropriate price is paid.

The slaves are generally suffering from 2d6 Wisdom and 2d6 Intelligence damage (and are likely to have damage to other ability scores). Any slave with an effective score of 4 or less in either Wisdom or Intelligence is either too insane or too damaged to provide accurate testimony.

Other slaves can describe where they came from: Some were shipped in on the Pride of Morrain (see Part 9: Fleet of Iron Sails). Some where sold through the Ennin Slave Market (Ptolus, p. 399). Some were taken to the Vladaam’s Slave Trade Warehouse (see Part 16: Slave Trade) before being shipped here.

AREA 4 – BERTRANT GAME

A double bertrant table in the shape of an infinity symbol fills this room. Croupiers stand in the eyes of the infinity symbol and the table can support one large game or two smaller games.

AREA 5 – DRUG STORAGE

This area contains:

  • 2,000 doses of abyss dust.
  • 30 doses of agony.
  • 5,000 doses of shivvel.
  • 15,000 doses of snakeweed.
  • 8 curse jewels.

SAFE: Hidden in the wall. DC 20 Wisdom (Perception) to find on a search. DC 30 Dexterity (Thieves’ Tools) to open.

  • Contains 5d10 x 10 pp in gold and silver coins.

Go to Part 8B: Curse Den – Oldtown

Framing Combat Encounters

July 29th, 2023

Warrior in Ink - warmtail

Everybody knows how an encounter starts: The goblins (or the SWAT team or the cyborg death squad) come through the door, snarl, and attack. Roll initiative!

Or the PCs are walking through the jungle when they suddenly see, or are ambushed by, the goblins (or the special ops team or the cyborg death squad). Roll initiative!

Or the PCs kick down the door, the goblins look up, snarl, and… Well, you get the idea.

All of these, however, are bang-bang encounters: The PCs see the bad guys (bang) and combat immediately begins (bang).

Nothing wrong with a good bang-bang interaction, of course, but this is just one way of initiating an encounter. If all of your encounters are bang-bang encounters, then you’re missing out on some fun options and your adventures will be unnecessarily one-dimensional. There can also be some tack-on effects in terms of game balance and scenario design that you may find surprising if you’ve only experienced bang-bang encounters.

STARTING OLD SCHOOL ENCOUNTERS

If we look back at the oldest editions of D&D, we’ll discover that they featured a procedural method for triggering encounters. The exact methods varied from one version of the game to another, but broadly speaking the procedure would look something like this:

  1. Determine surprise. This could result in the monsters becoming aware of the PCs before the PCs become aware of the monsters; the PCs becoming aware of the monsters first; or both becoming aware of each other simultaneously.
  2. Randomly determine the encounter distance. (For example, in a dungeon the encounter might start at 1d6 x 20 ft.) This could notably generate results farther than the current limits of the PCs’ line of sight, implying that the PCs would hear the monsters before seeing them (or vice versa).
  3. Make a reaction check, which could result in monsters being, for example, Friendly, Neutral, Cautious, Threatening, Hostile, or Immediately Attacking. (The players, of course, would determine how their characters would react.)

You can see how a GM, by simply following procedures like these, would generate a huge variety in how their encounters would be initiated.

What may be less immediately obvious is the effect this has on actual gameplay:

  • Spotting the goblin warg riders at a thousand feet creates a completely different combat dynamic than noticing those same warg riders when they’re only fifty feet away.
  • Hearing a group of kobolds arguing on the far side of a door in the dungeon gives the PCs an opportunity to barricade the door, ambush them, sneak past them, eavesdrop for information, or any number of other options.
  • Compared to an ogre who immediately attacks, a threatening ogre who says, “You don’t belong here! Get out and never come back!” offers the PCs a completely different range of potential responses, from drawing their weapons to attempting negotiations to accepting his offer and beating a hasty retreat.

And so forth.

The nifty thing to note here is that the GM doesn’t have to design all these different types of encounters. Instead, a simple, procedural variation in a handful of initial encounter conditions creates the opportunity for the players to approach each encounter in significantly different ways. Combined with different creatures, environments, and continuity, you end up with an essentially infinite variety of encounters with little or no effort.

This also has a direct impact on encounter balance.

For example, when discussing hexcrawl campaigns (or other sandbox structures where the encounters aren’t geared specifically to the PCs), I’m often asked what will happen if low-level PCs stumble into a section of the hexcrawl designed for higher-level characters or get a bad result on the random encounter tables. That’s surely just a TPK waiting to happen, right?

If you’re running exclusively bang-bang encounters, there’s a lot of truth to that, and counteracting that will require the GM to significantly limit the dynamic range of their encounter design (e.g., the world levels up with the PCs) and/or take on the responsibility of manually creating all kinds of signals warning the PCs away from dangerous areas.

But the procedural encounter methods also had the practical effects of creating ablative layers between the PCs and TPK. For example, imagine a party of 1st-level PCs encountering a beholder. Actually getting into a lethal combat encounter with the beholder would mean:

  1. Randomly generating the lethal encounter. (Which was statistically less likely.)
  2. Not having the % Tracks check indicate that the PCs are encountering monster-sign instead of the monster itself. (A tracks result would, of course, procedurally warn the PCs that something big and dangerous is in the area.)
  3. Failing to gain surprise. (Which would allow the PCs to silently withdraw.)
  4. Generating an encounter distance close enough that the PCs couldn’t slip away.
  5. The reaction check needs to generate a hostile response. (Or the PCs need to provoke a hostile response.)

As D&D stripped these various structures out of the default mode of play, however, the game gravitated towards a mode of play in which the encounter simply existing is functionally equivalent to a PC dying.

Note: The original 1974 edition of D&D also featured a fully functional mechanical structure for retreating from combat, so even when the ablative layers of the encounter system and/or the players’ commonsense failed and they found themselves in over their heads, the PCs would still have the opportunity to escape the imminent catastrophe. But that’s a topic for another time.

CREATING YOUR PHASES

Again, the point here isn’t that bang-bang encounters are bad. The point is that variety is good, and bang-bang encounters are just one option among many.

The point also isn’t that the procedural encounter-framing of old school D&D is the One True Way™ of gaming. That point is that encounters are, in fact, framed, just like any other scene in your game.

This means all the advice about scene-framing from The Art of Rulings applies to combat encounters, too:

  • What is the agenda of the scene? (There are other options than “fight to the death,” even if you’re using the combat system.)
  • What is the bang? (Bang-bang is, as we already know, only one option.)
  • What are the elements of the scene? (These include both characters and location.)
  • How does the scene end? (Are victory and defeat the only options? And, if not, what options have you been overlooking?)

What I will say is that playing around with old-school-style encounter framing procedures is, in my experience, a good way to experiment, push yourself out of ingrained habits, and begin exploring new alternatives. But these are, of course, random in nature and, ultimately, simulationist/gamist in nature. Which means that there are, once again, a lot of alternatives here. For example, you can frame dramatically or make deliberate creative choices in your encounter framing. And there are also completely different procedural methods you could explore.

Looking at the lessons that can be learned from old-school procedures, however, one that I find particularly useful is that the beginning of an encounter is inherently phased. (Even the choice to do a bang-bang encounter is, ultimately, a choice — conscious or otherwise — to collapse all of those phases into a single moment.) These phases include:

  • Seeing monster-sign (they’re close!)
  • Line of sight
  • Encounter distance
  • Surprise (aka, who’s aware of who? and when? and how?)
  • NPC reaction/mood/morale

Think about how (and why) certain phases are skipped or become irrelevant in some encounters, but not others.

Do these phases need to occur in a specific sequence? What happens if you change the sequencing?

During what phases (or after which phases) are the PCs able to take action? Do their choices affect the sequence or phases or which phases occur? What about the NPC choices?

Are there other phases we haven’t identified here?

Rolling for initiative (or, more generally, moving into combat timing) is usually a key pivot point in a combat encounter. It’s a big, definitive bang. But it can be very empowering to remember that there are many encounters that could become combat encounters but don’t necessarily need to end up that way. (Monster reaction checks remind us of that procedurally.)

Similarly, even after initiative has been rolled, remember that scenes can have more than one bang! That might be:

  • reinforcements (whether more bad guys or allies or neutral parties who could go either way)
  • environmental changes (the lava is getting closer! the ceiling starts descending! poison gas fills the room!)
  • retreat
  • surrender
  • negotiation and/or hostage-taking
  • momentous death

The fact that most RPGs feature a highly structured system for resolving combat can be a very useful and powerful tool, but don’t let it become a trap. Remember that you control the framing of the scene and empower your players to shape the outcome of the scene in ways that transcend the combat mechanics.

Archives

Recent Posts


Recent Comments

Copyright © The Alexandrian. All rights reserved.