The Alexandrian

Archive for the ‘Roleplaying Games’ category

I’ve been thinking about jump travel in Mothership. Here’s a quick summary, as described in the core rulebooks:

  • Jump points are rated from Jump-1 to Jump-9.
  • Utilizing a jump point requires a jump drive of equal to higher rating.
  • For the crew of the ship, the jump always takes 2d10 days.
  • Jumps usually seem to take the same amount of time for the rest of the universe, but each jump carries the risk of an unusual time dilation: Ships might disappear for months or even years instead of days.
  • The longer/higher rated the jump, the more dangerous and severe the time dilation appears to be. It’s possible that some of the Jump-9 deep space exploration vehicles that have gone missing will reappear a thousand years in the future.

The rulebooks, however, leave these time dilation effects up to the GM’s discretion. I thought it might be useful to instead resolve the mechanically.

TIME DILATION

When a ship performs a jump, roll 1d10 per Jump rating (e.g., if a ship is making a Jump-3, roll 3d10).

For each 1 rolled on a d10, the actual trip duration increases by one step:

  • days
  • weeks
  • months
  • years
  • decades
  • centuries

If you’re making a standard Jump-1, you have a minimal risk of the trip taking 2d10 weeks instead of 2d10 days. If you attempt a Jump-3, on the other hand, there is a 1-in-1000 risk that you’ll roll three 1’s and return 2d10 years later.

Note: This does not change the subjective time experienced by the ship. For the crew, a jump trip seems to take 2d10 days, regardless of how much time passes in the wider universe.

Other Chaotic Effects: At the GM’s discretion, each 1 rolled on the time dilation check instead triggers a different chaotic effect. Examples might include:

  • a crew member is replaced by a completely different person
  • time dilation is inverted (the trip takes minutes or seconds instead of days) or reversed (they arrive before they left)
  • subjective time experienced by the crew is dilated instead
  • strange hallucinations or manifestations
  • crew is unexpected awoken from cryosleep during the voyage
  • the ship arrives in the wrong place

ASTRONAVIGATION

Calculating a jump requires an Intellect (Hyperspace) check. This check is made with [+} if the astronavigator remains awake during the jump, monitoring the astronavigation computers.

Success: You made it!

Critical Success: Roll one fewer d10 when making the time dilation check for the jump. For a Jump-1 trade route, roll 2d10 and only have the ship experience time dilation if both dice roll a 1.

Failure: Something goes wrong! The GM chooses one:

  • Double the number of dice rolled for the time dilation check.
  • The ship arrives in the wrong place. (1 in 10 chance you arrive back where you started after 4d10 days, having traversed a Calabi-Ricci spacetime loop.)
  • The ship is damaged by jump turbulence, roll a Repair (SBT, p. 39).

Critical Failure: You could have killed us all! All three consequences of Failure happen simultaneously.

TRADE ROUTES

According to the Shipbreaker’s Toolkit, “regular Jump-1 trade routes seem to wear down the chaotic effects” of jump travel. Navigational calculations become more precise with each additional jump that’s recorded along a route, and ships traveling through the jump point can effectively wear a “groove” into spacetime.

At the GM’s discretion, ships jumping along a route which has been “worn” by regular travel reduce the number of d10s rolled for the time dilation check by one. For a Jump-1 trade route, roll 2d10 and only have the ship experience time dilation if both dice roll a 1.

UNCHARTED JUMPS

Most interstellar travel happens along charted jump routes: Jump points that have well-plotted navigational solutions (even if they shift slightly due to stellar drift) and are known to be stable.

These are not the only jump points in space, however. Once you’re away from planets, asteroids, and stations, it turns out there are many unstable points in the fabric of space which are constantly being created, destroyed, and shifting according to complex spacetime geometries.

The GM determines the base Jump rating of the uncharted route. (This can usually default to the total value of all Jump-ratings along the known path from the current system to the destination system. For example, if you could normally get to the other system through a known Jump-1 route, the base Jump rating for an uncharted route would also be Jump-1. If you would normally need to make a Jump-1 followed by a Jump-3, then the base Jump rating for the route would be Jump-4.)

Plotting the uncharted jump requires an Intellect (Hyperspace) check. This includes identifying the location of the jump point you need to use, which you will then need to travel to (as shown on the table below). If you’re in the Inner System or in orbit around a planet, increase the time required by one step. (Weeks become months.)

Success: Add 1d2 to the base Jump rating. This is the Jump rating of the uncharted route, which is then resolved normally.

Critical Success: -1 to the base Jump rating (minimum 1). In addition, roll 1d10. On a roll of 1, the jump path you’ve discovered is a new stable route. (Depending on the value of the route, selling the location of this new jump point might be worth thousands or millions of credits.)

Failure: Add 1d5 to the required jump rating. If you roll 5, roll again and add the result to the jump rating. If the result is 10 or higher, you have been unable to find any jump points leading to your desired destination.

Critical Failure: You thought you could get from here to there via a safe jump, but you were very wrong. Your Astronavigation check automatically fails. In addition, determine the jump rating as per a Failure, but you attempted the jump no matter what the result is. If the result was higher than the rating of your Jump drive, your ship suffers 1d2 MDMG and emerges from hyperspace in a completely random and unexpected location. (This is a good way to end up adrift in interstellar space.)

Dark Leaf mercenary with a bow

Go to Table of Contents

The slave trade in Ptolus is a gray market: It’s illegal to sell a slave within the city limits, but not illegal to own one (although more and more people disapprove or outright loathe the practice). The local trade is dominated by the Ennin, whose operations extend far beyond Ptolus and openly use the city as a distribution center while also maintaining a surreptitious black market.

The Vladaams don’t directly trade slaves, per se, but have deeply entwined themselves with the Ennin’s operations. There are some who consider the Ennin little than a front for the Vladaam, but this is not accurate. The Ennin are actually, unbeknownst to the Vladaams, a front for the Pactlords of the Quaan (Ptolus, p. 125). Most of the Ennin’s leadership are, in fact, Pactslaves.

For their part, the Vladaams are involved with the slave trade in two ways:

  • The Vladaams maintain a warehouse as a place where the Ennin can temporarily store slaves who are going to be sold at the Ennin Slave Market (Ptolus, p. 399)
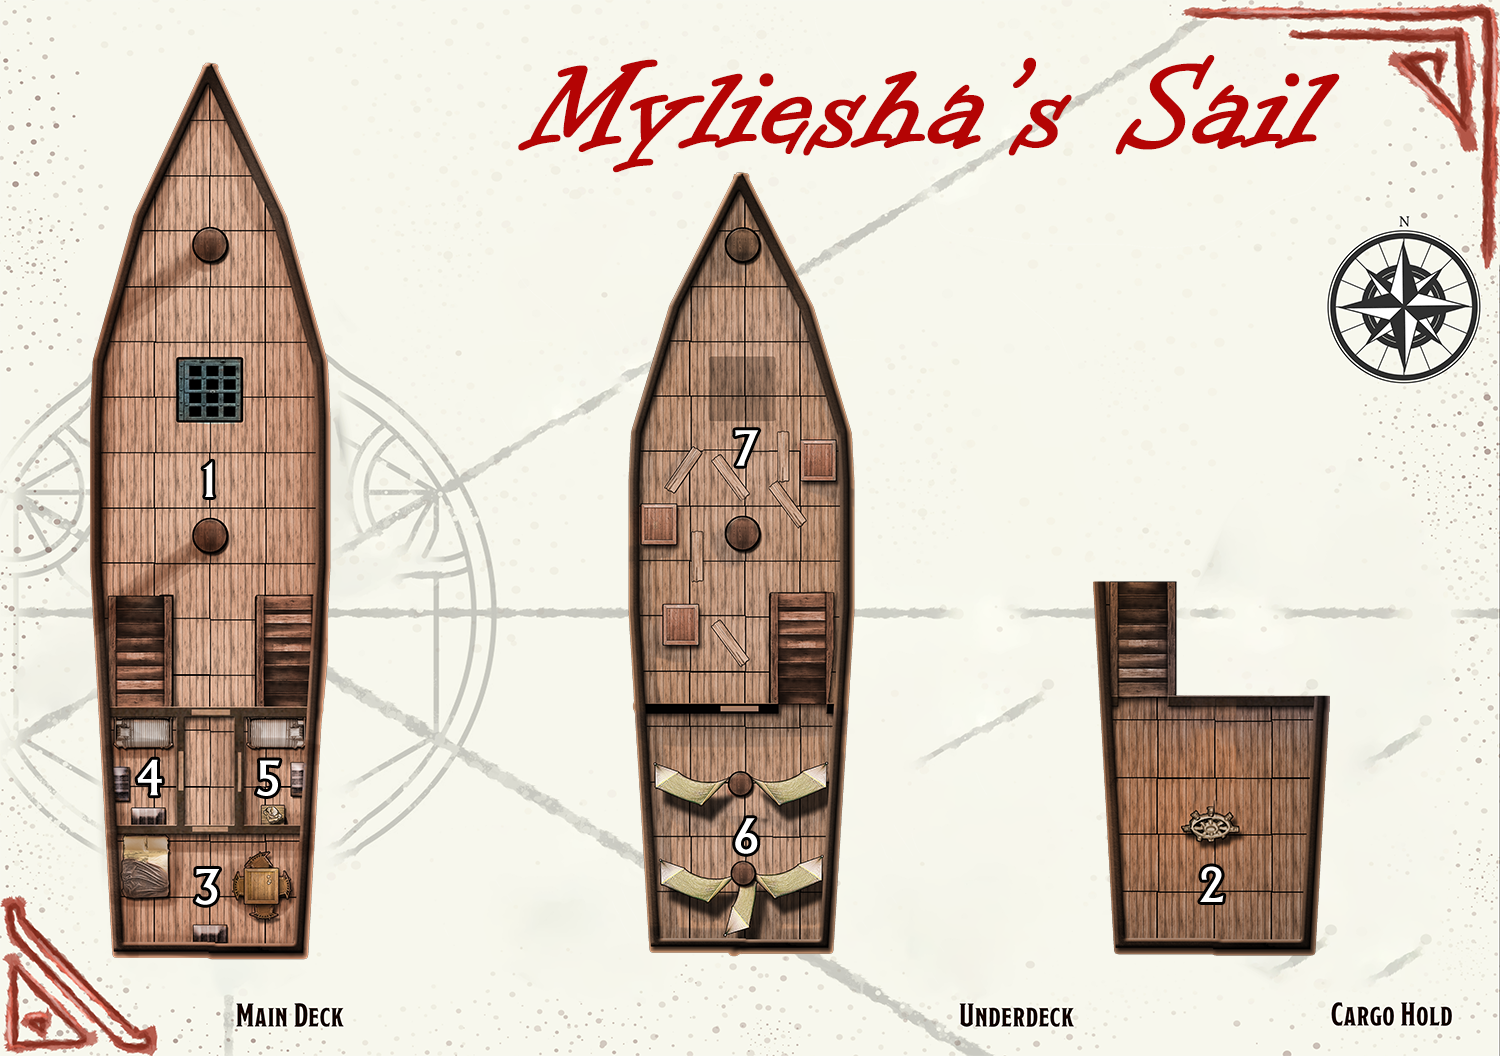
  • The Fleet of Iron Sails – specifically the Pride of Morrain, Eye of the East, and Sarathyn’s Sail – are regularly used to transport slaves for the Ennin. These ships collect slaves from the Serpent’s Teeth and deliver them to the Ennin Headquarters (Ptolus, p. 168).

The Vladaam operations are detailed below, while details of the Ennin facilities can be found in the Ptolus sourcebook, as indicated above.

VLADAAM SLAVE SHIPS

The Pride of Morrain, Eye of the East, and Myliesha’s Sail each have a 50% chance of carrying a cargo of slaves. Otherwise, they’re currently carrying normal goods. Check The Fleet of Iron Sails to determine how often they can be found at port in Ptolus.

SMELL OF THE SLAVE SHIPS: The Vladaam Mages assigned to these ships regularly cast prestidigitation to clean out the holds, but it’s not enough to purge the sickening stench that clings to the slave holds – a mix of filth, excrement, blood, and putrescence.

CREWS

Captain: As detailed for each vessel.

Vladaam Mage: Use mage stats, MM p. 347. See Part 13: Red Company of Magi.

Vladaam Guards (1d6-2): Banewarrens, p. 45.

Advanced Vladaam Guards (1d6-2): Use knight stats, MM p. 347.

Sailors (2d8 x 3): Use commoner stats, MM p. 345.

  • Proficiency: Athletics, Perception, Navigator’s tools, vehicles (water).
  • Equipment: dagger, corncob pipe, chewing tobacco, 2d10 sp, Vladaam deot ring

SLAVE RUNS

  • Half Load: 2d4 x 10 slaves
  • Full Load: 4d8 x 10 slaves

VLADAAM SLAVE WAREHOUSE

Map of the Vladaam Slave Warehouse

This facility can temporarily store slaves who are going to be sold at the Ennin Slave Market. It’s used as either an overflow storage facility or as a place where the current stock of the Slave Market can be evacuated if the market is threatened by law enforcement. The Vladaams offer this service gratis in exchange for being allowed to use the slaves to process Liquid Pain (in area 9).

DARK LEAF: In order to distance the facility from the Vladaams, the security is managed by Dark Leaf mercenaries (Ptolus, p. 108) overseen by a centaur named Dilar.

DILAR: Dilar is a captain in Dark Leaf and in charge of the mercenaries here, but he is also deeply in debt as a result of gambling at the Oldtown curse den. Unbeknownst to either the Vladaams or Dark Leaf, Dilar is also involved with the chaos cults. (He appears in Night of Dissolution, p. 37, overseeing a meeting at a secret meeting hall just across the street from this warehouse.)

MALAR: Malar is lieutenant in Dark Leaf. He and the centaur used to be friends, but tensions and suspicions surrounding Dilar’s debts and cult activity have driven them apart. Malar would like to either supplant Dilar in Dark Leaf or make the hop to a better position with either the Vladaams or Ennin.

DENIZENS OF THE WAREHOUSE

DENIZENSLOCATION
2 Dark Leaf MercenariesEntrance
2 Dark Leaf MercenariesArea 1
2d6 unskilled laborersAreas 1 & 2 (day only)
6 Dark Leaf MercenariesArea 7
2 Vladaam Mages + 50% chance of 1d4 slavesArea 9

DILAR (d100)

  • 01-25: Area 1
  • 26-75: Area 7
  • 76-00: Not present

MALAR (d100)

  • 01-50: Area 7
  • 51-75: Area 9
  • 76-00: Not present

Dilar: Use veteran stats (MM, p. 350) with centaur traits.

  • +1 greatsword: Melee Weapon Attack: +6 to hit, reach 5 ft., one target. Hit: 11 (2d6+4) slashing damage.
  • Alignment: Chaotic Evil
  • Equipment: splint armor, +1 greatsword, ring of jumping, broken square ring, coiled viper amulet worth 10 gp, Vladaam house ring, 1 gp, 14 sp
  • Languages: Common, Elven

Centaur traits:

  • Charge: If Dilar moves at least 30 ft. straight toward a target and then hits them with a melee attack on the same turn, they target gains an extra 10 (3d6) piercing damage.
  • Multiattack: Dilar makes two attacks, one with his sword and one with his hooves.
  • Hooves: Melee Weapon Attack: +6 to hit, reach 5 ft., one target. Hit: 11 (2d6+4) bludgeoning damage.

Dark Leaf Mercenary: Use veteran stats (MM, p. 350) with wood elf traits.

  • Speed 35 ft.
  • darkvision 60 ft.
  • Spells: druidcraft, detect magic (1/day)
  • Fey Ancestry: Advantage on saving throws vs. Charmed condition.
  • Trance: Immune to sleep. Finish Long Rest in 4 hours.
  • Equipment: Vladaam house ring
  • Languages: Common, Elven

Malar: Use master thief stats (Ptolus, p. 612).

  • Malar has a Balacazar fiendish slave amulet (Ptolus, p. 398) which allows him to summon a Shoggti (Book of Fiends 5E, p. 199). The shoggti emerges by having its tentacles erupt through the surface of the amulet. There is an ornate B stamped on the back of the amulet, certifying it as a creation of the Balacazars.
  • Equipment: Vladaam house ring

Unskilled Laborer: Use commoner stats (MM, p. 353).

Vladaam Mage: Use mage stats, MM p. 347. See Part 13: Red Company of Magi.

Street map with the location of the Vladaam Slave Warehouse

Ptolus Map – H6

AREA 1 – WAREHOUSE

This front area operates as a legitimate warehousing business, run by the Vladaams and servicing various local businesses and markets. The ceiling is 50 feet high.

AREA 2 – UPPER WAREHOUSE

This area is basically a very large “ledge” about ten feet above the level of Area 1.

GM Background: This elevated area exists only to make room for the lower storerooms (Areas 4-6). Architecturally this doesn’t make much sense, though. The unintuitive layout exists only to obfuscate the existence of the slave warehouse below.

AREA 3 – STAIRS

These stairs lead down to Area 4.

ALARM: The head of an antlered buck has been hung on the wall of the landing. It has an alarm spell that sends a mental alarm to Dilar. The alarm is triggered by anyone who doesn’t wear a Vladaam house ring.

GM Note: The laborers never use these stairs.

AREA 4 – LOWER HALLWAY

This stone hallway is rarely used.

AREA 5 – LOWER STOREROOMS

These storerooms have the appearance of being used for legitimate storage (barrels, casks, boxes, crates, etc.). Any inspection, however, reveals that there’s a thick coating of dust on everything. Opening the crates reveals that they contain mostly garbage and miscellaneous junk.

GM Background: These storerooms exist only to provide a pleasant fiction masking the entrance to the slave warehouse in Area 6.

AREA 6 – ENTRANCE TO THE SLAVE WAREHOUSE

At first glance, this area is identical to Area 5.

DC 20 Intelligence (Investigation): Several crates along the back wall are fastened together. They can be unlatched from the wall and then slid away to reveal the stairs leading down to Area 7.

AREA 7 – SLAVE WAREHOUSE

A floor of bare stone, worn smooth with a single trap door in it to the right of the stairs. A board with various papers and bills of sale pinned to it has been placed on the wall next to the stairs. A bank of ten levers on the wall to the left. Multiple cell doors line the far wall, extending down a hallway to the right.

LEVERS: A bank of ten levers. They require a key (which is held by someone in this room; with a duplicate held by Dilar) and open the nine cell doors and the secret door.

TRAP DOOR: A spiral stair below the trap door leads down to Area 9.

SECRET DOORDC 20 Intelligence (Investigation): The secret door to the east leads to a section of old sewer that was capped and bypassed during a sewer renovation long ago. A section of this sewer breaks through into a portion of Ghul’s Labyrinth, which provides access to the Ennin Slave Market.

POSTED BILLS: Includes the Business of the Vladaam Slave Warehouse handout.

IRON COFFER (10%): There’s a 10% chance an iron coffer is present containing 500 gp, 40,000 sp, and 50,000 cp with instructions to have the Ithildin couriers ship it to the Red Company of Goldsmiths on Gold Street.

AREA 8 – SLAVE CELLS

The facility typically holds 2d20 slaves as an overflow facility from the Ennin Slave Market.

  • 75% chance per ship that some of the slaves here were shipped in on the Pride of Morrain, the Eye of the East, or the Myliesha’s Sail. (See Vladaam Slave Ships, below.)

BIG CELL: 25% chance that the large cell holds a special creature/slave. If this is the case, double the number of mercenaries in this room. Examples of such “special guests” could include:

  • 1d4 cockatrices
  • 1d4+1 ogres
  • 1d2 hippogriffs
  • Giant Ant Queen

AREA 9 – LIQUID PAIN FACILITY

The main area of this chamber is outfitted as a high-end alchemy laboratory.

COTS: Two eastern niches contain cots on which Vladaam Mages sleep. Small trunks slid under each cot contain (see handouts):

LIQUID PAIN APPARATUS: The western niche contains four upright glass cylinders, each large enough to hold an erect man or woman. Shackles suspended from the ceiling allow the Vladaams to string up slaves upside down within each cylinder, while various tubes, syringes, and metallic attachments can be fastened onto someone so hung.

  • Liquid Pain: The apparatus allows one to withdraw 2d8 doses of agony (“liquid pain”) from a person suspended within one of the glass cylinders. The procedure lasts for ten minutes and the victim must make a DC 18 Wisdom saving throw or suffer 2d6 Constitution damage. (This is treated as psychic damage for the purposes of immunity and resistance.) On a successful save both the damage and the yield are halved.

Next: Vladaam Slave Ships

Armored science fiction figure

In Mothership, armor is rated in Armor Points (AP). Any damage you suffer is reduced by your current AP. However, if you suffer damage equal to or greater than the Armor’s AP, then the Armor is immediately destroyed.

I’ve been running Mothership for a while, though, and I’ve decided I don’t like this rule. The primary problem is that damage values in the system are high enough that armor is almost always immediately destroyed in the first hit. The intention is almost certainly to crank up the feeling of horror (not even your advanced battle dress can save you now!), but in practice it just feels cheap and kind of confusing. I’ve had multiple players new to the system who become completely baffled the first time they go into a fight, because it just feels as if something is wrong.

I’ve begun using the house rule below in my Mothership games, and we’ve had some pretty good success with it. It maintains the imagery of xenomorphs and nanoplagues slowly ripping their way through a PC’s armor, but it extends the experience over several rounds (which gives really great vibes at the table) without making armor feel pointless.

(And it works the other way, too, with PCs needing to apply significant force over time to cut their way through enemy AP!)

If you use these rules, let me know how it goes! I’m planning to continue tweaking these.

HOUSE RULE: ABLATIVE AP

If a character wearing armor takes damage equal to or greater than their AP value (including Cover), their armor becomes damaged and the AP of the armor is reduced by 1.

The armor is permanently destroyed if its AP is reduced to 0.

ANTI-ARMOR: An anti-armor weapon ignores AP. It automatically reduces AP by 1 on any hit and by an additional 1 point if it deals damage equal to or greater than the character’s AP value. On a critical hit, anti-armor weapons instantly destroy any armor, regardless of its AP value.

REPAIR: Damaged armor can be repaired with appropriate facilities for half the original cost of the armor.

Note: This rule does not apply to Cover. Cover is still immediately destroyed if an attack deals damage equal to or larger than the Cover’s AP rating.

The Horror Beneath - Eric Metcalf (Nightshift Games)

The Horror Beneath spends a lot of time shooting itself in the foot.

Review Originally Published May 21st, 2001

This adventure, to put it bluntly, is a mess:

1. You’ve got a bunch of maps. Tragically, three of them are completely illegible. Actually, I don’t know if “illegible” is the right word, because they’re also completely unkeyed. Let’s just say that — between the fact that they are unkeyed and reproduced in a muddy and indistinct greyscale — it’s nearly impossible to figure out what information they’re supposed to be conveying. The fourth map is of a dungeon. This one is keyed with numbers. For reasons beyond the scope of imagination, however, these numbers are not referenced in a standard D&D format. Instead, Metcalf has decided to describe his dungeon in, basically, a stream of consciousness format – dropping the numbers into the middle of the text between a couple of parentheses whenever he feels its convenient. Simply incredible. It takes true skill to deliberately go out of your way like this to make a product as unusable as possible.

2. Metcalf seems to have persistent problems with the English language. My favorite examples are his nebulous sentence structures, which result in treats like this: “He is unarmed and has no weapon proficiencies. He doesn’t think he needs them.” Needs weapons or needs weapon proficiencies? “Steorra’s temple is the oldest and largest in Ravendale.” Oldest and largest… what? Building? Temple in general? Steorra’s temple in general? You’d assume the second, but this passage is made particularly hilarious by the sentence which appears two paragraphs later: “Temple of Saint Tollan: Ravendale’s newest temple, as well as the largest.”

3. What’s truly bizarre is that the adventure spends a bunch of time discussing Ravendale… which serves absolutely no purpose except as a place for the PCs to pick up an undefined adventure seed which is going to take them to another town: Scarborough.

4. When the PCs reach Scarborough they find the entire town deserted… except for one family, the Tendermores. They discover this when they find the Tendermore’s fourteen-year-old daughter drawing water — by herself — from the well. First off, this staggers my suspension of disbelief: Everyone in town has been dragged off by zombies except your family, and your daughter is wandering around by herself? The daughter will take them back to her house, where the PCs will meet her father Jonathon. To add insult to injury, however, Metcalf closes this description with: “…he believes that he and his “boys” can hold their own.” Who are his “boys”? I dunno. Are they literally his sons, or do the quotation marks imply something else? I dunno. Is the wife of the house still alive and around? I dunno. Are there any other daughters? I dunno.

5. As if Metcalf’s lock-lipped descriptions are not bizarre enough, we then get the sequence of events that night when the zombies come: “The Tendermores are not very effective archers, the zombies should have no trouble advancing to the front of the house.” So, in other words, they’ve had no problems holding them off this long – but as soon as the PCs show up, the Tendermores are doomed? Apparently so, because no matter what the PCs do, they will “see two of the Tendermore women taken by the zombies.”

6. Actually, they’re not zombies. They’re grub hosts – which are just like zombies, except they can’t be turned. They are also the way that the Brood Queen (who’s hiding out in that dungeon, which is supposed to be part of an abandoned dwarven citadel, but doesn’t look it) creates her young (the Brood Warriors).

Basically, The Horror Beneath had a semi-decent idea (Aliens in a fantasy setting), but then simply fumbled the ball in executing it. Actually, let me rephrase that: They didn’t fumble the ball. They deliberately tossed it on the floor, tripped over it, broke their leg, stumbled over their target audience, and plunged off a cliff.

It would have been better if the maps had been legible. It would have been better if the presentation had been smoother. Heck, it would have been better if the plot had been comprehensible.

In short: Don’t buy The Horror Beneath.

Style: 2
Substance: 1

Title: The Horror Beneath
Authors: Eric Metcalf
Company: Nightshift Games
Line: D20
Price: $8.95
ISBN: 192933228-9
Production Code: CFE4001
Pages: 32

Style 2? I was apparently feeling generous that day.

I feel bad for Eric Metcalf. He was one of the very first adopters of the OGL and D20 System Trademark License, making the superhero RPG The Foundation and The Horror Beneath two of the earliest third-party 3rd Edition supplements, before the market became glutted with competitors. Unfortunately, this just meant that the entire hobby’s eyes fell upon what were extremely neophyte efforts. Sort of like grabbing someone who just took their first singing lessons and thrusting them onto a Broadway stage. Yeah, the result is terrible. But you can still empathize.

Re-reading this review, it was also interesting seeing my early reaction to someone forgetting how to key a dungeon. Notably, back in 2001, I don’t recall anyone trying to justify this.

For an explanation of where these reviews came from and why you can no longer find them at RPGNet, click here.

Unidentifiable woman prepping an RPG campaign

In the last month alone I’ve had three people tell me they were feeling overwhelmed trying to prep an entire campaign and ask me if I had any advice for how to push through that prep when all you really want to do is start playing!

Well, the good news is that at least nine times out of ten, you don’t need to push through that prep. You almost certainly can — and should! — start playing a lot sooner than you think.

I think the prevalence of this “I’ve gotta prep the whole campaign before the first session!” mindset is due, at least in part, to the prevalence of published campaigns, particularly for D&D 5th Edition. Obviously if you’re publishing a book, you need to write the whole book before you send it to the printer. Looking at these printed books, however, it can be easy for a new GM to think that this must be a model of what they should prep for their own campaigns: Literally hundreds of pages of notes detailing adventures that will take months or possibly even years to play through at the table.

And, yeah, that’s a pretty daunting prospect.

In So You Want to Be a Game Master, I actually recommend almost the exact opposite approach for first-time GMs: Start with a one-shot. Prep it, run it, and only then prep the next one. I think this is particularly important if you’re a new GM, because you’re going to be learning a lot in your first few sessions of play: What works and what doesn’t. What the players loved and what blew up in your face. What you need and what you don’t.

You’re going to want to be able to immediately apply those lessons to the next session and the next adventure so that you can keep growing and learning as a GM, and it’s a lot more difficult to do that if you’ve already prepped two dozen adventures before ever sitting down at the table. If you instead lean into an episodic campaign structure, you’ll be freeing yourself to learn and explore — and you’ll also able to embrace your excitement and start playing as soon as possible!

HOW MUCH DO I PREP?

But let’s say that you want to run a larger, more interconnected campaign.

You want to run a larger, more interconnected campaign.

– Leslie Nielsen (probably)

You still don’t have to prep the whole thing ahead of time. This raises the question, of course: How much do you need to prep?

In my opinion, you’ll want to start by creating a broad, comprehensive overview or outline of the entire campaign. What this looks like, exactly, will depend on what the primary structure of your campaign is going to be, but it will generally be no more than one or two pages in length.

With your outline in hand, you’re then going to prep just enough material for the first session. But what does that mean? Once again, it depends on the campaign structure.

For example, if you’re planning a megadungeon campaign, then your campaign overview is going to be a list of all the different levels in the dungeon. This might include short, one- or two-sentence descriptions of each level, and you might even put together a side view showing how the various levels connect to each other. This initial list might expand and the connections might shift over time, but this gives you a place to start.

Arneson and Gygax, way back in the 1974 edition of D&D, recommended having three levels of your megadungeon prepped before running your first session, and that’s still pretty solid advice: Most groups, during their first session, will likely never leave the first level of the dungeon, but there’s a chance that they might find a staircase down to the second level and decide to check it out. So you want to be prepared for that. You might even have a situation where, through pure dumb luck, that group makes a direct beeline to another staircase and ends up down on the third level. No reason not to have your bases covered.

In addition to not wanting the players to go charging off the edges of your prepared content, prepping a little bit ahead like this also lets you backfill and foreshadow, knitting the dungeon together into a more coherent environment. (For example, once you’ve prepped the dragonborn cultists on the second level of the dungeon, you might seed the goblin treasure on the first level with Tiamat artifacts they’ve captured from the cultists.)

If the level connections of your megadungeon are heavily xandered, I recommend modifying this advice: Prep the entrance level of the dungeon and any level directly connected to the entrance level. (For example, if Level 1 connects to Levels 2, 4, and 1A, you should prep all four of those levels, because you have no way of knowing which way the players might decide to go.)

After the first session of the campaign, make a list of which levels the PCs have visited. You should now prep all the levels which are connected to those levels. The great thing is that you’ll often discover you’ve already prepped some or all of those levels, which means your prep load will generally decrease over time. (For example, they might gone down to Level 2, which connects to Levels 3 and 4. You’ve already prepped Level 4, so all you need to do now is fill in Level 3.)

Repeat this after every session, and your megadungeon will expand, filling out the details of your original campaign overview at a nice, sustainable pace.

You’ll find that these same basic principles — prepping roughly one scenario ahead of wherever the PCs currently are — can be applied to a lot of different campaign structures. For example, if you’re using a node-based campaign structure, then your campaign overview will be a revelation list of all the adventures plus the clues that link those adventures together. You can include any number of scenarios on this list and, once again, you’ll be free to expand and rearrange the scenarios as you flesh them out into fully playable notes.

For your first session, you’ll obviously start by prepping the initial adventure. When you’re done, look at all the clues in that adventure which point to other adventures, then prep those additional adventures. (Because it’s fully possible that the PCs might discover one of those clues during the first session and choose to immediately follow it, possibly never realizing that it leads to a “separate” scenario in your notes.)

For example, consider the classic introductory node-based structure:

Here the initiating adventure has clues pointing to scenarios A, B, and C, so those are the four adventure you’d ideally want to have ready to go when the campaign begins.

After the first session, as with the megadungeon example, simply look at which scenarios the PCs have broken the seal on (either because they’ve already followed a clue into the scenario or because they’ve told you they’re planning to do so at the beginning of the next session), identify the clues in those scenarios, and make sure you prep all the scenarios those clues point to.

Once again, you’ll find that you’ve often already prepped these scenarios: For example, if the PCs head to scenario A, they’ll have access to clues pointing to scenarios B, C, and D. But you’ll have already prepped scenarios B and C, so all you need to prep is Scenario D. If they wrap-up scenario A in the next session and head to scenario C, you’ll discover that all your prep is already done.

These same basic principles can be applied to mixed campaign structures or even larger adventures. For example, imagine a node-based campaign in which several of the linked adventures are large dungeons. If the PCs have access to clues pointing to one of these dungeons, you don’t necessarily need to prep the whole thing: You could just prep the first couple levels and wait to fill in the rest of the dungeon until the PCs show up and actually start exploring it.

PREP-INTENSIVE CAMPAIGN STRUCTURES

Both of our examples have featured campaigns with a single point of entry — the first level of the dungeon; the initial scenario. But what if we wanted multiple potential points of entry? For example, what if the megadungeon has multiple entrances leading to multiple levels? What if we want to start the campaign with a job board or by giving each PC a set of rumors that they can choose to follow up on?

At this point, you have a few options.

First, you can modify things to collapse the campaign back down to a single point of entry. For example, the dungeon might have multiple entrances, but only one of those might be known or accessible to the PCs at the start of the campaign.

Second, you can give the players access to all of their options (e.g., telling them about all of the entrances or giving them all of their rumors) during Session 0 and have them make a decision about which one they’re going to choose when the campaign begins. You won’t want to completely forget about the other options, but this will still let you focus your initial prep.

Third, you can look at each point of entry separately and prep each of them using the principles described above. For example, if the megadungeon has entrances to Level 1 and Level 4, then you’ll need to prep both of those levels and all of the levels either of them are connected to. This will obviously be a lot more prep, but that’s okay as on as (a) you feel the benefits justify the costs and (b) you have the time and are willing to do that much prep.

As you can see, the same general principle applies: What scenarios could the PCs choose to engage in the next session? Prep those and, ideally, one step more.

This means, though, that some campaign structures are inherently prep-intensive. Hexcrawls, for example, are extremely prep-intensive, since the PCs could hypothetically head in any direction from their starting point and can easily travel multiple hexes in a single session. With no idea where, exactly, they could end up at in their wanderings, a typical hexcrawl requires you to key dozens of hexes before play begins, many of which could and probably will contain full location-based adventures.

If you can put in the effort, however, prep-intensive campaigns can be very rewarding. Partly because they give the players a lot of freedom in exploring the world or situation, but mostly because, as the campaign continues, all that prep will already be done! That will free you up to focus on other stuff during your inter-session prep. (Or, alternatively, just lean back and take it easy.)

REDUCING PREP

If you’re looking to cut down the amount of prep you need to do, there are a few techniques you can use.

First, if you’re comfortable with improvisation, then you can get away with reducing your safety net. Broadly speaking, you can usually get away with just prepping the scenario for the next session. Most of the time, the PCs won’t skip ahead to the next dungeon level or jet off for the next scenario. If you’re comfortable  just improvising when this does happen, then you don’t need to account for those possibilities in your prep.

Zero-prep games like Technoir and various procedural content generators can, of course, help you with improvising various types of content.

Something else to consider is downtime spacing between scenarios. This may be as simple as travel time: If the current scenario is in Geneva and the PCs find clues pointing to a different scenario in Dallas, then they’re much less likely to pop out in the middle of the Geneva scenario to check out what’s happening in Dallas than they would be if the other scenario was also located in Geneva. This can be generalized into anything that imposes a cost (in time, resources, etc.) for bailing on a scenario early or swapping between scenarios.

The other alternative is a downtime activity that consumes actual time at the table: If the players unexpectredly jag towards a scenario you don’t have prepped yet, you simply trigger the transitional content and use it to fill the rest of the session.

In some games, for example, you might just tell the players to level up. Then, while they’re spending twenty or thirty minutes advancing their characters, you can be throwing together the notes you need for the next adventure.

Blades in the Dark, on the other hand, has a structured downtime period between every job in which time in the game world passes, various events are played out, and crew development happens. This kind of downtime content requires more of your attention as the GM, but you don’t actually need to get an adventure prepped at the table: You just need the downtime spacing to chew up enough of the session that you can wrap things up and come back next week with the scenario prepped.

(For more tips on handling the endings of sessions, check out Cliffhangers & Conclusions.)

Archives

Recent Posts

Recent Comments

Copyright © The Alexandrian. All rights reserved.