IN THE SHADOW OF THE SPIRE
SESSION 31B: THE VAULTS OF FORGOTTEN EVIL
November 9th, 2008
The 17th Day of Kadal in the 790th Year of the Seyrunian Dynasty
WORD ON THE STREET
They decided to head back to the Banewarrens and rejoin Kalerecent’s watch. On their way, however, they passed down Tavern Row. Here they found a dozen ravens perched here and there on various buildings.
“What’s going on?” Tee asked.
“Could it be the Killravens?” Ranthir said.
“I’ll find out,” Elestra said.
While the others continued on, Elestra put her ear to the street. She heard a few people talking about an incident on Tavern Row: The day before, a centaur named Unos, the owner of the Old Goose tavern, had been found murdered in the common room of his tavern at dawn.
Drowning out the affair on Tavern Row, however, were the varied reports surrounding the events at the Cathedral. There seemed to be a good deal of confusion surrounding the exact details. Public opinion was still split fairly evenly on the issue of Rehobath claiming the mantle of the Novarch, but that opinion was beginning to slowly shift in his favor.
THE EMPTY VAULTS
Elestra rejoined the others in the excavated cave outside of the Banewarrens. Kalerecent reported that everything there had been quiet during their absence, and so they headed down to continue their exploration of the farthest vaults.
Passing down a wide hall they came to a T-intersection. The narrower corridor they entered was lined with more than a half dozen of the now familiar warded doors.
One of the doors stood ajar. Inside the chamber beyond this door was a long, metal box, not unlike a lidless coffin. On each of the four corners of the coffin-like receptacle a large amethyst has been inlaid. The inside of the box was lined with six heavy leather straps, arranged in such a way as to bind someone within.
Tee was tempted by the obvious worth of the amethysts, but cautious as well. (They’d already encountered one cursed jewel in this place.) Ranthir examined them closely and determined that the gems had been used to focus several enchantments onto the inhabitant of the box. Some of these appeared similar to those found in a stasis box while others appeared to have some form magical negatement as their purpose.
“Would these enchantments have held Tavan Zith’s abilities in check?” Tee asked.
“Yes, I think so,” Ranthir said. “But they’re harmless now. The spells were broken and the magical energy has dissipated.”
That’s all Tee needed to hear. She pried out the valuable gemstones and dropped them into her bag of holding.
They went back out into the hall. A careful examination of the remaining doors revealed that the wards on one of them had been broken. They opened this door to reveal an empty vault with a large, circular depression in the center of the floor. This depression was filled with water and large patches of the rest of the floor were damp as well.
Tee discovered runes worked into the inner edge of the circular depression and Ranthir was able to identify them as part of enchantments designed to bind something to both the material and ethereal planes. He hypothesized that this chamber might have been used to contain the ethereal-shifting, blue-skinned troll-spawn they had fought before.
THE VAULTS OF FORGOTTEN EVIL
After a brief debate they decided to break open the remaining vaults. Opening the first of these released a blast of chilled air. A large block of ice filled the center of the room, extending from the floor to the ceiling. A careful inspection of this ice revealed that it was laced with thin filigrees of golden thread and Ranthir was able to discern that these threads were minutely etched with tiny runes. Unfortunately, he had no idea what purpose the threads or runes might serve. Large bulbous shadows could be seen within the ice, although making out any sort of detail was quite impossible. When Ranthir was satisfied that he had learned all that he could learn (which was little), he stepped back. Tee started blasting away at the ice using her dragon pistol.
After only a couple of shots, the ice had already cracked badly. Tee lined up her third shot—
—and the ice shattered! A slimy, writhing tentacle burst free. It was followed moments later by more. Tee fired blindly into the ice and then the creatures within were free.
There were three of them – blobs of soft tissue and pulsating gray matter; long tentacles writhing in levitative 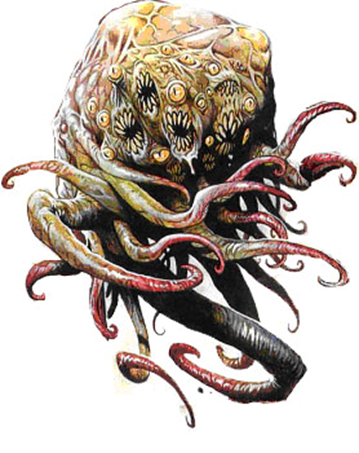 air; numerous, bulbous, yellow, feral eyes and befanged mouths scattered haphazardly within the folds of flabby flesh.
Tor, who had been standing on guard, dashed forward and slashed his sword across the eye of one. Tee, switching her dragon pistol to her side, drew her sword and lunged forward – stabbing through the eye of another and feeling the familiar thrill of it (although this eye was larger than most).
And then Agnarr stepped forward and with a single mighty swing his flaming greatsword cleaved its way through all three of the creatures in a single blow.
As each died in a deflating, wet heap of protoplasmic flesh, a wave of horrific terror swept across them – but each, in their own fashion, found a way to steel their soul against it.
Elestra, thinking of the wraiths they had fought before, took the time to burn the corpses thoroughly.
THE VAULT OF THE PAIN DEMON
They broke the wards on the next door, finding a vault not dissimilar in character but smaller than the last, with a pillar of ice suspended between floor and ceiling.
From a slightly safer distance, Tee again used her dragon pistol to blast away at the ice. Obviously her shots were disrupting whatever magicks had been laid upon the ice because it was not long before the shadowy form within began to shift and move.
As the ice began to crack, waves of hate-filled pain radiated from it. Grimacing against the pain, Tee continued firing. The demon trapped within finally burst free. Its skin was a glistening ebony. Its eyes were a blood-red crimson. Its mouth was a toothless maw with razored lips. Chains were fused about its wrists, each animate with hatred.
As it came free, Tee fired a shot, but it ricocheted harmlessly off the demon’s chitinous shell. The creature howled and the waves of psychic pain battering them seemed to intensify.
Ranthir recognized the thing: It was a naturally demonic creature. Its chains had been soul-bound to its demonic essence – binding its own pain sympathetically and allowing it to reflect that essence back in the psychic waves which were assaulting all of them (although Ranthir tasted only the edge of it from his relatively safe haven in the hall).
Agnarr and Tor had fallen back before its first assault – the waves of pain overwhelming their minds and the animate chains harrying their defenses – but now they rallied, pushing it farther and farther down the length of the narrow chamber. Step by step the pain demon was forced back.
Agnarr suffered grievous wounds from the chains – the cold pain of them numbing his limbs. And the assault of primal pain was strengthening. Those nearest the creature could feel it now as both a psychic and physical thing. The manifestation of pain itself was intense enough to open cuts upon their bodies.
In the end, they were able to beat the creature down.
Tor was left with a single, dramatic cut upon his cheek… But Agnarr welcomed the warming touch of Dominic’s healing.
THE CHITTERING SWARM
The next few vaults proved to be empty. There were no signs that they had even been used.
But then they unleashed the demon swarm.
As the ice of this third vault shattered, the chittering creatures boiled out. Agnarr and Tor had held the chokepoint of the door, but it mattered little as the creatures swarmed around them in every direction.
They found it difficult to fight the swarm. There was a pervasive aura around the dozens of demonlings that seemed to muddle their minds and the tiny creatures would hop from place to place, crawling over them and slipping into their clothes and armor. Some even tried to pry their way into mouths.
Tee fired several blasts ineffectively into the carpet-like mass of demonlings and then fell back before their indomitable advance. The party, in general, split awkwardly in two – with some retreating one way down the hall and others retreating in the other.
The creatures, despite their small size, had vicious claws that ripped and tore as they leaped and scuttled here and there in a chaotic, eddying swirl of motion. And the party discovered, to their horror and disgust, that the creatures were exuding some sort of unnatural black thread – iron-like in strength and binding to the wounds they dealt. The demonlings were literally stitching their limbs together.
Seeaeti howled in pain. Dominic quickly found himself mobbed by the creatures and rendered almost immobile within a cocoon of their black thread.
Ranthir poured flame from his hands and this had some limited success, but still the creatures came. Elestra called down bolts of lightning from thin air, but the demonlings seemed to dance around the scorching blasts.
They were going to be overwhelmed.
“Run!” Ranthir cried.
Elestra did. The others dived for cover.
A bead of fire flew from the tip of Ranthir’s finger into the midst of the chittering swarm. It blossomed into a ball of flame…
And in its wake were left the charred and stinking corpses of the demonlings.
Agnarr stepped forward and put the last of the little fiends out of their well-deserved misery.
This, however, still left them with the difficult task of undoing the demonic, black thread that had been sewn randomly across their bodies. Tee tried to simply rip her way free, but this opened some grievous wounds that sent black spots dancing across her vision.
They started carefully cutting each other free of the stuff. Only Elestra seriously botched this procedure, ripping a gaping wound in Dominic’s side. (The others dissuaded her from helping them with their own extrications.)
THE ABANDONED CAVES
They had now explored this entire section of the Banewarrens and made it as secure as they could (largely by killing everything in sight). Without passing through the sealed door, there was nothing else for them to do here. And so they were left with waiting for the emergence of whatever creature had slipped through the door before Kalerecent had shut it.
They decided to complete their explorations of the caves in which they had fought the umber hulk. Some of them were anticipating the possibility that the creature had returned (affording them with an opportunity to finish it off), and although others were skeptical that it would, if nothing else, eliminate the possibility of a second, unknown entrance to the Banewarrens.
It was an easy matter to return to the caves. Pushing farther into their depths, the group spotted a second passage that had been concealed by a boulder. A little distance further on, Tee saw that the passage they were in opened up into a larger chamber and that, out of that chamber, a second passage appeared to turn in the same direction as the concealed passage behind the boulder.
“Why would it put these boulders everywhere?” Elestra asked.
“I don’t know,” Tee said. But she decided to head down into the larger chamber to see if it did, in fact, meet up with the concealed passage in the way that it appeared to…
And narrowly avoided falling into a pit of loose gravel as it suddenly gave way beneath her feet.
From that they concluded that these boulder-hidden passages had been used by the umber hulk to bypass the traps and snares that it had laid out for the unwary.
With grunts of exertion, Tor and Agnarr managed to leverage the boulder out of the way and they headed down the passage it had concealed.
In the twisting passages beyond they found what appeared to be the creature’s lair: A large bed of stone had been crudely constructed in one corner of a cave in which other stones had been arranged and shaped towards some strange purpose.
“Could it be some form of art?” Ranthir said.
Tee briefly considered the possibility of taking this “umber hulk statuary” and selling it, but she eventually decided that there was unlikely to be any sort of meaningful market for it. Certainly no market worth hauling around several tons of stone for. “I might be able to hustle it… But it’s just not worth the effort.”
Hidden behind some cleverly arranged stones in another corner of the cave they found a surprisingly rich stash of gemstones and gold.
In the next cave they discovered the creature’s “larder”. A horrible stench permeated the air and the walls were slick with moisture. In a low spot near the center of the cave was assembled a grisly, bloody mess: The partially dismembered corpse of a goblin and a half-devoured corpse, greenish white with bloating and decay, that looked as if it might have once belonged to a man.
Tee was disgusted by the sight and wanted no part of it. But as she turned to leave, Agnarr stopped her. “Aren’t you going to search the cave?”
Tee bluffed him into thinking that she had already searched the bodies, but the others eventually convinced her that she should.
“There might be some sort of identification,” Elestra pointed out. “We could let people know what happened to him.”
Tee sighed and started searching.
“Wait,” Agnarr said. “I thought she already searched them?”
“I’m just making sure I didn’t miss anything.”
“Oh. Okay.”
There were no identification papers, but the man was carrying a small coin purse drenched in sickly decay. Tee left it where it lay.
Running the Campaign: PC vs. PC Social Checks – Campaign Journal: Session 31C
In the Shadow of the Spire: Index