The Alexandrian

GenCon

August 16th, 2012

I’m there now.

Anybody else hanging out in Indianapolis? Running a game I should attend? Seen an awesome game I should check out?

My big disappointment so far was missing out on Android: Netrunner, which I was hoping to play some pick-up games with. Had a fairly slow Thursday otherwise: Super RoboRally (played with giant-sized, fully-operational lego robots) is cute. Mechnoir, the mecha expansion to Technoir, has been released, and Ken Hite makes for an awesome panel.

Also, check out the Indie Games on Demand room. It’s pretty awesome up there.  I may end up running a game there if I get the chance. I’ll try to post an update here if that happens.

Untested: Fungal Traps

August 2nd, 2012

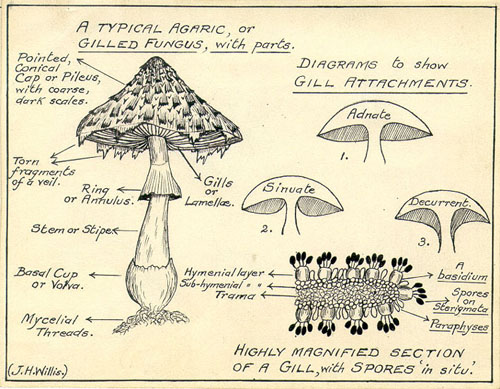
Fungus - James Hamlyn Willis

I’ve been watching After Life: The Science of Decay, which is a really fascinating BBS documentary. The link there will take you to a point in the middle of the video which showcases a couple of interesting real-life fungi which, with a little fantasy twist, could be made very interesting challenges for your PCs.

Confusion Spike (CR 4): Characters within an area infested by the airborne spores of the confusion spike must make a Fortitude save (DC 15) each minute or become infected. Once infected, the spores will grow rapidly within the character’s mind, creating alchemicals that control and disrupt the victim’s behavior. 2d6 rounds after exposure, the victim will become confused (as per a confusion spell). 2d6 rounds after that, they must make a second Fortitude save (DC 15): On a success, they have recovered from the infection. On a failure they die.

Characters who die while under the effects of the confusion spike (either due to the effects of the fungus or otherwise), rapidly exude the fruiting body of the fungus. 1d4 rounds after death, this takes the form of a long, narrow spike which bursts through the character’s skull and grows rapidly to a length equal to roughly three times the character’s body length over the course of 2d6 rounds.

4d6 minutes later, the top of the fruiting body will explode spreading spores in a radius equal to the length of the fruiting body. These spores create a new infection zone, which can linger in the air for years or even decades. (Although they dissipate more quickly in outdoor environments.)

Dwarfbane (CR 1): This magical fungus, reportedly a tainted byproduct from certain rituals used to enchant magical arms and armor, breaks down metallic items in a cycle of decay. It was named dwarfbane after a strain of the fungus infested the rich veins of Dharballa and completely destroyed the dwarven city’s mines. Efforts to contain the infestation failed and eventually — broken and impoverished — the entire city of Dharballa was abandoned. Today there are many dwarven cities that will still refuse entry to any dwarf of Dharballa out of fear they will bring banespore with them.

Metallic items that touch dwarfbane become infested. Magic items made of metal can avoid infestation with a successful Reflex save (DC 17).

Although a great threat to dwarven cities, dwarfbane poses little threat to adventurers as long as they are wary of the danger: 1d4 hours after exposure to dwarfbane spores, a successful Knowledge (nature) check (DC 15) or Spot check (DC 25) will allow the owner of an item to notice spots of the distinctive green patina formed by the fungus. After 4d6 hours, the item will suffer 1d6 points of damage per hour until destroyed.

Objects affected by dwarfbane are rendered into a green, mossy rust. (Which, of course, seethes with dwarfbane spores.)

Fungal Snare (CR 2): These large, strong fungal growths form large loops around subterranean corridors. When a creature passes through the loop, the fungus snaps shut in a vice-like grip. If the target fails a Reflex saving throw (DC 14),they are caught by the snare, suffer 1d6 points of damage, and become stuck and entangled. The snare has AC 16, 10 hp, and requires a Strength or Escape Artist check (DC 15) to escape. A fungal snare can be detected with a successful Search check (DC 15).

Goblins have been known to specifically foster and grow fungal snares as lair wards. The goblins will carry small bags containing cuttings from the fungal snares, the presence of which prevents the fungal snares from snapping shut.

Fungal Web Droppers: Fungal webs grow on tall stalks to the ceiling of a cavern or into the lower foliage of a forest’s canopy. Once they have reached this height, their fruiting body spreads a wide, web-like indusium. When creatures pass beneath the indusium, the fungi drop their webs.

Size
Escape Artist DC
Reflex/Break DC
Hit Points
Poison
Small (5' x 5')
10
14
2
Fort DC 10, 1d2 Str
Medium (5' x 5')
10
10
4
Fort DC 10, 1d3 Str
Large (10' x 10')
12
16
6
Fort DC 12, 1d4 Str
Huge (15' x 15')
13
17
12
Fort DC 13, 1d6 Str
Gargantuan (20' x 20')
16
20
14
Fort DC 16, 1d8 Str
Colossal (30' x 30')
20
24
16
Fort DC 20, 2d6 Str
Colossal+ (50' x 50')
28
32
18
Fort DC 28, 2d8 Str

The table lists the size of the web and the maximum size of the creature that can be trapped by the web. Creatures beneath the web are affected as per a web spell, except using the DCs listed on the table. The web is also coated with a contact poison, afflicting anyone caught in the web or trying to tear it apart with their bare hands.

The tall stalks of fungal web droppers are usually easily noticed, although a Knowledge (nature) check (DC 18) is required to recognize the danger. Some fungal web droppers have stalks which camouflage themselves as stone columns or tree trunks, requiring a Spot check (DC 20) to notice. A Spot check (DC 30 – 2 per size category) will suffice to notice the overhanging webs.

Fungal Snare Webs: Fungal snare webs are similar fungal web droppers, except their webs remain attached to the fruiting body of the fungi and will attempt to draw those caught in the web up into the air. Characters who fail their initial Reflex throws are drawn a random distance into the air. Increase the Escape Artist and Break DCs by +5.

Long Net Stinkhorn - Shirley Ng

The Seagull - Anton Chekhov (translated by Justin Alexander)

“I am writing a play. It’s a comedy. There are three women’s parts, six men’s, four acts, landscapes, a view over a lake; a great deal of conversation about literature, little action, tons of love.”

– Anton Chekhov

A few years ago I wrote a translation of Anton Chekhov’s The Seagull. That translation is now available as a DRM-free Kindle e-book. This, of course, also means that it can be read on any iPad, Android, Windows PC, Mac, or Blackberry device using the free Kindle Reading Apps for those platforms. Or transferred to any other e-reader you might care to employ with a minimum of effort.

Buy Now!

The Seagull is the haunting tale of young love, lost dreams, and broken promise. Its unique cast of incomparable characters echoes dully in a perfect balance – each drawn and repulsed in equal measures through an enchanting and terrifying dance choreographed by Anton Chekhov, the master of Russian theater. It is that rare and precious jewel which perfectly reflects a slice of life, finding those moments which are simultaneously comic and tragic; mortal and divine; eternal and common.

This performance-tested translation captures both the comic and tragic elements of Chekhov’s stirring drama. Those wishing to find a text which is both faithful to the play’s original Russian and also capable of achieving lyric truth in English will not be disappointed: The characters speak Chekhov’s words in another tongue.

ABOUT THE TRANSLATION

Back in 2010 I also wrote a series of essays discussing the translation. If you didn’t read them back then, you might find them interesting now:

The Seagull – Proxy Translation

The Seagull – Quoting Hamlet

The Seagull – Jupiter is Angry

The Seagull – (Not So) Virgin Wood

And if you’re generally interesting my playwriting, you might also be interested in John and Abigail:

John and Abigail - Justin Alexander


Go to Part 1

Organization of campaign material is always an interesting topic for me, and I don’t think there’s enough discussion of actual, practical methods. (As opposed to the idealized theoretical stuff you usually see published in advice books.) Although I’m constantly learning new tips and techniques, I’ve also found that no two campaigns ever use the same methods of documentation: Even similar scenarios will often have unique characteristics that benefit from a different approach.

In the case of my Thracian Hexcrawl, I maintain four “documents”:

(1) THE HEX MAP: This is 16 hexes by 16 hexes, for a total of 256 hexes. (If I had to do it again I would either go with a 10 x 10 or 12 x 12 map: Coming up with 256 unique key entries was a lot of work. But I had some unique legacy issues from the pre-hexcrawl days of the campaign that resulted in a larger map.)

(2) THE BINDER: This contains the campaign key. It includes 2 pages of background information (current civilizations, chaos factions, and historical epochs), 8 pages of random encounter tables (one for each of the six different regions on the map), and a 100 page hex key.

(3) THE FOLDER: Each document in this folder details a single location. These are locations with a key that takes up more than a single page and/or any location which requires a status update (because the PCs have visited it and shifted the status quo).

(4) CAMPAIGN STATUS SHEET: This document is updated and reprinted for each session. It’s responsible for keeping the campaign in motion. At the moment, the Thracian Hexcrawl campaign status sheet includes: A list of current events in Caerdheim and Maernath (the two cities serving as home base for the PCs); a list of empty complexes (which I reference when I make a once per session check to see if they’ve been reinhabited); the current rumor table; details about the various businesses being run by PCs; and the master loyalty/morale table for PC hirelings.

Of these documents, the most difficult to prep is, of course, the hex key itself (along with the folder of detailed locations). I spent two weeks of hard work cranking out all of those locations. But the up-side of that front-loaded prep is that, once it’s done, a hexcrawl campaign based around wilderness exploration becomes incredibly prep-light: I spend no more than 10-15 minutes getting ready for each session because all I’m really doing is jotting down a few notes to keep my documentation up to date with what happened in the last session.

DESIGNING FROM THE STATUS QUO

My general method of prep — particularly for a hexcrawl — is to originate everything in a state of “status quo” until the PCs touch it. Once the PCs start touching stuff, of course, the ripples can start spreading very fast and very far. However, in the absence of continued PC interaction things in the campaign world will generally trend back towards a status quo again. (This is something I also discussed in Don’t Prep Plots: Prepping Scenario Timelines.)

This status quo method generally only works if you have robust, default structures for delivering scenario hooks. In the case of the hexcrawl, of course, I do: Both the rumor tables and the hexcrawl structure itself will drive PCs towards scenarios.

The advantage of the status quo method is that it minimizes the amount of work you have to do as a GM. (Keeping 256 hexes up in the air and active at all times would require a ridiculous amount of effort.) It also minimizes the amount of prep work which is wasted. (If you’re constantly generating background events that the PCs are unaware of and not interacting with, that’s all wasted effort.)

It’s important to understand, though, that “status quo” doesn’t mean “boring”. It also doesn’t mean that literally nothing is happening at a given location. For example, the status quo for a camp of goblin slavers isn’t “the goblins all sit around”. The status quo is that there’s a steady flow of slaves passing through the camp and being sold.

Go to Part 10: Stocking the Hexes

Go to Part 1

When designing my hexcrawl, as I mentioned at the beginning of this series, I key every hex on the map and every key entry is a location (not an encounter). The distinction between a “location” and an “encounter” can get a little hazy if you stare at it for too long, but in practice it’s usually pretty obvious: If your key reads “an ogre walking down the road”, then the next time the PCs pass along that road the ogre would presumably be gone (particularly if they killed it). If your key instead reads “an ogre living in a shack”, then even if the PCs kill the ogre the shack will still be there.

Of course, one might argue that the PCs could do some quick demolition work on the shack and make it disappear, too. (That would be an excellent example of staring at the distinction for too long.) But the general point remains: You’re looking to key permanent geography, not ephemeral events.

What follows are several examples from the actual hex key I use for my Thracian Hexcrawl. The goal is to demonstrate the range of different key types that I use, so let’s start with the shortest:

K16 – HONEYCOMB CAVERNS (Secrets of Xen’dik)

No detail.

This one’s pretty simple: I’ve grabbed a pre-existing adventure (in this case selected from the Secrets of Xen’drik sourcebook) and plugged it straight into the hexcrawl. If the PCs encounter this hex, I just yank the book out and start running it.

I’ve actually been doing less of this recently because I’ve reached the point where I find the existing layout and presentation of adventure modules too frustrating to run on-the-fly even when the actual content is good. (They tend to bury way too much information into the middle of lengthy paragraphs.) But I digress. Here’s another simple one:

K13 – RUINED TEMPLE OF ILLHAN

See hex detail.

In this case, the location was too detailed to include in my primary hex key. Much like the published adventure, I’m telling myself to go look somewhere else for the details: In this case, a separate file folder in which I keep separate documents for each hex like this. (The rule of thumb here is that if it takes more than one page to describe the place, it gets a separate detail document.)

The details for the Ruined Temple of Illhan were previously posted here on the site. They can be found here. (The presentation there is somewhat polished from what would have been found in my original notes, but is substantially similar.)

A3 – ORLUK TOTEM

A giant statue, worn by weather. Depicting an elephantine beast of prey with black- and yellow-striped fur. (An orluk.) The yellow and black stone is not painted, but rather two different types of colored granite which have been quarried and then shaped to take advantage of the quarried strata.

This is an example of what I think of as a “landmark”. Sometimes these landmarks are more involved or have hidden features to them, but generally they’re just single points of interest distinct from the surrounding wilderness. Regardless of their other characteristics, they’re almost always useful for PCs trying to orient their maps.

N15 – RECENT FOREST FIRE

Landscape is scorched. No foraging is possible in this hex.

Another short one. This is basically similar to a landmark, but it covers a vast swath of territory. (In this case, an entire hex.)

C2 – WYVERN SHAFT

60 foot deep shaft that serves as the lair of a wyvern. The wyvern has dug an escape tunnel that emerges from a hill a quarter mile away.

WYVERN: Has a large scar on its left side from a spear wound; has preferred to stay away from intelligent prey ever since.

TREASURE: 7,000 sp, 5 zircons (50 gp each)

A simple monster lair. I usually don’t bother with maps for this sort of thing: It’s easy enough to improv any smaller complex of a half dozens rooms or less. (Assuming there’s nothing radically unusual about them, of course.)

F15 – SKULL ROCK (on river)
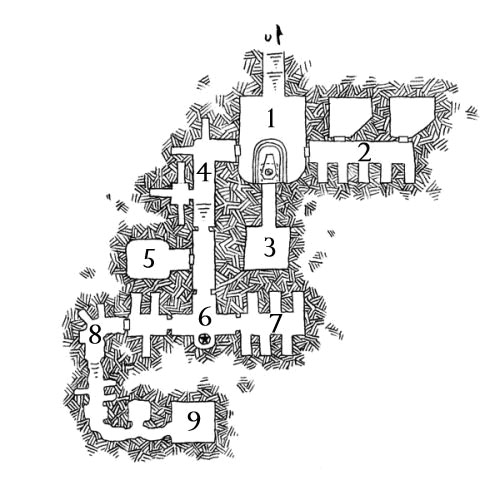
Map of Hex F15: Skull Rock - Dyson Logos

A rock shaped like a skull thrusts out of the river. Crawling through the mouth leads to a crypt.

AREA 1: Mummified red dragon’s head (huge). Breathes flame that fills most of the room. Secret entrance to treasure chamber under the head.

AREA 2: 5 wights (50% in lair), no level drain but paralyzing strike. The two rooms off this area have been pillaged.

AREA 3 – BURIAL OFFERINGS: 3000 gp, 3 golden spinels (200 gp each)

AREA 4: Trapped hallway. Arrows shoot from wall and alchemist’s fire from nozzles in the ceiling. (Room to the left has an incense burner in the shape of a squat, fat man worth 7000 cp.)

AREA 5: Wight, no level drain but can detect magic, life, and invisibility at will. (Sniffs out magic and lusts for it.)

AREA 6: Bas relief skull. Insane. Asks incredibly bad riddles (“What flies in the air?” “A bird.”), but then blasts those who answer with 1d6 magic missiles regardless.

AREA 7: Slain wights.

AREA 8: Staked vampires.

AREA 9: A lich has been chained to the wall. Arcs of purple electricity spark off him in eternal torment.

Notice the “on river” designator next to the key title. That indicates that the location is on the river flowing through this hex on the map: If the PCs are following the river, they’ll automatically encounter this location.

The map here was taken from Dyson Logos’ website. His site proved invaluable for stocking my hexcrawl, and there are a lot of other bloggers offering free maps out there.

This sort of fully-keyed, “mini-dungeon” represents pretty much the upper limit of what I’ll handle in a key entry before bumping it into a separate document.

Go to Part 9: The Four Documents of the Hexcrawl

Archives

Recent Posts

Recent Comments

Copyright © The Alexandrian. All rights reserved.