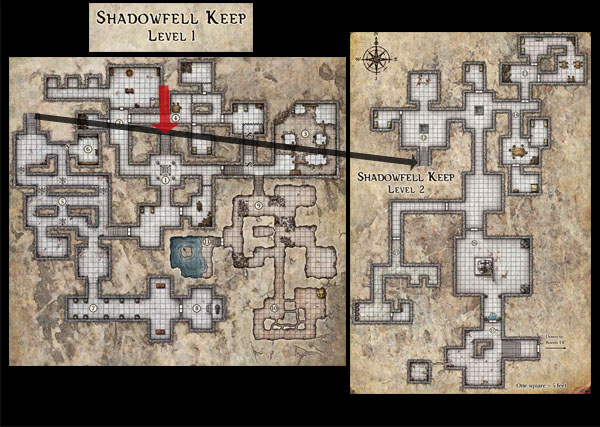
This is the complete map of the Keep of the Shadowfell, taken from the adventure of the same name. (The red arrow indicates the dungeon’s entrance. The black arrow indicates the connection between Level 1 and Level 2 of the dungeon.) At first glance, this dungeon may appear quite complex and interesting: There are lots of twisting corridors, and the PCs appear to be given an immediate and meaningful choice of three separate corridors upon entering the dungeon.
But as I mentioned earlier, when you straighten out all of those twisting corridors the overwhelmingly linear structure of the dungeon becomes quite clear:
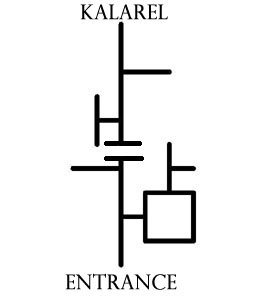
The only legitimately interesting feature of this dungeon, from a cartographical standpoint, is the loop of encounters in areas 1 thru 4. Everything else in the dungeon has been designed to proceed in an essentially predetermined fashion: The DM sets up the encounters, the PCs knock them down, and then the DM sets up the next encounter.
What I’m going to do is take a few simple xandering techniques and use them to tweak the Keep of the Shadowfell in order to make it a more dynamic and interesting dungeon. By changing the macro-structure of the dungeon, we’ll be able to unlock the full potential of the “local interest” in the map (all those twisting corridors and mini-loops) and the encounters themselves.
To do this, I’m going to suggest making four slight adjustments to the dungeon’s design.
SECOND ENTRANCE: As described in my original remix of Keep on the Shadowfell, add a second entrance to the dungeon. About a half mile to the west of the keep, up in the foothills of the Cairngorms, there’s a natural cave that leads, more or less directly, to area 10 of the Keep.
(This is how the kruthiks and rats got into areas 9 and 10. As described in the remix PDF, the PCs can discover this entrance either by scouting the area around the Keep or by researching it in Lord Padraig’s library in Winterhaven. If this entrance is found before the PCs enter the Keep, it’s a nice reward for their cleverness and preparation. If it’s found during their explorations of the Keep, it can provide a valuable avenue of escape or allow them to sneak back into the complex after a guard has been raised at the primary entrance.)
ADDING A STAIRCASE: Add a staircase leading from the Torture Room (area 2) to the antechamber of Sir Keegan’s tomb (area 7).
(My primary motivation here is to remove some of the dead ends from the dungeon. By linking two of the dead ends together, I’m creating a dynamic loop. Note, however, that I’m actually linking the loop in just before the actual dead end of Sir Keegan’s tomb in area 8. This is partly due to the internal logic of the adventure – it doesn’t make any sense for a hallway to pass straight through Keegan’s tomb – but it’s also practical in terms of design: By leaving the branch into area 8 intact, we’re providing a flavorful navigational choice to PCs entering area 7.)
ADDING A SECRET PASSAGE: Add a secret passage leading from area 6 to area 15.
(This provides a second connection to the lower level, providing the dungeon with important multiple connections between levels. By properly positioning these connections, we can turn entire dungeon levels into looping structures.)
MOVING A STAIRCASE: Move the staircase leading to area 12 from area 5 to area 3.
(The primary reason for this shift is to open up some real estate between the primary and secondary routes leading to the lower level. Admittedly, this is a problem that only exists because of where I chose to put the secret passage. But this also allows the goblins to reach the lower levels without passing through undead-infested halls, thus correcting a problem with the original dungeon’s design. And by hooking a level connector into the far end of the adventure’s original loop we’re layering the complexity of the dungeon’s cartography.)
Finally, in order to make these changes fit into a natural, logical geography, I’ve simply inverted the entirety of areas 6 thru 8. With this change, these areas, which were originally a minor elevation shift requiring the PCs to descend a staircase from area 1, become a true “second level” to the complex, passing directly beneath areas of the first level:
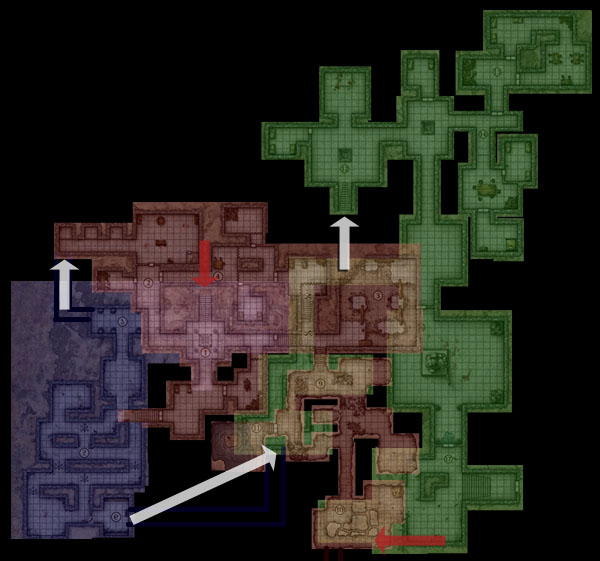
(Level 1 is highlighted in red. The “new” Level 2 is highlighted in blue. And Level 3, the original second level, is now highlighted in green.)


[…] С оригиналом Вы можете ознакомиться здесь […]