Beneath its charming exterior, the Eye of the East is a charnel horror of death and despair.
CAPTAIN MORSUL: Captain Morsul is a minotaur vampire, infected during a voyage through the Serpent’s Teeth. Use the stats for a vampire nightbringer (MM 2024, p. 316) with the following traits:
- Strength 18 (+4)
- Languages: Common, Abyssal
- Charge. If Morsul moves at least 10 feet straight toward a target and then hits with a gore attack on the same turn, the target takes an extra 9 (2d8) piercing damage. If the target is a creature, it must succeed on a DC 14 Strength saving throw or be pushed up to 10 feet away and knocked prone.
- Labyrinthine Recall. Morsul can perfectly recall any path he has traveled.
- Reckless. At the start of his turn, Morsul can gain advantage on all melee attack rolls he makes during that turn, but attack rolls against him have advantage until the start of his next turn.
- Multiattack. Captain Morsul makes one Bite attack, one Shadowstrike attack, and one Gore attack.
- Gore. Melee Attack Roll: +6 to hit, reach 5 ft., one target. Hit: 13 (2d8+4) piercing damage.
VAMPIRE SPAWN: There are 1d4+1 vampire spawn on the Eye of the East. (Morsul creates them from slaves and mutinous crew members, then has them periodically fight in survival-of-the-fittest deathmatches for the entertainment of the crew.)
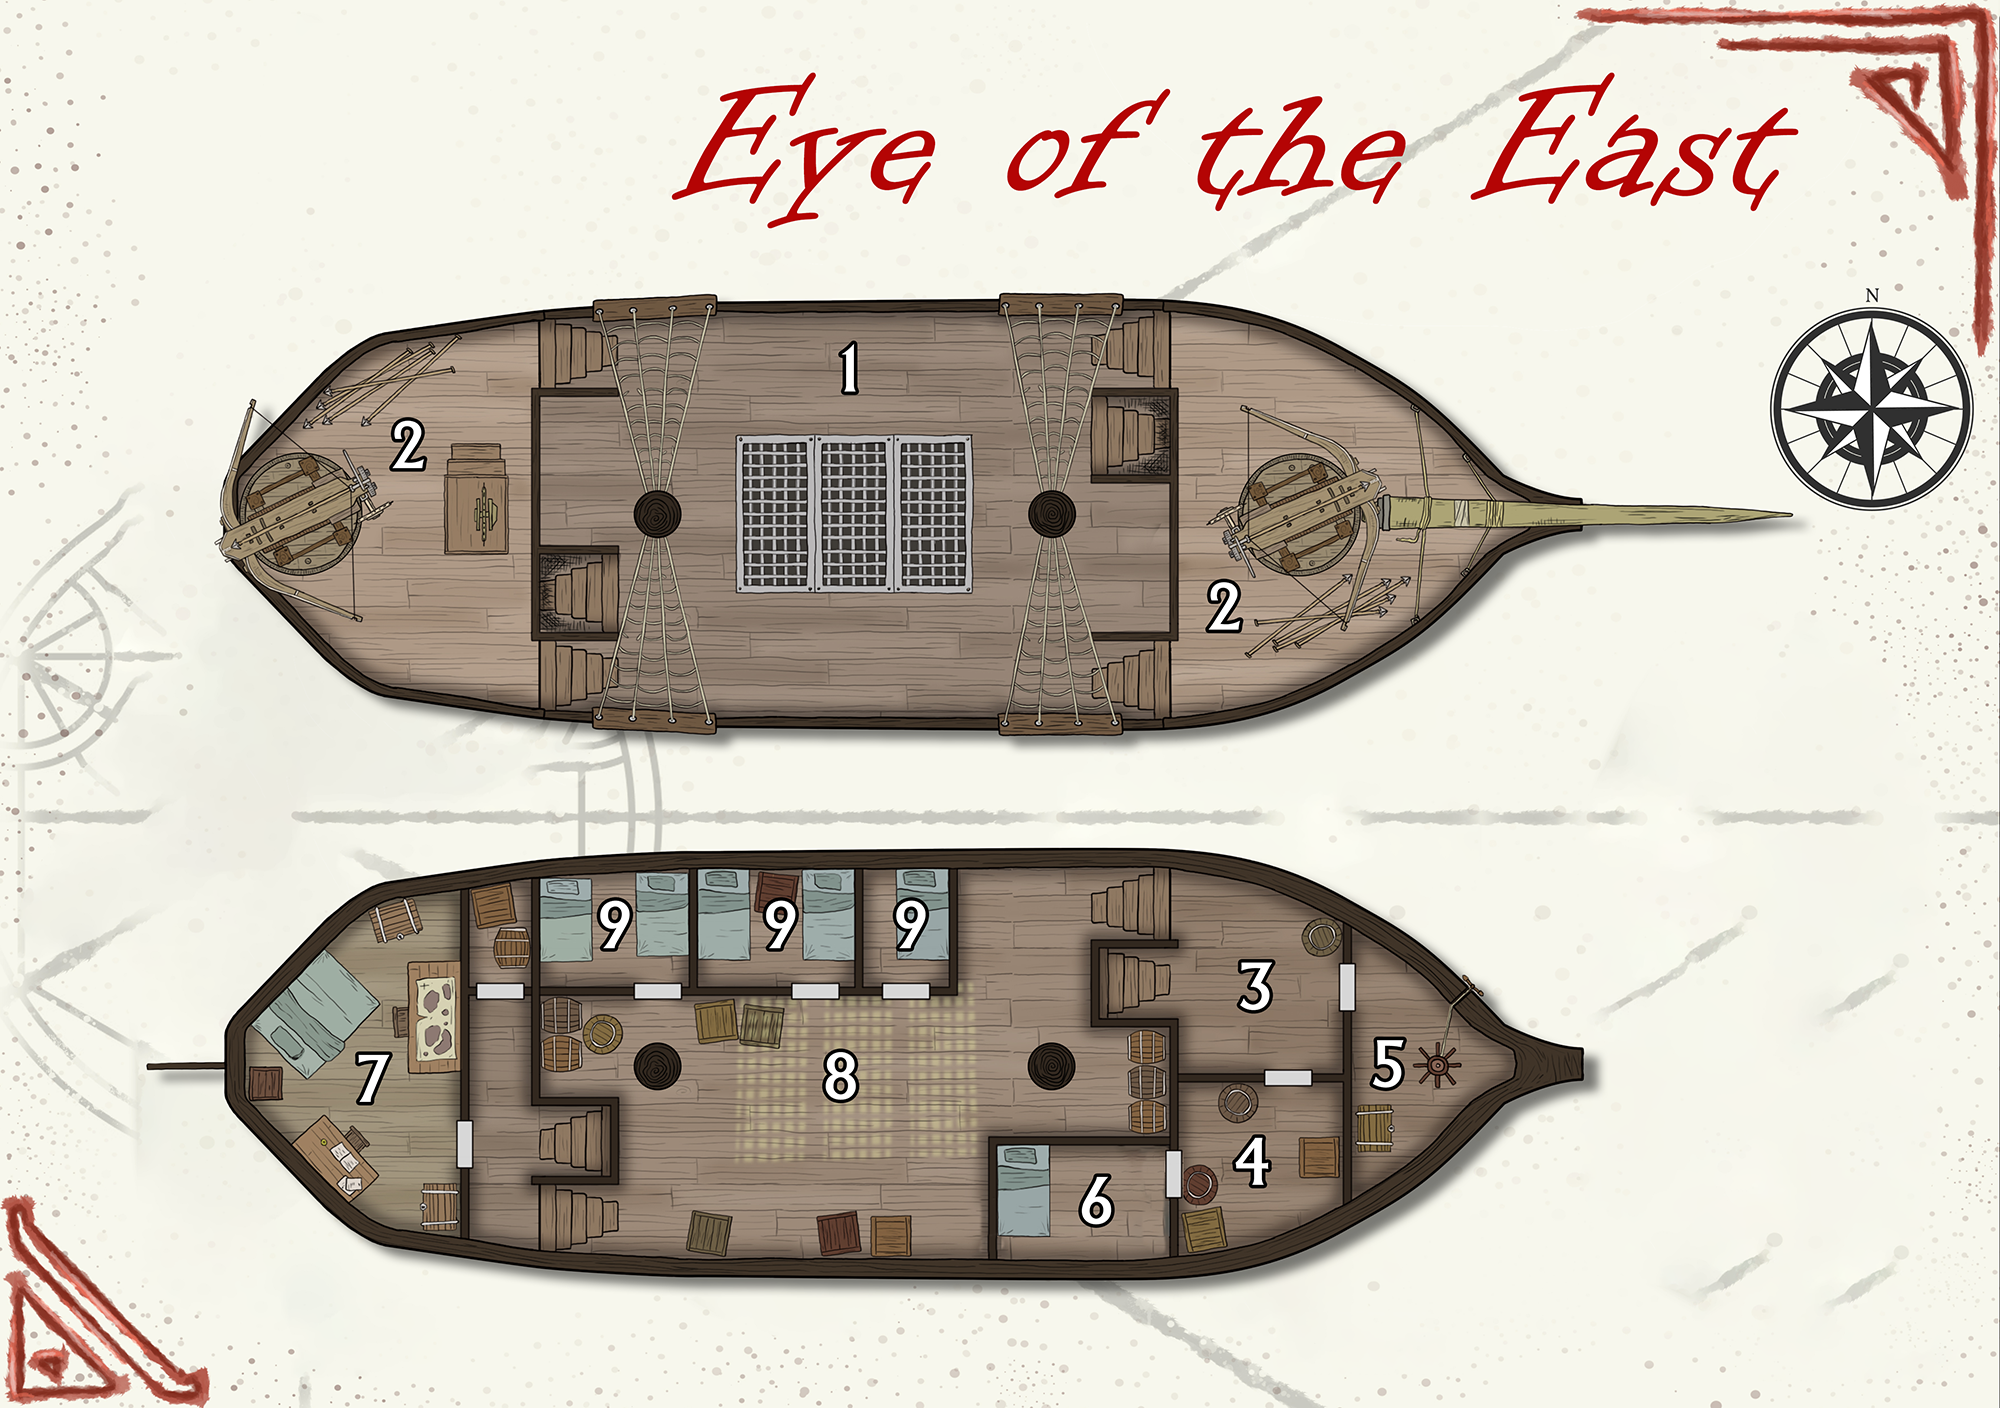
SHIP MAP: Elven Tower’s Scorpion Ship battlemap. (Minor alterations.)
AREA 1 – MAIN DECK
A fairly typical, double-masted ship’s deck.
CARGO HATCH: A clever device allows a shutter, operable from below, to be drawn across the cargo hatches and cover the grating. (This is unusual, but can both hide the slaves in the cargo bay and protect the ship’s vampires from sunlight.)
AREA 2 – BALLISTAS
The upper deck ballistas are mounted on swivels.
SEARCH — DC 10 Wisdom (Perception): 6 of the bolts at each ballista tipped with alchemist’s fire.
ALCHEMIST’S FIRE BOLTS: 3d10 piercing damage. Target takes 1d10 fire damage at the start of each of their turns.
- GM Background: These bolts are sourced from the Alchemical Lab — Shadowworks.
AREA 3 – CREW QUARTERS
This compartment is filled with crisscrossing hammocks. Additional bed rolls are spread uncomfortably on the floor.
SECURE DOOR: The door to Area 5 is steel-cored and securely locked.
- AC 19, 40 hp, DC 18 Dexterity (Thieves’ Tools)
AREA 4 – STORAGE & CREW
Ship’s stores are kept here. Because Area 3 is too crowded for all of the crew to sleep there, several additional hammocks are also hung high here above the stores.
AREA 5 – SECURE HOLD
This compartment is used to store high-value or sensitive cargo. The ship’s anchor is also operated from here.
AREA 6 – VLADAAM MAGE’S QUARTERS
Makena, the Vladaam Mage assigned to the ship, keeps her quarters here. Their personal belongings include their spellbook, a potion of superior healing, and a djinni’s lamp.
HADIYA THE DJINN: The djinni in the lamp is Hadiya. Makena has come to consider Hadiya her best friend and will spend hours in her quarters just chatting with her. Hadiya, however, yearns for freedom from her imprisonment.
AREA 7 – CAPTAIN’S QUARTERS
The portholes of this aft cabin are draped with thick, black velvet curtains which have been securely fastened and block out all light. An everburning lamp is built into the desk and casts long, dancing shadows around the compartment.
BED: Concealed beneath the bed is a coffin of mahogany inlaid with jet (worth 3,000 gp).
DESK: On the desk is a box of red jade containing three onyxes each painted with a dragon’s head. (The box is worth 750 gp. Each onyx is worth 75 gp.) Also on the desk is a Letter from the Founder’s Guild to Captain Morsul (see handouts).
AREA 8 – SLAVE HOLD
Dozens of shackles are attached to the walls and to long metal bars running along the floor.
AREA 9 – VAMPIRE SPAWN QUARTERS
These rooms are used by the vampire spawn. The bedclothes are soiled and smeared with blood and filth.


