The Alexandrian

Vanthampur Manor

Go to Table of Contents

Compared to the Dungeon of the Dead Three, we’re going to have a fairly light touch on Vanthampur Manor. For the most part, we’ll just be tying off some of the loose ends created while we were remixing other scenarios in Part 3, with a particular look at how this effects the various denizens of the manor.

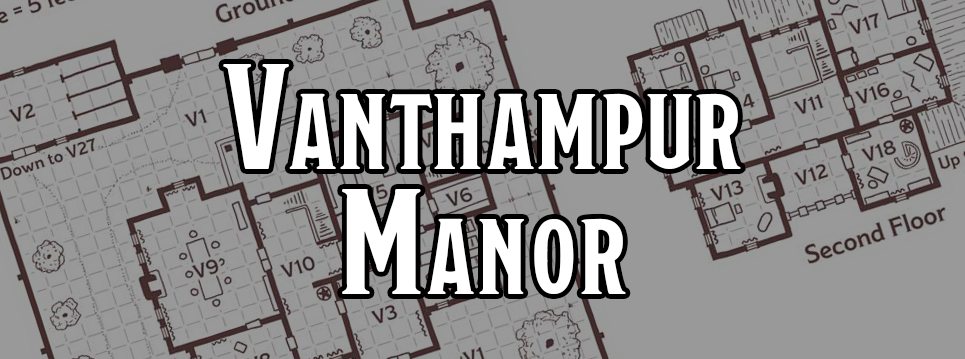
MANOR vs. VILLA: The published book refers to this location as Vanthampur Villa, but I’ve changed it to Vanthampur Manor. Why?

Short version: Waterdeep has villas. Baldur’s Gate has manors.

Feels like a minor thing (and I get the appeal of the alliteration), but this is actually baked pretty deep into Baldur’s Gate, which features things like the Manor Gate, which leads to the Manorborn neighborhood, which is filled with the Patriar Manors.

The other option would be to push strongly in the opposite direction and have the fact that the Vanthampurs own a “villa” instead of a “manor” be a commentary on how Thalamra Vanthampur wasn’t born into privilege (she wasn’t “manorborn”) and is instead a self-made woman. But (a) that’s a theme which would require a lot of extra work to meaningfully bring forward in the adventure and (b) I’m not really that interested in a theme that boils down to “the real problem with Baldur’s Gate is not the entrenched greed of its upper class, it’s the low-class upstarts trying to rise above their station.”

Also, minor though it may be, this does seem to subliminally draw a distinction between the noble culture of Waterdeep and the noble culture of Baldur’s Gate that I think helps to distinguish the two cities, particularly if you just recently got done running Waterdeep: Dragon Heist for your players.

THAVIUS KREEG: Thavius Kreeg’s role in the manor is largely unchanged, but it may be useful to remember, as we discussed at the beginning of Part 3, that there are some substantial contradictions and problems with Kreeg’s back story. We’ll be straightening those out in Part 4B of the Remix, but the changes should be kept in mind here.

I also recommend dropping the whole “Kreeg has the shadow of a pudgy devil” thing:

  • It’s a cool concept, but it doesn’t really make sense. (Why him and none of the other cultists?)
  • If it works as intended (the PCs immediately realize he’s evil), I think that’s less interesting than having ambiguity and the PCs either (a) figuring it out or (b) getting gulled.
  • But I think there’s a pretty big risk it WON’T work as intended and the PCs, instead of concluding that Thavius Kreeg is evil, will conclude that this ISN’T Thavius Kreeg and is actually a devil in disguise. This will thoroughly muddy a fairly key revelation.
  • If you still have Reya Mantlemorn involved, this detail is simultaneously scripted to be painfully obvious to the PCs and, for some reason, completely irrelevant to Mantlemorn. (“His altered shadow is not damning enough evidence.”) This is likely to result in a really frustrating interaction.

As I was typing this up, I think I figured out where we can repurpose this cool idea.

THE TRUTH OF ELTUREL’S FALL: Duke Vanthampur, High Observer Kreeg, and Gargauth all know the truth of what happened to Elturel (it was taken to Hell). Everyone else in the manor (who know anything about the cult’s business at all) are under the impression that devils under the command of Zariel laid siege to the city and destroyed it. They believe that their unholy mission is to similarly prepare Baldur’s Gate for Zariel’s scourge.

Even Vanthampur, Kreeg, and Gargauth will not readily give up the truth. All three of them will, instead, lie obliquely, by referring to “Elturel’s Fall.” If they’re pushed on the point (if caught in a zone of truth, for example), they’ll talk about how the legions of Zariel “fell upon the city” (and similar euphemisms and half-truths).

The dramatic goal here is for the players to NOT know Elturel’s true fate until the infernal puzzlebox is opened in Candlekeep. This is not absolutely essential (so if the PCs get clever or are particularly efficacious in hammering in on this point, there’s no problem in letting them get the truth out of one of the NPCs), but you will get a MUCH bigger impact from the puzzlebox if that’s the moment that the PCs discover the truth of Elturel’s fall.

RAID, HEIST, OR CRAWL? As written, Vanthampur Manor is largely designed to function as a dungeoncrawl, although adroit players might be able to turn at least the first part into a raid. The Remix, however, does open up the possibility of approaching the whole thing into a heist.

Let’s take a second to distinguish these three concepts: A dungeoncrawl features a room-and-key design which the PCs largely explore blind. A raid is similarly based on a room-and-key design, but the locations is designed so that the PCs can grok the entire floorplan and some (or all) of its defensive measures. A heist is similar to a raid, but the floorplan and defenses can’t be easily observed, so there are additional phases of play in which that information must be gathered. (It’s also fairly typical for a heist to be focused on achieving a specific goal while minimizing open conflict, whereas raids are often about planning a full-out assault with the goal of tactically clearing the location. But there can be a lot of overlap here.)

Check out Scenario Structure Challenge: Raiding the Death Star and Scenario Structure Challenge: Heists for a more detailed overview of these structures.

The opposition in Vanthampur Manor isn’t so overwhelming that the PCs can’t just kick down the front door and start clearing the place room by room: That’s what I mean when I say it’s designed as a dungeoncrawl.

However, it takes no significant effort to carefully observe the manor house itself and figure out the layout of the first and second floor, the location (and patrols) of guards, etc. So this first chunk of the scenario can easily operate as a raid (with smart PCs who take this course of action likely benefiting from their planning) up to the point where they find the entrance to the dungeon lair below, at which point they’ll have to descend into the unknown.

The Remix, however, creates the opportunity to approach Vanthampur Manor as a heist, with the PCs likely planning to either steal the infernal puzzlebox, kill the Vanthampurs, or both. To briefly review the five steps of the heist:

  1. Identify the score.
  2. Gather information.
  3. Onsite surveillance.
  4. Prep work.
  5. The Operation.

There are enough cultists and associates of the Vanthampurs wandering around this section of the campaign that PCs will almost certainly be able to grill them for information about the manor. Pursuing official records might also give them the layout of the manor, and the records of the Master of Drains and Underways could reveal that Duke Vanthampur had the sewers under her mansion sealed off and redirected. (The latter could carry some risk, however, as Duke Vanthampur was once the Master of Drains and Underways and the department still remains under her thumb.)

Onsite surveillance opportunities are trickier to imagine: Arranging a meeting with Thurstwell Vanthampur (after he contacts them via imp) might offer an opportunity, though. (Or could simply serve as the opportunity for the heist itself.)

It is important to note that this is not a choice you need to make as the DM. Or should make. Step back and let the players figure out how they want to approach the manor, and then follow their lead.

ADVERSARY ROSTER

MANOR HOUSE
3 x 3 GuardsV1. Yard(patrolling counter-clockwise)
Groundskeeper Sarvinder Peck (01-75%)V2. Stable House
4 impsV3. Foyer(invisible)
Gray, Peck, D'Vaelan, Fallwater (76-00%)V4. Servants' Quarters(resting or sleeping here)
Cook Gabourey D'VaelanV5. Kitchen
Duke Vanthampur (01-05%)V8. Parlor
Butler Fendrick Gray (01-75%)V10. Gallery
5 GuardsV11. Upstairs Hall
Thurstwell VanthampurV13. Thurstwell's Bedroom
Duke Vanthampur (06-10%)V16, V17, or V18. Master Suite(50% sleeping)
Helmed HorrorV18. Duke's Study(must be summoned by Vanthampur)
2 impsV19. Tower Peak(invisible)
DUNGEON
3 spined devilsV20. Cellar(ordered to guard this chamber)
3 x 2 CultistsV22. Sewer Tunnels(patrolling counter-clockwise)
1d4 cultists (50%)V24. Dining Room(subtract from V33)
Barbed Devil + 4 CultistsV26. Temple of Zariel
Duke Vanthampur (11-25%)V26. Temple of Zariel
Duke Vanthampur (26-00%)V28. Secret Shrine
Bearded DevilV29. Prison(ordered to guard prisoners)
2 cultistsV32. Connecting Tunnel
6 cultistsV33. Cultists' Quarters
1d3-1 cultistsV34. Ritual Chamber(subtract from V33)
Thavius KreegV36. Vanthampur Vault(unlikely to leave sanctuary)

RANDOM ENCOUNTERS – MANOR:

  • 1 in 10 chance that Amrik is unexpectedly visiting during the day.
  • 1 in 20 chance that Mortlock is unexpectedly visiting during the day.
  • 1 in 6 chance per room that Slobberchops (DIA, p. 34) is there.
  • 1 in 10 chance per room of encountering an imp.
  • If not in V4. Servants’ Quarters, randomly determine Maid Ambra Fallwater’s by rolling 1d20.

SCHEDULE: Vanthampurs all gather for dinner (V9. Dining Room) once per tenday.

PRISONERS & ENEMIES OF VANTHAMPUR

There are several friendly characters in (and around) Vanthampur Manor that need to be tweaked slightly. Most of these are prisoners being held by the Vanthampurs.

REYA MANTLEMORN: As previously discussed, having Reya Mantlemorn tell the PCs that Thavius Kreeg is alive (instead of having the PCs discover that for themselves) is a bad choice. So if you still want Reya to show up, you need a different explanation. Fortunately, this is pretty simply: Reya knows that the devils of Avernus were responsible for the fall of Elturel. There’s nothing she can do for lost Elturel (particularly since she believes it destroyed), but she’ll honor her oaths as a Hellrider by seeking vengeance: Following her own leads, she’s discovered that the Vanthampurs are part of some sort of Zariel cult. (This will almost certainly not be news to the PCs at this point.) She wants to break into the manor to continue her investigation (and probably kill the Vanthampurs and any other cultists inside).

Option: If you don’t want to run Reya as a GMPC here, but do like the idea of her investigating the Vanthampurs, you can split the difference by having her locked up in Area V19. She investigated, she came, she got caught, she got locked up. Duke Vanthampur is trying to figure out how to safely ship her to the Poisoned Poseidon to be murdered.

FALASTER FISK: In the adventure as written, Falaster Fisk tells the PCs to take the infernal puzzlebox to Sylvira Savikas in Candlekeep to have it opened. He also, for some godforsaken reason, tells them exactly what’s in it before they do so. As with Reya, the adventure is shooting itself in the foot by needlessly deprotagonizing the PCs.

So what is Fisk doing here? This only requires a slight adjustment: Sylvira Savikas, like Reya Mantlemorn, followed independent leads and came to suspect that Duke Vanthampur is secretly a Zarielite. She sent Fisk to investigate. He got into the manor by pretending to interview for the recently vacant housekeeper position (DIA, p. 33), but got careless and was caught. Duke Vanthampur is still trying to get him to confess who sent him and how much they know.

If Falaster sees the infernal puzzlebox, he’ll recognize it for what it is as a result of his work with Sylvira. He’ll still recommend that the PCs take it to her in Candlekeep: She’s an expert in such devices and will know how to safely open it. (He can also warn them of the disastrous psychic consequences of a failed attempt to open it.)

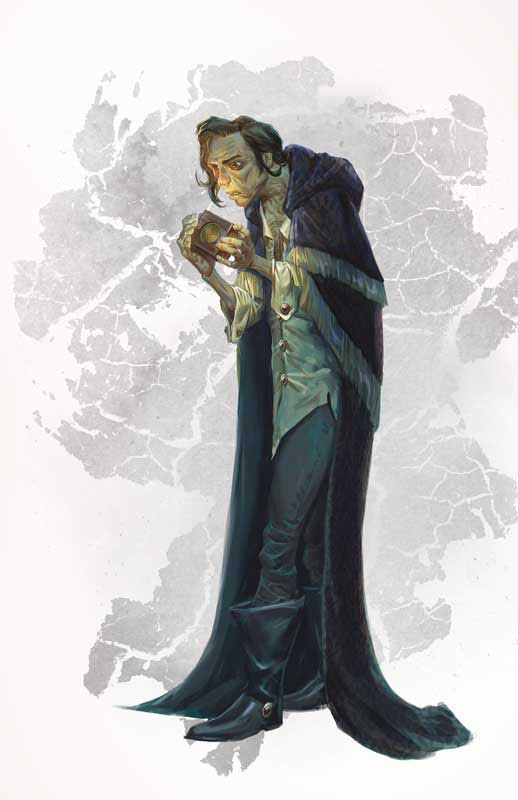
SATIIR THIONE-HHUNE: Satiir Thion-Hhune is described in Descent Into Avernus as a seventy-year-old aristocratic human woman. My brain somehow parsed that as seventeen-year-old, and I ended up picturing her as basically a young Claudia Christian:

Satiir Thione-Hhune (the Younger)

It’s a strong visual image, so it’s probably going to stick for me. (The seventy-year-old Satiir can be her grandmother.) As previously discussed in Part 3F, she was kidnapped by Bhaal cultists who were looting a Hhune treasury and taken to the Dungeon of the Dead Three, then transferred to Vanthampur Manor to be used as political leverage against the Hhune family when Vanthampur makes her move to become Grand Duke.

I put in some effort to untangle the Hhune family lore, but largely gave up when it became clear the effort involved was probably not worth it for what will almost certainly be a very minor character (see “Design Notes,” below, if you’re interested in taking up the project). The one important thing to note is that the Hhune family were once (and possibly still are) part of the inner cabal of the Knights of the Shield that venerated the Shield of the Hidden Lord and knew its true identity (see “Lore of Gargauth” in Part 3B of the Remix). This means that Satiir is likely to recognize the Shield of the Hidden Lord. This could take several forms:

  • She could be a true believer and member of the inner cabal. As a Gargauth cultist, she’ll know the Shield of the Hidden Lord for what it is. She will either attempt to convince the PCs that the Shield was stolen from the Hhune treasury so that they will “return” it to her, or she’ll report back to her family that the PCs have it (and the family will send Knights of the Shield to take it).
  • She could be a true believer and NOT a member of the inner cabal. She’ll recognize the shield from its depictions, but believe that it’s the Shield of Silvam. (Possibly to similar effect as the above. Or maybe she just fan-girls over it, misleading the PCs as to its true identity. Gargauth will happily play into being a stolen royal relic.)
  • In either of the scenarios above, Gargauth might telepathically communicate with Satiir and prompt her to similar (or different) effect according to his current agenda.
  • For something completely different, Satiir could be a rebellious teenager who’s familiar with the family’s secret worship of Gargauth, but has rejected it. This version of Satiir would recognize the Shield and warn the PCs that the Shield “speaks with the voice of Gargauth”, filling them in on at least part of its true history.

Design Notes: In the 14th century, Duke Inselm Hhune was the leader of the Knights of the Shield. He was somehow related to the Illehhune family. (Duke Tithkar Illehhune was responsible for first bringing the Shield of the Hidden Lord into the Knights of the Shield.) Duke Inselm was married to Lucia Thione-Hhune.

Duke Inselm was a self-made noble who bought his Tethyrian title of nobility and ALSO had a nephew who was part of the nobility (see Murder in Baldur’s Gate, p. 51). He arranged a marriage between his nephew and the heir of a patriar family in Baldur’s Gate. He then purchased the patriar family’s estate, and this somehow made the Hhunes a patriar family. (The estate also became the headquarters of the Knights of the Shield.)

At this point, logically, you’d have the Thione-Hhunes as Tethyrian nobles descending from Duke Inselm’s line and the Hhunes of Baldur’s Gate who would be descended from Inselm’s nephew.

But in Descent Into Avernus, you have both Satiir Thione-Hhune (who is being held “as leverage in the event that the Hhunes find out who stole the Shield of the Hidden Lord”) and Lady Lutecia Hhune, the head of the Hhune patriars who has no heirs and “faces the prospect of leaving her family home to a detested branch of the family when she dies.”

The Thione-Hhunes must be the detested branch, right? But if so, why would Duke Vanthampur kidnap one of them for “leverage”?

“Ah ha!”  It must be that the Thione-Hhunes, being descended from Lord Inselm, have continued as Gargauth cultists while the patriar Hhunes have broken away from that. Lady Lutecia detests the evil branch of the family. Vanthampur stole the Shield from the Thione-Hhunes and that’s why Satiir would give meaningful leverage to—

No. They stole the Shield from Lady Lutecia. Lutecia keeps the Shield locked up and wants it forgotten, but is also still a member of the Knights of the Shield and has devils working for her. Also the Knights are now a completely secret organization that nobody knows exists (instead of being a public organization with a secret cabal inside of it).

This is the point where I gave up.

SHALEEN ZORAZ: Shaleen is locked up because she discovered that Duke Vanthampur had rerouted the sewers to seize control of the Dungeon of the Dead Three. Minor tweak, but I recommend that Shaleen dug a little deeper and ALSO discovered that Vanthampur had similarly rerouted the sewers beneath her own manor.

KAEJIL ORUNMAR: Kaejil is also locked up with Shaleen in Area V19. No changes required.

THURSTWELL VANTHAMPUR

Thurstwell is a crippled spider stuck in his home, able to exercise his will upon the world only through his imp servitors while jealously observing his able-bodied siblings going out and about in the world.

Thurstwell VanthampurThurstwell’s imp spies can be found throughout the Vanthampur Investigations. As previously discussed, you’ll want him to take meaningful action in response to what his imps see. Options include:

  • He sends an imp to barter with the PCs. (He’d probably like them to kill one or both of his brothers. If he’s feeling daring, or if the PCs have already succeeded at eliminating his brothers, he might even ask them to kill his mother so that he can take her place at the head of the family. If the PCs were to go all in on this, you could have an alternate trajectory where, the job done, he asks them to take the infernal puzzlebox to Candlekeep and have it opened.)
  • He sends a murder squad of Dead Three Cultists (Descent Into Avernus, p. 28) to kill the PCs.
  • He sends an abduction squad to kidnap a refugee that the PCs care about so that he can use them as leverage. (Maybe to leverage them into an alliance. Maybe to force them to back off.)

V13. THURSTWELL’S BEDROOM

In addition to the normal key entry for his room (DIA, p. 35), this room includes a work table covered in papers, books, and other items. On this table can be found:

  • The infernal puzzlebox.
  • The Thurstwell’s Correspondence
  • A draconic mask made of bronze with a strange glaze upon its face. The mask shimmers different colors depending on the angle you look at it, varying from black to blue to green to red to white. (GM Note: This mask taken from the Tiamat relics stolen from the Hhunes, see the Dungeon of the Dead Three.)

THURSTWELL’S CORRESPONDENCE

My dear Thirsty,

It’s done. I’ve sent word to Vaaz. We’ll be rid of the oaf soon enough.

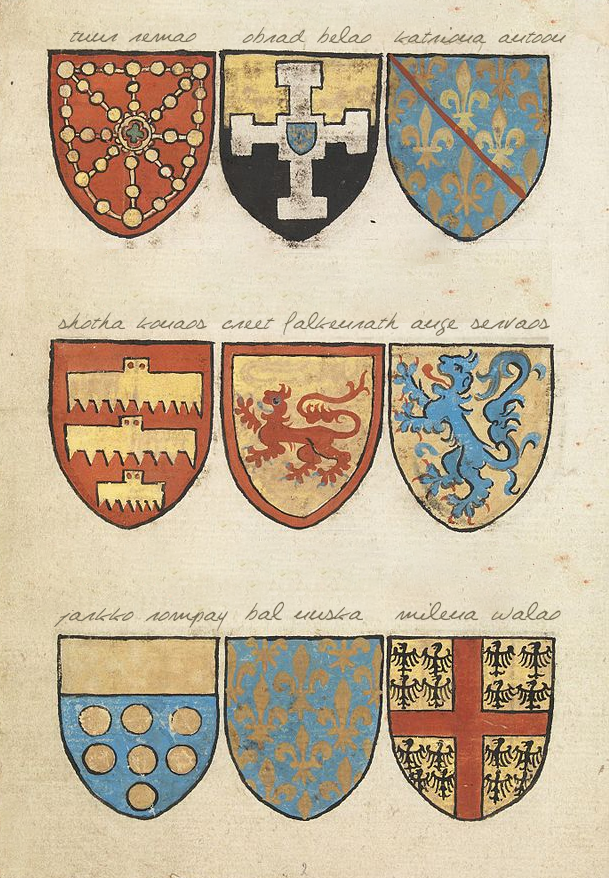
I could use more of your divinations, though. My research using Elturgard’s armorial rolls suggest that the Majerus family were quite bountiful with their loins both during and after their service to the Companion. Given how many brats they seem to have had, they were probably rutting in their saddles. It’s likely they have any number of heirs in the refugee camps, so I think it’ll be well worth your time to cast forth your seventh eye or whatever and identify them for me.

                                                                                                                Amrik


GM NOTE: The armorial rolls identify the name, coat of arms, and date of accolade for every knight in the Order of the Companion and the Riders of Elturel. See Part 3H: Trafficking Amrik.

Go to Part 3J: The Portyr Assassination

Go to Table of Contents

As we’ve previously discussed, Amrik has set himself up as a black market for smuggling refugees into Baldur’s Gate. He uses this position to identify and locate refugees who are or are related to Elturian knights and target them for the Dead Three murder squads, but it’s also an extremely profitable operation in its own right. He’s also beginning to branch out, offering assistance to refugees who are already in the city and looking to get passage out via the Docks.

Although Amrik is aware of the whole Vanthampur operation, it should be noted that he has no direct communication with the Poisoned Poseidon or the Dead Three cultists in general. Once he identifies a target, he sends that information to Mortlock at the Dungeon of the Dead Three and it’s Mortlock who coordinates with the Dead Three cult leaders.

SURVEILLANCE

As described in Descent Into Avernus, Amrik holds court at the Low Lantern tavern. If the PCs put his operation under surveillance, this is the type of activity they might observe:

Refugees meeting with Amrik. They’re likely looking to get help for family/friends still located outside the city (Amrik has some odd questions for them regarding family names, ancestors, etc.), but they might also be meeting with Amrik about money they still owe him or to make arrangements for their own passage out of Baldur’s Gate. (Having Amrik meeting with a set of refugees when the PCs first show up is probably a good choice.)

Amrik’s agents. Generally reporting or checking in with Amrik. These agents all have official government passes allowing them to pass in and out of Basilisk Gate (reputedly for business with Little Calimshan). If the PCs follow them, they’ll actually head into the refugee camps north of the city, where they circulate looking for those who can either pay Amrik’s fees or have some connection to Elturian knights. There are six of these agents (spy, MM p. 349):

  • Botros Cloudfury
  • Petra Czismadia
  • Neroni
  • Theophila
  • Apolena Giolla
  • Ratnam

Cliffgate runs. Amrik has bribed Gauntlet Fausti, who guards Cliffgate at night. Amrik’s agents lead small groups of refugees along old smugglers’ paths on Dusthawk Hill during Gauntlet Fausti’s shift, pay off Fausti, and lead them into the city.

Design Note: If the PCs are shadowing one of these Cliffgate runs and you want to add a little texture, it may turn out that somebody lays claim to the smugglers’ path that Amrik’s operation has been poaching. A bunch of thugs working for Straightstick (DIA, p. 171) intercept the refugee group and make it clear that their boss expects a cut of the action. And they’re going to make an example of the refugees to make sure their message is heard loud and clear.

Maybe the PCs are actually doing one of these runs for themselves! You could include details in Amrik’s paperwork indicating that a Cliffgate run is already scheduled: By taking out Amrik, they’ve left the refugees waiting for him in the camp high-and-dry.

Messengers, bearing messages from Amrik to the Dungeon of the Dead Three and/or Thurstwell at Vanthampur Manor. These duties could be variably carried out by Amrik’s agents, Dead Three cultists, or Thurstwell’s imps.

AMRIK’S PAPERWORK

Amrik has a variety of papers associated with this work that are usually spread out on the table in front of him at the Low Lantern. In the late evening, when he returns home, he carries them in a valise. Overnight they are kept in the locked chest in his bedroom (Area V15 in Vanthampur Manor).

I recommend shuffling these up into a random order before handing them over to the players.


ARMORIAL ROLLS OF ELTURGARD

This bundle of vellum scrolls proves to be the Armorial Rolls of Elturgard, detailing the name, coat of arms, and date of accolade for every knight in the Order of the Companion and the Riders of Elturel.

Armorial Rolls of Elturgard


GM NOTE: Closer inspection and a DC 14 Intelligence (History) or Intelligence (Perception) check reveals that these do not appear to be merely copies of the Armorial Rolls; they bear the High Observer’s seal and must have been taken directly from the High Hall in Elturel.


A PORTFOLIO OF GILTED RED LEATHER

Portfolio of Gilted Red Leather

A portfolio case containing an eclectic collection of genealogical and property records, most of which seem to be focused on or around the city of Elturel. Sheets of parchment are covered in notes relating to these records, tracing patterns of inheritance originating from a seemingly arbitrary selection of progenitors.

In other cases, it appears that the opposite work is being done, with lines of inheritance being traced backwards into the past. Some of these are marked with the small sigil of a sword in the upper left-hand corner; others have black X marked in the same spot.


GM NOTE: The progenitors in this case are all Elturian knights. Those having their lines of inheritance traced backwards are all refugees who have presented themselves to Amrik’s agents. The names on Amrik’s List (see below) are all marked with the sword sigil (indicating they are descended from Elturian knights).


AMRIK’S LIST

For the Poisoned Poseidon:

Remao
Akhila
Aneta D.
Servaos
Silverleaf
Braam
Oshrat
Nuska
Edmao
Tuur S.
Veer
Stien


LETTERS FROM THURSTWELL

Amrik,

I completely concur with your last. I recommend using the imp who brings this letter to you to send word to Vaaz to proceed. He’ll be able to slip into the Frolicking Nymph quietly and invisibly, deliver the missive undetected, and then return to me at the manor with none the wiser.

Thurstwell Vanthampur


Amrik,

On your advice, I have removed the Elturian puzzlebox from the family vault where mother had secured it. I have no idea how angry she might be if she found out, but I am utterly fascinated by it. I am certain that there are secrets of Zariel locked within it that will perhaps unlock power — the sort of power you and I have often dreamed of.Unfortunately, I have had no luck in determining how to open the thrice-damned thing. But I will keep you informed of any progress I make.

Thurstwell Vanthampur


LETTER FROM MORTLOCK

Amrik,

Thank you for the most recent targets. I will pass them along to Flennis immediately so that he can send out his teams and begin surveillance. He did request that, if possible, you include more information on those currently associating with them, as those relationships often make tracking them down easier given the general chaos of their circumstances.

There will be no need for you to send any of your agents to the bathhouse. Not only do I have things well in hand here, but you know as well as I do that mother had good reasons for keeping your operations separate from those of our allies.

Mortlock Vanthampur


Go to Part 3I: Vanthampur Manor

Purple Dice

Say that you want to randomly pick one of the PCs:

2 = coin flip, even/odds
3 = d6/2
4 = d4
5 = d10/2 or d6 + reroll 6’s
6 = d6
7 = (sure, I guess) d8 + reroll 8’s
8 = d8
9 = (seriously?) d10 + reroll 10’s
10 = d10
11 = stahp, u hav tu mny playrs

Obviously you can use this sort of technique for any random number you need to generate.

This is a sequel to Random GM Tip: Calling in the Big Guns. That article dealt with strategies for dealing with PCs who go to powerful patrons for help; NPCs that logically should want to help them with their current situation, but whose involvement would effectively sideline the PCs and possibly remove them from the scenario entirely.

This article deals with a similar problem: What happens when the PCs, when confronted with some horrible crime or circumstance, do the logical thing and report it to the proper authorities? For example, the police. Or the CIA. Or the army. The big, organized forces of Little Guys who enforce civilization.

Many of the techniques from the previous article will also work for this situation (and vice vera), but in practice they’re different enough to pose unique challenges. For example, while it’s relatively easy to explain why Elminster is busy and can’t help right now, it’s more difficult to explain why the entire police department would be so preoccupied that none of them can respond to a crisis.

(Realistically, of course, the difference between the Big Guns and the Little Guys is a spectrum with plenty of gray in the middle of it: The Chicago PD is definitely the “proper authorities.” A small town sheriff without backup looks a lot more like a solitary patron.)

In my experience, calling in the Little Guys also tends to be more disruptive than calling in a Big Gun. I think this is because most RPGs are structured around small bands of extraordinary heroes. Whereas Big Guns tend to work in the same paradigm, the inclusion of Big Brother seems to simply drown the PCs out. To mix my metaphors, the PCs end up being a fish out of water.

(This assumes that it’s the players who are deciding to reach out to the NPCs. Oddly, if the situation is reversed and it’s the GM who’s pushing the NPCs into the scenario I find that the exact opposite is true: Big Guns become far more disruptive and the Little Guys are manageable. I suspect this is for the exact same reason. The Big Gun operates in the same paradigm as the PCs, so when the GM tries to shove one of them down the players’ throats it feels as if the PCs are just being replaced by a newer, shinier model that they don’t get to play. Whereas when the Little Guys show up uninvited, they tend to be interpreted as simply another obstacle that our strong, independent heroes need to figure out a way to overcome. But I digress.)

So the PCs have picked up the phone and called the cops.

What happens next?

#1. THEY DON’T BELIEVE THEM

Supernatural

This solution can be basically a genre convention for any modern campaign featuring the paranormal. Think of shows like Buffy the Vampire Slayer and Supernatural: If you go to the cops babbling about werewolves, they aren’t going to believe you. They’ll probably just end up making the problem worse.

You can even use this paradigm in campaigns where the PCs are the authority. In fact, if you frame it correctly, it can let the PCs both simultaneously belong to a government agency AND be a small band of extraordinary heroes. Think The X-Files.

But this conceit doesn’t require the supernatural, either. Think about the beginning of Die Hard, where John McClane is continually trying to convince the LAPD that the terrorist threat is real, but they keep dismissing him as a kook or prank caller.

#2. LOST IN BUREAUCRACY

Alternatively, the PCs detect an oncoming crisis, warn the appropriate authorities, and… nothing. The authorities don’t do anything. Or they do something, but it’s misguided and doesn’t actually solve the problem. Or there’s a committee that’s going to figure out what the proper course of action is, but it’s clear by the time they’re done deliberating that the asteroid will have already obliterated Venice (or whatever).

Look no further than restraining orders that take three weeks to process when the guy bought a gun yesterday, the government response to the climate crisis, or the clusterfuck pandemic response in places like Brazil, England, and the United States. If anything, it becomes even easier to find malfeasance, mismanagement, and neglect at the local level.

You can send a strong signal early in a campaign that the Little Guys aren’t going to help the PCs by sending the bureaucracy looking for them first. Think about Walter Peck, the abusive EPA rep in the original Ghostbusters.

#3. THE BAD GUYS ARE CONNECTED

Coming back to Die Hard, do you remember that scene where McClane is celebrating because he can see the cop cars coming down the boulevard… but then the bad guys call it in as a false alarm and the cops flip off their sirens, turn around, and leave?

This scenario covers any number of possibilities for how the bad guys can counter the PCs notifying the authorities, like the horror and suspense movies where the heroes see something suspicious and call the cops, but by the time the cops show up, the bad guys have had a chance to make everything look normal.

It may be even more insidious than that, however, with the bad guys having already infiltrated the Little Guys: That might just be a few crooked cops so you don’t know who to trust, or it could be a conspiracy that secretly controls the entire local government. (Or an invasion of body-snatchers to the same effect.)

#4. THEY DEFER TO THE PCs

At the opposite end of the spectrum, let the Little Guys recognize that the PCs are the most qualified, the most skilled, and/or have the most insight into what’s happening. They’ll either partner up with the PCs or simply put resources (and manpower) at their disposal.

One variant of this that can work particularly well is for each PC to be put in command of a squad of NPCs. You can let the players run the whole squad or, if the squads split up to pursue multiple objectives simultaneously, you can use troupe-style play (in which all the other players take an NPC in the current PC’s squad).

But what really makes this technique work is to actually put the players in charge: Give them access to the resources, but let them figure out how they want to utilize them.

This can be a fine line to walk if you want to make sure that it doesn’t permanently transform the campaign, but it’s usually not too difficult to justify why this is a temporary circumstance that only applies to the immediate situation. (Although maybe permanently shifting the campaign is exactly the right way to go!)

Go to Table of Contents

“Dungeons should always be heavily xandered.” – Xandering the Dungeon

This article will probably make more sense if you read Xandering the Dungeon first, but the short version is that non-linear dungeons are more interesting than linear ones. The latter feature, at best, navigational pseudo-choices which lead the PCs through an inflexible sequence of prepackaged experiences. A xandered dungeon, on the other hand allows each group to…

…actively make the dungeon their own. They can retreat, circle around, rush ahead, go back over old ground, poke around, sneak through, interrogate the locals for secret routes… The possibilities are endless because the environment isn’t forcing them along a pre-designed path.

As demonstrated in Xandering the Dungeon, you can use Melan diagrams to look at the navigational structure of the dungeon (removing the “noise” of passages which twist around without every deviating from a single path). For example, this is what the Dungeon of the Dead Three looks like (minus the secret door that we removed):

Dungeon of the Dead Three - Melan Diagram

Broken down like this, it’s immediately apparent, as we briefly discussed in Part 3F, that this is a fairly linear dungeon: There’s a couple of loops and a few side branches, but the furthest you’ll ever get off the straight path from entrance to Area D29 (where the preprogrammed conclusion of the adventure is located) are the three rooms leading to the dead end in Area D16.

(Even moreso than other installments, this one will probably benefit from directly cross-referencing the module. The map for the Dungeon of the Dead Three is located on p. 21 of Descent Into Avernus.)

To be clear, this a well-designed dungeon. The two early loops (D5 thru D9 and the D12-D13-D14-D17-D18 loop) joined by a chokepoint give some tactical flexibility. What we refer to as minor elevations shifts (where areas on the same conceptual level of the dungeon are nevertheless at different heights relative to each other) are used ambitiously and to good effect, particularly when emphasized with the flooding in the dungeon (and, in the Remix, the corpsedamp gas leaks).

But as I was reading Descent Into Avernus, I couldn’t shake the feeling that the Dungeon of the Dead Three was calling out to be xandered.

THE LYNCHPIN

The lynchpin, for me, is Area D9. As we already discussed in Part 3F, this room has three doors decorated with bas reliefs — each associated with one of the Dead Three. As part of the Remix, we’ve already realigned these doors so that the images are associated with the cultists behind each door:

Dungeon of the Dead Three - Area D9

But although the Bhaal and Bane locations shown on the map above are the primary shrines of those gods, the Myrkullian cultists behind the third door are just hanging out in that room. Myrkul’s altar is way over here, on the far side of Bane’s altar:

Dungeon of the Dead Three - Myrkul's Altar

The image I have in my mind is to even more strongly base the dungeon around the three doors in Area D9: to have those doors give a very strong indication to the players of the dungeon geography that lies ahead of them.

The first broad stroke, therefore, is to reconfigure things so that Myrkul’s temple lies behind the southern door in Area D9.

QUICK TEMPLE VERSION: If that’s all you want do, you could move D17 – Myrkul’s Altar so that it lies between D10 and D11. I’d recommend also taking D22 – The Torture Chamber and placing it where D17 currently is to keep that strong second loop. You could leave the current location of D22 an empty room or just have the corridor run through there.)

THE FULL XANDER

But if you wanted to fully xander the dungeon, you’ll need to do more than that. My first step would be to mentally break the dungeon down into distinct “chunks.” For example, you can think of the three separate “temple complexes” — the small clusters of rooms each associated with one of the Dead Three Gods.

My conceptual chunks for the dungeon are:

  • The three temple complexes.
  • A “crypt complex” that has been partially converted into living quarters (Areas D19 thru D26, sans the torture chamber in D22).
  • The “inner sanctum” (Areas D27 thru D33, everything behind the secret door in the original dungeon)
  • The “D15 complex” consists of D14, D15 (explosion #1), and D16.
  • Area D18 (explosion #2) is a major feature by itself and not really part of another room complex.

Next, we’ll want to make sure we maintain the cool vertical variation in the dungeon, with the lower recesses flooded and gas leaks entering in the mid- or upper levels of the complex. If we just want to redo the layout (without re-keying any of the areas), we’ll want to make sure D15 and D18 are positioned in relation to the gas leaks in a way that makes sense.

With everything broken apart in conceptual chunks, we can play around with how we want to arrange them at a macro-level. My creative instincts immediately suggest:

  • Connect all three temple complexes to the deeper recesses of the dungeon (in the same manner that the Bane temple is connected).
  • Do at least some cross-connection between the temple complexes. I’m leaning towards the idea of a secret connection between two of them.
  • There should be a kind of “plateau” or set of plateaus where the gas leaks (in our original key these are D13, D17, and D19) are designed to flow down into D15 and D18.

The next question is how to position the crypt complex and inner sanctum. Broadly speaking, I think there are three options:

  • The temple complexes could all connect to Area D18, and then the crypt complex and inner sanctum could branch off from there.
  • The temple complexes could all independently connect to the crypt complex (temples connected to shared living quarters makes sense), and then the inner sanctum lies beyond them (probably connected via D18?).
  • The temples could connect to both the crypt complexes and Area D18, and then those could both lead to the inner sanctum. (You could also Venn diagram this, where two of the temples go to the crypt complexes and two go to Area D18. That would mean one of the temples would need to walk all the way through the inner sanctum or through a different temple to get to their quarters, though, which may not make sense.)

We also have the D15 complex, which could be used in a couple different ways:

  • It probably just branches off at whatever location makes sense based on the gas leak and, just as in the published adventure, dead ends.
  • Alternatively, it could do that (it needs to be positioned so that gas can leak down into D15) and ALSO be extended so that it serves as the connective tissue between two other sections described above. (For example, it could be the secret passage connecting two of the temple complexes. Or it might be the passage you have to follow from the crypt complex to the inner sanctum in the third option above, although that means you have to go through an explosive chamber no matter which route you take… maybe that’s good? Maybe that’s a little boring in terms of variable navigation?)

(This, it should be noted, is also how I usually design a dungeon from scratch: I list the big conceptual chunks that I want the dungeon to have and then I move them around until I have an interesting configuration. Stuff will still shift and change once I start mapping out the details, but it’s a lot easier to figure out the big picture first. This advice extends beyond dungeons, too: When I was working on “Seversen’s Mysterious Estate” with Jonathan Tweet for Over the Edge: Welcome to the Island, Jonathan brainstormed a bunch of cool stuff for the estate, I brainstormed some more, and then the pieces got juggled around until they had a compelling flow. But I digress.)

Looking at our brainstorming here, we can make some “final” decisions and sketch it out:

Dungeon of the Dead Three - Jaquays Diagram

MAPPING THE DUNGEON

The next step would be to actually map out the revised dungeon. I’m going to leave that as a project for you to pursue if you’re so interested, but here are a few thoughts:

  • The Bhaal Temple remains essentially identical to the map as it currently exists, except that there’s a secret passage behind the tapestry in Area D8 that leads to the crypt complex. (I think the passage is probably NOT secret coming the other direction.)
  • Coming from the Myrkul Temple to the Bane Temple, you basically have D14 to D15 to D16, and then another stair up from D16 that goes into the Bane Temple.
  • The “plateau” of rooms from which gas leaks down into D15 and D18 is in the junction between the Myrkul temple complex and the crypt complex: Areas D13 and D17 are, of course, part of the Myrkul temple and Area D19 must be kind of in the same “corner” as the stairs leading down to D15 and D18.
  • I imagine the Banites getting to their quarters in the crypt complex by going through the D15 Complex and briefly passing through the corner of the Myrkul temple complex (but not the temple itself).
  • The Inner Sanctum is also largely identical to the current map, with passages from the crypt complex and D18 coming together to enter Area D27 through a single door.

Make sure to include the minor elevation shifts and keep the flooded portions in the lower section of the dungeon! If you can actually arrange it so that the collapsed sections of D13, D17, and D19 are all clearly part of the same collapse, that would probably also give a good effect!

Go to Part 3H: Trafficking Amrik


JUSTIN ALEXANDER About - Bibliography
Acting Resume

ROLEPLAYING GAMES Gamemastery 101
RPG Scenarios
RPG Cheat Sheets
RPG Miscellaneous
Dungeons & Dragons
Ptolus: Shadow of the Spire

Alexandrian Auxiliary
Check These Out
Essays
Other Games
Reviews
Shakespeare Sunday
Thoughts of the Day
Videos

Patrons
Open Game License

BlueskyMastodonTwitter

Archives

Recent Posts

Recent Comments

Copyright © The Alexandrian. All rights reserved.