TM and © 2022 Monte Cook Games, LLC
SPOILERS FOR PTOLUS: NIGHT OF DISSOLUTION
In the Night of Dissolution, a campaign for 4th to 9th level characters by Monte Cook set in the city of Ptolus, the investigations of the PCs bring them to the Mrathrach Machine, a huge structure of chaositech which has been assembled in a cavern beneath the White House, a gambling establishment owned by the lich Aggah-Shan in the Oldtown district.
In the original adventure, the PCs are led to the Mrathrach Machine via an underground tunnel. But whether they come at the complex from above or below, they may nevertheless find themselves exploring the White House or the catacombs of Aggah-Shan.
The White House and Aggah-Shan’s Catacombs are briefly described in Ptolus, p. 310-312. The Mrathrach Machine is described in Night of Dissolution. The material here is designed to enhance this material for your campaign.
These notes were developed for use in my Ptolus: In the Shadow of the Spire campaign. They’ve been adapted to 5E for use with the newly adapted release of the Ptolus sourcebook and campaigns.
Part 1: The White House
Part 2: Aggah-Shan’s Catacombs
Part 3: Mrathrach Machine
Part 4: The Balacazar Job
Part 5: Mrathrach Table Raids
THE WHITE HOUSE
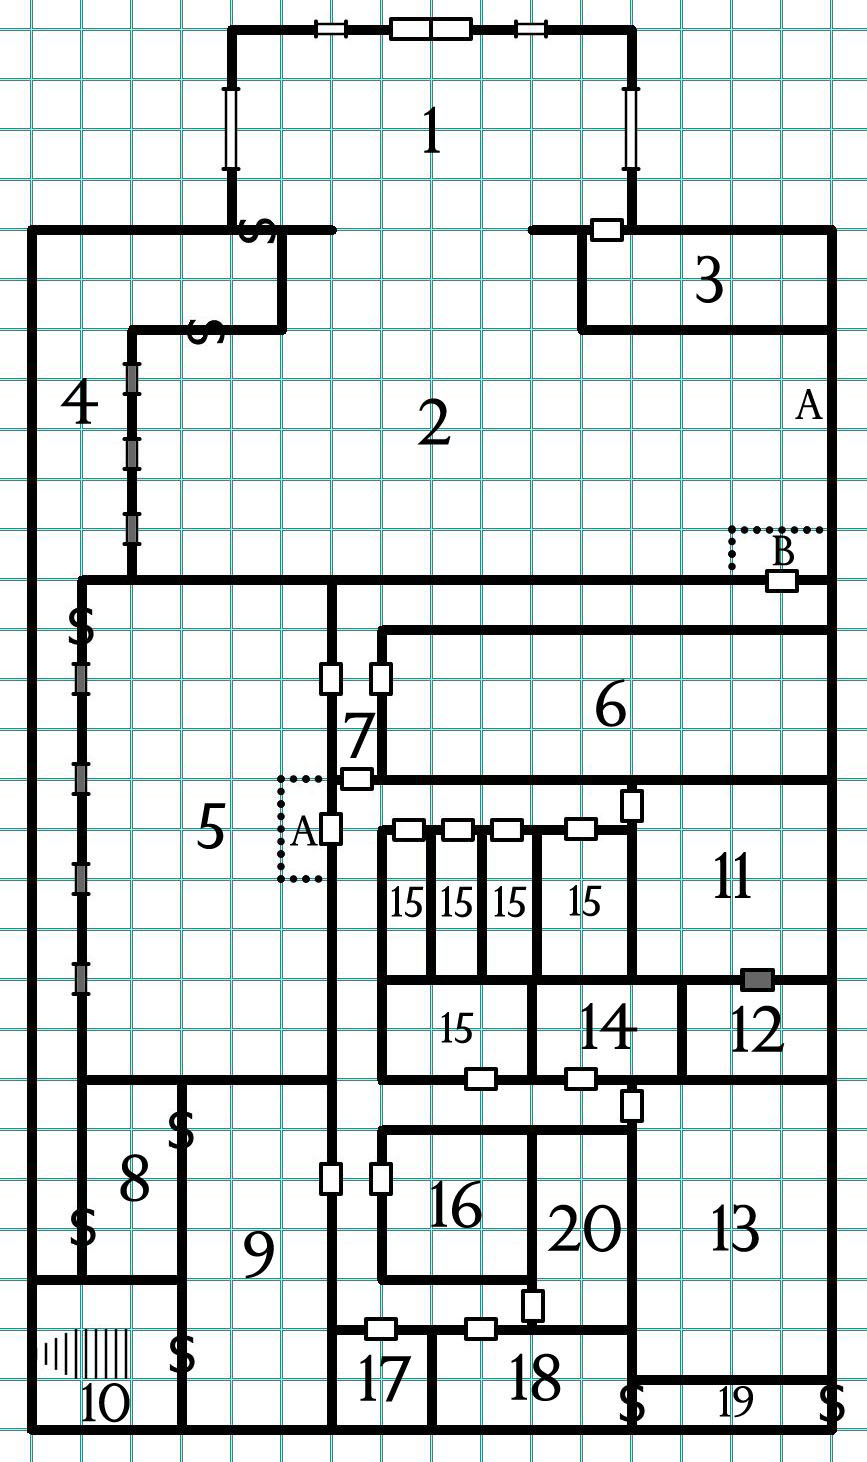
Note: This map is based on the map found on p. 311 of Ptolus, but has been modified to include additional details.
LOCATION OF THE WHITE HOUSE
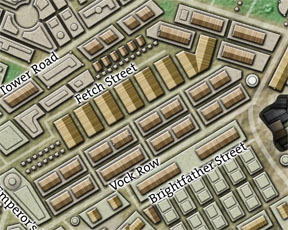
The White House is located on Fetch Street in Oldtown.
ADVERSARY ROSTER
| Area 1 | 2 Guards |
| Area 4 | 6 Guards + Guard Captain |
| Area 7 | 1 Guard |
| Area 8 | 1d4 Guards |
| Area 11 | 4 Advanced Guards |
| Area 13 | 4 Advanced Guards |
| Area 16 | Barras Noven* |
The adversary roster only lists the armed force the PCs are likely to meet if they cause trouble. The White House is filled with patrons, dealers, table managers, moneychangers, etc. Of particular note is Thurman Rees (steward, Ptolus, p. 613), the day-to-day manager who can usually be found in his office (Area 16). (Note that Aggah-Shan is currently out of town.)
The White House is open 24-hours per day. The guards rotate, but the general staffing doesn’t shift between day and night.
GUARDS: Veteran (MM, p. 350)
ADVANCED GUARDS: Knight (MM, p. 347)
GUARD CAPTAIN: Master Thief (Ptolus, p. 612)
BARRAS NOVEN: Barras Noven is Thurman Rees’ brother. He normally hangs out at the Onyx Spider (Ptolus, p.203). Rees hires him if the White House is experiencing any trouble (e.g., if the PCs or other adventurers raid the place or the Balacazars perform a heist). Once hired, Barras stays in Area 16 unless trouble arises. Barras doesn’t want trouble with the city watch, however, and if the authorities are involved he’ll try to slip out the secret back door (Area 19).
EXTERIOR
- White marble façade. Entrance flanked with massive columns.
- There are a half dozen messengers hanging around outside, waiting to service the late-night crowd.
AREA 1 – ENTRANCE
The White House is fashioned to emphasize a youthful, exuberant luxury. (Some might describe it as “gaudy.”) It lavishes its patrons with pleasures.
STAINED GLASS WINDOWS: Large, stained glass windows flank the chamber, depicting the patron saints of Luck and Grace.
CLOAKROOM DOOR: A man at the door of the cloakroom (Area 3) will check bags and weapons for 1 sp per item. All weapons must be checked.
COMPANIONS: “Companions” are available for rent in the corner of the room.
AREA 2 – PUBLIC GAMBLING HALL
A dozen or so tables, sporting the highest stakes. Games include:
- Green Dragonscales
- Wheels
- Poker
- Orcsnout
MRATHRACH WHEEL (A): The White House’s Mrathrach installation. A large crowd surrounds it.
MONEY CAGE (B): For the purchasing and exchange of chips. Contains 1,500 gp in various coins.
MIRRORS: Large, floor-to-ceiling mirrors line the walls, making the room feel much larger than it is. A DC 15 Wisdom (Perception) check identifies them as one-way mirrors (looking out from Area 4).
AREA 3 – CLOAK ROOM
- Contains a variety of common weapons, cloaks, etc.
- Contains 1d6-3 magic weapons.
AREA 4 – FLOOR GUARDS
The White House doesn’t want a bunch of armed guards harshing the vibe on the gambling room floor, but they wait here where they can respond quickly through the secret door.
- One-way mirrors look out onto the public gambling hall (Area 2).
- There are comfortable chairs for the guards to sit in while others walk up and down the length of the wall looking through the windows into gambling halls (Area 2 and Area 5).
SECRET DOORS: DC 15 Intelligence (Investigation) check. DC 20 Dexterity (Thieves’ Tools) to pick the lock.
AREA 5 – PRIVATE GAMBLING HALL
A private gambling room for VIPS, who are brought in through the secret doors in Area 4.
MONEY CAGE (A): Contains 9,000 gp in various coinage.
AREA 6 – PRIVATE LOUNGE
“Companions” or a concierge will bring high-rollers back here. There are a dozen or so prostitutes/exotic dancers lounging or performing here.
AREA 7 – EMPLOYEE-ONLY DOOR
There’s always a guard standing on duty here. Only employees are allowed into the rear of the building.
AREA 8 – GUARD’S LOUNGE
A few chairs and a cot.
Most of the guards are NOT aware of the secret door leading to Aggah-Shan’s office (Area 9); only the Guard Captain and Advanced Guards.
SECRET DOORS: DC 15 Intelligence (Investigation) check. DC 20 Dexterity (Thieves’ Tools) to pick the lock.
AREA 9 – AGGAH-SHAN’S OFFICE
A huge, lavish office.
- An imposing, dark-stained oak desk.
- A plush rug that your feet sink luxuriously into.
- A series of weapons hanging on the paneled walls.
RUG TRAP: Anyone approaching within 5 feet of the desk who doesn’t say the current verbal passphrase must make a DC 20 Dexterity saving throw or be restrained by the rug, which becomes sticky and also starts drawing trapped characters down into it. (You’re literally sinking into the rug!) Restrained characters have 1d4 rounds to succeed at a DC 16 Strength saving throw to free themselves. If they don’t, they vanish completely into the rug and begin to suffocate. In addition, they suffer 1d6 points of damage per round from constriction. Once fully “submerged,” they can still escape with a DC 20 Strength saving throw.
- Magical trap
- DC 20 Wisdom (Perception) check or DC 15 Intelligence (Investigation) check to note the subtle prehensile movement of the rug (in an activated area).
- DC 15 Intelligence (Arcana) to identify the nature of the trap.
- A dispel magic spell will suppress the trap for 2d6 rounds (also freeing anyone trapped inside the rug).
Aggah-Shan and the Guard Captain also know a set of command words which can activate the trap in any section of the rug, or the entire floor. (Or, alternatively, end the effect.)
DESK: The desk is surprisingly sparse, containing no written matter at all. It does have a secret drawer (DC 16 Intelligence (Investigation) check to find) which contains a stolen Balacazar ledger and a key to the lockbox in Area 20.
Balacazar Ledger: Details payments, transactions, shipments, and other information that implicates the Balacazar crime bosses in Midtown, South Market, and North Market.
WEAPONS: Inspecting the weapons hanging on the walls notes that each one has dried blood on its blade.
SECRET DOORS: DC 15 Intelligence (Investigation) check. DC 20 Dexterity (Thieves’ Tools) to pick the lock.
AREA 10 – TO AGGAH-SHAN’S LAIR
These stairs lead down to Area 1 of Aggah-Shan’s Catacombs.
AREA 11 – VAULT GUARD ROOM
This is the antechamber to the White House’s vault.
HALL DOOR (Steel-Cored): AC 19, 40 hp, DC 18 Dexterity (Thieves’ Tools)
VAULT DOOR (10-in. iron): AC 19, 300 hp, DC 24 Dexterity (Thieves’ Tools)
AREA 12 – VAULT
The vault itself is teleport-indicted. (You cannot teleport in or out.)
COIN: Coffers of copper, silver, and gold collected from the gambling floors.
- 19,400 cp
- 25,800 sp
- 6,000 gp
JEWELS: 24,000 gp. 14,000 spread across 65 incredibly rare jewels; the rest in small diamonds, rubies, and pearls.
ART: 50,000 gp in rare art.
Design Note: The expectation here is that if the PCs liberally loot the vault, Aggah-Shan will track them down and make them pay for it for the rest of their (likely very short lives). He’s also, at least for the moment, a legal business owner — so he’ll simultaneously send the City Watch after them. Removing the bulky wealth, particularly the art, should also be non-trivial (and fencing it even moreso).
AREA 13 – MRATHRACH CONSTRUCTION AREA
Several long workbenches run down the length of this room, each covered in bizarre equipment of a vaguely biological nature.
Half-completed Mrathrach tables lean up against the far wall.
WORKBENCHES: The workbenches have several chaositech modules under construction, as well as a variety of papers including the Modified Mrathrach Tower Plans and Chaositech Module Shipping Manifest.
- DM Note: The “warehouse off Flamemoth Way” belongs to the Surgeon in the Shadows (see Night of Dissolution, p. 39). The Modified Mrathrach Tower Plans reveal that Aggah-Shan is planning to betray his cultist allies and seize control of the Mrathrach Machine.
CHAOSITECH MODULE SHIPPING MANIFEST
This final delivery completely our supply of 25 bones of steel in paired, syncrotic modules customized to your requested specifications.
Deliver the payment of 5,000 platinum coins to the warehouse off Flamemoth Way.
MODIFIED MRATHRACH TOWER PLANS
Aggah-Shan–
I have enclosed the plans necessary for modifying the Mrathrach receptor modules within the Tower. The partial overlaying of your cerebral patterns onto the final matrix should reward you with the control you desire.
I am destroying my copies of these records, so that any potential leaks down here won’t get back to the Tolling Bell.
Caldor
AREA 14 – TAINT VICTIM
A victim of chaositech taint is strapped to the bed. Flesh of the nose has rotted away. There’s bleeding from the eyes and fingernails. A greasy, yellow sweat. The victim is incoherent and semi-conscious (moaning softly).
- DM Note: This room is normally use das a prostitution suite (see Area 15).
WHITE HOUSE HEALER’S REPORT: Located on the bedside table.
- DM Note: Mala Cathord can be tracked down with a DC 12 Charisma (Investigation) check asking around Ptolus. She’s working on the case quietly because her brother owes a great deal of money to Aggah-Shan.
WHITE HOUSE HEALER’S REPORT
Notes taken by Mala Cathord, Healer of the Sacred Heat.
Patient’s Name: Haffe Brin
Patient collapsed while serving as an operator at the White House.
Symptoms are resisting treatment.
There is a fundamental corruption of the flesh; none of my efforts are having any effect. The corruption seems to be feeding upon itself.
Fingernails are chalky and weak. Sweat is beginning to manifest the inner corruption.
AREA 15 – PROSTITUTION SUITE
A private room for use by the White House “companions.” They take their johns back here (through or from Area 6).
The larger chamber keyed as Area 15 is a lavish suite. The others are fairly basic affairs with a simple bed.
50% chance that any given room is currently occupied.
AREA 16 – THURMAN REES’ OFFICE
Thurman Rees is the day-to-day manager of the White House. He has keys to all doors in the White House, as well as the lockbox in Area 20.
AREA 17 – PRIVY
Pretty much what you’d expect.
AREA 18 – FAKE OFFICE
This appears to be an office, but it’s actually maintained as a fake front to disguise the presence of the emergency bolt hole (Area 19).
A DC 12 Intelligence (Investigation) check notices an unusual coating of dust and other signs that the office isn’t actually used.
SECRET DOOR: DC 15 Intelligence (Investigation) check to find, DC 18 Dexterity (Thieves’ Tools) to unlock.
AREA 19 – EMERGENCY EXIT
A short hallway, mostly undecorated.
The secret doors are obvious from inside this hall.
BOLT DOORS: DC 15 Intelligence (Investigation) check to find, DC 18 Dexterity (Thieves’ Tools) to unlock.
AREA 20 – GAMBLING RECORDS
A relatively bare office. There’s a large, double-locked box sitting on a table.
BOX: DC 20 Dexterity (Thieves’ Tools), contains the Gambling Records. (It takes some time to piece out the details revealed by these records.)
- GM Note: Lomwell’s refers to Lomwell’s Office (Ptolus, p. 209). The other locations are detailed in the Mrathrach Table Raids.
GAMBLING RECORDS
These records detail massive payments to Aggah-Shan from various gambling establishments around town, including:
- Cock Pit (in South Market)
- Urdoch’s “Mrathrach Holes” in the Warrens (some sort of collective operation)
- Temple of the One-Eyed God
- Broken Spine (in the Docks)
- Hell’s Door (in Midtown)
- Lomwell’s (in Midtown)
Business is brisk and healthy, with one exception: Most or all of Aggah-Shan’s establishments are accepting large losses on Mrathrach games.
There’s also a complaint from a local boss about his dealers falling ill and the difficulty of finding replacements. “Figure this out. We’re sick of it down here.”
Go to Part 2: Aggah-Shan’s Catacombs