
In Night’s Black Agents, the PCs are retired intelligence agents. Maybe they left willingly; maybe they’re ex-pats on the run from their own governments. Regardless, they’ve been putting their skills to use as mercenaries, doing whatever jobs their consciences can live with in the gray and black markets of the world.
And then they discover that vampires are real.
In fact, there’s a vast vampire conspiracy. It’s infiltrated (or has begun infiltrating) every corner of the modern world, feeding the murderous hunger of the undead.
Which, of course, means that — even as their minds reel from the sanity-shattering immensity of this revelation — the agents must dust off their skills one last time and save the world.
It’s not like anyone is going to believe them, after all.
In large part, Night’s Black Agents is driven simply and entirely by the immense erudition of Kenneth Hite, whose mastery and appreciation of both the espionage and vampires genres is vast. Even more impressive is Hite’s success in boiling his knowledge down onto the page and making it effortlessly accessible to you.
Sure, you’ll benefit mightily from flipping to “Sources” on page 207 and at least sampling the array of vampire and spy fiction that Hite recommends. But the point is that you don’t need to, because Hite has packed all that lore into this remarkably thin rulebook in the most practical and useful ways possible. With nothing but Night’s Black Agents in hand, you will be able to dial in everything from James Bond to John Le Carre; from Dracula to Buffy the Vampire Slayer.
THE GUMSHOE SYSTEM

The GUMSHOE system was originally designed by Robin D. Laws explicitly for designing and running mystery scenarios. It’s been adapted into a dozen different games over the years, and Night’s Black Agents isn’t even Hite’s first rodeo. (He previously designed Trail of Cthulhu.)
The central conceit of the GUMSHOE system is that it divides all of the PCs’ skills into Investigative Abilities (e.g., Cryptography, Electronic Surveillance, Accounting) and General Abilities (e.g. Athletics, Gambling, Shooting), both of which have pools of points which can be spent by the players.
While General Ability tests are resolved by rolling 1d6 + the number of points spent vs. a difficulty (which generally defaults to 4), the GUMSHOE gimmick is that you never need to test Investigative Abilities: If you are in a scene where a clue can be found using a relevant Investigative Ability and you use that ability, then you gain the clue. (The points for Investigative Abilities can be spent, but only for various enhancements to the action. You never need to spend or roll for a core clue required to solve the scenario.)
I have some quibbles with this gimmick: First, the claim is that it eliminates the risk of the players failing to find and follow a clue! But that’s not actually true. They can still fail to look for the clue and, if they find the clue, they may still misinterpret it. You can mitigate these problems somewhat with point spends, but the solution ultimately ends up being the Three Clue Rule. And if you’re using the Three Clue Rule, then you don’t actually need the “you never roll!” gimmick to begin with.) Ironically, the claim that it’s magically solved the problem can actually exacerbate the problem at some tables.
Second, this system can create some very nasty hard limits in play: The plethora of pools creates a multitude of limited resources, any one of which the PCs can unexpectedly and catastrophically run out of in ways that can completely derail scenarios or result in horrific TPKs.
A sufficiently savvy table, however, will be able to get a general feel for how scenarios need to be paced in order to work, and later GUMSHOE games have found ways to soften the hard limits. Night’s Black Agents, in particular, is festooned with a cornucopia of systems designed to flexibly replenish pools and route around the hard limits.
And despite my reservations, I’ve consistently found the various GUMSHOE games I’ve played and run deeply satisfying. A large part of this seems to be the skill lists, which are all built on the same chassis while varying somewhat game to game, and are universally excellent for investigation scenarios. This is paired to a character creation procedure which systemically divides these skills evenly among the PCs, neatly setting things up so that spreading the spotlight around during investigation scenes is a seamless and virtually automatic process.
Character creation also features a handful of other features that efficiently flesh out characters and motivate them for investigation. In Night’s Black Agents, this includes backgrounds (quickly orienting players into the milieu of the game), drives (directly motivating the characters), and sources of stability (which define people, places, and ideologies that are significant to the character and then ties those things to the dehumanizing themes of the spy genre).
The result is a system that’s not only good at the table, but also fabulous during prep.
CONSPYRAMID & VAMPYRAMID
The heart of Night’s Black Agents is the Conspyramid, a campaign structure/recipe that the GM can use to reliably create an effective conspiracy for their campaign.
The core concept is that the conspiracy is broken down into nodes — sources of blood, funding, and protection; cults, institutions, infrastructure, front companies, and so forth — and these are arranged into a pyramidal structure and then connected to each other:
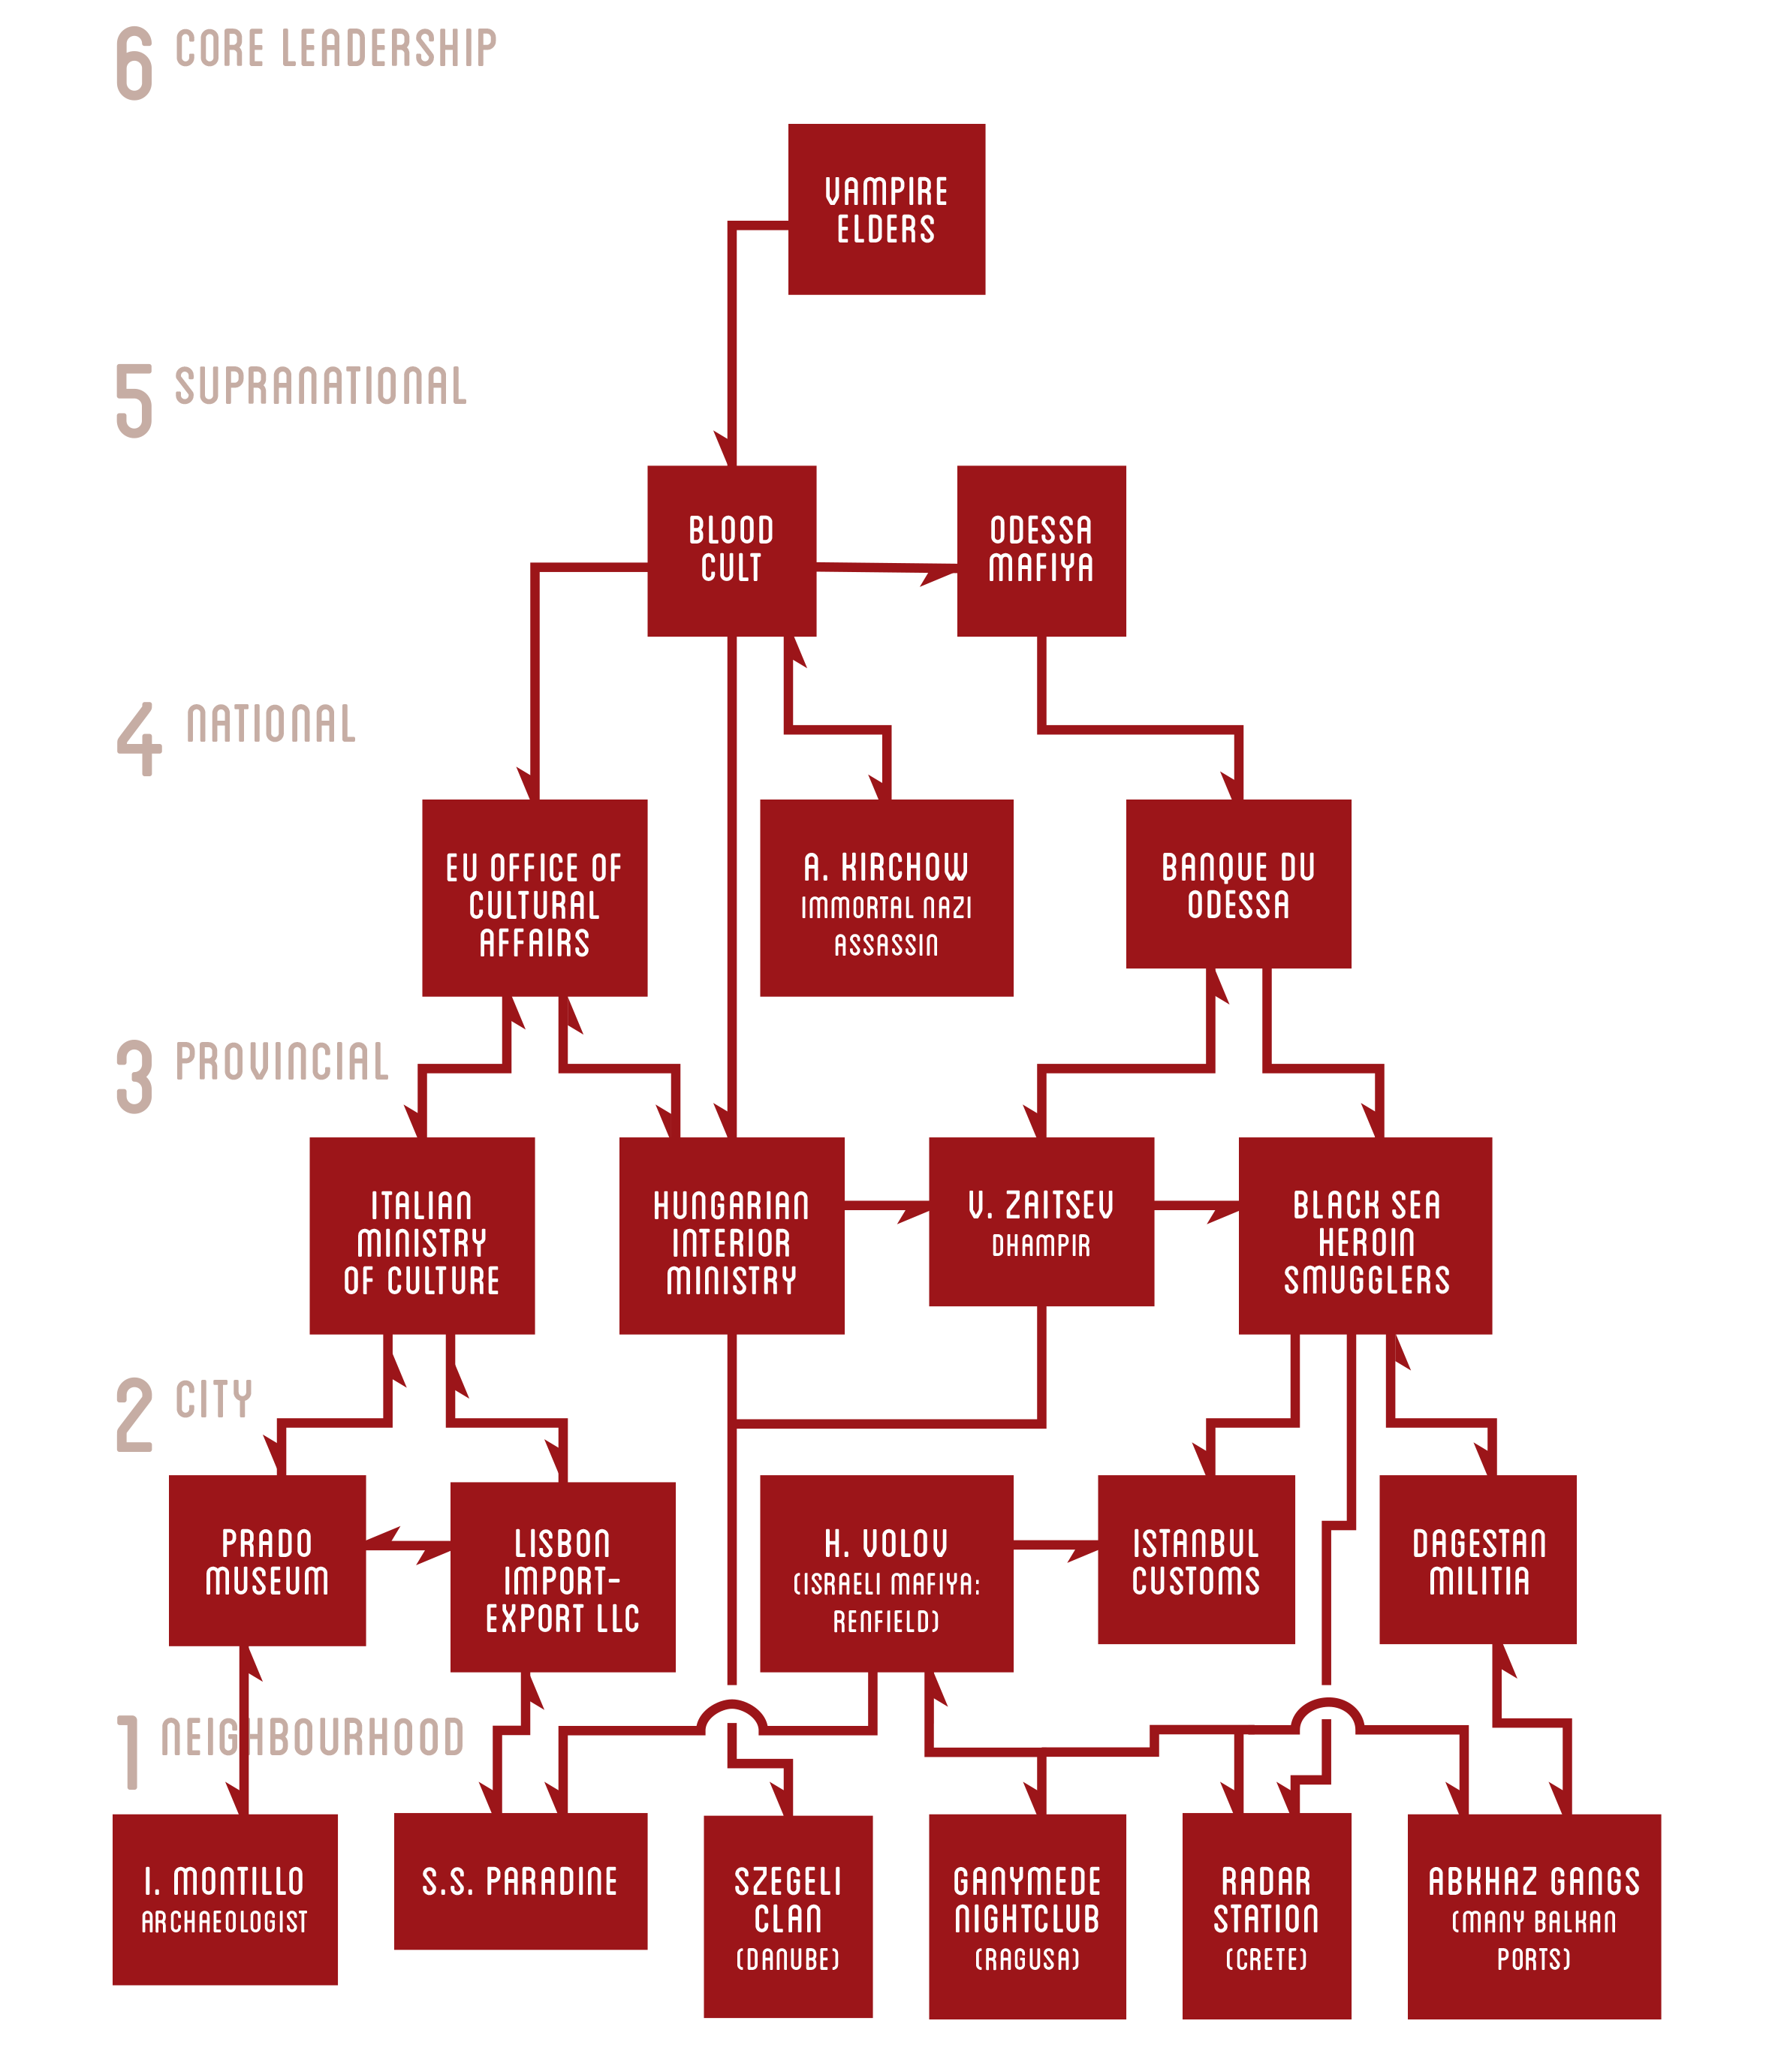
For example, in this sample Conspyramid, agents investigating the Ganymede nightclub might find leads pointing them towards the Abkhaz gangs or the renfield H. Volov. Similarly, those investigating Volov would find connections to Istanbul Customs and the S.S. Paradine. The idea, of course, is that the players will work their way up the Conspyramid to the core leadership at its pinnacle and then burn it all down.
What makes the Conspyramid sing in actual play, though, is how Hite has broadly integrated it into the other mechanics and structures of play.
The simplest example of this is that the default difficulty of relevant tests is equal to 3 + the row of the Conspyramid. So, for example, Infiltration tests to break into the Ganymede will default to difficulty 4, but if you’re trying to break into the Hungarian Interior Ministry (up in row 3), the tests would generally default to difficulty 6. A key word here, of course, is “default,” but the overall effect is that the stakes of the campaign will naturally escalate as the campaign continues — the players will feel the pressure and the difficulty as they climb the conspiracy’s ladder.
A more complicated example are the adversary mapping mechanics. Here the basic concept is that the PCs will use Human Terrain, Traffic Analysis, Surveillance, asset interviews, ops, and other relevant abilities and actions to discover how the conspiracy is organized (i.e., the links between nodes). What’s really cool is that Night’s Black Agents is designed to empower the PCs to create their own ops: Once you’ve identified the Ganymede on your adversary map, do you place it under surveillance, interrogate the owner, put a tap on the computer servers in the basement, or just burn it to the ground and see who collects the insurance money?
The agents’ adversary map will not always precisely match the GM’s Conspyramid, but the Conspyramid gives the GM everything they need to respond flexibly and confidently to the agents’ investigation no matter what form or direction it takes.
The players are also mechanically incentivized to build out their adversary map because the more links an op has, the more bonuses they’ll receive when staging an op with that node as their target, thus encouraging a slightly more contemplative style of play in which the PCs figure out how stuff is connected before choosing how and where they want to strike.
Perhaps the most significant integration with the Conspyramid, however, is the Vampyramid, which I consider the other pillar of a Night’s Black Agents campaign:
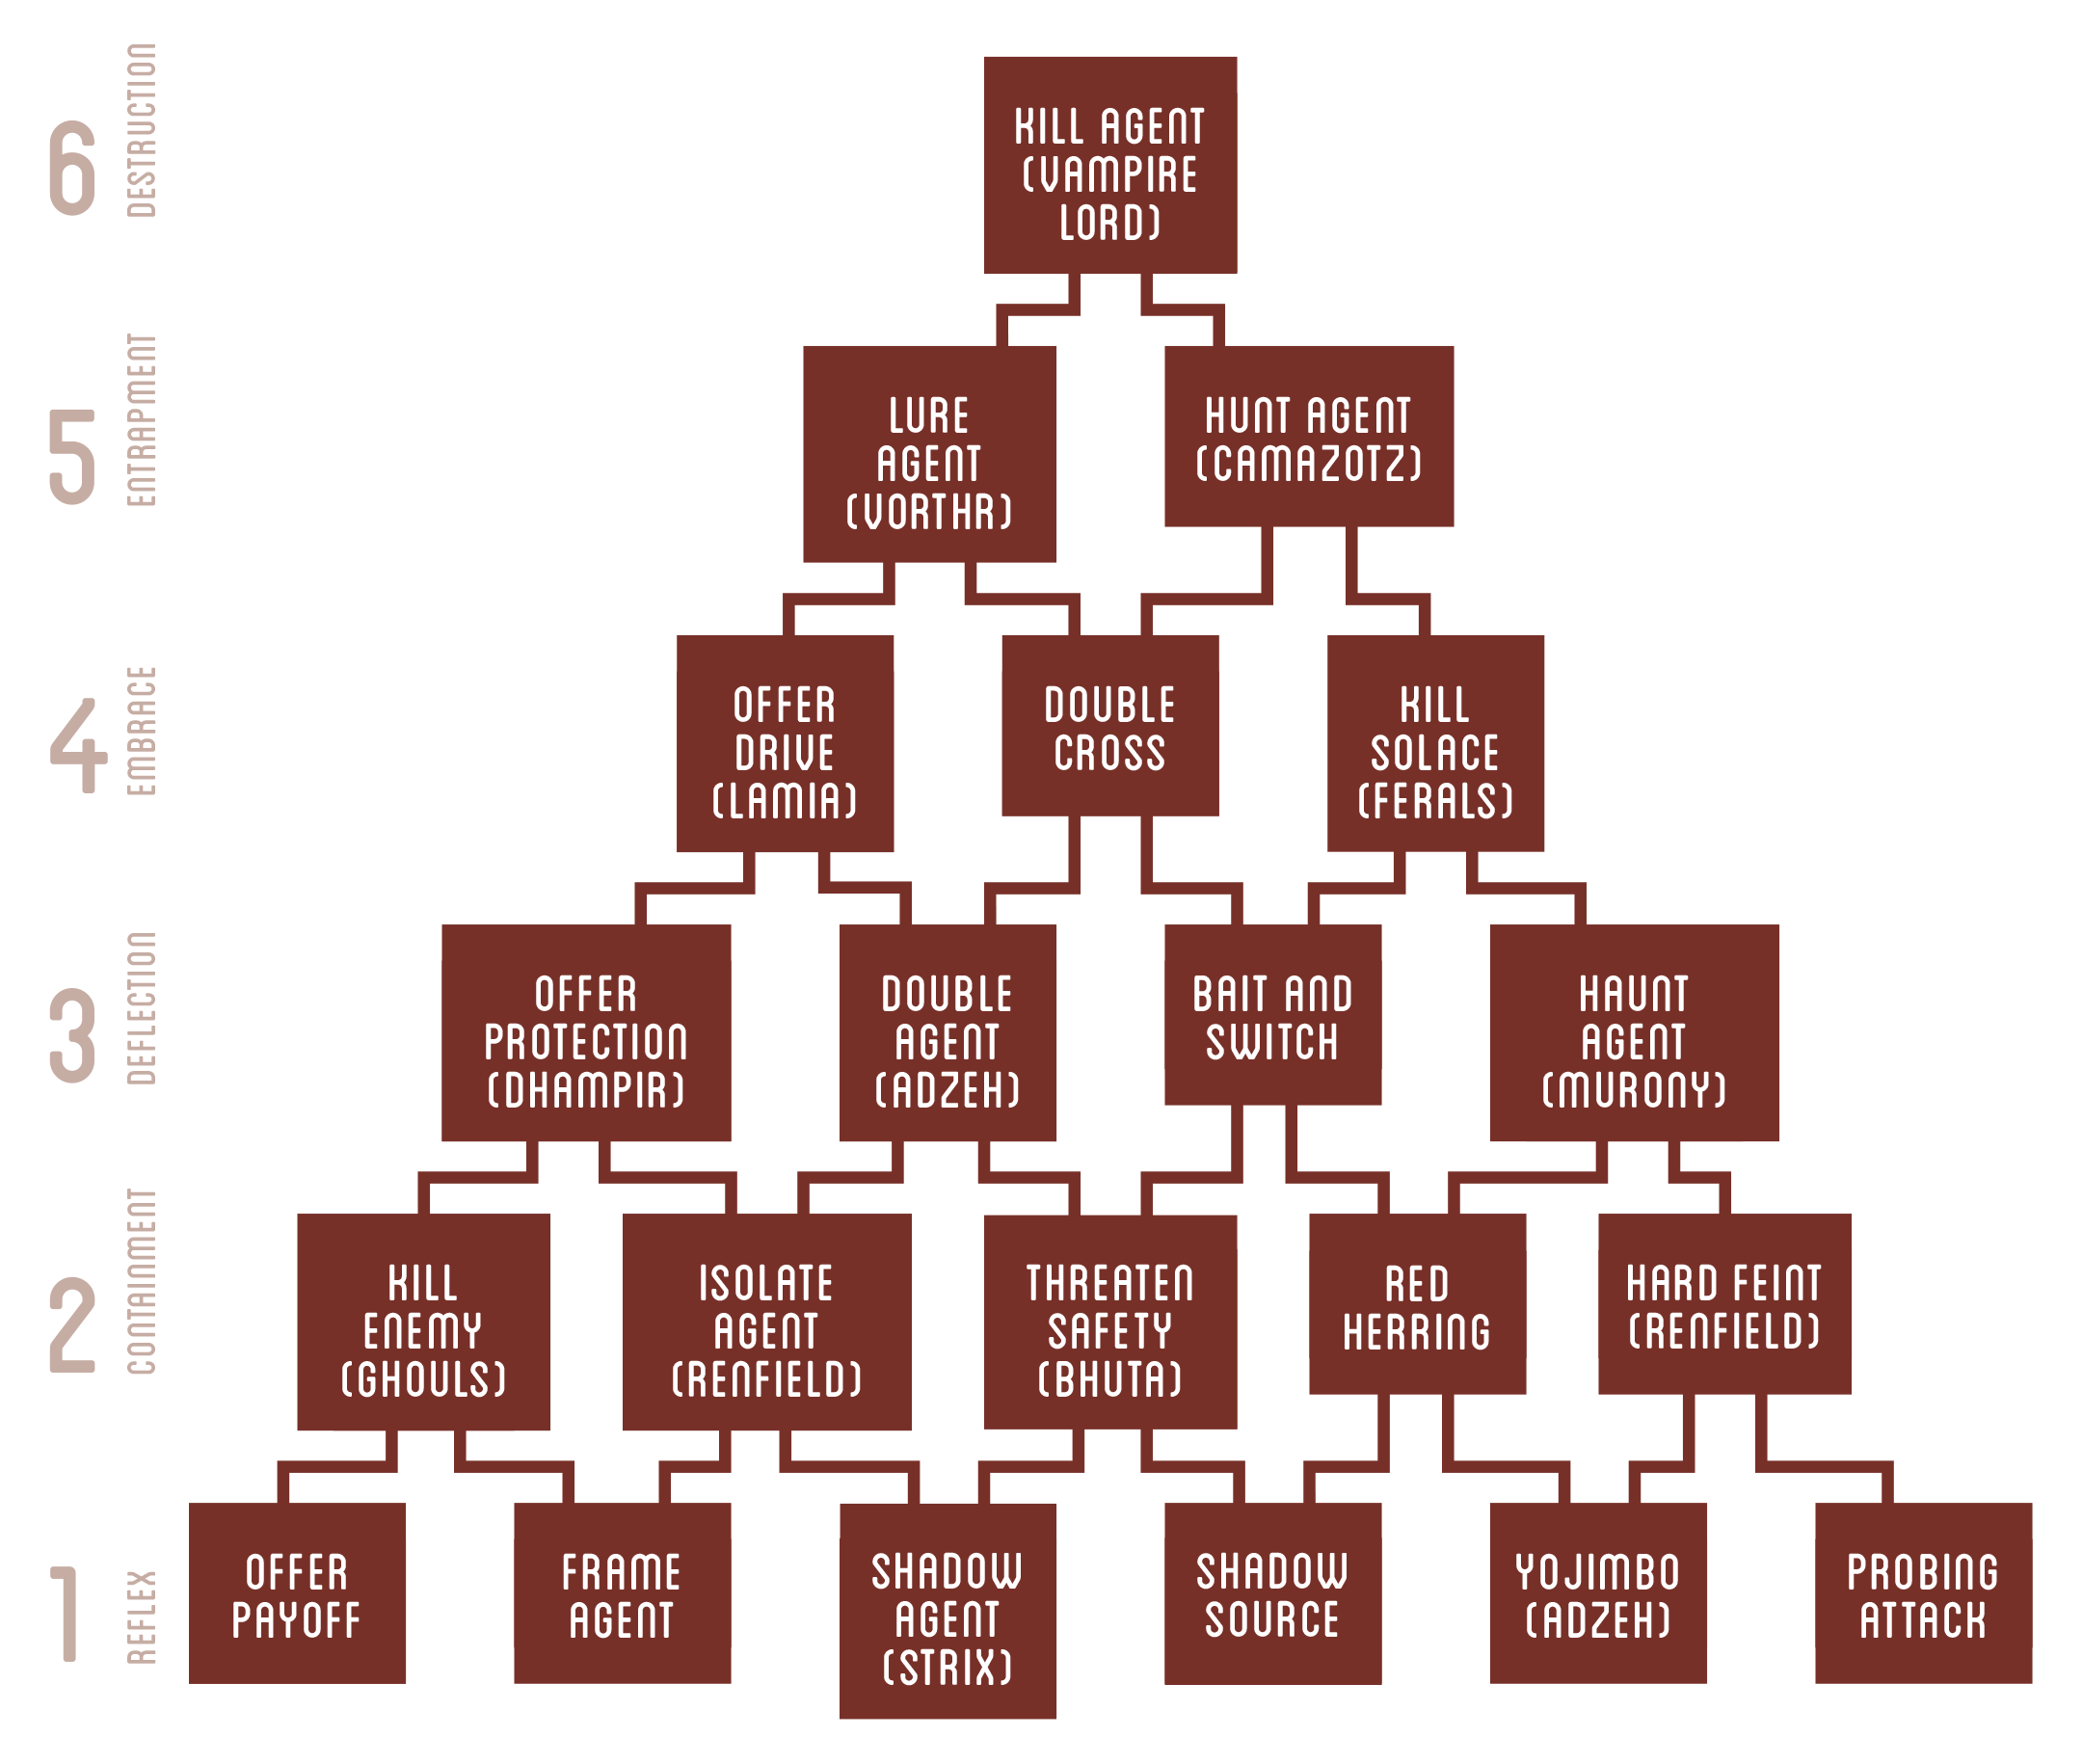
Although superficially similar to the Conspyramid, the Vampyramid, based on the Push Pyramid from Elizabeth Sampat’s Blowback, is a structure for running the active vampiric response to the agents’ actions. Each tier of the Vampyramid is “unlocked” as a result of the PCs targeting one of the nodes on the corresponding tier of the Conspyramid. The GM then selects an appropriate response, following a “path” up the Vampyramid.
For example, let’s say that the PCs hit the Ganymede nightclub, make a copy of the server hard drives, and then destroy the data center. This unlocks Tier 1: Reflex on the Vampyramid, so the GM scans through their options and decides Offer Payoff is the best fit:
OFFER PAYOFF: Some seemingly unconnected node of the conspiracy offers the agent a handsome payoff to walk away… This also offers the players a clue to another node of the conspiracy.
So we need to grab another node from our Conspyramid: We could go up the Conspyramid, perhaps having someone from Lisbon Import-Export, LLC approach the PCs. But at this early stage of the campaign, it might make more sense to stay lateral, so maybe we grab a rep from the Szegeli Clan to make the approach.
Since the PCs grabbed the data and slagged the servers, it probably makes sense if the conspiracy wants that data back. In fact, they might even assume that the PCs are just blackmailers. “We know you made a copy of our data. So how much do you want?”
However the PCs turn that approach to their advantage, we can assume they continue mucking about in their investigation and maybe they eventually track things back to the Dagestan Militia. That node is on the second tier of the Conspyramid and it unlocks the corresponding tier of the Vampyramid. Looking at the pyramid, the GM can just follow the arrows to find “the most natural escalations.” The idea is that, depending on which initial node you select, you can chart a course up through the Vampyramid in a process that creates great complexity and variety from a surprisingly simple structure.
Our chosen example, however, does reveal one structural drawback of the Vampyramid: Once you hit one edge of the Vampyramid, you end up “locked” into a single chain of response actions. (Offer Payoff, for example, connects only to Kill Enemy.) In practice, this is ameliorated because the Vampyramid is designed as a tool, not a straitjacket: You can always skip to a completely different node or improvise a custom response if it’s more appropriate for your campaign. You can also always return to the bottom tier and initiate a new response path.
Regardless, the Vampyramid provides a simple, default scaffolding that makes the Conspiracy a living, breathing entity that’s actively opposed to the PCs and reacting to their operations. It’s also, as we can see in the Offer Payoff example, yet another mechanism Night’s Black Agents uses to dynamically introduce clues into the PCs’ investigation. (The game is simply excellent at making it virtually impossible for the PCs to ever dead-end.)
The tight integration of the Conspyramid with the rest of the game can also be seen in the system for Heat.
The Heat mechanics provide a model for how much pressure the PCs are under from the authorities as a result of their actions: Did they kill someone? Did they blow up a building? Did they kidnap the daughter of a vampire scion? Did they get involved in a massive car chase through downtown Lisbon? All of these actions will generate Heat, and once per operation the GM can call for the players to roll against their current Heat level.
If the roll fails, some sort of official interference will crop up during the op. That might be the CIA agent who’s been tracking them catching up and ruining their cover stories. Or a SWAT team raiding their safe house. Or “a whole fleet of cop cars joining the chase.”
Notably, getting rid of Heat generally requires the PCs to either skip town (pushing their activities into the international scope of cinematic espionage films), make a deal with someone in power (further entangling them), and/or staging some kind of op (creating exciting game play). So this is yet another example of Night’s Black Agents using simple systems to dynamically generate complex and rewarding play.
But the other thing to really take note of here is how all of these different elements are put into motion and swirl around each other: The PCs are actively investigating the conspiracy’s infrastructure (Conspyramid), the vampires are actively trying to shut them down (Vampyramid), and the cops and other official agencies are getting drawn into the vortex (Heat). The ops generate Heat and unlock new tiers of the Vampyramid; the Vampyramid creates situations which draw Heat and introduce clues for tracing the Conspyramid; and Heat can either trigger responses from the Vampyramid or force the PCs to diversify their investigation into the Conspyramid.
This isn’t just a random assortment of resolution mechanics. It’s an engine that generates espionage and drives the campaign forward.
THRILLER RULES

With Heat and the two Pyramids driving the action, Night’s Black Agents packs even more action into GUMSHOE with the Thriller Rules, a selection of optional mechanics that are designed to evoke the espionage genre. These include:
- Thriller Chases
- Extended Chases
- Thriller Combat
- Special Tactics
The rules for Thriller Chases provide a robust, but not overly complicated system for resolving either foot or vehicle chases. The Extended Chase system sounds like it would be an add-on for Thriller Chases, but it’s actually a completely separate system for handling scenarios where the PCs are fleeing from trouble across multiple countries and is tied into the Heat system.
The Thriller Combat rules are designed to patch up the major problem with using GUMSHOE as the engine for an espionage action game: Combat in GUMSHOE kinda sucks.
The problem ultimately boils down to the core math of the combat system: You roll 1d6, add the points spent from the General Ability you’re using to attack (Hand-to-Hand, Shooting, or Weapons in Night’s Black Agents), and compare it to the target’s Hit Threshold. Hit Thresholds are almost universally between 3 and 5 (although some supernatural creatures will exceed those limits), so you can hit your target even if you don’t spend any points, but obviously you can improve your odds (or even hit automatically) if you do spend points.
From the player’s side this is very simplistic, but mostly works. They have a limited pool of points that likely needs to be stretched across multiple combat encounters in a scenario, and so they need to strategically decide when and where to spend their points. (This is largely a binary choice, though: If you’re going to spend points, you’re almost always going to want to spend enough for an auto-hit.)
The big problem is on the GM’s side of the screen. NPCs are built to have roughly the same range of ability ratings that PCs do, which means they also have a similar number of Hand-to-Hand, Shooting, and Weapons points to spend. But the NPCs don’t need to stretch their points across multiple encounters and usually don’t have a variety of targets to prioritize: They can spend two or three points on every single attack, automatically hit the PCs every single time, and almost certainly never run out of points before the encounter is finished.
In practice, this means that the GM can make one of three choices:
- Automatically hit the PCs every time. (Providing a flat and ultra-lethal combat experience. In fact, you’ll almost certainly TPK the group in any fight where the PCs don’t dramatically outnumber the opposition.)
- Never spend ability points for NPC attacks. (Another flat experience, and one in which there’s no difference between tussling with a random street thug and the ultimate battle with Dracula.)
- Just arbitrarily decide when the NPCs will hit the PCs. (Which kinda negates the entire purpose of having a combat system, and still doesn’t mechanically reflect NPC skill, but is probably fine if you’re the sort of GM who likes stuff like railroading and fudging.)
I’ve run a lot of GUMSHOE and, frankly, the combat system is fundamentally broken. Its only saving grace is that it’s just barely functional enough that you can sorta just coast through the occasional combat encounter. It’ll be vaguely bad and unsatisfying, but not game breaking.
Okay, but the Thriller Combat Rules are ostensibly designed to fix this, right? So do they pull it off?
Well, not to put too fine a point on it, but… No.
They do their best, but ultimately can’t route around the fundamental mechanical flaw. What they can do, however, is add a lot of fun options to the fight that can distract the players from the unsatisfying core mechanics and keep them entertained.
All this flash and bling, however, does highlight another slight tarnish in the system, which is that there seems to be a handful of minor mechanics scattered throughout Night’s Black Agents where the math just seems wonky to me.
Take called shots, for example. Useful mechanic to have for a vampire game (where you may need to stake them in the heart), but one of the generic effects is a damage boost. Check this out, though: Aiming at either the Heart or the Throat is +3 Hit Threshold, but hitting the Heart does +3 damage while hitting the Throat only does +2 damage, so you’re obviously always going to pick the mathematically superior option every time.
(It should be noted that these wonky bits are so minor in nature that, in practice, it’s quite difficult to spot them. But if you’re the sort of person who would put together a comprehensive cheat sheet for the game, they will pop out at you.)
What does make a big difference in Night’s Black Agents combat, though, are the Special Tactics. Tactical Fact-Finding Benefits (TFFBs) and Tag-Team Tactical Benefits (TTTB) both give the players (a) a channel for using their Investigative Abilities to gain tactical advantage in combat and (b) methods for the PCs to collaborate with each other and form mechanically impactful tactical plans on the battlefield. They’re flexible, powerful, and very satisfying to use.
VAMPIRES!

The final trick Night’s Black Agents has up its sleeves is an incredibly robust system for creating custom vampires.
These aren’t just palette swaps. Hite provides an almost overwhelming variety of options drawn from across world mythology and vampire fiction, strapping them into a modular system that can combine them fruitfully into an almost infinite variety of forms. This system is, in fact, so robust that it can be trivially adapted to creating supernatural foes of any type.
More importantly, this means that every time you start a new Night’s Black Agents campaign, the players will be legitimately in the dark about exactly what form the dark, vampiric threat will take. Every campaign is an exciting journey of discovery and revelation.
CONCLUSION
Night’s Black Agents takes the rock solid investigation mechanics of the GUMSHOE system and enhances them with Thriller Rules and Special Tactics that can flip the reactive investigations of Christie (“let’s look for the clues they left behind!”) into the explosive investigations of Fleming (“let’s blow stuff up and make some clues”). It then marries those mechanics to the tripartite espionage engine of Heat, Conspyramid, and Vampyramid.
The result is an RPG that’s not only delightful to bring to the table, but also a truly unique experience.
The core concept of “secret agents hunting vampires” is also surprisingly perfect in its conception and execution. When first pitched, it can seem almost random, but the more you think about it (and play with it), the more it seems not only utterly natural, but also inherently awesome.
It’s worth noting, though, that Night’s Black Agents is a fantastic RPG for even a mundane espionage campaign without a trace of vampiric action or supernatural conundrum: Drop the Vampirology ability and, on the player side, you’re just left with secret agents. On the GM’s side, the only potentially thorny issue is the Vampyramid, but that’s mostly just the name. (In a pinch, you could even grab the Push Pyramid from Sampat’s Blowback and plug it in.)
This is largely because, as I mentioned before, Hite is so effective at boiling down the huge breadth of not only the vampire genre but also the espionage genre into the game in a shockingly practical fashion. Truthfully speaking, either genre would be capable of supporting an entire game in its own right, and to have both so perfectly blended together in Night’s Black Agents is the gaming equivalent of possessing the riches of Croesus.
(Who, infamously, has no reliably recorded death, and is, therefore, almost certainly a vampire. Feel free to use the Lydian conspiracy for your first campaign.)
But I digress. The point is that removing the vampires from Night’s Black Agents nevertheless leaves you with a comprehensive and fully realized espionage game capable of handling everything from James Bond to Jason Bourne to George Smiley. In fact, Hite will help you dial in the subgenre of espionage you want with different modes of play:
- Burn games will focus on the psychological damage and personal cost of the spy game.
- Dust games eschew cinematic excess and instead dial in the gritty realism of The Sandbaggers or Three Days of the Condor.
- Mirror games feature the deception and betrayal of the spy game, where corrupt agents and agencies pursue ends that justify the means until, finally, they forget what the ends were supposed to be.
- Stakes games, by contrast, will shine the spotlight on the high ideals of espionage, where the fight really is about protecting the ideals, nations, and people that you believe in.
Through the Night’s Black Agents rulebook, symbols associated with each of these modes clearly mark various options and advice that you can use to dial in exactly the style of espionage campaign you want.
I offer this as the conclusion of this review because I think it speaks deeply to Kenneth Hite’s philosophy as a designer and to what Night’s Black Agents offers you as a game: Hite wants to give not only the GM but also the players everything they need to make the game that they want, and he achieves that by loading you up with a truly astonishing array of tools, options, and information. He doesn’t just dump this material on you, though. Instead, it is meticulously organized, designed, and implemented to make it as easy as possible for you to use it. Everything is designed to effortlessly empower you.
Night’s Black Agents comes bearing gifts.
And you should invite it in.
GRADE: A+
Designer: Kenneth Hite
Publisher: Pelgrane Press
Cost: $49.95
Page Count: 232
FURTHER READING
Review: The Zalozhniy Quartet
Review: The Persephone Extraction
System Cheat Sheet: Night’s Black Agents
Untested NBA: Funding