One of the great things about a well-executed location-based scenario is that each keyed area is effectively “firewalled” from the other areas: The GM generally only needs to process and manage a single chunk of material (the current area) until the PCs move on to the next area (at which point the GM can simply look at the new chunk of material). This makes a location-based scenario very easy to run, particularly if the key is well-organized, because everything you need is right there at your fingertips.
The drawback of this approach, however, is that it results in static scenarios. The firewall works both ways: It limits the amount of information the GM needs to process at any given time, but it also isolates each chunk of content. Furthermore, because the PCs generally control when they decide to move into a new area, this approach also grants the players near-perfect control over the pace of the scenario (which not only results in monotony, but can also create all kinds of tack-on problems like the fifteen minute adventuring day).
What’s needed is a dynamic element. Sometimes you can accomplish that with some sort of gimmick (moving chambers or the like). Random encounters, particularly those on a regular and aggressive schedule, also work. Ideally, though, we’d like to have the location come alive in an organic way that can allow for strategic depth. We want the ogre in Area 20 to call out for help and have the goblins in Area 21 to hear it and come running.
That seems easy enough. You can just slide your eyes down from Area 20 and notice that there are goblins in Area 21. It gets complicated, though, when you’ve got, say, seven or eight locations within earshot. And it gets even more complicated if you hit those sections of the map where non-sequential numbers bump up against each other:
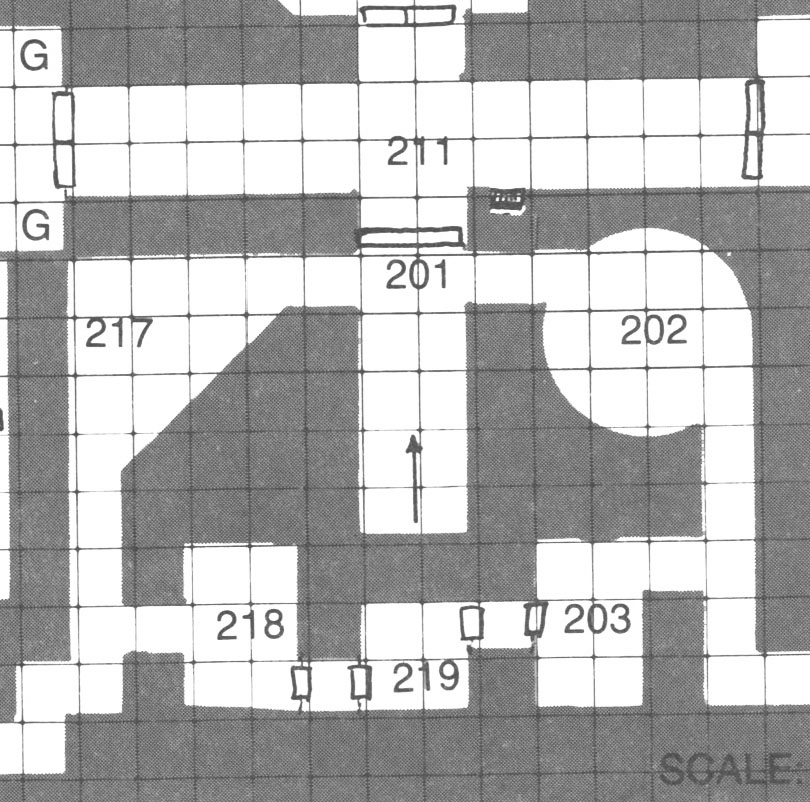
This area from the Temple of Elemental Evil, for example, would involve flipping back and forth between 8 different pages in the published module. At this point you’re trying to juggle a lot of different information, and you’ve probably lost almost all of the advantages normally offered by the “firewall” of the location key.
And this is still a relatively simple example: What happens when the alarm goes up and the entire compound begins mobilizing to hunt the PCs down?
For example, here’s the map from Secret of the Slavers Stockade:
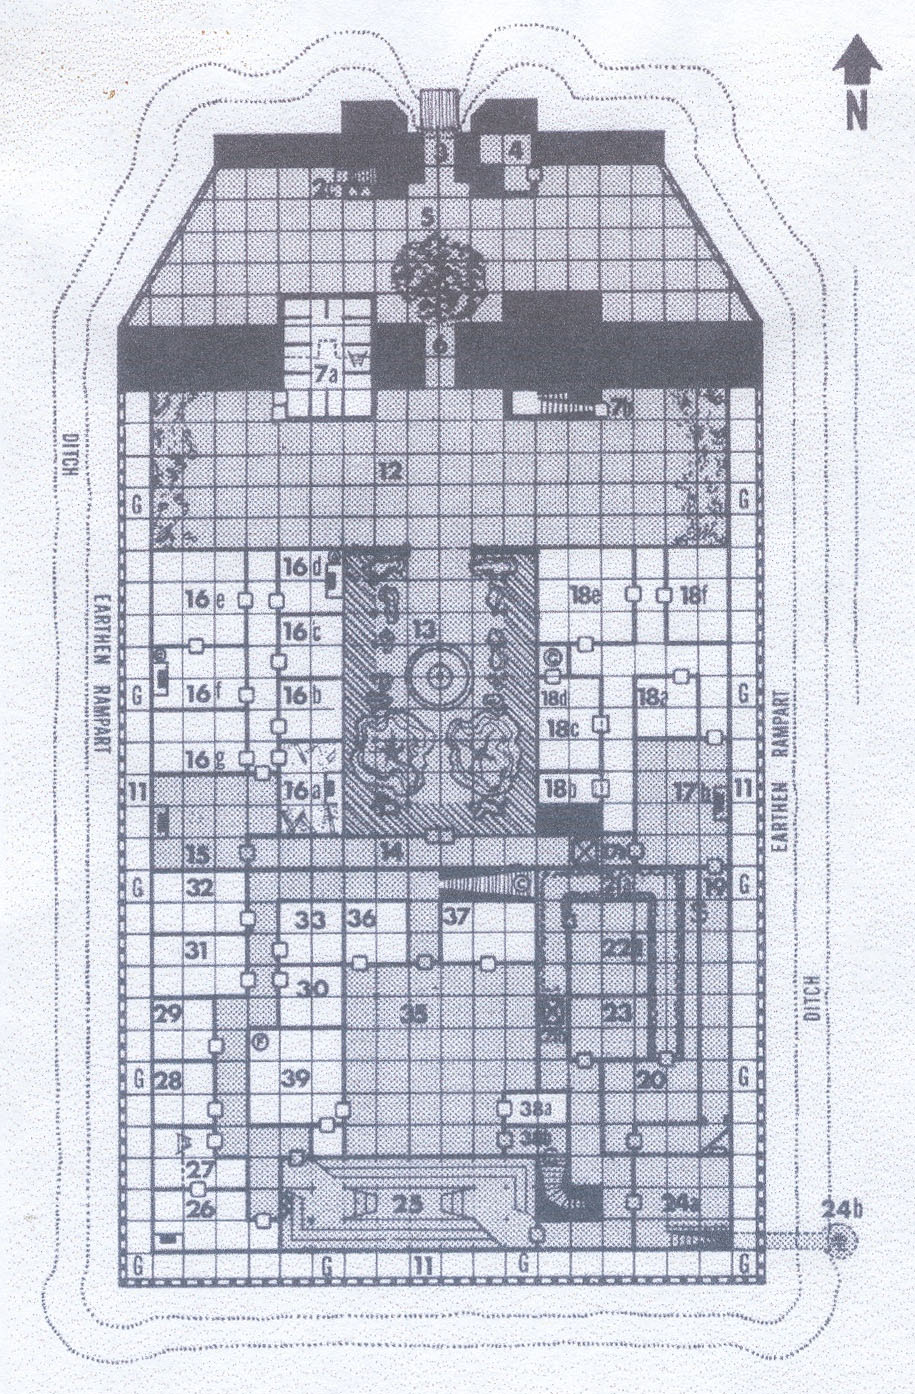
(click for larger version)
This is a fortified facility with a well-trained guard and a clear chain of command. If someone mounted an assault on the stockade, you would expect a well-coordinated response. But in order to run that response, a GM would need to smoothly manage information from basically all thirty-five keyed locations. It’s impossible.
ADVERSARY ROSTERS
The solution is to separate the occupants of a location from the location key: If they can move from one area to another, then they don’t belong in the key for any specific area.
This can be achieved through the use of an adversary roster (with a map from Dyson Logos for reference):
| 2 Orc Guards | Area 1 | (disguised as humans) |
| 4 Common Orcs | Area 2 | (playing dice at well) |
| 4 Orc Guards | Area 3 | |
6 Orc Guards | Area 4* | |
2 Goblin Stableboys | Area 8 | |
4 Common Orcs + 4 Orc Guards | Area 9 | (drunk) |
| Captain Gnarltooth | Area 9 or Area 16 | |
| Lieutenant Uggtusk | Area 11 (day) or Area 15 (night) | |
| 2 Orc Guards + 8 Common Orcs | Area 14 | |
| Eyegrasper (Orc Wizard) | Area 19 (80%) or Area 6 (20%) | |
| Eyegrasper's Coterie: 3 orc apprentices | (with Eyegrasper) | |
Fingerwaggler (Orc Wizard) | Area 20* | |
| 4 Caravanserai Guards | Area 21 | |
| Lady Starhuo | Area 23 | |
| Brother Jameston | Area 25 | |
4 Caravanserai Guards | Area 25 | (injured) |
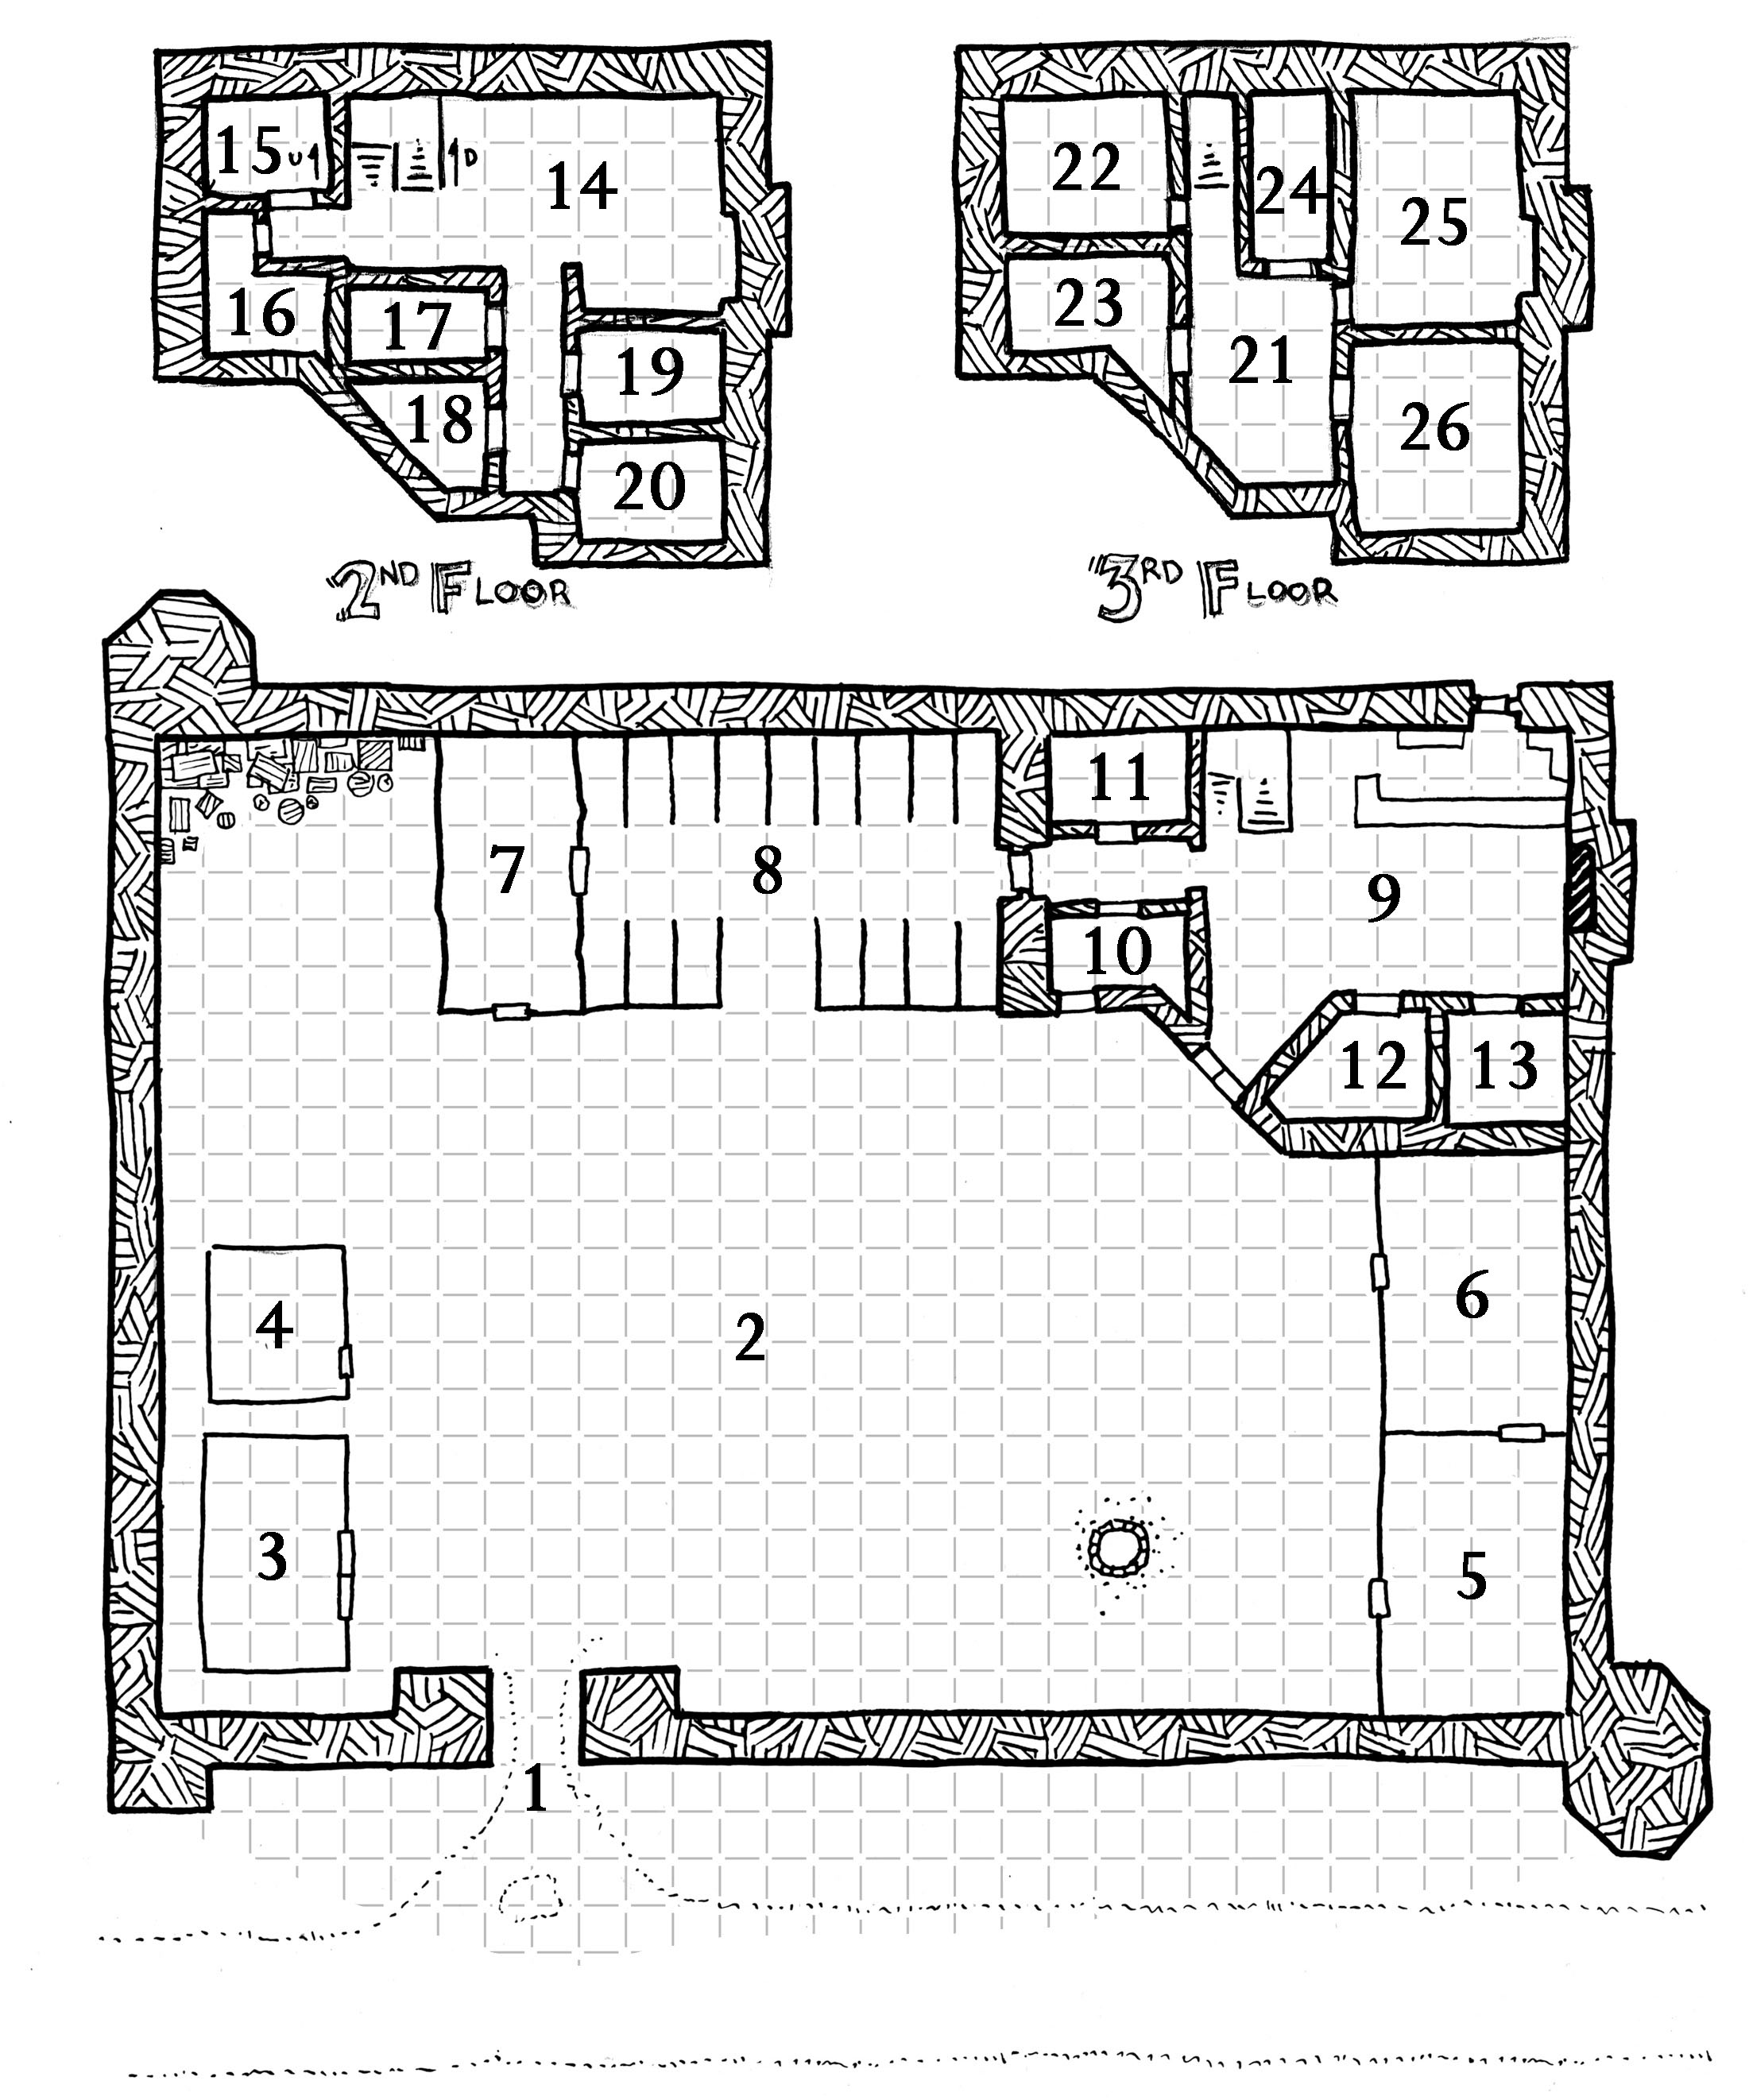
(click for larger version)
This does increase the complexity of running the scenario, but it’s not an exponential increase like the one seen in trying to run the Slavers Stockade. The GM is no longer looking strictly at the current location key, but rather than trying to cross-reference thirty-five location keys all at once they can generally limit themselves to looking at just the current location key and the adversary roster. Two discrete chunks of organized information instead of a multitude.
The fundamental building block of the adversary roster is the ACTION GROUP. Generally speaking, you don’t want to track every single goblin individually, so you group them together for easy management. (Although some of your action groups will probably consist of a single individual.) Most of the time, an action group will consist of all the adversaries in a single location. In some cases, however, you may want to split a large group up into smaller units. You can think about this purely in utilitarian terms: Do you think that the group is likely to split up and take independent action? Then it should be two action groups. (For example, if you’ve got twenty orcs bunking in a barracks, you might split them up into four action groups with five orcs each so that they can split up or be sent as guards to different areas of the compound.)
For ease of use and reference, you can also LABEL and/or NUMBER each group. A label is mostly useful as a keyword and reminder: If you see a “Death Squad” and a “Perimeter Guard” on your adversary roster, it’ll be a helpful reminder of how each group will behave and respond. You might also find it useful to prep a Death Squad stat sheet and a Perimeter Guard stat sheet: When the PCs run into one of these action groups, simply grab the matching stat sheet.
Numbering the action groups can make it easier to keep track of where they’re at during play:
- Lay the adventure map out as a tablemat in front of you.
- Take numbered counters and place them on the map in the “starting location” for each action group.
You are now ready to manage your adversaries in real time. Just move them around the map as the situation demands.
Note: Numbered counters are easy to find on the cheap. It’s also pretty easy to make your own by printing out the numbers and then affixing them to washers or quarters or something of the like.
ADVANCED ROSTER OPTIONS
In addition to that basic functionality of the adversary roster, there are a few additional embellishments you can use to enhance it.
VARIABLE AREAS: Characters on the roster don’t need to be limited to a single area. The club owner might be in his office, or he might be out on the floor. A wizard might be studying in the library or working in his laboratory. An orc sergeant might rotate through the barracks of his minions. There are a few different ways to handle this:
- Area 21 or Area 40: This approach simply states the options and lets the GM interpolate the result. (Or maybe they’ll just be in whichever area the PCs affect or explore first.)
- Area 21 (40%) or Area 40 (60%): Percentile chances can be used to randomize the group’s location.
- Area 21 (day) or Area 40 (night): The group’s location may be dependent on the present circumstances (and those conditions can be listed in parentheses). A night/day division is one I’ll commonly use.
One thing to keep in mind is that you can often simulate the activities of a compound without complicating the roster. For example, if the bouncers at a club might work eight hour shifts and then get relieved you probably don’t need to include all three shifts of bouncers on your roster. Functionally speaking, the club has one bouncer (although the name of that bouncer might be different depending on what time of day the PCs show up).
ACTION GROUP TYPES: I’ve found that there are four different categories of action groups, defined by their behavior.
- Patrols: Patrols make regular circuits through a location. They’re indicated by keying their route (Patrol Areas 1, 5, 7, 8, 9, 2, 1). In some cases I find it useful to create a separate “Patrol Roster” (if there are multiple patrols or if their routes are particularly complicated for some reason).
- Mobile: The default action group type. These are keyed to a specific location, but are generally willing and able to respond to the activities of the PCs.
- Mostly Stationary: Some action groups are unlikely to leave the area they’re keyed to. This might be a choice on their part (they won’t respond when the alarm is raised for whatever reason) or it may not (they’re dire wolves locked in a cell). Adversaries waiting in an ambush are another common variety. However, there is a possibility that these action groups might become active (most commonly because someone has gone to specifically fetch them). Therefore I include them on the adversary roster, but indent their entries to clearly distinguish them from the more active elements.
- Stationary: These adversaries will never leave the location they’re in. As a result, these adversaries are NOT included on the roster and instead appear in the location key. (Because they will only be encountered in that location, there’s no reason to clutter up the roster with them.) This might include literally immobile creatures, those simply uninterested in the rest of the complex, or creatures who are sealed away until the PCs disturb them (at which point, if they aren’t immediately destroyed, you might add them to the roster).
These distinctions – particularly those between Mostly Stationary and Stationary – are entirely utilitarian in nature. They don’t represent some deep or universal truth about the game world. Think about how you want to use a particular group of adversaries during actual play and then classify them appropriately. (If it turns out you were wrong, it’s easy enough to simply ignore the indentation, right?)
NOTES / FOOTNOTES: You can include notes as a third column on the roster and/or you can use footnotes to include additional information or cross-referencing. This can include:
- Adversaries carrying a specific item or piece of equipment. (This is useful when you’ve got a bunch of different bad guys all using the same stat block but only some of them – or one of them – is carrying X, Y, or Z. Otherwise, of course, you’d just list the item(s) in their stat block.)
- Brief tactical notes. (Stuff like “can be telepathically summoned by the mind flayer” or “will generally wait to launch prepared ambush” or “can see through walls”.)
- If they’ve been classified as Mostly Stationary, why they’ve been classified that way (sleeping, in ambush, indifferent, etc.).
- Other notes regarding their activities (polymorphed to look like prisoners, playing poker, torturing Sebastian, etc.)
I generally use a notes column if the notes are brief enough to fit on one line. I use footnotes for longer stuff.
MULTIPLE ROSTERS
It’s also possible to prep multiple rosters for a single location. I often find having one roster for Day and another for Night is useful. Normal and Alert statuses are also common, but any similar division that’s logical for the location can be used.
Multiple rosters are usually only worth the effort if the location radically shifts. If the differences are minor or isolated to a handful of characters, then you can use conditionals for individual action groups. It’s only once the conditionals get sufficiently complex that you need to switch to multiple rosters.
ROSTER UPDATES
Another great advantage of using an adversary roster is that you can trivially update a location as bad guys are killed, replaced, or retasked without needing to revisit the entire key. (This separation of NPC from location is why I’ll use a roster even if there are only a handful of characters present.)
This can also be massively useful in an open table campaign (or any other campaign) where you want to be able to revisit locations: With little or no change to a location’s key, you can completely restock it with new adversaries. For examples of this in play, see (Re-)Running the Megadungeon, Juggling Scenario Hooks in a Sandbox, and Prepping Scenario Timelines. (Reading along with the adversary roster technique in mind, you should be able to immediately see how simple the updates become.)
SIMPLE ROSTER
Sometimes you don’t need a roster with all the bells and whistles. For small, highly active complexes with a limited number of inhabitants (a half dozen or so) you may be able to just list the inhabitants and then improvise where they are and what they’re doing when the PCs show up.
(I label this simple, but it actually requires slightly more skill with improvisation when you’re running it.)
I most often use this technique if there’s a mansion (or similar living space) occupied by a number of different people. Trying to program out their ordinary, day-to-day living usually means a lot of complexity for a result that still isn’t realistic.
A hybrid approach can also work here: For example, each character might have a default location where they’re often found (their bedroom? office?) and then a percentage chance that they’re instead just “somewhere else in the house” (and you can figure that out in the moment).
ADAPTING PUBLISHED MODULES
It’s incredibly easy to use the adversary roster technique with published scenarios: Simply skim through the module and list where each occupant is keyed. Ta-da! You’re done. Simply ignore the rostered adversaries when you see them in the key.
Tip: Since ALL monsters will appear in the published key, you may find it useful to include a separate list of Stationary monsters on the same sheet as your adversary roster in order to quickly discern when you should still be using the monster listed in the encounter.
FOG OF WAR
One pitfall that a GM can easily fall into when using an adversary roster is having everybody in the dungeon immediately swarm the PCs. Sometimes that’s the logical outcome of the PCs’ actions and that’s fine (they’ll quickly learn to take approaches that don’t result in that outcome and to retreat and regroup if it does happen). But you should bear the fog of war in mind: Even if the PCs attack one action group, it doesn’t necessarily mean that everyone in the location will immediately know it’s happening. And even if the alarm does go up, some action groups may be assigned to guard other areas or simply have no idea exactly where the crisis is happening.
The adversary roster gives you the opportunity to roleplay the entire compound. So take advantage of it.
Since we’re discussing adversaries swarming the PCs, however, you may also want to take a moment to review Revisiting Encounter Design: If you’re using an active adversary roster, you need to keep in mind that multiple action groups can end up joining a single encounter. If you’ve been building your encounters to exist on a razor’s edge of survival-or-death, then you’ll need to revise that approach. (How To Use Published 3rd Edition Modules may also be useful.)
ROSTER LIMITS
There is, however, a practical limit to an adversary roster: Once you get a sufficiently large enough number of action groups, it becomes difficult to manage them. Generally, I find that number to be around 15-20 (and by the time I’m pushing it to 25, I’ve reached my limit). Your mileage may vary.
Larger complexes can sometimes be broken down into smaller sections to make them manageable. (The different levels of a dungeon are an obvious example of this if there’s limited movement between them by the denizens. You might also choose to model that limited inter-level traffic as a random encounter check.) But if that doesn’t work, then that’s the point where I’ll swap from a “living complex” (with an adversary roster where I’m managing the actions of the NPCs in real time) and start using random encounter tables to simulate the compound’s life.
It should also be noted that the adversary roster is a technique for locations with active bad guys. Not every dungeon needs a roster. Sometimes you really are cracking open dusty tombs which have lain undisturbed for centuries and you have only yourself to blame when you awaken the eldritch horrors which lie within. Variety is the spice of life.
(Another example from my own table was the Bloodpool Labyrinth: There were a limited number of monstrous patrols in the labyrinth, but the focus of the scenario was on navigating the labyrinth and its many non-mobile hazards. As a result, I chose to run the patrols using a random encounter table instead of trying to track them in real time.)
CONCLUDING THOUGHTS
I consider adversary rosters to be my greatest “secret weapon” as a GM. They allow me to run dynamic scenarios of considerable complexity on battlefields that can easily sprawl across a dozen areas with a relative simplicity which still leaves me with enough brainpower to manage varied stat blocks and clever tactics.
You’ll also find that, as the players warm up to the greater depth offered by these scenarios, they’ll rise to the challenge and respond with remarkable strategic creativity both in combat and outside of it.
And all of this will feed back on itself, permanently disrupting the staid rhythms of “kick in the door” dungeoncrawling in your campaign. Adversary rosters are also a great way for running stealth missions, heists, and covert ops.
The life and motion of a living compound will unlock a rich variety of new gameplay, keep your players on their toes, and invest them deeply into the fabric of the campaign world.
FURTHER READING
The Art of Rulings
The Art of Pacing
Xandering the Dungeon
Gamemastery 101
Design Notes: Adversary Rosters
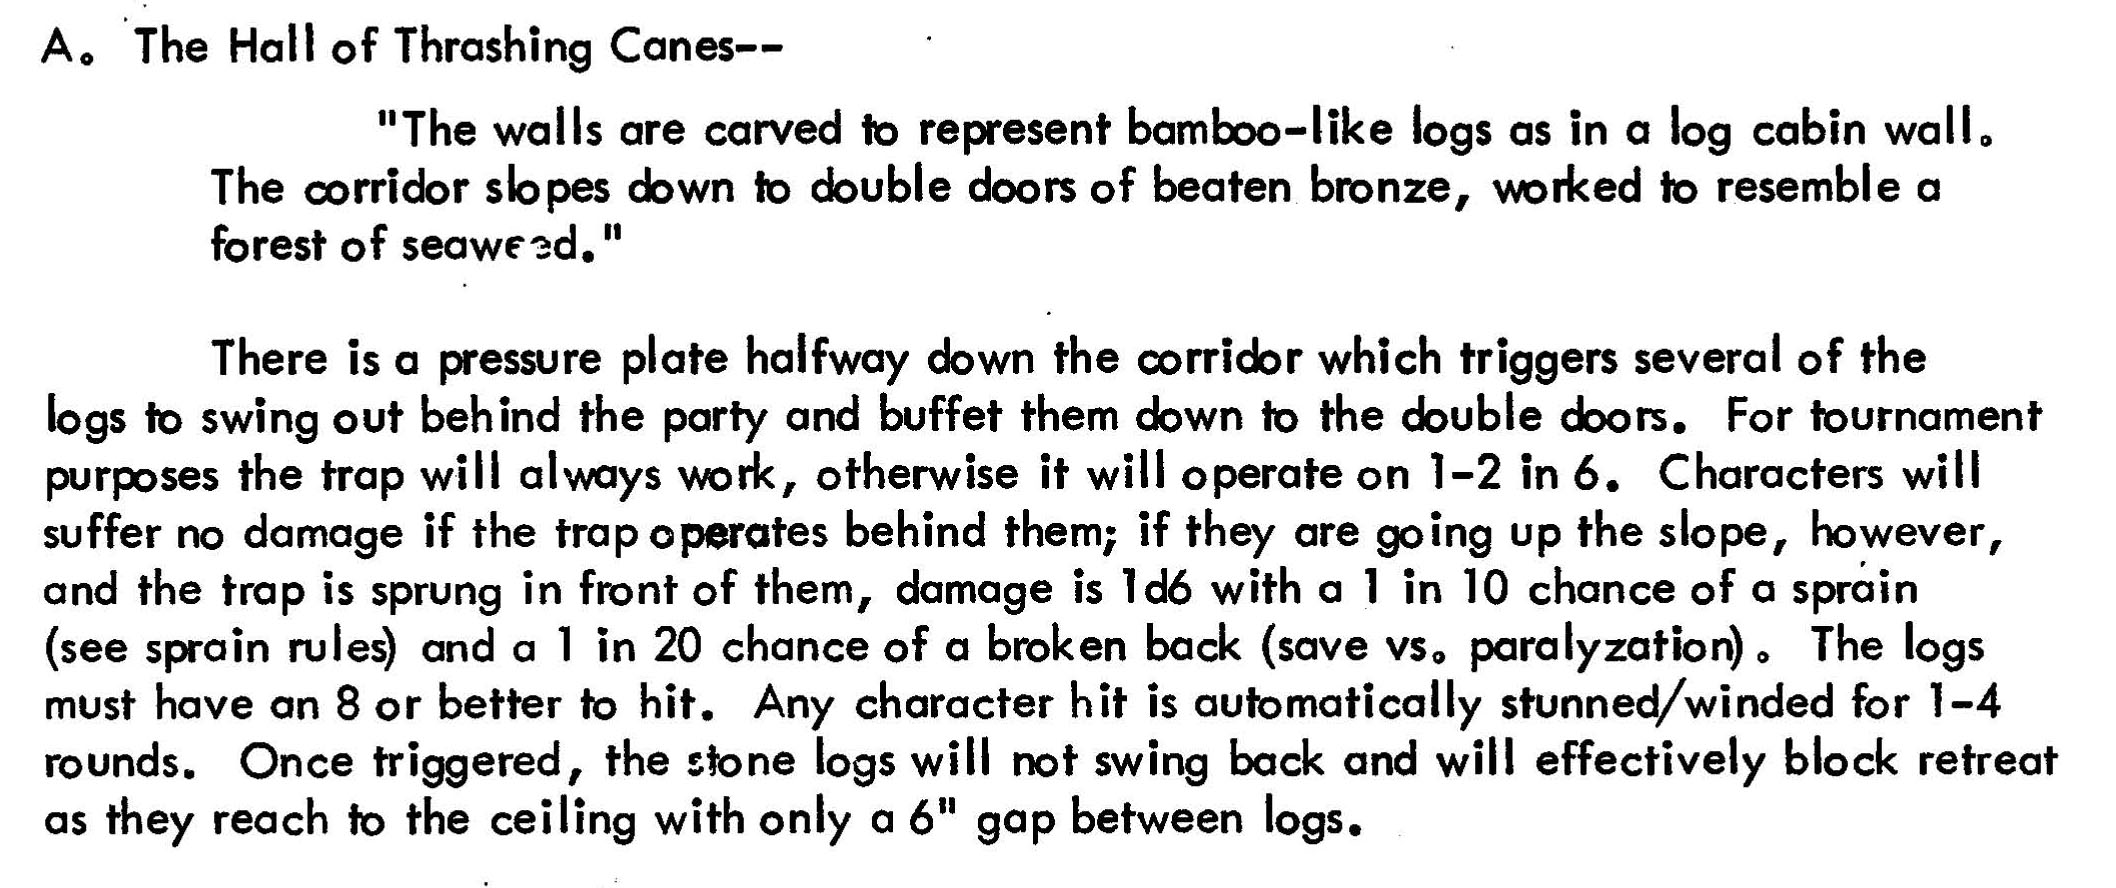
![2. The Hall of Thrashing Canes:
[BOXED TEXT] The sides of this corridor are carved to resemble walls of bamboo-like logs. The passage slopes down from a single door on its western leg, the lintel of which has been crafted to represent a stylized cavern entrance, to double doors of beaten bronze, worked to resemble a forest of seaweed. [END BOXED TEXT]
There is a pressure plate halfway down the hallway which triggers a trap. Several of the logs will swing out from either wall and buffet the party towards the double doors. For tournament play, the trap will always work. For campaign adventure, the trap will be triggered on a 1 or 2 in 6.](https://thealexandrian.net/images/20140519f.jpg)


 I find it most convenient to think of the treatment of empty time as a continuum. At one end of this continuum, for example, you have gameplay like that found in a pure, old school dungeoncrawl: Essentially no time is skipped and every action is catalogued because the density of meaningful decisions is incredibly high. (In by-the-book OD&D, for example, a wandering monster check is made every single turn. Because of this, even if you ignore the high density of geographically-significant navigation decisions being made, the decision to take or not take a single action