The Alexandrian

Posts tagged ‘rpg scenarios’

Go to Part 1

TELEPORTAL NETWORK

Lost Laboratories of Arn - Teleportal Network

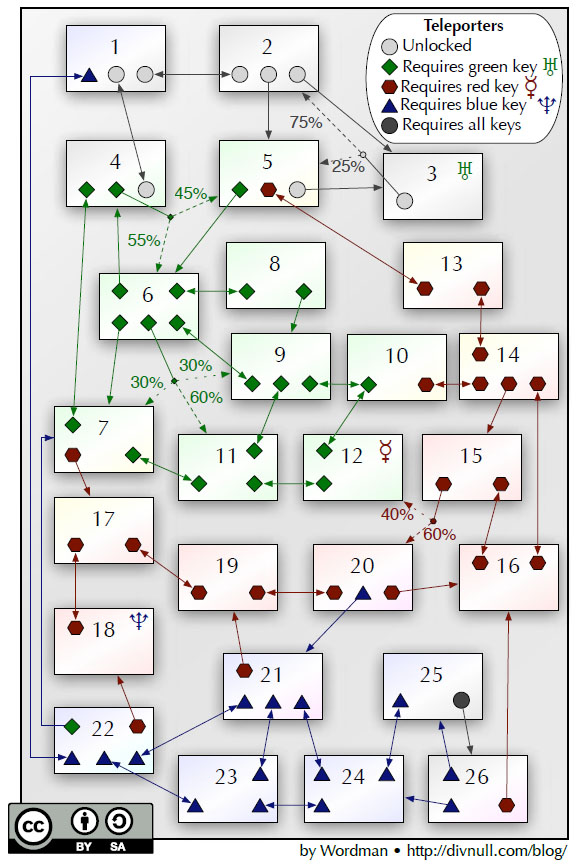
The laboratories of the Arn are connected using a teleportal network, as shown on the relational map above.

TELEPORT REDIRECT: The teleportal network has engrained the local astral space. The result is that anyone attempting to teleport into or out of the Lost Laboratories ends up in Laboratory 1.

TELEPORTAL RINGS: The teleportal network is made up of individual teleportal rings. When activated, everyone standing within the ring (or entering the ring within the next 30 seconds) is teleported to the destination portal. Teleportals give off a telltale sound when used (listed in parentheses): Most teleportals are linked to another, providing two way travel (wushhh) and arriving on the corresponding ring. Some work in only one direction (kishhh), with travelers arriving at random (but safe) locations at their destination. Some rings are malfunctioning and randomly send travelers to the wrong room (chance listed on the map; lisss for the most likely path, shaak otherwise), although the location is always the same for each activation (people teleporting together arrive at the same destination).

SILVER TELEPORTAL RING: A glowing ring of silver energy. In the center of these rings is a small circle of silver with a gem-like device similarly of silver affixed to them. Turning the gem-like device activates the teleportal ring.

BLUE / RED / GREEN TELEPORTALS: Identical to the silver teleportals, except that the circles are of amethyst, ruby, and emeraldy and have a hexagonal, pentagonal, or octagonal hollow instead of a device.

TELEPORTAL KEYS: Small, gem-like devices. They are inserted into the hollows and turned to activate the corresponding ring. (The key teleports with the person using it.)

This section of the adventure is based on Escape from the Lost Laboratoriesby Wordman. The teleportal network map is Wordman’s. The big shift is that I’ve redesigned all of the individual laboratories — swapping out most of them and radically expanding each into a small, mini-dungeon.

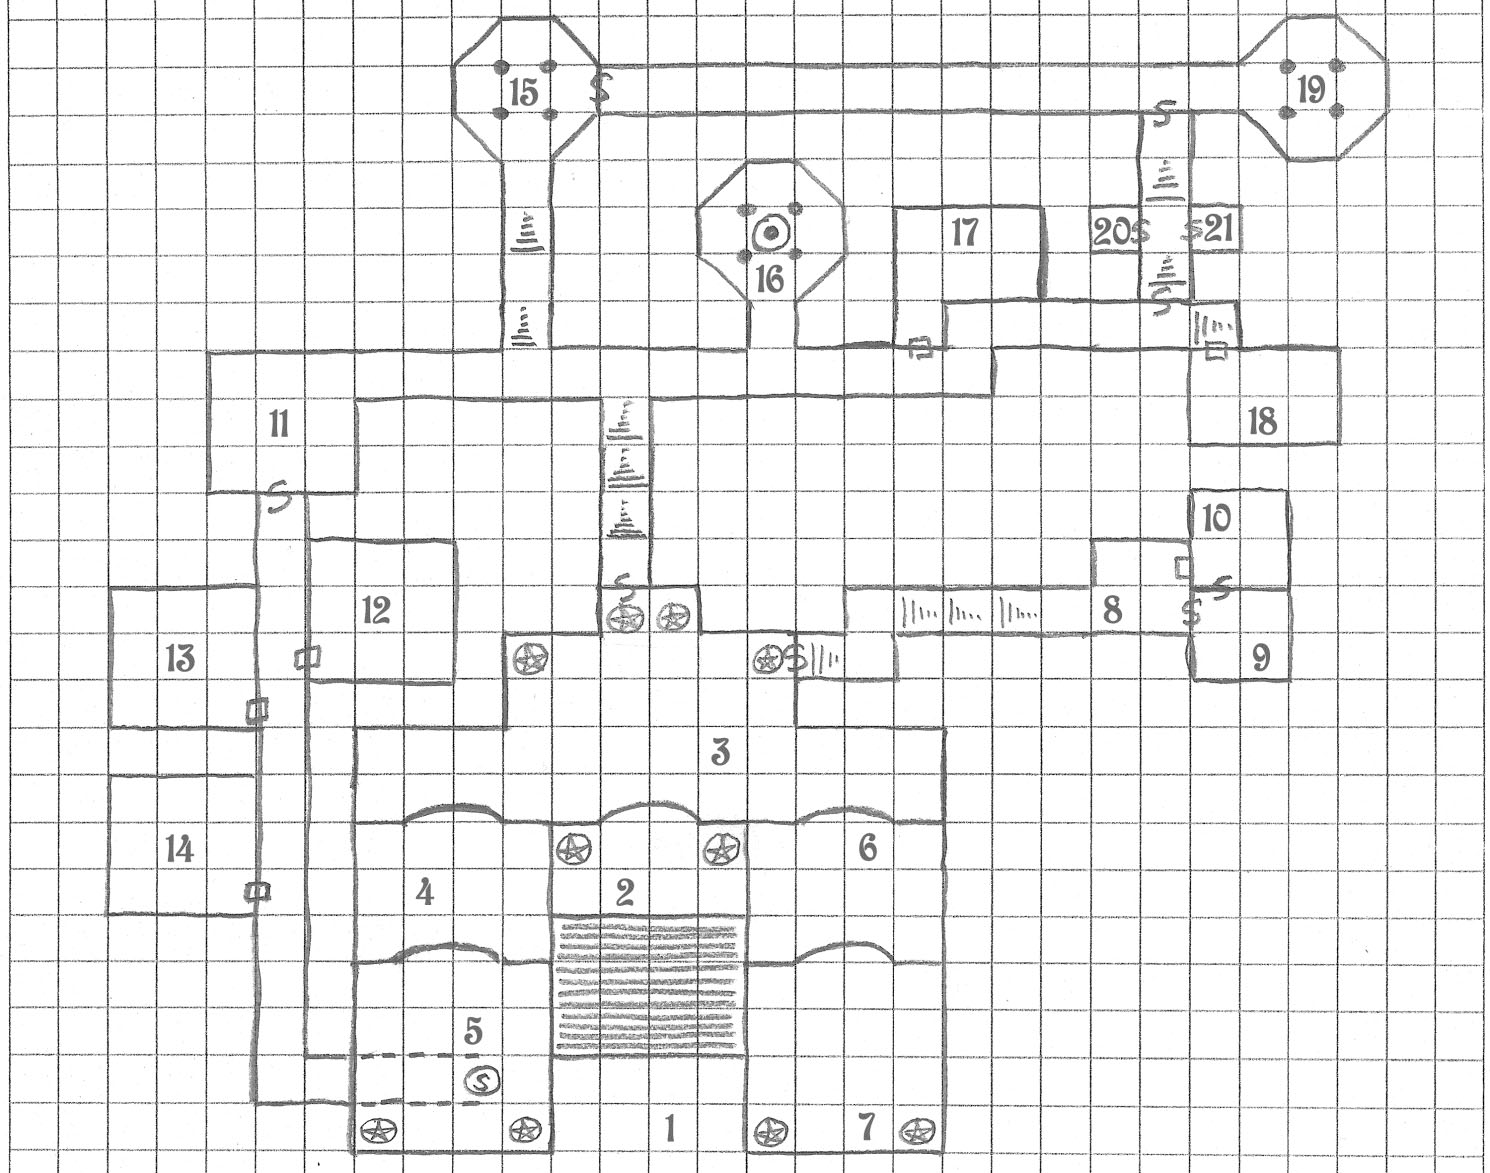
LABORATORY #1: CHARNEL PIT OF ARRIVAL

Sacrifices offered by the sahuagin appear here. The result is a massive charnel pit.

SAHUAGIN GHOULS: 8 sahuagin ghouls feast on the charnel pit. (Use normal ghoul stats, but they also gain a lesser form of sahuagin bloodfrenzy: +2 to attacks, -2 AC, +1d6 damage.)

TELEPORTALS: Two silver teleportals are on opposite sides of the room, each on the floor before twin statues of draconic ogres.

LABORATORY #2: RUINED LABORATORY

Glassware and copper instruments have been smashed into the smallest pieces.

CORPSE: A corpse lies near one wall. Above the corpse are carved the words “NO HOPE”.

  • Knowledge (DC 14): The corpse is dressed in fashions popular in Arathia over a century ago.

TELEPORTALS: Three silver teleportals, arranged in a triangular pattern.

LABORATORY #3: CLOCKWORK LABORATORY

Magitech clockworks slowly, but methodically, assemble and then disassemble a chaosomaton scorpion, chaosomaton boar, and chaosomaton chimera.

  • 1 in 6 chance on arrival (and per hour thereafter) that each creature is currently in a state of completion. If so, it will attack anyone who doesn’t bear a Sorcerous Brand of Arn.
  • Craft (Chaotic Magitech) (DC 24): Ascertain the control circuits that are currently attached to the mechanisms of the scorpion and bull. These can be removed and surgically grafted — Magitech Surgery (DC 32) — allowing telepathic control of the clockworks.
  • Craft (Chaotic Magietch) (DC 32): Modify one of the control circuits to allow control of the chimera instead.

EMERALD KEYWORKS: Another clockwork contraption contains the GREEN KEY. (If the key is removed, the clockwork mechanism will begin working on another green key, which will be ready in 1d6 days.)

TELEPORTALS: Silver teleportal in the center of the room. (The teleportals from both Lab #2 and Lab #5 arrive there.)


MONSTROUS SCORPION CHAOSMATON, HUGE (CR 10) – N Huge Construct
DETECTION – darkvision 60 ft., low-light vision, tremorsense 60 ft., Listen +0, Spot +4; Init +0
DEFENSES AC 24 (-2 size, +16 natural), touch 8, flat-footed 24; hp 85 (10d8+40); Immune vermin immunities (mind-affecting), ability damage/drain, critical hits, disease, death effects, energy drain, exhaustion, fatigue, necromancy effects, nonlethal damage, paralysis, poison, sleep, stunning
ACTIONSSpd 40 ft.; Melee 2 claws +14 (1d8+2d6+9) and sting +9 (2d4+5 and poison); Ranged +5; Reach 15 ft.; Base Atk +7; Grapple +24; Atk Options constrict 1d8+9, improved grab, poison
SQ darkvision 60 ft., low-light vision, tremorsense 60 ft., vermin traits (mindless)
STR 29, DEX 10, CON -, INT -, WIS 4, CHA 1
FORT +10, REF +3, WILL +3
FEATS: –
SKILLS: Climb +10, Hide -4, Spot +4

Constrict (Ex): Automatic claw damage on successful grapple check.

Improved Grab (Ex): Start grapple as free action off successful claw attack, no attack of opportunity.

Poison (Ex): Fort DC 18, 1d6 Con/1d6 Con

Vibrating Claws (Built-In Chaotic Technomancy): Claws deal an extra 2d6 damage.

Skills: +4 racial bonus on Climb, Hide, and Spot checks.


DIRE BOAR CHAOSOMATON (CR 7) – CE Large Magical Construct
DETECTION – darkvision 60 ft., low-light vision, scent, Listen +6, Spot +6; Init +1
DEFENSES AC 19 (-1 size, +10 natural); hp 59 (7d8+28) Immune ability damage/drain, critical hits, disease, death effects, energy drain, exhaustion, fatigue, mind-affecting, necromancy effects, nonlethal damage, paralysis, poison, sleep, stunning
ACTIONSSpd 30 ft.; Melee gore +15 (1d8+2d6+15); Ranged +4; Space 10 ft.; Reach 5 ft.; Base Atk +5; Grapple +20
SQ darkvision 60 ft., ferocity, low-light vision, scent
STR 33, DEX 10, CON -, INT -, WIS 7, CHA 2
FORT +8, REF +5, WILL +8
FEATS: Alertness, Endurance, Iron Will
SKILLS: Listen +5, Spot +5

Ferocity (Ex): Continues to fight without penalty while disabled or dying.

Vibrating Tusks (Built-In Chaotic Technomancy): Gore deals +2d6 damage.


CHIMERA CHAOSOMATON (CR 7) – CE Large Magical Construct
DETECTION – darkvision 60 ft., low-light vision, scent, Listen +6, Spot +6; Init +1
DEFENSES AC 23 (-1 size, +1 Dex, +13 natural); hp 85 (9d10+36); Immune ability damage/drain, critical hits, disease, death effects, energy drain, exhaustion, fatigue, mind-affecting, necromancy effects, nonlethal damage, paralysis, poison, sleep, stunning
ACTIONSSpd 30 ft., fly 50 ft. (clumsy); Melee bite +15 (2d6+7) and bite +15 (1d8+7) and gore +15 (1d8+7) and 2 claws +13 (1d6+3); Ranged +10; Space 10 ft.; Reach 5 ft.; Base Atk +9; Grapple +20; SA breath weapon; Combat Feats Hover
SQ darkvision 60 ft., low-light vision, scent
STR 25, DEX 13, CON 17, INT 4, WIS 7, CHA 4
FORT +9, REF +7, WILL +6
FEATS: Alertness, Hover, Iron Will, Multiattack
SKILLS: Hide +1*, Listen +6, Spot +6

Breath Weapon (Su): Once every 1d4 rounds. 3d8 damage, Reflex DC 17 for half. Randomly switches each round (color of gemson in the eyes of the clockwork dragon).

1-2: Black, 40-foot line of acid
3-4: Blue, 40-foot line of lightning
5-6: Green, 20-foot cone of gas (acid)
7-8: Red, 20-foot cone of fire
9-10: White, 20-foot cone of cold

Stunstones (Built-In Chaotic Technomancy): 60 in total. (Ranged attack. On success, 1d4 damage and Fort save (DC 14) or stunned 1d2 rounds.)

Skills: +2 racial bonus on Spot and Listen checks. *+4 racial bonus on Hide checks in areas of scrubland or brush.


LABORATORY #4: TEMPLE OF VEHTHYL

A floating, rectangular island in a huge sphere of smooth stone. Massive flying buttresses of a blackened granite are literally flying — forming the ghostly half-semblance of a cathedral.

TELEPORTALS: Silver teleportal in the middle of the island. Two green teleportals at one end, opposite the altar on the other.

ALTAR: Plain block of stone, but with a large, curling serpent of silver inlaid. (The serpent is rearing.)

  • Search (DC 16): The top of the altar slides back, revealing an everburning brazier and two branding irons — one of gold and one of silver.
  • Brazier: The brazier is not hot to the touch, but will heat the two branding irons. If the irons are both laid over the same spot, they’ll form the Sorcerous Brand of Arn. (If done with the heat from the brazier, then when the name “Arn” is spoken, the brand will glow brightly as per a light spell for 1d6 rounds.)

GM Background: Those to be indoctrinated into the order of Arn were brought here and branded.

LABORATORY #5: OPALETTES

BAD AIR: The air here cannot be breathed (having been consumed by the opalettes).

  • Reflex (DC 15) to hold breath for 2 rounds per point of Constitution, then Constitution checks (DC 10 + 1 per round) to continue. On failure, only hold breath for 1 round per 2 points of Constitution, followed by checks. Then unconscious (0 hp), dying (-1 hp), then suffocates (dead).

PEDESTAL: There is a stone pedestal in the center of the room. Six large, milky-white gemstones are arrayed on the top of the stone pedestal.

OPALETTES: The opalettes are currently in a comatose state. If brought into an oxygenated area, the “gemstones” will open their eyes, unfold faceted arms and legs, and begin crawling around like slow-motion puppies.

  • Arcana (DC 18): Opalettes feed on the vestigial auras of magical items. This doesn’t harm the magical items an can actually be beneficial in magical laboratories (where it prevents potential wild magic surges and the like).
  • Arcana (DC 25): Opalettes can be crushed, releasing the magical energy they’ve fed on and functioning as a one-use 1st level pearl of power (this kills the opalette).
  • If left in at least pairs, there is a 1 in 20 chance per week per opalette that it will give birth to a baby opalette.

LABORATORY #6: VESTIBULE

Alcoves with exquisitely detailed statues of various members of the Arn. A multi-tiered marble fountain with fluted spouts of red jade stands dry and dusty in the center of the chamber — its curved pools swirling around five green teleportals.

FOUNTAIN: Any water poured into the fountain is purified and coalesces.

  • If 20 gallons of water are added, the fountain will begin working again. Any water drunk directly from the fountain acts as a potion of cure light wounds (usable 1/hour per character). (Water taken any distance from the fountain remains purified, but has no curative powers.)

BRONZE TABLET: Bronze Tablet #6 lies in one of the basins.


BRONZE TABLET #6

HIDDEN KNOWLEDGE
Transmutation
Level: Sorcerer/Wizard 2
Components: V, S, M
Casting Time: 1 round
Range: Personal
Target: You
Duration: 1 day/level
Saving Throw: None
Spell Resistance: No

This subtle but useful spell allows the caster to safeguard important knowledge—even from himself. While casting this spell, you recite one piece of knowledge you possess (up to a maximum of 50 words). Upon completion of the spell’s casting, you transfer the knowledge from your mind to your skin in the form of an intricate, runic tattoo placed anywhere you choose on your body. The knowledge disappears utterly from your mind, and you might not realize you forgot something. The magic of the spell patches over gaps in your memory with recollections from the past. Until the spell’s duration ends, the knowledge is lost to you.

Many cyphermages commission nonmagical tattoos to disguise the effects of this spell. A detect magic spell or a Decipher Script check (DC 15 + your Int modifier) reveals an enchanted tattoo but not its contents. The effects of hidden knowledge can be dispelled normally, in which case the knowledge is completely lost.

Material Component: A drop of ink.


LABORATORY #7: GLASSWORKS

A twisted morass of glass piping filled with flowing fire.

THE ARTIFURNACE: Near the center of the twisted labyrinth of glass is the Artifurnace. Eight large valves run around its circumference. Bronze Tablet #2 lies on the floor nearby.

  • Valves: Opening the valves will release a blast of steam (10 ft. cone, 4d6 fire damage, Reflex DC 18 for half damage) and release the fire elementals trapped inside.
  • Cracking the Artifurnace: If all eight valves are released, the Artifurnace can be opened.
  • Helm of Fire Elemental Control: Suspended within the Artifurnace is a helm of fire elemental control (crafted from brass and gold). But it doesn’t work properly: One wearing the helm can summon a Large fire elemental, but anyone wearing the helm will instantly provoke rage from any fire elemental (including those summoned).

FIRE ELEMENTAL: If any of the glass tubing is broken or the valves on the Artifurnace are opened, the fire elementals trapped within the tubing will break free in a rage.

  • 1 Huge Fire Elemental
  • 2 Large Fire Elementals
  • 16 Small Fire Elementals

GM Background: The idea was to create a magical item through entirely sympathetic rituals (by controlling the fire elementals, imbue an item with the ability to control them). Instead, the item became imbued with the rage of the imprisoned fire elementals.

Go to Part 4: Laboratories #8-14

Any material in this post not indicated as Product Identity in the Open Gaming License is released by Creative Common Attribution-Share Alike 3.0.

Go to Part 1

This section of the adventure is based on The Sunken Temple of Arn, a submission to the One Page Dungeon Contest by Strange Stones. Everything you need to use this version of the adventure can be found here, but I recommend checking out the original and some of the other nifty stuff available for free download over there.

The Sunken Temple of Arn - Map

(1 square = 10′ x 10′)

TEMPLE ROSTER

DENIZENLOCATION
2d4 Monstrous CrabsArea 1
2 Sahuagin Elite + 8 Sahuagin + Dire SharkArea 2
2 KopoacinthArea 7
Fluorescent KrakenArea 8
Sahuagin Shaman + 4 Sahuagin Elite + Dire SharkArea 11
2 Sahuagin EliteArea 16 (spread fire in the hall)
2 Sahuagin Elite + 4 Dire SharksArea 18
Sahuagin Chieftain + 3 Sahuagin Elite + Dire SharkArea 19

(italicized denizens generally do not leave their area but might be fetched as reinforcements; see Adversary Rosters)

TEMPLE KEY

Although originally a subterranean structure of great beauty, the entirety of the Temple has become completely submerged and is now occupied by a tribe of sahuagin.

KRIS WARRIOR STATUES: Throughout the temple there are a number of kris warrior statues. If these are examined with a detect magic spell they register as having a faint magical aura. A successful Spellcraft (DC 18) check will indicate that they were once animated (as guardians of the temple), but the spells are ancient and no longer operating.

AREA 1 – GARDEN: Overgrown with seaweed. A verdigrised copper gnomon sits on a marble base. The gnomon alone is worth a small fortune (2,000 gp). The complete piece is worth four times as much.

AREA 2 – PLAZA: At the bottom of the stairs, statues of two warriors stare down — one bearing a kris in his left hand, the other unarmed.

AREA 3 – FEASTING HALL: A dozen humanoid corpses, decayed and bloated, float freely throughout this room. Statues of the unarmed, kris-bearing warriors dominate the room. This is a feasting hall — sahuagin simply pass through this area and feed upon the bloated corpses they collect.

AREA 4 – ANTECHAMBER: This room is stripped bare. Profane graffiti is carved into the walls (predating the deluge and sahuagin occupation). A fresco depicting the holy void remains intact.

AREA 5 – PLAZA OF WISDOM: This area features two giant statues of unarmed warriors in strange poses.

Search (DC 15): To find the trapdoor leading to a rusted ladder of iron that descends into the lower tunnels.

AREA 6 – ANTECHAMBER: As per area 4.

AREA 7 – PLAZA OF REPOSE: This area features two giant statues depicting cloaked humans armed with krises, preparing to strike unseen enemies. Perched upon their shoulders are two winged gargoyles (which are, in fact, kapoacinth).

Search (DC 15): To discover a ceramic box concealed beneath the eastern statue containing a variety of silver jewelry (worth 500 gp).

AREA 8 – FLUORESCENT KRAKEN: The room glows with a soft, coruscating light that emanates from a lesser kraken which lives beneath the iron grate of the floor.

False Door (Search DC 16, Disable Device DC 25): If opened, the door springs outwards with great force. Reflex DC 25 or 2d6 damage.

Secret Door (Search DC 20): The sahuagin are unaware of this door.

AREA 9 – ROOM OF SECRETS: The walls of this room are painted red.

Search (DC 20): There’s a secret compartment that contains 4 vials of oil of taggit and a cursed -2 kris.

AREA 10 – HIDDEN LIBRARY: This room contains the long-ruined remains of many scrolls and books. A scything blade trap was once set off here and now hangs limps from the ceiling, stirring slightly in the current. The skeletal remains of its 6 headless victims lie on the floor.

Skeletons: If disturbed, they will animate and attack.

Bronze Tablet #1: Among the water-ruined paper, there is a bronze tablet (see below).

AREA 11 – SHAMAN’S CHAMBERS: Ornate stonework furniture, covered with mosses and lichens, dominates the perimeter of this room, surrounding an altar of sea embers (bright blue coals which burn even in water).

AREA 12 – KITCHEN: This was once a kitchen for the temple. Rusted, worthless cutlery and rare, valuable bone china can be found in the cupboards.

AREA 13 – BATHS: This room served as the baths for the temple. A hot spring still feeds the baths, making the water in this room noticeably warmer.

AREA 14 – LATRINE: This room was once the latrine for the temple.

Search (DC 12): A cache of 75 triangular gold coins can be found at the bottom of the latrine trough.

Lost Laboratories of Arn - Sorcerous Brand of Arn

Sorcerous Brand of Arn

AREA 15 – ROOM OF GHOSTS: A blasted altar stands in the middle of the room.

Shadows: The ghosts of two Arn assassins (treat as shadows) linger here. Each of the shadows has a glowing sigil (the Sorcerous Brand of Arn) glowing brightly on their arms.

AREA 16 – THE WELL: Heavy black fluid rests within the well, not mingling with the water. This fluid burns like oil even when submerged.

Vat: A vat stands near the entrance with liquid taken from the well. The sahuagin can tip it over to fill the hallway beyond and light it on fire.

AREA 17 – MECHANICAL ROOM: Levers, dials, wheels, and gears take up much of this room. They are rusted and verdigrised; their function lost to the tides of time.

AREA 18 – SHARK PEN: Rusted remains of torture implements litter this room. There is an outlet to the open sea through a long, narrow tunnel.

AREA 19 – TELEPORTALS: This chamber contains  red teleportal (to Lab 1) and a blue teleportal (to Lab 4). Both are one-way.

AREA 20 / AREA 21 – THE OATHS OF ARN: The secret doors leading to these chambers require DC 25 Search checks to find. In Area 20, the Oath of Arn is inscribed upon the wall. A small altar contains a blue key.

In area 21, the False Oath of Arn is inscribed upon the wall. A small altar contains a blue key which will inflict 2d6 Constitution damage (Fortitude save, DC 20, half damage) when used.

BRONZE TABLET #1

TRACK THE BLOOD
Necromancy
Level: Rgr 0, Sor/Wiz 0
Components: V, S, F
Casting Time: 1 standard action
Range: Blood from the target
Target: One living creature
Duration: 1 min/Level
Saving Throw: None
Spell Resistance: No

By tasting the blood of the caster’s chosen target, he creates a connection with that person or creature, enabling a way of tracking it through all kinds of terrain. For some young wizards (level 1-3) this can be a rather tough experience, and they have to make a Fortitude save (DC 15) or lose the blood connection. The blood must still be liquiscent for this spell to work.

There is no defined range of this spell, but when the duration ends the connection is broken and new blood must be procured to cast the spell anew. The blood can come from an animal as well as a person, and even if that creature lies dead somewhere, this spell will lead the caster to it.

Arcane Focus: The blood from the target.

 MONSTROUS CRABS

MONSTROUS CRAB (CR 2) – Medium Vermin (Aquatic)
DETECTION – darkvision 60 ft., Spot +4; Init +1; Languages
DEFENSESAC 16 (+1 Dex, +5 natural), touch 11, flat-footed 15; hp 19 (3d8+6)
ACTIONSSpd 30 ft., swim 20 ft.; Melee 2 claws +4 (1d4+2; Ranged +3; Base Atk +2; Grapple +3; Atk Options constrict 1d4+2, improved grab
SQ darkvision 60 ft., water dependency, vermin traits
STR 14, DEX 12, CON 14, INT –, WIS 10, CHA 2
FORT +5, REF +2, WILL +1
FEATS: —
SKILLS: Spot +4*, Swim +10

Constrict (Ex): On successful grapple check (including grapple check to establish grapple), 1d4+2 damage.

Improved Grab (Ex): On hit with claw attack, grapple as free action without provoking attack of opportunity. On success, establishes hold and can immediately constrict.

Water Dependency (Ex): Survive outside of water for 1 hour per point of Constitution (then refer to drowning rules).

*Skills: +4 racial bonus to Spot checks. +8 racial bonus to Swim checks to perform special action or avoid hazard. Can always take 10 on Swim checks. Can perform run action while swimming.

LESSER KRAKEN

LESSER KRAKEN (CR 6): 60 (8d8+24), AC 19, tentacles +11/+11 (2d6+4), Save +9, Ability DC 16

Str 24, Dex 10, Con 19, Int 18, Wis 17, Cha 17

Skills: Concentration +13, Diplomacy +12, Hide +9, Intimidate +12, Knowledge (geography) +13, Knowledge (nature) +13, Listen +12, Search +12, Sense Motive +12, Spot +12, Survival +12, Swim +16, Use Magic Device +13

Constrict: On a successful grapple check (including grapple check to establish grapple), deal 2d6 damage.

Jet: As full-round action, can jet at a speed of 200 feet. Movement while jetting does not provoke attacks of opportunity.

Improved Grab: On hit with tentacle attack, grapple as free action without provoking attack of opportunity. On success, establishes hold and can immediately constrict.

Ink Cloud: 40-foot spread once per minute as free action. Cloud provides total concealment.

 SAHUAGIN ELITE

SAHAUGIN ELITE (CR 7): 75 hp (10d8+30), AC 20, talon or trident +14/+14 (2d8+3), Save +10, Ability DC 17

Str 16, Dex 15, Con 14, Int 14, Wis 13, Cha 11

Skills: Handle Animal +13, Hide +15, Perception +14, Profession (hunter) +14, Ride +15, Survival +14

Blindsense 30 ft.

Bloodfrenzy (Ex): 14 rounds, cannot end voluntarily. +2 to attacks, -2 AC, +2d6 damage.

Pounce and Rake (Ex): Full action. Move up to twice speed and then perform a full attack. Gains two additional attacks that each deal 2d6.

Speak with Sharks: Telepathically, 100 ft.

SAHUAGIN SHAMAN

SAHUAGIN SHAMAN (CR 7+2*): 75 hp (10d8+30), AC 20, talon or trident +14/+14 (2d8+3), Save +10, Ability DC 17

Str 16, Dex 15, Con 14, Int 14, Wis 16, Cha 11

Skills: Handle Animal +13, Hide +15, Perception +14, Profession (hunter) +14, Ride +15, Survival +14

Possessions: gold pearl (operates as pearl of power (2nd level) 4 times per day, but only with divine spells)

Blindsense 30 ft.

Bloodfrenzy (Ex): 14 rounds, cannot end voluntarily. +2 to attacks, -2 AC, +2d6 damage.

Pounce and Rake (Ex): Full action. Move up to twice speed and then perform a full attack. Gains two additional attacks that each deal 2d6.

Speak with Sharks: Telepathically, 100 ft.

*6th Level Cleric

Cleric Spells Prepared (CL 6)
3rd (DC 16)—magic circle against good, bestow curse, water breathing
2nd (DC 15)—desecrate, bull’s strength, resist energy, make whole
1st (DC 14)—obscuring mist, bless, entropic shield, shield of faith
0th (DC 13)—create water, detect magic, detect poison, guidance, light
Deity: Sea
Domains: Evil, Water

 SAHUAGIN CHIEFTAIN


SAHUAGIN CHIEFTAIN (CR 7+2*): 220 hp (10d8+30), AC 20, talon or trident +14/+14/+14/+14 (2d8+3), Save +10, Ability DC 17

Str 16, Dex 15, Con 14, Int 14, Wis 16, Cha 11

Skills: Handle Animal +13, Hide +15, Perception +14, Profession (hunter) +14, Ride +15, Survival +14

Blindsense 30 ft.

Bloodfrenzy (Ex): 14 rounds, cannot end voluntarily. +2 to attacks, +2d6 damage.

Pounce and Rake (Ex): Full action. Move up to twice speed and then perform a full attack. Gains two additional attacks that each deal 2d6.

Speak with Sharks: Telepathically, 100 ft.

*Potentate (calculated into stat block, see Legends & Labyrinths)

Go to Part 3: The Laboratories

Any material in this post not indicated as Product Identity in the Open Gaming License is released by Creative Common Attribution-Share Alike 3.0.

Lost Laboratories of Arn

November 16th, 2015

Catacombs of Alexandria

This 3rd Edition scenario was originally designed for my In the Shadow of the Spire campaign. I recently had cause to mention it while discussing the need to occasionally write-off the material you’ve prepped: Due to a series of odd events, the PCs in my campaign ended up falling in with a litorian named Wenra (who you’ll meet in detail below). At the end of one session they agreed to accompany him in exploring a dungeon complex he had recently discovered, but half of the party wasn’t firmly committed to the idea and at the beginning of the next session they managed to convince the others it wasn’t a good use of their time or resources. The rather lengthy adventure — which I had grown quite fond of — was laid aside.

The adventure itself is an adaptation of and radical expansion of two dungeons from the One Page Dungeon Contest: The Sunken Temple of Arnby Strange Stones and Escape from the Lost Laboratoriesby Wordman.

THE ARN

The Arn were a secret society during the era of the Sorcerer-Kings. (Much like the Brotherhood of the Silver Hand.) They constructed networks of underground laboratories to keep their work hidden and connected these laboratories using a teleportal network.

The Arn sect in the area around the City dabbled extensively into the chaotic magitech of the Banelord and Lithuin.

SORCEROUS BRAND OF ARN: These marked the members of the order. The branding irons can still be found in the Temple of Vehthyl (Laboratory 4).

BRONZE TABLETS OF ARN: Written in the secret arcane tongue of the Arn. Requires a read magic and comprehend languages spell, and still requires a 5/2 (failure starts over) Decipher Script check (DC 20, 1 hour per check). Each tablet generally has 1 spell on it.

THE WANDERER AND THE BEAR

Wenra is an Artathi — a member of the proud race of felinids who live on the southern continent. His animal companion is a bear named Seenmae.

Seenmae the BearWenra recently discovered a secret door in the Catacombs beneath the City that open onto a long stairway leading down to the entrance of the Sunken Temple of Arn. Finding his way blocked by water, he returned to the surface to get a potion of waterbreathing (and ended up getting several doses of gillweed, see below) and to seek out adventurous companions to accompany him in exploring the ruins (which is where the PCs come in).

Wenra believes that the sunken temple may lead to the Lost Laboratories of the Arn — elaborately concealed laboratories belonging to the arcane sect of Arn which were scattered around the City and only accessible through some sort of teleport network. (He is, in fact, right about this.)

Wenra has in his possession a red key which he believes will allow him to access the entire teleport network. Unfortunately, although it appears intact, it is actually broken. (Spellcraft DC 25 to identify the key; DC 35 to realize it’s not fully functional.)

GILLWEED: Chewing this heavily oxygenated weed allows a character to breathe underwater for up to 1 minute per dose.

WENRA

APPEARANCE: Broad-shouldered Artathi with golden fur. His mane has ribbons of blue-and-crimson threaded through it. His two front-fangs have scrollwork inking on them in the shape of a bear’s paws.

ROLEPLAYING:

  • Hunched shoulders.
  • Big laugh.
  • Gleeful about delving (which often overrides caution).

BACKGROUND: Wenra was a member of one of the Artathi hunting bands that roam the rocky land north of the city. He left his tribe and came to the City to escape a wrath oath that was sworn against him by his brother (Tyrian) for sleeping with his wife (Bithbessa).

When he arrived in the City two years ago, Wenra became fascinated with the Catacombs beneath the city. He joined the Wanderer’s Guild and threw himself enthusiastically (if not always competently) into delving.


WENRA (CR 5) – Male Litorian – Ranger 7 – CG Medium Humanoid
DETECTION – low-light vision, Perception +10; Init +1; Languages Common, Goblin, Litorian
DEFENSESAC 18 (+2 Dex, +1 Two-Weapon Defense, +5 +1 chain shirt of silent moves), touch 12, flat-footed 16; hp 61 (7d8+21)
ACTIONSSpd 30 ft.; Melee +1 battleaxe +8/+8/+3/+3/+3 (1d8+5) or +1 battleaxe +12/+7 (1d8+5); Ranged +8; Base Atk +7/+2; Grapple +11; Atk Options favored enemy (animal) +4; Combat Feats Power Attack; Combat Gear caltrops, acid (x3), antitoxin (x2), holy water (x3), potion of cure light wounds
SQ animal companion, improved combat style (two-weapon), favored environment (underground), low-light vision, wild empathy, woodland stride
STR 18, DEX 15, CON 16, INT 13, WIS 10, CHA 12
FORT +8, REF +7, WILL +2
FEATS: Improved Animal Companion, Endurance*, Track*, Improved Two-Weapon Fighting*, Power Attack, Two-Weapon Defense, Two-Weapon Fighting* (* Bonus feat)
SKILLS: Climb +8, Handle Animal +11, Heal +5, Intimidate +3, Jump +8, Knowledge (dungeoneering) +9, Knowledge (geography) +3, Knowledge (nature) +7, Perception +12, Stealth +11, Search +12, Survival +4, Swim +7
POSSESSIONS: +1 chain shirt of silent moves, +1 battleaxe (x2), backpack (caltrops (x2), candle, chain, crowbar, grappling hook, hammer, pitons (x12), 50 ft. rope, torch (x12)), bandolier (acid x3, antitoxin x2, holy water x3, potion of cure light wounds), gillweed (12 doses)

Endurance (Ex): +4 on Swim checks to avoid nonlethal damage; Constitution checks to avoid nonlethal damage from forced march/starvation/thirst, hold breath, nonlethal damage from cold and hot environments; Fort saves vs. suffocation damage. Can sleep in light or medium armor without becoming fatigued.

Favored Enemy (Ex): Gains +4 bonus on weapon damage, Bluff, Knowledge, Listen, Sense Motive, Spot, and Survival checks vs. Animals.

Favored Environment (Ex): Gains +4 bonus Hide, Listen, Move Silently, Spot, and Survival checks in Underground environments.

Wild Empathy (Ex): 1d20 + ranger level to improve animal’s reaction, resolve as Diplomacy.

Woodland Stride (Ex): Move through any non-magical undergrowth without speed penalty or damage.

Ranger Spells Prepared (CL 3)

1st (DC 12)—speak with animals


SEENMAE (CR 4) – N Large Animal
DETECTION – low-light vision, scent, Listen +4, Spot +7; Init +1
DEFENSESAC 20 (-1 size, +1 Dex, +5 natural, +5 partial plate barding), touch 10, flat-footed 19; hp 72 (6d8+24)
ACTIONSSpd 30 ft. (40 ft. w/o barding); Melee 2 claws +11 (1d8+8) and bite +6 (2d6+4); Ranged +4; Space 10 ft.; Reach 5 ft.; Base Atk +4; Grapple +16; SA improved grab; Combat Feats Run
SQ familiar abilities (link, share spells), low-light vision, scent
STR 27, DEX 13, CON 19, INT 2, WIS 12, CHA 6
FEATS: Endurance, Run, Track
SKILLS: Listen +4, Spot +7, Swim +8* (+12 w/o barding)
POSSESSIONS: partial plate barding

Improved Grab (Ex): Start grapple as free action off claw attack, no attack of opportunity.

*Skills: +4 racial bonus on Swim checks.


WENRA’S PATH

Wenra’s Path leads:

  • Through the Catacombs to a door.
  • Down a long stairway (with
  • The stairway continues down into sunken passages.
  • The sunken passages lead to Area 1 of the Sunken Temple of Arn.

Go to Part 2: The Sunken Temple of Arn

Any material in this post not indicated as Product Identity in the Open Gaming License is released by Creative Common Attribution-Share Alike 3.0.

Go to Part 1

Star Wars: Red Peace was originally designed to be the first part in a trilogy of generation-spanning scenarios: Red Peace was set during the waning days of the Clone Wars; the sequel would have been set during the Rebellion of the original trilogy; and the third scenario would have been set twenty years further in the future.

Unfortunately, my group’s experiment with Star Wars: Force and Destiny was not a success: My players did not like the game. (Nor did I.) And it also took about four times longer to accomplish anything in the system than we had anticipated. So we folded the mini-campaign before reaching the second or third scenarios.

As a result, those scenarios were never fully designed. But I’m going to share my original rough thoughts for these in case anyone might be interested.

Star Wars: Restless Sith

In Episode II: Restless Sith, twenty years have passed. The PCs have spent the intervening years studying the Red Holocron in the hopes that it would contain some clue to toppling Emperor Palpatine. They are currently hiding on the far side of the Galaxy, in a region of space outside of Imperial control, investigating information which they believe will lead them to an installation of the Jedi Empire that may contain a weapon they can use against Palpatine.

What they discover, orbiting a neutron star far beyond the common star lanes, is a Jedi Empire space station.

Star Wars: Restless Sith - Space Station

Investigating the station they would have discovered that it was a carbonite facility. They also would have inadvertently awoken the ancient caretakers of the facility: Strange droids made from some sort of malleable, silver-black metal. Bas relief glyphs run over their limbs and torso, concentrating on their faceless features. The glyph droids also exhibit a vicious pack intelligence — the more glyph droids present, the more intelligent they become.

Avoiding or bypassing the glyph droids, the PCs reach the carbonite facility where the weapon of the Jedi Empire was stored.

Unfortunately, they’ve been tricked by the Red Holocron: What they end up thawing out is not a weapon. It’s a Sith Master named Darth Victus.

I intended to end this episode in a fight with Darth Victus onboard the Jedi Empire space station. But if Darth Victus were to escape, you could extend this section of the campaign by having the PCs deal with Darth Victus’ rapidly expanding base of power. (The Empire could also become involved if Emperor Palpatine were to become aware of the ill-timed challenge to his authority.)

Star Wars: Restless Sith - Darth Victus

Star Wars: Dawn of the Droid

To fully understand Dawn of the Droid, you’ll want to start by checking out my thoughts on what a sequel Star Wars trilogy would look like (circa 2006): Episodes VII, VIII, and IX.

Dawn of the Droid takes place 20 years after Restless Sith and the Original Trilogy: The Empire has been overthrown. The New Republic is ascendant. The PCs are now part of the New Jedi Order, founded by Luke Skywalker (who has been missing for a decade) and now run by his wife Mara Jade.

The PCs have been investigating some sort of case and the leads have taken them to Halon Prime, one of the major shipyards for the Republican navy. At Halon Prime they encounter morph droids for the first time: These droids appear to be formed from some sort of black mercury; they fluidly change shape and form. And raised glyphs race across their surface, identical to those they saw on the glyph droids twenty years earlier.

(It’s around here that they might realize that they opened a Pandora’s Box by reactivating those droids.)

The culmination of Halon Prime comes when they encounter a Droid Knight — a droid somehow capable of manipulating the Force — and a droid fleet attacks the shipyards. They duel and chase the Droid Knight through the burning remnants of the Republican fleet.

In the aftermath of the battle, the PCs hook up with Mara Jade and her daughter, who have come to Halon Prime to investigate what happened to the shipyard. (As Red Peace saw the PCs cross paths with known film continuity, the vibe here would be to make it feel like they were crossing over with the continuity of  film that doesn’t actually exist.)

If you wanted to push this scenario further, you could keep the PCs intimately involved in the emerging war and eventually have them follow the clues back to Pelori IV where the Droid Uprising had its start. You could also loop them into the grail quest for the Phoenix Holocron (the Jedi mirror of the Sith’s Red Holocron), which might mean crossing paths with Luke.

FFG STAR WARS – FURTHER READING
Review of Force and Destiny
Force and Destiny: System Cheat Sheet
FFG Star Wars: The Big Fix
Star Wars: Red Peace

Go to Part 1

Star Wars: Red Peace - Jedi Temple on Lothal

The Jedi Temple on Lothal appears in “Path of the Jedi”,  episode 8 of Star Wars: Rebels.

ENTERING THE TEMPLE: When two Jedi synchronize their focus to create a Force harmony, the large central spire corkscrews up to reveal an entrance to the temple. One of these entrances is shown on Star Wars: Rebels, leading to an area where padawans are taken for the Test of the Cave. In reality, there are multiple rotations available depending on the harmony you create.

STANDING ORDER 429: Commander Racto will call in additional clone trooper reinforcements from the Lothal garrison. But, per standing order 429, no clone trooper can directly enter property owned by the Jedi Order. Commander Racto and his men will remain stationed outside of the Temple.

(Technically, this is actually order 42.9 — the ninth section of Order 42. But the Army of the Republic tends to just elide over the decimals. The entirety of Order 42 regulates the relationship between the Army and the Jedi Order.)

MADAME MEREEL: Madame Mereel, the caretaker of the temple, will greet the PCs. Unfortunately, Mereel has been taken over by mind control bugs: At some point, they’ll crawl out of her clothes and over her skin, penetrating into her eyes and nose and mouth. And then she’ll attack.

IG-100 DroidBefore that happens, however, she’ll offer to take them some place where they can relax and enjoy some refreshments in the “quiet peace” of the temple. (In reality, she’ll be leading them to the Cyst.) On the way there, she’ll try to learn everything she can about what brought the PCs to the temple, feign her concern about Separatist interest in the temple, and offer whatever assistance she can.

The PCs will probably figure out that something is wrong as they pass into the Cyst, and that’s also a good place for Mereel to reveal herself and ambush them with the assistance of two IG-100 droids. (If they can come up with some clever way to free her from the bugs, great. Otherwise, it’ll be a fight to the death with a Fallen Master.)

MADAME MEREEL

Star Wars: Red Peace - Madame Mereel

IG-100 DROIDS (x2)

Star Wars: Red Peace - IG-100

DARK SIDE CYST

Like many Jedi Temples, the temple on Lothal has been built around a cyst of the dark side (with the temple actually serving to contain the corrosive influence of the cyst itself). Another example of a Dark Side cyst is the cave on Dagobah where Yoda tests Luke in Empire Strikes Back. Confronting the visions created by these cysts is actually part of the tests a Jedi apprentice must face before becoming a Jedi Master (as seen in Tartovsky’s animated Clone Wars mini-series).

The Red Holocron is being kept at the Heart of the Cyst. To get there, the PCs will need to navigate the cyst. This will take the form of navigating through four visions:

  • Fear
  • Anger
  • Hate
  • Suffering

These visions may take the form of dreams, premonitions, or even action sequences (like Luke dueling with Vader). However, each vision should be customized to the PCs. You can do this by either:

(A) Asking one of the players what the greatest Fear of their character is; then the next player what makes them most Angry in the universe; and so forth. (Crafting each vision based on their answer, so that the group collectively confronts the emotional baggage of the others.)

(B) Asking ALL of the players what their greatest Fear is and then crafting a vision which incorporates all of them. Including material that foreshadows the future events of your campaign would also be effective. (See Random GM Tips – Foreshadowing in RPGs for tips on doing this effectively.)

HEART OF THE CYST

When the PCs reach the Heart of the Cyst, they’ll find the Red Holocron: Force Shades extend from the walls of the inner cyst, caressing the holocron in a shadowy dance. (The cyst is being used to reconstitute and energize the Red Holocron.)

When the PCs access the Red Holocron, the stored personality of Darth Sidious will manifest itself. With Machiavellian glee it will answer their questions and then, at a dramatically appropriate moment, the projection of Darth Sidious will reveal itself to be Emperor Palpatine.

MOMENT OF REVELATION: In that moment of revelation, there is a vergence in the Force. The actual Emperor Palpatine is simultaneously declaring the execution of Order 66. Force sensitive characters can immediately roll any non-committed Force dice they possess.

1 Force Point: They’ll see the recorded projection of Darth Sidious say the words, “Execute Order 66.” (But they will have no idea what that means.)

2 Force Points: They recognize that “Order 66” was the reflection of some larger and darker truth. The disturbance of the Force wrought by Jedi being slaughtered is felt.

4 Force Points: They will also have a vision of Commander Racto receiving the Order and preparing to murder them.

Characters with the Foresee power have their Force point results count double.

FINALE: ORDER 66

Commander Racto and his clone troopers are, in fact, preparing to ambush and slaughter the PCs when they leave the temple. The PCs will either need to fight their way through their erstwhile allies or find a way to sneak out.

Either way, they’ll be escaping into a galaxy that is actively hunting and seeking to destroy them. (The next major incident they experience will probably be receiving the emergency signal from the Jedi Temple, followed shortly thereafter by General Kenobi’s warning that the emergency signal is a fake and that the Jedi should stay away from the temple.)

Star Wars: Red Peace - Commander Racto and the Clone Troopers

Go to the Sequels

Archives

Recent Posts

Recent Comments

Copyright © The Alexandrian. All rights reserved.