The Alexandrian

Posts tagged ‘rpg scenarios’

Stone of Golorr - Waterdeep: Dragon Heist

Go to Part 1

The Stone of Golorr is described on p. 192 of Dragon Heist. What many people don’t realize, however, is that the Stone of Golorr previously appeared as part of WotC’s Stream of Many Eyes event and a tie-in ARG:

The Sage of Shadowdale hath hid on Earth a stone, of great power and imminent import. Its guardian, an exile from my realm, was spirited to Earth with this in tow; to keep it safe and secret ‘ere its prophesied return.

The continuity of the Stream of Many Eyes features a number of elements from Dragon Heist, but although it seemed to lead directly into the published scenario, that promise didn’t really come to fruition. The Stone of Golorr as it appeared here had a different back story, different properties, and even a prophesied destiny.

Since I found a number of elements in the Stream of Many Eyes continuity for the Stone intriguing, I attempted to blend the two continuities together. This effort, however, quickly went awry: Rather than simply combining the two continuities, I ended up riffing on the basic conceptual ideas and ended up basically reinventing the Stone.

There are no principles of design or anything like that which led me down this path; it’s a purely idiosyncratic creative response to the raw material. Maybe you’ll end up liking what you’ll see here, and maybe you won’t. If you do, great. If you don’t, the good news is that you can generally just use the Stone of Golorr as it appears in Dragon Heist. The only element you’ll need to pick up from here are the Three Eyes.

WHAT THE STONE IS

The Stone of Golorr is an artifact that once belonged to the Abolethic Sovereignty. For millennia it was held in a vault within the ancient floating city of Xxiphu on the world of Abeir, but it was lost during the Wailing Years.

According to some histories, it was brought to Abeir-Toril when Xxiphu first plummeted to the world and settled deep below what is now the Sea of Fallen Stars. According to others, an aboleth who came to Abeir-Toril before the arrival of Xxiphu created the Stone; or perhaps he fled to Abeir-Toril carrying the stone and Xxiphu came in pursuit of their prize. Some versions of the tale claim that the Stone was forged during the primeval battles between Shar and Selûne, in the very moment that the world of Toril was formed.

Whether the Stone predates or co-dates the creation of Toril, in arcane terms this gives the Stone a position of primacy, making it capable of effects which no magic item or artifact created in these younger days could possibly duplicate.

HOW THE STONE WORKS

When the proper ritual is performed, the Stone magically eliminates a memory or piece of knowledge from everyone on Toril except for the person who is attuned to the Stone.

PERFORMING THE RITUAL: The use of the Stone to erase memory is a special ritual-form of legend lore which takes 12 hours to cast. Performing the ritual requires:

  • The ability to cast legend lore.
  • Knowledge of the ritual modifications to the spell.
  • The use of a second abolethic artifact, a small tetrahedron of red jade. (This artifact is still in Lord Neverember’s possession.)
  • Special incenses suffused with the blood of an aboleth (2,500gp cost) and four ivory strips worth at least 50gp each.

During the ritual, the burning of the incense causes the four sides of the tetrahedron to unfold, revealing slots into which the ivory strips are then inserted. The Stone is then placed within the tetrahedron and the sides closed around it.

As the ritual completes, the tetrahedron opens once more, revealing the Stone of Golorr as it releases a burst of psionic energy. This energy attempts to refract through the person attuned to the Stone, forcing them to make a Wisdom saving throw with a difficulty commensurate to the scope of the memory or knowledge they are seeking to eliminate. (The memory of something with little significance and known to very few people would have a smaller DC than something of great significance or known to a large number of people.)

A group of people can attempt to perform the ritual together in order to reduce the difficulty of this saving throw by -2 per additional person (by spreading psionic refraction between them). The number of characters participating in the ritual is limited by the level of the character leading the ritual (i.e., a 5th level character could lead a ritual with up to 5 people), and all participants must succeed at the saving throw in order for the ritual to be successful.

On a failure, the ritual member fails to refract the psionic energy and the memory they were seeking to erase is eliminated only from their mind. If a particularly significant piece of knowledge was being targeted, the failure might also invoke a general fugue state for minutes, hours, or days (at the DM’s discretion).

On a success, the knowledge is eliminated: Wiped clean from scrolls and inscriptions. Removed from all living memory except for those attuned to the Stone or participating in the ritual.

Note, however, that:

  • This is very specific. For example, Neverember only eliminated the knowledge of the Vault’s location, which is why other lore regarding the Vault (like its existence and the keys required to open it) can still be found. As if reality had become a poorly expurgated book, you can still see where the “text” has been snipped out if you know where to look.
  • This only destroys current knowledge, not the subject of the knowledge nor the ability to learn that knowledge in the future. Making everyone forget Bob, for example, doesn’t stop Bob from saying, “Hi! I’m Bob!”

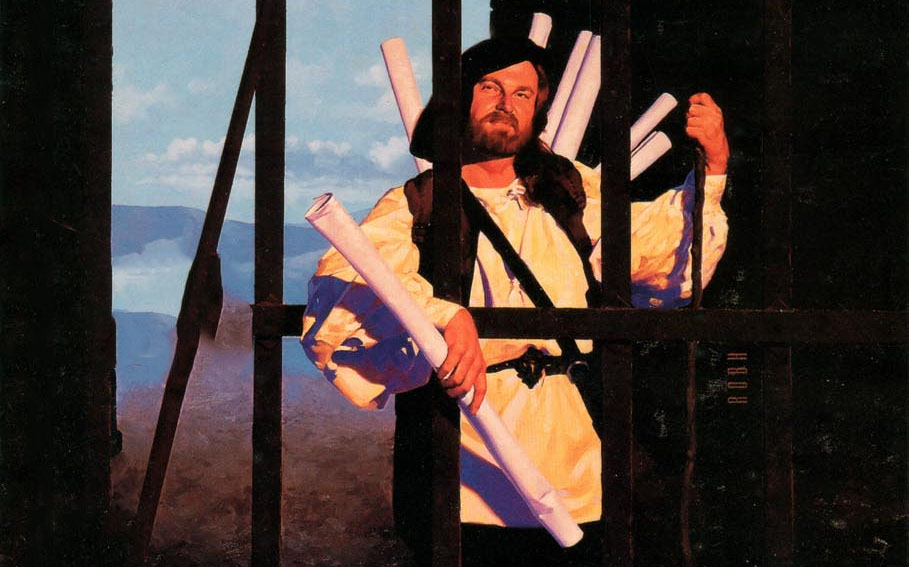
USING THE STONE: Communicating with the Stone, receiving knowledge from the Stone, or performing the knowledge-erasing ritual requires the user to be attuned to the Stone. This can be a somewhat unpleasant process as the attunement takes the form of your thoughts slowly becoming compatible with the utterly alien, abolethic thoughtforms of the Stone.

THE STONE BLINDED

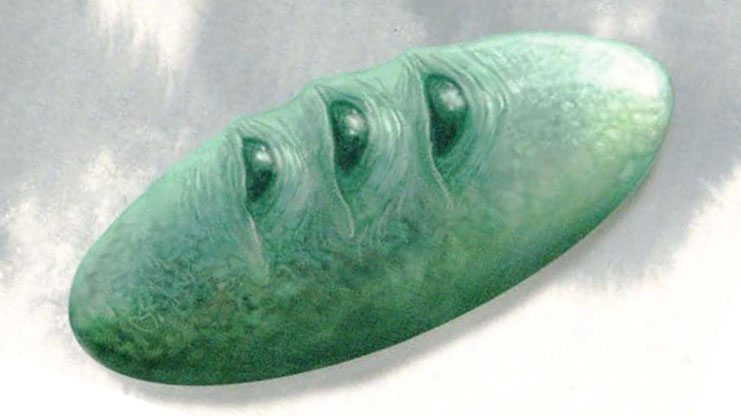
As Dragon Heist begins, the Stone of Golorr has been blinded by Lord Neverember; he has removed its three Eyes. This is not a physically difficult procedure: If someone is attuned to the Stone, an Eye can simply be physically popped out (or popped in). With the Eyes missing, however, the capabilities of the Stone are limited.

A simple physical examination of the Stone will make it clear that the three Eyes are missing.

BLINDED: The Stone is inert.

1 EYE RESTORED: With one Eye restored, the Stone can communicate, but still not see the secrets it once contained.

2 EYES RESTORED: Although still crippled, the Stone (and a character attuned to it) can now “see” the location of the remaining Eye and the immediate area around it. (This routes around a potential failure to figure out the location of the third Eye, and also speeds up the procedure of the third Eye Heist by essentially allowing the PCs to skip the normal surveillance requirements.)

3 EYES RESTORED: The Stone of Golorr is fully restored and operates normally once again.

SECRETS OF THE STONE OF GOLORR

The Stone of Golorr is a sentient magic item with an Intelligence of 18, a Wisdom of 16, and a Charsma of 18. It has hearing and darkvision out to a range of 120 feet. It can communicate telepathically with the creature that is attuned to it, as long as that creature understands at least one language. In addition, the Stone learns the greatest desires of any creature that communicates telepathically with it.

Speaking with the Stone is difficult as its thought processes are alien. As a result, the information it provides is often cryptic or vague.

Legend Lore: The Stone of Golorr has a maximum of 3 charges and regains 1d3-2 expended charges daily at dawn. While holding the Stone, you can expend 1 of its charges to cast the legend lore spell.

Using one of these charges, the Stone can share with its attuned holder the secrets which have been hidden inside of it, either through speech or through a telepathic burst of imagery and sensation. Its holder can direct this towards a particular secret if they are aware of its existence; otherwise the Stone will provide a secret according to its own perverse whim and alien predilection.

Examples of such secrets, ranging from the banal to the profound, include:

  • Any number of horrible racial slurs.
  • The elvish word essylathir, which means the beauty of eyes which are the color of a storm-tossed sea.
  • The existence of a race of tawny-haired bipeds known as “fuzzies” that live in the High Forest.
  • The Kingdom of Otheria, which ruled a demesne from the Sword Coast to the sands of Anauroch approximately 500 years ago.
  • The name “Anu-Devan,” which was once the most popular male elven name.
  • The Aurunean Invasion. Strange invaders wearing insectile helmets of mithral-and-gold came from a continent far to the west and invaded Faerûn. Apparently the Stone was used to eradicate all knowledge of the war, thus ending the conflict (since it also eradicated the navigational charts the Auruneans had used to reach what they called the Eastern Shores).
  • Book of Eldritch Might III: The Nexus - Monte CookThe location of 16 bars of silver, buried in the rear yard of a tavern in Murann in 916 DR.
  • The location of the Nexus (see Book of Eldritch Might III).
  • An atrocity performed during the Crown Wars. Although history has long-maintained that the dark elf Ilythiiri attacked the smaller kingdom of Orishaar on the thinnest of pretenses to begin the Second Crown War, it turns out that the Orishaari actually betrayed the Ilythiiri at a wedding which was to unite their two people and slaughtered most of the Ilythiiri royal family. The knowledge of this was wiped from history by the Stone of Golorr, leaving the official histories to record only that the dark elves went to war “in supposed retaliation for Aryvandaar’s aggression against the Miyeritari. Consdiering that the moon elves of Orishaar had no connection with Aryvandar beyond a trade alliance, and the Ilythiiri had little to do with the beleaguered elves of Miycritar, this was a thinly veiled excuse for the Ilythiiri to seize some land from the moon elves.” (Lost Empires of Faerun)
  • The spells blacksteel and midnight shroud (see Spells of Light and Darkness).
  • The ritual required for the creation of a Hell cyst (see Part 3).
  • The existence of the Shadowdusk family, and their holdings on Level 22 of Undermountain. (Or perhaps some other hook to Dungeon of the Mad Mage.)

Perceptive PCs may notice that many of these secrets were likely secured on Toril at a time when the Stone of Golorr was supposedly being held in a vault on Abeir. If they inquire on this topic, the Stone will reveal that when Abeir and Toril were reunited, it was ripped back in time to the point where the two worlds were sundered and then “skipping” through time, appearing in Toril at various, discontinuous points through history.

Memory’s Passing: If you lose attunement with the Stone you must attempt a DC 16 Wisdom saving throw or the memories you shared with the Stone (i.e., the lost knowledge you gained from it) will begin to fade from your mind

DESIGN NOTES

Another option I looked at here was to allow each secret encoded within the Stone to be locked with a passphrase. To access the secret you would need both Stone and passphrase.  (The passphrase for the Vault’s location would have been “Brandath,” which would be seeded throughout the campaign with the Three Clue Rule.)

Passphrases might be vulnerable to certain divinatory attempts; or maybe it’s a requirement that the passphrase be recorded on a stone disc. If they’re NOT vulnerable to divinatory “hacking,” the use of passphrases would allow you to control exactly what information the PCs can pull out of the Stone. And the hunt for a passphrase can become an adventure in its own right (many times over).

I decided the use of passphrases was just an extra layer of complexity that Dragon Heist didn’t need, however, and so opted not to implement it. If you do, I’d recommend that the Cassalanters have a list of several passphrases they’re interested in feeding into the Stone.

WHERE IS THE VAULT?

Those seeking Neverember’s Enigma from the Stone will receive that information in two simultaneous streams of information:

  • A tangled barrage of imagery: Twisted underground tunnels lit by strange lights. An endless field of corpses. Halls of stone. A golden dragon, aging so rapidly that scales shed from its skin. The sound of a silver hammer striking stone. A beam of sunlight in a darkened room. A chisel carving Dethek (dwarven) characters which transform themselves into two words: BRANDATH CRYPTS.
  • A cryptic riddle: Where laid his wife to rest ‘midst bones of son’s blood sealed, there where Anri laid himself to rest lies that which Open Lord concealed.

Go to Part 6B: The Brandath Crypts

Waterdeep: Dragon Heist

Go to Part 1

The PCs will spend a significant portion of this remixed campaign engaged with the other factions of the Grand Game: Investigating them, reacting to them, targeting them, getting pissed off at them, etc. Much of that activity will be structured around investigating the factions’ outposts and lairs, following the web of connections between them.

The revelation lists for each outpost and lair below adhere, at a minimum, to the Three Clue Rule. But you should remain alert for opportunities to dynamically generate clues in response to the PCs’ actions.

DYNAMIC CLUE – RESEARCHING A FACTION: If the PCs want to find a faction by doing general research, point them in the direction of one of the faction’s outposts. (Each outpost will contain clues that point to the Lairs, which are generally their ultimate goal.) See Rulings in Practice: Gather Information.

DYNAMIC CLUE – TRACKING BAD GUYS: Or backtracking them. Lean towards these trails leading to/from outposts, too. If the PCs are tracking the bad guys from an Outpost, though, it can be toss-up whether they’re heading to another outpost or a lair. In some cases, of course, simple logic about what the NPCs are likely to be doing will override this structural guidance, in which case you should go with the logical option.

DYNAMIC CLUE – INTERROGATION: Similar guidance applies when the PCs start interrogating faction members. If these are mooks they’ve found in the field, the interrogation will usually lead back to the outpost they’re based out of. If they’re interrogating people in an outpost, on the other hand, they’re more likely to spill the beans on the faction’s lair. Again, use common sense (particularly when it comes to established NPCs like Urstul Floxin or Nihiloor).

DESIGN NOTE

In distributing clues, my general rule of thumb for any given outpost was to include one clue in a different outpost of the same faction, one clue in a lair or outpost of a competing faction, and one clue with a response team. For the lairs, I included one clue in each of the faction’s outposts and then also includes at least one clue with a competing faction.

This was not a formula I followed slavishly and you’ll find a number of exceptions, but as a guiding principle it helped make sure that I didn’t over-cluster the clues and inadvertently create structural cul-de-sacs.

BREGAN D’AERTHE LOCATIONS

FENERUS STORMCASTLE’S HOUSE

  • Letter Regarding Fenerus Stormcastle’s House (Seven Masks Theater)
  • A Directive to Zorbog (Zhentarim Interrogation House)
  • Sealed Letter to Fenerus Stormcastle (Response Team: Krebbyg Masq’il’yr)
  • A Directive from Jarlaxle (Gralhund Villa – Artheyn Manor)

SEVEN MASKS THEATER

  • Message regarding “Westra Moltimmur” and “Sapphiria’s Booty” (Fenerus Stormcastle’s House)
  • Report on the Seven Masks Theater (Xanathar’s Lair)
  • Playbill for the Seven Masks Theater (Response Team: Soluun Xibrindas)
  • Letter from N’arl (Sea Maidens Faire)

LAIR: SEA MAIDENS FAIRE

  • Report regarding guild difficulties relating to the Sea Maidens Faire. (Fenerus Stormcastle’s House)
  • Following Krebbyg or Questioning Fenerus. (Fenerus Stormcastle’s House)
  • Speaking with Malcolm Brizzenbright (Seven Masks Theater)
  • Report on the Seven Masks Theater (Xanathar’s Lair)

CASSALANTER LOCATIONS

ASMODEAN SHRINE

  • Arn’s Meeting Notification (Converted Windmill)
  • Report on the Cultists of Asmodeus (Sea Maiden’s Faire)
  • Proactive: Harpers hire the PCs to investigate the shrine. (see “Using the Cassalanter Outposts”, Part 3B)

CONVERTED WINDMILL

  • Seffia Naelryke’s Visiting Card (Response Team: Vevette Blackwater)
  • Arn’s Book of Worship (Asmodean Shrine)
  • Injury Report (Terasse Estate)
  • Report from Seffia Naelryke (Cassalanter Villa)

LAIR: CASSALANTER VILLA

  • Proactive: Invitation from the Cassalanters
  • Bregan D’Aerth’s Report on the Grand Game (Sea Maidens Faire)
  • Questioning Cultists (Asmodean Shrine)
  • Noble Sigil on the Mirror of the Fiend (Asmodean Shrine)
  • Instructions from Lord Cassalanter (Asmodean Shrine)

XANATHARIAN LOCATIONS

GRINDA GARLOTH

  • Note Regarding Gladiatorial Weaponry (Terasse Estate)
  • A Recommendation for Materiel (Response Team: Fel’rekt Lafeen)
  • A Directive from N’arl Xibrindas (Any Xanathar Response Team)

TERASSE ESTATE

  • A Directive Regarding Materiel (Grinda Garloth)
  • On the Delivery of a Mechanical Beholder (Xanather Sewer Hideout 2)
  • Report from Seffia Naelryke (Cassalanter Villa)

XANATHAR SEWER HIDEOUT, TAKE 2

  • Orb Confectioners’ Note (Response Team: Korgstrod Uxgulm)
  • Report to Agorn Fuoco (Response Team: Vevette Blackwater)
  • An Ill Man’s Note (Terasse Estate)

LAIR: XANATHAR’S LAIR

  • Gralhund Report on the Grand Game (Gralhund Villa)
  • Rescuing Ott Steeltoes (Zhentarim Interrogation House)
  • A Note Regarding Gladiatorial Weapons (Grinda Garloth)
  • Gladiatorial Gathering Point (Terasse Estate)
  • Correspondence with N’arl Xibrindas (Xanathar Sewer Hideout 2)

ZHENTARIM LOCATIONS

ZHENTARIM INTERROGATION HOUSE

  • Directive to Urstul Floxin (Response Team: Urstul Floxin)
  • Crumpled Note (Yellowspire)
  • Questioning the Zhentarim Response Teams (or being captured by them)

YELLOWSPIRE

  • Tracking Urstul Floxin before the Gralhund Villa operation (Response Team: Urstul Floxin)
  • Threatening Agorn Fuoco; he’ll sell out his friend to save his own life (Response Team: Agorn Fuoco)
  • A Missive from Castle Ward (Gralhund Villa)
  • Questioning Samara (Xanathar Lair)

LAIR: KOLAT TOWERS

  • Xanathar’s Report on the Grand Game (Xanathar’s Lair)
  • Cassalanter’s Report on the Grand Game (Cassalanter Villa)
  • Teleportation circle (Yellowspire)
  • Capturing Agorn Fuoco (Response Team: Agorn Fuoco)
  • Questioning Samara (Xanathar’s Lair)

Go to Part 6: Golorr Artifacts

Dagger's End - Skyrim

Go to Part 1

BACKTRACKING DALAKHAR

Once the PCs identify Dalakhar as the primary target of the explosion, they may want to try backtracking his activities.

A successful Charisma (Investigation) check can track him back to the Inn of the Dripping Dagger, located in the Trades Ward (location T3 on the 3rd Edition City of Splendors map). He rented his room for one night and then left.

HIS ROOMS: Inspection will reveal that his room was scrubbed clean in a very professional fashion. A DC 12 Intelligence (Investigation) check will reveal ash in the base of the room’s oil lamp suggesting that a piece of correspondence was burned. (It can’t be reconstituted through non-magical means, but was Renaer’s response to Dalakhar’s original missive setting up the meeting at Trollskull Manor.)

Laying out in plain sight on the pillow, however, is a round disk of black stone painted with Xanathar’s stylized beholder sigil. It’s a death mark, left here as a threat after Xanathar’s minions tracked Dalakhar here.

XANATHAR RESPONSE TEAM: The room is also being watched by a Xanathar response team (see Part 3C). If they see the PCs enter the room, they’ll most likely accost them and see what they know about Dalakhar.

If it’s been more than a day since Dalakhar was killed, the response team has been briefed on that and is also aware that “the boss knows a guy name Floxin – one of those Zhent bastards – was following that gnome dungbag; the boss has got eyes on Floxin now”.

(This might give the PCs an alternative route to the Gralhunds by tracking down and following Urstul Floxin. Putting in some more legwork might discover that Floxin is currently operating out of Yellowspire (see Part 3B), and they might be able to follow him from there to the Gralhund Vila.)

If it’s been more than three days since Dalakhar’s death, the response team is pulled from this location.

THE LETTER: Four days after Dalakhar’s death, a letter arrives at the Inn of the Dripping Dagger for him.

Dalakhar,

I had to give considerable thought to your request. But you were always kind to me even when your demonic master was not. If you are still in need of my aid, you may claim whatever sanctuary I can offer.

Kalain of the Nine Waters

Before he was killed, Dalakhar was thrashing around trying to find whatever aid he could. He was even desperate enough to contact Kalain, a former mistress of Lord Dagult’s. Inquiries can identify Kalain’s place of residence in the Sea Ward.

DESIGN NOTE

The late arrival of the letter is designed to push a clue to PCs after their initial visit: Those who leave their names with the owners of the Dripping Dagger, particularly those who specifically ask the owners to contact them if any new information crops up, will be rewarded with a proactive follow-up. (Alternatively, but probably less likely, it can reward PCs who follow-up on old leads.) Since the clue is non-essential for the current investigation, the slightly heightened risk of them missing the clue is offset by the benefit of adding depth to the game world: Little details like this make the players feel as if the game world is a fully functional, living environment that persists beyond their immediate line of sight. (Largely because that is, in fact, what you’re doing.)

KALAIN’S TOWER

Kalain lives in a dilapidated tower in the Sea Ward. See Dragon Heist, p. 88, although the Vault is not secretly located there.

AREA W8 – KALAIN’S STUDIO: Here are Kalain’s most recent paintings, documenting her descent into madness.

  • DOCUMENT LOCKBOX: A document lockbox with three drawers sits on one of the tables (DC 13 Dexterity check to unlock). One of the drawers contains love letters she exchanged with Lord Dagult. Another drawer contains similar letters, but these have been torn to confetti. (She periodically removes a letter from one drawer, rips it to shreds, and deposits it in the other.) The third drawer contains a number of work papers left behind by Lord Dagult (see below).

KALAIN

Appearance: A beauty ruined by tragedy; lines of sadness are etched into her face. Long black tresses are streaked with silver turning to gray.

Roleplaying:

  • Believes everyone is secretly an assassin sent by Dagult Neverember to murder her.
  • Loses track of the conversation and abruptly starts talking about completely different subjects.
  • Rubs her cheek with her hand with increasing vigor as she becomes distressed.
  • Will activate creatures from her smaller, older, more peaceful paintings to assist her (fetching small objects, etc.).
  • Sees Dagult, Waterdeep, and the monsters of he newer paintings as all being the same thing; will refer to them interchangeably.
  • Speaks of Neverwinter as if she were a red-headed maiden who seduced Lord Dagult from her arms. Occasionally confuses Neverwinter and Alethea Brandath.

Background: Kalain, a famous Waterdavian painter, was commissioned to paint a portrait of Lord Dagult Neverember, then Waterdeep’s Open Lord, in 1475 DR. Her meeting with Neverember marked the beginning of a torrid affair that lasted over a year.

Their relationship faltered as Dagult’s visits to Neverwinter became more frequent and extended. He made promises to Kalain that he failed to keep, and when she raised the subject of a faithful commitment, he treated her poorly, for his true love was Neverwinter. Kalain became enraged after Dagult’s rejection and turned to painting monsters that, in her mind, represented him. Her power to harness the Weave clings to the fabric of her works, giving her the ability to bring these monsters to life on her command.

Ultimately Neverwinter left Kalain a little over four years ago. He used his influence to ruin Kalain and divorce her from Waterdeep’s high society. She was allowed to keep her home, but her works and her reputation were destroyed, slowly and methodically. Kalain’s spirit was broken, leading to the onset of madness. Now she locks herself away, content to let time erode the last of her conscience.

Key Info:

  • She knows that Dalakhar was a spy working for Lord Dagult Neverember. He sent a letter requesting her help, but she waited several days before replying due to her bitter history with Neverember.
  • If told that Dalakhar was killed, she will blame the PCs for killing him on Neverember’s orders and then rapidly escalate to concluding they’re here to kill her (unless they quickly talk her down)!
  • During their final days together, Lord Neverember was obsessed with a “Melairkyn ceremonial temple or religious vault or something like that. He was always more focused on anything else rather than me. Rather than us.” If questioned, she can provide the papers described above.
  • If asked if she knows where the “vault” is located, she will become quite distressed: “I should know this. He was fixated on it. It would make me so angry… so very, very angry… And now I can’t remember why.” (She was irrationally jealous because it was his ex-wife’s tomb, but because of the Stone of Golorr she can’t remember that any more. No one can.)
  • If specifically asked, she will recount speaking with the Lord Victoro Cassalanter about Lord Neverember and the vault a few weeks ago, but she won’t otherwise volunteer the information.

Stat Block: CE half-elf bard (DH p. 195).

  • Art Imitates Life: Kalain touches one of her paintings and causes its subject to spring forth, becoming a creature of that kind provided its CR is 3 or lower. The creature appears in an unoccupied space within 5 feet of the painting, which becomes blank.The creature rolls initiative when it first acts. It disappears after 1 minute, when it is reduced to 0 hit points, or when Kalain dies or falls unconscious.

LORD DAGULT’S PAPERS

These papers mostly concern minor (and now thoroughly outdated) affairs of the city. There are a few pieces of unusual interest, however:

  • A list of otherwise banal, crossed out tasks includes “move the dragon to the Melairkyn ceremonial vault.”
  • Correspondence with Hammond Kraddoc of the Vinterners’, Distillers’, and Brewers’ Guild making it clear that Kraddoc gave Lord Dagult large bribes to cover up a scandal involving contaminated liquor in the Dock Ward.
  • Notes apparently pertaining to a “ceremonial vault” built by the Melairkyn dwarves beneath Waterdeep centuries ago. The notes detail that such vaults were built by worshippers of Dumathoin, the Keeper of the Mountain’s Secrets. The dwarven cult believed that Dumathoin encoded his secrets in the veins of ore and precious stones he placed in the mountains he raised from the earth for the dwarven people. In their mining, the dwarves would release Dumathoin’s secrets into the world. This angered Dumathoin and there was a period of discord between the dwarves and the Mordinsamman (the council of dwarven gods). In order to appease Dumathoin and to protect his secrets, the cult would mystically bind the “secrets of the mountain” into items of finely-wrought dwarfcraft and then make offering of it to Dumathoin by securing them within ceremonial vaults. Such vaults, according to an ancient source, can be opned by “standing before Dumathoin’s doors and striking the scale of a dragon with a mithral hammer in the place where the sun’s light should fall.”
  • An unsigned letter written to Lord Neverember four years ago stating that “the last of the three Eyes has been secured.”
  • A letter from Dalakhar also dating to four years ago, reporting on his unsuccessful efforts to infiltrate the Enclave of Red Magic in the Castle Ward. (GM Note: This is literally a red herring. Dalakhar’s assignment four years ago has nothing to do with present events. The Red Wizards of Thay use the Thayan embassy as a cover for their local operations; it’s connected to the Thayan enclave in Skullport via a portal.)

DESIGN NOTE

I found Kalain to be a really fascinating character. For a long time, unfortunately, I couldn’t figure out how to fit her into the Remix. I eventually struck on the idea of having Dalakhar write to her for assistance so that the PCs could backtrack him and find a trail to her. Originally, I thought this would be a dead end: The PCs would meet an interesting character and get filled in a little bit more on the back story of the scenario, but there was nothing Kalain could offer towards their current investigation.

And then, in one of those glorious instances where creative thoughts heap one atop the next, I realized that there WAS a way that Kalain could contribute materially to the scenario. (It also allowed me to link to her from the Cassalanters, too, making it more likely that any given group will encounter her.)

Go to Part 5E: Outpost and Lair Revelation Lists

Volothamp Geddarm - Volo's Guide to Waterdeep

Go to Part 1

Dragon Heist launches with the PCs being hired by Volothamp Geddarm to find his missing friend Floon Blagmaar. Unfortunately, the scenario structure for this investigation is quite fragile, being formed from long sequences of linear clue-finding. There are also several continuity problems that we’re going to straighten out.

VOLO’S HIRING SPEECH

There are several problems here.

First, if the PCs don’t fight the troll or stirges that emerge from Undermountain, Volo has no reason to hire them. So if the PCs decide that discretion is the better part of valor here, the whole campaign never happens. (This is relatively low risk, but something you might want to give some thought to.)

Second, the adventure oddly claims, “Volo is embarrassed to admit he might have gotten his friend Floon in trouble, and he resists providing all the details of what happened the night Floon disappeared.” That must be some vestige from a previous version of the scenario, because in the published version of the scenario he does, in fact, tell the PCs everything that happened and has absolutely no reason to think he’s responsible for Floon’s disappearance. (Just ignore this continuity error.)

Third, when Volo hires the PCs, his hiring speech sets up a timeline of events which doesn’t line up well with the events described in the rest of the chapter. (According to Volo, Floon was kidnapped by the Zhentarim two nights ago, but “before the interrogation could begin”, the Xanathar Guild kidnapped him from the Zhentarim, and when the PCs arrive at the Xanathar sewer hideout, their interrogation of Floon has just begun. Where did the missing day go?) We’re going to clear this up (and prelude a later clue) with two new chunks of boxed text:

The figure who approached you strokes his mustache, adjusts his floppy hat, and tightens his scarf. “Volothamp Geddarm, chronicler, wizard, and celebrity, at your service. I am most impressed by your derring-do, and the truth is that I fear I have misplaced a friend amid the odious violence which has recently been seizing the streets of this fair city, and I could use your assistance in finding him. You’d be well paid, of course.”

PAYMENT: 100 gp per character, with 10 gp per character up front.

DC 10 Wisdom (Insight): Volo is stretching the truth about how much he can pay immediately. (Currently low on cash, Volo is awaiting royalty payments from Volo’s Guide to Monsters and he’s currently endeavoring to finish Volo’s Guide to Spirits and Specters, for which he is certain receive a handsome advance.)

FLOON: Once the job is taken, Volo identifies his missing friend.

My friend’s name is Floon Blagmaar. He’s got more beauty than brains, but he’s a great drinking companion. Last night he accompanied me to the Skewered Dragon, a dark, bawdy tavern in the Dock Ward. I called it an early night, but Floon remained – drinking and merrymaking.

His wife tracked me down here in the Yawning Portal half an hour ago and told me that Floon never came home last night. This was doubly surprising, as I had not previously been aware that he was married.

Floon is a handsome man in his early thirties with wavy red-blond hair. He is not difficult to pick out of a crowd, however, for he insists on always wearing a gaudy, 6-inch bas relief of a unicorn’s head on a chain of blue pearls around his neck.

(The necklace is a holy symbol of Lurue. It was Floon’s mother’s, but he’ll tell any of a dozen different stories for how he got it.)

TO THE ZHENTARIM WAREHOUSE

Kenku - Waterdeep: Dragon Heist

Tracking Floon from the Skewered Dragon to the Zhentarim warehouse is restructured as a two-part investigation.

BLOOD IN THE STREETS: Make sure to frame the “Blood in the Streets” incident on the way to the Skewered Dragon.

  • Mention that the three men who have been arrested each have a black tattoo of a flying snake (one on the hand, two on their arms).

REVELATION #1: Floon was kidnapped by men with flying black snake tattoos.

  • Canvassing the Neighborhood: Several people saw Floon and another man (Renaer) waylaid in front of the Old Xoblob Shop (see Dragon Heist, p. 23). Xoblob the Gnome can describe the attack (see Dragon Heist, p. 24). Searching outside Xoblob’s shop will turn up a gaudy, 6-inch bas relief of a unicorn lying in the gutter (see below).
  • Questioning at Skewered Dragon: As the PCs arrive, the evening regulars are probably rolling back in. Several of them will remember Floon and be able to describe how he drank with Volo, Volo left, and then he was joined by another man, a “spoiled, rich noble who likes to rub our noses in it!” (Note: Berca, the bartender, knows that the other man was Renaer Neverember, the son of Waterdeep’s previous Open Lord, Dagult Neverember, but she won’t be free with that information.) Floon and the other man left around midnight. They were followed out by several men, one of whom had a tattoo of a flying black snake on his neck.

(Note: Contrary to the published scenario, the patrons of the Skewered Dragon do NOT know that the “flying black snake” men can be found on Candle Lane. Some of them may be able to identify them as Zhentarim gangsters at the GM’s discretion.)

REVELATION #2: Floon was taken to the Zhentarim warehouse on Candle Lane.

  • Canvassing the Neighborhood (Looking for Tattoos): Several locals have seen men with flying black snake tattoos “up by the candle on Candle Lane” (see Dragon Heist, p. 24). Surveying the lane identifies the correct warehouse because it had a black winged snake painted above the front door’s handle. Asking workers at the other warehouses along Candle Lane can also point them at the right warehouse, and may also reveal that there was some kind of “ruckus” over there early this morning, with large groups of people coming and going.
  • Questioning the Prisoners: The PCs may backtrack to the “Blood in the Streets” crime scene and figure out a way to talk to the Zhentarim agents being held by the city watch. (They’re likely to speak with Captain Staget, see Dragon Heist, p. 27). If they can convince these agents to talk, they’ll learn that they aren’t local, but were told to report to the warehouse as a safe haven after performing the hit on the Xanatharians.
  • Tracking Floon’s Beads: Floon kept his wits about him as he and Renaer were being kidnaped. Breaking the necklace around his neck, he let the blue beads drop into the streets and alleys as they were carried to the warehouse. PCs who find the unicorn’s head in the street outside Xoblob’s may be able to track the trail of beads back to the Zhentarim warehouse.

PROACTIVE FAILSAFES: If the PCs’ investigation is running aground, consider using these proactive elements.

  • Zhentarim hear that the PCs are asking questions about Zhentarim agents, safe havens, or both. A number of Zhent thugs (MM, p. 350) equal to half the number of PCs comes to intimidate them into going away. (Adroit PCs can turn the tables, question them, and learn the location of the warehouse.)
  • A small squad of Zhentarim agents arrives at the Zhentarim warehouse. The kenku lying in ambush attack them, and the fight spills out into the street right in front of the PCs.

AT THE WAREHOUSE

As initially described in Part 1, after he lost his Eye to Xanathar, Manshoon needed to get back in the game. His agents eventually concluded that Neverember’s son, Renaer, might have another of the Eyes. They were right, although Renaer didn’t know it: His father had given him an elaborate, ivory mourning locket in honor of his mother. The Eye was hidden inside it.

The full dynamic in the first chapter, therefore, is this:

  • Zhentarim agents snatch Renaer Neverember and his friend Floon Blagmaar.
  • While questioning Renaer in Area Z5, they realize that the Eye is in the mourning locket and take the locket from Renaer.
  • Renaer is hauled back down to Area Z2 and tied up next to Floon. Upstairs, the Zhentarim break open the locket (it can still be found in Area Z5), remove the Eye, and give it to a courier to carry to Manshoon.
  • Floon is then hauled upstairs for questioning (the Zhentarim want to see if he might be worth a ransom).
  • Xanathar’s agents storm the warehouse. They immediately find “the prisoner” (i.e., Floon), assume he’s Renaer, and several of their agents hustle him out to their sewer hideout. Meanwhile, Renaer takes advantage of the confusion downstairs to slip his bonds and hide in Area Z2.
  • Xanathar’s agents do a perfunctory sweep of the warehouse and then take off, leaving the kenku behind to kill any Zhents who show up.

DEAD SNAKE: A black flying snake lies dead in the lower yard, pierced by an arrow. (GM Note: The Zhentarim tried to send it as a messenger during the attack, but a Xanatharian watcher shot it down.)

RENAER: Renaer will be able to tell the PCs that he was questioned by the Zhents about the half million dragons his father stole from the city; then they ripped off a locket that was very precious to him. If they find the locket and see the (now empty) secret compartment inside it, Renaer can also tell them that he had no idea that the compartment existed or what was stored inside it.

TO THE XANATHAR GUILD HIDEOUT

Once the PCs realize that Floon was taken by members of the Xanathar Guild, they’ll need to track them back to the Xanathar Guild Hideout in the sewers.

TRACKING: The Xanatharians exited the warehouse through the yard on the lower level and accessed the sewer half a block away down the alley. A DC 11 Wisdom (Survival) check easily tracks them that far.

Once in the sewers, it requires three successful DC 13 Wisdom (Survival) checks. On a failure, the PCs waste considerable time needing to backtrack and pick up the trail. If the PCs fail the test three times, they’ve wasted too much time: When they arrive at the hideout, they find it abandoned except for the goblin watchers in Q2 and Zemk, the usual keeper of the hideout, in Q5. Floon’s dead body lies in Q7. (Zemk will toss it into the sewer later in the day when he gets around to it.)

However, each time the PCs roll a tracking check, whether it’s successful or not, they can also make a DC 13 Wisdom (Perception) test to notice the guildsign (see below).

(Note: Even if the PCs only manage to recover Floon’s dead body, Volo, albeit a little disappointed with them, will still reward them for completing their mission.)

QUESTIONING THE KENKU: As described on page 25 of Dragon Heist, questioning the kenku may reveal the existence of the guildsign in the sewers (see below). Beyond that, the kenku are largely incapable of describing where the hideout is located. However, they can lead the PCs there (although they’ll be looking for opportunities to lead them into traps or otherwise betray them).

GUILDSIGN: Symbols scrawled in yellow chalk – a stylized representation of Xanathar – is marked at each tunnel intersection in the sewers, indicating the path which should be followed by the direction the main eye is looking. Once the PCs are aware of the guildsign, they can simply follow it back to the hideout.

To Part 5C: The Nimblewright Investigation

Waterdeep: Dragon Heist

Go to Part 1

In this penultimate section of the Remix, we’re going to use the principles of node-based scenario design to retrofit the campaign’s fundamental structure. This work can broadly be divided into three parts:

  • Strengthening the Three Clue Rule for Finding Floon (Chapter 1)
  • Heavily revising the Nimblewright Investigation that leads to the Gralhund Villa (Chapter 2)
  • Linking together all of the elements of the Grand Game (primarily the faction outposts and lairs)

This will primarily consist of revelation lists, the use of which is discussed in the original Three Clue Rule essay.

Where the clues on these revelation lists can be integrated into the material we’ve treated at length in the Remix, I’ve done so. In these cases, the revelation lists can be used strictly for their normal function: As a reference for helping the GM to understand and track the structure of the scenario.

In some cases, however, clues are added to other sections of the campaign which we haven’t visited in detail as part of the Remix. (This is particularly true for the material in Part 5B: Finding Floon, for example.) These clues will be called out, and the GM will need to use the revelation lists to make sure that this material is properly incorporated into those sections of the campaign.

THE REFERENCE TIMELINE

Before diving into the revelation lists, however, we’re going to organize all of the back story of the campaign (revised and otherwise) into a single reference timeline. This partly exists in order to eliminate the myriad continuity errors found in the original campaign, but mostly to provide an easy reference for the GM while they’re actually running the campaign.

RISE AND FALL OF LORD NEVEREMBER

  • 1451 DR: Lord Dagult NeveremberNeverwinter is destroyed when a small adventuring party (including Jarlaxle Baenre) awoke the primordial Maegera beneath Mount Hotenow.
  • 1467 DR: Lord Dagult Neverember, Open Lord of Waterdeep, proclaims himself ruler of Neverwinter and begins the New Neverwinter movement to rebuild the city.
  • Lord Neverember begins embezzling money from the Waterdeep treasury.
  • Lord Neverember discovers the Stone of Golorr in Neverwinter.
  • When Lady Alethea Brandath (Lord Neverember’s wife) dies, Lord Neverember learns of the existence of an ancient dwarven vault beneath the Brandath Mausoleum.
  • Lord Neverember gains access to the old Melairkyn Vault beneath the Brandath Mausoleum. He begins storing the embezzled money (eventually totaling half a million gold dragons) in the Vault and uses the Stone of Golorr to hide its existence.
  • As an additional security precaution, Lord Neverember blinds the Stone of Golorr: Leaving the Stone in Waterdeep Palace, he keeps one of the Eyes with him in Neverwinter, secretly gives one to his son (hidden inside a mourning locket), and hides the last within the Brandath Mausoleum.
  • During this time, various factions become aware that Lord Neverember is engaged in some grand scheme, of which only the contours are known. The phrase “Neverember’s Enigma” is coined.
  • 1489 DR: Laeral Silverhand returns to Waterdeep and Lord Neverember is deposed.
  • In the confusion of the transition of power, Lord Neverember sends agents to retrieve the Stone of Golorr from the palace. As those agents leave the city, they are ambushed by Xanatharian agents who steal the Stone.

THE GRAND GAME

  • The Cassalanters retrieve what they believe to be Neverember’s Enigma — but is actually just one of the Eyes — from the Brandath Mausoleum. Their research quickly reveals that it is part of the Stone of Golorr.
  • Lord Neverember sends a network of agents into Waterdeep. Many of these agents are attempting to locate the Stone. One of them, Dalakhar, is assigned to keep a watchful eye on Dagult’s son, Renaer. (Dalakhar isn’t told this, but Lord Neverember’s primary concern is that the Eye unwittingly carried by Renaer is kept safe until he can regain the Stone.)
  • Manshoonian Zhentarim steal the Eye from the Protector’s Enclave in Neverwinter.
  • Laeral Silverhand’s auditors discover Lord Neverember’s embezzlement. The news soon leaks.
  • Zhentarim go to Xanathar to propose an alliance. Xanathar kills the embassy and takes their Eye. A gang war breaks out between the Guild and the Black Network.
  • Lord Neverember discovers that Xanathar stole the Stone. Dalakhar is sent to infiltrate Xanathar’s organization and steal the Stone back. (At this point Lord Neverember believes that Xanathar has the Stone and that the Zhentarim still have the Eye they stole from him. To maintain the original siloing of information, Dalakhar is not told about the Eyes and doesn’t know to look for the one Xanathar now holds.)
  • Jarlaxle Baenre arrives in Waterdeep and begins selling nimblewrights.

DRAGON HEIST BEGINS (1492 DR)

  • With Dalakhar’s network removed from watching over Renaer, he’s exposed. The Zhentarim kidnap Renaer and take the Eye hidden in his mourning locket. (The PCs then presumably rescue Renaer.)
  • Ches 20th: Dalakhar successfully steals the Stone from Xanathar.
  • Ches 22nd: Dalakhar’s attempts to leave town are unsuccessful. (Xanathar tracked down and killed his extraction team before he could rendezvous with them, and he has agents surrounding Renaer Neverember’s house.) Dalakhar attempts to meet Renaer at Trollskull Manor, but by this time he’s being actively tracked by the Gralhund, Zhentarim, Cassalanters, and possibly others. Dalakhar is killed by the Gralhund Nimblewright. (See Part 2 and Part 5C.)

REVELATION LIST: THE STONE OF GOLORR

The first part of Dragon Heist is procedurally driven by investigations which are, structurally, unrelated to the Stone of Golorr: The PCs can solve the mysteries of Floon’s kidnapping and Dalakhar’s assassination without necessarily understanding what the ultimate motivation behind those crimes was.

Thus, the key turning point in the campaign is when the PCs realize what’s truly at stake and, importantly, begin to proactively drive the Grand Game.

REVELATION: DALAKHAR WAS CARRYING THE STONE OF GOLORR

  • Casting speak with dead on Dalakhar or the dead Zhentarim (see Dragon Heist, p. 46, but note that we’re specifically adding that the Zhentarim knew that Dalakhar was carrying the “Stone of Golorr”).
  • Questioning any number of people involved in the Grand Game (Urstul Floxin, the Gralhunds most likely, but also members of Xanathar’s Crime Guild or, later, Bregan D’Aerthe lieutenants).
  • Observing Jarlaxle’s nimblewright recordsings. (Sea Maidens Faire)
  • A Directive from Jarlaxle (Gralhund Villa – Arthen Manor)

REVELATION: WHAT IS THE STONE OF GOLORR?

  • Researching the Stone of Golorr (see Part 6A)
  • Any significant player in the Grand Game (lieutenant or up within any faction) will know that the Stone of Golorr is they key to finding Lord Neverember’s Enigma
  • Faction Reports on the Grande Game (see Part 6D)

REVELATION LIST: THE THREE EYES

The PCs need to figure out that (a) the Stone of Golorr is missing three Eyes and (b) where those Eyes are being held, so that (c) they can go steal them. This is basically the core structure of the campaign.

REVELATION: THERE ARE THREE MISSING EYES

  • Studying the Stone of Golorr
  • Gralhund Study of the Grand Game (Gralhund Villa)
  • Jarlaxle’s Report on the Grand Game (Sea Maidens Faire)
  • Cassalanter Report on the Grand Game (Cassalanter Villa)
  • Xanathar’s Report on the Grand Game (Xanathar Lair)
  • Manshoon’s Report on the Grand Game (Kolat Tower)
  • Letter to Lord Neverember (Kalain)

REVELATION: CASSALANTERS’ EYE

  • If the PCs are working for them, the Cassalanters provide their Eye once they have the other two.
  • Jarlaxle’s Report on the Grand Game (Sea Maidens Faire)
  • Manshoon’s Report on the Grand Game (Kolat Tower)
  • Seffia’s Ritual & Seffia’s Note (Converted Windmill / Response Team: Seffia)

REVELATION: XANATHAR’S EYE

  • Gralhund Report on the Grand Game (Gralhund Villa)
  • Jarlaxle’s Report on the Grand Game (Sea Maidens Faire)
  • Cassalanter Report on the Grand Game (Cassalanter Villa)
  • Manshoon’s Report on the Grand Game (Kolat Tower)

REVELATION: ZHENTARIM’S EYE

  • Gralhund Report on the Grand Game (Gralhund Villa)
  • Jarlaxle’s Report on the Grand Game (Sea Maiden’s Faire)
  • Xanathar’s Report on the Grand Game (Xanathar’s Lair)
  • Questioning Samara (Xanathar’s Lair)

REVELATION LIST: THE VAULT KEYS

  • Examining and researching the vault entrance (The Vault)
  • Cassalanter’s Report on the Grand Game (Cassalanter Villa)
  • Vision of the Vault (Stone of Golorr)
  • Questioning Kalain (Backtracking Dalakhar)

Go to Part 5B: Finding Floon

Archives

Recent Posts

Recent Comments

Copyright © The Alexandrian. All rights reserved.