The Alexandrian

Posts tagged ‘descent into avernus’

Go to Table of Contents

As we’ve previously discussed, Amrik has set himself up as a black market for smuggling refugees into Baldur’s Gate. He uses this position to identify and locate refugees who are or are related to Elturian knights and target them for the Dead Three murder squads, but it’s also an extremely profitable operation in its own right. He’s also beginning to branch out, offering assistance to refugees who are already in the city and looking to get passage out via the Docks.

Although Amrik is aware of the whole Vanthampur operation, it should be noted that he has no direct communication with the Poisoned Poseidon or the Dead Three cultists in general. Once he identifies a target, he sends that information to Mortlock at the Dungeon of the Dead Three and it’s Mortlock who coordinates with the Dead Three cult leaders.

SURVEILLANCE

As described in Descent Into Avernus, Amrik holds court at the Low Lantern tavern. If the PCs put his operation under surveillance, this is the type of activity they might observe:

Refugees meeting with Amrik. They’re likely looking to get help for family/friends still located outside the city (Amrik has some odd questions for them regarding family names, ancestors, etc.), but they might also be meeting with Amrik about money they still owe him or to make arrangements for their own passage out of Baldur’s Gate. (Having Amrik meeting with a set of refugees when the PCs first show up is probably a good choice.)
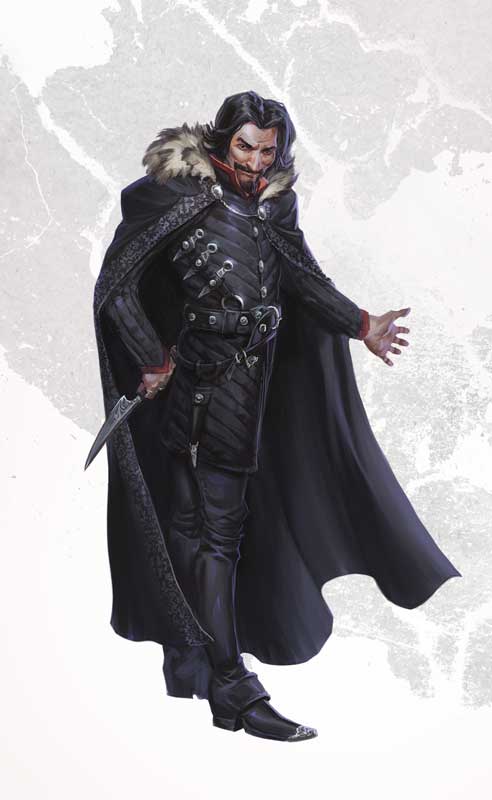
Amrik’s agents. Generally reporting or checking in with Amrik. These agents all have official government passes allowing them to pass in and out of Basilisk Gate (reputedly for business with Little Calimshan). If the PCs follow them, they’ll actually head into the refugee camps north of the city, where they circulate looking for those who can either pay Amrik’s fees or have some connection to Elturian knights. There are six of these agents (spy, MM p. 349):

  • Botros Cloudfury
  • Petra Czismadia
  • Neroni
  • Theophila
  • Apolena Giolla
  • Ratnam

Cliffgate runs. Amrik has bribed Gauntlet Fausti, who guards Cliffgate at night. Amrik’s agents lead small groups of refugees along old smugglers’ paths on Dusthawk Hill during Gauntlet Fausti’s shift, pay off Fausti, and lead them into the city.

Design Note: If the PCs are shadowing one of these Cliffgate runs and you want to add a little texture, it may turn out that somebody lays claim to the smugglers’ path that Amrik’s operation has been poaching. A bunch of thugs working for Straightstick (DIA, p. 171) intercept the refugee group and make it clear that their boss expects a cut of the action. And they’re going to make an example of the refugees to make sure their message is heard loud and clear.

Maybe the PCs are actually doing one of these runs for themselves! You could include details in Amrik’s paperwork indicating that a Cliffgate run is already scheduled: By taking out Amrik, they’ve left the refugees waiting for him in the camp high-and-dry.

Messengers, bearing messages from Amrik to the Dungeon of the Dead Three and/or Thurstwell at Vanthampur Manor. These duties could be variably carried out by Amrik’s agents, Dead Three cultists, or Thurstwell’s imps.

AMRIK’S PAPERWORK

Amrik has a variety of papers associated with this work that are usually spread out on the table in front of him at the Low Lantern. In the late evening, when he returns home, he carries them in a valise. Overnight they are kept in the locked chest in his bedroom (Area V15 in Vanthampur Manor).

I recommend shuffling these up into a random order before handing them over to the players.


ARMORIAL ROLLS OF ELTURGARD

This bundle of vellum scrolls proves to be the Armorial Rolls of Elturgard, detailing the name, coat of arms, and date of accolade for every knight in the Order of the Companion and the Riders of Elturel.
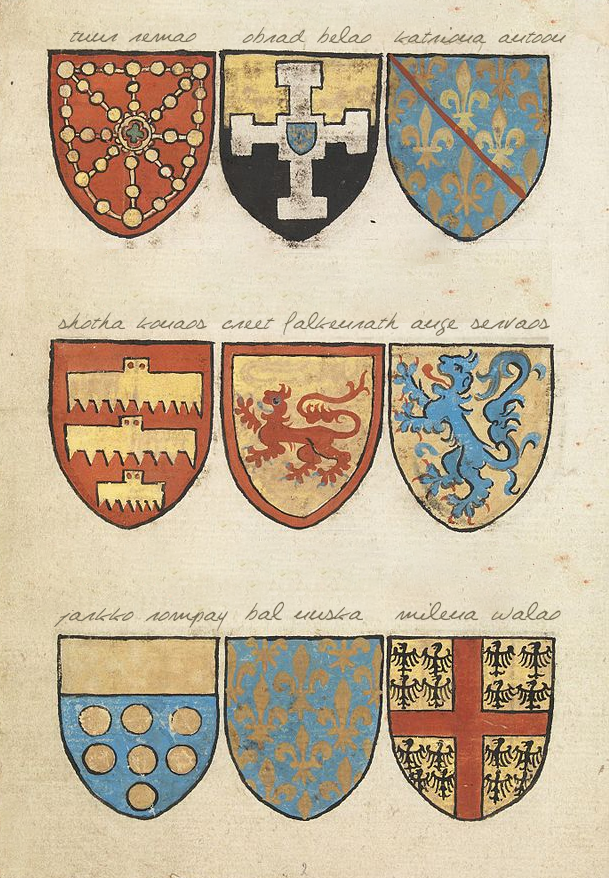
Armorial Rolls of Elturgard


GM NOTE: Closer inspection and a DC 14 Intelligence (History) or Intelligence (Perception) check reveals that these do not appear to be merely copies of the Armorial Rolls; they bear the High Observer’s seal and must have been taken directly from the High Hall in Elturel.


A PORTFOLIO OF GILTED RED LEATHER
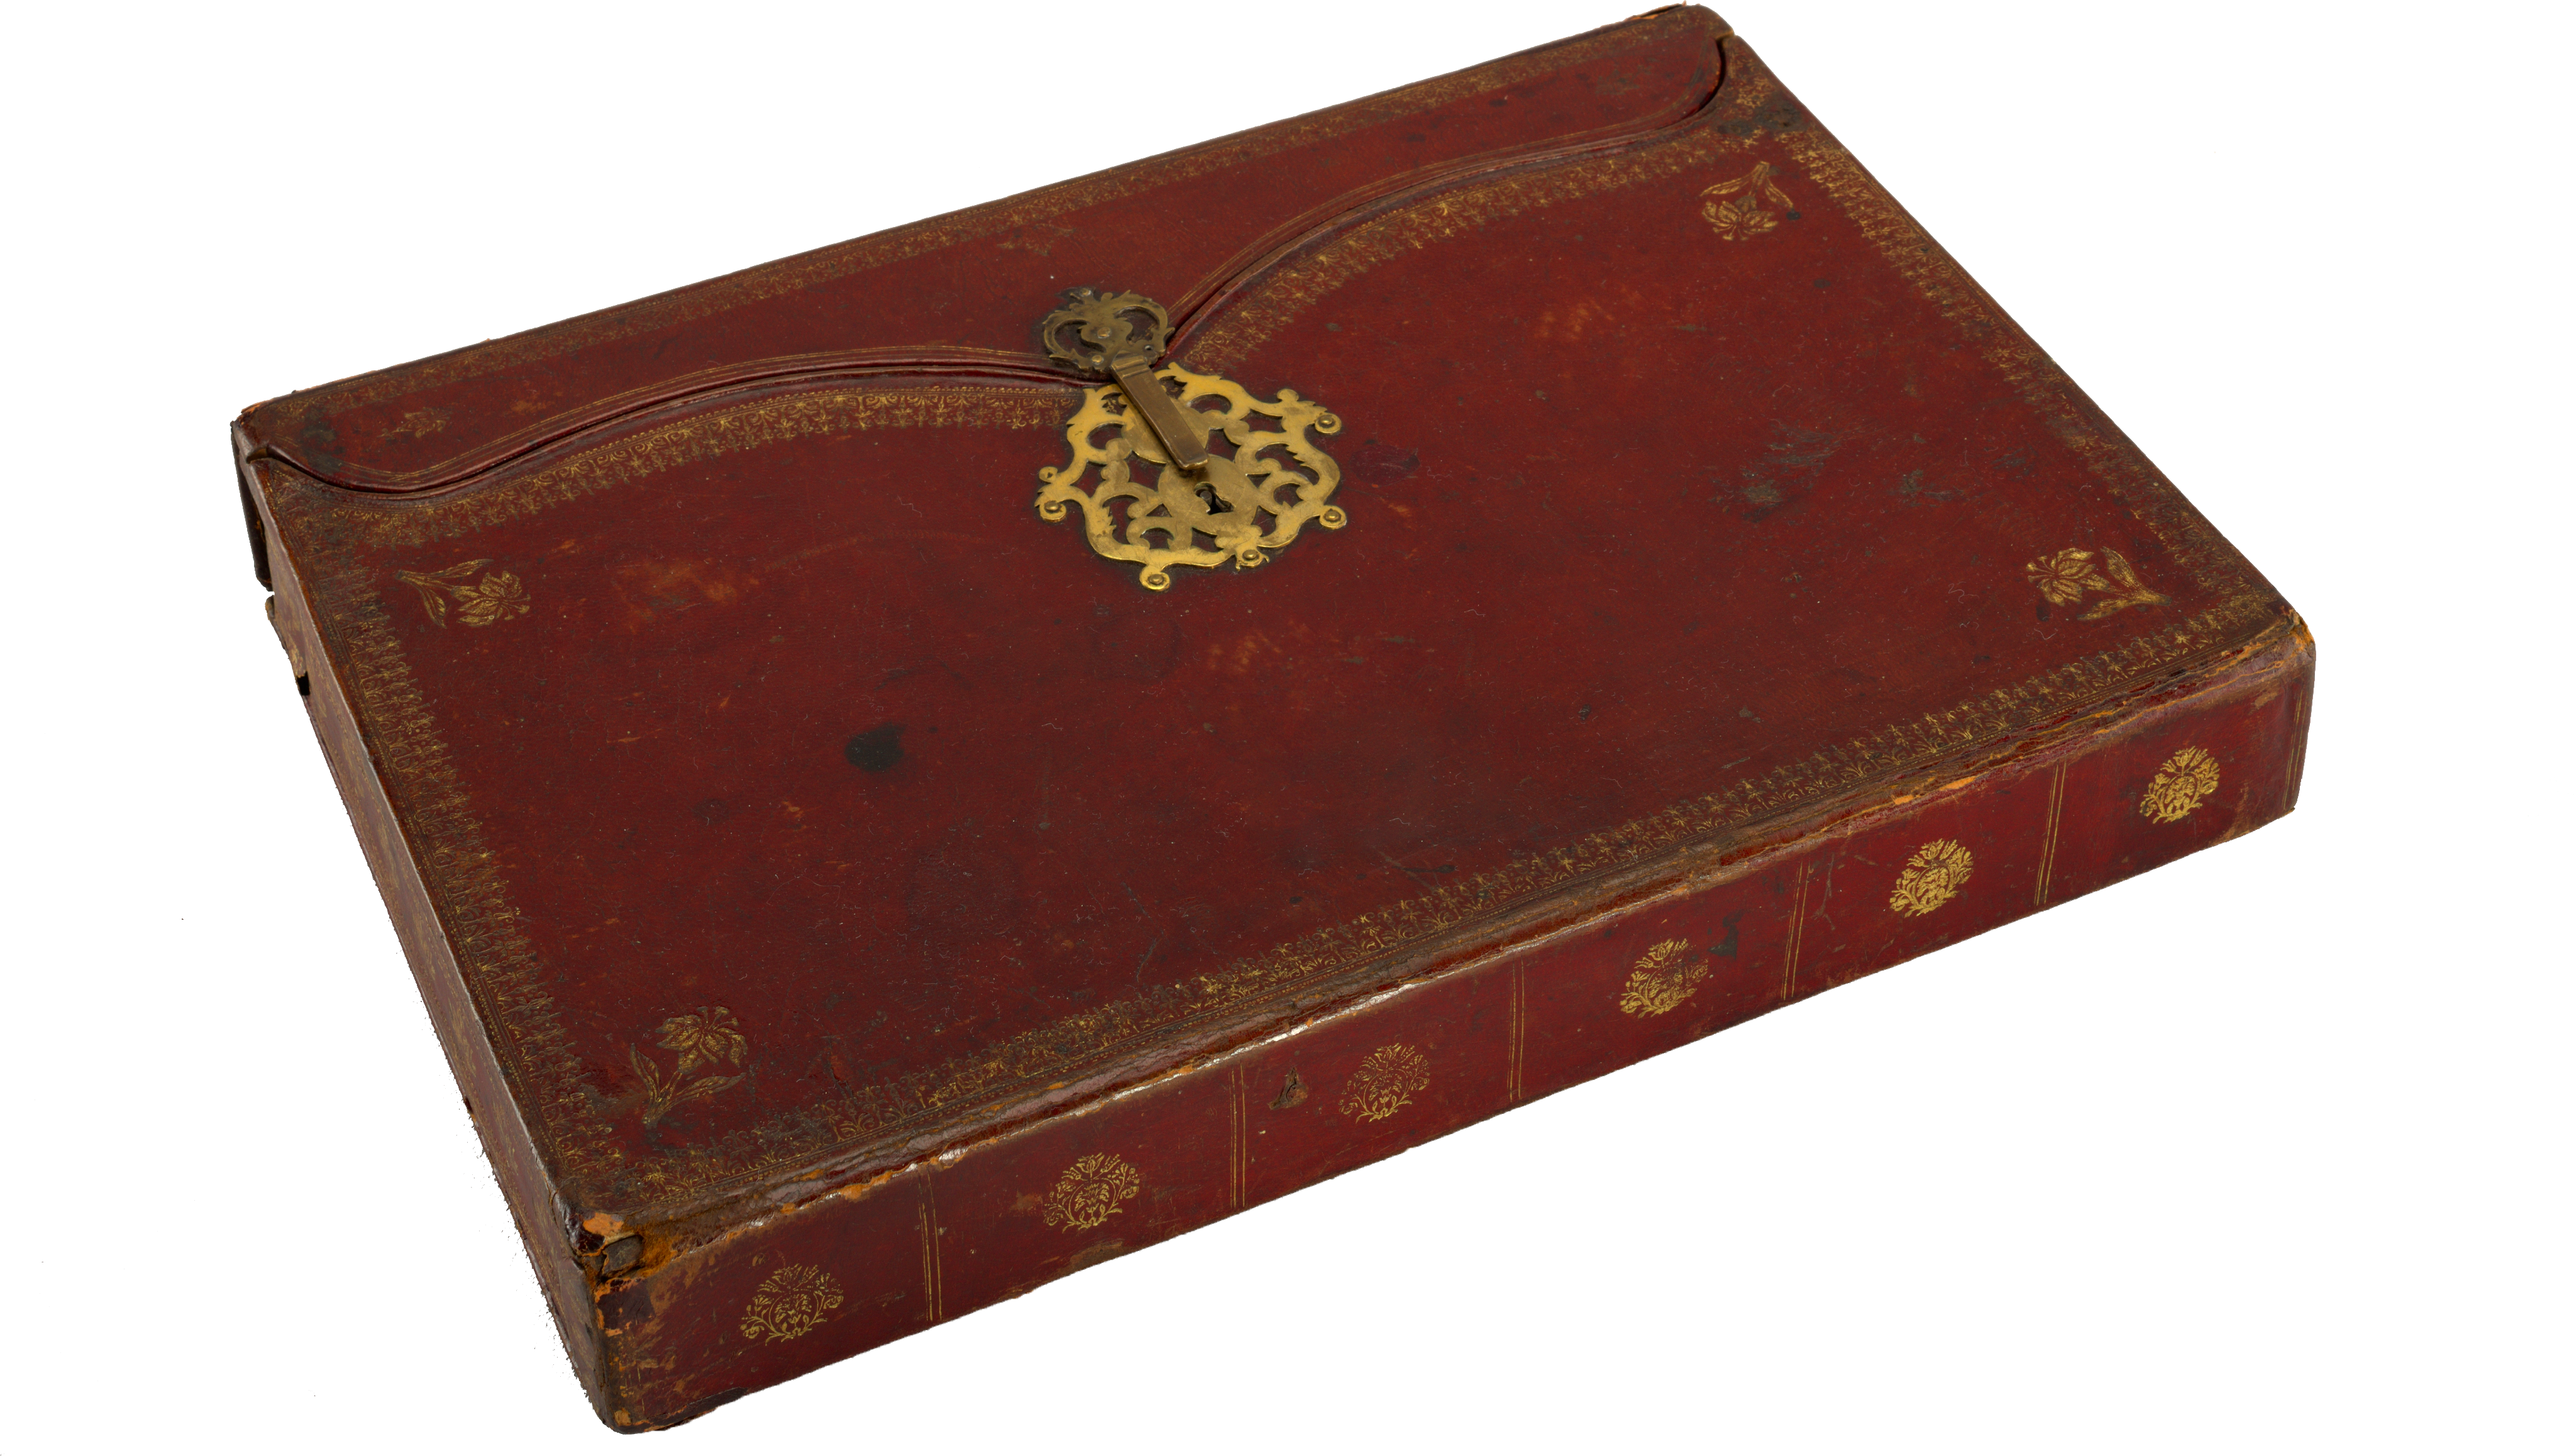
Portfolio of Gilted Red Leather

A portfolio case containing an eclectic collection of genealogical and property records, most of which seem to be focused on or around the city of Elturel. Sheets of parchment are covered in notes relating to these records, tracing patterns of inheritance originating from a seemingly arbitrary selection of progenitors.

In other cases, it appears that the opposite work is being done, with lines of inheritance being traced backwards into the past. Some of these are marked with the small sigil of a sword in the upper left-hand corner; others have black X marked in the same spot.


GM NOTE: The progenitors in this case are all Elturian knights. Those having their lines of inheritance traced backwards are all refugees who have presented themselves to Amrik’s agents. The names on Amrik’s List (see below) are all marked with the sword sigil (indicating they are descended from Elturian knights).


AMRIK’S LIST

For the Poisoned Poseidon:

Remao
Akhila
Aneta D.
Servaos
Silverleaf
Braam
Oshrat
Nuska
Edmao
Tuur S.
Veer
Stien


LETTERS FROM THURSTWELL

Amrik,

I completely concur with your last. I recommend using the imp who brings this letter to you to send word to Vaaz to proceed. He’ll be able to slip into the Frolicking Nymph quietly and invisibly, deliver the missive undetected, and then return to me at the manor with none the wiser.

Thurstwell Vanthampur


Amrik,

On your advice, I have removed the Elturian puzzlebox from the family vault where mother had secured it. I have no idea how angry she might be if she found out, but I am utterly fascinated by it. I am certain that there are secrets of Zariel locked within it that will perhaps unlock power — the sort of power you and I have often dreamed of.Unfortunately, I have had no luck in determining how to open the thrice-damned thing. But I will keep you informed of any progress I make.

Thurstwell Vanthampur


LETTER FROM MORTLOCK

Amrik,

Thank you for the most recent targets. I will pass them along to Flennis immediately so that he can send out his teams and begin surveillance. He did request that, if possible, you include more information on those currently associating with them, as those relationships often make tracking them down easier given the general chaos of their circumstances.

There will be no need for you to send any of your agents to the bathhouse. Not only do I have things well in hand here, but you know as well as I do that mother had good reasons for keeping your operations separate from those of our allies.

Mortlock Vanthampur


Go to Part 3I: Vanthampur Manor

Go to Table of Contents

“Dungeons should always be heavily xandered.” – Xandering the Dungeon

This article will probably make more sense if you read Xandering the Dungeon first, but the short version is that non-linear dungeons are more interesting than linear ones. The latter feature, at best, navigational pseudo-choices which lead the PCs through an inflexible sequence of prepackaged experiences. A xandered dungeon, on the other hand allows each group to…

…actively make the dungeon their own. They can retreat, circle around, rush ahead, go back over old ground, poke around, sneak through, interrogate the locals for secret routes… The possibilities are endless because the environment isn’t forcing them along a pre-designed path.

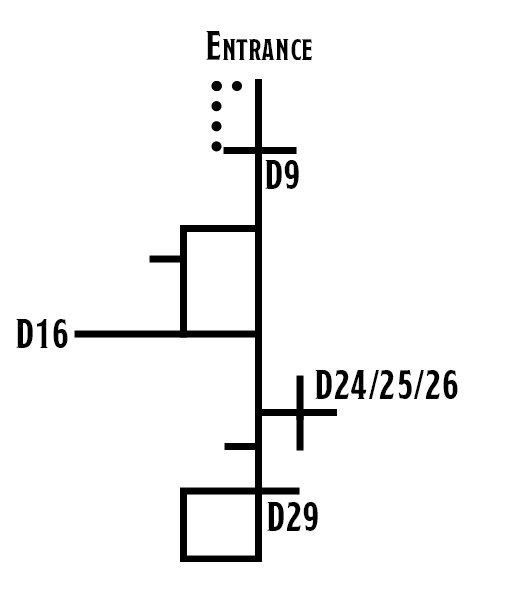
As demonstrated in Xandering the Dungeon, you can use Melan diagrams to look at the navigational structure of the dungeon (removing the “noise” of passages which twist around without every deviating from a single path). For example, this is what the Dungeon of the Dead Three looks like (minus the secret door that we removed):

Dungeon of the Dead Three - Melan Diagram

Broken down like this, it’s immediately apparent, as we briefly discussed in Part 3F, that this is a fairly linear dungeon: There’s a couple of loops and a few side branches, but the furthest you’ll ever get off the straight path from entrance to Area D29 (where the preprogrammed conclusion of the adventure is located) are the three rooms leading to the dead end in Area D16.

(Even moreso than other installments, this one will probably benefit from directly cross-referencing the module. The map for the Dungeon of the Dead Three is located on p. 21 of Descent Into Avernus.)

To be clear, this a well-designed dungeon. The two early loops (D5 thru D9 and the D12-D13-D14-D17-D18 loop) joined by a chokepoint give some tactical flexibility. What we refer to as minor elevations shifts (where areas on the same conceptual level of the dungeon are nevertheless at different heights relative to each other) are used ambitiously and to good effect, particularly when emphasized with the flooding in the dungeon (and, in the Remix, the corpsedamp gas leaks).

But as I was reading Descent Into Avernus, I couldn’t shake the feeling that the Dungeon of the Dead Three was calling out to be xandered.

THE LYNCHPIN

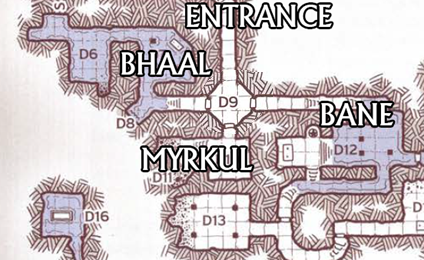
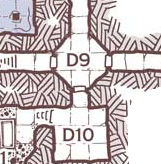
The lynchpin, for me, is Area D9. As we already discussed in Part 3F, this room has three doors decorated with bas reliefs — each associated with one of the Dead Three. As part of the Remix, we’ve already realigned these doors so that the images are associated with the cultists behind each door:

Dungeon of the Dead Three - Area D9

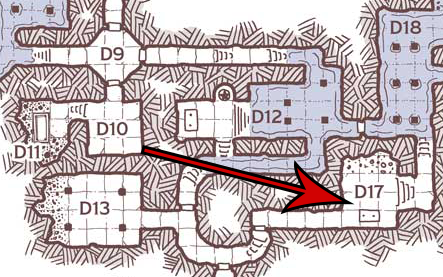
But although the Bhaal and Bane locations shown on the map above are the primary shrines of those gods, the Myrkullian cultists behind the third door are just hanging out in that room. Myrkul’s altar is way over here, on the far side of Bane’s altar:

Dungeon of the Dead Three - Myrkul's Altar

The image I have in my mind is to even more strongly base the dungeon around the three doors in Area D9: to have those doors give a very strong indication to the players of the dungeon geography that lies ahead of them.

The first broad stroke, therefore, is to reconfigure things so that Myrkul’s temple lies behind the southern door in Area D9.

QUICK TEMPLE VERSION: If that’s all you want do, you could move D17 – Myrkul’s Altar so that it lies between D10 and D11. I’d recommend also taking D22 – The Torture Chamber and placing it where D17 currently is to keep that strong second loop. You could leave the current location of D22 an empty room or just have the corridor run through there.)

THE FULL XANDER

But if you wanted to fully xander the dungeon, you’ll need to do more than that. My first step would be to mentally break the dungeon down into distinct “chunks.” For example, you can think of the three separate “temple complexes” — the small clusters of rooms each associated with one of the Dead Three Gods.

My conceptual chunks for the dungeon are:

  • The three temple complexes.
  • A “crypt complex” that has been partially converted into living quarters (Areas D19 thru D26, sans the torture chamber in D22).
  • The “inner sanctum” (Areas D27 thru D33, everything behind the secret door in the original dungeon)
  • The “D15 complex” consists of D14, D15 (explosion #1), and D16.
  • Area D18 (explosion #2) is a major feature by itself and not really part of another room complex.

Next, we’ll want to make sure we maintain the cool vertical variation in the dungeon, with the lower recesses flooded and gas leaks entering in the mid- or upper levels of the complex. If we just want to redo the layout (without re-keying any of the areas), we’ll want to make sure D15 and D18 are positioned in relation to the gas leaks in a way that makes sense.

With everything broken apart in conceptual chunks, we can play around with how we want to arrange them at a macro-level. My creative instincts immediately suggest:

  • Connect all three temple complexes to the deeper recesses of the dungeon (in the same manner that the Bane temple is connected).
  • Do at least some cross-connection between the temple complexes. I’m leaning towards the idea of a secret connection between two of them.
  • There should be a kind of “plateau” or set of plateaus where the gas leaks (in our original key these are D13, D17, and D19) are designed to flow down into D15 and D18.

The next question is how to position the crypt complex and inner sanctum. Broadly speaking, I think there are three options:

  • The temple complexes could all connect to Area D18, and then the crypt complex and inner sanctum could branch off from there.
  • The temple complexes could all independently connect to the crypt complex (temples connected to shared living quarters makes sense), and then the inner sanctum lies beyond them (probably connected via D18?).
  • The temples could connect to both the crypt complexes and Area D18, and then those could both lead to the inner sanctum. (You could also Venn diagram this, where two of the temples go to the crypt complexes and two go to Area D18. That would mean one of the temples would need to walk all the way through the inner sanctum or through a different temple to get to their quarters, though, which may not make sense.)

We also have the D15 complex, which could be used in a couple different ways:

  • It probably just branches off at whatever location makes sense based on the gas leak and, just as in the published adventure, dead ends.
  • Alternatively, it could do that (it needs to be positioned so that gas can leak down into D15) and ALSO be extended so that it serves as the connective tissue between two other sections described above. (For example, it could be the secret passage connecting two of the temple complexes. Or it might be the passage you have to follow from the crypt complex to the inner sanctum in the third option above, although that means you have to go through an explosive chamber no matter which route you take… maybe that’s good? Maybe that’s a little boring in terms of variable navigation?)

(This, it should be noted, is also how I usually design a dungeon from scratch: I list the big conceptual chunks that I want the dungeon to have and then I move them around until I have an interesting configuration. Stuff will still shift and change once I start mapping out the details, but it’s a lot easier to figure out the big picture first. This advice extends beyond dungeons, too: When I was working on “Seversen’s Mysterious Estate” with Jonathan Tweet for Over the Edge: Welcome to the Island, Jonathan brainstormed a bunch of cool stuff for the estate, I brainstormed some more, and then the pieces got juggled around until they had a compelling flow. But I digress.)

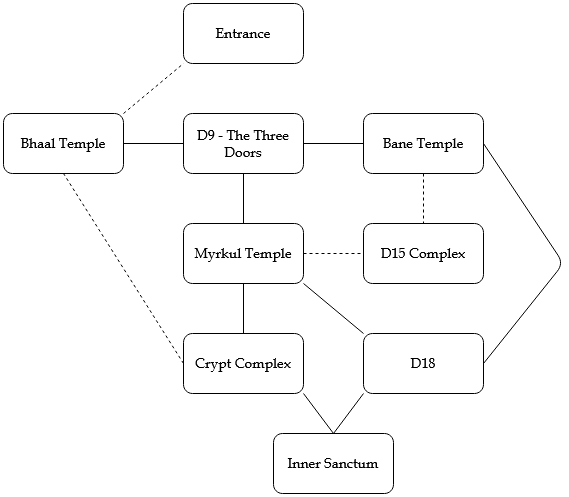
Looking at our brainstorming here, we can make some “final” decisions and sketch it out:

Dungeon of the Dead Three - Jaquays Diagram

MAPPING THE DUNGEON

The next step would be to actually map out the revised dungeon. I’m going to leave that as a project for you to pursue if you’re so interested, but here are a few thoughts:

  • The Bhaal Temple remains essentially identical to the map as it currently exists, except that there’s a secret passage behind the tapestry in Area D8 that leads to the crypt complex. (I think the passage is probably NOT secret coming the other direction.)
  • Coming from the Myrkul Temple to the Bane Temple, you basically have D14 to D15 to D16, and then another stair up from D16 that goes into the Bane Temple.
  • The “plateau” of rooms from which gas leaks down into D15 and D18 is in the junction between the Myrkul temple complex and the crypt complex: Areas D13 and D17 are, of course, part of the Myrkul temple and Area D19 must be kind of in the same “corner” as the stairs leading down to D15 and D18.
  • I imagine the Banites getting to their quarters in the crypt complex by going through the D15 Complex and briefly passing through the corner of the Myrkul temple complex (but not the temple itself).
  • The Inner Sanctum is also largely identical to the current map, with passages from the crypt complex and D18 coming together to enter Area D27 through a single door.

Make sure to include the minor elevation shifts and keep the flooded portions in the lower section of the dungeon! If you can actually arrange it so that the collapsed sections of D13, D17, and D19 are all clearly part of the same collapse, that would probably also give a good effect!

Go to Part 3H: Trafficking Amrik

Dungeon of the Dead Three - Handouts

Go to Table of Contents


ASSASSIN’S ORDERS

Vaaz—

My brother Thurstwell and I are agreed. Mortlock is not only a liability to us, but a liability to you, taking credit for all of the good work that you and your Fists are doing for us.

Rid us of our troublesome brother and send his right ring finger to me at the Low Lantern as proof and I will see to it that you are raised above Flennis and Yignath in this affair. You will be the liaison between the Shield of the Hidden Lord and your fellow cultists. It will be your face that Gargauth sees. He will know that YOU are the one responsible for carrying out his will! Bane himself will know your name when Gargauth sings your praises unto him!

Act swift, with the strength of the fist and the finality of the knife, my friend!

                                                                                Amrik of the House Vanthampur


MORTLOCK’S CORRESPONDENCE

My dearest Mortlock,

The temple is located beneath the Frolicking Nymph. In the north massage room, rotate the circular element in the stained glass window and the door will open. Vaaz, Flennis, and Yignath, along with their minions, should already be ensconced.

Flennis will be relatively easy to manage, but you may have some difficulty with the other two. Yignath is too ambitious. The trick will be keeping him reined in, otherwise he could easily compromise the bloodletting with some other foolhardy endeavor. Vaaz, on the other hand, is simply bull-headed. He’ll strain against the leash unless you pull it. So pull it hard.

You should not return to the manor until the work is done.

                                                                                                Mother


Mortlock,

I warned you to keep a leash on Yignath! What’s done is done, but I hope this will be the last bit of foolishness you’ll allow to happen.

The kidnapping of Satiir Thione-Hhune is particularly vexing, but perhaps we can turn it to our advantage as long as she’s not harmed. (Or, at least, not harmed until it’s useful for us to do so.) Take custody of her and transfer her to the manor as quickly as possible.

Thurstwell is also intrigued by the mask they found. Send it along with Satiir so that he can study it.

                                                                                                Thalamra


Mortlock,

That fool Portyr has emerged from his mansion. He’ll be giving a simpering speech in support of his misguided Confraternity of Refugee Relief at the Beloved Ranger. This is the opportunity we’ve been waiting for. If we kill him now, it should disrupt his brat Liara’s attempts to steal the Flaming Fist from us.

I’m enclosing a packet of information for Vaaz, along with a very special weapon which has been prepared just for Portyr. Act quickly, my son!

                                                                                                Thalamra


DESIGN NOTE: If you can, add the date of the confraternity event (i.e., whatever today’s date is when the PCs raid the Dungeon of the Dead Three) to the second note.


MISSIVE OF THE HIDDEN LORD Ω

Flennis,

Know ye that these missives pass through holy hands directly from the Shield of the Hidden Lord, which speaks with the True Voice of Gargauth, Once Lord of Avernus and Treasurer of Hell, the Tenth Lord of the Nine, the Hidden Lord, the Lord Who Watches, and Legatus of the Dark Gods.

When the devils of Avernus brought down Elturel, the Grand Duke of Baldur’s Gate was claimed as a prize for Hell. So too shall you claim for Zariel the souls of those who once served Elturel. You can know this to be truth, for I hold here, at Vanthampur Manor, secure within its infernal puzzlebox, the pact with Zariel; the declaration of the powerful purpose to which we set our hands. Lay to rest your doubts.

                                                                                                                                -T.K.


MISSIVE OF THE HIDDEN LORD Ψ

Yignath,

Know ye that these missives are inscribed under the gaze of the Shield of the Hidden Lord, which speaks with the True Voice of Gargauth, the Tenth Lord of the Nine, the Lost Lord of the Pit, the Outcast, Daemon of Astaroth, and Legatus of the Dark Gods.

In completing this work, your reward shall be to rise to the rank of Black Gauntlet in the esteem of Bane. And when the Cult of Zariel claims the Flaming Fist, the Fist shall become the Left Hand and Bane’s Gauntlet shall become the Right Hand of the Council. The old temples shall be overthrown and their fanes given over to the black hand, the white skull, and the bloody tear.

                                                                                                                                -T.K.


MISSIVE OF THE HIDDEN LORD φ

Vaaz,

Know ye that these missives are inscribed by my hand at Vanthampur Manor, passing through holy hands directly from the Shield of the Hidden Lord, which speaks with the True Voice of Gargauth, Once Lord of Avernus and Treasurer of Hell, the Outcast, and Legatus of the Dark Gods.

Seek ye the blood of the holy orders of Elturgard. That is the commandment of this hour. Let the great work which was begun in the light of the Companion be completed here under the aegis of the Dark Gods.

Vanthampur shall remain within her manor for this time, for she has mighty work to do and must consult constantly with us in its pursuit. But just as she has given unto you the temple of your forefathers, so you shall obey the fruit of her loins. Her three sons speak with my voice and work to our common cause.

                                                                                                                                -T.K.


VAAZ’ CORRESPONDENCE

Vaaz,

Duke Portyr will be delivering a speech at the Beloved Ranger in the Wide during an event held by the Confraternity of Refugee Relief. Give the iron barb I have enclosed in this packet to your best assassin.

I know that you will serve me well in this.

                                                                                Duke Thalamra Vanthampur


DESIGN NOTE: If you can, add the date of the confraternity event (i.e., whatever today’s date is when the PCs raid the Dungeon of the Dead Three) to this note.

Go to Part 3G: Xandering the Dead Three

Dungeon of the Dead Three - Adversary Roster

Go to Table of Contents

ADVERSARY ROSTER

BATHHOUSE (NIGHT)
ImpD1 - Courtyard(spies for Thurstwell)
3 Night BladesD2 - Baths
NecromiteD4 - North Massage Room
DUNGEON
2 corpsedamp zombiesD6 - Bloated Corpse(must be summoned)
3 NecromitesD10 - Necromites' Room
Yignath (Iron Consul)*D12 - Bane's Altar
Kazzira (Fist of Bane)D12 - Bane's Altar
2 Flying GauntletsD12 - Bane's Altar(must be summoned)
Flennis (Master of Souls)** + Skeletal RatsD13 - Morgue
3 skeletonsD17 - Myrkul's Altar(must be summoned)
3 corpsedamp zombiesD21 - Zombie Crypt
Fist of BaneD23 - Door Sentry
4 Fists of BaneD25 - Bane's Rest(sleeping)
ReaperD26 - Bhaal's Rest
2 corpsedamp zombiesD28 - Old Cellar(must be summoned)
Mortlock*** + Vaaz**** (Death's Head)D29(programmed encounter)

* Key ring with seven keys (shackles in D12 & D22, chests in D30).
** Carries spellbook (see DIA p. 23) and Missive of the Hidden Lord Ψ handout.
*** Carries Mortlock’s Correspondence handout.
**** Has Assassin’s Orders handout.

Stat blocks for Dead Three cultists can be found in Descent Into Avernus, p. 231-235.
Corpsedamp zombie stats can be found here.
See Art of the Key: Adversary Rosters for details on using an adversary roster.

QUESTIONING CULTISTS

Descent Into Avernus - Dead Three Cultists

CULTISTS

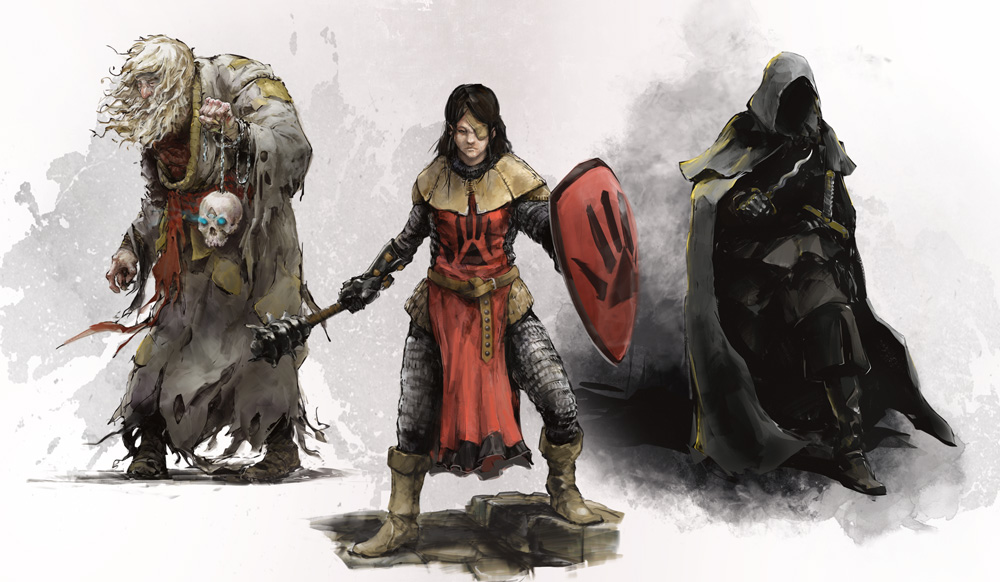
  • The abductions/murders are actually being carried out by a team based out of the Poisoned Poseidon in the Brampton neighborhood.
  • They have the support of one of the Council of Four! (Or, at the very least, someone very powerful.) Most of the low-ranking cultists don’t actually know who it actually is, and they might speculate: Ravengard, Stelmane, Portyr, Vanthampur. The ducal representative (Mortlock, although not all of them know his name) is here in the dungeon.
  • The local cult leaders are Yignath (Iron Consul of Bane), Flennis (Myrkullian Master of Souls), and Vaaz (Death’s Head of Bhaal). They may be able to give some indication of their current location.

CULT LEADERS

Yignath, Flennis, and Vaaz are obviously more knowledgeable than the rank-and-file cultists.

  • They have been receiving missives from the Shield of the Hidden Lord, which is currently in the possession of the Vanthampurs. (See “Lore of Gargauth” in Part 3B of the Remix.)
  • Under Gargauth’s guidance, they have formed an alliance with Duke Vanthampur. They have also received this temple complex in exchange for their service (proving the divine purpose of their actions).
  • They know that Duke Vanthampur is a Zarielite. They believe that Zariel is responsible for the fall of Elturel, with an army of devils responsible for sacking the city.
  • Their primary liaison with the Vanthampurs is Mortlock Vanthampur. Mortlock provides them with the target list for their murders. (They don’t know where Mortlock gets the names.)
  • Each leader also knows the contents of the Missives of the Hidden Lord addressed to them.
  • Vaaz: Can also reveal the information in the Assassin’s Orders (that he was hired by Amrik and Thurstwell Vanthampur to kill their brother and was to send evidence to Amrik at the Low Lantern when the job was done). Within just the past hour, he has dispatched an assassination team to kill Duke Portyr at a charity event being held at the Beloved Ranger in the Wide.

MORTLOCK VANTHAMPUR

Mortlock is not inclined to betray his family, but if he realizes that the attempt on his life was coordinated by Amrik and Thurstwell he will feel betrayed himself and be more likely to help the PCs (if they agree to giving him an amnesty for his own role in all this).

  • The Vanthampurs are Zarielites. Mortlock is not a true believer, but he’s loyal to the family.
  • Duke Vanthampur is using the Dead Three cultists to murder specific targets. Mortlock’s brother, Amrik, is responsible for identifying these targets: He provides the names to Mortlock, who passes them along to the Dead Three cultists.
  • Amrik has set himself up as a black market resource for smuggling refugees into the city. He holds court at the Low Lantern, fleecing refugees who want to bring their loved ones inside the city.
  • Duke Vanthampur is working in coordination with a powerful cult leader that escaped from Elturel just before its fall. The Duke is protecting this cult leader in the basement of Vanthampur Manor. (Mortlock does not know the identity of this cult leader.)
  • The cult leader brought two powerful artifacts with him from Elturel, one of which was a shield in the likeness of a demonic face. Mortlock’s other brother, Thurstwell, was fascinated by these artifacts.
  • He also knows the history of the Dungeon of the Dead Three, and how it was given to the Dead Three cultists in exchange for their alliance.
  • If questioned, he can provide background on the Tiamat treasure found in Area D30: Yignath had his followers steal it from a vault owned by the Hhune noble family. They kidnapped Satiir Thione-Hhune in the process. Satiir and one of the artifacts were taken to Vanthampur Manor at his mother’s request.
  • Duke Vanthampur has ordered the assassination of Duke Portyr. A Dead Three assassination team has already been dispatched to a charity event at the Beloved Ranger where the Duke is planning to make a speech within the hour (see Part 3J: The Portyr Assassination).

Go to Part 3F-D: Dungeon of the Dead Three (Handouts)

Dungeon of the Dead Three - The Revised Key

Go to Table of Contents

For ease of use, these key entries are designed to completely replace the matching entry in the book (unless otherwise noted).

Design Note: My actual process for assembling the revised key is pretty straightforward. First, I run through my list of things that I think need to be changed. When I’m not writing essay-long explanations of my thought process for public consumption, this would usually just be a short, bullet-pointed list.

In addition to stuff that I think needs to be fixed, this list would also include any cool ideas that reading through the key had spurred in my imagination. You can see a little bit of that here with Area D13 and the corpsedamp zombies, but I’ve mostly eschewed it for this exercise.

Once that’s done, I simply run through my revelation list (as seen in Part 3C), and place every clue that’s supposed to appear in the location. It’s not unusual for this to be a two-way street, with additional clues being added as I develop the revised key and then being added to the revelation list (instead of vice versa).

D4. NORTH MASSAGE ROOM

In addition to the normal key for this room (DIA, p. 20):

Secret Door: Opened by rotating a circular piece in the stained glass window next to it.

D7. BHAAL’S ALTAR

In addition to the normal key for this room (DIA, p. 21) there is a wax tablet and stylus lying on the altar next to the entrails. This tablet contains various prophecies which have been divined from the entrails:

  • When the box is opened in the house of Alaundo, the path forward shall be revealed.
  • One of four shall be damned to Hell. One of four shall be struck by a thunderbolt. One of four shall rise.
  • The great Sun shall be blackened and the devil legions of Avernus shall conquer Elturel.
  • Conflict shall come to the Great Cities of Waterdeep, Athkatla(?), and Iriaebor.
  • Volcanic fire shall tremble the peaks of Orsraun.
  • Of the West shall speak the Tears of Selûne, and they shall weep upon the Inner Sea.

GM Note: The “house of Alaundo” refers to Candlekeep (Alaundo founded Candlekeep and foresaw the coming of the Bhaalspawn). The “great Sun” refers to the Companion. The other prophecies are either nonsense or unrelated to Descent Into Avernus (although players might conclude that “one of four” refers to the Council of Four).

D9. DEAD THREE DOORS

Descent Into Avernus - Dungeon of the Dead Three

Each door is carved with a full-figured bas relief of a different person.

Wisdom (Perception) – DC 10: The carvings are very old The stone is worn and some of the carvings show other signs of damage, along with some evidence of recent repairs. (For example, one of Bhaal’s scythe-like hands appears to have been broken off and only recently re-attached.)

Intelligence (Religion) – DC 10: On success, recognize the figures as depicting the Dead Three.

  • East Door – Bane: A tall, armored man wearing a bucket helm. His right gauntlet is painted black and clutches a set of shackles.
  • South Door – Myrkul: A cloaked figure whose face is hidden under a cowl. In his skeletal hands he clutches a screaming human skull.
  • West Door – Bhaal: A powerfully built, skull-headed man with long, curved blades where his hands should be.

D12. BANE’S ALTAR

Generally use the normal key for this room (DIA, p. 22), but if Yignath is present, rather than torturing Klim Jhasso for fun, he is using a blacksteel razor to carve infernal text into his skin. (If Yignath is no longer present, the blacksteel razor lies on the altar.)

Blacksteel Razor: Blacksteel is dark, silent, and nonreflective. It makes no noise when striking other objects or creatures (even if it is broken or shattered). Blood clings to the razor, rather than spraying or dripping.

Infernal Carvings: “In the name of Bane, we offer adulation to Zariel, Archduchess of Avernus. In the name of Bane, we give the blessing of one god to another. In the name of Bane, we give blessing unto the unholy conquest of Elturgard. In the name of Bane, we offer adulation under the fear and tyranny born in her name.”

D13. MORGUE

  • Far end of the room has collapsed. Four wooden beams brace the ceiling.
  • Three sarcophagal slabs have been converted into work tables. Two are covered with vials, alembics, and similar alchemical and arcane apparatus. The center slab has a human cadaver lying atop it, partially dissected with its various organs and viscera neatly organized around it. (If Flennis is taken by surprise here, she will be actively studying the corpse.)
  • Several large pipes have been bolted to the collapsed wall of rubble. They twist their way towards a huge vat of iron standing near the sarcophagal slabs.
  • If they have not been taken from this room, three bloated corpsedamp zombies are strapped to the north wall. Various tubes leading from the iron vat are attached to the corpses.

Wisdom (Perception) – DC 14: To notice the very faint smell of rotten eggs. It can be traced back to the collapsed wall, where the smell is stronger. (Anyone specifically inspecting the collapse will automatically detect the smell.)

  • This is corpsedamp gas. See areas D15 or D18 for full description (including guidelines for identifying the gas and its properties). There is no risk of explosion here as the gas is not sufficiently concentrated.

Iron Vat: This is a pressurized vessel, collecting corpsedamp gas that’s leaking through the collapsed wall. The tubes connected to it are designed for the creation of corpsedamp zombies (the current crop is more or less ready to go). The tubes have long needles at the end of them and are basically just jammed into the corpses.

  • If the pipes weren’t harvesting the corpsedamp gas here, the leak would be much more significant.

Dissected Corpse: A DC 14 Intelligence (Arcana) test suggests that someone is experimenting with exposing internal organs individually to the corpsedamp gas.

Work Tables: The Missive of the Hidden Lord Ω handout can be found here.

D15. SMALL FLOODED ROOM & GAS BUILDUP

On Approach: DC 10 Wisdom (Perception) check to notice the smell of rotten eggs. (Once in the chamber itself, the smell intensifies to a putrid stench anyone will immediately notice.)

  • Four rotting wooden beams rise from the murky water to brace the ceiling here.
  • A pile of rubble in the northwest corner.
  • Northern tunnel narrows to just 2 ½ feet wide.

Rubble: Nothing of interest here.

Corpsedamp Gas: Open flame triggers explosion (4d6 fire damage, DC 15 Dexterity saving throw for half damage). All wooden beams are destroyed by the explosion, which may trigger a roof collapse. The explosion burns away the gas, which builds up slowly and becomes danagerous again after 24 hours.

  • Intelligence (Arcana) / Wisdom (Survival) – DC 12: Misidentifies the gas as stinkdamp; a toxic and explosive gas.
  • Intelligence (Arcana) / Wisdom (Survival) – DC 15: Correctly identifies the gas as corpsedamp. Most often extracted by necromancers from rotting corpses, it has a number of properties favorable to their work.
  • Intelligence (Arcana) – DC 18: Corpsedamp gas is particularly notable for allowing the creation of corpsedamp zombies — shambling undead literally bloated by the mass of gas used to animate them. Corpsedamp zombies are vulnerable to fire, but explode when killed.

Roof Collapse: If the beams are destroyed, 25% chance of roof collapsing. 4d10 bludgeoning damage, DC 15 Dexterity saving throw for half damage. Room remains open, but is difficult terrain.

  • A roof collapse in this area will have an additional 50% chance of extending 1d4 x 5 feet up each passage leading to this room. (Check for each passage.)

D17. MYRKUL’S ALTAR

  • A dry room.
  • The north wall is partially collapsed.
  • A stone altar in the center of the room with humanoid skulls and bones piled around it. The top of the altar is covered with dozens of half-melted, unlit candles made of black wax.

Wisdom (Perception) – DC 14: Notice the very faint smell of rotten eggs. It can be traced back to the collapsed north wall, where the smell is stronger. (Anyone specifically inspecting the north wall will automatically detect the smell.)

  • This is corpsedamp gas. See areas D15 or D18 for full description (including guidelines for identifying the gas and its properties). There is no risk of explosion here as the gas is not sufficiently concentrated.

Altar:

  • If one or more black candles are lit, they shed a green light that reveals black writing on the walls. It reads, in Common, “RISE AND BE COUNTED!”
  • If someone says, “RISE AND BE COUNTED!” within 5 feet of the altar, the words vanish as bones hidden under the debris at the north end of the room rise up and knit together, forming three animated human skeletons that obey the commands of whoever spoke the words.

Black Candles: These candles have been marked with the names of those targeted by the Dead Three cultists — Edmao Eduarda, Wemba Oshrat, Madhuri Akhila, Leiv Diomids, Aneta Diomidis, Annika Silverleaf, Shohreh Letitia, Iolanthe Oshrat. (Valeria Nuska and Weronika Nuska would also be included if Amrik has identified them.)

  • Intelligence (Religion) – DC 14: These candles symbolically offer “Myrkul’s blessing” (i.e., death) unto those named upon them. Myrkullites believe that the smoke from the candles rises up, seeks out the lungs of the one so “blessed,” and blackens them. (Some magical versions of the candles do just that.)
  • GM Info: This ritual is not a required part of the cultists’ dark work. It’s just the priests’ way of offering an unholy blessing to their task.

D18. LARGE FLOODED ROOM & GAS BUILDUP

On Approach: DC 10 Wisdom (Perception) check to notice the smell of rotten eggs. (Once in the chamber itself, the smell intensifies to a putrid stench anyone will immediately notice.)

  • The room is flooded.
  • The ceiling is supported by numerous wooden beams.

Corpsedamp Gas: Open flame triggers explosion (4d6 fire damage, DC 15 Dexterity saving throw for half damage). All wooden beams are destroyed by the explosion, which may trigger a roof collapse. The explosion burns away the gas, which builds up slowly and becomes danagerous again after 24 hours.

  • Intelligence (Arcana) / Wisdom (Survival) – DC 12: Misidentifies the gas as stinkdamp; a toxic and explosive gas that is heavier than air.
  • Intelligence (Arcana) / Wisdom (Survival) – DC 15: Correctly identifies the gas as corpsedamp. Most often extracted by necromancers from rotting corpses, it has a number of properties favorable to their work. It is easily mistaken for stinkdamp, and is similarly heavier than air.
  • Intelligence (Arcana) – DC 18: Corpsedamp gas is particularly notable for allowing the creation of corpsedamp zombies — shambling undead literally bloated by the mass of gas used to animate them. Corpsedamp zombies are vulnerable to fire, but explode when killed.

Roof Collapse: If the beams are destroyed, 25% chance of roof collapsing. 4d10 bludgeoning damage, DC 15 Dexterity saving throw for half damage. Room remains open, but is difficult terrain.

D19. PARTIALLY COLLAPSED CRYPT

  • Most of the room has fallen in.
  • Debris field mostly buries a stone sarcophagus.

Wisdom (Perception) – DC 14: Notice the very faint smell of rotten eggs. It can be traced back to the collapsed south wall, where the smell is stronger. (Anyone specifically inspecting the collapse will automatically detect the smell.)

  • This is corpsedamp gas. See areas D15 or D18 for full description (including guidelines for identifying the gas and its properties). There is no risk of explosion here as the gas is not sufficiently concentrated.

Sarcophagus: Empty. Looted years ago.

D20. HALF-PLUNDERED CRYPT

In addition to the normal key entry for this area (DIA, p. 24) the far wall of the crypt is badly cracked, but shows signs of being repaired. (Corpsedamp was also leaking into this room, as in Area D19, but efforts have been made to seal the cracks and prevent the leak.)

D23. DOOR

Instead of a secret door, the door leading to D27 is a normal wooden door.

D26. BHAAL’S REST

  • The middle of the room is occupied by an open stone sarcophagus, but the floor has been cleared (as a resting place for the followers of Bane).
  • There are six dusty bedrolls on the floor.
  • Sconces in the north and south wall.
  • There are three footlockers against the far wall.

Footlockers: Two of these are battered and worn with years of use. The third is clearly of better construction and is also padlocked. (This latter footlocker belongs to Vaaz and contains the Missive of the Hidden Lord φ and Vaaz’ Correspondence handouts.)

D30. TIAMAT’S STOLEN TREASURE

Use the normal key entry for this room (DIA, p. 26) except for Chest 4.

Chest 4 contains a bronze crown with fire spires (250 gp) that weights 2.5 pounds. Each spire is shaped and painted to resemble one of the five kinds of chromatic dragon (black, blue, green, red, and white). It has been carefully packed in shaped padding; there is a second hollow in this packing material that would appear to fit a mask, but there is nothing in it. (GM Note: It does not fit the mask from Chest 3. This mask is located in Vanthampur Manor.)

Crown: Around the interior of crown is an inscription, written in Draconic: “From Avernus we summon her. To Tiamat we pledge fealty.”

Go to Part 3F-C: Dungeon of the Dead Three – Adversary Roster

Archives

Recent Posts


Recent Comments

Copyright © The Alexandrian. All rights reserved.