The Alexandrian

Posts tagged ‘d&d’

My Favorite Character Sheet

January 24th, 2011

I’m re-posting a tale from the Caverns of Thracia which I’ve shared previously here on the site because it provides the context for my favorite character sheet of all time. (This was originally posted as part of OD&D in the Caverns of Thracia. You can just scroll down to the end for the new bit.)

What’s your favorite character sheet? Post it to your blog, link back to here, and throw a link up in my comments.

THE GRAND TOUR

As Thalmain led them into the Caverns of Thracia, he was able to act as a bit of a tour guide for the new players/characters. (“Here’s where the bridge almost burned down… Don’t open that door… Here’s the pit trap I heroically saved the party from… Here’s the place where I roasted lizardmen…”)

Eventually, however, they began pressing on into unexplored territory. A short while later, they found themselves descending broad stairs of stone…

And that’s when things got epic.

In the Caverns of Thracia, there is a room keyed thusly:

The Burial Crypt of the Cult of the Dark One: The reek of decaying flesh permeates the air here. Lying in ordered rows are rank upon rank of corpses. Most are long decayed and in skeletal form, but many are still fairly fresh, not having been dead for more than a few weeks (if you can call that fresh!). […] If the southernmost pair of columns is approached within 5′ or if the columns are passed between or to either side, 1-4 skeletons will animate and begin to attack intruders. Each additional melee round 1-4 more skeletons will animate as long as there are living intruders to fight, up to a total of 400 skeletons. Skeletons, AC: 7, Move: 12″, HD: 1, Damage 1-6, HP 3.

I decided that the Thanatos cultists that they had killed before would have been moved down here, so there were also about a dozen bodies laid out directly before the leading into this large chamber and covered with fresh linen. (This creeped them out because, of course, it implied that there had been somebody around to move the bodies.)
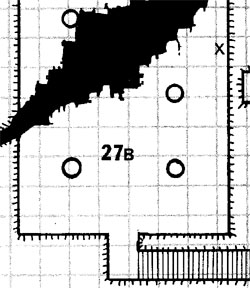
Caverns of Thracia - Area 27B

Inevitably, of course, the PCs moved far enough into the room to trigger the undead guardians. As the corpses began to stir and wrench themselves free from the cordwood-like stacks of the dead, the party fell back to the entrance.

The two halfings — skilled in ranged weaponry — picked off the first wave. (Aided by the occasional coin-toss from Howard.) But more and more of the dead were beginning to stir, and they realized it would only take a few unlucky die rolls for the skeletons to reach their defensive position.

(Actually, I don’t think I’ve discussed this previously: Halflings are described in OD&D as having “deadly accuracy with missiles as detailed in CHAINMAIL”. These sessions are being run with the conceit that I don’t “have” Chainmail, so we decided that halflings would simply get a +1 bonus to damage while using ranged weapons.)

Against the eminent risk, they quickly rearranged their lines. Brennan and Reeva took the front line. Greenwick switched from ranged attacks to a polearm in the second rank. And then Howard, Thalmain, and Bob lined up in back using their ranged attacks to thin the undead ranks before they reached the melee fighters.

But, more importantly, they also started spreading oil in front of their defensive position. And as soon as some of the undead got close enough, they lit the oil.

Based on my interpretation of the room key, the undead would just keep coming. Each undead had 1d6 hit points. Those that survived the ranged attacks would enter the oil, suffer 1d6 hit points, and frequently die before they even threatened the melee fighters.

After a couple of rounds, it was clear that the 1d4 skeletons per round were just never going to pose any kind of credible threat: The defensive position they’d created was too strong. And while the oil would only last for 1d6 rounds, they had stocked up on it (in large part due to Thalmain’s success with a similar tactic during the last session).

THE MASSACRE

I was in the process of trying to figure out how to make the encounter more interesting (since wittling through 400 undead 1d4 at a time wasn’t particularly exciting) when the PCs made it easy for me:  They decided to try proactively eliminating the undead before they could rise. They tossed a flask of oil onto one of the piles of corpses and then fired a flaming arrow into it.

I ruled that the resulting conflagration was successful in destroying a large number of potential undead… but it also had the effect of rousing them. I rolled 1d10, got a result of 8, and went from rolling 1d4 to rolling 8d4 for the number of undead animating each round.

As the undead rose en masse, the piles collapsed — sending the dead cascading across the floor of the chamber.

It’s a testament to the strength of their defensive position that they managed to hold out for several more rounds against the larger waves of undead without sustaining any injury. I was literally rolling fistfuls of d6’s to calculate the skeleton’s hit points while the players rolled a fistful of d6’s to calculate the damage wrought from the wide moat of fire they had laid down. They would read off the results and I would toss d6’s aside or lower their totals to reflect the current hit points of the skeletons.

Unfortunately, many of them were just 1st level characters. Eventually the law of averages worked against them and one of the skeletons emerged from the flaming oil and with a howl of undead rage managed to rip out Brennan’s throat.

Around this same time, my d4’s rolled high and a wave of 22 skeletons started heading towards them. At that point, they decided that discretion might be the better part of valor. But they weren’t done yet: Howard moved up to the melee line and they held the position for another couple of rounds.

As the wave of the 22 skeletons got close, however, they fell back.

But they weren’t done yet. See, Brennan had been the one carrying most of their (very large) supply of oil. So before they retreated, they rolled Brennan’s body into the flames.

1… 2… 3….

KA-BOOM!

Surprisingly, a couple of the skeletons managed to actually emerge from the far side of the inferno and pursue them a couple of steps up the stairs. (I say a couple of steps, because Thalmain and Bob put arrows through their skulls before they got any further.)

When it was all said and done, I tallied up the dead:

They had killed 76 skeletons.

Killed? It’s probably more accurate to say “slaughtered” or “massacred” on a scale that a bunch of 1st level characters (with the exception of the 3rd level Thalmain) should really not be capable of dealing out.

Of course, they weren’t 1st level any longer. Everybody not only leveled up, but also maxed out their XP for the next level, bumping into the “thou shalt not get enough XP for two levels” ceiling. (Well, except for Thalmain, who bumped into the “thou shalt not advance past 4th level” ceiling for halflings.)

76 skeletons.

It isn’t the largest single-battle slaughter I’ve ever seen in a D&D game, but it’s almost certainly the most impressive. The only battles that rival it in terms of sheer number involved groups fighting large hordes of significantly weaker opponents.

Smart play. Very smart play.

Admittedly, if the skeletons had been smarter they wouldn’t have continued marching into the flames. But, on the other hand, I’m not sure how much difference it would have made: The skeletons had no access to ranged weapons and any possibility of a retreat was cut off by the chasm to the north). Even if they had hung back, they would have simply been picked off by the party’s ranged attacks.

MY FAVORITE CHARACTER SHEET

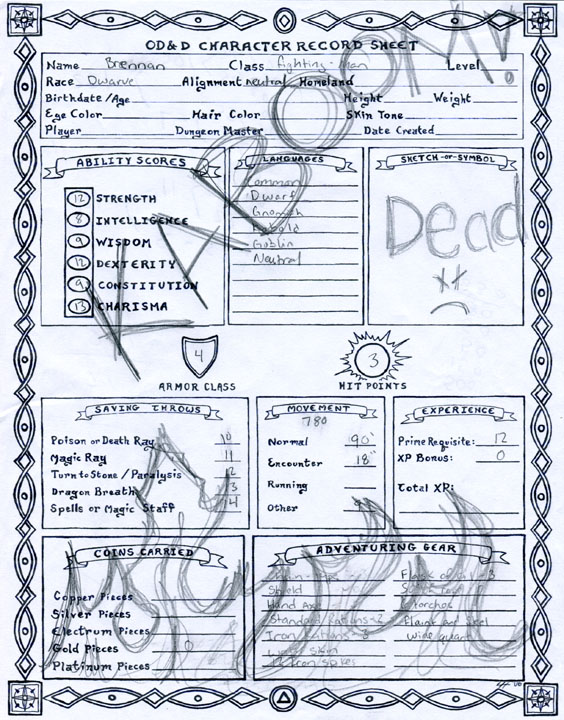
Which brings me to my favorite character sheet, which belongs / belonged to Brennan:
Character Sheet - Brennan

(click for larger image)

As decoated posthumously by Brennan’s player, Katlin.

Go to Part 1

DELVE FIVE

The first four passes through this section of the dungeon had completely cleared out the anubian outposts on Level 1 and heavily decimated their forces on Level 2. I made the decision to allow this section of the dungeon to be temporarily cleared and dropped the chance of random encounters to one check per three turns.

This allowed the next group to pass through relatively quickly through largely abandoned chambers. They were once again tempted by the plaster-chipped door, but decided to pass it by when one of their veteran party members explained what the inscription said. Passing down to area 42 they encountered an ochre jelly (random encounter) who had taken up residence in the rubble pile and grown to a rather impressive size as a result of feasting on the dead rat corpses left behind by the last expedition. (This encounter nearly resulted in intra-party homicide when a particularly dim-witted knight couldn’t figure out that he was not helping matters by constantly hitting the ochre jelly and splitting it into smaller-yet-equally-vicious portions.)

They then continued south of this area, had several other adventures beyond the scope of this section (including rescuing an amazon warrior who had been frozen in ice for a thousand years), and then left.

(Nothing too exciting about this. If there is a lesson to be learned, it’s that you don’t have to cram in fresh content all the time. The importance of negative space — the absence of something to contrast its presence elsewhere — can’t be dismissed as a design principle.)

DELVE SIX

There was then a lengthy break in the campaign, which was marked in the game world by the pollen monsoon. When the PCs were able to return to the Thracian ruins, I spontaneously decided that an elementalist had moved into this vacated upper level. Accompanying him would be a number of lesser elementals.

And then, when the PCs kicked down the door to area 5, I found myself saying, “… sheets of malevolent flame dance around hearts of molten magma.” When the elementals died, they left behind smoldering, blackened pyrites. If they were struck with cold-based spells, I decided there would be a percentile chance that their magma hearts would explode from the sudden contraction (killing the elementals, but peppering the room with shrapnel).

So, those were pretty cool.

I also knew at this point that the anubians had re-fortified the guardpost in area 43, but the PCs didn’t make it that far during this session.

(This is our first major re-population of a deserted section of the dungeon. Couple things to note: First, I didn’t consult any repopulation tables. Why? Because I was struck by a cool idea. Random tables are tools, but I feel that you shouldn’t feel enslaved by their results.

Second, I’m not spending any time outside of the game prepping this repopulation. At the beginning of a session, I’m jotting down a few notes on how the dungeon has changed during the same time that the players are rolling up new characters, shopping for supplies, and the like. Of course, nothing says you can’t spend some time doing detailed prep work between sessions. But preserving the “I can play this any time” nature of your megadungeon means that you never want to feel like you need to do that kind of prep work before you can play the next session.)

DELVE SEVEN

When the PCs next returned to this section of the dungeon, I decided that the elementalist had been killed. (They discovered his flame-scorched body jamming the door to area 5 shut.) The reasons for this aren’t really important (and would be spoilers for my players), but this meant this section of the dungeon (along with 3 others) were depopulated.

I decided arbitrarily to check repopulation for each section by making a single 1-in-10 wandering monster check for each “section”. (The determination of “section” was essentially arbitrary on my part.) The check in this section came up positive, and I rolled on the Level Two wandering monster table (on the theory that some group from deeper in the dungeon had moved up to occupy these chambers).

The result was “giant spider”. There’s a minor spoiler here that I’m going to put into black text. My players shouldn’t highlight it, but the rest of you can do so to read it:

(On the second level of the dungeon there is a Shelob-sized spider that is described as having an egg sack of young spiders that’s ready to hatch. I decided that the egg sack had hatched, and some of the young spiders had migrated to this upper level.)

In any case, I decided these giant spiders had moved into the bat chambers. They had strung their webs and were basically feasting on the bats (whose population had been significantly depleted).

The PCs’ first inkling that something was wrong came when they found the giant spiderweb draped across the staircase leading down to area 2. After they had cleared out the spiders, they found the elementalist’s scorched body, verified that the rest of this section was still deserted, and then moved down to the second level where they engaged in multiple, semi-futile skirmishes with the anubian guardpost (which I had repopulated before the previous session).

(Here we can see how random tables can provide the raw seeds that you can riff off of to develop the megadungeon in interesting ways. This kind of improvisational extrapolation from a simple table entry of “giant spiders” is what makes the campaign come alive.

The wandering monster table is like the audience members who yell out suggestions on an improv show: Simply yelling out “mime” and “airplane” doesn’t make for a comedy show; it requires the improv actors to create a sketch about a mime pilot making an announcement over the plane’s intercom system for that. Similarly, just having random “giant spiders” attack the PCs because the table says so doesn’t make for an adventure; what you need are giant spiders in a particular place for a particular reason and doing a particular thing.

Why use the table at all? For the same reason the improv actors use audience suggestions: It keeps you fresh. It forces you to think outside of your comfort zone. It can give you an idea where you’re drawing a blank. Perhaps most importantly, it’s fun.)

A FEW FINAL THOUGHTS

At several points during the writing of this essay I found myself thinking, “This is really boring. This is just me giving a litany of fairly simplistic events.”

But maybe that’s the point: There really isn’t any magic here. You keep the dungeon alive by using wandering monster encounters to simulate the activity of the complex. You partially repopulate the dungeon inbetween sessions to keep it fresh. The result is that you can take 10 encounter areas, a couple of tables, and get dozens of hours of play out of it.

With that being said, if these 10 areas were the only section of the dungeon available none of this would work. First, the PCs would be able to “clear” the dungeon and there would be no immediate motivation to return. I could, obviously, repopulate such a dungeon and remotivate them to come back (“the draconian scouts have established their advance base in the same abandoned mines used by the orcish raiders!”), but there would be a greatly reduced sense of building on past successes or contributing to a single, larger goal.

Second, in the megadungeon the PCs aren’t being forced to go back over the same ground. They’re choosing to come to this entrance of the dungeon instead of another. This is important for both tactical and psychological reasons.

But, laying those caveats aside, my biggest point here is the ability to effectively reuse and refresh the megadungeon. This material can be used and re-used many times over without becoming stale. And if it ever starts to become stale, it’s a relatively trivial matter to freshen it back up again: Lizardmen invade the complex from the nearby swamplands. In a mighty, magical earthquake a new ziggurat pushes its way out of the earth leading to an entirely new complex connected in yet unknown ways to the caverns beneath. The black-eyed cultists approach some of the heroes to form an alliance against the aggressive anubians. And so forth.

In many ways, I feel like a megadungeon becomes the DM’s character. And I play my megadungeon much like I would play a PC. Before play begins, I don’t really know what my megadungeon is going to do: But my random encounter tables generate 2d4 anubians just after the PCs raid the depths, and I know the anubians have sent a team of assassins to hunt them down. Black-eyed cultists are holding a ritual on Level 2 and I suddenly know the sin day they’re celebrating. Lizardmen show up in the anubian sections of the dungeon and I know tensions are erupting between their tribes. Then the minotaur shows up to determine why tribute is not being paid and… and… and…

And a story gets told.

Go to Part 3: The Players Take Charge

(Re-)Running the Megadungeon

January 19th, 2011

Caverns of ThraciaLast week I talked about the importance of a megadungeon in creating an open game table. Today I want to talk a little bit about how that works in practice. I’m going to be using my own experiences running the Caverns of Thracia as an example. Players currently playing in my campaign may wish to avoid reading this, but there’s nothing here which I feel strongly about “forbidding” you from looking at. Except for the reference map, which I’m hiding behind a link:

REFERENCE MAP – PLAYERS DO NOT LOOK!

The rest of you may want to open that up in a separate tab or window.

An effective megadungeon has three basic components:

1. A map.

2. A starting map key.

3. Wandering monster tables.

The map should be large and thoroughly xandered. Xandering is crucial in a campaign megadungeon because of the complex and dynamic environment it provides: Players need to be free to choose different experiences each time they return to the dungeon. If you force them to trudge down the exact same path each time, the dungeon will have no effective replay value.

The map key should be flavorful and interesting. It will be frequently rewritten, but the starting key should provide a strong foundation for you to build on and a rich soil in which the dungeon can grow. Most old school bloggers I’ve seen tend to advocate minimalistic keys that tend to de-emphasize memorable geography. (For example, the Castle of the Mad Archmage contains key entries like “ORC SERGEANT. (8 h.p.) armed with sword and flail. He has 12 e.p.” and “SECRET CHAMBER. Great skeleton (3 HD, 15 h.p., turns as a ghoul, otherwise as a normal skeleton). Small locked chest holds 75 g.p.”) But I disagree with this approach: The monsters in the dungeon are ephermeral. It’s the geography that’s going to stick around. Minimalist keys are fine, but use them to make memorable locales. (Check out my Halls of the Mad Mage for my own efforts to use a minimalistic key to create interesting locations.)

Wandering monster tables have generally gotten a bad rap in many modern gaming circles. They’re generally considered to be “wasted time”. But when properly employed, wandering monster tables are improv tools and low-tech procedural content generators. (See Breathing Life Into the Wandering Monster for a deeper look at how this works in practice.) Wandering monsters also play an important part in maintaining proper pacing throughout the dungeon complex and help to make the complex “come alive”. In all of these functions, wandering monster tables are playing a vital role in preventing the megadungeon from becoming a place that can be “cleared out”.

Caverns of Thracia, of course, provides all three of these essential elements: Although the reference map I’m using for this essay shows only the small, specific section of the dungeon complex I’ll be discussing in detail, there are, for example, three completely separate entrances into the caverns and the delves described below represent only a fraction of the sessions I’ve run there. Similarly, Jennell Jaquays’ map key positively drips with detail — the unique characters of the Caverns of Thracia seem to ooze out of every room description. Jaquays also provides detailed and dynamic wandering monster tables.

THE FOUNDATION

Let’s start with the basics. Looking at our reference map, allow me to present a very simplified/summarized version of the pertinent map key:

  1. Walls once painted in brightly color murals. Now home to several hundred bats. The floor is covered a couple feet deep in bat guano.
  2. Columned hall. More bats and guano.
  3. Ruined statue, digging rubble pile turns up the face of Athena. More bats.
  4. Ruined statue of a winged figure. Giant centipedes (x19).
  5. Ruined statues reduced to complete rubble. Lizardmen hunting party (x4).
  6. Spear trap.
  7. Anubian Guardpost. (x6)
  8. Sloping passage.

42. Rubble-filled cavern. Colony of rats in rubble (raise alarm if disturbed).
43. Guardpost and Pit Traps. Anubians (x4). One of the pits leads to a sub-level with a small, hibernating dragon.

In addition, the module provides two wandering monster tables — one for Level One and one for Level Two. There is a 1 in 10 chance per turn of generating an encounter.

Simple enough, right?

Now, let me show you how I’ve used these simple tools to run 20-30 hours of high quality gaming.

DELVE ONE and DELVE TWO

The first delve is pretty simple and by the book: The PCs entered the dungeon, held their noses at wading through bat dung as they headed through areas 1-3. They found the lizardmen in area 5 who were nursing a comrade who had been injured by the centipedes in area 4 (as described in the adventure key). They killed the lizardmen and then entered area 4 to fight the centipedes themselves. After a nasty fight, they spiked the door shut, dragged the corpses of the centipedes that they had killed out of the dungeon, and returned to the jungle. That night they feasted that night on roasted centipede meat.

When they returned to the dungeon the next day I generated a surface encounter using the Level One wandering monster tables. It turned out to be a rather tough one, featuring a minotaur along with half a dozen dog-faced anubians. What were they doing there? Guarding the entrance. The party’s wizard tried to use a sleep spell, but it failed spectacularly. He ran back to where the others were waiting, but they all dithered long enough for the minotaur to reach them and then it turned rather abruptly into a TPK.

The heads of the PCs were placed on pikes outside the dungeon entrance (where they remain to this day).

DELVE THREE

The players rolled up new characters and ended up entering the dungeon through a different entrance. A few sessions later, however, a different set of PCs returned to this area. They discovered a half dozen anubians (minus the minotaur) standing guard at the entrance. (Another random encounter, which also slotted naturally into the “guarding this entrance” concept.) This time the battle went much better for the heroes and they were able to clear away the freshly positioned guards.

Downstairs they returned to area 3. They could hear noises coming from behind the door to area 5 and saw that the door to area 4 had been spiked shut. They tried to ambush the anubians in area 5 (which had been generated from the wandering monster tables), but the door squeaked when they tried to open it and the anubians were warned. Despite this, they dispatched the anubians.

With their backs secure, they carefully pried up the spikes. Somebody scooped up some bat guano in a skull and tried to use it to grease the hinges and then they threw open the door.

Angry red centipedes looked up at them.

They slammed the door shut and spiked it again.

Exploring the room where the anubians had been, they found the secret door. They turned left, through area 8, and down to the second level.  They fought some giant rats in area 42, spotted the guards in area 43, and decided to retreat back to the first level and finish it off.

There they fought and killed the anubians in area 7, looted the treasure chest, spiked the door shut from the inside, and spent the night. In the morning there was a loud buzzing coming from outside the door, which turned out to be stirges which were feeding on the corpses they had left outside the door the night before. (The stirges were a wandering encounter; I figured feasting on corpses made the most sense given the circumstances.)

DELVE FOUR

The PC who had been mapping in the previous delve sold their maps to a newly formed adventuring party for a percentage of the treasure liberated on their expedition. (The player of the PC who owned the maps couldn’t play that night.)

This group returned to the tunnels and finished exploring this section of the first level. An elf in the party detected the secret door hidden behind some plaster at area 9A, but when they discovered that the inscription on the door read: “KNOW YE THAT BEYOND THIS PORTAL LIES THE DEMESNE OF THANATOS, THE CURSED, HATER OF LIFE, GOD OF DEATH. SEEK NOT TO PASS THIS GATE FOR IT LEADS ONLY TO HIS BOSOM.” They decided that discretion was the better part of valor and left it alone.

But what the party was really here for was to push through the guard outpost on Level 2. Down they went and got into a huge melee with the anubians. (Complicated by a wandering monster encounter that reinforced the guard post.) During the fight, one of the PCs fell down one of the pits depicted on the map… which led to a chamber where a small dragon was hibernating. (This was all according to the map key.)

There was some abrupt panic, but the PCs rallied and actually managed to kill the dragon. (They were very excited about that.) In the pit they found several ancient Thracian artifacts, which they hauled back to town and sold for a tidy profit. (It was at this point that Himbob Jimblejack bought up all the garlic futures in town and set up his monopoly on garlic sales.)

FIRST DESIGN INTERLUDE

Up until this point, things may seem fairly standard. I haven’t really deviated from or supplemented the original dungeon key. But the one key factor to note here is the effect that random encounters have had on the game. Half of the combat encounters have been with randomly generated encounters:

KEYED ENCOUNTERS

  • Lizardmen (Area 5)
  • Centipedes (Area 4)
  • Anubian Guardpost (Area 7)
  • Lower Anubian Guardpost (Area 43)
  • Dragon (Area 43)

GENERATED ENCOUNTERS

  • Minotaurs + Anubian Guards (Delve 2)
  • Anubian Guards (Delve 3)
  • Anubian Guards in Area 5 (Delve 3)
  • Giant Rats (Delve 3)
  • Stirges (Delve 3)

At this point, these generated encounters have accomplished three things.

First, they have slowed the pace of the PCs exploring the dungeon. By providing an additional ablative layer, they have prevented the PCs from delving as far into the dungeon as they otherwise would have been able to. This puts a premium on exploration — their knowledge of the deeper complex is hard-earned and, thus, more appreciated. (Of course, this also presumes that there are interesting and cool things to find down there in the first place. Fortunately, the Caverns of Thracia provide that.)

Second, they prevent a “return to save point” mentality. You can’t just leave the dungeon, come back at a later date, and pick up where you left off. Permanently clearing a section of the dungeon is hard work, and it’s not particularly permanent. (There are not guarantees that something won’t wander back in or that deeper denizens won’t extend their guard perimeter.) This provides a drive to “push on a little farther” because they know that they’ll have to fight hard just to get back to where they are now.

Third, they are keeping this section of the dungeon fresh. In many ways, it really is a completely new dungeon crawl every time they go in. But, on the other hand, their preexisting knowledge of the geography of the place is a reward in itself. (“Oh, I know how to get past these guys. There’s a secret passage a couple chambers to the west that we can use to bypass them.”) That this knowledge is valuable to them is proven by the fact that they were willing to pay cold, hard cash for it.

Tomorrow we’ll take a look at the next step in managing your megadungeon…

Go to Part 2

Castle RavenloftI wasn’t planning on doing this, but almost immediately after writing about my first set of rulebook woes with Castle Ravenloft I ended up playing the solo scenario “Adventure: Impossible” and running headlong into two particularly egregious problems.

First, a quick description of the “Adventure: Impossible” scenario: In the scenario you play each of the five Heroes in the game sequentially as they enter Castle Ravenloft’s dungeons in order to defeat 3 of Strahd’s powerful lieutenants. (Which three is randomly determined before the game begins and revealed as you play.) When one hero dies, the next hero arrives.

(Minor problem: The scenario doesn’t specify what happens to the dead Hero’s treasure. It also doesn’t specify what happens to the monsters which were controlled by the dead Hero. I arbitrarily ruled that the dead Hero’s treasure disappeared, but that their monster control cards and traps transferred to the new character.)

The scenario wasn’t going too badly for me until I got an Alarm trap. These traps generate a new monster every single turn until they’re disabled… and I could never get the damn thing disabled. My fighter failed to disable it twice and was then killed. He was replaced by the rogue, who has a +5 bonus to disabling traps (and thus has an 80% chance of success). The rogue failed three times, but was then fortunate enough to get teleported to the far side of the dungeon by an Encounter card. A few turns later, this was my predicament:

Castle Ravenloft - Adventure: Impossible

The Alarm trap was still spitting out monsters, all of which were pouring across the dungeon towards me. At this point I had killed one of Strahd’s lieutenants and was now engaging Klak. Klak’s appearance was actually quite lucky in some respects because he would cause unexplored tiles to flip over, which gave me room to continue moving away from the monsters pursuing me and, thus, enough time to kill Klak before they reached me.

PLACING MONSTERS

Here, however, we run into our first rulebook woe. The rule for placing Monsters reads:

When you have to “place a Monster” this is shorthand for draw a Monster Card and place the corresponding Monster figure on the bone pile that’s on the Dungeon Tile you just placed. If you already have the same Monster Card in play in front of you, discard that Monster Card and draw again. Note, however, that it’s okay to draw a Monster Card if another player has the same Monster in play.

(Minor problem: You will often be told to “place a Monster” in situations where you haven’t just placed a Dungeon Tile, so the first sentence is actually misleading in addition to being ungrammatical. But that’s just a quibble, really.)

The question becomes: What happens when you already have one copy of every single Monster Card in the game? Should multiple Monsters now be allowed? Or is it now impossible for new Monsters to appear? And if it’s impossible for new Monsters to appear, should I cycle through the entire deck?

I ask that last question, because the game is also unclear on what you should do when you get to the bottom of a deck of cards. Should you reshuffle the discards? Or have you simply depleted the dungeon of Monsters? (I think the answer here is pretty obviously “reshuffle”, but once again we’re seeing the sloppiness of the rulebook.)

In terms of whether or not Monsters should be drawn when you already have one copy of each Monster Control card, I see three possibillities:

(1) You don’t draw any additional monsters. (This is the most literal interpretation of the rules; it is also the most favorable to the players.)

(2) Draw an additional control card to determine what type of monster to place, place it, but then place the extra control card under the existing control card. The new monster will still be activated by the control card already in your hand. If one of these monsters is killed, remove one control card to your XP pile normally while leaving the other in play. (This allows new monsters to continue entering play, but doesn’t result in a single player activating the same monster multiple times on their turn.)

(3) Draw an additional control card, place the monster, and resolve the additional control card normally. (This is the most punitive possibility, since it means that the active player will be activating those monsters twice.)

I decided to go with the first possibility in thie scenario, largely because the alternative was pretty much certain death. In the future, however, I might actually use a house rule in which scenario #2 is always used when a duplicate control card is drawn. It might make the game slightly more difficult, but in a way that I feel would be more enjoyable and universally consistent.

TACTICAL FAIL

In any case, I’d managed to kill Klak, but the monsters were still coming.

Castle Ravenloft - Monster Pursuit

oh shit…

I had them strung out pretty well so that I could take them one at a time, but the problem was that as soon as I killed one of them the Alarm trap would immediately respawn them. And I couldn’t keep that up indefinitely because the encounters would slowly whittle me away.

But then I got lucky and pulled a treasure that would let me teleport all the way back to the other side of the board where I could deactivate the Alarm trap.

… instead I missed the die roll three more times.

(If you’re keeping track at home, I have now missed the die roll seven times. One of these had a 55% chance of success and the others all had an 80% chance of success, meaning that there’s only a 0.002% chance that something like this could happen.)

I’m now down to 1 hp and the monsters are closing in, but I have a clever scheme which will allow me to circle around a corridor loop in the randomly generated dungeon, pull the monsters away from the Alarm trap, and give me one more shot at disabling the thing.

… except for the encounter card which teleported a spider right next to me for a guaranteed kill.

At this point, the cleric — my last Hero in the scenario — teleports in and makes a beeline for the Alarm trap. Once there, he proceeds to blow his disarm roll three more times. (I am officially done calculating the probability on this one.)

With more monsters closing in, the cleric fled down the hall, where he promptly discovered the Zombie Dragon (Strahd’s third lieutenant) lurking in a the Rotting Nook:

Castle Ravenloft - This Does Not Look Good

This does not look good.

And here, as the Zombie Dragon pins me in the corner, we reach our second rulebook woe. When a monster activates, you are supposed to check the Monster Tactics listed on their control card. The rules for this are:

  • The Monster’s tactics are presented as a list. Each possible maneuver for the Monster starts with a statement. If that statement is true, the Monster follows the resulting tactics.
  • If the statement is not true, go on to the next statement. If that statement is true, the Monster follows the resulting tactics.
  • Once a Monster has selected and followed one set of tactics, the Monster’s turn ends. Do not continue to check its remaining tactics that turn.

What these rules fail to address is a situation in which a tactics statement is true, but the resulting tactics cannot be executed. For example, in the picture above my cleric is boxed into the corner by a skeleton and the Zombie Dragon. As a result, there are no adjacent spaces open next to the cleric. You can see just beyond the Zombie Dragon that there is a wolf and a spider waiting to pounce me. The wolf’s tactics read:

  • If the Wolf is adjacent to a Hero, it attacks that Hero with a bite.
  • If the Wolf is within 2 tiles of a Hero, it moves adjacent to the closest Hero and attacks that Hero with a pounce.
  • Otherwise, the Wolf moves 2 tiles toward the closest Hero.

The first line doesn’t apply since the Wolf isn’t adjacent. The second line does apply (the Wolf is within 2 tiles of the cleric), but it can’t move adjacent. Does that mean it doesn’t attack at all? And, if so, should I instead execute the third line of the Wolf’s tactics? What if this wasn’t a solo scenario and the closest Hero was boxed in but there was another Hero within range who wasn’t? Should the Wolf attack the available target or freeze-up on the unavailable target?

Then consider that the spider’s tactics unambiguously trigger a web attack. (“If the Spider is within 1 tile of a Hero, it attacks the closest Hero with an acidic web.”) But the spider’s web attack is a +11 attack with the effect, “1 [damage] and Slowed. Place the Spider adjacent to the Hero.” Should the spider deal damage and then not move? Or is the entire effect canceled since part of it can’t apply?

What would probably be useful is a general rule for handling occupied spaces. Maybe something like, “If a Monster must move to or appear in a particular space and all possible spaces are occupied, the monster instead moves to an adjacent space.” This doesn’t necessarily clear up the question of whether or not the Wolf would be allowed to attack even though they didn’t get adjacent to their target, but it would help.

It would also clear up another issue with the “place a Monster” rules: What happens if the bone pile is already occupied by another monster? (Since many monsters won’t move when they appear and several encounters spawn multiple monsters, this situation actually crops up quite frequently.) We’ve been playing with the “place them in an adjacent space” rule since it obviously makes the most sense.

Castle RavenloftA couple days ago I posted my first thoughts on the Castle Ravenloft boardgame. One of the things I mentioned was the horrific quality of the rulebook. Today I want to expound upon that a little bit.

But first, let me mention how the session we played last night went: We had a couple of newbies at the table, so we started with Adventure 2: Find the Icon of Ravenloft. This is essentially the plain, vanilla version of the game. It’s a good way to get introduced to the basic gameplay, and then wraps up with a climactic fight in the Chapel. We were able to conserve our big AoE attacks until reaching the Chapel, but then two bad Encounter draws ended up teleporting two of our Heroes to opposite ends of the dungeon while spawning even more monsters. With a good deal of scrambling, however, we were able to strand a gargoyle, reconcentrate the enemies, and then blast our way out of the castle.

Good times.

We then moved to Adventure 9: Gauntlet of Terror. In this scenario the layout of the dungeon is largely predetermined at the beginning of play and groups of monsters are moving towards the dungeon’s entrance, seeking to escape and ransack the village. This adventure completely inverts the strategy of the game in almost every way.

The first time we played it, we screwed up the respawning rules for the monsters. Then a couple of players left and a new player showed up and we played through it a second time using all of the rules correctly. Both plays were great fun, with quite a few really tense moments. (Including one memorable turn where we ended up semi-intentionally spawning 7 monsters at the same time.)

I’ve now played the game a total of 18 times. It continues to deliver a consistently fun experience.

THE RULEBOOK

With that being said, I now want to discuss the inadequacies of the rulebook in a bit more detail. To quickly sum up the problem: Castle Ravenloft pretty much can’t be played without house-ruling nearly every facet of the game.

EXAMPLE 1: IMMOBILIZATION

The complete rules for the Immobilized condition read: “If your Hero is Immobilized, your Speed is reduced to 0 — you can’t move!”

Okay, that means that you can’t use a Move action to move (since your Speed has been reduced to 0). But can you still use At-Will, Utility, or Daily powers that allow you to move? What if another character uses a power that would move you… is that allowed? What if an encounter card is triggered with a trap-like effect that would ordinarily force you to move — does the Immobilized condition prevent that movement, too? What if the effect in question doesn’t use the word “move” to describe the positional change, should that be allowed?

For example, here’s the text from the Overwhelming Terror encounter card: “Place each Hero 2 tiles closer to the Start tile. If a Hero is on the same tile as a Monster after being placed, that Hero is slowed.”

Should Overwhelming Terror move an Immobilized Hero to a new tile? Does the flavor text (“A cacophony of shrieks and howls rises up around you, and you flee in terror.“) change your opinion?

If they aren’t moved, do you still check to see if they are slowed? And if you do, do you use the tile they’re currently on or the tile they would have been placed on if they were moved?

Okay, let’s consider Strahd’s Minions: “Place the active Hero and the two Monsters that are closest to that Hero on the tile farthest from the active Hero. If there are less than two Monsters in play, place a new Monster adjacent to the active Hero after he or she is placed.”

If an Immobilized Hero isn’t placed on a new tile, should you still move the monsters? And if not, should you draw a new monster if there are less than two in play? (After all, there is no “after he or she is placed” if the Hero was never placed.)

Should an immobilized rogue be allowed to move as part of their Deft Strike ability? (“Before the attack, you can move 2 squares. Attack one adjacent Monster.”) If not, should the immobilized rogue be allowed to move when the cleric uses Hallowed Advance? (“Hit or miss, each other Hero can move one tile.”) If not, can the fighter use Bodyguard when the immobilized rogue is attacked? (“The attack misses instead, and you swap positions with the Hero that was attacked.”) Can the fighter use Bodyguard if the fighter is the one who’s been immobilized?

In order to have a nice, consistent ruling for being immobilized, our table has been playing “Immobilized” to mean:

(1) The immobilized Hero cannot change their own location through the use of any action or power. Any other power, ability, or effect which would change the immobilized Hero’s location takes effect normally — including other Heroes using their powers, attacks from Villains and Monsters, and Encounter cards.

But other reasonable interpretations could include:

(2) “Immobilized” simply reduces the Hero’s speed to 0. Any effect (including their own powers) which allows a Hero to move without taking a Move action can be performed normally.

(3) An immobilized Hero “cannot move”. Nothing will cause them to leave they’re currently standing in.

(4) 4th Edition’s definition of Immobilized: “You can’t move from your space, although you can teleport and can be forced to move by a pull, a push, or a slide.”

Since forced movement isn’t defined as part of the Castle Ravenloft rules (and “pull, “push”, and “slide” are terms of art which are not used), this would still leave gray areas. But you could try to formalize something close to it by saying:

(5) An immobilized Hero has a speed of 0 and cannot move using a Move action. A Hero cannot use any of their own abilities to move. (Exception: The eladrin’s Fey Step ability can be used normally.) Any ability or effect which says that a Hero “may” or “can” change their position cannot be used by the Hero. Abilities or effects which do not give the Hero a choice in whether or not to move affect an immobilized Hero normally.

Of course, each of these variant interpretations result in significantly different gameplay. And many of them don’t provide clear guidance in resolving the tack-on issues of effects like Strahd’s Minions. (One of the reasons we use the interpretation we do is because it doesn’t have any gray areas in resolving abilities or powers found in the game. It may occasionally give “illogical” results based on the flavor text, but it can be applied with absolute consistency.)

EXAMPLE 2: GAUNTLET OF TERROR

Adventure 9: Gauntlet of Terror, like most of the adventures in the game, introduces several scenario-specific rules. For example:

When an active Hero moves within 1 tile of a tile with a face-down Monster token on it, or onto a tile with a face-down Monster token on it, flip that token over.

Seems simple enough. But does that mean that a Hero can avoid flipping Monster tokens by simply not moving on their turn? And if that’s the case, then we’ve also re-opened the whole “what counts as a move?” can of worms. Are we only talking about Move actions? What if you take a Move action (which may or may not be mandated by the game) but move 0 spaces? Or use your Move action to do something other than move? What if you’re immobilized?

And so forth.

(We interpreted this rule as, “If the active Hero is within 1 tile of a face-down Monster token or on the same tile as a Monster token at any point during their Hero phase, flip that token over.”

This seems to match the intention of the rule as written, but may be a distortion if “move” should be interpreted to include movement from Encounter cards (which are drawn after the active player’s Hero phase is completed). On the other hand, if we changed the rule to read “if the active Hero is within 1 tile of a face-down Monster token (…) at any point during their turn” we end up with a different kind of distortion because the Monster tokens can also be moved within range during their turn but after the Hero has moved. The rules as written clearly don’t suggest those tokens should be flipped over… but maybe they should? I don’t know.)

Complicating this, here’s another example from the same scenario:

Discard the token [you flipped over]. Then place a new Monster token from the box top face down on any tile (except for the Start tile) that doesn’t have a Monster token on it.

Does that mean we can place a Monster token on the same tile as the Monster token we just flipped over? And, if so, should we immediately flip it over again?

Another point of confusion: The rule as written reads, “When an active Hero moves within 1 tile (…) or onto a tile.” That’s a strange way of writing it because “within 1 tile” is interpreted consistently elsewhere in the game to include the tile you’re on. It’s probably just needless redundancy, but should it be interpreted to mean that “within 1 tile” doesn’t include “the tile the Monster token is on” in this particular case? If so, does that mean if you start your turn on a tile with a Monster token on it that you can actually move around on that tile without flipping the token over (since you wouldn’t be moving onto the tile)? Or even move diagonally off the tile (which would result in you being two tiles away and never “within 1 tile” due to the tile-counting rules)?

Final example:

Shuffle the Dungeon Tile stack and take out 15 tiles. One at a time, each player takes a turn placing one of those tiles adjacent to the unexplored edge that it closest to the Start tile until all 15 tiles have been placed.

This rule is problematic because it doesn’t tell you how to orient the tiles you’re placing. Since the monsters and monster tokens in the scenario follow the arrows on the tiles, the vagueness of the rule technically allows the players to construct a board in which all of the monsters move away from the Start tile (making the scenario ridicuously easy).

THE NEED FOR A REVISED RULEBOOK

Needless to say, these radically different interpretations and/or patchings of the rulebook are not trivial matters in terms of gameplay.

For example, if Monster tokens can be placed on the same tile you just removed a Monster token from and they can be triggered as you place them, you can actually end up in scenarios where all the remaining monsters in the game spontaneously generate.

On the other hand, consider the difference between (1) “characters moving as a result of encounter cards flip a monster token” and (2) “characters only flip monster tokens while using a Move action” when dealing with an encounter card like Strahd’s Minions (“Place the active Hero and the two Monsters that are closest to that Hero on the tile farthest from the active Hero. If there are less than two Monsters in play, place a new Monster adjacent to the active Hero after he or she is placed.”).

In the first scenario, you end up with a situation where a Hero can be teleported to the far side of the board and immediately spawn multiple monster tokens which will (probably) all attack them simultaneously on the same turn.

In the second scenario, however, the Hero is stranded in a far corner of the dungeon surrounded by prowling monsters, allowing the other players to move the monster tokens away from their location and prevent the mass-spawning which would otherwise occur on their next turn.

Off-hand, I can’t tell you which one makes for the more interesting game; nor can I tell you which one makes for a more balanced game; nor can I tell you which one the designers (Mike Mearls and Peter Lee) intended me to play.

And these are not isolated problems. Both the Rulebook and the Adventure Book are filled to the brim with this kind of vagueness and inaccuracy. I can’t really classify this as bad game design (I’m pretty certain the underlying design is actually quite robust and thoroughly playtested). It’s atrocious rules-writing, not bad rules-design.

But given this woeful shortcoming in the game, it’s surprising that Wizard’s response to the problem has been an overwhelming and deafening silence: No errata. No FAQ. No official clarification or support of any kind.

So, to conclude: Fun game. Very much worth grabbing a copy of. But be prepared to put in a little sweat equity to make the game function properly.

Go to Castle Ravenloft: More Rulebook Woes

Archives

Recent Posts

Recent Comments

Copyright © The Alexandrian. All rights reserved.