The eighth through eleventh adventures of Avernus Rising are a sequence of stand-alone, Tier 2 side quests with the PCs based out of Mahadi’s Emporium.
 IN THE GARDEN OF EVIL (DDAL 09-08): This adventure has an interesting premise – a knight of Zariel’s crusade and her unicorn mount fled the battle and were chased down by devil outriders who forced the unicorn to make an infernal pact in exchange of the life of her knight and companion – but it doesn’t hold together.
In the Garden of Evil takes place in a forest which is supposed to be a primeval remnant of the paradise that Avernus was before the Blood War tore it apart, but this concept doesn’t really go anywhere. The forest is primarily “explored” through a series of random encounters, which are mostly confusing in their execution. The adventure states that the Ride of the Hellriders took place long ago, but nevertheless repeatedly frames encounters as if it happened like three days ago. (For example, with devils still hanging around the corpse of a fleeing Hellrider they pursued and killed.)
Meanwhile, the pact at the center of the story makes no sense: The devil promised to save the knight’s life in exchange for the unicorn submitting to captivity, but it didn’t actually do that. It killed the knight and “hid” the body like three feet away from the unicorn where the unicorn can clearly see it. Nevertheless, the unicorn remains imprisoned as if the pact were still in force until the PCs helpfully show up and tell her that she could leave at any time.
Which she does.
- Grade: D
 RUINED PROSPECTS (DDAL 09-09): Is it just me, or is the rigid formatting of Adventurers League scenarios actually pretty awful? You can see this really clearly, I think, when an author just wants to present a simple dungeoncrawl and the format forces them to contort it into a weird linear-ish narrative built around “Story Objectives.” But even scenarios that would ostensibly be suited to the milestone-obsessed AL formatting nevertheless seem to founder on the rocky shores of its bloated, repetitive presentation (which never seems to sequence the information in a coherent fashion).
But I digress.
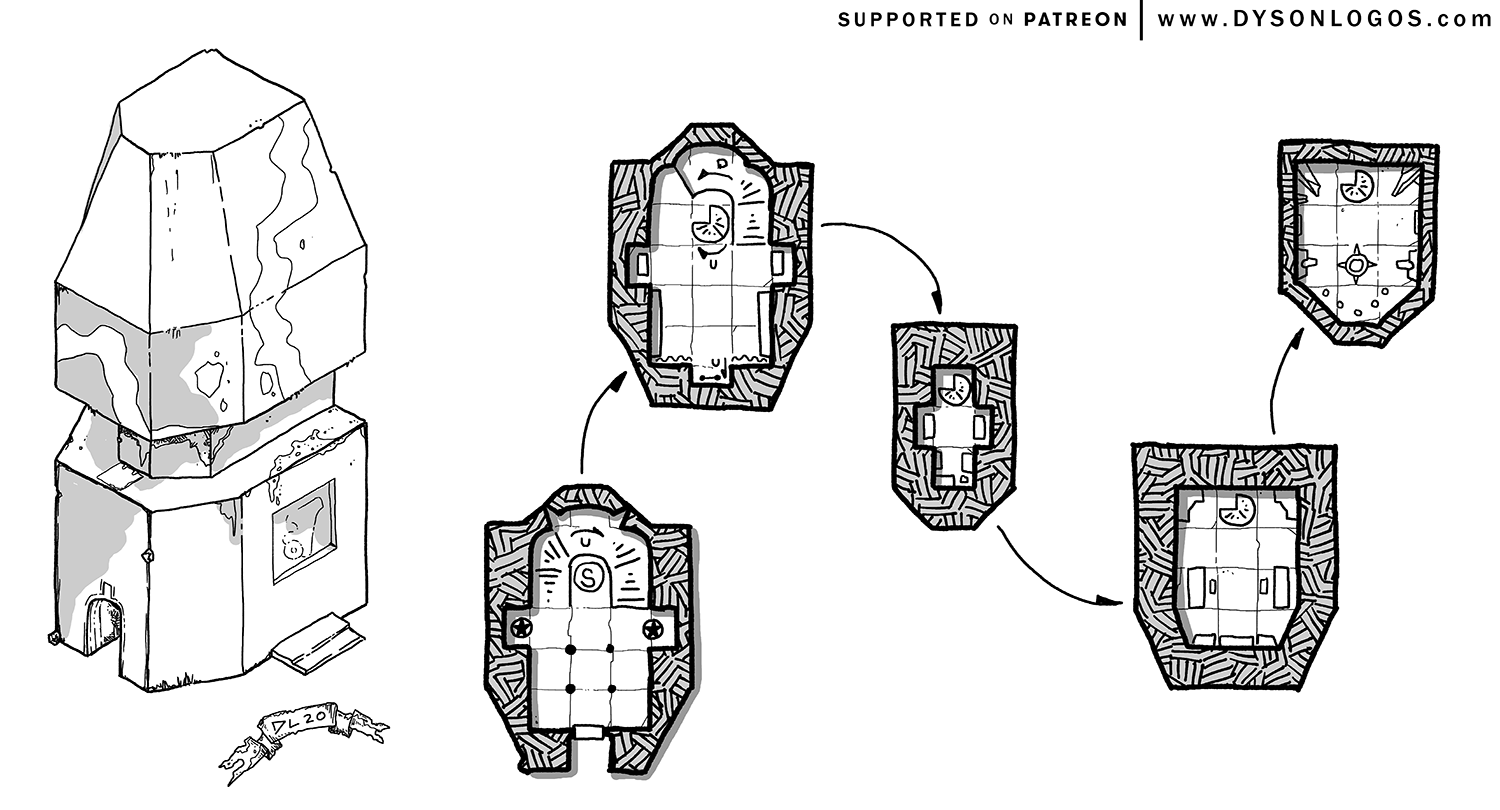
Ruined Prospects is a pretty straightforward dungeoncrawl in which the PCs are attempting to reach yet another errant survivor of the Charge of the Hellriders who wandered away from the battle and is now held in stasis within Weatherstone Keep. It’s quite literally a 5 Room Dungeon, following the recipe fairly strictly, but to good effect before culminating in an entertaining boss rush.
- Grade: C
 TIPPING THE SCALES (DDAL 09-10): The PCs learn that there is an adult silver dragon who has been playing a game of chess against an ice devil for the past 1,000 years in an effort to win back the soul of his lady love. The PCs journey to the deep Avernian pit where the chess game is being played to intervene and rescue both dragon and lady love.
My favorite bit in this adventure is the bearded devil Sadazah, who carries with him a lemure in a bowl. The lemure was a devil who displeased their master and was demoted, but Sadazah hopes that their master “will eventually promote his friend once more. They had plans together.” The adventure has a lot of really nice details like this.
Where the adventure falls down, unfortunately, is the execution of its central premise.
When the PCs show up at the 1,000 year old chess match, they attempt a DC 15 Wisdom (Perception) check. If they succeed, they realize the ice devil is cheating and can use this knowledge to force him into a wager for the souls of the dragon and his lady love. If they fail… I guess the PCs just shrug and go home?
Even the successful result on the check is kind of a head-scratcher, though: Despite the relative ease of a DC 15 check, we are told that the silver dragon – who, it should be noted, has a legendary action that specifically allows them to make Wisdom (Perception) checks – has simply never noticed (in a thousand years?!) that the devil is cheating!
I’ll note that, like In the Garden of Evil, Tipping the Scales involves trekking across a swamp to reach the devil lair. The swamp trek in In the Garden of Evil is significantly superior (in detail and structure), while the finale of this adventure is significantly more interesting (and its weaker bits relatively easy to salvage). You might considering breaking these down for parts and combining them into a single adventure using all the best bits.
- Grade: D
 LOSING FAI (DDAL 09-11): “Fai Chen has gone missing from Mahadi’s Traveling Emporium.”
To be honest, my first reaction to that premise is, “Good riddance.”
This is not, however, James Introcaso’s fault. In Losing Fai he’s crafted a decent little mystery in which the PCs are given three leads to pursue, each of which can lead them to Fai Chen’s kidnapper, albeit with varied consequences depending on which leads they choose to pursue and how they pursue them.
These consequences, coupled to the camp politics surrounding Fai Chen’s disappearance, provide a nice amount of texture to the scenario. Everything wraps up with an utterly creeptacular boss fight against Fai Chen’s kidnapper.
- Grade: C+
The next three adventures – The Breath of Life, The Swarmed Heart, and The Vast Emptiness of Grace – form the Call for Aid series.
 THE BREATH OF LIFE (DDAL 09-12): In The Breath of Life, Dara informs the PCs that she has been given a divine vision of a dead angel’s skull that is being held by an archdevil and she needs the PCs to get it. Fortunately, the archdevil is holding a party and Mahadi has invitations, so the PCs just need to get themselves invited as Mahadi’s +1s and then perform an improvised heist once they’re inside.
Jared Fegan does a good job here, creating a multi-layered security system around the skull that the PCs can unravel if they pump the party guests for information. The party guests themselves are colorful, entertaining, and well-drawn.
I’m picky about party-based adventures and there are things I would certainly do to enhance this scenario if I were running it at my table. (Notably adding a main event line and some topics of conversation would go a long way. The latter, in particular, is a missed opportunity here, as the conversations could’ve been linked to other Avernus Rising adventures that the PCs might have been part of or will become part of in the next tier.) But what’s here on the page is good, and very ready to be built upon.
- Grade: B-
 THE SWARMED HEART (DDAL 09-13): In Bianca Bickford’s The Swarmed Heart, Mahadi’s Emporium is attacked by a swarm of hellwasps and the PCs have to figure out why.
The main event here is invading the hellwasp hive, which is distinguished by being the best-realized dungeon I’ve seen in Season 9 so far. It’s got some light xandering, three-dimensionality, a solid key, and support for multiple approaches.
The only blemish on this adventure is a weird interlude where the PCs have to protect a cleric for multiple rounds of combat while the cleric casts plane shift… a spell with a casting time of 1 action.
This is definitely a highlight of the season, and I’ll most likely be looking to incorporate it in some fashion into the Remix
- Grade: B-
 THE VAST EMPTINESS OF GRACE (DDAL 09-14): Over the past couple adventures, the PCs have brought a couple angel corpses back to Dara, who has used her mystic connection to Ilmater to return them to life. Both angels hear the tortured call of a third angel named Yuriall who calls out to them even across planar boundaries!
… so they definitely won’t be joining you in saving Yuriall. And, in fact, the only reason they’re bothering to send you to save Yuriall (who has been imprisoned and getting tortured for decades) is because they’re pretty sure he has an artifact that they need.
Celestials in this series are just the worst.
The thing I find almost overwhelming about this adventure is how broken its continuity is.
At a high level, the premise is that Descent Into Avernus is over and Elturel has been returned to the Material Plane… but the overarching plot of Season 9 nevertheless assumes that Zariel is still in charge of Avernus, which doesn’t seem to be the endorsed ending of Descent. The DM is told that they can choose to keep Elturel in Avernus if they want, but they’ll need to make a bunch of only semi-specified adjustments to the adventure. And then, later, the DM is instructed that they MUST do this (i.e., adapt the entire adventure on the fly) if the PCs are only playing Season 9… which makes sense, because the PCs are literally going to Elturel to retrieve an artifact that will help them get another resource in the next adventure which can help “turn the tide in the struggle to save Elturel.”
The whole thing is dizzying.
At the low level, there’s a constant stream of contradictions. One of my favorites is when a group of bandits is said to attack the PCs because they mistook them for undead, and then in the very next paragraph we’re told that they attacked the PCs so that they could murder them and steal their stuff. It also seems as if the PCs are assumed to know that the place they’re going is infested with vampires, even though, as far as I can tell, they have absolutely no way of knowing that. And so forth.
Other aspects of the adventure are inane. For example, there’s a locked door that requires the PCs to solve a puzzle to open it. The solution to the puzzle? Someone has conveniently nailed it to the door. Later, a system of random encounters is proposed in which the GM should check once each hour… for a dungeon with only six rooms that the PCs are virtually certain to clear out in less than an hour.
The Vast Emptiness of Grace, however, is not without its moments. For example, there’s a very atmospheric encounter with chain devils in a library where all the books are chained to the shelves. And the dungeon that the PCs are seeking (and eventually find) is a decent bit of horror, only somewhat sabotaged by poorly executed boxed text that is constantly telling the players what their characters are going to do.
- Grade: D