Go to Table of Contents
ABJURATION GENERATOR: A pair of matching bronze poles extend from the ceiling and floor of this prism-shaped room. In the middle of the three-foot gap between them is a large, black diamond which is suspended in an energy field.
Energy Field: The field operates as a forcecage spell.
Black Diamond: Each facet of the diamond is inscribed with an arcane rune. A DC 20 Intelligence (Arcana) check reveals that the diamond is the focus for a powerful abjuration effect which, when triggered using a telepathic password, blocks all teleportation and scrying effects within the flying fortress.
The diamond is connected to the bronze poles with astral wires.
The abjuration effect can be turned on or off using the telepathic password. The abjuration effects can be canceled by severing the astral wires, removing the diamond from the energy field, and/or destroying the bronze poles.
Defenses:
- 1 bearded devil (knows the telepathic password)
- 2 barlguran slaves
BRIG: The brig contains four cell blocks, one of which features big cells designed for larger demons. Antimagic fields can be selectively raised and lowered for individual cells from a central console. The cells also have symbols written on the wall which prevent teleporting into and out of the cell.

- 5 cerberus spawn are the jailers.
- 2 cranial wretches (Book of Fiends, p. 150) are latched onto the skulls of prisoners in the torture chambers, sucking out their memories while slowly consuming their brains.
The doors throughout this area are security gates and there are demon detectors in each room and the hallways.
The cerberus spawn nest in several large chambers in one wing of the brig. One of these chambers is shared by an alpha pair.
COMMAND DECK: The control center of the flying fortress.
Defenses:
- 2 optio squads, stand guard at each entrance (W8 and W13)
- 1 primus squad, providing security on the Bridge (W1).
Commanding Officers:
- Zariel (01-70) chance) or Iseddon (71-90, her ice devil XO) or both (91-00).
- 25% chance of corps commander being present — Signifier Uxatarthus (01-40), Principia Hathastus (41-80), or both (81-00)
- 10% chance of Legate Siccatrax Augustus (pit fiend)
Bridge Crew:
- 2d6+6 imps
- Efrarta, a chain devil navigator
- 1d4+2 spined devils
- 1d4+2 bearded devils
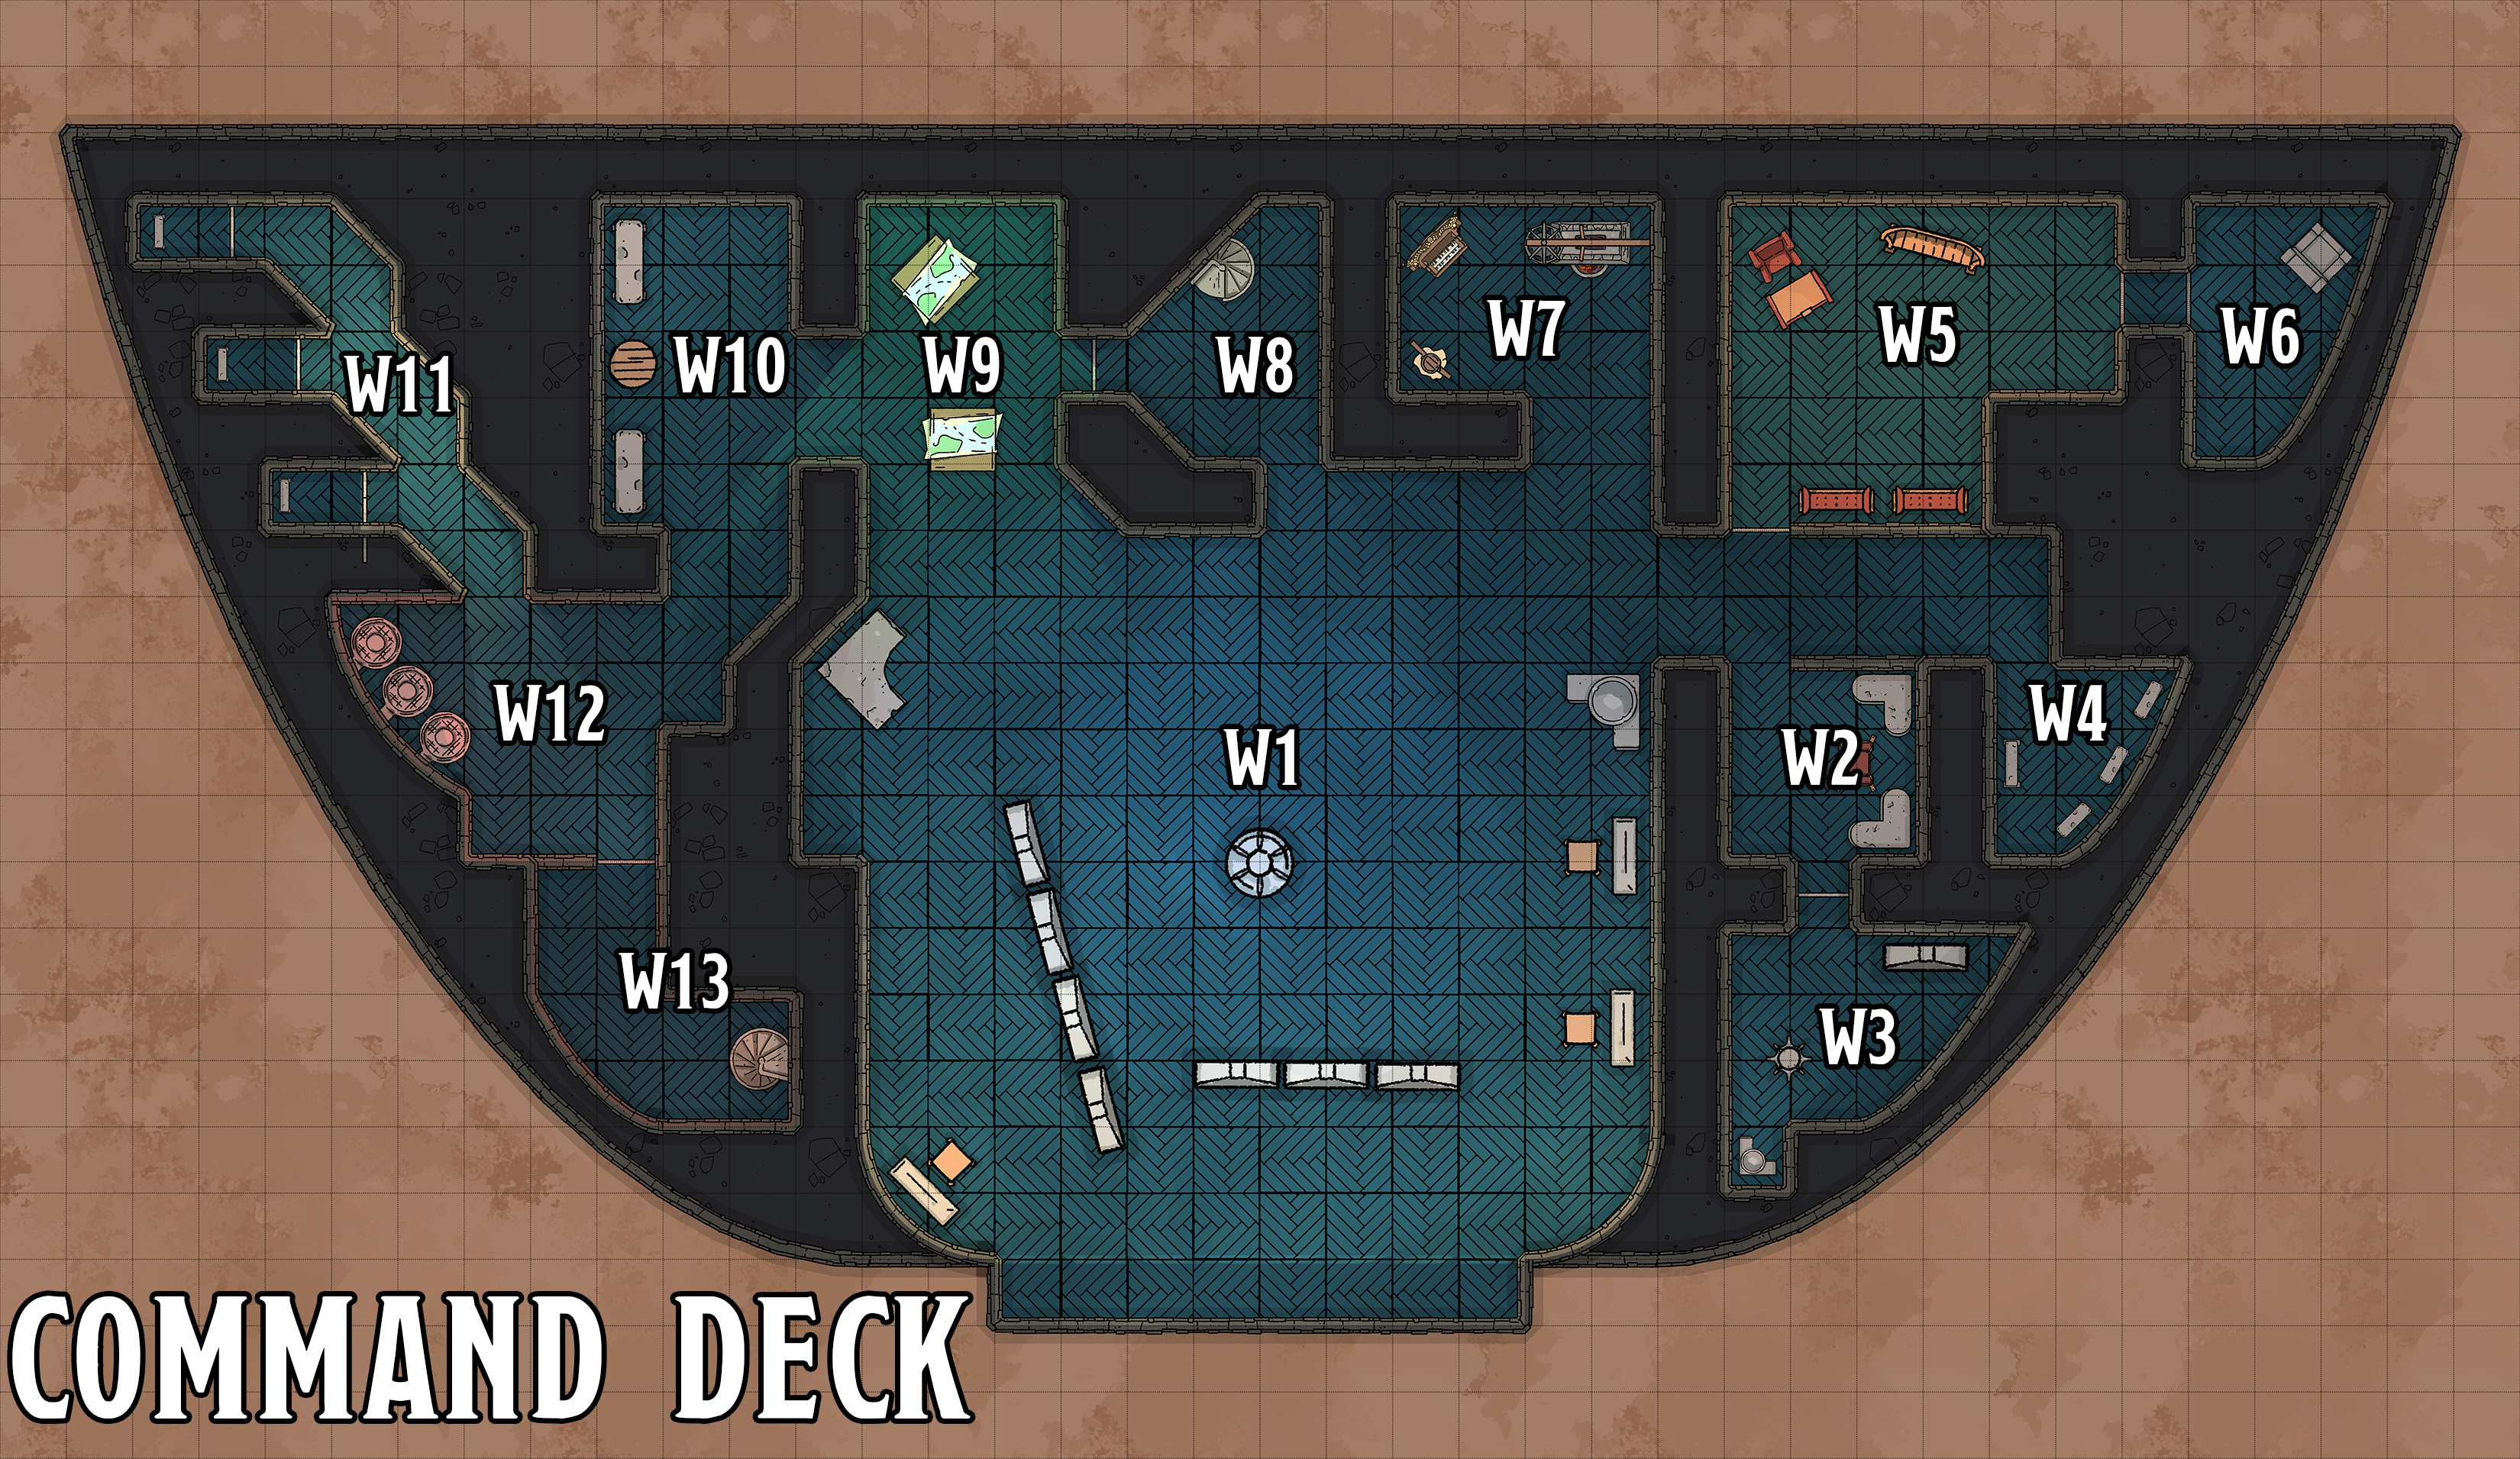
W1 – Bridge. The ship is primarily controlled from here. There are a variety of consoles, including a central control station for piloting the fortress.
W2 – Alarm Console. This console monitors the internal security systems and reports on triggered alarms.
W3 – Backup Control Systems. This room is usually empty; it’s used if the primary control interfaces in area W1 are damaged. There’s a hatch hidden in the floor here which leads to service tunnels that can be access from (among other places) the Engine Room.
W4 – Damage Control. Damage reports from across the fortress are routed here and response crews and repair teams are dispatched.
W5 – Zariel’s Ready Room. A compartment Zariel uses for her personal work and for briefing (or dressing down) senior officers.
W6 – Safe. The safe is made from a three-foot block of infernal iron and stuck to the deck with sovereign glue. It uses a three-digit combination lock and requires three knock spells to open. If the combination is attempted unsuccessfully three times, it triggers an alarm in W2.
W7 – Divination Stations. The equipment in this room uses a variety of divination effects to monitor the area around the flying fortress.
W8 – Entrance. The stairs here go up and are primarily used by the officers corps (although reports form the Upper Perch also come this way).
W9 – Navigation Charts. Tables here have navigation charts of the immediate area laid out with the current location of the flying fortress indicated.
W10 – Commissary. A variety of food appropriate for devils is available here, including a number of rare delicacies.
W11 – Signal Desks. Behind each door is a closet with a miniature console and chair bolted to the floor. These consoles have keys and function like Infernal typewriters. An imp stationed at each console types orders from superiors on small slips of paper before delivering them to their intended recipients. Rigged above each desk is a long, slender horn through which bridge officers can dictate orders.
W12 – Imp Access. Three circular hatches on the floor connect to the imp signal tubes (some leading to interior locations; others to the Imp Roosts and, from there, to the exterior signal vents).
W13 – Entrance. The stairs here go down, providing primary access to the lower decks.
DEVIL DENS: The barracks of the bearded devils of the 7/5. The devils’ “bunks” are actually exuded foam “nests” with a spongy interior and a hard, shell-like exterior. The devils leave their heads exposed while sleeping, and then break out of the nest when rising. During the next rest period they’ll crawl into the remnants of the previous night’s nest and exude a fresh foam, creating over time a strange and alien structure. These nests are often infested with maggots (which the devils find comforting), who can feed on the foam. (This also results in the dens being filled with large, red-black biting flies.)
In addition to the dens themselves, there are a number of storerooms, common rooms, bog-rooms, and the like.
Alarm: If an alarm is sounded in the devil dens, there’s an essentially limitless number of nearby troops. During a fight, reinforcements arrive every 1d4 rounds. Roll 1d8 to determine the reinforcements.
| d8 | Reinforcements |
| 1-5 | Security Patrol (2-4 bearded devils) |
| 6-7 | Optio Squad (4-6 bearded devils, including optio) |
| 8 | Primus Squad (4-6 bearded devils + 1 horned devil) |
In addition, each time reinforcements appear there is a 1 in 6 chance that the security response will escalate. When the security response escalates, roll twice for the current and all future reinforcements. Continue checking for additional escalations, the effects of which stack.
DOCK OF FALLEN CITIES CONTROL ROOM: An oval-shaped chamber with a sunken floor. In the center of the chamber illusion spells create a projection of the Dock of Fallen Cities (including, at the moment, Elturel) that floats in mid-air. There’s a ring of strange mechanisms – dials, switches, levers, and the like – around the perimeter of the sunken oval.
Bel’s Forgemark: The equipment is marked with Bel’s forgemark, indicating that it was built at Bel’s Forge (Hex H2).
Status Readings: A character can attempt to understand the dizzying array of readouts with an Intelligence (Arcana) check.
- DC 15: The character discover the true nature of the Companion (a prison containing and harnessing the power of a planetar).
- DC 20: There’s a release mechanism that can free the planetar, but the readouts indicate that it requires the insertion of nine adamantine “lockout” rods.
- DC 24: Monitors indicate that a huge charge of negative energy was released by the Companion when Elturel was brought to Hell. However, it appears the release of that energy caused an equal and opposite charge to be passed into the planetar within the Companion (where it is dissipating, but only very slowly).
- DC 28: The negative energy was an etheric charge that was built up in Elturel’s buildings, streets, and even people as a result of being bathed in the Companion’s light. The negative energy release occurred when the “polarity” of the Companion was flipped and was the actual mechanism by which Elturel was brought to Avernus. It seems likely that the only way to return Elturel to the Material Plane is a similar energy release.
Controls: A DC 15 Intelligence (Arcana) check indicates controls for releasing the chains holding Elturel, but they are “pact-locked.” As long as Bellandi’s pact remains in effect, Elturel cannot be released until the pact is nullified or destroyed.
ENGINE ROOM: The engine room is a large complex with three levels arranged around a central chamber that extends up through all three levels.
- Central Chamber: Suspended in the middle of the engine room is an iron, bell-shaped contraption painted black (Large object, AC 19, damage threshold 10, 45 hit points, immunity to poison and psychic damage). A DC 20 Intelligence (Arcana) check reveals that the bell is responsible for keeping the fortress aloft and level with the ground.
- Bottom Level: There is a maintenance hatch allowing access to the cistern beneath the engine room which holds necrotic-infused soul fuel. (See Entrances, above.)
- Middle Level: On this level, the central chamber is surrounded by several “control bulbs” — roundish rooms filled with gauges, monitors, and controls (big switches, small dials, etc.). Various service hatches can be popped, revealing service tunnels that twist throughout the flying fortress, leading to (among other places) the Bridge.
- Upper Level: There are storage rooms on this level, as well as hallways connecting the engine room to the rest of the ship.
Defenses:
- The chief engineer is a kere (Book of Fiends, p. 167) named Athaxial. She crawls around the engine room using her spiders legs.
- Athaxial is assisted by a small team of six imps (MM, p. 76) and two chain devils (MM, p. 72).
IMP ROOSTS: The quarters of the imps who serve as couriers for the Blood Legions. Although well-connected, the trick is that the passages and chambers of the roosts are all imp-sized: they can only be accessed by Tiny or gaseous creatures.
Imp sleeping quarters are domed chambers in which clusters of imps hang upside down from the ceiling, like bats.
Alarm: If an alarm is sounded in the roosts, the imps will generally prefer to avoid combat. Instead, they’ll try to invisibly track the PCs’ movements while alerting nearby security patrols who will respond quickly (or be waiting to ambush them) when the PCs leave the roost tunnels.
If the imps become aware that the PCs have killed an imp, however, they will swarm with 2d4 imps arriving every 1d4 turns. In addition, each time these reinforcements appear there is a 1 in 6 chance that the security response will escalate, doubling the number of imps appearing in each wave. Continue checking for additional escalations, the effects of which stack.
LOOKOUT DECK: A lookout deck located on the very top of the fortress is manned by 4 spined devils.
Rooftop Hatch: 10-foot-square hatch on the rear top of the fortress.
PERCH, LOWER: Located below the command deck, the lower perch is a set of five hangar bays, allowing flying devils, infernal war machines, and other aerial assault teams to launch during battle.
- Cargo Platforms: The two cargo perches have semi-circular silver platforms that can be slowly levitated to and from the ground when the flying fortress is stationary. They are operated by means of a copper pedestal attached to the platform. These platforms are generally used for cargo loading, but can also be used to bring non-flying, non-teleporting passengers into the fortress.
- Perch Access: It’s not unusual for one or two of the perches to be open during flight to allow flying devils to come and go, so it’s often possible for the PCs to simply fly in (if they can somehow avoid being detected by the devil legionnaires on security duty and also actively working throughout the perch).
Defenses:
- 2 optio squads
- 6 barlguran slaves
- 2 demon-detectors
PERCH, UPPER: Also known as the Crow’s Nest, the Upper Perch is located near the top of the fortress. It’s a single, small hangar bay from which flying scouts are deployed.
- The Three-Eyed Kenku: The taxidermied head of a three-eyed kenku hangs in the center of the perch. The devils think of it as a good luck charm. If you pat it on the head, it utters cryptic “prophecies” in a multitude of voices which may (or may not) be complete nonsense. (It does have a faint aura of divination magic.)
- Perch Access: The Upper Perch is generally not open except during an actual deployment. The doors can be raised or lowered from a control room at the back of the bay.
Defenses:
- 1 optio squad
- 4 barlguran slaves
- Scorpion Guns: The perch entrance is guarded by two small scorpion blasters (see Ventral Battery, below), which are used to prevent enemy flyers from breaching the perch during combat deployments.
ROOKERY: The Upper and Lower Rookeries are the barracks of the spined devils of the 3/5. In addition to perch-like “bunk” rooms, the rookeries include a number of storerooms, common rooms, armorers, and wing-pollers (basically cosmetologists for wings).
Alarm: If an alarm is sounded in a rookery, there’s an essentially limitless number of nearby troops. During a fight, reinforcements arrive every 1d4 rounds. Roll 1d8 to determine the reinforcements.
| d8 | Reinforcements |
| 1-5 | Security Patrol (2-4 spined devils) |
| 6-7 | Optio Squad (4-6 spined devils, including optio) |
| 8 | Primus Squad (4-6 spined devils + 1 erinyes) |
In addition, each time reinforcements appear there is a 1 in 6 chance that the security response will escalate. When the security response escalates, roll twice for the current and all future reinforcements. Continue checking for additional escalations, the effects of which stack.
Design Note: If the PCs can find a way to pass undetected through the rookeries, devil dens, roosts, or officers’ quarters of the flying fortress, it can often provide a more direct route to their objectives. But it’s also very risky, and getting into an armed conflict in the place where all the bad guys sleep is a really bad idea.
TELEPATHY STATION: A large, semi-circular control panel in the center of this chamber resembles a pipe organ that has had most of its ivory keys replaced with switches of blood red jasper. The brassy walls of the chamber are filled with roundels.
Roundels: Each roundel is a cylindrical chamber which can be extracted from the wall with a successful DC 12 Intelligence (Arcana or Investigation) check. Each chamber contains a magically preserved brain. (These brains, which are actually networked together and through the other machinery in this room via astral wires, are the mechanism by which the telepathic functions of the station operate.)
Telepathic Jamming: The station can (and almost always is) scrambling telepathic communications within 1 mile of the fortress.
Telepathic Transmission: If the jamming is dropped, the station can instead transmit a telepathic message to all devils within 1 mile of the fortress.
VENTRAL BATTERY: The ventral battery consists of several weapons bays.
Scorpion Array: Scorpion guns fire lightning bolts. Small scorpion guns deal 45 (10d8) lightning damage, while the six large guns deal 110 (20d10) lightning damage.
Firebomb Bays: The bomb bays drop ordnance that deals 35 (10d6) fire damage in a 40-foot-radius sphere. Some firebombs are rigged as missiles. They move 80 feet per round and are guided by integrated soul coins.
Firing Crews: Each weapons bay is manned. (Deviled?)
- 1 primus squad
- 1 optio squad
- 1d8-2 barlguran slaves
ZARIEL’S QUARTERS: The walls of Zariel’s opulent quarters are an ever-shifting mosaic of obsidian-black slabs limned with crimson light. Notable features include:
- A bath filled with blood.
- A collection of soul coins.
- Lighting provided by golden glow globes that float randomly through the suite.
- A demon’s skull hung on the wall.
- Beneath the demon’s skull there are two brackets for hanging a sword which stand empty.
There is a 25% chance that Zariel is present.
Entrance: There is an honor guard consisting of one erinyes and one horned devil outside the door to Zariel’s quarters.
Fractal Vault: A DC 20 Intelligence (Investigation) check can locate a concealed keyhole – a fixed point in the ever-shifting walls. The only key for this lock is carried by Zariel at all times, but it can be opened with a DC 25 Dexterity (Thieves’ Tools) check, which causes the wall to peel back, revealing a small vault.
The vault is empty except for another vault door (see below). If this vault door is opened, it reveals another small vault with another vault door, which leads to another vault door and another and another.
To access the real vault you need to enter one of the fractal vaults, turn around, and close the door you just came through. If you then open this vault door (requiring a DC 30 Dexterity (Thieves’ Tools) check) you will reveal a huge vault filled with infernal contracts:
- Countless drawers filled with paper.
- Calligraphic scrolls hung upon the black walls.
- Stone slabs stacked like paving stones.
- Several plinths on which particular contracts are displayed like pieces of art.
- A small series of linked statuettes displaying a sequence of sign language.
Zariel’s half of Bellandi’s Pact is located here. (Remember that infernal contracts can only be destroyed if you have both parts, so the PCs won’t be able to just go on a contract-destroying spree. At least, not easily.)
Fractal Vault Doors: The base DC for opening each fractal vault door is 25. Each vault door is also a little bit unique, featuring both a trick and a trap. Determine tricks and traps randomly using the tables below. All traps require a DC 18 Wisdom (Perception) or Intelligence (Investigation) to locate, and an appropriate DC 20 check to disable.
| d12 | Trick |
| 1 | Multiple locks. There are 1d4+1 locks instead of just one. |
| 2 | Illusion-hidden lock. The lock is hidden as per a silent image spell, requiring a DC 18 Intelligence (Investigation) check to locate. Unless dispelled, the illusion imposes disadvantage on attempts to pick the lock. |
| 3 | Arcane locked. In addition to the lock, the door is also affected by an arcane lock spell. |
| 4 | Animated lock. The lock is an animated object that will bite (+10 to hit, 1d4 damage) or demand the answer to a riddle or refuse to open its mouth or (falsely) claim to be a polymorphed paladin or engage in similar antics. |
| 5 | Really tough lock. +5 DC. |
| 6 | Motile lock. The lock drifts across the surface of the vault door. The DC to open the lock is +2. |
| 7 | Light averse. The lock only appears if the vault is in darkness. |
| 8 | Personal touch. The lock only appears if someone touches the door. (Touching the door will trigger the door’s trap, if any, unless it has been disabled.) |
| 9 | Door above. The vault door is on the ceiling instead of the far wall, making it more difficult to access. |
| 10 | Roll twice on the Traps table. |
| 11 | Roll twice on the Tricks table. |
| 12 | No trick. |
| d12 | Trap |
| 1 | Lightning bolt. As per the spell. 100 feet long, 5 feet wide, in direct line from door; DC 18 Dexterity saving throw for half damage; 52 (15d6) electricity damage. |
| 2 | Fireball. Fills current vault and the immediately preceding vault. DC 18 Dexterity saving throw for half damage; 52 (15d6) electricity damage. |
| 3 | Acid-laced. he door is coated in an oily-sheen which is actually a nasty acid. Anyone touching the door suffers 22 (4d10) acid damage. The door also deals this damage to any Thieves’ Tools used to pick the lock. |
| 4 | Adhesive door. Anyone or anything touching the door is immediately stuck to it. It requires a DC 20 Strength check to pull free, which also inflicts 1d6 damage. |
| 5 | Fire door. When touched or the lock opened, the door lights on fire. Anyone within 5 feet of the door suffers 22 (4d10) fire damage. DC 14 Dexterity saving throw for half damage (or a Constitution saving throw if you’re deliberately not moving away from the flames; e.g., if you’re picking the lock). |
| 6 | Scourge ooze door. When the vault door opens, it reveals a scourge ooze door blocking passage to the next room. |
| 7 | Alarm. If trigged, an alarm spell notifies Zariel. |
| 8 | Morph spikes. When triggered, the surface of the door morphs to shoot out long, needle-sharp spikes to a distance of 5 feet. +10 attack bonus, 55 (10d10) piercing damage. |
| 9 | Hellwasps. A swarm of 2d4+6 hellwasps are released from the ceiling. |
| 10 | Roll twice on the Traps table. |
| 11-12 | No trap. |
Go to Part 7E: Warlords of Avernus