“Dungeons should always be heavily xandered.” – Xandering the Dungeon
This article will probably make more sense if you read Xandering the Dungeon first, but the short version is that non-linear dungeons are more interesting than linear ones. The latter feature, at best, navigational pseudo-choices which lead the PCs through an inflexible sequence of prepackaged experiences. A xandered dungeon, on the other hand allows each group to…
…actively make the dungeon their own. They can retreat, circle around, rush ahead, go back over old ground, poke around, sneak through, interrogate the locals for secret routes… The possibilities are endless because the environment isn’t forcing them along a pre-designed path.
As demonstrated in Xandering the Dungeon, you can use Melan diagrams to look at the navigational structure of the dungeon (removing the “noise” of passages which twist around without every deviating from a single path). For example, this is what the Dungeon of the Dead Three looks like (minus the secret door that we removed):
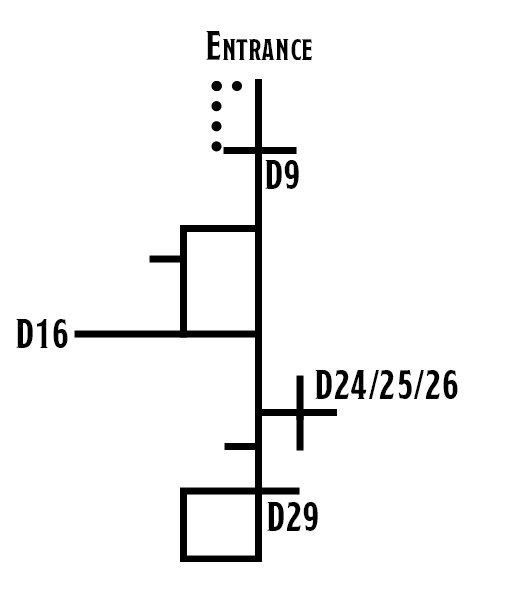
Broken down like this, it’s immediately apparent, as we briefly discussed in Part 3F, that this is a fairly linear dungeon: There’s a couple of loops and a few side branches, but the furthest you’ll ever get off the straight path from entrance to Area D29 (where the preprogrammed conclusion of the adventure is located) are the three rooms leading to the dead end in Area D16.
(Even moreso than other installments, this one will probably benefit from directly cross-referencing the module. The map for the Dungeon of the Dead Three is located on p. 21 of Descent Into Avernus.)
To be clear, this a well-designed dungeon. The two early loops (D5 thru D9 and the D12-D13-D14-D17-D18 loop) joined by a chokepoint give some tactical flexibility. What we refer to as minor elevations shifts (where areas on the same conceptual level of the dungeon are nevertheless at different heights relative to each other) are used ambitiously and to good effect, particularly when emphasized with the flooding in the dungeon (and, in the Remix, the corpsedamp gas leaks).
But as I was reading Descent Into Avernus, I couldn’t shake the feeling that the Dungeon of the Dead Three was calling out to be xandered.
THE LYNCHPIN
The lynchpin, for me, is Area D9. As we already discussed in Part 3F, this room has three doors decorated with bas reliefs — each associated with one of the Dead Three. As part of the Remix, we’ve already realigned these doors so that the images are associated with the cultists behind each door:
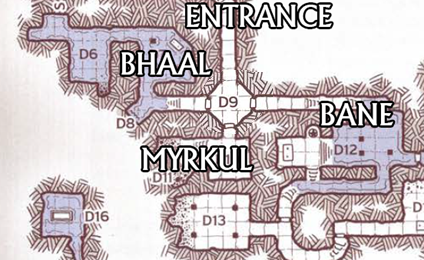
But although the Bhaal and Bane locations shown on the map above are the primary shrines of those gods, the Myrkullian cultists behind the third door are just hanging out in that room. Myrkul’s altar is way over here, on the far side of Bane’s altar:
The image I have in my mind is to even more strongly base the dungeon around the three doors in Area D9: to have those doors give a very strong indication to the players of the dungeon geography that lies ahead of them.
The first broad stroke, therefore, is to reconfigure things so that Myrkul’s temple lies behind the southern door in Area D9.
QUICK TEMPLE VERSION: If that’s all you want do, you could move D17 – Myrkul’s Altar so that it lies between D10 and D11. I’d recommend also taking D22 – The Torture Chamber and placing it where D17 currently is to keep that strong second loop. You could leave the current location of D22 an empty room or just have the corridor run through there.)
THE FULL XANDER
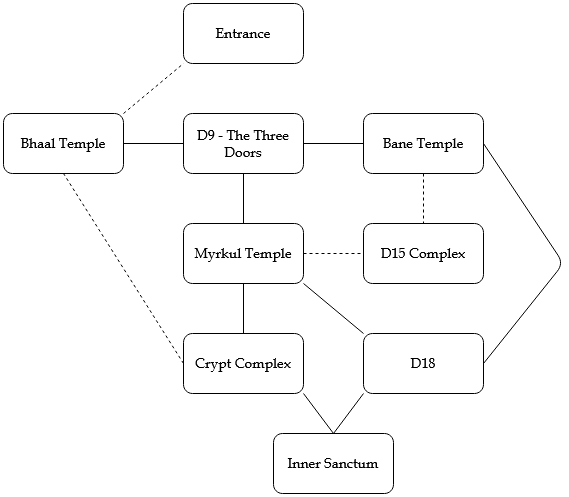
But if you wanted to fully xander the dungeon, you’ll need to do more than that. My first step would be to mentally break the dungeon down into distinct “chunks.” For example, you can think of the three separate “temple complexes” — the small clusters of rooms each associated with one of the Dead Three Gods.
My conceptual chunks for the dungeon are:
- The three temple complexes.
- A “crypt complex” that has been partially converted into living quarters (Areas D19 thru D26, sans the torture chamber in D22).
- The “inner sanctum” (Areas D27 thru D33, everything behind the secret door in the original dungeon)
- The “D15 complex” consists of D14, D15 (explosion #1), and D16.
- Area D18 (explosion #2) is a major feature by itself and not really part of another room complex.
Next, we’ll want to make sure we maintain the cool vertical variation in the dungeon, with the lower recesses flooded and gas leaks entering in the mid- or upper levels of the complex. If we just want to redo the layout (without re-keying any of the areas), we’ll want to make sure D15 and D18 are positioned in relation to the gas leaks in a way that makes sense.
With everything broken apart in conceptual chunks, we can play around with how we want to arrange them at a macro-level. My creative instincts immediately suggest:
- Connect all three temple complexes to the deeper recesses of the dungeon (in the same manner that the Bane temple is connected).
- Do at least some cross-connection between the temple complexes. I’m leaning towards the idea of a secret connection between two of them.
- There should be a kind of “plateau” or set of plateaus where the gas leaks (in our original key these are D13, D17, and D19) are designed to flow down into D15 and D18.
The next question is how to position the crypt complex and inner sanctum. Broadly speaking, I think there are three options:
- The temple complexes could all connect to Area D18, and then the crypt complex and inner sanctum could branch off from there.
- The temple complexes could all independently connect to the crypt complex (temples connected to shared living quarters makes sense), and then the inner sanctum lies beyond them (probably connected via D18?).
- The temples could connect to both the crypt complexes and Area D18, and then those could both lead to the inner sanctum. (You could also Venn diagram this, where two of the temples go to the crypt complexes and two go to Area D18. That would mean one of the temples would need to walk all the way through the inner sanctum or through a different temple to get to their quarters, though, which may not make sense.)
We also have the D15 complex, which could be used in a couple different ways:
- It probably just branches off at whatever location makes sense based on the gas leak and, just as in the published adventure, dead ends.
- Alternatively, it could do that (it needs to be positioned so that gas can leak down into D15) and ALSO be extended so that it serves as the connective tissue between two other sections described above. (For example, it could be the secret passage connecting two of the temple complexes. Or it might be the passage you have to follow from the crypt complex to the inner sanctum in the third option above, although that means you have to go through an explosive chamber no matter which route you take… maybe that’s good? Maybe that’s a little boring in terms of variable navigation?)
(This, it should be noted, is also how I usually design a dungeon from scratch: I list the big conceptual chunks that I want the dungeon to have and then I move them around until I have an interesting configuration. Stuff will still shift and change once I start mapping out the details, but it’s a lot easier to figure out the big picture first. This advice extends beyond dungeons, too: When I was working on “Seversen’s Mysterious Estate” with Jonathan Tweet for Over the Edge: Welcome to the Island, Jonathan brainstormed a bunch of cool stuff for the estate, I brainstormed some more, and then the pieces got juggled around until they had a compelling flow. But I digress.)
Looking at our brainstorming here, we can make some “final” decisions and sketch it out:
MAPPING THE DUNGEON
The next step would be to actually map out the revised dungeon. I’m going to leave that as a project for you to pursue if you’re so interested, but here are a few thoughts:
- The Bhaal Temple remains essentially identical to the map as it currently exists, except that there’s a secret passage behind the tapestry in Area D8 that leads to the crypt complex. (I think the passage is probably NOT secret coming the other direction.)
- Coming from the Myrkul Temple to the Bane Temple, you basically have D14 to D15 to D16, and then another stair up from D16 that goes into the Bane Temple.
- The “plateau” of rooms from which gas leaks down into D15 and D18 is in the junction between the Myrkul temple complex and the crypt complex: Areas D13 and D17 are, of course, part of the Myrkul temple and Area D19 must be kind of in the same “corner” as the stairs leading down to D15 and D18.
- I imagine the Banites getting to their quarters in the crypt complex by going through the D15 Complex and briefly passing through the corner of the Myrkul temple complex (but not the temple itself).
- The Inner Sanctum is also largely identical to the current map, with passages from the crypt complex and D18 coming together to enter Area D27 through a single door.
Make sure to include the minor elevation shifts and keep the flooded portions in the lower section of the dungeon! If you can actually arrange it so that the collapsed sections of D13, D17, and D19 are all clearly part of the same collapse, that would probably also give a good effect!


I have linked a jacquayed map to Justin’s Patreon post because I’m not sure where he draws the line on copyright “re-use”. I can share privately (croald@gmail) or could also link here with a green light.
These remixes are produced under Wizard’s Fan Content Policy and fair use. The most important thing to my sense of fair play is to make sure people know that they both need and should buy the original book if they’re using the Remix. My goal is to enhance the original; not replace it.
The map looks good to go under the Fan Content Policy, so feel free to share the link here!
A jacquayed map. https://drive.google.com/file/d/1odrZiVbTFCo2gWluHS_tMNvrbKyUkrnL/view
For anyone wondering what the brown lines are, these cultists have laid planks across uneven stone blocks, to keep from having to walk through the groundwater all the time. They’re a rickety exercise in balance: Dex checks to keep from falling off at bad times (recommended only when the consequence is more interesting than “you get wet” — during combat or when trying to be sneaky, etc.)
Also, there’s a continual light at a strategic corner in D18, so the cultists don’t have to carry lights through there. It provides enough light to cross the room if you know where you’re going, but certainly not enough to search the distant corners.
In case it helps anyone, I made a version based on colin’s map in dungeondraft. Correct resolution for use in roll20, feel free to use it. It is however at double the original size, because I felt the original was too cramped for my six player party.
https://drive.google.com/file/d/1fbnjbkb-PKAyPkruhjOcvMKITBL6OMi9/view?usp=sharing
I too created a [xandered] Dungeon of the Dead Three, using Dungeon Painter Studio. The assets are pretty basic, but I managed to connect the Myrkul and Bane Temple complexes via the D15 complex and to reconcile the cave ins for D13, D17, D19, and I added D11’s too. I believe all the rooms (except part of D18) have their original dimensions, but a number are flipped/rotated and the passageways and stairs are whatever size they needed to be. In case it helps anybody:
https://drive.google.com/drive/folders/11byrtnLHlGCOLOSMZz7RyAaVtKwDBQRI?usp=sharing
Thanks for all your help, this has been fantastic. ANd thanks to all who are sharing their file! A question for Yorick, I plan on using your fantastic version. Do you have by any chance the Keys for each location for your map?
@Eddie I have screenshots of my roll20 setup on which they are readable: https://i.imgur.com/GHfKeoZ.jpg https://i.imgur.com/scw8YlN.jpg https://i.imgur.com/HNItdsi.jpg
The keys themselves are mostly just Justin’s version with minor alterations (the cultists use safety lamps instead of torches, the light in D16 is a continual flame, the guy in D23 is sitting on the stairs instead of chilling in the water for no reason, the unmarked room on the left contains digging supplies the cultists use to restore the dungeon further)
@Yorick, this is amazing thanks! I wasn’t sure you’d answer so I took a crack at it and got it almost all right. The unmarked room threw me off but I thought it was the Rat (D14) room! I’m preparing all of this in the Foundry and it’s been very helpful.
I had fun building a simple map in dungeonscrawl. Here is my attempt: https://i.imgur.com/as1IWJh.png (with DM notes) or https://i.imgur.com/vHOw7kI.png (without DM notes).
I posted a fantasy grounds .bod file of the map with walls, doors and secrets for LOS and added a “water” layer for the flooded parts.
The file is also keyed but keep in mind that the encounters are changed around for a much more difficult fight and accounts for the players clearing the first 2 fights and then retreating. Flennis created 4 corpsedamp zombies from the cultists remains.
https://www.reddit.com/r/DescentintoAvernus/comments/jsczgu/the_alexandrian_baldurs_gate_descent_into_avernus/
All your hard work, you guys, is incredibly appreciated.
I look forward to returning the favor some day.
I know it’s been a ludicrously long time, but I’m just getting around to running Avernus, and I decided to devote a good bit of this week off to prepping the game. So I took a stab at [xandering] this by fiddling with the book’s map in GIMP. https://imgur.com/DnoTrp7 It’s a little rough around the edges (literally in some spots) and the orientation of the room numbers is all over the place. I wound up eliminating D14 and D22, mostly because it made the GIMPing easier. I don’t love the wide arm with long hallways on the left side, but 1) GIMP, and 2) I didn’t want to use the tapestry in D8 for a secret passage, since it wouldn’t make any sense given the mold there. I also wanted to add an up-and-down section so that the gas concentrated in D18 wouldn’t drift back to D6, and that lengthened the arm.
Looking back I realized I had left a single entrance point into the inner sanctum, so I added a secret passage (secret at both ends) leading to the dragon treasure horde. My theory is that a rogue cultist is sneaking off with bits of the treasure. (I just put walls where the secret doors are because it was easier. Also, I couldn’t color in the water in D23.)
Hi. I’ve extremely appreciated your Remix and colin r work and Yorick’s version. So, I propose the following map build by strictly following all the instructions given by Alexander in his flow chart. This is the link: https://mega.nz/file/eJ5lhICZ#1GBZCMAodWNaew0_ORk3-VBg_Lsf7q4FDSE_3fjfca0
In respect to the work made by colin r:
1) rooms d14-16 are directly connected to room d10
2) room d22 is just below room d20
3) room d12 and d13 can be accessed through room d9, d15 complex and d18
@14 Andrea: Nice. There’s a lot of ways to do it.
Dunno if you’re still fiddling, but it kind of seems like a lot of long parallel hallways in the middle. You could get rid of one of them maybe by running a hall south out of D14, if you want.
Just for fun – Melan diagrams of the [xandered] dungeons posted in the comments:
https://imgur.com/dRBaQjq
@Janette: Awesome.
I guess I appear slightly behind the curve, but I thought I would add my design, that is inspired by Colins’ version. It places D14-D16 as a connection from Myrkuls altar and Banes, while also connecting in D18 to D29 via another passage.
The path from Bhaals altar to the Crypts feels a bit uninterestingly long, though I like the togetherness of the all of the three different crypt section in that main junction.
https://imgur.com/a/Z4ZakbL
Loving the Remix, Justin. Much appreciated still after 3 years!