The Alexandrian

Search results for ‘numenera’

Numenera - Monte Cook GamesMany moons ago I wrote D&D: Calibrating Your Expectations: The point of the article was to re-orient your expectations regarding the level of power being modeled by mid- and high-level D&D characters. (If you think “Conan” when you think about a 15th level character, you’re doing it wrong. Think Hercules in his most powerful persona as a full-blooded demigod.) The article had a few unexpected consequences, but by and large it seems to have helped a lot of people avoid or resolve the dissonance they once experienced between the mechanics of the game and the fantasy they were creating or emulating. We all stopped fighting the system and started embracing all the awesome stuff it was capable of.

Brandon Perry shot me an e-mail recently asking me to give Numenera the same treatment. It sounded like a really fascinating idea for a blog post, so I’m going to take a crack at it. Before I do, though, I want to offer a little bit of a proviso: When I wrote D&D: Calibrating Your Expectations I had nearly 20 years of experience with the game and had played or run hundreds (possibly thousands) of sessions. Although I’ve been playing Numenera since it was released last August, my experience with the game is obviously extremely truncated by comparison (consisting of a couple dozen sessions). So there’s going to be a little more armchair theorizing this time around, with all the risks that sort of thing entails. Take what I have to say with a grain of salt and keep testing it against your actual experience at the gaming table, but hopefully you’ll find some value in what I have to say here.

STATS vs. EFFORT vs. EDGE

Let’s begin with the core attributes of your character in Numenera. These seem to be frequently misunderstood, in no small part because they defy the expectations formed by the norm of other roleplaying games.

For those unfamiliar with it, the basic mechanic of Numenera works like this: The GM sets a difficulty between 0 (Routine) and 10 (Impossible). This number is multiplied by 3 in order to arrive at a target number (between 0 and 30). The player rolls 1d20; if they roll equal to or higher than the target number, they succeed.

For example, if you wanted to climb a Difficult (4) cliff, you’d have to roll 12 or higher on 1d20 (because 4 x 3 = 12).

In practice, however, the difficulty will be modified before the dice are rolled: Each relevant asset or skill the character has will reduce the difficulty by 1. So if a character who was skilled at climbing (-1) and also had their climbing kit with them (-1 for the asset) was facing a Difficult cliff, the effective difficulty would only be 2 and they’d have to roll a 6 or higher on 1d20 to reach the top.

Each PC has three stats: Might, Speed, and Intellect. Your score in each stat forms a pool and you can spend points from your pool to activate special abilities and also exert effort. When you exert Effort, you spend 3 points from the relevant pool to decrease the difficulty of the task by 1.

So, looking at that Difficult cliff again: You start with difficulty 4, subtract 1 for being skilled in climbing, subtract 1 for having the asset of a climbing kit, and then you could exert effort (spending 3 Might points) to subtract 1 again. (Now the cliff has an effective difficulty of 1 and you only have to roll 3 or higher on 1d20.) As your character advances, you’ll be able to exert multiple levels of effort simultaneously (further reducing the difficulty of a task).

Now, this is the point where most people get confused: Say you’ve got one character with Might 9 and another character with Might 14. Which character is stronger?

Neither.

Primed by other roleplaying games you probably have a natural instinct to think the Might 14 character is stronger. But he’s not. He simply has more endurance when it comes to performing difficult Might-related tasks. (Think about it: If both characters have the same skills and assets, then they’re facing the same probability of success. They are both equally capable of applying effort to any given Might roll. The only difference is that one of them will be able to apply effort to more Might rolls: He’ll win in a competition of endurance, but it’s a 50-50 split for any individual feat of strength.)

So stat pools are not the same thing as a typical RPG ability score. To find something like those in Numenera, you need to look at Edge.

In addition to having a pool in each stat, characters in Numenera also have an edge in the stat. For example, a beginning glaive has Might Edge 1, Speed Edge 1, and Intellect Edge 0. You use edge to reduce the cost of any associated pool expenditures. (So, for example, if you had a Might Edge of 1, you would spend 2 points to apply Effort to a Might roll instead of 3 points.) What this mechanic means is that a character with a Might Edge of 1 is stronger than a character with Might Edge of 0.

If this distinction is confusing you, think of it like this: When you get a Might Edge of 3, you can now apply Effort for free. That means you are just automatically 15% more likely to succeed at anything you do that’s related to Might. (Which means that you’re stronger.)

It should be noted that the range of potential Edges in Numenera is fairly small: The theoretical maximum is 0 to 6, and 0 to 4 is probably more likely in actual practice. (And you’ll only see those ranges with higher tier characters.) So, at most, characters are going to vary 20-30% based on their “ability scores”.

EFFORT AS CALIBRATOR

 The difficulty table in Numenera does a pretty good job of calibrating your expectations for a normal person:

DIFFICULTY / NPC LEVEL
DESCRIPTION
TARGET #GUIDANCE
0
Routine
0
Anyone can do this basically every time
1
Simple
3
Most people can do this most of the time
2
Standard
6
Typical task requiring focus, but most people can usually do this
3
Demanding
9
Requires full attention, most people have a 50/50 chance to succeed
4
Difficult
12
Trained people have a 50/50 chance to succeed
5
Challenging
15
Even trained people often fail
6
Intimidating
18
Normal people almost never succeed
7
Formidable
21
Impossible without skills or great effort
8
Heroic
24
A task worthy of tales told for years afterward
9
Immortal
27
A task worthy of legends that last for lifetimes
10
Impossible
30
A task that normal humans couldn't consider (but doesn't break the laws of physics)

All the guidelines there pretty clearly flow from the underlying math (which is straightforward because the system is just 1d20 vs. the target number): Routine tasks can be achieved every time (unless adverse circumstances push the difficulty up) because you’ll always roll higher than 0 on a d20. Difficult tasks have a 50/50 chance for trained characters because the skill drops the difficultly level by 1 (and math does the rest).

The key breakpoint on the chart is between Intimidating tasks and Formidable tasks, because that’s the point where you need to be either skilled or spend effort to have any chance of success (and the chart says exactly that).

Where I quibble with the chart a little bit is the Heroic level: It claims that these are “tasks worthy of tales told for years afterward”. But a character with skill specialization (-2 difficulty) expending a couple levels of effort (-2 difficulty) would actually have a 45% chance of success. That’s definitely impressive and probably the sort of thing you’d tell your friends about for a couple of days if you saw somebody do it, but it’s probably not going to be talked about for years.

Long story short: I’d bump the descriptions of Heroic, Immortal, and Impossible actions all up a slot or two.

The point, though, is that if you’re looking for the upper limit of what a character is capable of, then the maximum level of effort they can expend (which is generally equal to their tier) is a good indicator.

In general, the absolute best an unskilled character can do is difficulty 6 + their effort. Skills top out at specialized (-2 difficulty), so highly skilled characters will top out at difficulty 8 + their effort. In proper conditions and with proper equipment (i.e., with a couple of assets under their belt), it actually ends up being 10 + their effort.

(That, coincidentally, means that even beginning characters can line things up to make difficulty 10 tasks achievable. Which is another reason why the concept of “Impossible” should probably be bumped up a level or two on that table.)

EDGE AS CALIBRATOR

What you also want to calibrate, however, is the other end of your scale: What do your characters consider routine? (In fact, I generally find this a lot more useful in terms of really conceptualizing what life is like for a particular character.)

For that, we want to look at edge.

In a purely theoretical sense, Edge 3 and Edge 5 are the magic numbers where the first and second levels of effort become completely free and the difficulty for any related task is usually going to automatically drop.

In actual practice, however, I’ve found that once effort only costs 1 pool point the threshold for ubiquitous “impulse purchasing” seems to be reached: Players will start liberally using effort on pretty much every die roll (and they can generally get away with it). That means that the real thresholds to look at are Edge 2 and Edge 4.

In other words, an untrained character will consider tasks with a difficulty equal to one-half their Edge routine. (Of course, you should also adjust this difficulty for their skills and assets.)

These numbers don’t hold up if your Edge radically outpaces your maximum Effort (it doesn’t matter how cheap it is to spend the points if you’re not allowed to spend the points). This is theoretically possible due to the flexible advancement mechanics, but incredibly unlikely in practice.

SKILLS AND TOUCHSTONES

One thing to get a feel for in Numenera is that most of the ratings in the system cover a fairly broad range. (This is deliberate. Phrases like “precision isn’t that important” and “precision isn’t necessary” are sprinkled liberally throughout the rulebook.) This is also true when it comes to skills, with the system only distinguishing between three levels of training – untrained, trained, and specialized. Each of those skill levels must be covering a lot of territory and, upon closer inspection, it’s also notable that “untrained” is something of a misnomer because even untrained characters can succeed on challenging and even intimidating tasks with a fair amount of regularity if they apply a little effort and preparation.

PCs will only get a handful of skills in Numenera, but this isn’t because they’re ignorant louts: The game is actually assuming that characters have a very broad and pervasive competency across the board and only highlights the stuff they’re really, really good at. (This also fits the other elements of the system: As characters increase in tier their Effort improves across the board, which means their maximum possible performance improves in everything. Edge focuses the regularity of their performance and skills refine that focus even further.)

In trying to really peg what skill performance means in Numenera, however, the generalized flexibility of the system occludes things a bit. Unlike D&D, Numenera doesn’t give a lot of difficulty guidelines outside of the primary difficulty table described above. In practical terms, we’re basically limited to crafting items, climbing, and remembering/understanding particular pieces of knowledge.

Limited although they may be, I will use these guidelines as touchstones in the calibration discussions. If you want to see the tabular breakdowns for these difficulties, you can find them on my Numenera system cheat sheet.

Go to Part 2: Comparing the Tiers

Numenera - System Cheat Sheet

(click for PDF)

A couple months ago I posted a draft version of my system cheat sheet for Numenera. At the time, I predicted that I would be running the game sooner rather than later. That turned out to be really, really true. I’m now running the game regularly for three groups:

  • The original playtest group I organized.
  • A second group which had gathered at my house for random gaming and asked me if I had a roleplaying game ready to roll.
  • A group composed entirely of players new to roleplaying games.

It’s been a rousing success with all three and I’ve now run a total of 12 sessions. At least one of these groups will be winding down once the original adventure is completed (Vortex), but one of the groups has already transitioned to a full campaign using The Devil’s Spine as a foundation and the group of newcomers also appear to be interested in the long haul (although I think they’ll end up going a different direction).

In any case, I’ve used my play experience to both expand and refine the cheat sheet, which I now consider to be in its final version. As before, this cheat sheet is designed to summarize all the rules for the game — from basic action resolution to advanced combat options. I’ve found that it’s a great way to get a grip on a new system and, of course, it’s also a valuable resource at the game table for both the GM and the players. (For more information on the methods I use for prepping these sheets, click here.)

IT’S STILL A GM SCREEN!

The cheat sheet still uses landscape formatting suitable for insertion into a modular, four-panel, landscape-oriented GM screen. (Just like the one backers of the Numenera kickstarter were able to buy as an add-on. And which you can buy here.) I’m not including graphics for the front of the screen, but if you buy the Numenera GM Screen PDF you’ll be totally golden.

You may notice, however, that the final version of the sheet has more than four pages. What I’ve been doing is printing the “Miscellaneous Rules” and “Numenera” pages using inverted duplex printing and then taping that sheet to the “Hazards & Combat Modifiers” page. Insert the “Hazards & Combat Modifiers” page into the screen and you’ll be able to fold the other sheet over so that it displays the “Miscellaneous Rules” page, but can be flipped up to show the other two pages.

(Alternatively, of course, you can just choose two pages not to include.)

WHAT’S NOT INCLUDED

These cheat sheets are not designed to be a quick start packet: They’re designed to be a comprehensive reference for someone who has read the rulebook and will probably prove woefully inadequate if you try to learn the game from them. (On the other hand, they can definitely assist experienced players who are teaching the game to new players.)

The cheat sheets also don’t include what I refer to as “character option chunks” (for reasons discussed here). So you won’t find types, descriptors, or focuses here.

You also won’t find most of the optional rules for the game. I may add those later, but not yet. (The exception are the rules for modifying abilities; I suspect they’re going to be too useful not to have handy.)

HOW I USE THEM

I generally keep a copy of my system cheat sheets behind my GM screen for quick reference and I also place a half dozen copies in the center of the table for the players to grab as needed. The information included is meant to be as comprehensive as possible; although rulebooks are also available, my goal is to minimize the amount of time people spend referencing the rulebook: Finding something in 6 pages of cheat sheet is a much faster process than paging through a 400 page rulebook. And, once you’ve found it, processing the streamlined information on the cheat sheet will (hopefully) also be quicker.

The organization of information onto each page of the cheat sheet should, hopefully, be fairly intuitive. The actual sequencing of pages is mostly arbitrary.

Page 1: For Numenera, the difficulty terrible is the heart of everything. Once you understand that, the special rolls, GM intrusion, and the concept of advantage/disadvantage 90% of the rest of the system actually becomes irrelevant. This page is likely to become superfluous quickly. You’ll note that I included examples of GM intrusion: This is unusual for my cheat sheets, but so much of Numenera is designed to empower strong, flexible rulings by the GM that providing this kind of idea fodder feels right to me and has proven useful during play.

Page 2: The core of the combat mechanics. If you’re teaching new players the game, you really only need to walk them through these first two pages. (I’ve been adding another column or so of additional material at the beginning of each subsequent section, slowly adding more tools to the players’ toolboxes.)

Page 3: The extended combat actions and options. The rules for “Trading Damage for Effect” are technically an optional rule, but I’ve found them too invaluable not to include here. (Compared to the draft version of the sheet, you may also notice that I’ve pulled out the guidelines for simplifying multiple enemies and the boss package you can use to buff NPCs. Very useful stuff for the GM that’s buried deep in the rulebook.)

Page 4: A collection of miscellanea. Optional rules are off on the right, but I haven’t used them yet in my own game. (You’ll also note a couple of house rules tucked down in the corner. These are still being playtested, but I think they’re useful.)

Page 5: Everything that you need to know about the numenera. This stuff is highly situational, but one concept I’ve found needs to be stressed to new players is the idea of scavenging for numenera. This process appears to be non-intuitive so you need to let them know it’s an expected part of the game world.

Page 6: Hazards & Combat modifiers. I expressed bafflement when I posted my draft version of the sheet for why all of these modifiers exist. In actual practice, I’ve found them more useful than I anticipated.

PLAY NUMENERA

As I mentioned before: Y’all should grab a copy of Numenera and start playing ASAP. It had my official “I Had a Ton of Fun Playing That” seal of approval and twelve more sessions has only served to add a “I Had a Ton of Fun Running That” merit badge.

Numenera - Monte Cook Games

FURTHER READING

The Art of GM Intrusions
Numenera: Calibrating Your Expectations
Numenera: Last Precept of the Seventh Mask
Tales from the Table: Last Precept of the Seventh Mask
The Numenera Tavern
Numenera: The Wandering Walk
The Moon of Numenera
Numenera: NPC Allies
Numenera: Grappling
Numenera: Attacking Objects
Numenera: Identifying Numenera
Numenera: Into the Violet Vale – Prep Notes
Review: Weird Discoveries
The Aldeia Approach
Numenera: Welcome to the Ninth World

(Please note that the title page has been altered to remove the copyright logo graphic I originally used in the draft version. All Numenera content on this website is issued under the fair use doctrine and it should be explicitly understood that no content on this website is issued under the MCG fan use policy.)

Untested Numenera: Grappling

December 6th, 2013

Numenera - Monte Cook GamesGRAPPLE: You can attempt to physically wrestle and restrain an opponent by attempting a Might task. Once a grapple has been successfully initiated, all physical actions are treated as opportunity actions requiring a Might task to attempt. A character can attempt to break out of a grapple by succeeding on a Might task as an action (without needing to make the opportunity check). Characters in a grapple defend at +1 difficulty.

(So if you’ve been grappled and wanted to throw a dagger at someone, you would need to first succeed at a Might task in order to gain the opportunity to throw the dagger. If you’re grappling someone who wants to punch you in the face, you would get an opportunity action to attempt a Might task to prevent them even trying to punch you.)

If multiple characters are grappling a single opponent, you can use the standard rules for helping. (The bonuses from helping would also affect the Might task for the opportunity action.)

FOCUSED GUARDING: If you’re attempting to stop a specific character from attempting a specific action (“I tackle him before he can run out the door!”), you can attempt a Speed task at -2 difficulty. On a success, the character you’re targeting will be prevented from taking the indicated action.

DESIGN NOTES

There are no rules for grappling presented in the Numenera rulebook. The closest you’ll get is a special ability possessed by a monster called a chirog, which looks like this:

Chirogs do not use weapons or tools, usually attacking with a savage bite. However, they can also grapple a foe, which is just like a normal attack except that rather than inflicting damage, it holds the foe immobile. The foe can take only purely mental actions or struggle to get free (a Might task at difficulty 4). Both the grappling chirog and the grappled foe are easier targets for other combatants, with attackers gaining a two-step modification in their favor.

At first glance, this looks like a decent place to start if you’re looking to make a ruling for grappling in Numenera. Unfortunately, upon reflection it turns to be fairly unbalanced as a generic mechanic. For example, the chirog’s ability is even better than stunning an opponent: Stunning means that you can’t take an action next turn and you defend at +1 difficulty. Chirog-style grappling means that you can’t take an action next turn, you defend at +2 difficulty, and are at risk of having the effect continue unless you succeed on a Might task. There is a trade-off insofar as the person initiating the grapple also suffers a +2 difficulty to defense, but since stunning also requires a much greater expenditure of resources than the single action required by chirog-style grappling it’s pretty clear that chirog-style grappling would be broken as a generic mechanic.

So I instead took chirog-style grappling as a loose guideline and improvised on a similar theme. When I was done I discovered that I had inadvertently created something pretty reminiscent of my Super Simple Grappling rules for D&D.

The rules for focused guarding are a bit more experimental. My basic thought process there is that, by the rules as written, a character can perform a Guard action which allows them to specify an action and prevent anyone from attempting it by making a Speed roll at -1 difficulty. Ergo, I’m concluding that stopping only a specific character from preventing that action should be easier. (So you can stop that one specific guy from running through the door, but all of his friends will still be free to do so.)

It may be too powerful, though. I’m specifically eyeballing the scenario where the PCs are fighting a solo monster. I’ve suddenly made it flat-out easier to counter that monster’s actions. So something to keep an eye on.


Numenera - Monte Cook GamesSome quick mechanical background for people unfamiliar with Numenera: In this system, you deal flat damage based on the type of weapon you use. (A light weapon does 2 points of damage; a medium weapon does 4 points of damage; and a heavy weapon does 6 points of damage.) You can increase the amount of damage you inflict by exerting effort or by rolling well on your attack roll. And, finally, you subtract the target’s armor value from the damage inflicted before applying it to their health pool.

This means that the key armor values in Numenera are 2, 4, and 6: At armor 2, you can’t hurt it with a light weapon unless you use effort. At armor 4, you can’t hurt it with a medium weapon unless you use effort. And so forth.

Now, let’s talk about items: Items are assigned a health pool and an armor value. The armor value for an item can be 1 (hard objects), 2 (very hard objects), or 3 (extremely hard objects).

This means that, mechanically speaking, the game is asking the GM to make an assessment: Can you hurt this with a dagger? Can you hurt this with a dagger if you use some effort?

Once you express it in those terms, it becomes pretty easy to see that, objectively speaking, the system is producing really unrealistic results. (If you’re wielding anything larger than a dagger, you’re going to be able to break literally anything in the game world. And you are probably going to be able to break it very quickly and with very little effort.) And from a mechanical standpoint, it would be much more interesting for the GM to have a richer panoply of assessments to trivially choose from.

My recommendation is to set the object armor values at the key armor values indicated above:

  • Vulnerable objects get 0 Armor
  • Hard objects get 2 Armor
  • Very Hard objects get 4 Armor
  • Extremely Hard objects get 6 Armor
  • Impervious objects get 12 Armor

You can hit that marble statue with your dagger all day, but unless you spend some effort to find a key weak point you’re not getting anywhere. You’re probably going to want to something big and heavy to pound through a metal door. Et cetera.

(“Impervious” objects aren’t actually impervious here. But 12 Armor seems like a decent figure for something that could be physically destroyed, but which would require significant effort. Leaves the door open for creative thinking. If something were truly indestructible in some metaphysical sense, I just wouldn’t bother putting stats to it.)

You can also look at these revised mechanics in terms of how they interact with each type of weapon when wielded by a tier 1 character:

  • Light weapons aren’t very effective against tougher objects. They can only damage hard objects (stone) if they spend some effort (+3 damage). They can deal a little bit of damage to very hard objects (made out of metal) with effort, but it’s very unlikely that they’ll effect extremely hard objects (it would require a combination of effort and a special ability or great die roll). It’s virtually impossible for them to affect impervious objects.
  • Medium weapons can hack through hard objects with patience, can damage very hard objects with a little bit of effort, and can even make pretty quick work of extremely hard objects. Impervious objects are probably out of reach, unless special powers get involved.
  • Heavy weapons will annihilate most vulnerable objects in a single blow, smash through hard objects with a couple of solid blows, and make very quick work of very hard objects. Extremely hard objects will require a bit of effort, but can be managed. Impervious objects can get dinged up, but it’s going to take a really long time.

Numenera: The Wandering Walk

October 1st, 2013

Numenera - Monte Cook GamesThe Wandering Walk is a pilgrimage route through the Ninth World of Numenera. It is described, in part, on page 368 of the core rulebook:

No one knows the exact length of the Wander, nor can anyone point to its exact beginning or end. Many people speculate that the Wander is actually a closed circle that encloses the whole of the Ninth World and that some travelers, especially those with enhancements or otherworldly attributes, have been trekking its eternal loop since before recorded time. (…)

Those who follow the Wander for religious, spiritual, or other reasons are called Peregrines or just Birds (though the latter term is usually derogatory). Although their dress varies, true Peregrines bear some mark of the Wander. Typically, the mark is an elaborate and continually growing circular bloodscar along their palm; there is little else to do along the Wander when one is not wandering, and the intricate nature of the scar gives bragging rights to show how long a traveler has survived along the way. Experienced Peregrines carry the scar up the length of their arm or on both palms.

Of course, there are also many who trek the Wander for other kinds of growth — namely the growth of their pockets. These skulkers who come to borrow from the bodies of the fallen often become inadvertent pilgrims themselves, either getting lost along the route or walking it to find a home where they can settle with their newfound spoils. They don’t generally make it far before they fall to the elements or to the hand of another skulker.

And thus the Wander captures all within its eternal length.

As described there, however, I don’t fully grok the Wandering Walk:

1. A pilgrimage suggests a visitation of sacred sites. What are these sites? Who are they sacred to? Why are they sacred?

2. The “route” has neither a beginning nor an end. It would follow logically, therefore, that anyone actually following the route would never revisit the same territory (unless we’re talking about semi-mythological immortals who might have completed a full loop around the entire world). Despite this, the rulebook seems to speak of common peregrines who are familiar with the route and able to avoid pitfalls through experience.

3. The full length of the “route” is unknown. How do peregrines follow it, then? Is it marked in some way?

In order to grok the walk, I decided to both expand it and rewrite chunks of it.

BLOODSCARS

Those traveling the Wandering Walk slowly develop a bloodscar — an elaborate and continually growing circular pattern of crimson that begins on their palms. Experienced peregrines will find that the scar extends up the length of their arms. Every peregrine’s scar is unique and there are some tellers who say that they can read the story of a walker in their scar, although whether there’s any real truth to that is hard to say.

What is certain, however, is that peregrines traveling the Walk can often tell which direction to follow by touching and meditating upon their bloodscar. The path of the bloodscar is, in fact, what determines the route of the Wandering Walk.

LORE OF THE WANDERING WALK

The path of the bloodscar is not always reliable, but various markers have also been left along the various stretches of the Walk.

The true lore of the Wandering Walk, however, comes from the fact that it is walked in both directions along its length. Thus declining peregrines (whose count of stretches descends from one number to the next) often encounter ascending peregrines (whose count of stretches ascends from one number to the next). Rumors, tales, and truths are passed freely back and forth: Thus a descending might learn of a roving band of skullhunters a few days further up the Walk from an ascending peregrine who avoided them himself, but heard the warning from a descending peregrine a year ago who had barely escaped from them.

THE FIFTH STRETCH OF THE WANDERING WALK

As described in the Numenera rulebook (pg. 370), the Fifth Stretch of the Wandering Walk begins at the mouth of Tremble Pass where it passes through the Black Riage and extends east to the Great Slab.

The length of the Fifth Stretch is marked by the Mouth Cairns: Hulking metallic structures which form shallow, circular hollows. These hollows are surrounded by short, round walls built from jaws of dead peregrines and are considered among the few safe places along the Fifth Stretch. Those who enter a bone circle must give some promise of their good intent to the slain lest the dead mouths awake and cast their retribution. Even those who don’t believe in the so-called Slaytongue may find themselves at the end of a weapon if they try to break the cairn-peace.

THE FOURTH STRETCH OF THE WANDERING WALK

The Fourth Stretch of the Walk is not described in the core rulebook and I do not know its ultimate origin (although I have heard both that it leads into the Sea of Secrets and that it passes through the Cloudcrystal Skyfields and into the lands of the Gaians beyond; perhaps there is truth in both).

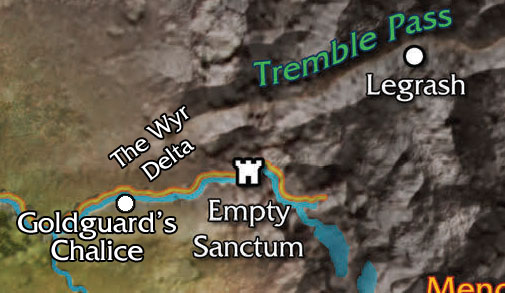
What I do know is the ending of the Fourth Stretch: It leaves the kingdom of Thaemor and crosses the Wyr River at Goldguard’s Chalice.

The Titan's Goblet - Thomas Cole

Goldguard’s Chalice is named for Goldguard Langdon, who founded the nation of Thaemor, although it clearly predates Goldguard’s reign by untold aeons. The city at the base of the Chalice is often a place of respite for peregrines, who will rest and resupply there before plunging onward into the long, bleak leagues of the Fifth Stretch.

Beyond the Wyr River, the Wandering Walk turns north toward Tremble Pass and enters what is currently known as the “Wyr Delta”.

Numenera - The Wyr Delta and Goldguard's Chalice

Unlike the straight and singular path which defines the rest of the Wandering Walk, this section of the Fourth Stretch splits apart into many different paths. Some of these paths follow rivers as they currently exist. Others follow dry riverbeds. Others simply pass through a harsh wilderness, but the hypothesis is that rivers used to run here; it was simply so long ago that any trace of them has been overgrown by the pine forests.

USING THE WANDERING WALK

The reason I, personally, decided to spend time etching into the lore of the Wandering Walk is that it provides a rather nice structure to hang scenario seeds off of. Specifically, I’m using it to launch the “playtesting” sessions of Numenera at my table.

First, establish that the PCs are ascending peregrines nearing the end of the Fourth Stretch of the Wandering Walk. The oddities of the Walk provide a nice dose of weirdness for introducing players to the setting; it also provides a loose bonding mechanism between the PCs that the players can improvise within while creating stories about when and how their characters met and why they’re traveling together. (The loose formality of the Walk also provides a nice mechanism for having players drop in and out of the sessions: If somebody can’t make it this week, it’s because they stayed behind or rushed ahead on their pilgrimage. And, of course, it’s just as easy for them to rejoin the group at a later date.)

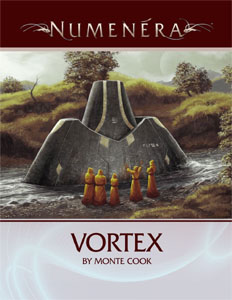
Numenera: Vortex - Monte CookSecond, I placed the Vortex adventure in the Wyr Delta. Thus the game begins with the PCs leaving Goldguard’s Chalice and, shortly thereafter, they encounter the scenario hook. The village of Jutte is located along one of the small tributaries leading down to the Wyr River. I placed the reappearance of the Narthex at a position 2 days ride north of Tremble Pass.

Third, once Vortex has been completed you can run “The Beale of Boregal” from the core rulebook (pg. 367). This adventure is already designed to lie along the Wandering Walk and takes place immediately on the other side of the Tremble Pass in the first reaches of the Fifth Stretch.

If you want to run additional adventures using this structure, it’s easy enough to seed the scenario hooks along the length of the Fifth Stretch. (And drop pertinent lore into the gathering of descending peregrines the PCs encounter in the Mouth Cairn at the beginning of “Beale”.)

Archives

Recent Posts


Recent Comments

Copyright © The Alexandrian. All rights reserved.