Session 20F: The Ghost Appears
From here Tee could look down onto an outdoor terrace surrounding three-quarters of the courtyard. Half of this terrace had, at some point in the past, been turned into a rooftop garden. Various boxes and pots – most in disrepair and many spilling their dirt out onto the stone roof – lay here and there. Many of the plants were still alive, although most of the garden had been overrun with weeds.
Almost directly across from Tee – on the wall near the door leading to this terrace – she could see a strange face that had been carved into the wall. Something glinted in the eyesocket of the carving, glittering like a gemstone.
The “Pythoness House” adventure comes from The Night of Dissolution, a campaign supplement for Ptolus written by Monte Cook. It’s a fantastic little haunted house scenario that’s greatly enhanced by the convoluted, heavily xandered design of Pythoness House itself.
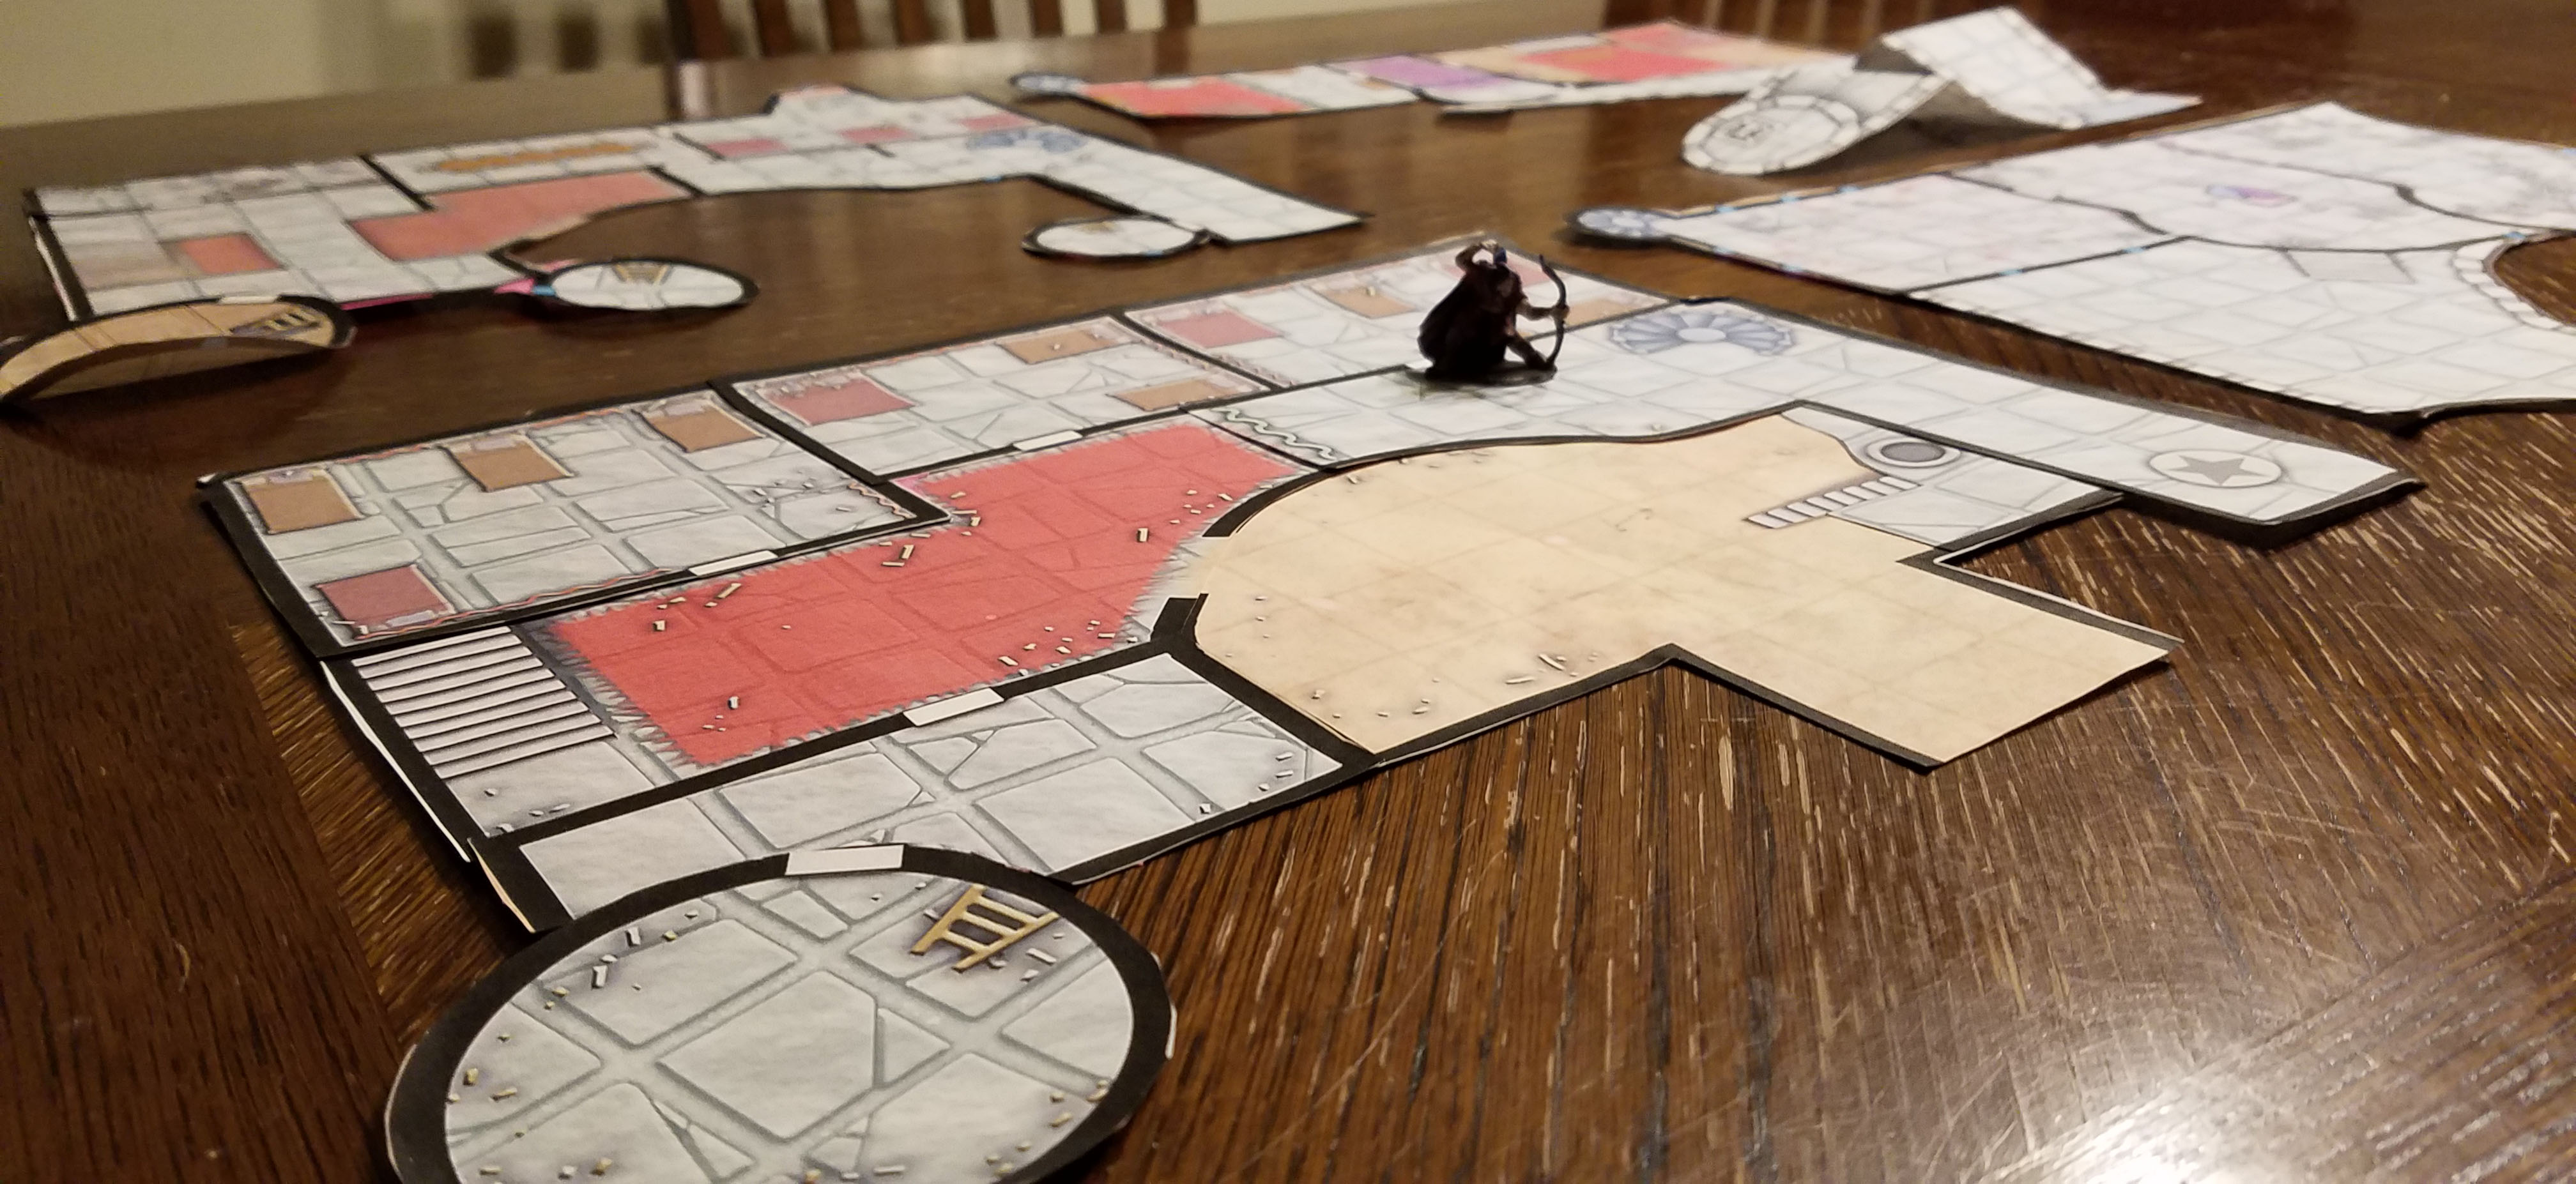
As with many of the Ptolus scenarios, SkeletonKey Games designed absolutely gorgeous battlemaps for the whole keep:

If you’re thinking about running Night of Dissolution on a digital tabletop, these maps are absolutely perfect. You can buy them in PDF here.
I, however, was no longer running the campaign on a digital tabletop at this point, and so I was faced with a choice:
First, I could follow my standard operating procedure of chicken-scratching out the map onto a Chessex battlemap. This would be both time-consuming (due to intricate, overlapping complexity of the maps) and force me to sacrifice the awesome visuals of the SkeletonKey maps.
Second, I could print out a copy of the maps and lay them down on the table. But this would almost certainly compromise the fun of actually exploring the castle.
In many cases, you can mitigate this by laying out sheets of paper or notecards in order to block sections of the map and then only reveal them as they’re explored. But this tends to be finicky and unreliable (as papers get nudged or blown around). It was also a poor fit for these particular maps because of their claustrophobic, interwoven design.
So I used another technique that I’m going to refer to as Post-It mapping:
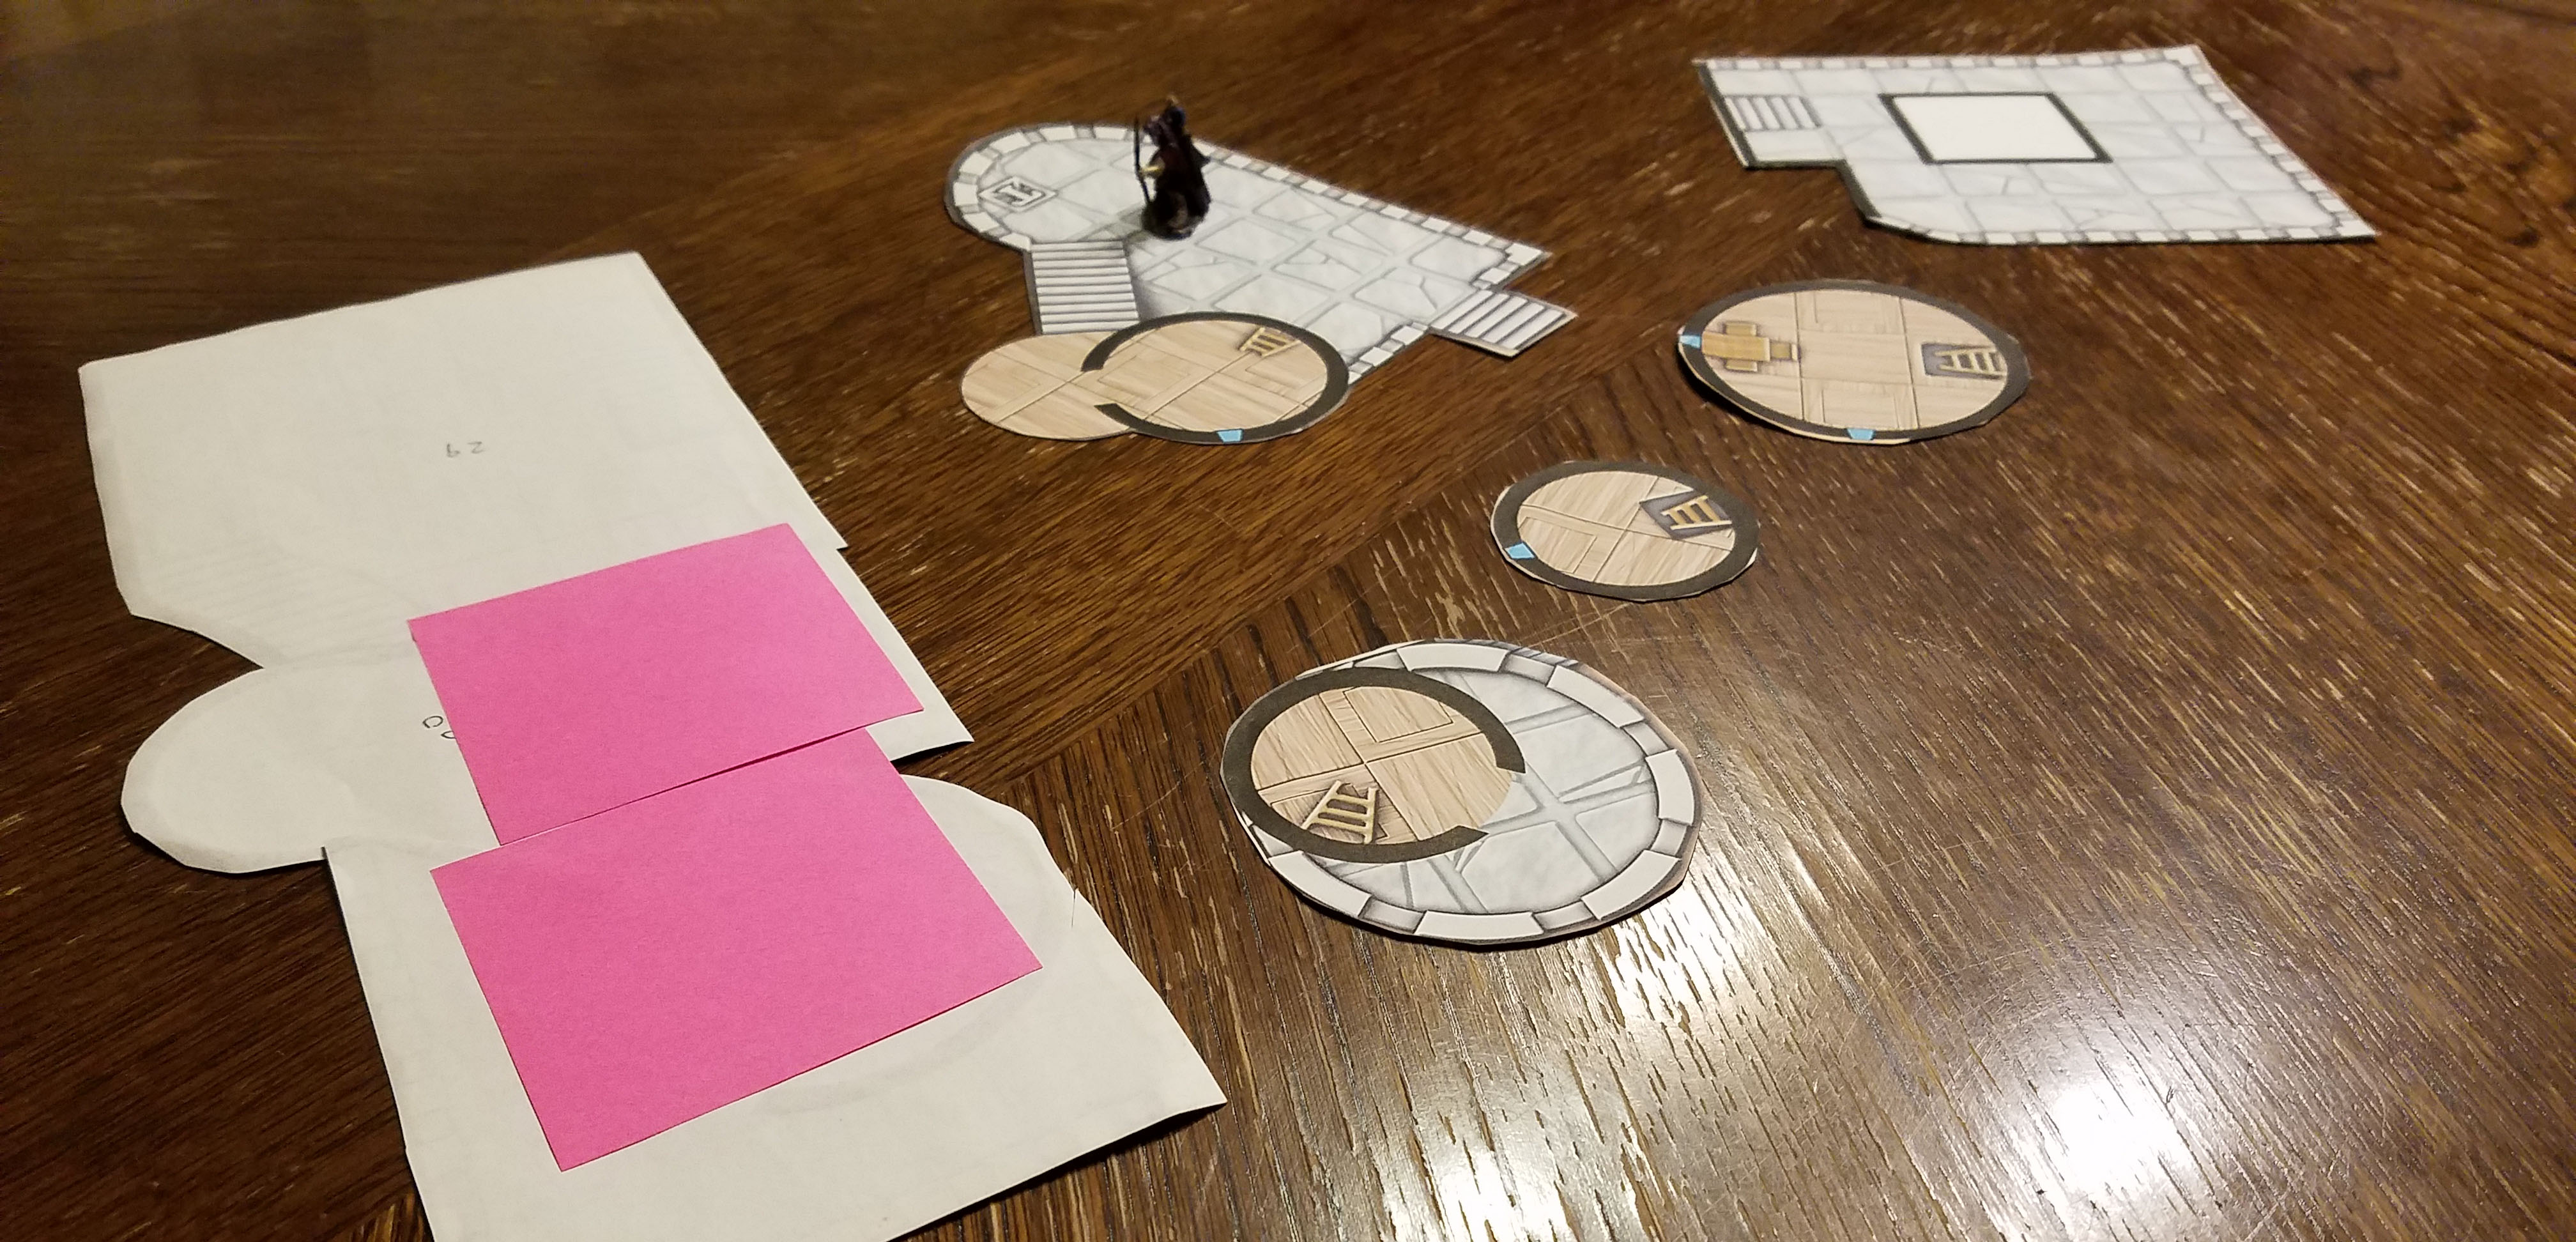
As you can see here, I cut out each individual room and labeled the back of each room with its keyed number (to make it easier to find the correct rooms during play). As the PCs explored, I could pull out each room one at a time and attach it to the neighboring rooms using Post-It notes.
If you’re familiar with digital tabletops, this is basically an effective way of creating an analog fog-of-war effect.
USING THE POST-IT NOTES
Post-It notes are ideal for this method because the temporary adhesive makes it easy to correct mistakes and rearrange room tiles as necessary. As the map begins to grow on the table, you can easily slide a Post-It note partially under edge of the map (without needing to pick the map up) and press the edge of the map down to adhere it to the Post-It note. You can then position the new room tile and press it firmly down to easily attach it to the map.
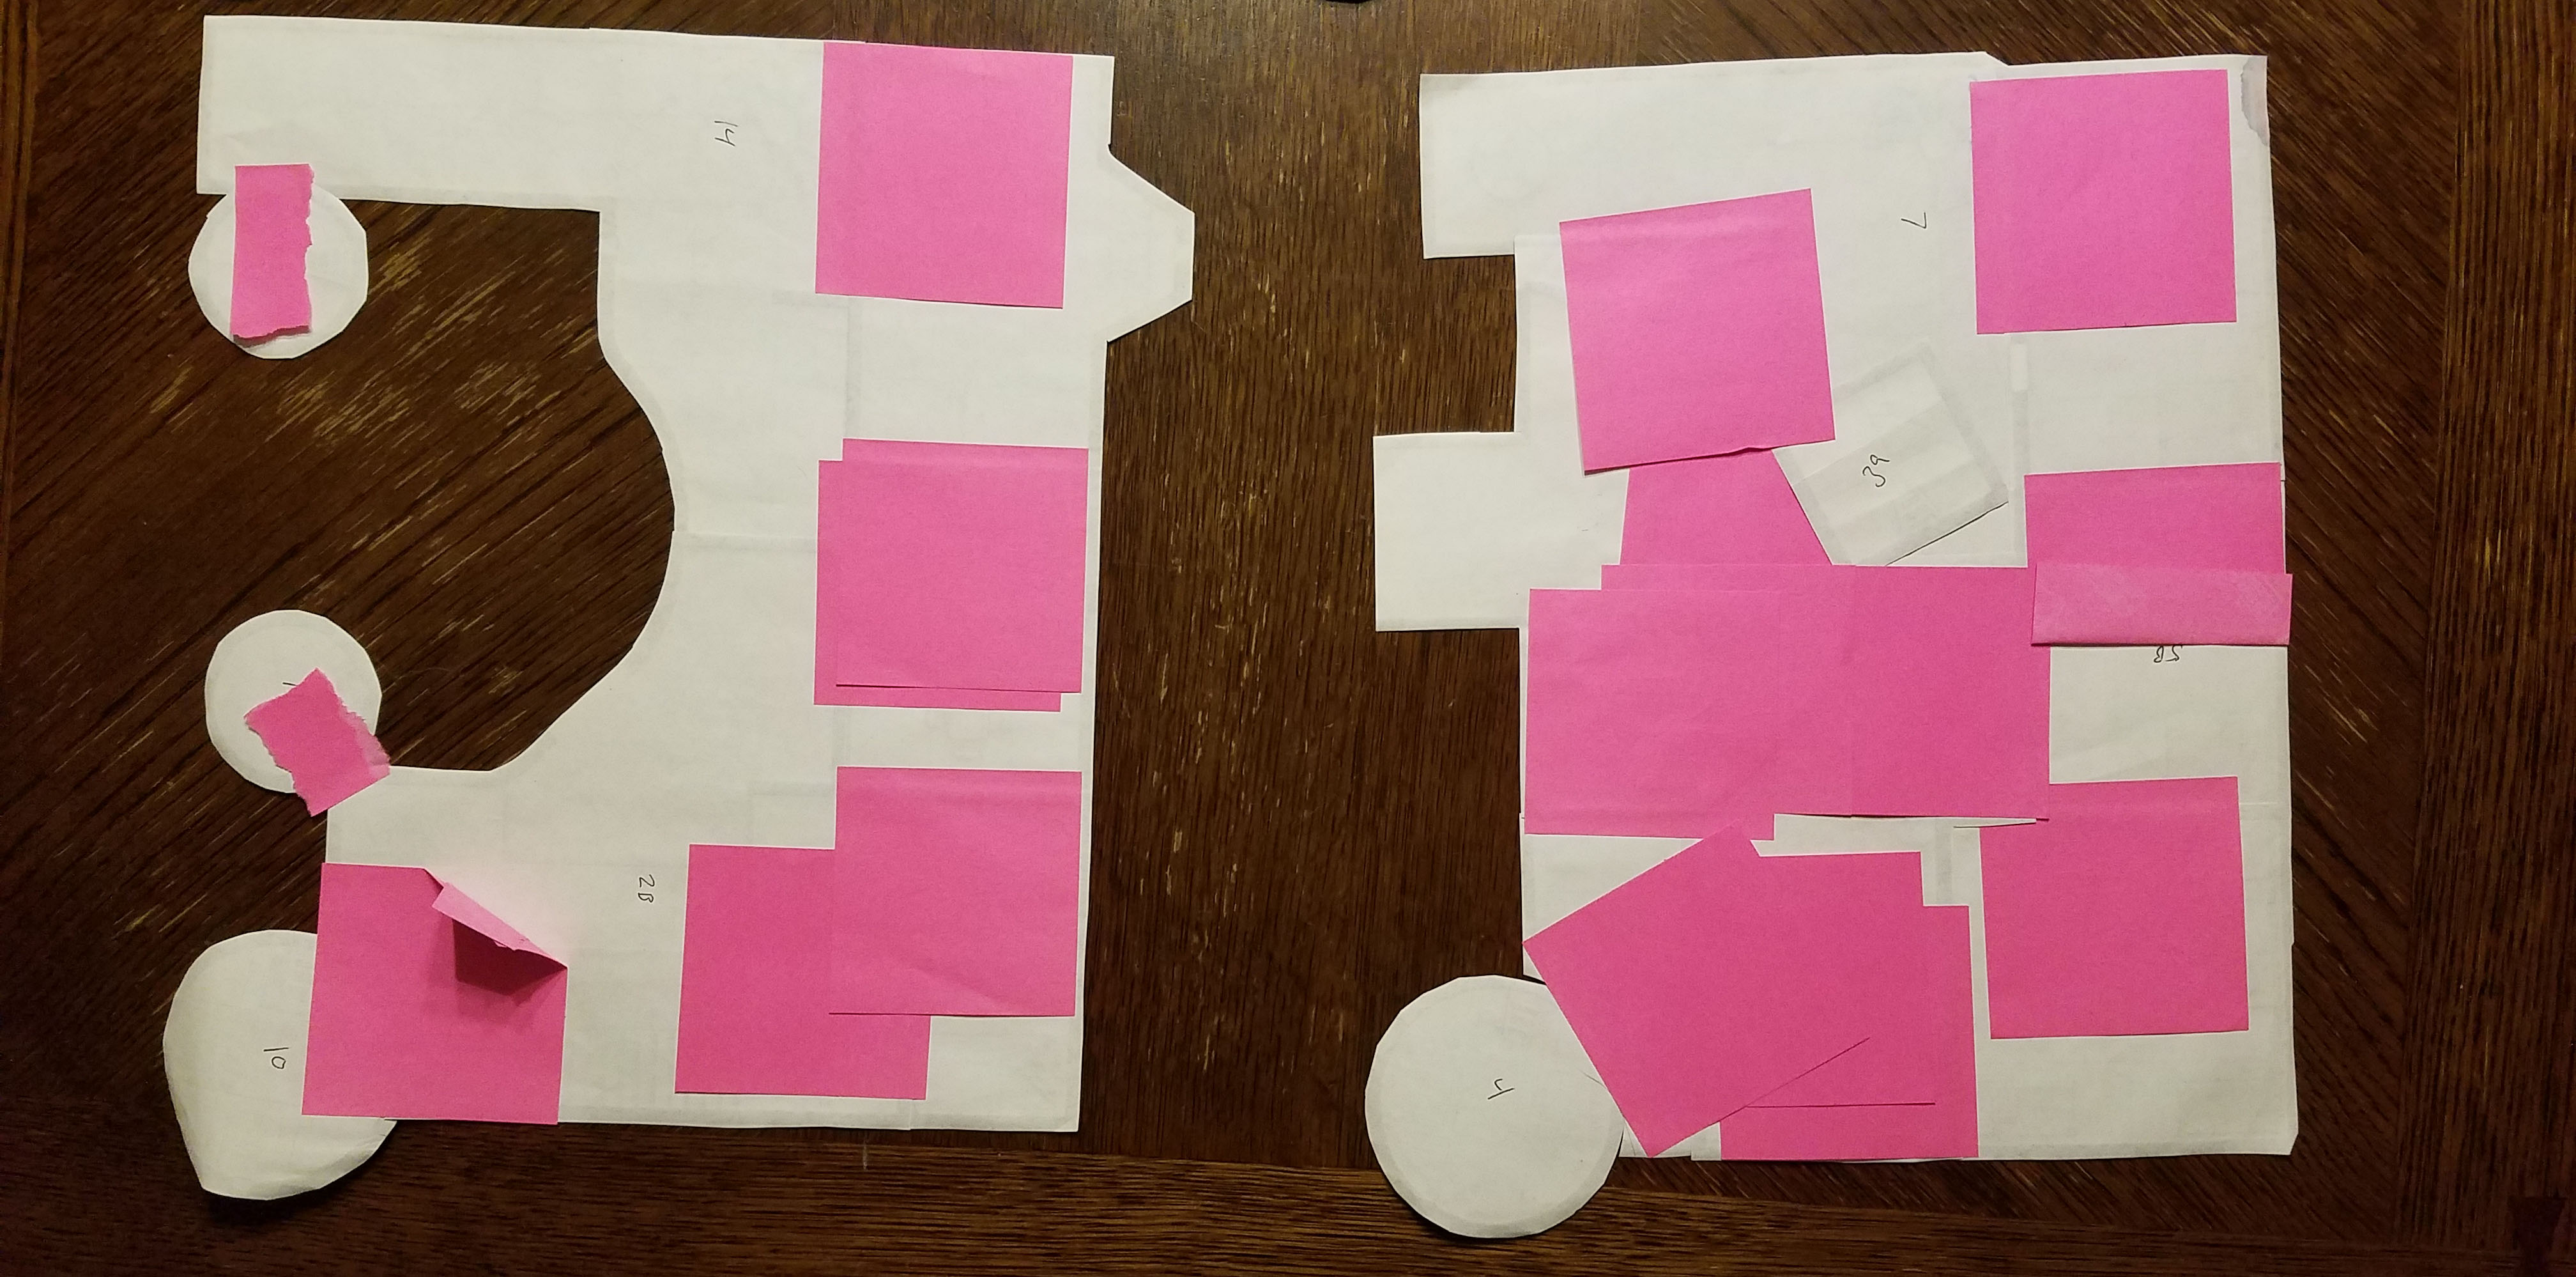
What you end up with looks like this on the backside:
But the front side, as you can see here, is very clean and gives a great presentation:
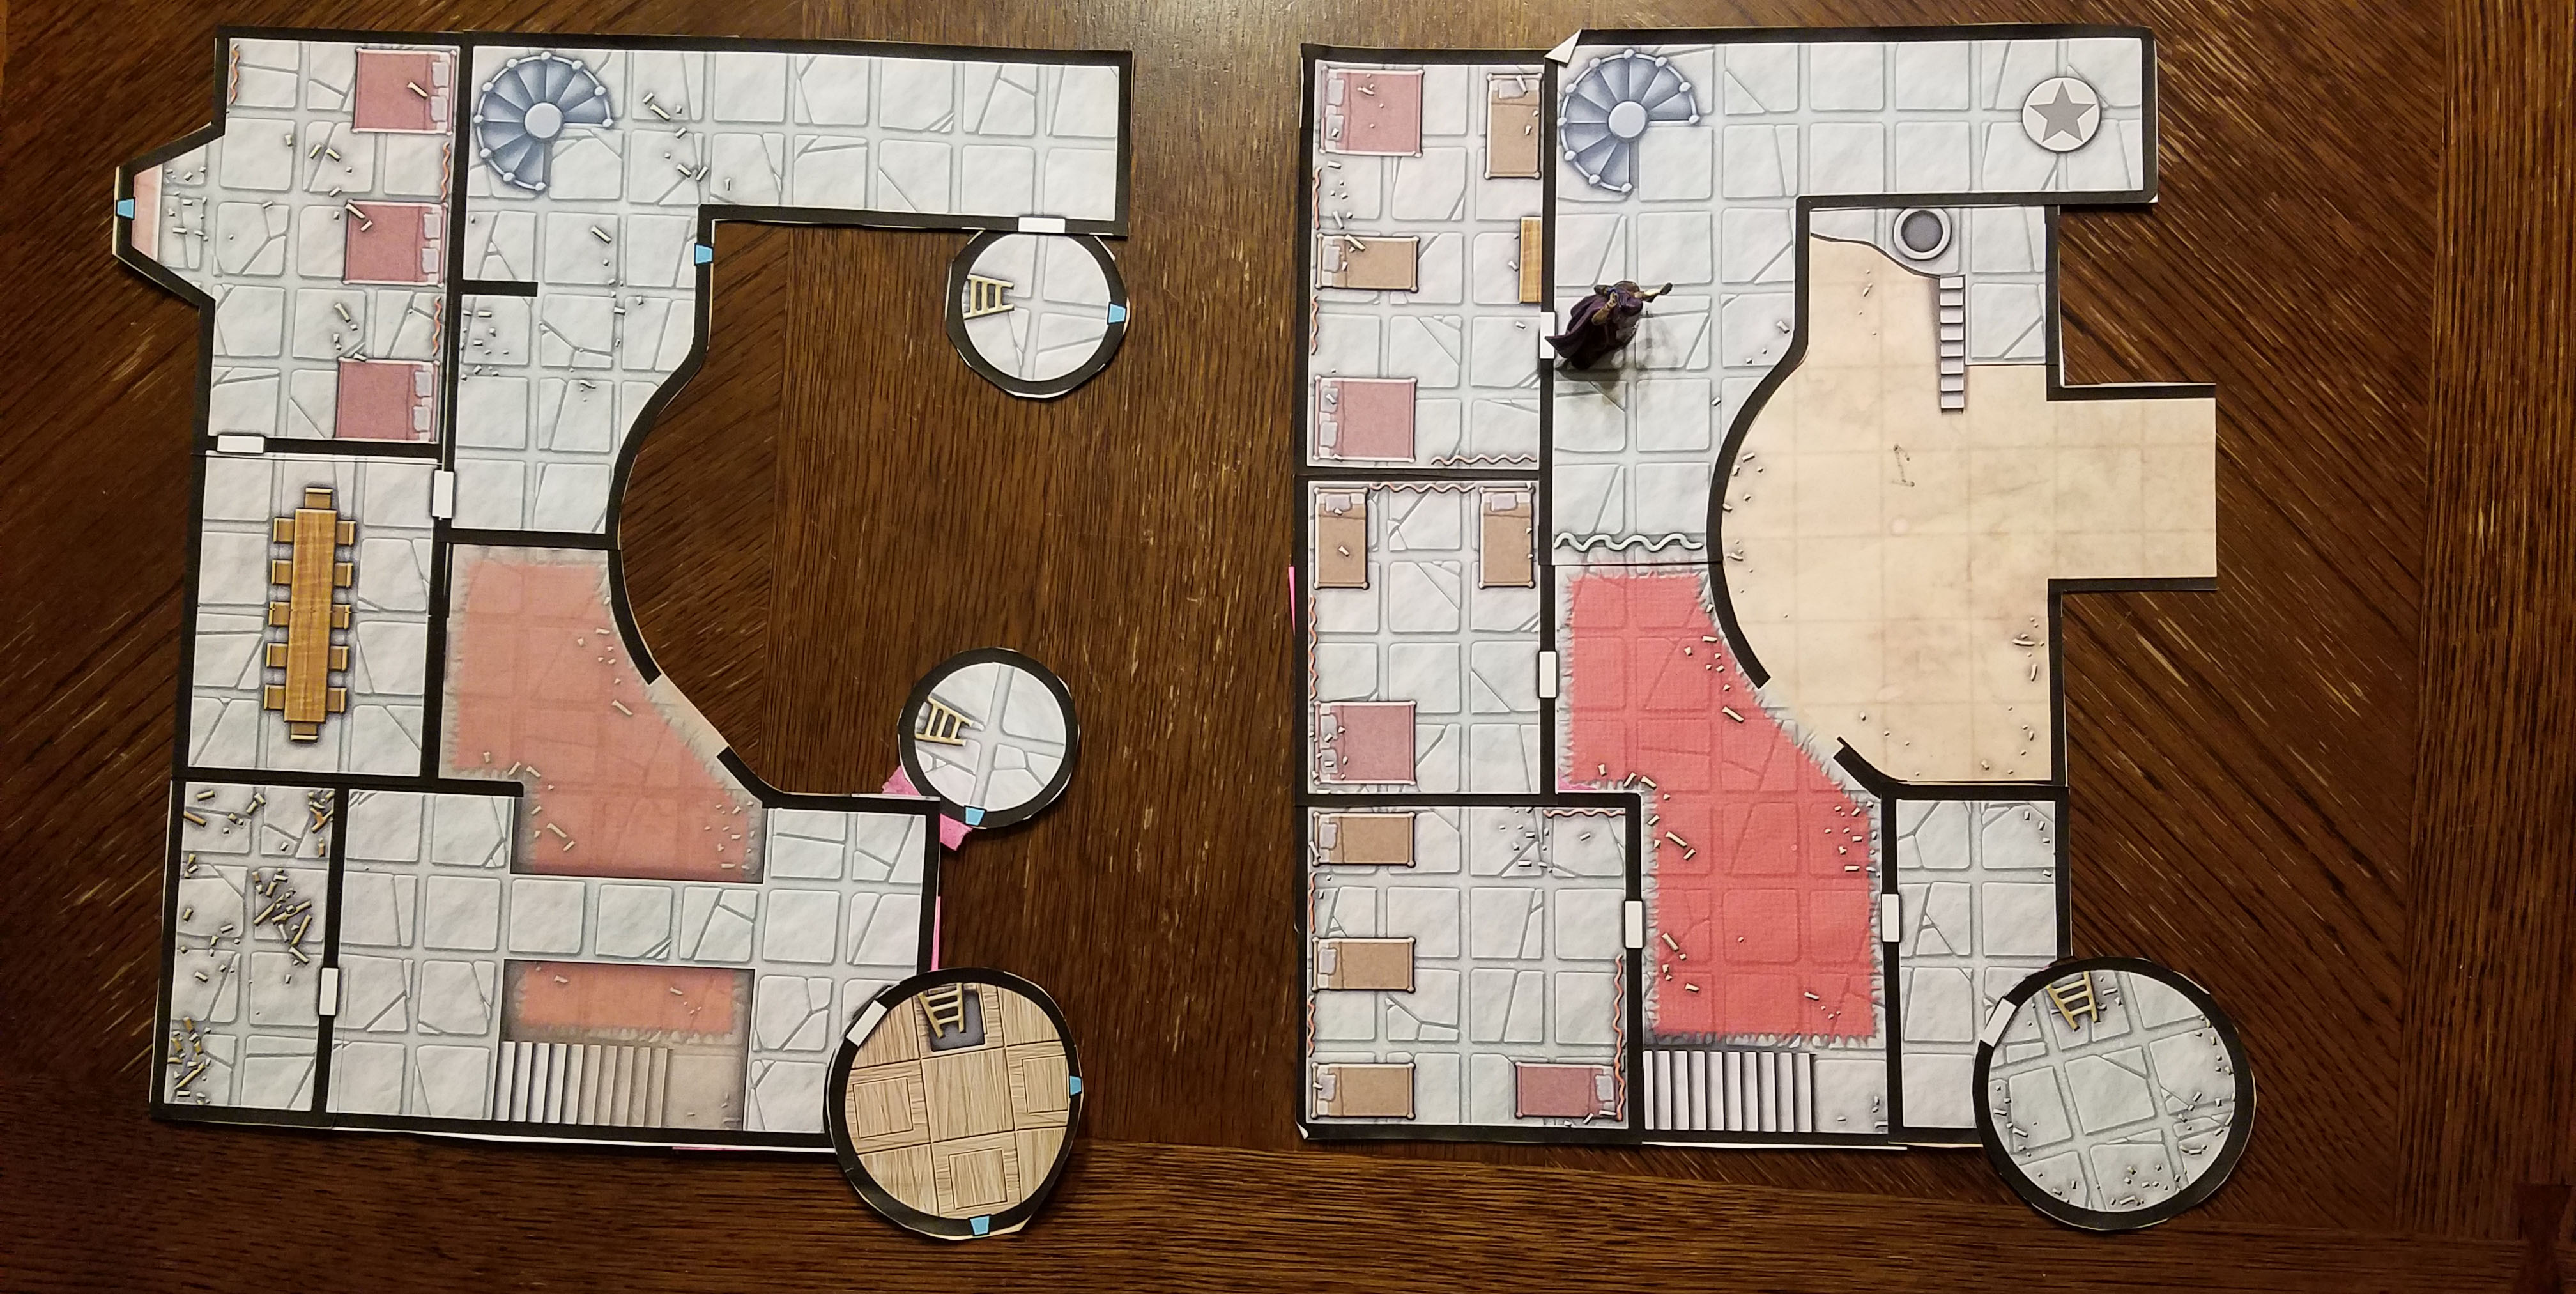
(click for larger image)
In practice, it will actually look a little better than this: These are photos of the maps I used when running “Pythoness House” back in 2008. They’ve seen a lot of use over the last eleven years and have bounced around any number of storage solutions (some of them quite poor).
And although they have gotten a little ragged around the edges here and there, I think this is also a testament to just how durable Post-It mapping can be in practice: These are also the original Post-It notes. So, despite all the abuse these maps have received over the years, they’ve held together almost as well as a flat print out would have done.
The drawback of this technique, obviously, is that it does require a fair amount of prep work to set it up. So is it appropriate for every dungeon? I wouldn’t say so. (Although there are plenty of people who build out 3D terrain for every single dungeon they run, so your mileage may definitely vary here.) But I do use it from time to time when I want to be able to share a particularly awesome piece of cartography with the players.
This, of course, also requires a module’s publisher to actually present their maps in a format and resolution that makes printing them out as battlemaps viable. Over the years I have seen so many incredibly gorgeous pieces of cartography and been immensely saddened by the fact that it was all so much wasted effort that the players would never get to enjoy.
Thankfully, the rise of digital tabletops seems to be changing this, with more and more publishers recognizing that if they’re going to spend hundreds of dollars on great cartography, then it’s in their best interest to make that cartography accessible at the actual gaming table.


A long time ago (in the 2nd ed erra) I would do something a bit like this but not on a battle map, only a grid paper map of the dungeon. It would be covered in pieces of paper glued temporarily to the map with Blu Tack – as a room or corridor was revealed, the specific piece of paper was removed.
The problem was that the players could see the layout by observing the layout of the pieces of paper, which required adding “decoy” pieces of paper to create pretend corridors and rooms that weren’t actually on the map.
It worked very well, but also was quite time consuming, and I haven’t done this in years.
More recently I’ve been running the Tombs of the Serpent Kings using giant grid paper by drawing on it as the party explores stuff, and also using it as a battle map. It works well but it’s a large sprawling dungeon, so it’s been challenging to manage all the sheets.
I actually adopted the Post-It method here specifically to avoid the “there must be something there because you’ve covered it up” problem!
But, yes, anything of this nature is very time-consuming. I generally only go all-out like this in very special circumstances. Scratches on a Chessex map are good enough for me at least 9 times out of 10.
I use two methods very adjacent to this and wanted to share them.
1. Since I make all my maps in a program, I can control how I export them to a PDF and therefore how I print them. A room might have 2 doors and that is the only thing printed on it: a room with two doors. The first door leads to kitchen, so I print out the kitchen and use a paper slicer to cut along the door edge and can drop the kitchen room on top of the first room. I use “sign here” style tabs which have very light adhesive to hold the pieces together (I also delegate someone who enjoys aligning pieces of paper perfectly to put them together and award them inspiration for it). Since the maps are made digitally, they can be used for VTT and are easily transferable to actual tabletop. This method works well for sprawling dungeons when players don’t know the shape of the dungeon. Downside, cutting pieces the right way so they fit can be tricky sometimes.
2. Similar to the cover up method, if I have a haunted house, a ship, or a finite space to explore, I’ll create a repeating “busy” tile to print out that covers the entire house or ship. Usually this consists of a roofing pattern for buildings or wood grain for ships. Using an Xacto knife, I can cut the entire tile into smaller pieces that line up perfectly and I use the tabs to stick the tiles to the map. Downside is your players may know when there is a “hidden” room but in a finite space, they would figure it out anyway. Also, cutting shapes can get tricky if you have weird angled or curved walls.
I used the 2nd method to overwhelming success with Salvage Operation (recently reprinted as chapter 4 in Ghosts of Salt Marsh). Method 1 worked great for Palace of the Silver Princess when I ran it in 5e.
I hope these methods are useful and my descriptions make sense, I feel it’s easier to show them than it is to describe them.
When running Dungeon of the Mad Mage, I printed the maps and then turned then scratch-off with some diy easily found online. Didn’t work as a battlemat, but it made the crawling tolerable.
Here’s how I handle it. Little prep and high utility at the table:
http://www.creightonbroadhurst.com/scratching-the-surface-a-new-approach-to-mapping/