The Alexandrian

Posts tagged ‘ruined temple of illhan’

Check This Out – Son of Thor

November 25th, 2014

In 2011 I posted the Ruined Temple of Illhan here at the Alexandrian: It’s an old school dungeon crawl based around the Neo-Norska Pantheon and the supporting mythology I created. The centerpiece of of this mythology was Illhan, the eldest son of Thor. Illhan led the Eight Sons of Thor and Three Daughters of Hel to fight the legions of Nidhogg, the Great Serpent of Shadow. He was notable for wielding a hammer in each hand and his primary holy symbol was a pair of crossed hammers.

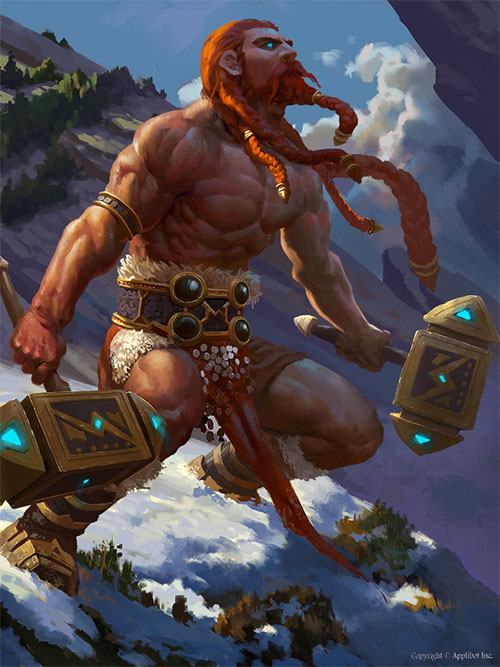
A few days ago, I was linked to this amazing piece of art entitled “The Son of Thor”:

Son of Thor - 0BO

This isn’t a direct depiction of Illhan, the Son of Thor. (It’s some other son of Thor.) But if you were going to use the Ruined Temple of Illhan, this piece of art would be pretty cool to use.


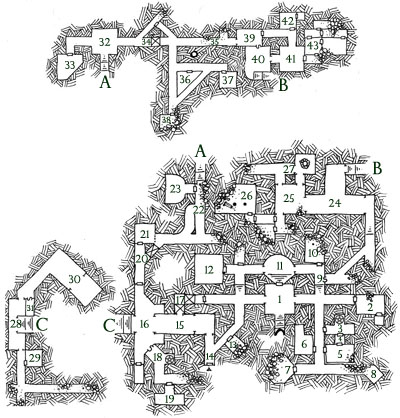
Go to Part 1Go to Map

The key posted over the last several days for the Ruined Temple of Illhan represents the temple as it was discovered by my players. If you’re interested in running through the temple in the days after that hardy group of wanderers passed through it, you’ll want to make the following changes:

AREA 9: The secret door has been wedged open with iron spike.

AREA 20: The stone block has been propped up with three iron chests, holding it far enough off the ground for halflings and unarmored characters to crawl under.

AREA 21: Portcullis has been raised (using the control level in area 23).

AREA 26: The ceiling of this room has collapsed, leaving behind a solid wall of rubble in the doorway.

AREA 30: The iron chests and treasure have been removed.

AREA 36: Spear has been removed.

AREA 43: All of these doors have been chopped through with axes.

Thanks again to Dyson Logos for giving me permission to share his re-keyed map. I very much recommend checking out his site; he’s got a plethora of terrific stuff over there ripe for pillaging.

The Ruined Temple of Illhan - Dungeons

Go to Part 1Go to Map

AREA 32: Empty chamber.

AREA 33: The angled wall has the chipped remnants of what must have once been an extravagant mural; but it is now too damaged to make out any pertinent details. On the wall opposite the mural there is an iron rod bracketed to the wall about seven feet off the floor and running perpendicular to it.

AREA 34 – PIT TRAP (30’ deep): 1 in 6 chance of opening when crossed.

AREA 35: These rubble piles will shift ominously as people walk over the top of them (but there’s no real risk).

AREA 36: A metallic pole covered in runes stands upright from the floor in the middle of this room.

Pole: The runes are arcane. The pole is actually a +1 spear of charged lightning, which can hurl 1d6 lightning bolts which deal 4d6 points of damage each. When the charges on the spear are exhausted, it remains a +1 spear but cannot discharge lightning again until it has been returned to the depression in this chamber. The weapon can be used normally by any follower of the Norse or Neo-Norskan pantheon (despite being a bladed weapon).

Each time the spear is used (whether to throw lightning or in melee) by a character who does not worship the Norse or Neo-Norskan pantheons, there is a 1 in 6 chance that its curse will be revealed: Black lightning will run up the spear and into the arms of the character wielding the spear. The black lightning will sap the strength from their limbs, inflicting a -4 penalty on attack rolls on damage until the spear has been returned to this chamber or they have received a blessing from a Norse cleric.

AREA 37: Empty room.

AREA 38: Partially collapsed chamber.

AREA 39: Room is empty. Door is wooden.

Secret Door: On the wall here there are two small, concealed lenses. (See area 40.)

AREA 40: On one wall of the chamber there is a kind of iron coffin or sarcophagus which is flush with the wall (where the secret door is indicated). On the other side of the room, a set of open stairs goes up, takes a turn to the left across a short landing, and then heads up another flight (to area 24).

Iron Coffin: This is hinged and can be opened if six clasps down the opposite side are removed. Affixed to the wall within the cavity of the sarcophagus are a set of “viewing glasses” (similar to binoculars or opera glasses), which look through the lenses into area 39. If the viewer is sealed inside the sarcophagus (with all six clasps being shut from the outside), the view in area 39 will shift to show the same room several hundred years ago when the complex was still in use.

Vision: Three maidens wearing blindfolds (one of crimson red, one of royal purple, and one of pale blue) sitting around a large brass bowl filled with burning incense. Priests of Illhan will enter, drop tokens of intricately carved wood into the burning incense, and ask questions. There’s no sound, but those who can read lips will be able to decipher a prophecy describing the temple’s destruction.

AREA 41: An empty room.

AREA 42: In the center of the room there is a large pile of dry wood. (Those looking through it will discover the remains of broken furniture.)

Closet: The wooden door on the far side of the room has been hit with an axe several times, but is still mostly intact. The closet beyond it has a skeleton slouched in one corner; it has a small, badly rotten pouch with 6 sp and 76 cp.

AREA 43: All of the rooms in this little complex are empty. The doors are made of wood, several of which have swelled from moisture and jammed shut (3 in 6 chance).

Continued tomorrow…

(Original cartography by Dyson Logos.)

Go to Part 1Go to Map

AREA 24: The arches at either end of the long hall here are formed from the upper halves of a spinning wheel. A half chipped mural on the ceiling depicts white clouds in a blue sky.

Stairs: Go down, turn right across a short landing, and then descend again into area 40.

AREA 25: The arch to the south has the top of a hammer serving as a capstone (with its handle pointing up). The arches to the north both have a pair of horns curving up from their capstones.

AREA 26: The room opens off to the left. There are still two columns left standing, but you can see a third one further down the length of the hall which has fallen onto its side. Beyond that the room has collapsed. And as the door opens, you see some dust drift down from the ceiling.

Pillars: Disturbing a pillar has a 1 in 6 chance of causing the room to collapse. Removing one of the pillars will automatically cause the chamber to collapse. Everyone in the room will take 8d6 points of damage.

AREA 27: This room contains a stone well raised about three feet high. There’s potable water 30 feet down.

AREA 28: The arch leading to the stair is formed by two large hammers (see area 16). The archway leading towards area 29 has a large, stone eye serving as its capstone. The archway leading towards area 30 has an empty socket at its capstone (a missing eye).

Capstones: Moving the capstone from one arch to the other will cause the (currently secret) door leading to area 31 to become visible and the door to area 29 to vanish.

AREA 29: Hanging from a long iron rod on the far side of the room there is a single red curtain in perfect condition. (The curtain benefits from a mild enchantment to render it immune to the passage of time, but is otherwise unremarkable.)

AREA 30: The archway in this chamber is formed by two spears. There are three iron chests at the end of the chamber. Their lids are thrown back and they have been completely emptied. The chests have been bolted to the floor, although the one on the right is slightly loose.

Secret Compartment: Beneath the iron chest on the right there is a hidden compartment. Loosening the bolts allows the chest to be removed, revealing the compartment. The compartment contains 9 thin strips of gold, each worth 100 gp. There is also a small flask of crystal filled with a reddish liquid (potion of fire resistance).


AREA 31: The door to this room only becomes visible if the capstone in area 28 swaps its position. On a small, circular altar of white marble at the far end of this chamber lie two silver hammers worth 250 gp each due to their high craftsmanship.

Those familiar with dwarfcraft will recognize the hammers as being of dwarf-make. One of the hammers has the dwarven rune for FRIENDSHIP engraved upon it; the other has the Norskan rune for FRIENDSHIP on it.

(Note: These hammers can be used in area 19.)

Continued tomorrow…

(Original cartography by Dyson Logos.)

Go to Part 1Go to Map

AREA 13: Tree roots grow down through the ruined ceiling here, curling through the rubble pile.

AREA 14: This is a false door made of bronze with runes engraved upon it. Beneath the runes there is a pair of crossed hammers. (The door is remarkably clean: Essentially spotless.) The door tingles to the touch.

Norskan Runes: THE PATH OF THE SOUL’S RICHES. (Those familiar with Neo-Norskan mythology will recognize this as part of a quotation ascribed to Illhan: “The path to the soul’s riches shall lie along no path of gaudy promise.”)

Trap: Opening the door triggers a 50’ bolt of lightning (4d6 damage). The door will then snap shut (resetting the trap). There is a circular disc of brass  in the center of the wall behind the door (from which the lightning is emitted).

AREA 15: The two sets of arches down the length of this hall are formed by two ravens with their beaks touching at the capstone. The eyesockets of each raven appears to have once been a gem, but the stones have been pried out.

Raven’s Sight: If a gemstone worth at least 250 gp is placed into the eye-socket of a raven, a character will be gifted with a visitation from Odin as per a commune spell. Removing a gemstone from one of the eye-sockets will result in a powerful curse being placed on the character.

AREA 16 (THE HEAD OF THE HAMMER): A larger chamber angling away in both directions. The archway leading to the stairs leading down is formed by two large hammers. The angled walls are covered in elaborately carved stonework forming intricate, knotted designs.

Secret Door: Twisting one of the knots causes the door to swing aside.
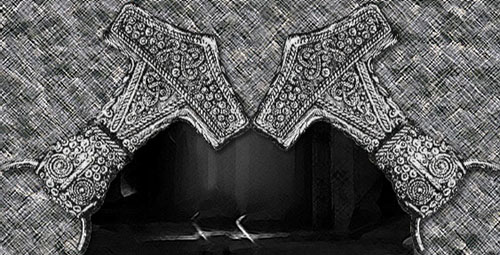
Temple of Illhan - Archway of Hammers

AREA 17:The floor in this hallway is covered in a layer of dirt 2 feet deep.

Pit Traps (30’ deep w/spikes): Covered by badly weathered, graying wood (beneath the dirt) – very weak. 2 in 6 chance that anyone crossing them will break through and fall. 1 in 6 chance that someone crossing will hear the wood creaking under them.

AREA 18: The floor immediately beyond the secret door is of a white tile inlaid with a mosaic of blue depicting a twisted knot (similar to those depicted on the hammered arch in area 16). The statue is of a broad-shouldered man wearing a bearskin with a hammer held in each hand.

Trap: Anyone crossing the mosaic without saying Illhan’s battle prayer (“Let my eyes be washed in the blood of my enemies and my hands kept clean with valiant work”) will activate the statue. Bolts of energy as per magic missile will shoot out from the hammers, striking the nearest character once per round for 10 rounds. After ten rounds, twin bolts of lightning (4d6 damage) will shoot from the statue’s eyes.

AREA 19: The walls of this chamber are clad in white marble. At either end of the hall, in the center of the wall, is a circular depression.

The Map: If the shafts of the silver hammers from area 31 are inserted into the two depressions, lines of blood will exude from the south wall, revealing a blood-etched map leading to the dwarven stronghold described in Hammers of the God. The following passage will also appear in both dwarven and Norskan runes: “THE SECRET OF ALLIANCE SHALL BE KEPT.”

AREA 20: 1 in 6 chance of stepping on one of several pressure plates which will cause the stone block forming the ceiling to fall, crushing those beneath it (4d6 points of damage). Once the block has fallen, it’s possible for a halfling or an unarmored character to squeeze through the gap between the stone block and the ceiling.

The stone block can be reset or released from area 23.

AREA 21: The portcullis in this room is incredibly sturdy and difficult to break or lift. (It’s controlled from area 23.)

AREA 22: This collapse is about 5 feet deep and blocks the width of the passage. The area around the door to area 23 has been excavated out (you can climb up and then drop down into it). Once you’re in that excavated portion, it’s possible to notice that a crawlspace has been cleared at knee-height leading to the stairs.

AREA 23: The far wall of this chamber has a large wheel affixed to the middle of it. There are two levers set into the wall – one to either side of the wheel.

Wheel: Operates the portcullis in area 21.

Levers: The one on the right releases the stone block trap in area 20 (and does nothing if it’s already down). The one on the left resets the trap (and does nothing if it’s already up).

Continued tomorrow…

(Original cartography by Dyson Logos.)

Archives

Recent Posts


Recent Comments

Copyright © The Alexandrian. All rights reserved.