The Alexandrian

Posts tagged ‘ruined temple of illhan’

Go to Part 1

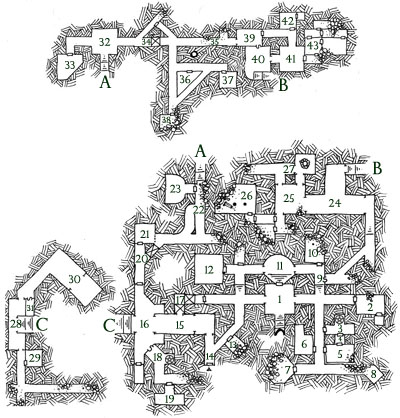
Map of the Ruined temple of Illhan

(Click for larger map. Original cartography by Dyson Logos.)

Stairs go down about 30 feet.

AREA 1: Thirty foot square. Door in the opposite wall is made of iron. To the left and right are two archways. The archways are formed by two female figures reaching up to touch the hands of the other. The women depicted are slightly different from each other: The ones on the right have shorter hair and are wearing chain shirts with swords strapped to their hips. To the left they have flowing robes with long hair cascading down around their shoulders and wear circlets (with places for gems which have been pried out).

Destroyed Murals: The walls and ceiling here were once covered in brightly painted murals; but the paint has faded and chipped to the point where no recognizable features can be made out.

AREA 2: In the far back corner on the right there is a wooden door. On the left, about midway down the wall, you see what appears to have once been a fireplace. The fireplace is now packed tight with dirt, with a cascade of looser earth spilling out across the floor of the chamber.

Closet: Door to the closet has swelled into the frame and is stuck tight. There’s an empty wooden shelf (swollen and warped). The floor has collected detritus.

AREA 3: This area is a long, narrow hall with an alcove in one wall facing a door. The alcove contains a headless statue of what appears to be a broad-shouldered man wearing a bearskin (the head of the bear hangs down the back). It holds a hammer in each hand. The head of the statue is missing.

Doors: The door from the hall has been smashed in (the lock hangs loosely from splintered wood). If the door leading to area 4 is opened, the hammers on the statues will glow a bright blue and then, a minute later, a strange, high-pitched howl will be emitted by the statue. Both the howling and glow will fade away without any seeming effect a few moments later.

AREA 4: A short hall with iron doors at either end.

Doors: The door to area 3 will trigger a magical effect (see that area). The door to area 5 has been spiked shut from that side.

AREA 5: Three skeletons are laid out on the floor near a collapsed wall. Scraps of leather cling to them.

Doors: The door to area 4 is spiked shut (from this side). The door to the hallway was once spiked shut, but the spikes have been removed (leaving only the holes behind).

AREA 6: A small chamber, twenty foot square. Off to the right there are the shattered remnants of a thin wooden door which seems to have once led to a small closet. There are three broken swords lying on the floor. On the wall opposite the door there are three large indentations, as if someone had taken a great hammer and smashed it into the stone wall.

Broken Swords: Each has caked, blackened blood along one edge of it. The break on each sword looks as if the metal was actually cut.

Indentations: All at the same level. Equidistant along the wall.

AREA 7: The chamber ends in a collapse of rubbled stone.

AREA 8: Reaching this area requires squeezing past the collapsed portion of the hallway. Halflings can squeeze through without problems; others will need to spend some time excavating and probably remove their armor.

AREA 9: Secret door is hidden from this side, but easily detected from the other. It slides to one side, recessing into the wall.

AREA 10: Most of the room beyond has collapsed, sending a cascade of earth against the door (jamming it shut). Due to a confluence of sound, every time someone tries to bash open this door it will echo loudly throughout the complex.

AREA 11: The floor of this chamber curves down to form a pool (now dry and filled with drifts of dust and dirt). The ceiling also curves up. Stairs to the south lead up to the lip of the pool. Archways to the west and east also look out onto the pool. The only way to cross between the archways or the stairs is to climb down into the pool and then climb back up again.

Archways: Formed by two male figures reaching over and touching hands palm-to-palm. The ones to the east are in chain armor; the ones to the west are wearing tunics.

Coins: There are 8 cp mixed into the detritus at the bottom of the pool.

Destroyed Murals: The walls and ceiling surrounding the pool were once covered in murals, but the paint has faded and chipped to the point where they can no longer be identified.

AREA 12: This chamber is empty, but the murals on the wall here are not as badly damaged as those found elsewhere in the complex. On the wall opposite the door, there is a large figure. His face is missing – it appears to have been deliberately defaced; the wall itself has been deeply scratched. The figure wears a bearskin cloak and holds a hammer in each outstretched hand with the heads of the hammers pointed towards each other. Surrounding him are twelve women kneeling and offering various gifts unto him:  Amphora in the hands of one; a large golden sword in the hands of another… The others are too difficult to make out; the paint has been too badly damaged.

Continued tomorrow…

Go to Part 1

When the PCs approached the ruined temple I needed to figure out which god the temple was dedicated to. I knew from my background notes that the Norse pantheon had been worshiped in this area by the Norskans, and I briefly considered re-assigning the temple to Thor. (The image of a hammer stuck in my head. If you take a peek at areas 15 and 16 on the map tomorrow, you should be able to figure out why.) Then, at the last minute, I decided not to change Illhan’s identity… but I also kept the Norskan connection. The result was the Neo-Norska Pantheon.

NEO-NORSKA PANTHEON

When the Nidhogg, the Great Serpent of Shadows, gnawed its way free from the prison which had been formed for it within the roots of Yggdrasil, it passed into the Realm of Midgard and there wrought horrible deeds and raised a mighty legion of darkness. It formed alliance with Surtr and the Muspelheim, the Realm of Fire, and with their aid prepared a great siege to sweep aside the gods.

But the ravens of Odin brought tidings of Nidhogg’s legions. The blind seers of Valhalla foretold that this might prove one of the Ragnaroks. The gods did not believe that any power could stand against the might which Nidhogg had raised, and so they closed the gates of Yggdrasil and cast loose the nine worlds – sealing themselves from the terror.

But not all within the halls of Valhalla believed that the Realm of Midgard should be abandoned. With the aid of Heimdall, the Eight Sons of Thor and the Three Daughters of Hel crossed the Rainbow Bridge, leading the Court of Young Gods to rally the armies of men and oppose the shadows of Nidhogg.

ILLHAN: Thor’s Eldest. He proved himself a great hero during the war and became known as the Bearskin Knight. He wielded a hammer in each hand.

LATER TALES: In the days after the War of the Great Serpent, the Court of Young Gods turned against itself. One of the Daughters of Hel, the Queen of Rivers, was murdered. Her sisters – the Ice Queen and the Fire Queen – accused each other of the crime and the Second War of the Young Gods began.

During the latter days of this second war, Illhan, who had pledged himself to the Ice Queen, saw the Fire Queen from afar and his ancient passion for her was lit afresh.

For more details of the sad tale which follows, see the Pleasure Palace of Izrigul in Nod #6. (Which I’m incorporating into the Neo-Norska myth cycle because it’s too cool not to use. It’s free, so check it out.)

Continued tomorrow…

Recently my open table megadungeon campaign has been expanded into an open table hexcrawl campaign. One of the interesting consequences is that players can become intensely focused on the idea of being “scooped” by other groups: There have been discussions about need to “get back here quick” before someone else can swoop in; there have been a few feelings of friendly acrimony about groups “getting lucky” on the backs of another group clearing out the “tough stuff”; and at some point there is going to be a group that goes delving into a complex that has recently been emptied by someone else.

The adventure I’m about to share is not one of those. But it was designed with that final concern in mind: Knowing that cleared out dungeon complexes were going to crop up eventually, I decided it wouldn’t hurt to key a few in ahead of time. I knew that I was going to be keeping a “restock checklist” as part of my campaign status document for the hexcrawl, and I figured pre-seeding it with a few entries would actually be for the best.

Which brings us to hex K13: The Ruined Temple of Illhan.

I’ve mentioned previously that I drew on the work of Dyson Logos considerably when it came to stocking the hexes for this campaign. The Temple of Illhan was one of those maps, and you can find Dyson’s original maps on his site (along with a lot of other wonderful stuff). In this case, Dyson had posted the map, but not the key. So it was very easy to simply plug in the map; write, “Nothing down here. Currently completely cleaned out.” And then move on to the next hex.

A few days ago, one of my groups stumbled onto the temple while looking for something else entirely. They decided to check it out, quickly concluded that it was not the place they were looking for, and then decided to continue exploring it any way. I found the resulting session (and the need to make an empty complex as entertaining as possible) intensely interesting and it seems like most of the players agreed.

(One of the players, unfortunately, was less than happy with exploring an entire complex that had nothing he could stick a sword in. It clashed hard with his expectation that “if there’s a dungeon, there will be monsters”. But based on the brief discussion I had after the session with him, it seems like the session helped reinforce the idea that, in a sandbox, you don’t have to stick around. Because there are a lot of options to pursue, you don’t have to engage with the options that don’t entertain you. That’s the great thing about them: As a DM I’m there to facilitate your entertainment, but I’m not responsible for it. It takes a lot of pressure out of the prep work.)

What I’ll be presenting over the next few days is the full key for the dungeon as it was developed in play. We’ll start today with the portion of the temple which remains above ground.

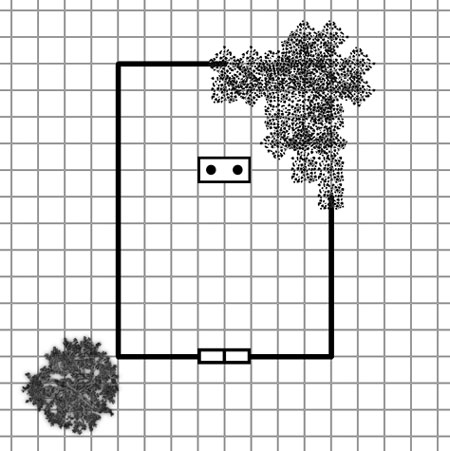
Special thanks to Dyson Logos for giving me permission to reproduce his maps and the adventure key as part of this series. (It should be noted, however, that the map of the above ground temple below is not Dyson’s work. His stuff is much, much cooler.)

I’ll also note that Dyson has has posted some session logs of his group playing through the original version of the temple. My version of the temple isn’t based on those logs at all, but it might be interesting to do a side-by-side comparison of the same map being used in two different ways.


THE RUINED TEMPLE

Ruined Temple of Illhan

(Map drawn in Dundjinni.)

DOORS: Front doors hang loosely from their hinges. They appear to have been smashed open. The splintered wood is gray and desiccated, however, indicating the damage is well-weathered with age.

TREE: A stunted, twisted growth.

COLLAPSE: Tumbles out across the prairie. Grass is growing up amidst the rubble pile. The pile can be easily climbed over to enter or exit the church.

INTERIOR: Filled with rubble. It appears that the upper floors of the building collapsed at some point. This rubble has been scooped out to the right and the left beyond the door, however, forming a path leading to a stone block in the far end of the building (the altar).

ALTAR: A kind of stone block. On the side of which is a bas relief depicting crossed hammers.

SECRET STAIRS: The stone block has actually been pushed forwards towards the door, partially revealing stairs going down. (Originally it would have cleared the stairs entirely, but it has ground to a halt and is now jammed halfway open, forcing human-sized characters to squeeze through.)

Altar of Illhan

Continued tomorrow…

Archives

Recent Posts


Recent Comments

Copyright © The Alexandrian. All rights reserved.