 We’re going to continue our remix of Keep on the Shadowfell by looking at the kobold lair. This is the area made up of encounters A2 and A3 in the original module.
KOBOLDS – BACKGROUND
The kobold tribe is known as the Clan of the Withered Arm. Once in every generation a child of the clan is born with a withered arm, marking them as the future leader of the clan. The clan’s history in the area around Winterhaven actually dates back more than 25 years to a time period when they were driven from their ancestral lands by Necross the Black Mage. The villagers in Winterhaven, however, were largely unaware of their presence: They survived by hunting wild game and generally shunned contact with the civilized races (who they had learned to fear).
Kalarel’s arrival in the area changed all that. He sent one of his goblin lackeys — brutish oaf named Irontooth — with a band of thugs to take control of the kobolds. They took the kobolds by surprise, overpowered their leader (a kobold named Issitik), and chopped off his arm. Irontooth now wears the withered arm on a chain about his neck.
THE KOBOLD LAIR – OUTSIDE
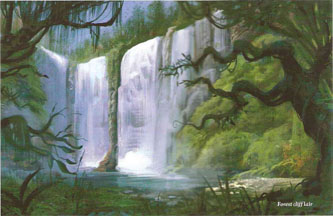
Encounter A2: The Kobold Lair – Outside is going to remain largely unchanged. In fact, the only major thing we’re going to do here is add a little extra flavor to the sacred circle:
Sacred Circle: A circle of worn stone monoliths stands on the ground in this location. When a creature steps within the circle, blue runes glow softly on the surface of the stones and the creature gains a +1 bonus to attack rolls. A Nature check (DC 10) recognizes the circle as a druidic friendship circle. A DC 20 check allows a character to decipher enough of the runes to identify the circle as having once belonged to the Vassals of the Verdant Lord.
TRACKS: A successful Perception check (DC 10) allows a character to notice the large number of kobold tracks in the soft mud along the river bank leading to and from the waterfall. A DC 22 check reveals a few goblin tracks mixed in with the kobold tracks.
WATERFALL: In addition to acting as difficult terrain, the roaring noise of the waterfall imposes a -5 penalty to Perception checks on characters within 4 squares. It imposes a -20 penalty to Perception checks made to hear anything happening on the other side of the waterfall.
THE KOBOLD LAIR – PROBLEM AREAS
This inside of the kobold lair, however, needs a lot more work. Notable problems include:
(1) The encounter descriptions claim that the only entrance into the lair is through the waterfall. The actual battlemap, however, depicts two other entrances.
(2) The edges of the map are left completely open. In fact, you can come in through one entrance, turn immediately to the left, move one square, and… disappear off the edge of the map. Not only does this imply that there’s more to the lair than what’s described in the module, it also makes this encounter almost impossible to run: Players are going to immediately be asking what they’re not seeing off the edges of the map. Can they maneuver back there? Is there anything valuable? Are there more creatures? And so forth.
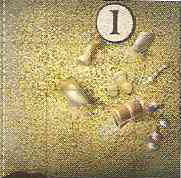 (3) The map also shows a huge pile of treasure that fills 400 square feet.
However, the module claims — and I wish I was kidding about this — that abolutely none of the gold you see there is valuable. The only valuable stuff is in the chest: 420 gp and a suit of magical armor.
There is absolutely nothing wrong with the amount of treasure listed in the module. (Although why Irontooth isn’t wearing the magical armor instead of sticking it in the chest is a bit of an open question.) But you just cannot show your players a picture of 400 square feet of gold and then say, “Ha ha! Just kidding!”
(4) The kobolds are supposed to attack in two waves spaced 3 rounds apart. But a single move action from any of the entrances into the lair will put a PC in a location where they can see the kobolds in the second wave. What are these kobolds doing? Are they just standing there? Are they putting on their armor (giving the PCs a potential advantage if they engage early)? The players are going to want to know.
For the most part we’re not going to change the fundamental dynamic of this encounter, but we are going to clean it up.
First, when running the outside portion of the encounter leave the battlemap folded in half (so that the inside portion of the lair cannot be seen by the players). Ignore the two additional entrances to the kobold lair and describe that entire side of the area as being a mossy cliff face.
Second, the beautiful color illustration of the waterfall in the module doesn’t match the battlemap. (Yet another example of the sloppy production quality of this product.) However, if you can make a high-quality copy of this illustration and then trim the left half of the image you should end up with a pretty good handout.
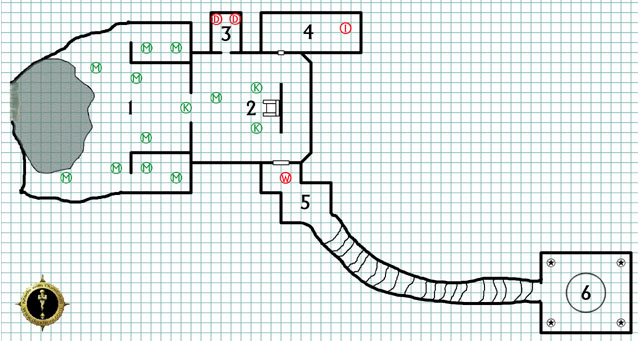
Third, we’re going to scrap the entire interior map of the kobold lair and replace it with a new one that actually makes sense; supports the attack waves designed into the encounter; and also includes more flavor.
THE KOBOLD LAIR – INSIDE THE LAIR
TACTICS – SURPRISED: If the kobolds are surprised in their lair, the kobolds attack in two waves as described in the module. The initial locations of the first wave are indicated on the map in green and the initial locations of the second wave are indicated in red.
The dragonshields and Irontooth are sleeping when the PCs arrive. It takes them 1 round to wake up; 1 round to realize what’s happening; and then 1 round to grab their weapons. (If the PCs reach them before the second wave is triggered, they probably won’t be armed.)
The wyrmpriest’s delay is merely due to hesitation. If the PCs burst in on him, he is fully prepared to defend himself.
TACTICS – FOREWARNED: If any of the kobolds outside the lair manage to flee into the lair, this encounter becomes much more difficult. The minions and skirmishers will have all gathered in area 1. The wyrmpriest will have moved to the archway leading from area 1 to area 2, positioning himself so that he can use both his energy orb and incite faith abilities to aid the other kobods. Irontooth, flanked by the dragonshields, will be sitting in the throne in area 2 wearing the withered arm about his neck. (“You fools. Orcus will not tolerate your meddling. Kill them all.”) The dragonshields and Irontooth will hold back, but if it looks like the PCs are getting the upper hand (or if the PCs try to attack Irontooth) they’ll move to engage.
AREA 1 – THE UNNATURAL CAVE: The pool behind the waterfall is relatively calm and shallow, allowing characters to pass through it normally (although the squares of the waterfall itself are difficult terrain, see Outside the Lair). The kobolds will immediately move to attack intruders (see Tactics, above).
The rough, moisture-slicked walls of the cavern behind the waterfall give way to walls of ancient, worked stone. Here and there can be seen what appear to have once been bas relief statues — but years of moisture have worn them away to unrecognizable lumps. Through the archway to the east can be seen another large chamber, in the center of which stands a great throne of stone. Set into the back of the throne is a giant fire glowgem, casting an eery red light thorughout the chambers.
A few of the more favored kobolds roost in the antechambers here. (The rest of the kobolds make their nests in treetops throughout the area.)
AREA 2 – THE THRONE ROOM: The fire glowgem on the back of the throne casts a bright light to a distance of 20 squares. It can be pried loose and is worth 500 gp. A Nature check (DC 18) reveals that such thrones are often used as part of druidic initiation rituals.
AREA 3 – DRAGONSHIELD LAIR: The two dragonshields here betrayed Issitik when Irontooth and the goblins came. As a result, they were given a place of honor.
Two thick mats of straw are laid out on the floor in this otherwise nondescript room of plain stone.
AREA 4 – IRONTOOTH’S LAIR: This was once a library maintained by the Vassals of the Verdant Lord. The books here were protected by powerful magicks before the kobolds arrived and broke the seals.
A great, mounded nest of shredded paper has been built up in one corner of the room. It looks surprisingly comfortable. A variety of braziers, each burning a different scented incense, are lit here and there and around the room. The walls are lined with empty stone shelves. A large iron chest has been shoved into a corner.
The nest here is made from the shredded remains of the books. The chest can be opened with the key Irontooth keeps in his pouch or a Thievery check (DC 20). It contains 420 gp and a suit of +1 dwarven chain mail (see module).
AREA 5 – THE WYRMPRIEST’S CHAMBER: This chamber was once a shrine dedicated to the goddess Tiamat (who is held sacred by the Clan of the Withered Arm). Once Irontooth took control of the clan, he forced a conversion of the shrine to the worship of Orcus.
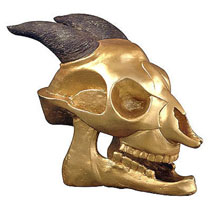 The walls of this crooked chamber appear to have once been covered in colorful mosaics, but these have recently been defaced beyond recognition. In one corner of the room there is a shallow depression in the floor before a plain altar of stone. Atop the altar a golden skull with ram’s horns sits in honor.
The far side of the chamber gives way once more to the natural walls of the cavern, in a series of tiered steps leading down into the darkness.
The golden skull is worth 150 gp.
A character making a successful Perception check (DC 15) will notice the following symbol carved into the wall behind the altar:
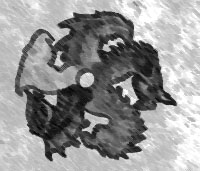
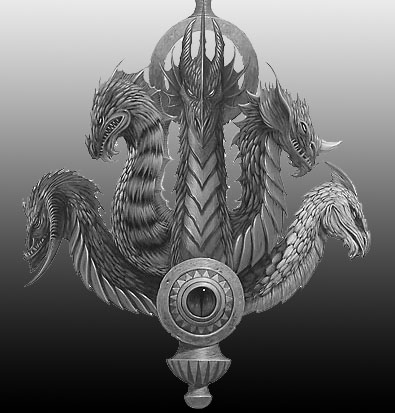
A Religion check (DC 15) will recognize this as a holy symbol of Tiamat. Characters taking a closer look at the symbol can make an additional Perception check (DC 15) to realize that the hole in the center of the symbol is actually a depressed button. Pushing the button causes a section of the wall to slide back, revealing a stone idol:
AREA 6 – THE DESECRATED TOMB: The stairs leading down to area 6 are uneven and slick with condensation. Characters must make a Balance check (DC 10) while moving down the stairs.
The stairs bottom out into a large, square chamber. In each corner a thick ionic column stands between roof and ceiling. The walls here are covered in small niches. In a few of these niches there are ceramic urns, but it appears that most of these urns have been destroyed: The floor is covered in ash and broken shards of pottery.
In the center of the room, the floor sinks into a circular depression. In the center of this depression a 15-foot wide mass of thick roots run between the floor and the ceiling.
This area was once a tomb for the Vassals of the Verdant Lord. When the kobolds moved in, they desecrated the burial chamber. Their thoughtless and spiteful destruction created a vengeful druidic spirit which still lurks here. The kobolds avoid this entire area now.
If a PC moves more than 15 feet into the room, the druidic spirit will manifest itself:
A howling wind suddenly whips through the chamber. Shards of light burst forth from somewhere within the tangled mass of roots in the center of the chamber, and then the roots begin to move of their own accord — drawing apart and forming a cage-like sphere in the center of the room. Looking through the gaps between the roots you can see a translucent spirit in the form of a human figure floating in the center of the sphere.
“LEAVE US TO OUR ETERNAL REST.”
PCs can attempt a skill challenge (4/2, with Diplomacy and Nature as primary skills) to convince the spirit that they are friendly. Knowing of the Vassals of the Verdant Lord counts as an automatic success in this skill challenge. Swearing fealty or otherwise pledging themselves to the druidic cause also counts as an automatic success.
If the PCs fail, the light in the center of the chamber grows and the spirit begins lashing out with lightning bolts (Range 20, 1d6+2 damage). There is no way for the PCs to exorcise this spirit at this time. (Alternatively, if you have the 4th Edition MM, use the stats for a phantom warrior but add the lightning bolt attack. The roots will move to defend the spirit from attacks, granting it — but not its targets — cover.)
If the PCs succeed, the spirit can give them the history of the kobold lair. In addition, the druids have found a greater connection to the spirit of the land through their death. They are aware of Kalarel’s ritual, which they describe as “a gaping wound in the natural world”. They are also aware that there is a powerful artifact at the dragon burial site which and can tell the PCs where to find it. The artifact is “resonating” with Kalarel’s ritual and they know that he seeks it.
TREASURE: The dragonshields and Irontooth each wear necklaces from which dangle dragon figurines carved of obsidian. On the bottom of the figure is etched the outline of a skull with ram’s horns. Anyone who succeeds on a Religion check (DC 15) recognizes the etching as an abstract representation of the demon lord of the undead, Orcus. PCs can sell the necklaces for 40 gp each in Winterhaven. The rest of the kobolds, in addition to their meager equipment, have 7 gp in loose coin on them.
WHERE ARE ALL THE WOMEN?
The Clan of the Withered Arm lives in what is known as a bassabal by the kobolds: The nest-mates of the clan live more than a hundred miles to the south in the clan’s “maternal nests”. Once per year, during the bassasurnal (“the season of egg-laying”), a large portion of the clan will make the journey south to meet with their nest-mates.
The kobold young are raised in the maternal nests until their year of ascension, at which time the clan males will test them through the rites of manhood and then bring them back to the hunter nests.
WHAT HAPPENED TO ISSITIK?
Issitik was taken to Area 2 of the keep and thrown in a cell. He’s being held as a hostage to help keep the kobolds in line.
If Issitik is freed, he will attempt to enlist the aid of the PCs in freeing his people. If he is brought to the kobold lair, all of the kobolds — except for the two dragonshields — will turn against Irontooth. Issitik will thank the PCs and gift them with the fire glowgem from the throne and the +1 dwarven chain mail from the chest. He will also tell them this: “While I lay in pain and captivity, I saw great visions of darkness. The thing beyond the veil brings death with its grip, and Kalarel hopes to open all these lands to its grasp. He must be stopped before his power grows too great.”
If Issitik discovers that his clan has been wiped out (or largely wiped out), he will lay a curse upon the valley and the village of Winterhaven. If he knows the PCs were responsible, he will give them a cold epithet in kobold and say: “May the grasp of the veil-thing find your soul!” Later, if the PCs investigate the kobold lair again, they will find a message written in blood on the wall behind the throne. The runes require an Arcana check (DC 15) to decipher and read:
THIS VALLEY SHALL BE CURSED FOR THE BLOOD IT HAS SPILT
(The consequences of that curse, if any, could, of course, lead to other adventures.)
Either way, Issitik seeks to lead as many of his followers as possible back to the maternal nests. He has become convinced that the lands of this valley have become cursed for his people. However, if the PCs helped the kobolds, two kobold slingers — named Dassesek and Trigassas — volunteer to join the PCs in fighting Kalarel.



ARCHIVED HALOSCAN COMMENTS
Guest
if anyone has read goblins they know why irontooth doesn’t use the treasure
Tuesday, March 08, 2011, 10:01:05 PM