The Alexandrian

Posts tagged ‘rpg scenarios’

Recently my open table megadungeon campaign has been expanded into an open table hexcrawl campaign. One of the interesting consequences is that players can become intensely focused on the idea of being “scooped” by other groups: There have been discussions about need to “get back here quick” before someone else can swoop in; there have been a few feelings of friendly acrimony about groups “getting lucky” on the backs of another group clearing out the “tough stuff”; and at some point there is going to be a group that goes delving into a complex that has recently been emptied by someone else.

The adventure I’m about to share is not one of those. But it was designed with that final concern in mind: Knowing that cleared out dungeon complexes were going to crop up eventually, I decided it wouldn’t hurt to key a few in ahead of time. I knew that I was going to be keeping a “restock checklist” as part of my campaign status document for the hexcrawl, and I figured pre-seeding it with a few entries would actually be for the best.

Which brings us to hex K13: The Ruined Temple of Illhan.

I’ve mentioned previously that I drew on the work of Dyson Logos considerably when it came to stocking the hexes for this campaign. The Temple of Illhan was one of those maps, and you can find Dyson’s original maps on his site (along with a lot of other wonderful stuff). In this case, Dyson had posted the map, but not the key. So it was very easy to simply plug in the map; write, “Nothing down here. Currently completely cleaned out.” And then move on to the next hex.

A few days ago, one of my groups stumbled onto the temple while looking for something else entirely. They decided to check it out, quickly concluded that it was not the place they were looking for, and then decided to continue exploring it any way. I found the resulting session (and the need to make an empty complex as entertaining as possible) intensely interesting and it seems like most of the players agreed.

(One of the players, unfortunately, was less than happy with exploring an entire complex that had nothing he could stick a sword in. It clashed hard with his expectation that “if there’s a dungeon, there will be monsters”. But based on the brief discussion I had after the session with him, it seems like the session helped reinforce the idea that, in a sandbox, you don’t have to stick around. Because there are a lot of options to pursue, you don’t have to engage with the options that don’t entertain you. That’s the great thing about them: As a DM I’m there to facilitate your entertainment, but I’m not responsible for it. It takes a lot of pressure out of the prep work.)

What I’ll be presenting over the next few days is the full key for the dungeon as it was developed in play. We’ll start today with the portion of the temple which remains above ground.

Special thanks to Dyson Logos for giving me permission to reproduce his maps and the adventure key as part of this series. (It should be noted, however, that the map of the above ground temple below is not Dyson’s work. His stuff is much, much cooler.)

I’ll also note that Dyson has has posted some session logs of his group playing through the original version of the temple. My version of the temple isn’t based on those logs at all, but it might be interesting to do a side-by-side comparison of the same map being used in two different ways.


THE RUINED TEMPLE

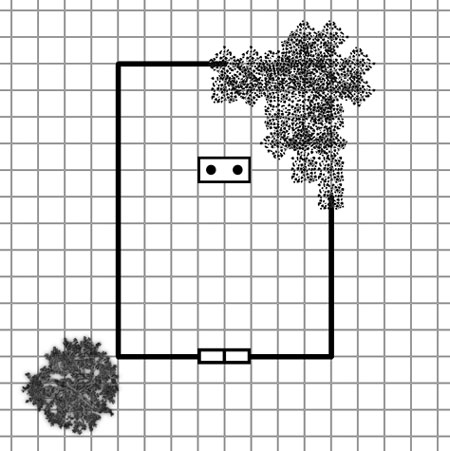
Ruined Temple of Illhan

(Map drawn in Dundjinni.)

DOORS: Front doors hang loosely from their hinges. They appear to have been smashed open. The splintered wood is gray and desiccated, however, indicating the damage is well-weathered with age.

TREE: A stunted, twisted growth.

COLLAPSE: Tumbles out across the prairie. Grass is growing up amidst the rubble pile. The pile can be easily climbed over to enter or exit the church.

INTERIOR: Filled with rubble. It appears that the upper floors of the building collapsed at some point. This rubble has been scooped out to the right and the left beyond the door, however, forming a path leading to a stone block in the far end of the building (the altar).

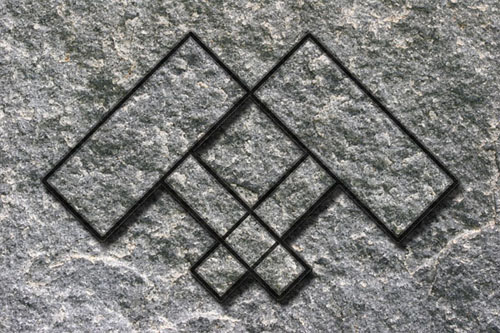
ALTAR: A kind of stone block. On the side of which is a bas relief depicting crossed hammers.

SECRET STAIRS: The stone block has actually been pushed forwards towards the door, partially revealing stairs going down. (Originally it would have cleared the stairs entirely, but it has ground to a halt and is now jammed halfway open, forcing human-sized characters to squeeze through.)

Altar of Illhan

Continued tomorrow…

One Page Dungeon Codex

Last year my one-page dungeon The Halls of the Mad Mage, inspired by the twisted landscapes of M.C. Escher, won Best Geometry in the One Page Dungeon Contest. The deluxe version of the One Page Dungeon Codex 2009, which collects all of the winners, has now been released as a FREE e-book from Tabletop Adventures.

I believe the 2010 contest has also concluded (I didn’t enter this year).

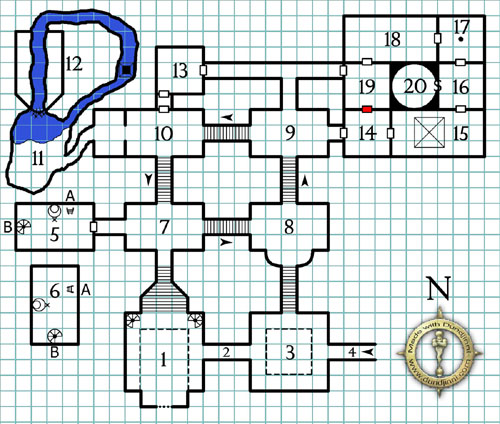
THE HALLS OF THE MAD MAGE

Halls of the Mad Mage

If you like The Halls of the Mad Mage, while you’re at RPGNow for the Codex, you might also want to check out some of my other adventure supplements:

Mini-Adventure 1: Complex of Zombies Mini-Adventure 2: The Black Mist

Halls of the Mad Mage

July 24th, 2009

Halls of the Mad Mage - Map

Awhile back, ChattyDM (Philippe-Antonie Menard) announced the One Page Dungeon Contest. For those not familiar with the One Page Dungeon Concept, the idea was originally conceived by David Bowman (Sham’s Grog & Blog) and then developed by Chgowiz (Old Guy RPG Blog) and Amityville Mike (Society of Torch, Pole, and Rope). Basically, the One Page Dungeon is a template for designing a complete dungeon in one page.

To a certain extent, the point of the template is to emphasize that you don’t need a lot of laborious prep to run a successful adventure: With nothing more than a dungeon map and a couple of pertinent notes, a GM can use his creativity at the game table to take care of everything else. I think a lot of us fall into the trap of thinking that our adventure notes need to be rigorous documents, but the reality is that, when we embrace our own ability to improvise creatively, that level of detail is more than over-kill.

If you’re willing to embrace that lighter design ethos, the One Page Dungeon is not only great for its ease of prep. It’s also great for ease of running. With a One Page Dungeon you don’t have any notes to flip through: You have your rulebook, a single sheet of paper, and your dice. The entire dungeon is literally laid out in front of you. This isn’t just simple, it’s usable.

Of course, there are a lot of things the One Page Dungeon can’t do. And thus, for me, its value is primarily in its use as an exercise: The artificial strictures of the form force you to become more creative while reminding you that simplicity has its value.

So, long story short, there was a contest. And for this contest I was inspired to whip out a One Page Dungeon of my own: The Halls of the Mad Mage.

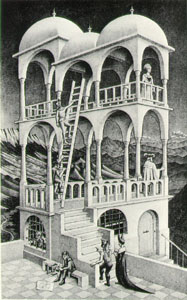
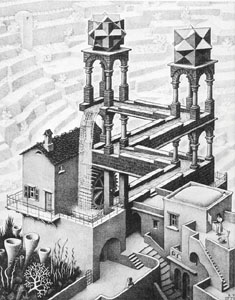
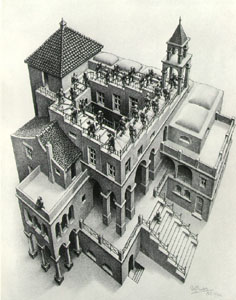
The design of the Halls was inspired by M.C. Escher:

Escher Escher Escher Escher

The Halls of the Mad Mage twist back on themselves in impossible spatial contortions. Here you’ll find everfalling rivers, endless stairs, and mobius chambers.

So I was quite happy when I won Best Geometry in the One Page Dungeon Contest:

One-Page Dungeon Contest - Halls of the Mad Mage (Justin Alexander) - Best Geometry 2009

Those of you interested in taking a tour of the Halls of the Mad Mage should feel free to download the PDF:

THE HALLS OF THE MAD MAGE

Map made with Dundjinni software, http://www.dundjinni.com

Keep on the Shadowfell - The Alexandrian Remix

Keep on the Shadowfell was the inaugural product for 4th Edition. I was fairly disappointed with the quality and the content of the module, but I wanted to playtest the new edition. So I decided to do a fairly expansive remix to give the adventure a stronger backbone and a richer mythology; adding depth and breadth where necessary.


COMPLETE COLLECTION

DOWNLOAD HERE

Patrons of the Alexandrian can download a PDF collection of the entire Remix. It includes:

The Complete Collection, containing every article form the series (including addendums, as detailed below).

Justin’s Running Files, which function as a kind of cheat sheet for the adventure. These are the actual notes I prepared and used for running the adventure, more or less stripping out all of hte design notes and other commentary from the Complete Collection.


INITIAL IMPRESSIONS
First Impressions
Impressions with Spoilers
Last of the First Impressions

ANALYZING DESIGN
Traps and the Chamber of Statues
Remixing the Chamber of Statues
Rotten Cherubs

REMIXING KEEP ON THE SHADOWFELL
Part 1: Kobolds
Part 2: The Kobold Lair
Part 3: Arriving in Winterhaven
Part 4: On the Streets of Winterhaven
Part 5: On the Streets of Winterhaven 2
Part 6: Winterhaven NPCs
Part 7: Winterhaven NPCs 2
Part 8: Winterhaven Developments
Part 9: Cultists in Winterhaven
Part 10: The Ruined Keep
Part 11: Kalarel’s Ritual and the Dragon Burial Site
Part 12: The Three Clue Rule
Part 13: Three Clue Rule – First Revelations
Part 14: Three Clue Rule – Second Revelations

BELATED ADDENDUMS
How (Not) To Fix the Keep on the Shadowfell
A Much Belated Addendum
Kobold Lair Battlemaps
Xandering the Dungeon

DM’S CHEAT SHEET

Keep on the Shadowfell

Go to Part 1

Keep on the ShadowfellSPOILER WARNING!

The following thoughts contain minor spoilers for Keep on the Shadowfell. If you don’t want to be spoiled, don’t read it. And if you’re in my gaming group then you definitely shouldn’t be reading it.

REVELATION 4: CULT OF ORCUS

Once the PCs become aware of the cult’s potential involvement in the area (either through identifying a holy symbol; an Orcus idol; or learning of the keep’s true history), they may want to find out more about Orcus and his cult.

CLUE 1: ARCANA/RELIGION CHECK. See the Monster Manual, pg. 206, for Orcus Lore.

CLUE 2: STREETWISE CHECK/VALTHRUN. See “On the Streets of Winterhaven”.

CLUE 3: DOUVEN STAHL. Douven Stahl can tell them everything on pgs. 206 and 210 of the Monster Manual regarding Orcus and his cults. See, also, “Dragon Burial Site”.

REVELATION 5: KALAREL’S RITUAL

The PCs don’t need to know about Kalarel’s ritual before stumbling into area 19 of the keep, but they’re likely to be interested in learning what the cult is planning.

CLUE 1: KALAREL’S RITUAL LETTER. The note Kalarel writes to Ninaran can be recovered after the “Dead Walk” interlude. It mentions the keep (see below).

CLUE 2: DOUVEN STAHL. Douven Stahl can make several informed guesses regarding the ritual (see “Dragon Burial Site”).

CLUE 3: SIR KEEGAN. Sir Keegan, in area 8 of the keep, can tell them of the Fane of Orcus which lay beneath the keep (see “Kalarel’s Ritual”). He knows that the cultists have gathered there.

KALAREL’S RITUAL LETTER

I received your report on the runebearers. Next time you see them, but an end to their meddling. Mix the blood of ten people with the elixir my messenger brings. Then trace the following pattern on the ground of the graveyard and pour the liquid into the lines:

Kalarel - Necromantic Symbol

With the thinning of the veil here at the keep, this circle will create a sympathetic connection to the Shadowfell.

My work here is very near completion. It will not be long now. If you come to the keep, the pass phrase for the second level is “from the ground, some magic was found”.

Kalarel

USING THE REVELATION LIST

Basically, there are three steps to my use of the revelation list for an adventure:

First, I determine the chokepoints of the adventure and list the necessary revelations.

Second, for each revelation I make a list of at least three clues and then incorporate these clues into the design of the adventure.

Third, while actually running the adventure, I keep the revelation-and-clue list handy as a quick-reference tool. I treat it as a literal checklist: If the PCs find a clue, I check it off. If the PCs have missed a clue (by failing to search a room, for example), I’ll circle it. If the PCs have definitely reached a particular conclusion (not just considered it as a possibility, but definitively concluded that “this is what’s happening”), I’ll cross the entire revelation off my list.

Using this approach allows me to spot potential trouble spots as they’re developing: If, for example, the PCs have discovered all the clues I’ve designed for a particular revelation but, for whatever reason, still haven’t draw the proper conclusion then I know I need to introduce new clues. Similarly, if they’ve been missing a lot of clues for a particular revelation, I can start anticipating the need for new clues.

My original Three Clue Rule essay had a lengthier discussion of how to deal with these types of issues as they emerge, but here’s an example: If the PCs have missed or ignored all of the clues suggesting that they should really check out the Keep of the Shadowfell and see what’s going on there, I might decide to trigger Ninaran’s assault on Lord Padraig’s manor house with the intention that either Ninaran or one of the other cultists will willingly surrender when the encounter turns against them and spill their guts regarding Kalarel’s plans.

Similarly, if the PCs haven’t found the kobold lair yet, I might trigger one of the kobold encounters — either the “Slyblade Hunter” or “Farmer’s Jeopardy” encounters can be used without the PCs taking any action themselves — and use it as a way of introducing a new clue. (Or, if nothing else, give the players something to do while I try to figure out another way of getting them back on track.)

The good news is that, when you use the Three Clue Rule, you generally won’t run into these problems in the first place, so you’ll be able to spend more time playing the game and less time trying to fix the game.

July 2nd, 2008 REMIXING KEEP ON THE SHADOWFELL

PART 14: THREE CLUE RULE – SECOND REVELATIONS

Go to Part 1

SPOILER WARNING!

The following thoughts contain minor spoilers for Keep on the Shadowfell. If you don’t want to be spoiled, don’t read it. And if you’re in my gaming group then you definitely shouldn’t be reading it.

REVELATION 4: CULT OF ORCUS

Once the PCs become aware of the cult’s potential involvement in the area (either through identifying a holy symbol; an Orcus idol; or learning of the keep’s true history), they may want to find out more about Orcus and his cult.

CLUE 1: ARCANA/RELIGION CHECK. See the Monster Manual, pg. 206, for Orcus Lore.

CLUE 2: STREETWISE CHECK/VALTHRUN. See “On the Streets of Winterhaven”.

CLUE 3: DOUVEN STAHL. Douven Stahl can tell them everything on pgs. 206 and 210 of the Monster Manual regarding Orcus and his cults. See, also, “Dragon Burial Site”.

REVELATION 5: KALAREL’S RITUAL

The PCs don’t need to know about Kalarel’s ritual before stumbling into area 19 of the keep, but they’re likely to be interested in learning what the cult is planning.

CLUE 1: KALAREL’S RITUAL LETTER. The note Kalarel writes to Ninaran can be recovered after the “Dead Walk” interlude. It mentions the keep (see below).

CLUE 2: DOUVEN STAHL. Douven Stahl can make several informed guesses regarding the ritual (see “Dragon Burial Site”).

CLUE 3: SIR KEEGAN. Sir Keegan, in area 8 of the keep, can tell them of the Fane of Orcus which lay beneath the keep (see “Kalarel’s Ritual”). He knows that the cultists have gathered there.

KALAREL’S RITUAL LETTER

I received your report on the runebearers. Next time you see them, but an end to their meddling. Mix the blood of ten people with the elixir my messenger brings. Then trace the following pattern on the ground of the graveyard and pour the liquid into the lines:

With the thinning of the veil here at the keep, this circle will create a sympathetic connection to the Shadowfell.

My work here is very near completion. It will not be long now. If you come to the keep, the pass phrase for the second level is “from the ground, some magic was found”.

– Kalarel

USING THE REVELATION LIST

Basically, there are three steps to my use of the revelation list for an adventure:

First, I determine the chokepoints of the adventure and list the necessary revelations.

Second, for each revelation I make a list of at least three clues and then incorporate these clues into the design of the adventure.

Third, while actually running the adventure, I keep the revelation-and-clue list handy as a quick-reference tool. I treat it as a literal checklist: If the PCs find a clue, I check it off. If the PCs have missed a clue (by failing to search a room, for example), I’ll circle it. If the PCs have definitely reached a particular conclusion (not just considered it as a possibility, but definitively concluded that “this is what’s happening”), I’ll cross the entire revelation off my list.

Using this approach allows me to spot potential trouble spots as they’re developing: If, for example, the PCs have discovered all the clues I’ve designed for a particular revelation but, for whatever reason, still haven’t draw the proper conclusion then I know I need to introduce new clues. Similarly, if they’ve been missing a lot of clues for a particular revelation, I can start anticipating the need for new clues.

My original Three Clue Rule essay had a lengthier discussion of how to deal with these types of issues as they emerge, but here’s an example: If the PCs have missed or ignored all of the clues suggesting that they should really check out the Keep of the Shadowfell and see what’s going on there, I might decide to trigger Ninaran’s assault on Lord Padraig’s manor house with the intention that either Ninaran or one of the other cultists will willingly surrender when the encounter turns against them and spill their guts regarding Kalarel’s plans.

Similarly, if the PCs haven’t found the kobold lair yet, I might trigger one of the kobold encounters — either the “Slyblade Hunter” or “Farmer’s Jeopardy” encounters can be used without the PCs taking any action themselves — and use it as a way of introducing a new clue. (Or, if nothing else, give the players something to do while I try to figure out another way of getting them back on track.)

The good news is that, when you use the Three Clue Rule, you generally won’t run into these problems in the first place, so you’ll be able to spend more time playing the game and less time trying to fix the game.

Comments (67)

| Link

Archives

Recent Posts

Recent Comments

Copyright © The Alexandrian. All rights reserved.