The Alexandrian

Posts tagged ‘keep on the shadowfell’

Kobolds!After studying Keep on the Shadowfell, I came to the conclusion that the only way I could run the module would be if I remixed the module in an effort to overcome some of its shortcomings. I previously demonstrated some detail work on a particularly troublesome encounter, but now I’m going to be taking a look at the big picture: Giving the adventure a stronger backbone and a richer mythology; rearranging the setpieces; fleshing out Winterhaven to give it some unique character and depth; adding extra encounters where possible; and so forth.

SPOILER WARNING!

The following thoughts contain minor spoilers for Keep on the Shadowfell. If you don’t want to be spoiled, don’t read it. And if you’re in my gaming group then you definitely shouldn’t be reading it.

RAW RESOURCES

While working with the kobolds, we basically have the following resources to pillage from Keep on the Shadowfell:

(1) On the Road: Kobold Brigands

(2) A1: Kobold Ambush

(3) A2: Kobold Lair – Outside

(4) A3: Kobold Lair – Inside

Or, to look at that another way, we have the following encounter builds:

(1) Kobold Dragonshields (x2), Kobold Slinger, Kobold Minions (x5)

(2) Kobold Dragonshields (x3), Kobold Skirmisher, Kobold Wyrmpriest

(3) Kobold Dragonshield, Kobold Skirmisher, Kobold Slinger, Kobold Minions (x10)

(4) Irontooth (goblin), Kobold Dragonshields (x2), Kobold Skirmisher (x3), Kobold Wyrmpriest, Kobold Minions (x10) (in two waves)

ON THE ROAD: KOBOLD BRIGANDS

We’re going to leave this encounter largely unchanged. From a conceptual standpoint it serves as a nice introduction to the problems besetting the village of Winterhaven. And from a design standpoint, it’s a relatively simple encounter that serves as a nice way to introduce players and DM alike to the new rules.

However, we do need to make one slight adjustment because of some sloppy design. There are two separate triggers for starting this encounter. The PCs are approaching from the east and trigger #1 is:

The minions make themselves visible, darting from their hiding places, when one or more PCs reach the place in the road between the two easternmost boulder piles.

And trigger #2 is:

Alternatively, if one or more of the PCs decide to move off the road and travel through the grassy terrain, it’s possible that some of the kobolds will be spotted in their hiding places. If a PC moves to a square that provides line of sight to a kobold, that creature lets out a screech that alerts its companions.

Sounds good, but look at the map:
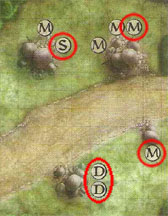
KotS - Kobold Ambush Locations

All of these kobolds are going to be visible to PCs traveling along the road long before they reach the easternmost boulders. There is some forest just off the right of the map shown here that will help to obscure the northern minion, but this doesn’t help the southern minion (who can be spotted from the road 30 feet before the boulders) nor the dragonshields and skirmisher (who appear to have been placed on the wrong side of the boulders they’re supposed to be hiding behind).

Worst. Ambush. Ever.

MOVE THE MONSTERS: Obviously we need to move the monsters.

Minions: Put all the kobold minions and hide them behind the western boulders where they can’t be seen before the ambush is sprung.

Slingers: You can’t see it in the picture here, but on the battlemap there’s a small patch of forest just to the west (on the north side of the road). Put the slinger in this patch of forest (where he benefits from cover, but can shoot at the PCs freely).

Dragonshields: Off the east side of the map there is a forest south of the road. Put both dragonshields inside this forest.

PRE-COMBAT: The module suggests the following set-up:

Have the players place the miniatures of their characters on the road within 2 squares of the eastern edge of the map, then give them two rounds to move their characters westward.

I absolutely hate this. First, they’ve gotten their miniature skirmish game all over my roleplaying game. Second, the setup invites metagaming and ruins any element of surprise. (“Gee, I wonder if we’re going to be ambushed…”) Third, it creates two really boring rounds of “action” in which the players all take turns with no motivation beyond “head west… I guess”.

It’s just a poor gameplay experience.

So here’s what you do:

(1) You lay out the scenario: “You are on the King’s Road traveling west towards Winterhaven. How are you travelling?”

(2) At the very least, you want to establish a marching order (sequence and relative positioning). But, without prompting the players, you also want to find out what active precautions they’re taking.

(3) If nobody states that they’re specifically watching out for an ambush, use their passive Perception checks (10 + Perception modifier) to determine whether or not they spot the kobold dragonshields hiding in the woods (DC 19). (This is a bit of a cheat because, given the pregenerated characters, I know none of them will detect the dragonshields with a passive Perception check.)

(4) If they do state they’re watching out for an ambush, allow them to make an active Perception check (d20 + Perception modifier) to determine whether or not they spot the kobold dragonshields hiding in the woods (DC 19).

(5) If they detect the dragonshields, the encounter starts when they get within 30 feet of where the dragonshields are hiding. Lay out the battlemap, position them according to their marching order, and inform whoever rolled high enough on their Perception checks that they’ve spotted the dragonshields lurking in the woods.

(6) If they don’t detect the dragonshields, the encounter starts when they reach the easternmost boulders. Lay out the battlemap, position them according to their marching order, and describe the kobold minions pouring out of their hiding spots to attack them (see below).

TACTICS: Ideally, the PCs are surprised. The minions will swarm out and engage them. The dragonshields will emerge from the forest onto the road behind them, cutting off their escape. The slinger will being shooting at them from the cover of the forest.

If the PCs detect the dragonshields and attack, the minions will swarm out and come to the dragonshields’ defense. The slinger will also emerge from cover, move close enough to attack, and begin firing.

GOALS: Make the ambush actually work as an ambush. Make the start of combat more dramatic, immediate, and exciting.

GUARDING THE KEEP

I talked about this briefly before, but the first two combat encounters in Keep on the Shadowfell are extremely repetitive: In the first, kobolds ambush the PCs on the road. In the second, kobolds ambush the PCs on the road. (And, even worse, if you follow the internal logic of the module, it’s highly unlikely that the PCs will actually be on the road at the time that you’re supposed to use the second encounter.)

So we’re going to completely scrap A1: Kobold Ambush. Instead, we’re going to remix this encounter — using the same opponents in a slightly different scenario.

SETUP: Instead of an ambush, these kobolds are going to be manning a barricade blocking the road leading to the Keep. (Kalarel has placed them here to ensure that he’s not disturbed at the Keep.)

BARRICADE: The wooden barricade is 15 feet high (requiring characters to make an Athletics check to climb over it). There is a 10-foot wide platform at the top of the barricade and a ladder leading down the other side.

TACTICS: The wyrmpriest stands atop the barricade, using his energy orb to attack those drawing near the barricade. The dragonshields and skirmishers ready actions to attack anyone attempting to climb the barricade.

If the PCs reach the top of the barricade, the wyrmpriest will blast them with his dragon breath and then jump down on the other side of the barricade. From there the wyrmpriest will continue using his energy orb, while the dragonshields and skirmishers engage the PCs atop the barricade.

THE SECOND GUARD

An identical barricade is located on the road north of the Keep, too.

DEVELOPMENT: If the PCs wipe out either barricade, the kobolds at the second barricade are pulled back 1d2 days later and lay an ambush in the ruins of the Keep. (I’ll be discussing the ruined keep in a later entry.)

In practice, this likely means that the PCs will head towards the keep, overcome one of the barricades, and then spend some time exploring the keep. Then they’ll pull back to Winterhaven and, when they return, a kobold ambush will have been laid for them at the keep.

If the PCs completely bypass the barricades on their way to the keep (by circling through the woods), Kalarel might end up pulling back both patrols to lay an ambush in the ruins of the keep. (This depends on how threatened Kalarel feels.)

INTERLUDE: FARMER’S JEOPARDY

This encounter is designed to build on the crisis facing the village of Winterhaven (which I’ll be discussing at greater length: The farmers southwest of Winterhaven have been cut off from the village by the kobolds. A dwarven farmer named Terrik Sabanar, however, has attempted to break the blockade and reach Winterhaven with a wagon full of supplies.

FARMERS: Terrik Sabanar is a good-hearted dwarf. While he plans to sell the food he’s hauling for a fair price (he can’t afford not to), his primary motivation for trying to break the blockade is because he knows the people of Winterhaven must be in fairly dire straits.

Terrik was once a member of the Iridescent Guard, a powerful order of dwarven knights. He became disenchanted with the order, however, when his superior officer seduced his wife. Taking his infant son, Alric, Terrik left the dwarven kingdoms and came to Winterhaven. He has adopted the simple lifestyle of a farmer and left his past behind him.

For this dangerous mission, however, Terrik pried up the floorboards of his cottage and took out the +2 resounding warhammer he had once wielded as a knight. Those making a History check (DC 15) can recognize the hilt-marks on the warhammer as belonging to the Iridescent Guard — a strange sight to see in these lands.

Terrik is accompanied by his son, Alric. Alric knows nothing of his father’s history with the Iridescent Guard. Terrik didn’t want to bring Alric along, but the boy begged him until he finally relented (fearing, in fact, that if he refused Alric would merely follow him and be in even greater danger).

STATS: For Terrik, use the stats for the pregenerated fighter PC. However, Terrik wields the +2 resounding warhammer (dealing base damage of 1d10+5 and +2d6 thunder damage on a critical hit). For Alric use the stats for the pregenerated fighter PC, but treat him as a minion.

(If you’ve got the core rulebooks available, feel free to give them unique and/or more appropriate stats as you feel fit.)

SITUATION: Terrik and Alric are ambushed by kobolds along the road. Their wagon is disabled.

KOBOLDS: Use the kobolds from the On the Road: Kobold Brigands encounter, but add two more slingers.

MAP: We can reuse the map from the same encounter, or draw a new one on an erasable battlemap. Roads are easy.

TRIGGER: This encounter can be triggered in several ways:

(1) The PCs are traveling along the road when they hear shouts and the sounds of combat. When they reach the scene, they see the kobold minions and dragonshields clustered around the wagon. Terrik stands atop the wagon, swinging his warhammer.

(2) The PCs in Winterhaven when Alric rides up to the gate begging for help. (As the ambush broke, Terrik dumped Alric onto one of the horses and sent him riding for safety.) The city guard seems confused… perhaps somebody runs to ask permission from Lord Padraig before leaving their posts. (Padraig will be furious that none of his mean seized the initiative, but meanwhile…)

If the PCs think of it, let them make an Intimidate check (DC 20) to convince two of the guards to go with them to help Terrik. If the guards do accompany them, you’ll need to figure out stats for them. (Easy to do if you’ve got the core rulebooks. Otherwise, just use the same stats as Alric.)

If the PCs return with Alric, they see two dead kobolds lying near the wagon. The minions and dragonshields have pulled back, and the kobold slingers are pelting the wagon with their slingstones. Terrik is hiding in the wagon, trying to stay behing cover. (This trigger can be used particularly effectively if Alric rides up to Winterhaven just as the PCs are leaving or entering the village.)

(3) While traveling along the road away from Winterhaven, the PCs pass Terrik and Alric heading in the opposite direction. If they choose to accompany the dwarves, they’ll be there when the ambush breaks out a few minutes later. If they continue on their way, just a couple minutes later they hear shouts and the sounds of combat coming from behind them. (If they need further prompting, have Alric ride after them.)

REWARD: If the PCs rescue them, Terrik will gift them with this +2 resounding warhammer. The weapon deals 1d10 damage, +2d6 thunder damage on critical hits, and has a daily power that can be used as a free action when a target is hit with the warhammer, rendering the target dazed.

FOLLOW-UP: Once the ambush has been dealt with, it takes Terrik about 5 minutes to fix the wagon wheel. (If it was 3rd Edition, we could let the PCs help. But, hey, there’s no Craft skill in 4th Edition. Who would ever need such a thing? It’s not like we could ever be in a situation where you might want to fix a wagon wheel before more kobolds show up. Feel free to throw an ability check in there to compensate for the dumbed down rules.)

The villagers in Winterhaven are thrilled when the supplies, meager as they are, arrive. Terrik, Alric, and the PCs are greeted as heroes.

Continued…

Go to Part 1

Keep on the ShadowfellSPOILER WARNING!

The following thoughts contain minor spoilers for Keep on the Shadowfell. If you don’t want to be spoiled, don’t read it. And if you’re in my gaming group then you definitely shouldn’t be reading it.

THE CHERUB STATUES

When I remixed the first part of the Chamber of Statues, I didn’t think I’d be discussing the second part of that encounter. Why? Because there was nothing seriously wrong with that section of the encounter.

… or so I thought.

I’ve been cross-posting these mini-essays on Keep of the Shadowfell to WotC’s forums, and the discussion there revealed there was actually a rather serious problem with that section of the encounter.

Cherub StatuesIn this section of the encounter, there are four cherub statues. When triggered, the cherubs create an arcane cage to trap a victim. The cherubs then pour water into the arcane cage, which triggers a whirlpool effect that smashes the victim into the cherub statues and cause them to take damage.
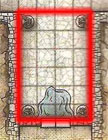
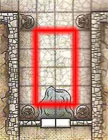
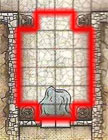
The key element to this encounter is the arcane cage that the statues create:

ARCANE CAGE (immediate interrupt, when a creature walks past the northern two statues; encounter)
The statues create a wall of arcane magic to enclose the area between the four statues. The wall lasts as long as at least three statues remain intact. The wall cannot be damaged and is affected only through the destruction or disabling of the cherub statues.

The key problem here is the phrase “create a wall of arcane magic to enclose the area between the four statues”. When I first read that phrase, I interpreted it as meaning that the arcane cage enclosed the entire 4×6 hallway, including the cherub statues. But then I realized that the other half of the encounter talks about the dragon statues reacting to characters outside the arcane cage attacking the cherub statues, so I concluded that the arcane cage must only enclose the 2×4 area between the cherubs.

I thought the phrasing was a little unclear, but no big deal.

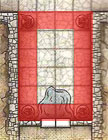
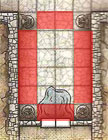
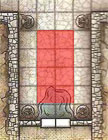
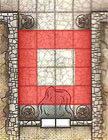
Except it turned out I wasn’t the only one who had interpreted that phrase differently. In no time at all, in fact, the conversation included four mutually incompatible interpretations of what the arcane cage did and they were all legitimate interpretations of the phrase “create a wall of arcane magic to enclose the area between the four statues”:

Cherub Wall - Option 1 Cherub Wall - Option 2 Cherub Wall - Option 3 Cherub Wall - Option 4

To this muddle we can also add some confusion from the phrase “when a creature walks past the northern two statues”. There seem to be two meaningful possibilities for this:

Cherub Trigger - Option 1 Cherub Trigger - Option 2

(Of course, if you go with the second possibility for the arcane cage, the answer to this question is pretty obvious — it’ll be the one that actually traps the triggering character inside the cage.)

PROBLEMS, PROBLEMS, PROBLEMS

In trying to work out how this encounter is supposed to work, we can try to narrow the possibilities down by taking two facts into consideration:

(1) Barrier effects “run along the edge of a specified number of squares”. Since each statue is entirely within one square, the statues either have to be inside the barrier or they have to be outside the barrier — they can’t be both.

(2) The dragon statues are supposed to be able to use their force shot ability against characters outside the barrier making attacks against the statues. Therefore, the statues have to be outside the barrier. (And even if this wasn’t true, you wouldn’t want a scenario where the only character who can lower the cage is the character trapped inside the cage: If they get killed by the whirlpool effect, not only are the irretrievable, but the location of the cage effectively prevents the rest of the group from reaching the end of the adventure.)

Thus we can conclude that it must be one of these two scenarios:

Cherub Trap - Scenario 1 Cherub Trap - Scenario 2

… except these doesn’t actually work.

First, because the cherubs have to be inside the cage (they’re pouring water into the cage and the trapped character is slammed against them for damage).

Second, because under this interpretation the guy inside the cage is effectively taken out of the game: There’s nothing they can do to escape. All they can do is hang tight, soak up the damage each round, and hope somebody gets them out. (This second problem isn’t necessarily unworkable, it’s just a questionable design choice.)

In short, the encounter doesn’t work. The cherubs have to both inside and outside the cage and, according to the rules of the game, that can’t happen.

As I see it, there are two options:

(1) Use the 2×4 option and then break the rules, basically creating an ad hoc ruling that the character inside the force cage can attack and destroy the cherubs even though they shouldn’t be able to.

(2) Redesign the encounter so that each cherub statue takes up 2 squares (and, thus, you can have them half-in and half-out of the arcane cage without breaking the rules).

FUEL ON THE FIRE

After writing up this whole analysis, I was looking through my friend’s copy of the Player’s Handbook and discovered something that only serves to deepen the confusion over what the arcane cage is supposed to be doing.

In the Quick Start Rules that came with Keep on the Shadowfell, there were three areas of effect defined: Barriers, Blasts, and Bursts. In the PHB, on the other hand, barriers no longer exist. They’ve been replaced by walls.

Here are the rules from Keep on the Shadowfell:

Barrier: A barrier runs along the edge of a specified number of squares. A barrier must cross at least one edge of the origin square.

And here are the rules from the PHB:

Wall: A wall fills a specified number of contiguous squares within range, starting from an origin square. Each square of the wall must share a side—not just a corner—with at least one other square of the wall, but a square can share no more than two sides with other squares in the wall (this limitation does not apply when stacking squares on top of each other). You can shape the wall however you like within those limitations. A solid wall, such as a wall of ice, cannot be created in occupied squares.

I have two reactions to this:

(1) Why wasn’t this fixed in the Quick Start Rules? Yet another example of sloppy editing.

(2) The encounter still doesn’t work.

Chamber Trap - Wall 1 Cherub Trap - Wall 2 Cherub Trap - Wall 3 Cherub Trap - Wall 4

It can’t be option #1 because the arcane cage is a solid wall (otherwise you could walk through it and the trap would be pointless), and therefore it can’t be formed in the squares occupied by the cherub statues.

It can’t be option #2 because walls must fill contiguous squares and each square must share a side — not just a corner — with at least one other square of the wall.

It can’t be option #3, obviously, because then there’s no interior of the cage for someone to be trapped in.

It can’t be option #4 because the trigger for the arcane cage would either result in no one being trapped inside or would make it impossible for the wall to form (since the triggering character would be occupying one of the squares the wall has to fill).

There are two possible ways of handling this:

(1) You can use option #4, change the trigger for the trap (so that it goes off when a character enters one of the squares inside the arcane cage), and then ignore the rules so that the cherubs are somehow inside the cage (despite the fact that they’re nowhere near the inside of the cage).

(2) You can use option #2 and rewrite the effect so that it creates multiple walls. Unfortunately, it’s not clear whether or not a character inside the arcane cage can attack the cherubs. (There’s a clear rule that says you can’t move across a diagonal if one of the squares bordering the diagonal has a solid barrier in it, but I can’t find any rule that tells you whether or not you can attack through a diagonal where two solid barriers meet.)

THIS IS RIDICULOUS

Needless to say, I consider this to be ridiculous. I consider the complete inability for this encounter to work as written just further evidence that Keep on the Shadowfell was never playtested. Such a shoddily designed encounter would, frankly, be inexcusable in any professional product. But it completely baffles me that WotC evidently spent so little effort and care on the product they chose to serve as the flagship for 4th Edition.

Go to Part 1

Keep on the ShadowfellYesterday I analyzed the shortcomings in the Chamber of Statues encounter from Keep on the Shadowfell. Today I’m going to look at how we can fix this.

SPOILER WARNING!

The following thoughts contain minor spoilers for Keep on the Shadowfell. If you don’t want to be spoiled, don’t read it. And if you’re in my gaming group then you definitely shouldn’t be reading it.

THE LAYOUT

We’ll start by shifting the layout. I think there are two directions we can go with this.

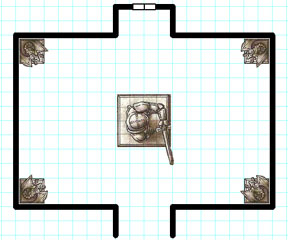
CENTERPIECE: First, we can make the room larger, put the titan statue in the center of the room, and add some additional dragon statues.

Chamber of Statues - Centerpiece Option

With this layout, whenever the PCs try to circle around the dangerous sweeping blow of the titan statue, the dragon statues will push them back towards the center of the room.

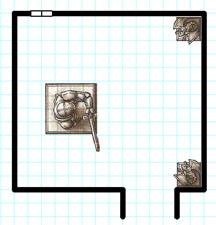
ILLUSION OF SAFETY: This layout has a greater similarity to the original layout and doesn’t increase the number of dragon statues.

Chamber of Secrets - Illusion of Safety

With this layout, clever PCs will notice the limited range of the titan statue’s attack and conclude that they can safely circle around it to the east. But if the try that, the dragon statues will use their force breath ability to push them back towards the titan statue.

NO CHEAP SHOTS

The dragon statues in the original encounter already have a force shot ability that interacts with the second part of this trap (which I’m not dealing with here):

FORCE SHOT (immediate reaction, when a creature makes a melee attack against a cherub statue from the exterior of the arcane cage; at will)
Range 10; +7 vs. Reflex; 1d6+6 force damage, and the target is pushed 1 square

We’re going to make an adjustment to this ability in order to stop the PCs from getting to a safe distance and then taking pot-shots at the titan statue.

DEFENSIVE FORCE SHOT(immediate reaction, when a creature makes an attack against any statue in this encounter or when they can’t use their force blow ability on their turn; at will)
Range 15; +7 vs. Reflex; 1d6+6 force damage, and the target is pushed 1 square

PROXIMITY SAFETY

We’ll use the original mechanics from the encounter to allow a character to make an Athletics check to jump onto the titan statue or the dragon statue. But we’ll add the following detail: The dragon statues won’t use their defensive force shot against any creature in the same space as another statue (the designer of the trap didn’t want to risk having the dragon statues damage the other statues).

So getting onto a statue makes a character effectively immune against the titan statue’s sweeping blow and the force abilities of the dragon statues. However, there’s a limited number of such safe zones in the encounter (particularly if you use the Illusion of Safety layout).

COOPERATION

By making the dragon statues an active part of the encounter that can’t simply be ignored, we’ve already encouraged a higher level of cooperation: The rogue can only be dealing with one statue at a time, making it necessary for the other characters to deal with the other statues (or at least take actions to avoid them until the rogue can deal with them).

However, we’ll go one step further and make it possible for more than one character specialty to work on a single statue at the same time. For the titan statue:

Thievery/Arcana: Eight successful DC 20 checks before four failures to disable the titan stone

For the dragon statues:

Thievery/Arcana: Four successful DC 20 checks before two failures to disable one of the dragon statues

Now the rogue and the wizard can work together to rapidly disable the magical statues through the combined use of their skills.

If you really wanted spice things up, you could even make it possible for the statues to be bloodied and then add the following:

Mechanical Ruin: If the statue is bloodied, it counts as 2 successes towards disabling the statue

Now everybody in the party can work to disable a statue together. Instead of having the characters race against each other (will the statue run of hit points, Thievery checks, or Arcana checks first?), all of the characters can work together towards a common goal.

This also creates a meaningful strategic choice for the group to make as they try to deal with this encounter: Do we split up and try to deal with the dragon statues separately to clear a path to the exit? Or do we all focus our efforts on disabling the tougher titan statue and reach the exit that way?

In this last section, it should be noted, I’m not just talking about adjustments to this particular trap — I’m talking about house rules which, based on what I’ve seen of 4th Edition to date, would appear to fundamentally change some of the basic ways in which the game works. But the reward appears to be gameplay which is both more interactive and offers richer strategic and tactical choices.

To be continued…

PROXIMITY SAFETY

We’ll use the original mechanics from the encounter to allow a character to make an Athletics check to jump onto the titan statue or the dragon statue. But we’ll add the following detail: The dragon statues won’t use their defensive force shot against any creature in the same space as another statue (the designer of the trap didn’t want to risk having the dragon statues damage the other statues).

So getting onto a statue makes a character effectively immune against the titan statue’s sweeping blow and the force abilities of the dragon statues. However, there’s a limited number of such safe zones in the encounter (particularly if you use the Illusion of Safety layout).

COOPERATION

By making the dragon statues an active part of the encounter that can’t simply be ignored, we’ve already encouraged a higher level of cooperation: The rogue can only be dealing with one statue at a time, making it necessary for the other characters to deal with the other statues (or at least take actions to avoid them until the rogue can deal with them).

However, we’ll go one step further and make it possible for more than one character specialty to work on a single statue at the same time. For the titan statue:

Go to Part 1

Keep on the ShadowfellSPOILER WARNING!

The following thoughts contain minor spoilers for Keep on the Shadowfell. If you don’t want to be spoiled, don’t read it. And if you’re in my gaming group then you definitely shouldn’t be reading it.

TRAPS IN 4th EDITION

One of the features of 4th Edition that has been widely touted in WotC’s promotional material have been the new trap design focusing on active traps. Basically, the argument is made that traditional traps either (a) suck up a lot of time because they encourage players to make constant Search checks; (b) are nothing more than random dice rolls that deal out arbitrary damage; and/or (c) focus the spotlight on the player of the rogue while everyone else sits around twiddling their thumbs. The new 4th Edition-style traps will allow everyone in the party to participate in overcoming the trap.

This seems like a laudable goal, but the actual examples we were given turned out to be fairly lackluster. They still required skill checks to detect them. They were slightly more interactive than a simple pit trap, but were pretty tame compared to some of the stuff we saw in the Book of Challenges (a 3rd Edition supplement that came out back in 2002), Traps & Treachery (a D20 supplement from Fantasy Flight Games that came out in 2001), or Grimtooth’s Traps (an entire line of supplements that date back to 1981).

(Which ties into one of the reasons I’ve been perpetually turned off by the 4th Edition preview material. They seem to be constantly shouting about how they’ve reinvented the wheel. I like wheels as much as the next guy, but when somebody asks me to get excited about them I tend to get turned off by the fake enthusiasm.)

As for the effort to make traps into something that everybody can take part in, that seems to have boiled down to: The rogue makes a lot of skill checks and, if that doesn’t work, then everybody else can beat the crap out of it.

For example, here’s the countermeasures for the Whirling Blades trap (the first example of their “innovative” 4th Edition traps):

  • A character can engage in a skill challenge to deactivate the control panel. DC 22 Thievery. Complexity 2 (6 successes before 3 failures). Success disables the trap. Failure causes the whirling blades to act twice in the round (roll a second initiative for the trap).
  • A character can attack the whirling blades contraption (AC 16, other defenses 13; hp 55; resist 5 all) or the control panel (AC 14, other defenses 11; hp 35; resist 5 all). Destroying either disables the entire trap.

Color me unimpressed. I mean, there’s nothing wrong with that. But when you claim that one of the fundamental gameplay elements of D&D for the past 30+ years have “rarely had a positive effect on the game”, then the examples you give of “fixing” the “problem” probably shouldn’t look exactly like the stuff we’ve been seeing in our D&D supplements for the past 30+ years.

THE CHAMBER OF STATUES

Chamber of StatuesKeep on the Shadowfell has a couple of traps: There’s a bog standard pit trap. There are some runes that cause characters to flee in panic. And then there’s Area 16: The Chamber of Statues.
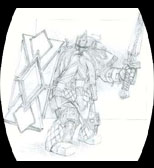
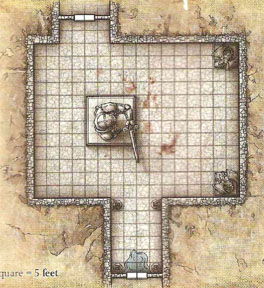
The Chamber of Statues is a two-part trap, but I’m only going to be talking about the first part. In this section there are three statues, starting with a large titan statue in the middle of the room which acts like a monster. On its initiative it uses its sweeping blow ability:

SWEEPING BLOW (standard; at will)
Close burst 3; +11 vs. AC against all non-Evil creatures in burst; 1d6+6 damage, and the target is knocked prone

In other words, the titan statue picks a square in either its own space or immediately adjacent to its space. That square is the center of an 7-square by 7-square area. It then makes an attack against all non-Evil creatures within that area.

The titan statue is accompanied by two dragon statues, each of which use a force breath ability:

FORCE BREATH (standard; at will)
Close blast 5; +7 vs. Reflex; 1d6+6 force damage, and the target is pushed 3 squares

In other words, if you try to circle around the titan statue’s reach the dragon statues will hit you with their force breath and push you back towards the titan statue. It’s a simple dynamic, but it has a lot of potential to be fun in play. Unfortunately, there are several design problems here.

THE WALK AROUND: One of the ways you can work your way through the trap is to make an Athletics check to jump onto the statue. This allows you to avoid the titan statue’s attacks. So you could potentially jump onto the statue, avoid its attacks, jump off the other side and head to safety on the other side of the room (without ever getting close enough to the dragon statues to get targeted by their force breath).

The problem is that there’s absolutely no reason to do that: You can simply walk right past the entire trap. Why? The titan statue’s sweeping blow isn’t triggered as a reaction — its an action taken on the titan statue’s initiative. Nor does the titan statue have reach (which would allow it to take opportunity attacks). That means, once the titan statue makes its first attack, everyone is free to walk right past it.

LACK OF COOPERATION: As with the sample traps posted on WotC’s website, this trap features the ability to either whack on it or disable it. This theoretically opens up a bit more interactivity than the website samples because, in this trap, there are multiple targets that aren’t dependent on each other: The thief could be working on the titan statue while the other characters are whacking away on the dragon statues.

Only that isn’t actually true, because there’s no reason to go anywhere near the dragon statues (even if you don’t simply walk right past the entire trap): If you stick to the west side of the titan statue you’re completely out of their range.

LACK OF COOPERATION 2: This trap also introduces the ability for non-Thievery checks to disable traps: The dragon statues (but not the titan statue) can be disabled by either four successful Thievery checks or six successful Arcana checks.

Setting aside the fact that disabling the dragon statues is completely irrelevant, there’s a deeper design problem here: The Thievery and Arcana checks can’t be used in conjunction with each other. Either you disable the trap using Thievery checks or you disable the trap using Arcana checks — you can’t mix-and-match.

Based on other traps in the adventure, this seems to be a frequent (but not required) feature of magic-based traps. However, it always requires more Arcana checks than Thievery checks, which means that you’ll always see the exact same dynamic in play with traps of this type: The guy with the Thievery skill will try to disable the trap. If he fails, the guy with the Arcana skill will try to disable the trap.

This doesn’t actually make the trap any more interactive, nor does it actually get more players involved in the process. (At any given time, there’s still just one guy making skill checks.) It just means that the entire thing takes more time and becomes a lot more monotonous.

WotC claims that one of the problems with traps in 3rd Edition was that the rogue made a Disable Device check while everyone else sat around and watched him. So explain to me how this is “fixed” by giving us a trap in which the rogue makes 6+ skill checks in order to disable the trap while everybody else stands around watching them work?

(Why 6+ checks? An Athletics check to jump up on the statue. A Perception check (DC 25) to find the access panel. And then at least four Thievery checks to disable the statue. So it will take a minimum of 6 checks, but given the probable skill modifiers of the pregenerated rogue PC they’ll probably be making 9 or 10 checks in total.)

JUST BEAT THE CRAP OUT OF IT: But none of what I’ve described actually matters because none of these statues can move and none of them have relevant ranged attacks. This means that the PCs will stay in the safe area by the northern door and use their ranged attacks to whittle away at the titan statue’s hit points.

THE BOTTOM LINE

So this entire elaborate trap which, at first glance, appears to be filled with interesting possibilities, will, in fact, be resolved in one of three exceptionally boring ways:

(1) One of the PCs will suffer 1 or 2 attacks from the statue and then they’ll all walk out of the room.

(2) The rogue will make a half dozen or more skill checks and then they’ll all walk through the room.

(3) The PCs will engage in the most boring combat imaginable: Standing where the opponent can’t possibly hurt them, the players will repetitively roll dice until they finally manage to rack up the magic number and can walk through the room unimpeded.

I honestly don’t understand how such a lackluster encounter got designed. I also don’t see how it could have possibly been playtested without such fundamental design errors being exploited by the playtesters. (And if it was playtested and the playtesters exposed its flaws, why weren’t they fixed?)

Tomorrow I fix it.

To be continued…

Keep on the ShadowfellI thought I was done talking about Keep on the Shadowfell for a bit, but as I was prepping the adventure yesterday I had some interesting thoughts that I felt like sharing. These should give you some insight not only into how I go about prepping an adventure, but also how I analyze game design issues (both in the design of the system and in the design of the scenario).

DWARF FIGHTER

Let’s start by looking at the pregenerated fighter character. As most of you probably already know, there are basically three different kinds of abilities in 4th Edition: At-will abilities (which can be used as often as you like); Encounter abilities (which require a short rest to recharge); and Daily abilities (which require an extended rest to recharge).

(Some at-will abilities will also recharge irregularly or in response to conditions on the battlefield.)

I’ve been kinda thinking of these different abilities like this: At-will abilities are the ones which define your character; encounter abilities are nifty; and daily abilities are awesome.

With that in mind, let’s take a look at the at-will abilities that the pregenerated dwarf fighter has at 1st level: Cleave and reaping strike.

CLEAVE – Fighter Attack 1
You hit one enemy, then cleave into another.
At-WillMartial, Weapon
Dwarf FighterStandard ActionMelee weapon
Target: One creature
Attack: +6 vs. AC
Hit: 2d6+3 damage, and an enemy adjacent to you takes 3 damage.

REAPING STRIKE – Fighter Attack 1
You punctuate your scything attacks with wicked jabs and small cutting blows that slip through your enemy’s defenses.
At-WillMartial, Weapon
Standard ActionMelee weapon
Target: One creature
Attack: +6 vs. AC
Hit: 2d6+3 damage
Miss: 3 damage

I’m very impressed by the ways in which the utility of these abilities interlock with each other.

First, there is the obvious situational advantage: Cleave is going to be preferable when you’re standing in the middle of a minion mob; reaping strike is going to be useful when you’re facing off against a single opponent.

But, there’s also another trade-off point that happens because reaping strike is more useful than cleave when an opponent becomes sufficiently difficult to hit. Here’s the math:

The average expected damage per round for cleave is:

(3.5 + 3.5 + 3 + 3 = 13) x probability to hit + (0 x probability to miss)

The average expected damage per round for reaping strike is:

(3.5 + 3.5 + 3 = 10) x probability to hit + (3 x probability to miss)

If the probability to hit is 50/50, for example, then you end up with cleave doing an average of (13 x 50%) 6.5 points of damage per round and reaping strike doing an average (10 * 50% + 3 * 50%) 6.5 points of damage per round.

So if my math here is correct, reaping strike is going to deal more damage to your opponents in any situation where you have to roll a natural 12 or higher to hit. (With a slight hiccup because minions aren’t affected by missed attack damage like reaping strike.)

On the one hand, I’m impressed by how two distinctive fighting styles emerge quite naturally out of these probabilities. When you’re using cleave you’re swinging away like wild because your significantly superior to your opponents (you have a 50/50 or better shot of hitting them); in the other you’re performing a variety of jabs and cutting blows against a more skilled opponent, trying to find the weakest spots in his defense.

On the other hand, I’m impressed because of the meaningful tactical choice that these interlocking utilities give you. Either utility, by itself, doesn’t constitute a meaningful tactical choice: If one ability is merely better against multiple opponents and the other is better against solitary opponents, there’s no meaningful choice to be made. If you’re fighting multiple opponents you’d use cleave and if you’re fighting a single opponent you’d use reaping strike.

Similarly, if one ability was merely better against difficult-to-hit opponents and the other was better against easy-to-hit opponents, there’s no meaningful choice to be made. If you’re fighting difficult-to-hit opponents you’ll use reaping strike and if you’re fighting easy-to-hit opponents you’d use cleave.

But once you combine the two, meaningful choices emerge. There will still be times when the decision basically boils down to running the math and figuring out what your best expected damage is, but in most situations involving multiple foes you’ll actually be making a meaningful choice about what your immediate goal is and how you want to pursue it. (I also have a fair degree of confidence that, as tactical choices proliferate at higher levels, these choices will become increasingly non-trivial.)

Now, there is one caveat to this, which is that the minion rules pretty much muck it up.

For one example of this, let’s look at reaping strike: Because minions never suffer damage from missed attacks, reaping strike is completely useless against minions. So if you’re trying to hit a minion, there will never be any conceivable benefit to using reaping strike. The tactical choice has once again been rendered completely moot.

On other hand, if minions were damaged — and, thus, killed — by missed attacks, the tactical choice between cleave and reaping strike is meaningful: Do you use reaping strike for a guaranteed kill on one minion or do you use cleave for a chance to kill two minions? It becomes a trivial decision when you’re only facing off against a single minion, of course (since cleave has no advantage over reaping strike) — but that’s true of any situation when you’re facing off against a single opponent and minions are designed to come in large numbers.

(Of course, this change would make reaping strike more effective on average. And I hardly know enough about the complete panoply of 4th Edition abilities to know what other effects such a change might have.)

But, overall, these are well-designed abilities that give rise to a well-designed character. It’ll be interesting to see what the other 1st level fighter abilities are and how they interact with cleave and reaping strike.

To be continued…

Archives

Recent Posts


Recent Comments

Copyright © The Alexandrian. All rights reserved.