The Alexandrian

Posts tagged ‘dragon heist’

Waterdeep: Dragon Heist

Go to Part 1

As you may have already ascertained, this remix is simply tossing out most of Chapter 4: Dragon Season from the original campaign. The original sequences no longer work with the more dynamic, multi-faction approach we’re using for the remix, and I’m simply not that interested in these sorts of pre-scripted, linear, and often railroaded sequences.

We’re still going to take advantage of some of the raw material in Chapter 4, however, to create a number of Outposts for each faction. (In some ways you can think of this as sort of taking the best version of each location from the campaign.)

BREGAN D’AERTHE OUTPOSTS

FENERUS STORMCASTLE’S HOUSE (Trade Ward, Quill Alley – Dragon Heist, p. 63): Fenerus Stormcastle was the founder of the Blood Hawk Posse, a gang of horse-riding brigands that, to this day, harries travelers on the road to Amphail. When he was drummed out of the gang after a botched raid, Fenerus “retired” to Waterdeep and joined the Guild of Chandlers and Lamplighters. He supplements his income by spying for the city of Luskan and providing his contacts with information on the political climate in Waterdeep, as well as juicy bits of news overheard on his nightly rounds through the Trades Ward.

Since the Sea Maidens Faire arrived in Waterdeep, Fenerus has also been acting as a message drop for Bregan D’Aerthe. Fenerus collects messages from various covert drops and brings them back to his house, where they are collected by Krebbyg Masq’il’yr and taken back to Jarlaxle’s ship.

Questioning Fenerus: Although he’s supposed to be a cut-out, Fenerus once followed Krebbyg after Jarlaxle’s lieutenant picked up the messages and knows that they’re being taken to the Sea Maidens Faire.

Following Krebbyg: Krebbyg comes to collect messages from Fenerus once every 1d3 days. If the PCs stake out the house long enough, they may also be able to follow him to the Sea Maidens Faire.

Messages: The PCs may be able to capture several messages. These are written in code, requiring an Intelligence test (DC 16) to decipher. (The check is made with advantage if they speak Drow.) The contents of these messages will vary depending on when, exactly, the PCs come to Fenerus’ house. Possibilities include:

  • Information unrelated to the Grand Game, most likely revolving around attempting to identify Masked Lords, gain blackmail material over them, and/or diplomatic assessments of their support for Luskan joining the Lords’ Alliance.
  • A report from the Gralhund Villa observation team: “Watchpost established in the manor south of the Gralhund Villa. We have identified members of the Black Network onsite. We have also observed gazers in the area, although we have not yet determined which beholders’ dark dreams they’ve sprung out of. – Fel’Rekt Lafeen”
  • “Westra Moltimmur is demanding three additional dresses for Sapphiria’s Booty. Considerable expense. Rongquan Mystere may need to put in an appearance.” (A little research can quickly identify these names as referring to the Seven Masks Theater, see below.)
  • “The Council of Musicians, Instrument-Makers, & Choristers refuses to withdraw their objection to the Sea Maidens Faire as a public entertainment. But I’ve resolved the matter by getting license from the Jesters’ Guild. We only need to make payment to them with claim that we are employing a guild entertainer, even though we’re not. The guilds in this city are even more rotten than those in Luskan.”
  • “Nimblewright delivery completed to Bowgentra Summertaen. We have eyes up in the Watchful Order.” (Summertaen is the leader of the Watchful Order of Magists and Protectors, a guild for wizards and sorcerers in Waterdeep.)

SEVEN MASKS THEATER (Dragon Heist, p. 75): Use the description of the Autumn version of the theater from the original campaign. Jarlaxle owns this theater under the false identity of Rongquan Mystere. One of the dressing rooms is kept empty as a safe house for D’Aerthe agents in trouble. Jarlaxle will also use the theater as a “neutral” meeting place with other factions (including the PCs).

Malcolm Brizzenbright: We’ll also transplant Brizzenbright’s Ghost from the Winter version of the Theater (see Dragon Heist, p. 76). He’s the founder of the Seven Masks Theater, but has been dead for over thirty years.

  • He knows that “Rongquan Mystere” is a fake identity, and he’s anxious that his theater not be used for nefarious purposes.
  • He can identify the dressing room being used as a safe house.
  • He once saw “Rongquan” speaking with drow in the lobby during a performance of The Mad Mage’s Seven Riddles. They mentioned something called the “Sea Maidens Faire”.

Area P6 – Stage Manager’s Office: Amongst the other papers dealing with theater work is a Letter Regarding Fenerus Stormcastle’s House. Directed simply to “J”, it warns him that, “There have been strange eyes fixed upon the house of Fenerus Stormcastle and flights of black snakes have been seen flocking the skies of the Trades Ward. Greater care should be taken when messengers approach the house, and we may want to find an alternative asset. I leave it to your judgment whether or not Fenerus himself should be warned. -K”

  • GM Note: “J” is Jarlaxle Baenre and “K” is Krebbyg.

CASSALANTER OUTPOSTS

ASMODEAN SHRINE (North Ward, Aveen Street): From the outside, this appears to be a nondescript residence. The entire interior of the house, however, has been converted into a shrine dedicated to Asmodeus. The Cassalanters discovered the ancient Hell cyst (see Area 8) below the house, bought the property, and installed members of the cult.

Asmodean Shrine - Dyson Logos

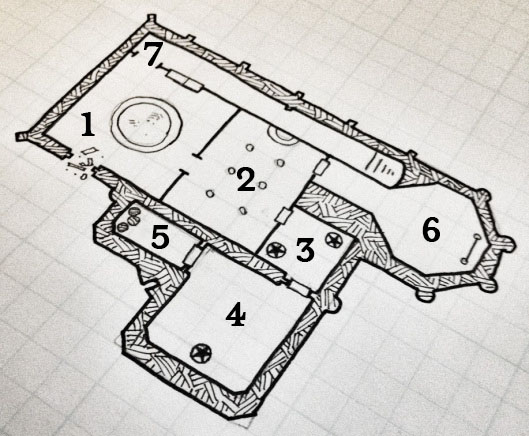
Area 1 – Summoning Circle: Demonic sigils have been painted onto the floor to form a summoning circle. Tapping into the power of the Hell cyst, the circle can be used to summon 2 imps once every nine days.

Area 2 – Styxian Shrine: Intertwined figures of demons and devils twist about the columns in this room, a visceral depiction of the savage brutality of the Blood War. At one end of the room there is a small font of reddish-gray stone that extrudes from the wall. The cistern is half-filled with grayish water, enchanted to act as the water of the River Styx. Those drinking from it must succeed at a DC 14 Wisdom saving throw or lose all of their memories for 8 hours. (The cultists consider this a test of their faith and a sacrament.) On the wall above the font, the symbol of Asmodeus has been painted on the wall in blood.

Sigil of Asmodeus

Area 3 – Demonic Statues: Two large demonic statues – one depicting a kyton (chain devil) and the other a bezekira (hellcat) – face off against each other.

Area 4 – Chapter House: Huge, writhing tentacles seem to erupt from an arcane circle on the far side of this room, but it’s just a disturbingly lifelike statue given the semblance of life by an animate object spell (50 hp, AC 10, +6 to hit, 2d20+2 damage, Str 14, Dex 10). The tentacles are fastened to the floor and only attack a target within 10 feet if given a command by one of the cultists; otherwise they just writhe artistically.

Two cots are lined up against the wall. A long trestle table runs down the middle of the room with benches to either side.

Under the cot is Arn’s Book of Worship: This text with a stylized goat’s head drawn in blood upon its plain brown cover, contains a number of “high prayers” to Asmodeus and the description of a number of banal demonic rites of worship. On the inside back cover, in simple handwriting, one can read, “This book belongs to Arn Xalrondar, of the Windmill upon Coachlamp Lane.”)

Area 5 – Demonic Jelly: Three large wooden kegs. A mysterious amber jelly within them acts like a potion of hill giant strength if rubbed over the body (6 doses per keg).

Area 6 – Mirror of the Fiend: A large mirror with an obsidian frame carved with demonic sigils stands at the far end of this chamber. Anyone seeing themselves reflected in the mirror is bathed in purplish flames which deal 1d6 damage per round to most creatures, but heal 1d6 damage per round for fiends.

  • Noble Sigil: On the back of he mirror is carved a small rune. A DC 13 Intelligence (History) check reveals that his is a Waterdhavian noble sigil; a practice that was once common in Waterdeep, but which died out over a century ago. A DC 16 check identifies this specific rune as indicating that the mirror belonged to the Cassalanter family.

Area 7 – Passage of the Nine Hells: The plaster walls of this long hallway are completely covered in a mural seamlessly depicting the Nine Hells – the desolate wasteland of Avernus; the malefic green skies of Dis; the endless rotting bogs of Minauros; the magma-ridden valleys of Phlegethos; the frozen sea of Stygia; the cyclopean basalt of Malbolge; the endless, maze-like ruins of Maladomini; the serrated glaciers of Cania. At the far end, above the arch leading to the descending stairs, is depicted the Malsheem, the Citadel of Hell, in Nessus, the Ninth Circle of Hell.

Asmodean Shrine: Lower Level - Dyson Logos

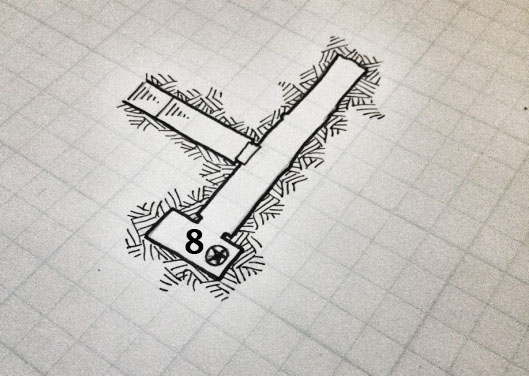
Area 8 – The Hell Cyst: The entire lower level of the shrine is clearly much, much older than the house above it. The walls were once covered in bas relief, but the stone has worn away and the carvings have become unrecognizable.

In a niche one end of the cramped corridor, the extrusions of stone seem to reach out from the wall and almost cradle a glowing ball of hellish red light which floats in midair.

Hell Cyst

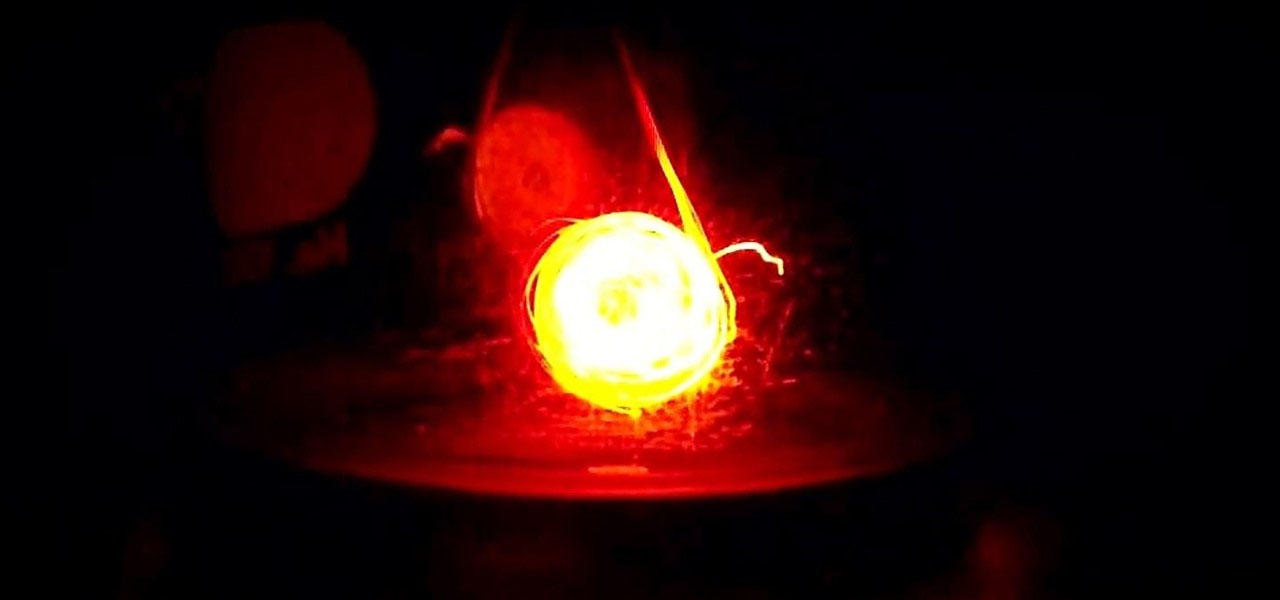
Those who dare to lean close to the ball will discover that – at a distance of a few inches or so – they can actually peer into it (or perhaps, more accurately, through it). Doing so is like peering through a heavily distorted lens into a volcanic hell. (The Hell cyst is actually a pin-prick of Hell co-located onto the Material Plane. There is no way to traverse or communicate through the event horizon of the cyst, but the cyst is nevertheless a literal manifestation of Hell on Earth and can be used as the focus for a number of demonic rites.)

ASMODEAN SHRINE – ADVERSARY ROSTER

1 cult fanatic + 2 impsArea 1MM p. 345, MM p. 76
1 apprentice wizard + 2 impsArea 2DH p. 194, MM p. 76
2 cult fanaticsArea 4MM p. 345

Questioning Cultists: Successfully questioning the cultists will reveal that rituals are held at a site beneath the Cassalanter Villa. The fanatics will report that their contact there is Willifort Crowell (which might lead the PCs to believe that the Cassalanters are unaware of what’s happening in their own home); the wizard knows better and may be made to reveal as much.

Instructions from Lord Cassalanter: The apprentice wizard carries a note from Lord Cassalanter instructing that the next pair of imps to emerge from the summoning circle should be dispatched to perform surveillance on the Sea Maidens Faire, which he believes to have become of particular importance as a result of recent intelligence which has come into his posssesion. (The note might mention the PCs by name here if they were the source of this intelligence; otherwise he names Willifort Crowelle.) “The imps should report back to me directly at the villa.”

CONVERTED WINDMILL (Southern Ward, Coachlamp Lane): Use the description of the Summer version of the Converted Windmill (see Dragon Heist, p. 88). It’s used as an apartment by Arn Xalrondar (LE male Tethyrian human) and Seffia Naelryke (LE female Tethyrian human), both cult fanatics.

Area W7 – Secure Apartment:

  • A note can be found under the bed. It reads: “Meeting Ches 17th, the shrine on Aveen Street”.

Area W8 – The Room of Rituals: A pentagram has been painted on the floor in blood. At the points of the pentagram are five black globs of wax — the remains of burned candles — and there’s a variety of writing in charcoal surrounding the pentragram. There is a desk alone one wall, covered in a mass of papers.

  • The Ritual – DC 15 Intelligence (Arcana): The ritual performed here was a form of weak demonic divination, similar to a legend lore or contact other plane spell, but more like a weakly amped up Ouija board or similar parlor trick. The runes indicate that this ritual was performed in an effort to find something associated with “Neverember”, “the wealth of Waterdeep”, “Golorr”, and “that which has been lost to the waters of Lethe” (although the latter appears to be more of a symbolic representation rather than a literal one).
  • Desk: At the center of the drift of miscellaneous papers is a map of Waterdeep. Strange lines of blood criss-cross the map in bizarre patterns, but one location within the City of the Dead has been picked out from the pattern and circled in black charcoal. Accompanying writing identifies this as the “Brandath Crypt”.
  • GM Note: This ritual, performed by Seffia, identified the Brandath Crypt as the hiding place of one of the Eyes. It actually only worked, however, because the Vault is actually hidden below the Crypt (making it a much more powerful locus for the conceptual anchors of the ritual), although Seffia didn’t realize that.

Got to Part 3B: More Faction Outposts

Fireball - Waterdeep: Dragon Heist

Go to Part 1

In Chapter 3: Fireball, an explosion kills nearly a dozen people in Trollskull Alley not far from the PCs’ front door. Their investigation takes them to Gralhund Villa, which is described in Part 2 of this remix.

WHAT HAPPENED:

  • Dalakhar was attempting to meet with Renaer Neverember at Trollskull Manor. He was being tracked by the Gralhund, Zhentarim, Cassalanters, and possibly others.
  • A small team of Zhentarim agents led by Urstul Floxin attempted to waylay Dalakhar as he came down Trollskull Alley.
  • The Gralhund nimblewright, observing the scene from a nearby rooftop, used a necklace of fireballs to launch a fireball which kills Dalakhar and most of the Zhentarim agents, with the exception of Urstul Floxin (who barely survives, but is incapacitated).
  • The Gralhund nimblewright jumped off the roof, dashed forward, rifled through Dalakhar’s pockets, and took the Stone of Golorr. It then ran off, returning to Gralhund Villa.

MOTIVATION: A core problem in this scenario is that (a) the PCs are not strongly motivated to investigate the explosion, (b) they are explicitly encouraged to NOT investigate the explosion, but (c) if they don’t investigate the explosion, the rest of the campaign doesn’t happen.

My recommendation is simple: Kill someone they care about in the explosion.

Who you choose to kill is going to be heavily idiosyncratic to your campaign. It’s really difficult to predict exactly which NPCs are going to resonate most strongly with the players during actual play. Honestly, it’s just as likely to be some random person that you improvised off-the-cuff. But here are a couple of possibilities:

  • Renaer Neverember. As described below, he arranged with Dalakhar to meet at Trollskull Manor. In this scenario, however, Renaer spotted Dalakhar on the street as they both arrived, approached him, and they were both killed in the explosion. (If you go this route, I recommend having a note from Dalakhar in Renaer’s pocket for the PCs to discover that will cover at least some of the information Renaer would otherwise impart.)
  • One of the Three Urchins (see Part 3). If it’s not a deal-breaker for your group, introducing the cute little urchin kids and then killing one of them is virtually guaranteed to set the PCs on the warpath.

STRUCTURE: Generally speaking, this investigation will break down into three phases.

  • First, the questioning of witnesses to the explosion. The primary revelation here is that a nimblewright was responsible.
  • Second, finding and investigating known owners of nimblewrights. The primary revelation here is that they’re being purchased from Captain Zord of the Sea Maidens Faire.
  • Third, either speaking with Captain Zord (aka Jarlaxle) or performing a heist (see Part 4B) to retrieve his customer information. If they perform the heist, they might also stumble across the crystal ball Jarlaxle is using to spy through the nimblewrights. Either way, the information will lead them to the Gralhunds.

THE CRIME SCENE: The crime scene is described on p. 44 of Dragon Heist.

  • Add black flying snake tattoos to the Zhentarim corpses.
  • Tracking the nimblewright? Physically tracking the nimblewright is not really feasible, its trail being quickly obliterated in the crowded streets of Waterdeep.
  • Speak with dead? See p. 46 of Dragon Heist, but tweak answers to fit revised continuity where necessary. The key revelations from Dalakhar is that he was carrying the Stone of Golorr, what the Stone does (although he doesn’t know it’s been blinded), that he stole it from Xanathar, and that he was coming to meet Renaer. The key revelations from the Zhentarim is that they were seeking something that Dalakhar was carrying, they worked for Urstul Floxin, and they came from Yellowspire (see Part 3: Faction Outposts).

REMINDER!

During this investigation…

Renaer Neverember - Waterdeep: Dragon HeistDon’t forget to have Renaer show up at the scene of the crime, probably 15-30 minutes after the explosion. When he does so, he’ll be able to tell the PCs:

  • That he had arranged to meet with Dalakhar at Trollskull Manor. The gnome had sent him an urgent message requesting the meeting and Renaer chose Trollskull Manor as the location.
  • That Dalakhar was an agent working for his father.
  • That his father had assigned Dalakhar to “keep an eye on me. He would skulk around and I would see him everywhere.” A few weeks ago, though, he abruptly disappeared and Renaer doesn’t know where he’s been. (If the PCs ask, it happened just before Renaer was kidnapped by the Zhentarim.)
  • That he doesn’t know what Dalakhar wanted. “His message simply said that he was carrying something valuable for my father, was unable to deliver it, and was hoping that I could help.”

Don’t forget to have the Cassalanters contact the PCs and ask for their help in saving their children. It’s strongly recommended that this occur before they reach the Gralhund Villa.

PHASE 1: QUESTIONING WITNESSES

Street Scene - Waterdeep: Dragon Heist

There’s generally three types of witnesses:

  • Those who didn’t see anything, and merely relate their personal experience. (Heard a huge explosion, rushed into the street. Saw a friend immolated in front of their eyes and the heat of the flame on their face. All their windows blew out. Et cetera.)
  • Those who saw the nimblewright throw a bead from a necklace of fireballs. (Variation: As described on p. 45, young Martem Trec recovered the spent necklace from where it fell in a rain barrel after the nimblewright tossed it away.)
  • Those who saw the nimblewright approach Dalakahar’s body, take something from it, and run away. If the PCs inquire about which direction it went, the answer is between two buildings and heading east. (Variation: Some people may have also seen the nimblewright leap down from the roof from which it launched its attack.)

Which witnesses saw which events doesn’t really matter. The key revelation is that a nimblewright was responsible for the attack.

BONUS CLUE – THE HOUSE OF INSPIRED HANDS: One of the witnesses who saw the nimblewright remembers seeing a similar automaton participating in the Twin Parades yesterday as part of the Temple of Gond’s procession. (Following up on the Temple of Gond will lead to the House of Inspired Hands, see below.)

Option: There’s no reason the PCs couldn’t attend the Twin Parades themselves (see Part 4). If they do, you can describe several impressive processionals participating in the parade, including the nimblewright who was operating a number of wonderous mechanical contraptions. (If you want to force it, arrange for one of the PCs’ faction missions to require action during the parade.)

DESCRIPTION OF THE NIMBLEWRIGHT:

  • A construct made of both burnished copper and pale wood.
  • Wore a red robe and foppish red hat with a feather.
  • A long, stylized Van Dyke beard. (This is unique to the Gralhunds’ nimblewright and may help identify it to Captain Zord later.)
  • You can see its clockwork mechanisms constantly whirring and pistoning under its rune-etched skin-plating.

POTENTIAL WITNESSES

  • Fala Lefaliir, owner of Corellon’s Crown (Dragon Heist, p. 32)
  • Tally Fellbranch, owner of the Bent Nail (Dragon Heist, p. 32)
  • Rishaal, owner of the Book Wyrm’s Treasure (Dragon Heist, p. 33)
  • Jezrynne Hornraven, client of Vincent Trench (Dragon Heist, p. 45)
  • Martrem Trec, 12-year-old boy and friend to the dead halflings (Dragon Heist, p. 45)
  • Emmek Frewn, owner of Frewn’s Brews and rival (Dragon Heist, p. 42).
  • Shard Shunners, gang hired by Frewn to interfere with the PCs’ business (Dragno Heist, p. 42)
  • Ulkoria Stonemarrow, regular at Trollskull Manor (Dragon Heist, p. 42)
  • The Three Urchins, particularly if one of them was killed (see Part 3C)

WITNESS – URSTUL FLOXIN: Urstul Floxin obviously survived the explosion, but he was badly hurt and will attempt to leave the area as quickly and surreptitiously as possible. If the PCs respond to the explosion quickly, however, they may have the time to briefly question him (particularly if they immediately move to assist the wounded).

  • Somewhat disoriented, Urstul will give his real name if questioned.
  • He’ll claim to have come to Trollskull Alley in order to go to (he glances around and points at a storefront) the Book Wyrm’s Treasure. He doesn’t know what happened; there was just a bright light and a lot of heat and he’s pretty sure he was knocked out.
  • A DC 13 Wisdom (Insight) test suggests that he’s not being entirely truthful. If pushed, he’ll say, “Look, I must have been hallucinating. But just after the explosion, I could have sworn I saw a mechanical angel of death moving among the bodies. I thought he was going to come for me next, but then it turned and ran away.” (GM Note: Urstul doesn’t actually believe it was an “angel of death”, but he wants to present himself as a confused rube who just happened to be passing by.)

Note: Urstul also has a black flying snake tattoo, but his is located on his left breast and is not visible unless the PCs somehow (and for some reason) strip him down.

THE WATCH ARRIVES: See Dragon Heist, p. 44-45.

DESIGN NOTES

The witness list has been expanded here specifically to reincorporate NPCs the characters may have been interacting with during Chapter 2. Accent the list with any other familiar faces the PCs might recognize, although not everyone in the area should be someone the PCs know.

Note that the in the published version of the campaign Urstul is the one to steal the Stone of Golorr from Dalakhar’s corpse, but in this continuity the nimblewright steals the Stone (and it’s the nimblewright’s trail the PCs will be following). This also means Urstul can still be onsite, allowing the PCs to encounter him face-to-face before interacting with him at the Gralhund Villa.

PHASE 2: ON THE MATTER OF NIMBLEWRIGHTS

Once the PCs have the description of the mechanical man responsible for the attack, the next step is to figure out exactly what it was and where it came from.

RESEARCH: A DC 13 Intelligence (Arcana) can reveal that it was a nimblewright, most likely built by the technomancers of Luskan and based on ancient Calishite designs of the Shoon Nimblewright - Waterdeep: Dragon HeistImperium. They had not previously been seen in Waterdeep and the Luskan technomancers have been reticent about sharing their secrets. If they succeed at DC 17, however, they learn that Bowgentra Summertaen, Lady Master of the Watchful Order of Magists and Protectors, is known to have recently come into possession of one.

Following up on the Luskan angle is possible, with a DC 17 Charisma (Investigation) check revealing that the Sea Maidens Faire carnival ships recently came to Waterdeep from Luskan and the performers might know more.

CANVASSING: A DC 13 Charisma (Investigation) check reveals two owners of nimblewrights (see below). For every two points of margin of success, they discover an additional owner.

OTHER APPROACHES: Perhaps the PCs approach their faction for information on the mechanical man. Or they could easily come up with some completely unanticipated idea. If the approach seems plausible, default towards providing them 1-2 nimblewright owners.

THE BONUS CLUE: The bonus clue, described above, will also point the PCs towards one of the nimblewright owners (the Temple of Gond).

DESIGN NOTE

The PCs aren’t meant to find all the owners of nimblewrights here. The intention is for them to trace the nimblewrights to Jarlaxle. If they do so and then steal Jarlaxle’s records of sale, they’ll find a list of all the owners, including those on the list below that they didn’t already identify + the Gralhunds.

(This path is actually more difficult than just asking “Captain Zord” for help – because the PCs have to (a) steal the records and then (b) investigate all the different buyers before identifying the Gralhunds. But it has the advantage of not tipping off Jarlaxle, possibly eliminating an entire faction from the Grand Game.)

The bonus clue will preferentially point the PCs towards the fully developed Temple of Gond from the published scenario. If you want to open things up a bit, give the PCs two owners via the bonus clue. For example: “I think I saw a similar automaton in the Twin Parades yesterday. He was part of the Temple of Gond’s procession.” And then a bystander pipes up, “Hey! You’re right! I’ve seen something like it before, too! It was dueling down at the City Armory!” Or whatever owner you want to evoke.

OWNERS OF THE NIMBLEWRIGHTS

Jarlaxle has sold 9 nimblewrights. His asking price is just 25,000 gold dragons – which is a lot of money, but shockingly cheap as far as constructs go. That’s because he’s selling them at loss. His interest is not in making a profit from selling mechanical constructs: The nimblewrights have clairvoyance crystals built into them, allowing Jarlaxle to use a special crystal ball to capture “records of witness” through the eyes of each nimblewright, which he can review at his leisure. (See “Nimblewright Crystal Ball”, below.) He simply wants to get nimblewrights positioned in as many advantageous households and organizations as possible, collecting intelligence and blackmail opportunities.

TEMPLE OF GOND: The House of the Inspired Hands is described on p. 46 of Dragon Heist. The nimblewright they’ve named Nim has, much to their surprise, proven remarkably adept at interacting with and even creating their mechanical marvels. (He does not, however, have a nimblewright detector.)

  • Appearance: Its “hair” consists of multi-layered, overlapping metal feathers.

BOWGENTRA SUMMERTAEN: Lady Master of the Watchful Order of Magists and Protectors, a guild for wizards and sorcerers in Waterdeep. Her nimblewright is serving as a majordomo-cum-curiosity piece at the Order’s guildhouse.

  • Appearance: The nimblewright’s head is is featureless – no eyes, no mouth, no nose, no ears, no hair. (This does not impede its senses of sight or hearing.)

LORD LABDAR ADARBRENT: Head of a noble Waterdhavian family who owns the fourth-largest shipping fleet in the city and has strong ties with the Master Mariners’ Guild. His nimblewright stands as a guard in his front hall, replacing the human guard who once stood there.

  • Appearance: Its eyes are black onyx and its face is fixed in a permanent, rictused scowl. It wears the tabard of House Adarbrent.

LORD CORIN DEZLENTYR: The wizened, half-elven head of the Dezlentyr family. They first rose to prominence in the 13th century as caravan masters, traders, and explorers. They own a villa in the Sea Ward ($51 on the 3rd Edition City of Splendors map). The nimblewright was actually purchased by his headstrong, swashbuckling daughter, Hermione Dezlentyr.

  • Appearance: Its right eye is a green gemstone which glows faintly. Hermione has dressed it in traditional swashbuckling gear – the hate, the doublet, and so forth. (This lends it an appearance quite similar to the Gralhunds’ nimblewright, although it lacks the Van Dyke beard.)

HOUSE OF WONDER (TEMPLE OF MYSTRA): Jarlaxle may have gotten a little cocky here. The servants of Mystra obtained the nimblewright in the hope of unraveling the secrets of its construction. They have not done so (at least not yet), but they did discover the clairvoyance crystal and have successfully removed it from their nimblewright. (If you want to complicate things, send a Bregan D’Aerthe response team to reclaim the compromised nimblewright from the House of Wonder.)

  • Appearance: Feminine in appearance, dressed in a simple white robe. Silver “hair” has been carved to resemble a bob cut.

House of Wonders - Waterdeep: City of Splendors

MOTHER TAMRA’S HOUSE OF GRACES: A finishing school catering to young ladies of ambitious families located on Mendever Stret in the Castle Ward. Their nimblewright is serving as a housecleaner.

  • Appearance: Eight halos of different precious metals circle the nimblewright’s head at strange, intersecting angles.

CITY ARMORY: Located in the Sea Ward ($75 on the 3rd Edition City of Splendors map), the members of the Armory Guard have a nimblewright who serves as a fencing partner. They appropriated the funds to purchase the nimblewright without really having proper authorization.

  • Appearance: Simple, generic facial features, but this nimblewright has additional plates of gleaming metal positioned around its body to resemble a stylized breastplate and greaves.

THE GRALHUNDS: The guilty party.

FACTION MEMBER: A prominent member of one of the factions the PCs belong to. Possibly their direct contact, but it’s arguably more effective to have it be someone they’re not personally acquainted with yet: It will make the outcomes of the investigation less certain, raise more questions in their mind, and have wider-ranging consequences in terms of deepening (or radically changing) their relationship with the faction.

INVESTIGATING THE OWNERS

As the PCs track down and question the owners, their stories and interactions will all be different, but make sure to establish the key revelations:

CORE REVELATION: The nimblewrights were all purchased from Captain Zord of the Sea Maidens Faire. His carnival ships are currently docked at a rented pier.

SECONDARY REVELATION: Captain Zord is selling the nimblewrights for a shockingly low price.

NIMBLEWRIGHT APPEARANCE: It’s important to note during these visits that the nimblewrights all look different from each other. While they share certain key features (a slight, nimble build; construction from thin, curved plates of burnished metal and pale wood; their visible clockwork mechanisms), each is a bespoke creation with distinct, unique features. If you slip up and describe the nimblewrights as all being identical to each other (and, particularly, identical to the Gralhunds’ nimblewright), the PCs will have no way of figuring out who the guilty nimblewright belongs to and their investigation is likely to turn into a muddle.

THE JARLAXLE CONNECTION

Once the PCs have tracked the nimblewrights back to “Captain Zord”, there’s generally three directions their investigation can take.

Jarlaxle Baenre - Waterdeep: Dragon HeistTALKING TO ZORD: If the PCs simply seek a meeting with Captain Zord, it’s relatively easy to obtain. If they ask him about the ownership of a particular nimblewright, he’ll first want to know why they’re looking for it. His curiosity satisfied, he’ll excuse himself for a few minutes, and then return to tell them that the nimblewright they’re looking for was purchased by the Gralhunds. He can even give them an address.

Easy-peasy. (Except for the part where they’ve inadvertently tipped off Jarlaxle and brought him into the Grand Game.)

ZORD’S RECORDS OF SALE: If the PCs stage a heist to steal Zord’s records of sale, they’ll find the Ledger of Nimblewright Sales in Area J30 of the Eyecatcher (see Part 4B). This ledger records all the current owners of nimblewrights in Waterdeep.

THE CRYSTAL BALL: If the PCs discover the existence of the nimblewright crystal ball (see below), this can be found in Area U4 of the Scarlet Marpenoth (see Part 4B). If PCs stage a heist to access or steal the crystal ball, they can review the records of witness and easily discover that the nimblewright responsible for the fireball was sent by the Gralhunds.

THE NIMBLEWRIGHT CRYSTAL BALL

The nimblewright crystal ball is actually a rare and incredibly powerful crystalmantic artifact that’s not inherently associated with the nimblewrights: It is attuned to specially created clairvoyant crystals, and is capable of not only perpetually scrying through those crystals, but also creating and storing records of witness. Basically, it allows you to not only view “live feeds” from any attuned clairvoyant crystals, you can also review everything those crystals have “seen” in the past.

Jarlaxle and his agents killed the dragoness Asphosis and stole the crystal ball from her horde. The technomancers of Luskan have been creating attuned clairvoyance crystals and building them into the nimblewrights. Thus, the crystal ball is currently capable of seeing out through the eyes of any nimblewright.

STUDYING THE NIMBLEWRIGHTS: The clairvoyance crystals are very carefully hidden deep inside the nimblewrights’ clockworks (and, at least initially, appear to be an integrated part of their operation; they’re not just wedged in there randomly). If several hours can be taken to carefully study a nimblewright (including at least partially disassembling it), a DC 18 Intelligence (Arcana) check will discover the crystal’s superfluous nature and then normal efforts can be used to identify its function.

The attunement between crystal and crystal ball can be traced. A detect magic spell combined with a DC 15 Intelligence (Arcana) check is sufficient to identify that the crystal is attuned to something onboard the Eyecatcher (assuming the trace is followed to the harbor).

DESTROYING A CLAIRVOYANCE CRYSTAL: A clairvoyance crystal is actually quite delicate and will shatter like glass if appropriate physical force is employed.

CREATING A CLAIRVOYANCE CRYSTAL: Players who take possession of the nimblewright crystal ball have a very powerful and versatile tool. Attuned clairvoyance crystals can be scavenged from the nimblewrights (both those “in the field” and also those still located in Jarlaxle’s ships), but if they want to create more crystals, they’ll need to visit Luskan and perform a raid on the technomantic workshops there.

WHAT ELSE CAN YOU SEE? In addition to identifying the Gralhunds’ nimblewright, the PCs can access records from all of the other nimblewright owners. This is a vast body of knowledge that is either banal or essential.

You might even include older records of witness from before the time that Aphosis took possession of the ball. These might be fragmentary and incomplete, but their study could reveal any number of adventure seeds for the PCs.

Perhaps there’s even a very old crystal that remains attuned to the crystal ball and located somewhere within Undermountain.

Go to Part 5D: Backtracking Dalakhar & Kalain

Waterdeep: Dragon Heist

Go to Part 1

The investigation which brings the PCs from the fireball in Trollskull Alley to the Gralhund Villa will be fully described in Part 5. For the moment, however, we do need to establish a few key pieces of revised continuity:

  • As mentioned in Part 1, the Gralhund’s nimblewright and the Zhentarim agents tracking Dalakhar are NOT working together.
  • The nimblewright uses a necklace of fireballs to launch a fireball which kills Dalakhar and most of the Zhentarim agents, with the exception of Urstul Floxin (who barely survives, but is incapacitated).
  • The Gralhund nimblewright dashes forward, rifles through Dalakhar’s pockets, and takes the Stone of Golorr. It then runs off, returning to Gralhund Villa.
  • Urstul Floxin is able to identify the nimblewright. The Zhentarim track it back to the Gralhunds and are out for both revenge and the Stone.
  • Meanwhile, the PCs will have likely tipped off Jarlaxle and pulled Bregan D’Aerthe into the Grand Game. Jarlaxle and his agents will also know who the nimblewright belonged to.
  • Xanathar doesn’t know that the Gralhunds have the Stone, but he has learned that Urstul Floxin, a Zhentarim agent, was present when Dalakhar was killed. The beholder is still not entirely clear who stole the Stone, but he has his agents observing Urstul Floxin and those agents have tracked him to Gralhund Villa.

This sets up the quadpartite confrontation (really quinpartite once you add in the PCs) at the Gralhund Villa.

DESIGN NOTES

The simple goal here is to viscerally evoke the cross-faction conflict of the Grand Game: The first scenario of the campaign features two of the factions (although the PCs only encounter one of them). The climax of the second scenario features three of the main factions plus the Gralhunds (and also the Cassalanters if the PCs are working for them at this point) all coming together in immediate conflict. That’s the essential story of Dragon Heist being told through action, and it sets the stakes for the rest of the campaign.

OBSERVING THE VILLA

The Villa, for our purposes, exists in one of two states when the PCs arrive: Before the Zhentarim Raid and During the Zhentarim Raid. The DM can select which scenario is true based on any number of criteria, but I’m going to use a simple metric: If the PCs arrive during the day, then the Zhentarim raid happens that night. If they arrive at night, then the Zhentarim raid is in progress. (And if, for whatever reason, they specifically decide not to go to the Gralhund Villa after tracking the nimblewright back to it, I’ll trigger the raid a couple days later and have the PCs hear reports of it – either through broadsheets or contacts or simply gossip in their tavern’s common room.)

Before the raid happens (i.e., if the PCs arrive during the day), the Villa is under observation by up to three different factions. If the PCs scout around the Villa, they may be able to spot these teams. The DC for Wisdom (Perception) tests is noted with each faction.

ZHENTARIM WATCHERS (DC 12): Two Zhentarim thugs are located on the roofs of the buildings near the estate, stealthily changing their position from time to time. They have been placed here by Urstul Floxin to make sure that neither the nimblewright, the Gralhunds, nor the Stone of Golorr leave the villa before the raid begins. They have a black flying snake with them to send a message if necessary.

The Zhentarim watchers spotted one of Xanathar’s gazers, but didn’t realize it was watching them (or that it has remained in the area). They are unaware of the presence of Jarlaxle’s team.

XANATHAR’S GAZERS (DC 16): There are four of Xanathar’s gazers in the area. At DC 16, the PCs spot one gazer. They spot an additional gazer for each PC who succeeds on the test or for every 2 points of margin of success.

Xanathar’s agents tracked Urstul Floxin and the Zhentarim watchers to the villa when he gave them their instructions. Xanathar isn’t sure exactly what Floxin wants with the Gralhunds, but he’s installed the gazers to find out.

JARLAXLE’S TEAM (DC 14): If Jarlaxle has been tipped off by the PCs, he has a team holed up in Artheyn Manor across the street from the villa.

Artheyn Manor - Dyson Logos

The Artheyns are a mercantile family. Radford Artheyn, the patriarch, has packed up the household and temporarily relocated to the Moonshae Isles in pursuit of a rumored vein of black gold in Alaron. (See MOON1-3: Black Gold from the 4th Edition Living Forgotten Realms for more on black gold, although the details aren’t actually important for this scenario.) Drop cloths cover most of the furniture in the three-story house. A watch team has been stationed by the front door (Area A), which is on the opposite side of the house from Gralhund Villa, and the primary observation team is on the top floor (Area B).

Area A: Fel’Rekt Lafeen (drow gunslinger; Dragon Heist, p. 201) and 2 drow.

  • A Directive from Jarlaxle lays on a side table. (If the PCs search Artheyn Manor after the raid, Fel’Rekt has carelessly left this behind.) The directive, signed by “Jarlaxle Baenre”, indicates that Fel’Rekt is to keep a watch on the Gralhund Villa and “seize any opportunity to take possession of the Stone of Golorr”. Updates are to be sent twice daily via Fenerus Stormcastle, and someone named Krebbyg has been instructed to pick up messages from Fenerus twice daily for the duration of the Gralhund operation.
  • GM Note: Fenerus Stormcastle’s House is a Bregan D’Aerthe outpost, see Part 3.

Area B: Two drow gunslingers and 6 drow.

Jarlaxle’s team are aware of both the Zhentarim watchers and Xanathar’s gazers.

THE VILLA – ADVERSARY ROSTERS

Adversary rosters make it easy for a DM to run dynamic locations in which the action spills over from one room to the next. If you’re not already familiar with their use, I recommend reviewing this article which discusses them in detail.

To use these rosters, simply ignore any references to NPCs in the published key for the Gralhund Villa. If the PCs enter the villa before the Zhentarim raid has begun, you should also obviously ignore any references to corpses or other signs of violence.

GRALHUND VILLA – PCs ARRIVE DURING THE DAY

2 Gralhund GuardsArea G1 - Main Gate
1 Servant (Gardener)Area G2 - Yard
Stableboy (Ike) + 2 MastiffsArea G3 - Coach House(mastiffs don't obey Ike)
Groundskeeper (Hurv)Area G3 - Bedroom(sleeping)
12 Gralhund GuardsArea G4 - Barracks(8 unarmored, 1d4+1 sleeping)
2 Servants (Head Butler + Cook)Area G6 - Pantry
Servant (Head Maid)Area G7 - Laundry Room(keys to all locked doors)
4 Gralhund GuardsArea G8 - Great Hall
1 Servant (Maid)Area G9 - Parlor
1 Servant (Maid)Area G10 - Trophy Room
NimblewrightArea G11 - Orond's Study
Orond GralhundArea G12 - Family Library
2 Gralhund GuardsArea G13 - Upstairs Foyer
Yalah Gralhund + HrabbazArea G16 - Master Bedroom
2 Servants (Nursemaids)Area G18 - Children's Room
Gralhund Children (Zartan + Greth)Area G18 - Children's Room
4 ServantsArea G19 - Servant's Wing(playing Three-Dragon Ante)

GRALHUND VILLA – PCs ARRIVE AT NIGHT

Groundskeeper (Hurv) + 2 MastiffsArea G2 - Garden(in shadow form)
Stableboy (Ike)Area G3 - Bedroom(sleeping)
2 Zhent ThugsArea G8 - Great Hall
4 Zhent Thugs + 4 Gralhund GuardsArea G13 - Upstairs Foyer(fighting)
Urstul FloxinArea G15a - Guest Suite(wounded)
Orond Gralhund Area G15b - Guest Suite
Yalah Gralhund + Nimblewright + HrabbazArea G16 - Master Bedroom
Gralhund Children (Zartan + Greth)Area G18 - Children's Room
9 ServantsArea G19 - Servant's Wing

STAT REFERENCE

Shadow MastiffGroundskeeper (Hurv) – cult fanatic, MM p. 345 or shadow, MM p. 269
Mastiffs – MM p. 332 or shadow, MM p. 269
Servants – commoner, MM p. 345
Gralhund Guards – veteran, MM p. 350

Yalah Gralhund – DH p. 220; noble, MM p. 348
Orond Gralhund – DH p. 213-4; noble, MM p. 348

Urstul Floxin – DH p. 216; assassin, MM p. 343
Zhentarim Thugs – thug, MM p. 350
Flying Snake – MM p. 322

Drow Gunslingers – DH p. 201
Drow – MM p. 126

Gazer – DH p. 203

THE VILLA – MODIFIED KEY

Area G11 – Orond’s Study: The mahogany desk is covered with papers, which consist of the Gralhund Study of the Grand Game (see Part 6D).

Area G12 – Library: Orond was studding A Missive from Castle Ward. He leaves it laying on the arm of one of the library’s chairs if disturbed (by, for example, a Zhentarim strike team breaking into this house).

  • A Missive from Castle Ward: “We are now certain that the Second Eye was carried from the warehouse in the Dock Ward to Yellowspire in the Castle Ward. I no longer believe that it remains within Yellowspire, however. After observing the Zhentarim traffic here, I am convinced that they must be using a teleportal within the tower. If we wish to track the Second Eye further, we will need to access that teleportal or otherwise determine where it leads. – Chirada”

Area 15b – Guest Suite: Does not contain a teleportation circle or flying snakes.

THE PCs RAID THE MANSION

If the PCs arrive during the day and raid the mansion before Floxin shows up, what happens?

OBSERVATION TEAMS: Check to see if they spot the PCs’ infiltration. If they don’t, then nothing happens until they do. Then, broadly speaking:

The Zhentarim will send their flying snake to Urstul, who will hastily assemble his team and rush over. He still won’t arrive for 10+2d6 minutes, though, so it’s quite possible the PCs will complete their raid and leave. If that happens and the Zhentarim think they have the Stone, they’ll leave a message drop for Urstul and attempt to follow the PCs to see where they take it. If they don’t think the PCs have the Stone, one of the Zhentarim will follow them (to identify who the new players in the Grand Game are) and the other will maintain observation of the villa.

Xanathar’s Gazers will continue monitoring the situation, with one or more of the gazers following the PCs when they leave.

Jarlaxle’s Team will wait for an opportunity to present itself and then strike at the Stone. That might mean attempting to send a team into the compound (probably heading over the roof and entering through Area 17 – The Balcony), or it might mean waiting until the PCs have the Stone and then attacking them as they leave.

GRALHUND GUARDS: If the alarm is raised, then

  • 2 of the guards from Area G8 – Great Hall will move towards the alarm.
  • 1d4 rounds later, 4 armored guards from G4 – The Barracks will mobilize. 2 will head towards the alarm; two will move towards Lord Gralhund.
  • 1d4 rounds later, the unarmored guards from G4 – Barracks who were NOT asleep will mobilize with weapons but no armor.
  • 1d4 rounds later, the unarmored guards from G4 – Barracks who WERE sleeping will mobilize with weapons but no armor.

(It would take unarmored guards 5 minutes to don their chain shirts. They’re not going to wait on it if the villa is under attack.)

Beyond that general response procedure, though, simply use the adversary roster and play the characters appropriately based on the information they have.

OTHER APPROACHES: What about other approaches? For example, what if the PCs knock on the front door? Or bring the City Watch? Broadly speaking, if the compound seems threatened by armed force, similar responses will be taken. If a peaceful approach is being taken, successful Charisma checks may allow PCs to meet with Lord Orond. (Lady Yalah will not put in an appearance; she stays with the Stone upstairs.)

ZHENTARIM RAID TIMELINE

Gralhund Villa - Lower Level

The night-time adversary roster assumes that the PCs arrive on the scene during the night, with the Zhentarim raid taking place in media res. If the PCs instead arrive during the day and settle down as their own observation team, then they’ll be able to watch the raid play out in real time.

FLOXIN’S PLAN: Urstul wants to enter the house quietly through G6 – Pantry, make a rush through G8 – The Great Hall, go up the stairs, and capture Lord Orond, Lady Yalah, and/or the children before the guards can fully mobilize. With hostages in hand, he believes they can negotiate for the Stone of Golorr and then leave.

This is what their raid looks like, broadly speaking (assuming the PCs don’t intervene):

  • Urstul Floxin and 8 Zhents in black leather armor rendezvous with the 2 watchers and then all of them approach along the villa’s rear wall and pick the lock to the Pantry (G6).
  • Inside they are surprised to discover two servants (the head butler and the cook) using the pantry for an illicit, late night romantic liaison.
  • The halfling cook makes a run for the Kitchen (G5), screaming bloody murder. Which is, in fact, what the Zhents do: They murder both servants.
  • The cook’s screams, however, alert the head maid who was working in the Laundry (G7). She comes to see what the fuss is all about, entering the kitchen to see the Zhents cut down the cook in the opposite doorway. She turns and runs back through the laundry screaming.
  • Floxin curses and tells half of his men to chase her down. They catch up with her on the backstairs to the Servant’s Quarters (G19) and kill her. A couple of other servants who were coming down the stairs run back up, raising the alarm, and the servants eventually barricade themselves.
  • Meanwhile, the head maid’s screams have alerted the guards in the Great Hall (G8). One of them runs out the front doors and circles around to the Barracks (G4) to raise the rest of the guard. The other three move into G7 and begin fighting the Zhents there.
  • This actually works to Floxin’s advantage slightly, leaving the Great Hall (G8) empty. He and his force rush from the Kitchen (G6) into the south end of the Great Hall (G8), but before they can head for the stairs, two guards on patrol in the Parlor (G9) walk out the door. Urstul and his men attack, driving the guards back into G9 and killing them.
  • Lord Orond emerges from the Library (G12), where he’s been studying late. Urstul, still in the hall just outside G9 sees him, gives a cry. Lord Orond flees up the stairs while Urstul and his men give chase.
  • The guards fighting the Zhents in the Laundry (G7) are mortally wounded and fall back almost simultaneously into G8. The Zhents they were fighting give pursuit and kill them.
  • Upstairs the guards in the Upstairs Foyer (G13) have already barricaded the doors to the Master Bedroom (G16) where Lady Yalah and the children are. So when Lord Orond comes rushing upstairs, one of the guards ushers him into the Guest Suite (G15). The guard is killed by Urstul Floxin as he shuts the door on his lord.
  • Meanwhile, guards are pouring out of the Barracks (G4) and entering the house through both the Great Hall (G8) and the Kitchen (G5). They engage the second Zhent force in G8.
  • Upstairs things are looking bad for the Gralhunds, with Urstul’s Zhents dispatching the other guard in G13. The Zhents downstairs hold the line and manage to kill a total of eight guards there, but after two Zhents are killed they’re forced into a fighting retreat up the stairs.
  • A furious melee breaks out at the top of the stairs while Urstul desperately tries to break down the door in the Guest Suite (G15b) to reach Lord Orond and take him hostage. Some of the Zhents manage to break down the door to the Master Bedroom (G16), but are then forced to turn and fight as the guards come pouring up the stairs.

Gralhund Villa - Upper Floor

This is the point in time represented by the PCs Arrive At Night roster. At this point, as described in the original adventure key, there are the following corpses:

  • G6 – head butler and cook
  • G7 – head maid on the stairs up to G19
  • G8 – 8 guards, 2 Zhent
  • G9 – 2 guards
  • G13 – 6 guards, 2 Zhents

(Note: There’s nothing special about this point in time. If it seems more dramatically appropriate, you can have the PCs arrive at any point during this timeline, although running things from the key will be slightly more complex as you’ll want to adjust the corpses, etc. accordingly in real time. Tracking the PCs attempting a stealthy infiltration from the north at the exact same time that Floxin and his team are infiltrating from the south can be a lot of fun!)

If the PCs haven’t interfered (and don’t interfere going forward) here’s what the rest of the raid looks like:

  • Jarlaxle’s team goes into motion: Fel’Rekt Lafeen and 6 drow cross the roof of Gralhund Villa, taking up a position immediately above the Balcony (G17). The two drow gunslingers and 2 more drow move across the roofs and take up a position opposite the large windows of the Upstairs Foyer (G13).
  • The Gralhund Guards manage to kill the rest of the Zhents. At this point, however, there are only four guards left.
  • The drow gunslingers sniper the Gralhund guards through the window. Simultaneously, Fel’Rekt and his team drop onto the Balcony (G17) and break open the doors.
  • Lady Yalah flees into the Children’s Room (G18). While his drow go to G15 and collect Lord Orond, Fel’Rekt spends 6 rounds dueling Hrabbaz, eventually killing him.
  • Lord Orond is dragged into G16 and Fel’Rekt negotiates with Lady Yalah through the door. Lady Yalah eventually breaks and, sobbing, gives Fel’Rekt the Stone of Golorr. He and his team flee back the way they came as the City Watch comes bursting into the house on the lower level.

BUT WHAT ABOUT THE PCs?

With all that being said, it’s considerably more likely that the PCs will intervene at some point. Once that happens, of course, everything is probably going to change. It’s impossible to speculate on that new outcome because the situation is so volatile and there are so many different ways the PCs might go in the confusion and chaos of the situation they find themselves in: Do they help the Zhents? The Gralhunds? Do they end up fighting Fel’rekt’s people on the roof and giving the Gralhunds a chance to escape or for the City Watch to arrive? Ultimately, you just have to play and find out!

There are a few points to make, however:

The failure of the Zhentarim is not foreordained. If the PCs draw off some of the reinforcements from the barracks, for example, it’s quite possible that the Zhents are able to kill the guards and take control of the Gralhund family.

If circumstances change, Lady Gralhund may be presented with an opportunity to give the Stone of Golorr to the nimblewright and have the construct escape with it.

Jarlaxle’s Team will look for an opportunity to intervene in Bregan D’Aerthe’s favor. In the default raid that comes quite late, but once the PCs get involved Fel’rekt may decide to have his drow crash the party much earlier. Or they might wait and attack the PCs after they leave.

Xanathar’s Gazers will not intervene. But they will attempt to follow anyone and everyone leaving the scene afterwards.

WHAT HAPPENS TO THE STONE?

With all that being said, the EXPECTED OUTCOME of the Gralhund Villa sequence in this remix is for the PLAYER CHARACTERS TO HAVE THE STONE OF GOLORR.

(This is a really significant change to the campaign as published, so I’m putting it in bold here.)

ROOFTOP CHASE: If the PC’s DON’T have the Stone of Golorr, then it is likely that they’ve spotted someone fleeing the scene with it. This will probably trigger a rooftop chase, for which you can use the Rooftop Chase Complications from p. 72 of Dragon Heist.

AND NOW THE GAZERS: If you end up in a rooftop chase – here or anywhere else in the adventure – it will be a really cool visual for the PCs to suddenly see multiple gazers come swooping out of the darkness.

This is the scenario – the Stone of Golorr known and in the open – that Xanathar will have his gazers get involved. You might use this to cripple those carrying it, allowing the PCs to catch up. If circumstances allow, Xanathar might also be able to send a Response Team (see Part 3C) to intercept the chase, turning it into a three-way brawl for control of the Stone.

THE STONE IS LOST: If that fails (or the PCs don’t see the Stone leave or choose not to pursue it), figure out where it goes. Transport to a Faction Outpost (see Part 3) and then to a Lair (see Part 4) is the most likely outcome for any of the factions.

Go to Part 3: Faction Outposts

Waterdeep Factions

Go to Part 1

Let’s briefly discuss Chapter 2: Trollskull Alley. This remix is largely not going to be discussing this chapter of Waterdeep: Dragon Heist because it is mostly unimpeachable and almost certainly the best part of the published campaign. To briefly review:

  • The PCs are awarded with Trollskull Manor, which they can “refurnish, rebuild, rename, and otherwise personalize.”
  • The expectation is that they will reopen the tavern on the first floor, and a number of encounters and mechanics are given for doing so.
  • During this time, their recent notoriety also results in them being approached by one or more factions who would be interested in having them join up.
  • The factions ask the PCs to perform a series of missions for them, spanning from the time the PCs are 2nd level until they are 5th level.

The faction missions, it should be noted, are clearly intended to be interwoven with the ongoing events of what we’re referring to as the Grand Game, but this is one place where the campaign kind of glitches because the heavily compressed timeframe of the primary plot doesn’t really leave a lot of breathing room for integrating these missions (or running their new tavern for that matter).

This remix should help address this problem simply by virtue of decompressing the events of the Grand Game: Investigating the Faction Outposts (Part 3) and performing the Eye Heists (Part 4) will expand the timeline and give a little more room for integrating the faction missions.

Beyond that, there are only two tweaks I would suggest for Chapter 2: Trollskull Alley:

  • Add 1-3 additional urban adventures that overlap with setting up the tavern and running the early faction missions.
  • Review the Running the Game: Tavern Time essay here at the Alexandrian and use it to bring Trollskull Tavern to life. (UPDATE: I ended up doing a customized version of this for Dragon Heist. You can find it here.)

You might also consider fleshing out the faction missions and putting a little more meat on their bones, but I think you’ll largely find that unnecessary: As designed the faction missions will take up perhaps one-quarter or one-third of a session. As such, they’ll integrate with everything else that’s going on to create a dynamic, multi-faceted session that draws the players ever deeper into the rich life of Waterdeep. If the faction missions expand to take up a full session on their own, some of that effect will be lost.

On the other hand, giving each faction one meaty mission as a diversion or counterpoint to the Grand Game might make for a good change of pace. (That’s going to be beyond the scope of this remix, however.)

ALLIES IN THE GRAND GAME

Once the PCs have joined a faction, however, the PCs themselves become a vector by which those factions can become involved with the Grand Game.

The PCs can ask for help. Factions can provide assistance, particularly when it comes to intelligence gathering. If the PCs need help locating a faction outpost or lair, for example, their faction can probably help them with that. Of course, they might ask the PCs to do them a favor (in the form of a faction mission) first.

Have the factions push them for information. “How have you been spending your time?” “We heard you were involved in that fracas at the Gralhund Villa. What was up with that?” “We’ve noticed you haven’t been around a lot lately. We’ve got a vested interest in you now, and we need to know how to find you.”

Intermingle the factions. You can also have a PC’s faction become engaged with a faction of the Grand Game from a completely different direction. For example, maybe the Harpers are interested in exotic poisons which were shipped into Waterdeep (and are destined for the Cassalanters’ ritual). Or the Order of the Gauntlet might be interested in targeting Xanatharian slavers.

If these factions discover the Grand Game and/or the PCs’ role in it, they are likely to bring their own agenda to bear.

Bregan D’Aerthe is, of course, Jarlaxle’s faction and their agenda should be obvious. Look at areas of the campaign where Jarlaxle’s agents are present and consider simply making the PCs those agents (perhaps even giving them a small force of drow to command).

The Emerald Enclave actually has no interest in the Grand Game or Neverember’s ill-gotten dragons. They’ll assist PCs who have proven loyal to the faction, but, perhaps refreshingly, will make no demands upon them for the Vault or its contents.

Force Grey is allied to the Open Lord. If members of the Grey Hands or Force Grey bring the Grand Game to their attention, the Open Lord will quickly figure out what actually happened to the missing 500,000 gold dragons and she’s going to want the money back.

The Harpers know that the Cassalanters are actually demon-worshippers and, if they realize the PCs have gotten tangled up with them, will quickly warn them of the fact. The Harpers are more than happy to let the PCs keep the gold (although they will encourage them to “do the right thing” and return the money to the citizens of Waterdeep), but they want the Stone of Golorr, which they believe contains vital intelligence that can help them in their struggle with the Abolethic Sovereignty. It should be noted that the Harpers of Waterdeep are riddled with Zhentarim double-agents, and anything the Harpers learn about the PCs and their activities can very easily fall into Manshoon’s hands.

The Lords’ Alliance actually works directly for the Open Lord. If Jalester Silvermane becomes aware of what the PCs have gotten themselves tangled up in, he’ll arrange a discreet meeting with Laeral Silverhand as quickly as possible.

The Order of the Gauntlet will expect the PCs to tithe at least 25% of the horde.

The non-Manshoonian Zhentarim will see an enormous opportunity in the gold: Efforts are under way to reclaim and repair Zhentil Keep, and that money could be used to buy them a seat on the Zhentarim Council that’s forming to do so. This could really raise the profile of the local Zhentarim network, and the PCs would basically be buying their way into the local leadership of the Black Network. (Or they could pursue this thread all the way to the ruins of Zhentil Keep if that’s their predilection.)

DESIGN NOTE

These interactions serve to tie the material in Chapter 2 more tightly to the wider events of the campaign spine. Using the PCs’ factions to demonstrate the wider scope of how the factions involved with the Grand Game are integrated into the life of the city will deepen the scenario, while also providing the opportunity for creative players to find unique vectors for targeting their enemies. Finally, forcing the PCs to make some tough choices between the advantages and obligations of their faction allegiance will make those relationships more meaningful.

Go to Part 2: Gralhund Villa

Forgotten Realms: City System

Go to Part 1

Moving beyond the major villains, the Grand Game also features the participation of any number of other factions (including the PCs).

GRALHUNDS

The Gralhunds are a minor faction (at least compared to the four main villains) involved in the Grand Game. They simply hope to obtain the Vault for themselves, and use its riches to elevate their position in Waterdeep’s high society. (As described on p. 213, the Gralhunds believe that Lady Yalah should have been elevated to the Masked Lords years ago following the events in the novel Death Masks.)

Many dismiss the Gralhunds as petty schemers, but the truth is that they have had to be clever and conniving in order to punch above their weight-class in Waterdeep’s labyrinthine politics. Even now, as they play the Grand Game, they are struggling to compete with organizations that are far larger and have far more resources.

Thinking outside of the box, they embedded agents in Renaer Neverember’s household months ago. Because Renaer was estranged from his father, they knew it was a long-shot, but it paid off: The agents spotted Dalakhar’s surveillance of Renaer and identified him as an agent of Lord Neverember. When Dalakhar was abruptly pulled off of that assignment, the agents followed a hunch, followed up, and discovered he had ended up in Xanathar’s organization (presumably still on orders from Lord Neverember). The Gralhunds didn’t know that Xanathar held the Stone of Golorr, but when it was stolen they were among the first to suspect (and then know) that Dalakhar was responsible.

Waterdeep: Dragon Heist - The Gralhunds

THE NIMBLEWRIGHT: Two days after Dalakhar stole the Stone, the Gralhunds located him and dispatched their newly acquired nimblewright to find him. In Trollskull Alley, the nimblewright uses a fireball spell to kill Dalakhar and the Zhentarim agents trailing him. The nimblewright then grabs the Stone of Golorr from Dalakhar’s corpse and flees the scene, returning to the Gralhund Villa with his prize (see Part 2).

DESIGN NOTE

The key decision here was to simplify the Gralhund back story. This quickly eliminates a whole slew of continuity errors from the campaign and simplifies a rather convoluted intrigue that the players are unlikely to ever fully fathom. But we’ve also simultaneously increased the scope of the Grand Game (by establishing that there are numerous minor factions all wrapped up in the intrigue) and given ourselves the opportunity to dynamically increase the number of factions involved in the Gralhund Villa sequence (see Part 2).

OTHER MINOR FACTIONS

OPEN LORD: The Open Lord of Waterdeep isn’t exactly a “minor” faction, but Laeral Silverhand is considerably behind the curve in the current Grand Game. She knows that Lord Neverember embezzled 500,000 dragons from the city, but as Dragon Heist begins she is under the belief that he already has the money in Neverwinter. She has agents working to recover it there, but little hope of succeeding (as she believes it has likely already been laundered into Neverember’s expansive plans for rebuilding and expanding Neverwinter). She has heard rumors of Neverember’s Enigma, but has yet to connect that with the missing dragons, and is also unaware of the Stone of Golorr (although she knows that a powerful artifact was stolen from the palace during the confused time period when Neverember was being ousted from power).

The most likely avenue for that to change — and potentially change rapidly — is through information blabbed to the City Watch. This could happen as early as Scenario 1 (depending on exactly what Renaer and/or the PCs report to the watch), but it’s quite possible for the Open Lord to never fully twig to what’s happening.

THE UNSEEN: James Introcaso, one of the original designers for Dragon Heist, wrote a supplement for the campaign called Unseen Waterdeep. It includes a Unseen Waterdeep - James Intracasonew villain for the campaign — a half-doppelganger, half-illithid hybrid running a small gang of shapechangers who wants the gold in order to fund bribes to discover the identities of the Masked Lords (who he intends to assassinate and replace with his shapechangers).

If you want to crank up the byzantine complexities of the Grand Game by adding in more villainous factions, the Unseen are a great plug-and-play option for that. I’m not going to discuss them at great length, but:

  • Consider introducing the Unseen by having them send a doppelganger disguised as a friend or ally of the PCs to politely pump them for information. (They may also be targeting other factions with the same tactic. Their goal is to quickly play catch-up in the Grand Game.)
  • I would avoid adding the Unseen to the Gralhund Villa sequence (see Part 2). Partly to keep that complexity of the sequence under control, but mostly because adding them a little later will create the feeling that the Grand Game is attracting more attention and the stakes are ratcheting up.
  • However, if the PCs have staged a successful heist on Jarlaxle’s ship without tipping him off about Neverember’s Enigma, then the Unseen can very easily slip in and fill that vacuum in any sequence where I discuss Bregan D’Aerthe’s involvement.

DESIGN NOTES

The Unseen also make a convenient exemplar for how other factions of your own design can be added to the campaign. Note that their method of introduction to the campaign is via a unique vector: The Zhentarim have kidnapped people. Cassalanters ask the PCs for help (perhaps in exchange for a percentage). The PCs have to ask Jarlaxle for help. The Gralhunds launched a violent assault. The Unseen’s introduction comes via social subterfuge and deceit. Similarly, the Unseen are also capable of deploying tactics that the other factions can’t. If you’re adding a new faction, try to make sure they’re bringing something new to the table, and not just rehashing what the current factions already provide.

BONNIE’S DOPPELGANGERS / THE BLACK VIPER: These aren’t really factions. They’re small, independent operators who almost certainly lack the resources to go up against the big players. (Of course, the same thing could be said of the PCs.)

Whatever the case may be, Bonnie’s Doppelgangers and the Black Viper are good examples of small-time players who can get swept up in the Grand Game.

  • They might interfere with heists. (Either pursuing the same objective or just coincidentally breaking into the same establishment in pursuit of some other item of value.)
  • They might be hired by NPCs to accomplish any number of ends. But, in particular, they might seek to steal the Stone and/or the Eyes from the PCs.
  • They might also offer their services to the PCs (or be found by the PCs if they go looking for such services).

(Bonnie’s doppelgangers are described on p. 20 and are part of faction missions on p. 35 and 37. The Black Viper is described on p. 196 and is part of faction missions on p. 39 and 40. She also appears at the Cassalanter Estate, as described on p. 118.)

Go to Part 1C: Player Character Factions

Archives

Recent Posts

Recent Comments

Copyright © The Alexandrian. All rights reserved.