Go to Part 1
The rules for wilderness exploration can be broken down into four modules:
- Wilderness Travel, with rules for timekeeping and determining the distance traveled.
- Watch Actions, which allow characters traveling through the wilderness to do activities other than simply moving.
- Navigation, providing a structure for determining where the characters actually go.
- Encounter System, for determining what characters experience during their travels.
To some extent, each of these modules can be used independently of the others, either by simply ignoring a particular module or, in some cases, by assuming a basic default for the module.
For example, instead of using the rules for wilderness travel, you could simply assume that an expedition always moves 24 miles or 2 hexes per day, while still using the rules for navigation to determine where the PCs end up with that distance traveled. Conversely, you could use all the rules for wilderness travel to greatly vary and customize the distance traveled each day, but simultaneously ignore all the rules for navigation and simply checking off the distance traveled towards whatever destination was selected.
But, of course, the four modules are also designed to be used together, with the results produced by one module enhancing and informing the others.
WATCHES
A watch is the basic unit for tracking time. A watch is equal to 4 hours.
Determining Time Within a Watch: To randomly generate a particular time within a watch, use 1d8 to determine the half hour and 1d30 to determine the exact minute (if necessary).
WATCH TYPES
There are six watches per day and three types of watch:
While traveling, it is generally assumed that an expedition is spending two watches per day traveling, two watches per day resting, and two watches per day engaged in other activities.
Forced March: If a character spends more than two watches traveling in one day, they must make a Constitution check (DC 10 + 1 per hour of additional travel). On a failure, they suffer one level of exhaustion.
TRAVEL PACE
During each travel watch, the expedition determines their travel pace.
Normal: An expedition traveling at normal pace cannot use Stealth checks to avoid detection.
Slow: While moving at a slow pace, the expedition is purposely being careful. An expedition traveling at slow pace:
- Gains advantage on navigation checks.
- Can make Stealth checks to avoid detection.
- The chance for a non-exploratory encounter is halved. (If a non-exploratory encounter is generated, there is a 50% chance it doesn’t actually happen.)
Exploration: While exploring, an expedition is assumed to be trying out side trails, examining objects of interest, and so forth. While exploring, an expedition:
- Cannot use Stealth checks to avoid detection.
- Gains advantage on navigation checks.
- The chance for encounters is doubled.
Fast: While moving quickly through the wilderness, expeditions traveling at fast pace:
- Cannot use Stealth checks to avoid detection.
- Suffer disadvantage to Wisdom (Perception) checks.
- Suffer a -5 penalty to navigation checks.
BASIC TRAVEL DISTANCE
| Pace | Per Hour | Per Watch | Per Day |
| Fast | 4.5 miles | 18 miles | 36 miles |
| Normal | 3 miles | 12 miles | 24 miles |
| Slow | 2 miles | 9 miles | 18 miles |
| Exploration | 1.5 miles | 6 miles | 12 miles |
Note: Per Day on this table is based on traveling for two watches (8 hours); i.e., a full day of travel without a forced march.
ADVANCED RULE: MOUNTS & VEHICLES
Gallop: If riding a mount, you can gallop for 1 hour during a watch in which you are traveling at normal or fast pace. During that hour you travel at twice your fast pace speed. (This results in a total watch distance of 18 miles at normal pace or 22.5 miles at fast pace.)
If fresh mounts are available every 8 or 10 miles, characters can cover larger distances at this pace, but this is very rare except in densely populated areas.
Note: If you are using the advanced rules for party speed below, do not use the rule for galloping.
Land Vehicles: Choose pace normally.
Waterborne Vehicles: Distance is limited to the speed of the vessel. On some ships, characters may be able to take rest and active watches even while the ship is moving. This may also allow the ship to travel up to 24 hours a day if the crew can operate in multiple shifts.
Unsuitable Terrain: Most land vehicles are designed to be used on roads, although many will fair well in open terrain (like a prairie). At the GM’s discretion, in unsuitable terrain a vehicle may be limited to a slow pace and ability checks may be required each watch to make any progress at all.
ADVANCED RULE: EXPEDITION SPEED
An expedition’s speed is based on the speed of its slowest member.
- In 1 hour at normal pace, the expedition can travel a number of miles equal to its speed divided by 10.
- At a fast pace, the expedition can travel 150% of its normal speed.
- At a slow pace, the expedition can travel two-thirds of its normal speed.
- At an exploration pace, the expedition can travel one-half of its normal speed.
- Calculate distance per watch based on the expedition’s hourly speed.
On the tables below, distances have been rounded to the nearest half mile.
EXPEDITION SPEED – PER HOUR
| Expedition Speed | Fast Pace | Normal Pace | Slow Pace | Exploration Pace |
| 20 ft. | 3 miles | 2 miles | 1.5 miles | 1 mile |
| 25 ft. | 4 miles | 2.5 miles | 2 miles | 1.5 miles |
| 30 ft. | 4.5 miles | 3 miles | 2 miles | 1.5 miles |
| 40 ft. | 6 miles | 4 miles | 3 miles | 2 miles |
| 60 ft. | 9 miles | 6 miles | 4 miles | 3 miles |
| 100 ft. | 15 miles | 10 miles | 7 miles | 5 miles |
| 300 ft. | 45 miles | 30 miles | 20 miles | 15 miles |
EXPEDITION SPEED – PER WATCH
| Expedition Speed | Fast Pace | Normal Pace | Slow Pace | Exploration Pace |
| 20 ft. | 12 miles | 8 miles | 5.5 miles | 4 miles |
| 25 ft. | 15 miles | 10 miles | 7 miles | 5 miles |
| 30 ft. | 18 miles | 12 miles | 8 miles | 6 miles |
| 40 ft. | 24 miles | 16 miles | 11 miles | 8 miles |
| 60 ft. | 36 miles | 24 miles | 16 miles | 12 miles |
| 100 ft. | 60 miles | 40 miles | 27 miles | 20 miles |
| 300 ft. | 180 miles | 120 miles | 80 miles | 60 miles |
Note: You might also choose to generally use the basic travel distance for expeditions, but use the advanced rules for expedition speed for unusual means of conveyance (via magic, mechanism, or fantastical mount, for example).
ADVANCED RULE: TERRAIN
The type of terrain modifies the speed at which an expedition can travel.
- Highway: A highway is a straight, major, paved road.
- Road: A road is a dirt track or similar causeway.
- Trail: An irregular byway. Probably unsuitable for most vehicles and may only allow for single-file travel. Most off-road travel follows local trails. A known trail does not usually require navigation checks, although a known trail in poor repair requires a DC 10 navigation check to follow.
- Trackless: Trackless terrain is a wild area with no paths. +2 to navigation DCs.
| TERRAIN | HIGHWAY | ROAD/TRAIL | TRACKLESS | NAVIGATION DC | FORAGE DC |
| Desert | x1 | x1/2 | x1/2 | 12 | 20 |
| Forest (sparse) | x1 | x1 | x1/2 | 14 | 14 |
| Forest (medium) | x1 | x1 | x1/2 | 16 | 14 |
| Forest (dense) | x1 | x1 | x1/2 | 18 | 14 |
| Hills | x1 | x3/4 | x1/2 | 14 | 12 |
| Jungle | x1 | x3/4 | x1/4 | 16 | 14 |
| Moor | x1 | x1 | x3/4 | 14 | 16 |
| Mountains | x3/4 | x3/4 | x1/2 | 16 | 18 |
| Plains | x1 | x1 | x3/4 | 12 | 12 |
| Swamp | x1 | x3/4 | x1/2 | 15 | 16 |
| Tundra, frozen | x1 | x3/4 | x3/4 | 12 | 18 |
ADVANCED RULE: CONDITIONS
Certain climate conditions and activities modify the speed at which an expedition can travel.
| CONDITIONS | SPEED MODIFIER |
| Cold or hot climate | x3/4 |
| Giant terrain | x3/4 |
| Hurricane | x1/10 |
| Leading mount | x3/4 |
| Poor visibility (fog, darkness) | x1/2 |
| River crossing | x3/4 |
| Snow cover | x1/2 |
| Snow cover, heavy | x1/4 |
| Storm | x3/4 |
| Storm, powerful | x1/2 |
Leading Pack Animal: Under normal circumstances, a pack-puller can lead a file with a number of animals equal to their passive Wisdom (Animal Handling) skill.
Poor Visibility: This condition also gives disadvantage to navigation and forage checks.
River Crossing: This penalty applies to any watch during which a river must be crossed. This does not apply if the characters are following a road which has a bridge on it, but does apply if they’re traveling cross-country and must seek out a bridge.
ADVANCED RULE: ACTUAL DISTANCE TRAVELED
The distance cited on the travel tables is the average distance traveled. The actual distance traveled in a watch is 50% to 150% (2d6+3 x 10%) of that distance.
Characters can ascertain the actual distance traveled with a successful Wisdom (Survival) check made at the navigation DC of the terrain. On a failure, they assume the average value of the distance traveled.
Design Note: The purpose of this rule is to make accurate mapping more difficult. (You could hypothetically adapt a similar rule to dungeon exploration in order to make accurate mapping of the dungeon environment more difficult, too, although the resolution time involved would probably be prohibitive.)
ADVANCED RULE: TRAILBLAZING
Trailblazing is a special travel pace which can be taken in conjunction with other travel paces. It reduces the expedition’s speed by one-half, but also marks an efficient trail through the wilderness with some form of signs – paint, simple carvings, cloth flags, etc.
Once blazed, this is considered a known trail to the expedition.
Hidden Signs: The signs of a trail can be followed by any creature. When blazing a trail, however, the character making the signs can make a Wisdom (Stealth) check to disguise them so that they can only be noticed or found with a Wisdom (Perception) or Intelligence (Investigation) check.
You don’t need to make a Wisdom (Perception) check to follow your own hidden signs (or the hidden signs of a known trail you’ve followed before). Those who are aware of the trail’s existence but who have not followed it before gain advantage on their Wisdom (Perception) or Intelligence (Investigation) check to find the trail sign.
Note: Trail signs – including hidden trail signs – may be encountered as an exploration encounter in a hex the trail passes through.
Optional Rule – Old Trails: Most trail signs are impermanent and likely to decay over time. There is a 1 in 6 chance per season that a trail will decay from good repair to weather worn; from weather worn to poor repair; or from poor repair to no longer existing.
Someone traveling along a weather worn trail can restore it to good repair as long as they are not traveling at fast pace. Trails in poor repair require someone to travel along them at the trailblazing travel pace to restore to good repair.
Note: Erecting more permanent trail signs – like cairns, stone carvings, etc. – is a significant and time-consuming activity, but may be worthwhile on well-traveled trails.
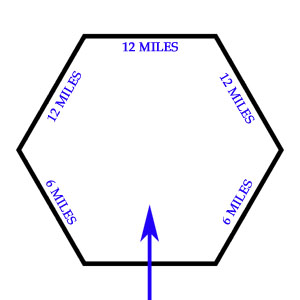
HEXES

1 Hex = 12 miles (center to center / side to side) = 7 mile sides = 124 square miles
Movement on the wilderness hex grid is abstracted. In order to determine if an expedition has left a hex, you must keep track of their progress within the hex.
Starting in a Hex: If an expedition starts movement within a hex, it requires 6 miles of progress to exit any face of the hex.
Optional Rule: You can choose to bias a starting position. For example, you might see that a river flows near the western edge of a hex. If the PCs start traveling from that river, you might decide it only takes 2 miles to exit through the hex’s western face and 10 miles to exit through its eastern face.
Crossing Hex to a Far Side: It requires 12 miles of progress to exit a hex through one of the three faces on the opposite side.
Crossing Hex to a Near Side: It requires 6 miles of progress to exit a hex through one of the two nearest faces.
Changing Direction: Changing direction more than once within a hex will result in the loss of 2 miles of progress each time direction is changed.
Back the Way We Came: If characters deliberately double back along their own trail, simply reduce their progress until they exit the hex. If they leave back through the face through which they entered the hex for any other reason (by getting lost, for example) it requires an additional 1d6-1 miles of progress to exit the hex (unless circumstances suggest some other figure).
Go to Part 3: Watch Actions