The noir detective, stymied in his investigation, returns to the scene of the crime. He paces slowly, lost in his thoughts. He must have missed something here. Some vital clue. But what could it be?
The PCs have been eating at Norma’s Diner every day since they came to the sleepy town of Everglade, gathering there every evening to compare their notes and brainstorm what their next steps should be. But then they discover evidence that corpses are being shipped from the county hospital to the basement of the diner. What exactly has Norma been cooking up this whole time?
This dynamic is a staple of the mystery genre. Another common variant is when a spy publicly approaches a target during daylight hours, socializes with the bad guys (or their staff) for a bit, and then comes back later after everybody has gone home to conduct a more thorough investigation. (James Bond does this in almost every film, for example.)
Structurally, at the game table, we’re talking about a situation where the PCs go to a node — a person, place, organization, event, etc. — and fail to find all (or possibly any) of the clues. Then, later, they return and discover what they missed.
This might occur for purely practical reasons: The PCs’ investigation has stalled out and they need more info, so they have no choice but to double back and try to figure out what they missed.
But it can also be played for dramatic effect: What seemed innocent is revealed to be sinister. The twist villain reveals themselves. The irony of discovering that you were standing on top of Captain Adachi’s treasure the whole time.
If you’re using node-based scenario design in concert with the Three Clue Rule, this will often occur organically: The PCs don’t realize that a clue means they need to look UNDER the apartment building, so they stake it out for a bit, come up empty, and decide to pursue other leads. Then, later, they find a new clue, realize their mistake, and rush back to the apartment building for some clandestine excavation.
In this sense, it’s kind of like red herrings: You don’t need to prep this dynamic; it will just emerge during play. It’s just a natural consequence of missing or misinterpreting clues, and we know the PCs will do that (which is why we’re using the Three Clue Rule in the first place).
But you can also prep some variants of this dynamic deliberately.
For an easy example, the PCs may visit a location for reasons that aren’t investigatory — their friend invites them; they have a seemingly unrelated appointment; etc. — and then later clues point them back to the earlier location with investigation on their minds.
More complex versions may have one set of clues which point the PCs to a node and then another set of clues that they’ll likely encounter later in the scenario that will point them to a completely different aspect of the node. For example, they find clues suggesting that they need to talk to Miles Duverney, who lives in the penthouse of Central Park Tower. They question him there and then continue their investigation… only later discovering the clues that reveal a secret satanic temple was built beneath the building.
In either case, you need to be mentally prepared for a clever or insightful party to make an intuitive leap that uncovers the “hidden” aspect of the node they first time they explore it. (“Wait a minute… Why did Duverney help design Central Park Tower? I’m going to go check out the architectural plans on file with the Department of Buildings.”)
JUST ONE MORE THING…
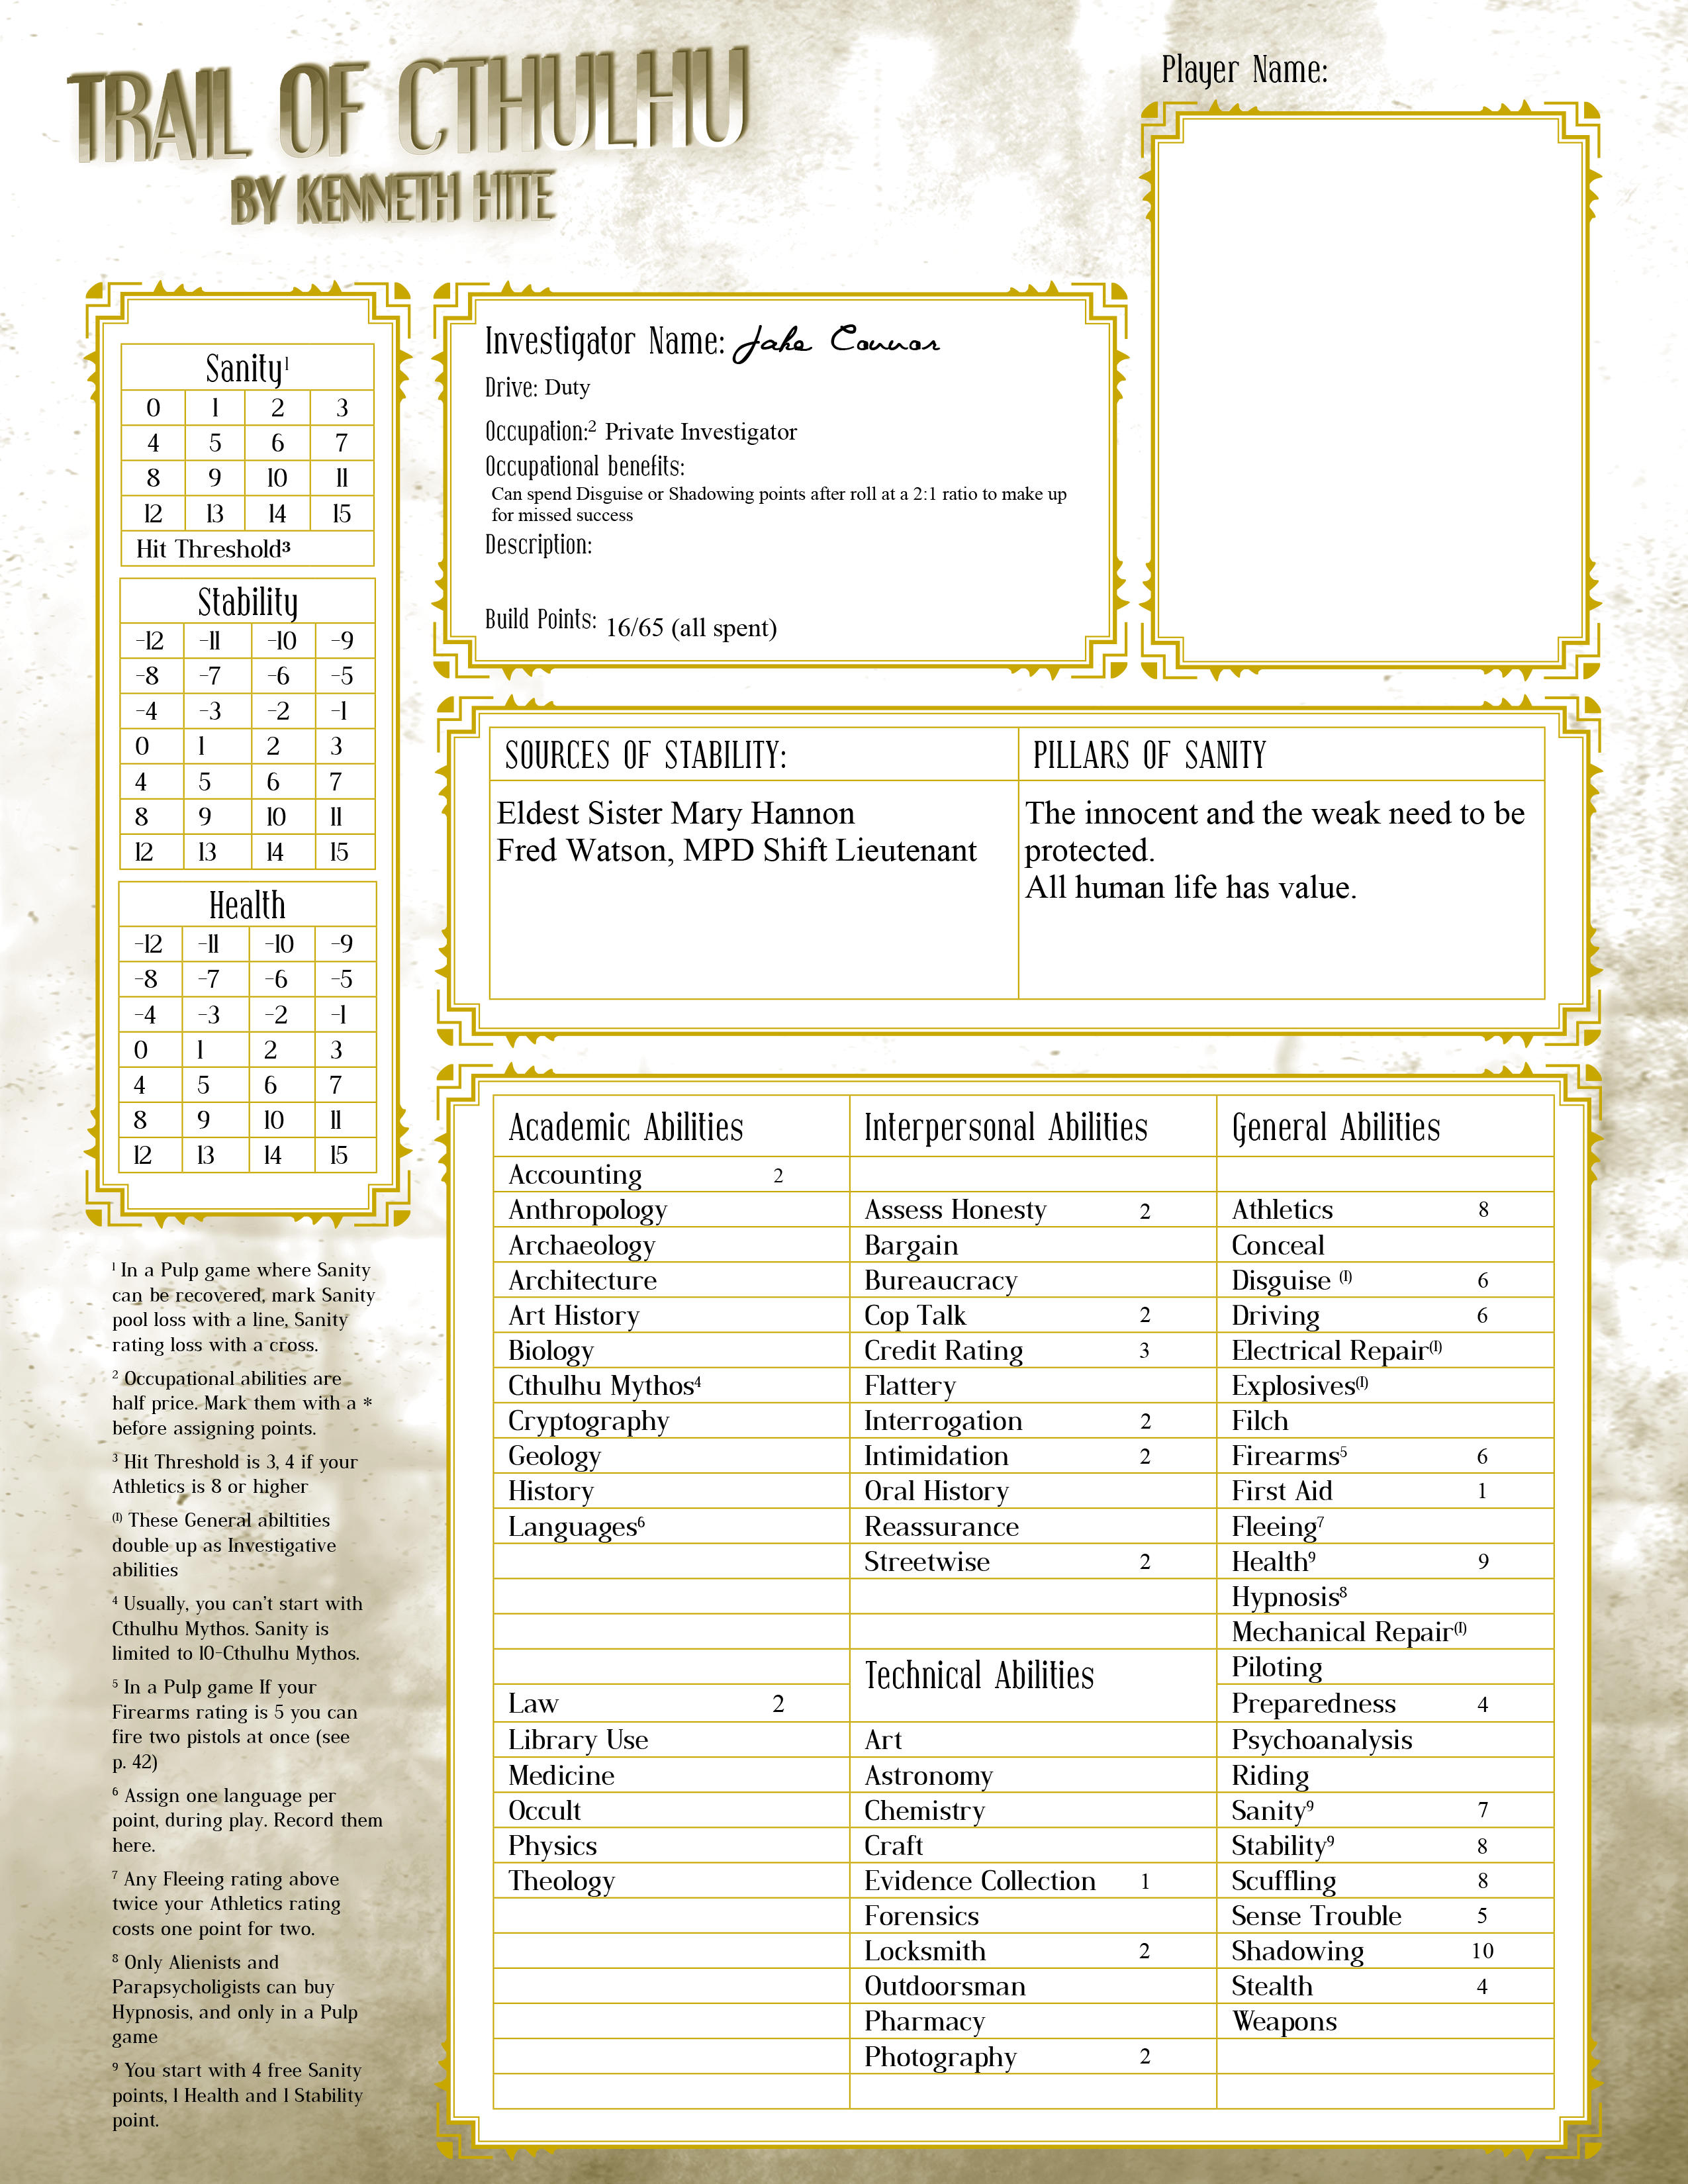
This is a dynamic that the GUMSHOE system, used in RPGs like Trail of Cthulhu and Esoterrorists, actually struggles with because the PCs in that system are supposed to automatically find every clue in every scene. As a result, it can’t emerge organically and instead has to be arbitrarily forced by the GM.
GUMSHOE recognizes it has a problem, however, and attempts to rectify it through another structure which can be conceptually useful in a wide variety of investigation games: leveraged clues.
A very common form of the “revisit a node and learn new information” dynamic is questioning suspects: It’s bog standard for a detective to talk to a suspect (or witness) early in their investigation and then question them again later and gain new information.
But in GUMSHOE, this doesn’t work because you’re supposed to get all the information an NPC has when you talk to them! Rather than having all of the social dynamics of a mystery story flatten out, therefore, GUMSHOE patches over the issue with the leveraged clue: In order to get certain clues from an NPC, you first need to obtain a different clue — the prerequisite or leverage clue — and then invoke it while talking to the NPC.
Columbo, for example, is basically this conceit injected with steroids and then turned into a procedural formula where every episode is just him repeatedly re-engaging with the same NPC node, but with new leveraged clues each time.
And, as Columbo demonstrates, this concept can be quite useful for organizing dynamic NPC interactions that evolve over the course of a scenario.
FAILING SCENARIOS
In some cases, however, the PCs revisiting nodes they’ve already investigated can be a sign that the scenario has gone awry: They’ve missed enough clues that they don’t know what to do next, and so they’re being forced to retrace their steps and try to dig up clues
Most of the time, though, this is still just fine: The players have already identified the problem and are taking action that will likely solve it. (Unless, of course, they’re still missing all the clues for the same reason they missed them the first time through — e.g., they just aren’t thinking to check the cult members’ computers and that’s where all the information they need is.)
What’s more problematic is when the players have become stuck and aren’t going back to find the clues they missed.
When this happens, one technique described in Three Clue Rule for getting the scenario back on track is to use a proactive node to give the PCs a new clue. This might be a clue directly pointing them to a revelation they need, but it could also be a clue pointing them back to a node where they’ve been but missed a clue at.
Note that it’s not enough to just point them back at the node. (This can be too easily dismissed with, “Well, we’ve already been there and didn’t find anything.”) Instead, the new clue must specifically indicate how they’re supposed to investigate the node in order to find the clue they missed (e.g., “the note in his pocket is written on Linustech stationary and appears to be the user name and password for System 42” or they get a phone call from an informant who tells them to “follow the money”).
WHILE YOU WERE GONE
Another variant of this technique is when the PCs return to a former node and discover that it has changed in the interim: The apartment has been ransacked. The NPC has been murdered. The laundromat has burned down.
This can create all-new clues for the PCs to find, or make the clues they previously missed more obvious.
Personally, I wouldn’t spend a lot of time prepping this type of thing ahead of time unless there’s a separate set of clues specifically indicating that the PCs should revisit a location. (Or if there’s some other structural reason for them to do so.) But if a mystery scenario has derailed, the players are feeling lost, and they double back to a location they’ve already been, improvising such changes in order to get them back on track is a solid option.
Thanks to the members of the Alexandrian Discord, particularly bobamk and Alberek, for suggesting and inspiring this article.