Many people are familiar with the 5 Room Dungeon. It’s a simple little structure that you can very quickly pour content into, allowing you to create simple dungeon scenarios on the fly. Basically you design a dungeon with 5 rooms, and in those rooms you place:
- Room 1: Entrance And Guardian
- Room 2: Puzzle Or Roleplaying Challenge
- Room 3: Red Herring
- Room 4: Climax, Big Battle Or Conflict
- Room 5: Plot Twist
Depending on the system you’re using and exactly what you stock each room with, this should produce about 2-4 hours of game play.
Personally, I’m not a huge fan of the 5 Room Dungeon: Partially because its structure is too rigid (which results in effective material, but also very predictable material if you use it too frequently). And partially because a remarkable number of people preach it as the one-true-way of dungeon design (which isn’t really the fault of the structure itself, but combines rather horribly with the first problem).
But what the 5 Room Dungeon does a very good job of demonstrating is how valuable it can be to have a simple structure like this in your back pocket. Not only does it let you very quickly (and very effectively) prep simple scenarios, it’s also incredibly useful when you need to start improvising during a session: You can very quickly brainstorm ideas, paste them into the proven scenario structure, and know that the result is, on a basic level, going to work.
I’ve got a similar structure that I default to whenever I’m looking to whip up something simple and quick. I’ve come to call it…
THE 5 NODE MYSTERY
The 5 Node Mystery structure arose pretty much completely independently from the 5 Room Dungeon, but the repetition of the number 5 isn’t really coincidence: Five good, meaty chunks of interactive material is pretty much what you need to fill an evening of gaming. The interaction between five different elements is also roughly the bare minimum complexity required to create something more meaningful than a solitary random encounter. Nothing wrong with a random encounter, of course, but if you’re looking for the next step up — if, for example, you’re interested in what the random encounter might lead to — then this is basically what you’re looking for.
You use the 5 Node Mystery when you want a simple, fairly straight-forward investigation. It uses node-based scenario design and it works like this:
1. Figure out what the mystery is about. Was someone murdered? Was something stolen? Who did it? Why did they do it?
2. What’s the hook? How do the PCs become aware that there’s a mystery to be solved? If it’s a crime, this will usually be the scene of the crime. It could also be “place where weird shit is happening”. Or maybe someone or something comes to the PCs and brings the mystery with them. (Thugs kicking down the door is a classic.)
3. What’s the conclusion? Where do they learn the ultimate answers and/or get into a big fight with the bad guy? (Big fights with bad guys are a really easy way to manufacture a satisfying conclusion.) This will be your Node E.
4. Brainstorm three cool locations or people related to the mystery. Ex-wife of the bad guy? Drug den filled with werewolves? Stone circle that serves as a teleport gate? These will be your Nodes B, C, and D. (Hint: Brainstorm more than three items. Then pick the three coolest ideas. You’ll end up with better stuff. Also: Before you toss the other ideas, see if there’s any way that you can combine them with the three you picked and make them even cooler.)
5. You’ve got five nodes. Connect ’em with clues. The default structure looks like this:
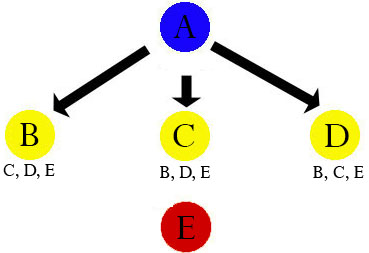
The basic idea here is that Node A points you in three different directions (although, remember, the PCs might find only one of the clues). Then those three locations point to each other and also point towards the big conclusion. Simple.
You’ll also find that the precise structure of the 5 Node Mystery is easy to modify on the fly. In some cases, you’ll find that the nature of the scenario will pretty much dictate the pattern of the clues. (For example, while working on the Violet Spiral Gambit — which was designed in a few hours using this structure — I discovered that it made more sense for the initial node to point to two locations and then have those two locations point to a third. Then I loaded up that third location with a bunch of different clues all pointing to the conclusion.) About the only thing you should avoid as a general rule are clues pointing directly from Node A to your conclusion.
There is a possibility in this structure, of course, for the PCs to go from Node A to Node B to Node E (skipping Nodes C and D). In some cases, the scenario will be modular enough that this just means the conclusion isn’t what you thought it was. (You thought the conclusion was a big showdown with a bad guy in the violet tower at the center of the graveyard. Turns out, it was actually a rooftop chase as the badly injured PCs try to escape the werewolves from the drug den.) In other cases, the nodes left behind the PCs will metastasize into new adventures — either because the werewolves end up causing trouble or because when the PCs go back to mop-up the werewolves they’ll find clues pointing them to other scenarios.
THE 5 x 5 NODE CAMPAIGN
Seasoning your scenario with clues pointing to other scenarios is actually a pretty good way to start expanding from 5 Node Mysteries into designing more interwoven campaigns.
1. Design five 5 Node Mysteries. You might have some idea about how they all relate to each other as you’re designing them, but maybe not. Discovering how seemingly unrelated things are actually connected to each other is a great way to make both things richer and more interesting.
2. Arrange the 5 Mysteries into the same node pattern. In other words, Mystery A will have clues pointing to Mysteries B, C, and D. Mystery B will have clues pointing to Mysteries C, D, and E. And so forth. (If you didn’t already know how the mysteries related to each other, the process of figuring out how clues for Mystery D ended up over in Mystery B is the part where you’re going to figure that out.)
As you’re seeding your clues into each mystery, mix it up a bit. Some clues will be the “pay-off” for solving the first mystery: You’ve taken out El Pajarero, but who was he really working for?! But don’t fall into the trap of always putting the clues in the concluding node. Spread ’em around a bit.
And that’s basically it. It’s a very simple technique for you to use, but you’ll find that (much like the technique of the second track) it creates experiences for your players which are complicated, interesting, and ornate.
FURTHER READING
Game Structures
Node-Based Scenario Design
Gamemastery 101