Go to Campaign Status Documents
Another element that you can keep track of using your campaign status documents is literally just the miscellaneous continuity of the campaign.
Obviously, there are lots of ways that you can (and will) use to record the continuity of your campaign. A detailed campaign journal, for example. Or an updated set of scenario notes. Or a restocked dungeon. Or notes scribbled in the margins of an NPC’s briefing sheet.
But sometimes you just need a quick reference to help you keep the events of the campaign organized in your mind and consistent at the table, or there may be miscellaneous stuff you need to keep track of, but which you just don’t have any clear place in your notes to write down.
It turns out that the last page of your campaign status document is the perfect place for that.
EXAMPLE: NPC EXPEDITIONS
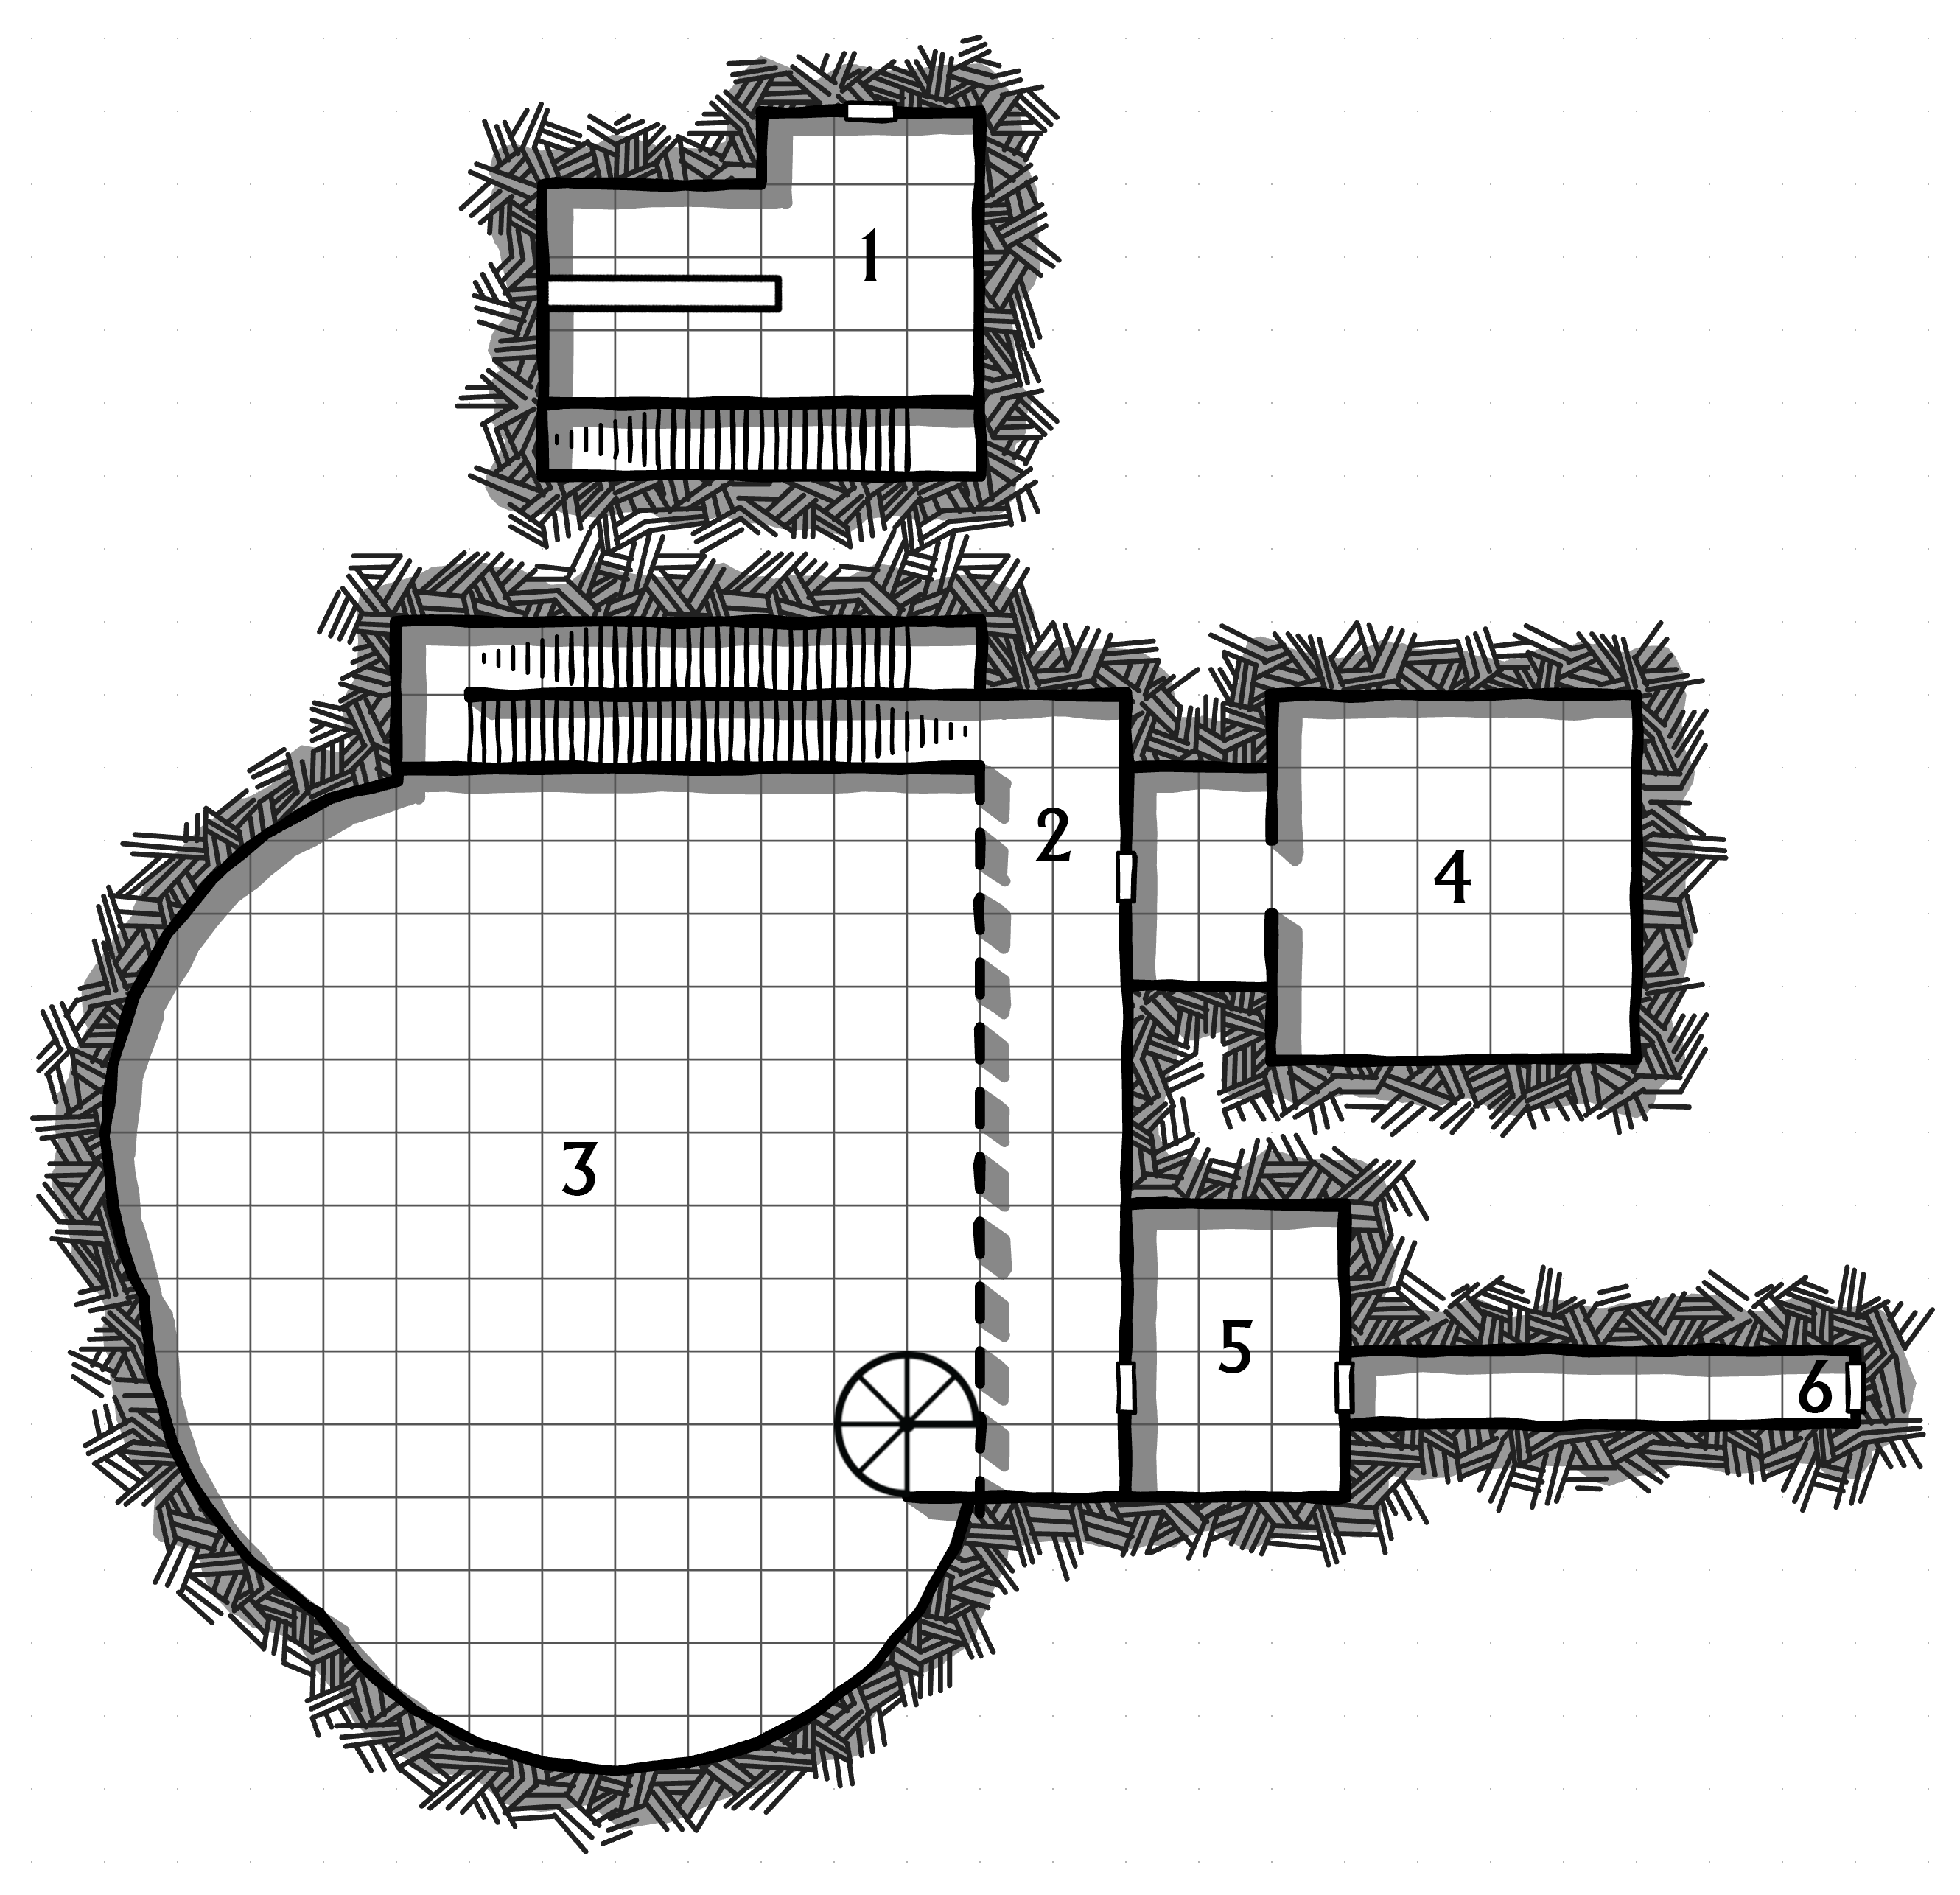
During my Ptolus campaign, the PCs were exploring a vast dungeon known as the Banewarrens. At the same time they were doing this, however, there were several other factions who were also sending NPC adventuring groups into the Banewarrens pursuing a wide variety of agendas.
So I needed to not only keep track of what the PCs were doing in the Banewarrens, I also needed to keep track of these various NPC expeditions and the changes they were making to the dungeon. (So if I determined that, for example, the Pactlords of the Quaan found the body of a fallen comrade and removed it from the dungeon, I would need to update the dungeon key to reflect that the body was no longer there.)
I quickly realized, however, that there were some significant problems with this approach: If I needed to figure out what, exactly, the Pactlords had been doing – for example, if the PCs captured a Pactlord agent and interrogated them – then I would end up sifting through the updated room keys like a detective trying to reconstruct events that I had worked out weeks or months earlier. (And some of these clues would have been obliterated from the record by subsequent changes to the key.)
I concluded that what I needed, in addition to the updated room keys, was a literal log of the NPC expeditions. For example:
NAVANNA – FIRST TRIP
10/06/790 – 5 AM
- Inspects door to purple wraiths, but does not open.
- Passes through Area 10.
- Heads down to the creature vaults. (Will remove the body of the pain devil and take it to the NOD4 apartment complex.)
- Goes to warding generator.
- Enters Outer Vaults. Passes through Area 12/13 and spots new construction in Area 10. Places a clairvoyant mark on the wall for Aliaster. (This doesn’t work, since you can’t scry into the BW, but she doesn’t know that yet.)
- Goes to the warding generator in Area 6.
- Gets caught in the trap in Area 5 and is badly wounded.
- Leaves the Banewarrens.
GOAL FOR NEXT VISIT: Break through into the weapons vault.
(The “Goal for Next Visit” was basically just a way of encoding the line of my thought for Future Justin. It remains important, of course, not to prep so far in advance that you end up throwing out a bunch of stuff that gets contradicted by play.)
This format also let me start pre-running these expeditions, which meant I could also seamlessly trigger this NPC expeditions in the middle of a session. Which, in turn, resulted in more dynamic play as the PCs could react to the expeditions in real time.
If the expeditions were modified during play, I could just note that in my campaign status document. Either way, these expedition “logs” were then archived in the campaign status document for future reference as needed.
EXAMPLE: SESSION SUMMARIES
I don’t always keep detailed campaign journals. (In fact, I usually don’t.) But it can still be useful to tie a little figurative string around your fingers to remind yourself of what you’ve done before.
I’ve found this to be particularly true for open table campaigns, where a long-absent player will often ask me what their previous expeditions were or if they know another PC at the table (i.e., have they gone on an adventure together?).
(Yes, it would be nice if they kept their own notes for this type of stuff – and many players do – but the whole point of having an open table is to encourage more casual play in the first place.)
So what I’ll do is write short summaries of each session, limiting myself to no more than two or three quick sentences. For example, the session summaries for my Castle Blackmoor open table look like this:
Session 10: Drake, Tolliver, Gio, Tana, Havel. Journey through Tanglefuck. Fight a flying machine. Gio strips down to swim under the Pool.
Session 11: Drake, Eilidh, Gio, Tana, Tolliver. Return to Level 3. Recover +2 plate of giant strength. Baron Fant revealed as vampire. Eilidh turned by Fant. Eilidh’s sister Rue joins the rest of the group to search for her sister.
Session 12: Towby, Wazoo, Walton. Three W’s make plans for the church. Particularly making plans for the re-consecration of the Church.
Session 13: Anutar, Tana, Tolliver, Drake. Extensive mapping on Level 2. Enter the dark dwarf forge, kill most of them, and emerge with the elven mithril crown bound in taurum.
Session 14: Anutar, Drake, Hublin Mandrill, Tana, Tolliver. Drake met Hublin on caravan back from Great Kingdoms. Finish clearing out dark dwarf forge. Kill men working for the balrog Ascutiel.
Session 15: Hublin, Johnny, Lana, Ashton, Rue. Hobbit children are now vampires; rescue three out of six hobbits who had been sent after the kids. Ashton and Lana die.
Session 16: Tolliver, Sid, Johnny, Lunara. Followed Sid’s maps down to Level 4. Chased by bandits, werelions, and Baron Fant back upstairs. Attacked by hobbit child vampire; Tolliver turned it. Removed corpses from the cages.
Session 17: Gio, Tana, Zaxxon, Illenya, Sid. Find obsidian charm that grants sight of gasoline-slick alternate version of dungeon. Kill werelion.
But I’ll often find this useful for campaigns run with dedicated tables, too. For example, this list of previous scores from a Blades in the Dark campaign:
Score #1: Steal shipment of ekrosi from the Gaddoc Rail Station impound warehouses for the Fog Hounds.
Score #2: Lady Sharrah has them meet with Maw of the Void cultists in the Lost District to receive delivery of the Flayed Skin of Sevraxis in exchange for an Iruvian dusk candle.
Score #3: Raided the Midnight Gold for evidence against the proprietor, Drav. Killed him, released his ex-wife’s hussy-obssessed ghost.
Score #4: Broke Vestine Vale (Roland’s banker) out of Charterhall jail. Mission goes badly pear-shaped; failed to do side job for Gray Cloaks (stealing ethereal railgun). Attracted interest of Roethe.
Score #5: Delivery of ekrosi to Rubbo’s Boys at Kellis Tower goes awry when Grey Coats ambush the couriers. Managed to deliver drugs without Grey Coats identifying them, but with several deaths.
These particular campaigns took place years ago, and only the dimmest memories are stirred by these quick references. But at the time, they were just enough of a reminder to refresh our collective memories.
KNOWN FACTS
I love improvising new lore and setting details during a session. It’s fun, it’s rewarding, and it’s a great way to flesh out a world.
Some of the stuff you improvise is just ephemera – it has its moment in the sun and then drifts away. Other stuff will have a clear place in your notes where it can/should be recorded. But sometimes it’s a detail just random enough that it has no place to live, but is still compelling enough to be preserved and reincorporated into the campaign.
For that stuff, there’s the “Known Facts” section of my campaign status document. This is literally just a bullet-pointed list of stuff
(This can also be a repository for stuff that probably could be added to my notes somewhere else, but it’s just convenient to store it here until I’ve accumulated enough material to make updating stuff worthwhile.)
For example, here are the Known Facts from that same Blades in the Dark campaign:
Rat ‘n Crown. Bar in Crow’s Foot where Nissan and Marlene intimidated drivers from 1st score.
Kites, a hawker crew in Crow’s Foot. Cyrene spread rumors they were responsible for the 1st score.
Red Mark Bounty is 6 Coin.
Big Lock vs. Fishing Lock.
Iruvian Dusk Candle. Suppresses the ghost field.
Blood Wine.
Triplicate of the final letter in your name is the “hip” thing kids are doing.
Lady Sharrah. Mansion in Six Towers. A fief-witch of the Dimmer Sisters. Multiple spirits in her body.
Lost District: Echoes. The Big One. Faceless market.
Physickers: Wear bandoliers filled with unguents, etc. Different orders marked by different colors.
- Fungal treatments. Including mushroom cocoons.
- Nightshade ears. A fungal replacement for damaged ears.
Charterhall Jail: 3 tiers (padded cuffs, overnight cells, and the literal shithole in the basement with leaking sewage). Under the domed roof is the armory and interrogation rooms. Cupola on top of the dome.
You can see here that, for example, I don’t actually know what “blood wine” is yet. I’ve just mentioned it, and it felt like something that might be drunk in a future scene (or perhaps casks of it stolen for the black market).
In some cases, a Known Fact (or collection of facts) will accumulate enough details and/or additional lore to forge some dedicated place in my notes. For example, perhaps I end up with enough novel foods and drinks that adding a Duskvol Menu to my setting notes will be worthwhile.
In other cases, I’ve had the Known Facts section of my campaign status document grow large enough that it became unwieldy to use. In those cases, I have found that separating it into separate categories can be helpful. For example, here’s a selection of the Known Facts from my Castle Blackmoor campaign:
GREAT KINGDOM
- King Robert rules from palatial estates on the Inner Sea of the Royal Demesne.
- 750 miles from Blackmoor along the coast to the river of the Royal Demesne.
DWARVES
- Northern Dwarves.
- Hold of Iron Hand. Vast lowland kingdom carved out by the dwarven king Iron Hand.
- Southern Dwarves. Technically found in the Mountains west of Blackmoor. Tonisborg is apparently home to many of them. Speak with Massachusetts accents.
- Clan Crowns. Clan crowns can’t be replaced, even if lost/destroyed.
- Elder Metal. Electrum adulterated with copper. Various small artifacts passed down form the Elder Dwarves; their purpose now lost.
ELVES
- Elves. Wake up amnesiac, with no memory of how they entered this world.
- Elven Crown. Allows access to Elven spaceship through Elf Stump (and similar sites). Bound in taurum by dark dwarves prevents that function and inflicts amnesia on elves. [Possibly use Metamorphosis Alpha?]
VAMPIRES
- The vampires of the First Coven drank of Baldr’s blood, hoping to gain his eternal youth and vigor. The goddess Hel twisted the gift.
- Vampires can be killed with: Stakes of mistletoe through the heart (Baldr’s weakness), rays of sunlight, fire (like the pyre of the Ringhorn), or by being submerged in the waters of the ocean.
EQUIPMENT
- Dragon’s Milk. Flash-burn oil. 2d6 (take highest) damage; 2d6 (take lowest) duration. Costs 10gp. (Havel has alchemical instructions from the Great Kingdom.)
- Graysilk. Material woven by dark dwarves. Very difficult to see in normal light (2 in 6).
- Giant Weapons: Cost x10 normal weapons. Deal 2d6 damage. (Usable with giant strength effect.)
- Silvered Weapons. Light +25gp, One-Handed or Ammo +75gp, Two-Handed +150gp.
- Wine skins. Have 12 drinks in them.
- Gorget. Same price as helmet. +1 to AC vs. vampires.
- Lodestone: 10 gp.
OTHER
- Language of the Ancients. “Ocun” means forbidden or in error or rejected.
- Deera. Hugh’s sister is missing somewhere in the dungeon.
- Pixie Scars. Glow blue. Barbarians who use captive pixies for scarification.
- Troll Ash: Can be sold for 1d6 gp per dead troll. Used for rejuvenating face cream; possibly snorted as a mood-altering substance (makes you act like a troll?).
The equipment listed here is a good example of where this material comes from in actual play. Almost all of these items, or details, were the result of players asking specific questions or seeking specific equipment. (With the exception of graysilk, which was something I improvised when describing a random encounter with dark dwarves.)
Similar equipment sections have, in the past, eventually been transferred to the equipment list that players use while creating their characters. (And it’s likely that this one would have been similarly transferred, if COVID-19 hadn’t killed this particular open table.) You could similarly imagine me either improvising enough vocabulary from the Language of the Ancients, or perhaps sitting down one day and deliberately fleshing that material out, that it would make sense to create a dedicated document for it.
Next: Supporting Cast