This adventure was originally developed as part of my In the Shadow of the Spire campaign. When I posted the campaign journal describing what happened when my players encountered the crypt (which you can read here), several people asked where they could find a copy of the crypt for their own campaigns.
The False Tomb was originally designed for D&D 3rd Edition. It has been updated to 5th Edition here. (Members of my Patreon will receive a copy of my original 3rd Edition adventure notes as special bonus content.)
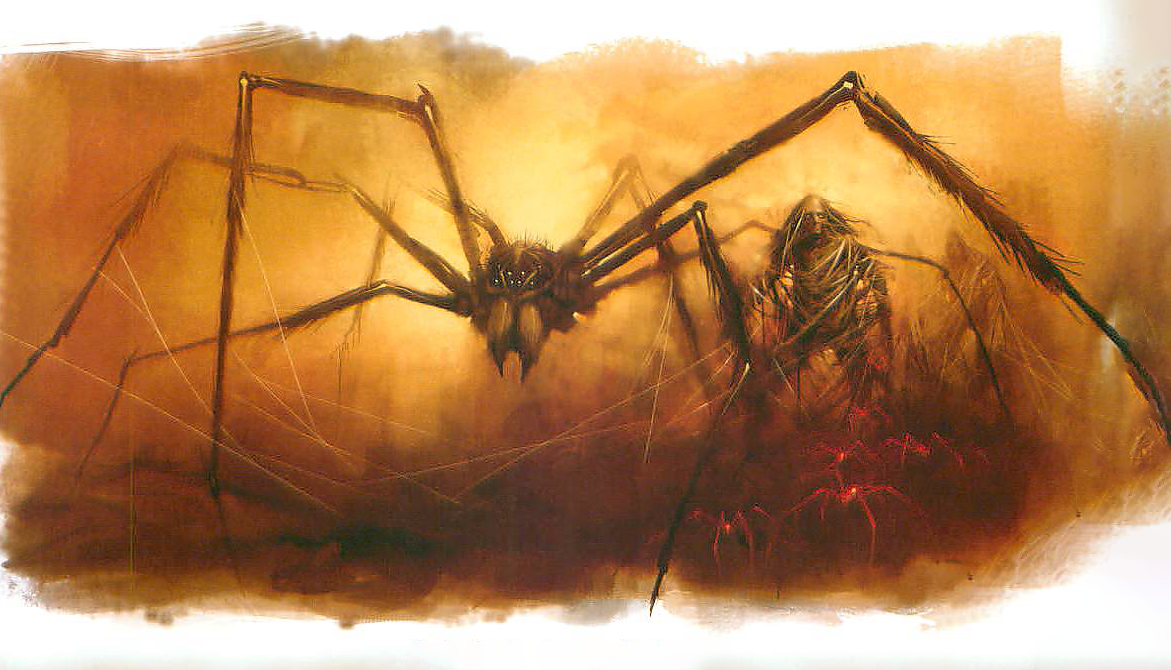
The adventure uses the tomb spider, along with the associated broodswarms and web mummies, from Monster Manual IV. Tomb spiders also appeared in Monster Manual 2 for D&D 4th Edition, but have not received an official 5th Edition update. You can find fan conversions here and here.
The original adventure used copyrighted content from two different RPG publishers. Both publishers have fan content licenses, but for legal reasons I’m uncertain both can be used at the same time. I am using Wizards of the Coast’s Fan Content Policy and have, therefore, stripped the other IP from the adventure.
BACKGROUND
Sagrathea’s Sigil
The PCs are searching for the burial compound of an archmage named Sagrathea. At some point in the past, several of the stone sarsens above Sagrathea’s tomb were taken from the site and reused to build the walls of a small crypt. These sarsens were marked with Sagrathea’s sigil, which may result in the crypt being misidentified as her tomb.
IDENTIFYING THE FALSE TOMB:
- DC 15 Intelligence (Mason’s tools) or Intelligence (History): Recognizes that the walls were built using repurposed sarsens, suggesting that the presence of Sagrathea’s arcane sigil is coincidental.
Once the tomb has been identified as false, finding the actual tomb by searching the surrounding area is relatively easy.
THE FALSE TOMB
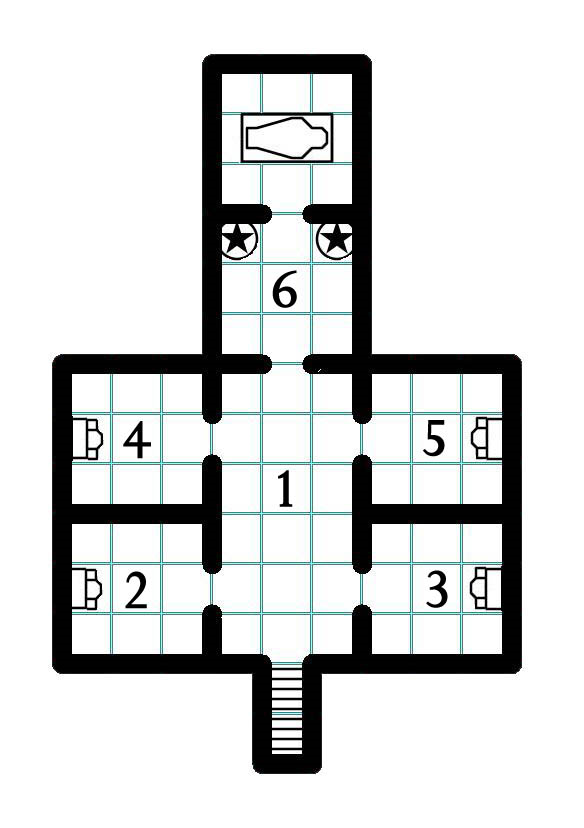
ENTRANCE
This crudely built crypt has thick walls formed from heavy stone slabs. Several of these slabs have the distinctive — yet heavily worn — sigil of Sagrathea worked into them. On one side of the crypt there is a badly rusted iron door.
DOOR: The door is rusted shut.
- Batter Down: DC 20 Strength check.
- Repair: DC 15 Dexterity (tool proficiency) check.
STAIRS: On the other side of the door there is a flight of gloom-shrouded stairs leading down about twenty feet into the crypt. At the top of the stairs — propped up against the walls — are the shattered stone remnants of the crypt’s original door.
AREA 1 – ENTRY HALL
The floor is strewn with rubbled stone from the broken walls and ceiling. Thick cobwebs are strung from the walls, although there is a more or less clear path to the door on the far side of the chamber. This heavy door of stone hangs half-open, its bottom half smashed apart.
Difficult Terrain: Due to the broken floor and webs.
 AREA 2 – CORPSE HUSK
An upright sarcophagus stands against the far wall of this burial chamber. It has been smashed apart. The corpse of its former inhabitant lies on the floor in the middle of the chamber. Thick webs seem to manacle the dried husk to the walls. The chest of the corpses appears to have been ripped open.
BODY — DC 10 Intelligence (Investigation) / Wisdom (Medicine): Something burst OUT of the corpse’s chest.
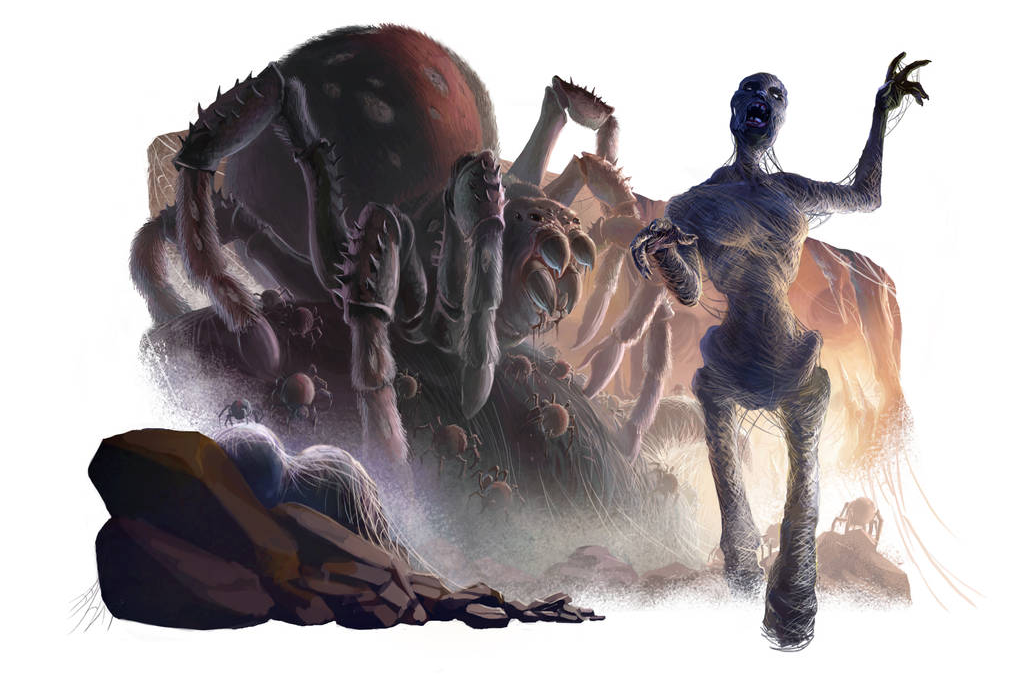
AREA 3 – LURKING BROODSWARM
The webs are much thicker in this chamber. They almost look like snowdrifts as they crawl their way up the walls. You can see what appears to be an upright sarcophagus standing against the far wall.
BROODSWARM: There is a broodswarm lurking in the webs in the corner of the room (Stealth +7). It will attack if anyone who gets caught in the webs
WEBS: Difficult terrain. DC 10 Dexterity check to cross the room. On failure, become restrained in webs and must make a DC 12 Strength check to escape. (AC 10; hp 5; vulnerability to fire damage; immunity to bludgeoning, poison, and psychic damage.)
SARCOPHAGUS: A large hole has been punched in the front of the sarcophagus. Inside the sarcophagus is a corpse wearing a ruined mithril shirt — its chest has been ripped open.
- DC 10 Intelligence (Investigation) / Wisdom (Medicine): Something burst OUT of the corpse’s chest.
- Mithril Shirt: Although useless, the raw mithril is still worth 1,000 gp.
AREA 4 – WEB-CHOKED ROOM
This burial chamber is choked with webs. They literally fill every inch of open space. The far side of the room is completely obscured by them.
WEB MUMMY: A web mummy lurks in the webs. If the PCs disturb the webs in this room or Area 5, it will attack. Otherwise, it will wait until the PCs are confronted by the tomb spider in Area 6, emerging from this room while dragging webs behind it.
WEBS: Difficult terrain. DC 10 Dexterity check to cross the room. On failure, become restrained in webs and must make a DC 12 Strength check to escape. (AC 10; hp 5; vulnerability to fire damage; immunity to bludgeoning, poison, and psychic damage.)
SARCOPHAGUS: A sarcophagus stands against the back wall of the room. It has been broken open. (And is where the web mummy comes from.)
AREA 5 – WEB-CHOKED ROOM
This burial chamber is choked with webs. They literally fill every inch of open space. The far side of the room is completely obscured by them.
WEB MUMMY: A web mummy lurks in the webs. If the PCs disturb the webs in this room or Area 5, it will attack. Otherwise, it will wait until the PCs are confronted by the tomb spider in Area 6, emerging from this room while dragging webs behind it.
WEBS: Difficult terrain. DC 10 Dexterity check to cross the room. On failure, become restrained in webs and must make a DC 12 Strength check to escape. (AC 10; hp 5; vulnerability to fire damage; immunity to bludgeoning, poison, and psychic damage.)
SARCOPHAGUS: A sarcophagus stands against the back wall of the room. It has been broken open. (And is where the web mummy comes from.)
- A +1 longsword lies inside the broken sarcophagus.
AREA 6 – THE TOMB SPIDER
ANTECHAMBER:
Through the broken door you can see an antechamber. A mosaic of glittering lapis lazuli has been worked into the floor, depicting a bursting star. Twin statues with red gemstones in their eyes flank a door leading into the tomb beyond. Each statue raises its right hand before it, as if to ward off trespassers.
THE BURIAL CHAMBER:
In the tomb itself lies an iron sarcophagus worked in the likeness of knight with a sword and shield laid upon his chest. Thick webs are draped from this sarcophagus, shrouding the far corners of the room in darkness.
TOMB SPIDER: The tomb spider is on the ceiling of the burial chamber. It will wait to attack until someone either stumbles into the entry web or enters the burial chamber. It cannot be seen until someone is standing in the doorway of the tomb chamber (Stealth +7, with advantage).
- Tactics: As soon as it gets a chance, the tomb spider will throw a web across the exit.
ENTRY WEB: There is a finely-woven web draped across the antechamber just inside the broken door. DC 18 Wisdom (Perception) check to notice it; otherwise the character entering the antechamber will automatically stumble into it.
WEBS – BURIAL CHAMBER: Difficult terrain. DC 10 Dexterity check to cross the room. On failure, become restrained in webs and must make a DC 12 Strength check to escape. (AC 10; hp 5; vulnerability to fire damage; immunity to bludgeoning, poison, and psychic damage.)
THE KNIGHT: The iron sarcophagus could not be broken by the tomb spider. The heraldry on the knight’s shield can be recognized as belonging to the Order of the Rosy Cross. The knight wears elven chain and a +1 longsword.
The False Tomb is unofficial Fan Content permitted under the Fan Content Policy. Not approved/endorsed by Wizards. Portions of the material used are property of Wizards of the Coast. © Wizards of the Coast LLC.