The Alexandrian

Archive for the ‘Roleplaying Games’ category

Old Prague - Martin Suchanek (modified)

DISCUSSING
In the Shadow of the Spire – Session 37A: Dominic Departs

They had an almost impossible number of possible courses to pursue. First, there were the Banewarrens. They had been hired by Jevicca to seal them and by Rehobath to retrieve the Sword of Crissa.

Agnarr raised the possibility of following up on Demassac Tovarian, assuming that Jevicca hadn’t already done so. They knew he was experimenting with chaositech.

“He might even be the one who supplied the items that let the bone rings into the Banewarrens,” Ranthir said.

Ah! Demassac Tovarian!

He’s one of those roads untraveled that almost always crop up here and there in any campaigns that aren’t purely episodic.

(Spoilers: The PCs never actually pursue the Demassac Tovarian lead. Well, I guess at least not yet. We’re still playing the campaign, so I guess it could happen. But it seems extremely unlikely at this point.)

Tovarian was one of the scenario nodes forming Act I of the campaign. The PCs first encountered a reference to him while investigating the Cran crime family in Session 8, but despite frequently mentioning the lead, they never actually pursued it. I actually primed the pump a bit by having a patron (Jevicca) offer to hire them to check out Tovarian’s operation, but in Session 15 they turned down the job because they were too busy with other stuff.

At that point, I figured the Tovarian scenario was dead, and so I was actually a little surprised when it came up during this Second Meeting of All Things – what the players’ called their mega-planning sessions. That’s also something that’s fairly common in campaigns like this: The players will reach back and pull on the most unexpected threads.

In this case, of course, the tugging still didn’t go anywhere.

There were other clues that would have also pointed to Tovarian, but the PCs either missed those clues (because they got captured by Malkeen Balacazar and never explored the smuggler caves thoroughly) or actually missed the entire adventure those clues were placed in. (I don’t think the Ennin Slavers have even been so much as mentioned; the PCs missed them entirely.)

In fact, there were a BUNCH of Act I scenarios that the PCs skipped past. (And which the players remain unaware of to this day.) Tovarian and the Ennin Slavers collectively had a bunch of clues pointing to things like the Swords of Ptolus, Jirraith, and the Pale Dogs. Because the PCs missed both Tovarian and the Ennin, that whole wing of the campaign kinda just fell away.

And that’s just fine.

I’ve previously mentioned that one of the GM’s biggest friends is a simple question asked at the end of every session: “What are you planning to do next time?”

It’s not foolproof, but it will save you from a lot of wasted prep. In this case, I knew how Tovarian and the Ennin and Jirraith and the Pale Dogs and the Swords of Ptolus all connected to each other because I’d prepped a revelation list. But because the PCs never got anywhere near most of those nodes, I never actually prepped the scenarios. So the only thing I “lost” were a few scribbled concept notes.

(Some of which I would eventually circle back to: The Ennin Slavers had connections to the Vladaams, and so they eventually got hooked in from the opposite direction.)

Of these scenarios, the one I spent the most time on was Demassac Tovarian, because there were a few points where I thought the PCs were going to be heading in that direction.

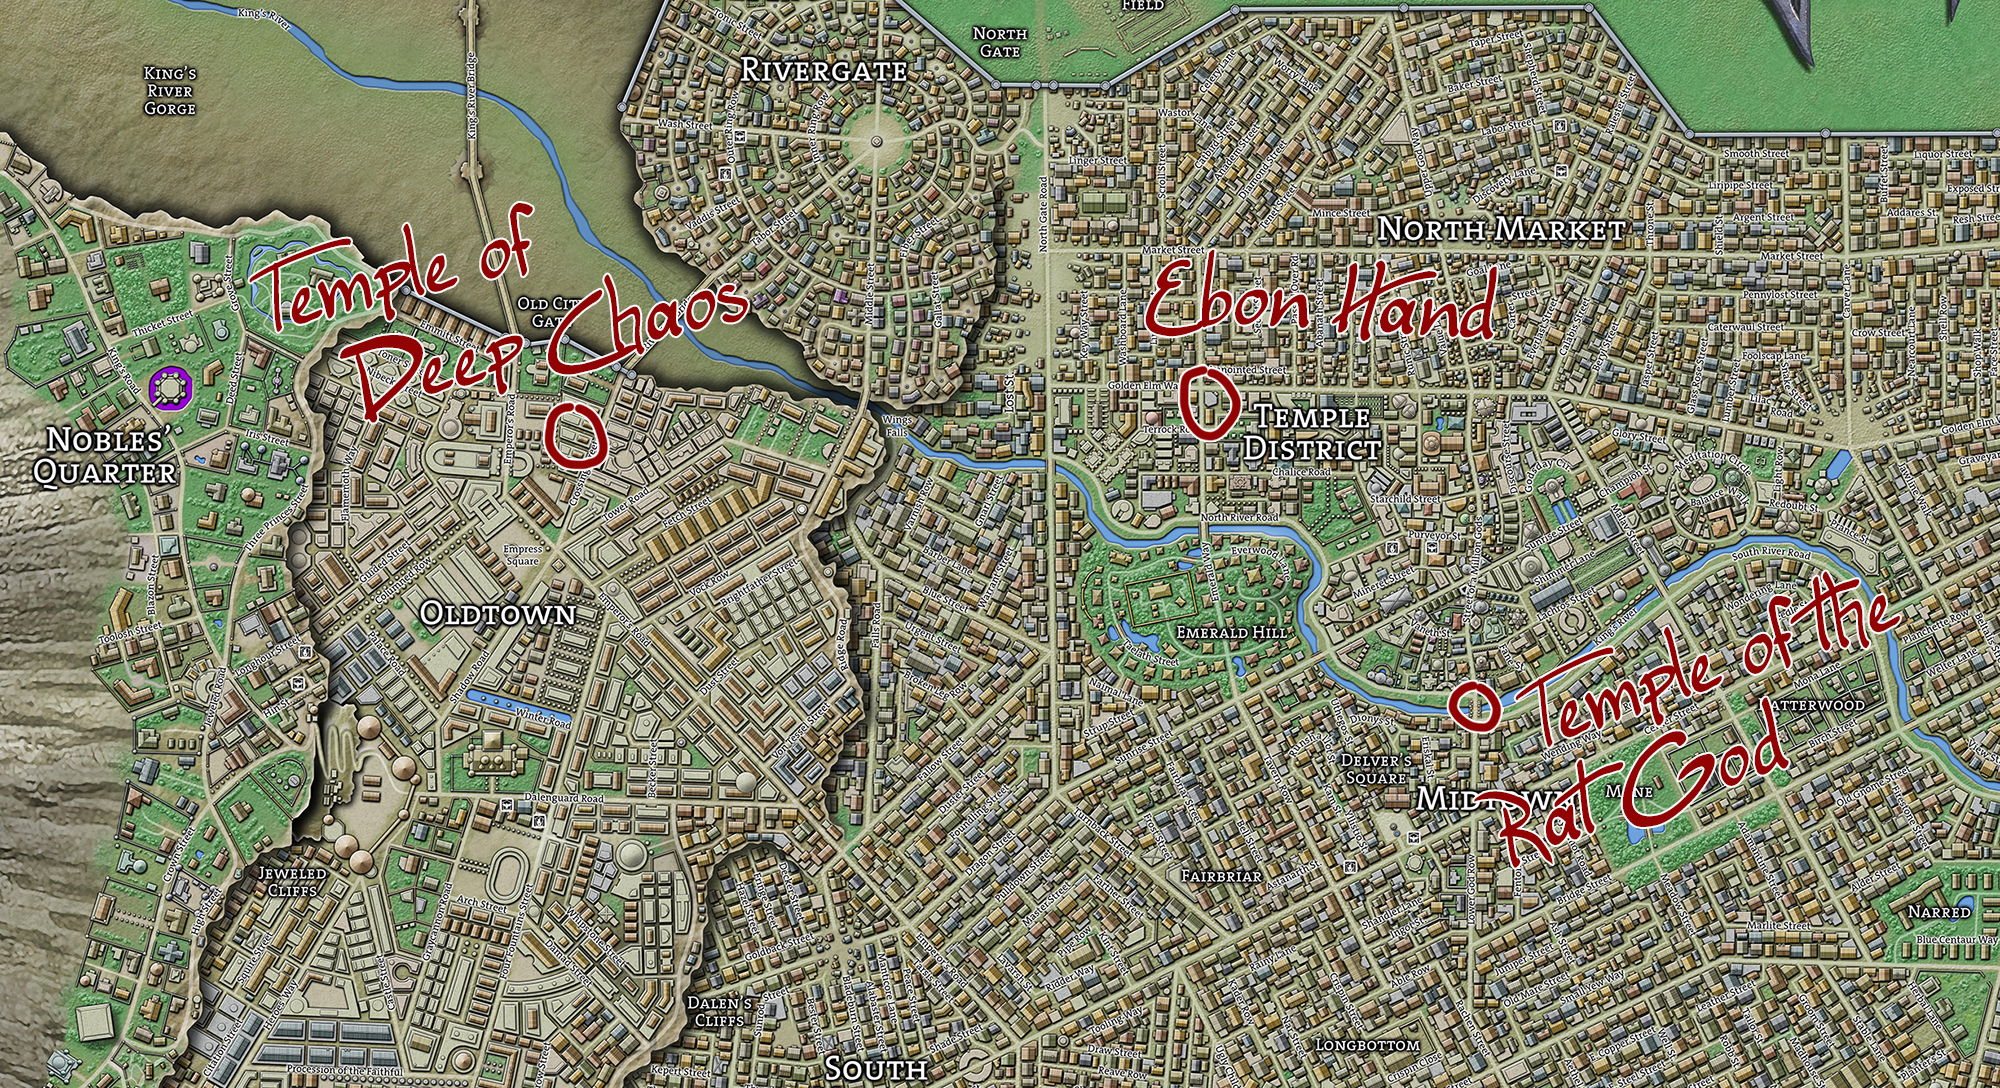
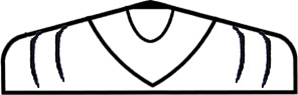
This work included a map of the alley where the House of Demassac Tovarian was located:

The House of Demassac Tovarian - Map: The Street. Depicting several slum-style buildings haphazardly built around an alley. Individual buildings are keyed A1 through A8.

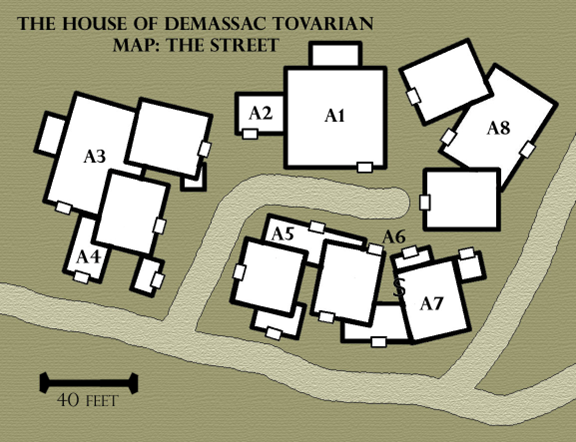
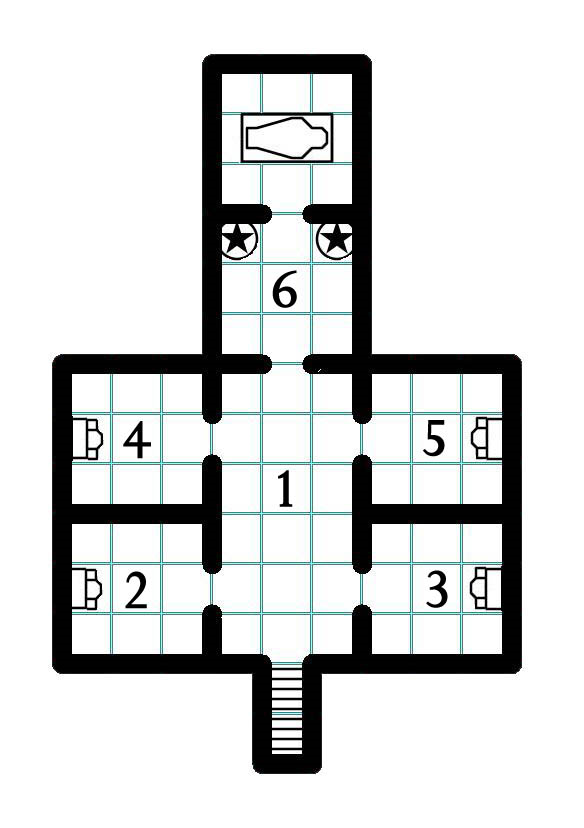
I also mapped the house itself (A1), but as you can see, I never actually finished keying it:

The House of Demassac Tovarian - Map: Interior An unkeyed map of a five-storey structure. Cartography done in an old school style.

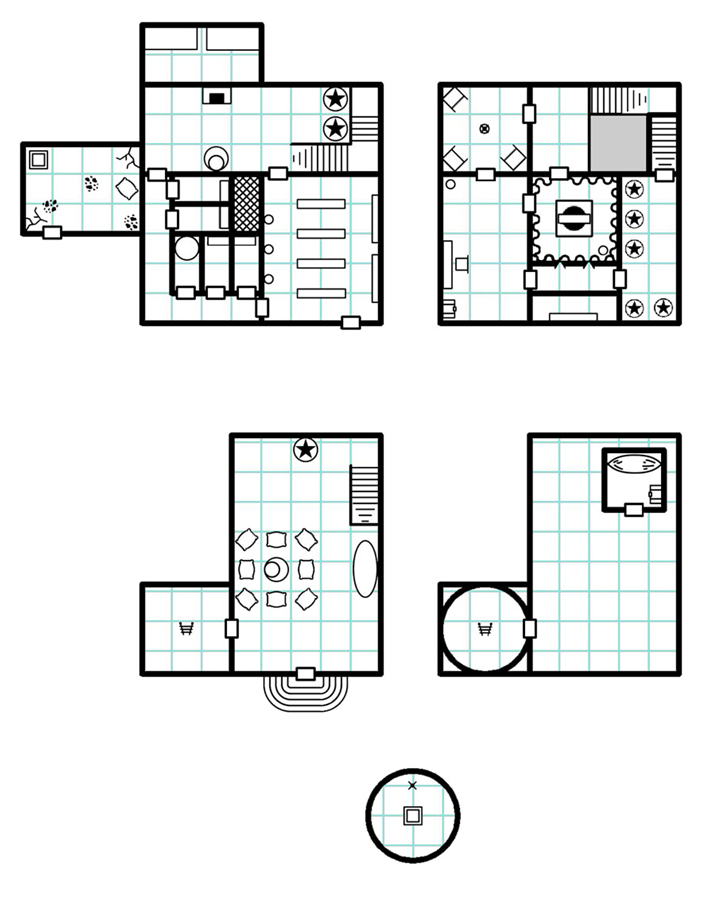
I never got as far as mapping the Undercity located beneath the alley, nor the Tomb of St. Thessina. In the case of the latter, I’m not even sure what my intentions were: The only thing preserved in my notes is the name.

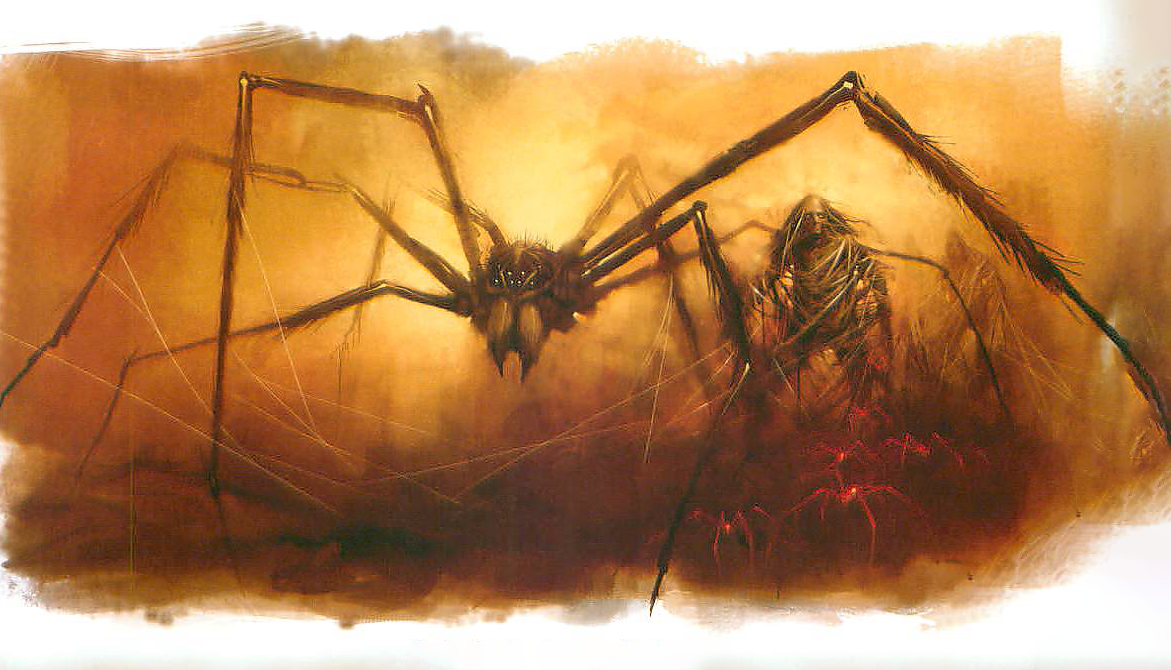
I did have a general vibe in mind for Demassac’s demesne, which was largely inspired by the slightly surreal fantasies of Clark Ashton Smith. He possessed a dream sifter – a piece of powerful chaositech that he used to steal dreams from people. I had several strong images which were the touchstone and inspiration for the adventure, and a handful of these I’d worked up into preliminary room keys, like the Room of Endless Night:

A perpetual gloom shrouds the room. Thick shutters and inky drapes cover the walls and window. The light seems to twist and turn beyond the threshold of the room, casting only a strange phosphorescence that barely illuminates the contents of the room: In one corner of the room stands a heavy basalt statue of a squat, reptilian beast with a grotesque, horned head, stunted bat-like wings, and crooked claws. In another corner there is a sphere of black glass standing on a pedestal of black stone. In the center of the room, a large stone pool or basin is filled with water. Stretched across the top of the pool is a stone slab. The slab has been fitted with manacles.

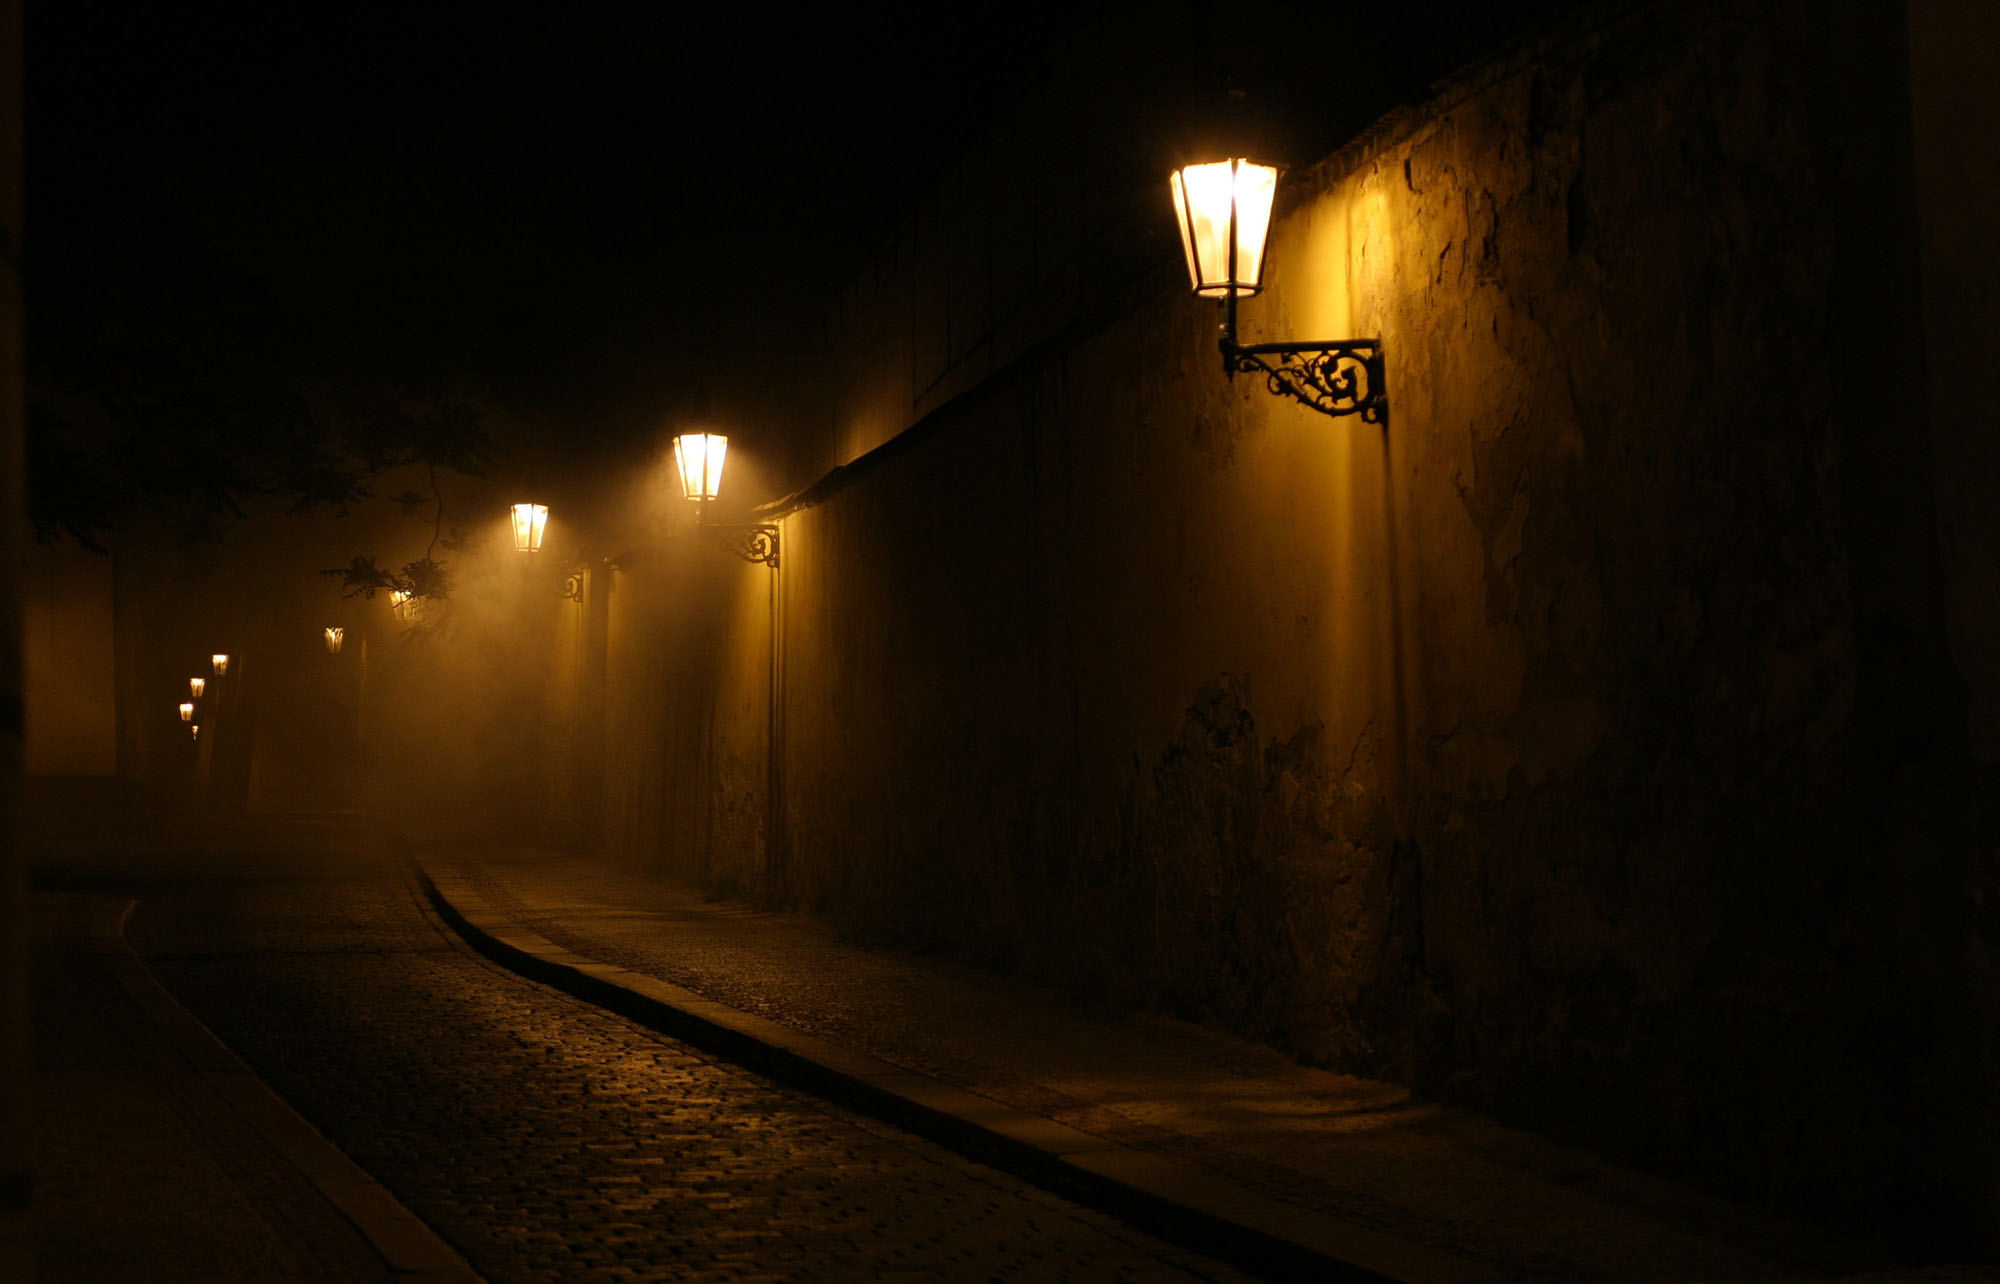
And the Corridor of Lost Dreams:

This corridor, with a hall at one end of it, is shrouded in a perpetual gloom. Dozens of small glass spheres are suspended on nearly invisible wires here and there from the ceiling. Ghostly sounds of laughter and merrymaking float through the air. Sparks of multicolored light seem to dance through air, leaping sedately from one glass sphere to another.

There’s just enough of Demassac that came into existence that I do sometimes think of him and wonder what might have been, and perhaps some day I will return to this strange alley of madmen, dark technomancy, and strange visions. But for the moment, much like the fleeting dreams Demassac fights so hard to preserve, he has tripped along merrily into a lost realm of imagination.

Campaign Journal: Session 37BRunning the Campaign: No, But…
In the Shadow of the Spire: Index

Ptolus - In the Shadow of the Spire
IN THE SHADOW OF THE SPIRE

SESSION 37A: DOMINIC DEPARTS

May 9th, 2009
The 19th Day of Kadal in the 790th Year of the Seyrunian Dynasty

Ptolus - Map of the Chaos Temples Locations (Monte Cook Games, edited by Justin Alexander)

At the gates of the Necropolis, Tee stopped and spoke with the Keepers of the Veil. She inquired after records of those buried in the Necropolis, hoping that they might indicate the location of Alchestrin’s ancient tomb. The knights didn’t keep records of that sort, but they suggested that one might inquire at the Administration Building in Oldtown.

When they returned to the Ghostly Minstrel, a figure wearing a dark green cloak with the hood raised high about its features detached itself from the corner of the common room and came to them. The figure pulled back the hood slightly, revealing to them the face of Sera Nara. Pulling her hood back down, Nara accompanied them up to Elestra’s room where they could speak privately.

“Why are you here?” Tee asked.

“I bring bad news,” Nara said. “This afternoon Rehobath appointed Prelate Adlam as the Silver Fatar of the Cathedral and moved his own retinue into Orridar Palace.”

“Orridar Palace?” Tor asked.

Tee answered. “It’s located in the Nobles’ Quarter. It was originally built by Shay Orridar during the founding of the city. Its construction ruined the Orridars. With the Orridars bankrupted, the other merchant houses squabbled over possession of the palace. It was viewed as a preeminent position of power in the city and the infighting for control was fierce. It became known as the Palace Trade Wars. Eventually, the merchant houses agreed that none of them would ever occupy the Palace. Various people have tried to make it their home over the centuries, but it’s been abandoned for decades.”

“That’s right,” Nara said. “But now Rehobath has dubbed it the Holy Palace and named it as the seat of his false novarchy. Unfortunately, that’s not the worst of my news. We have been gathering our loyalist knights to Pythoness House, as we discussed. Earlier this afternoon, however, we discovered that one of them was a doppelganger. An agent sent by Rehobath to impersonate the knight.”

“What happened to the knight?” Tor asked.

“We think he’s dead.” Nara grimaced. “We killed the doppelganger, too. But we don’t know if he had a chance to send word back to Rehobath or not. If he did, then it’s likely that Dominic’s plan to denounce Rehobath may be known.”

“What about the rest of us?”

“We think you’re safe. Your involvement was only known to a few of us. But preparations were being made for Dominic’s denunciation. It was common knowledge among the knights who were arriving.”

“So… what does that mean?” Dominic asked.

“It means you’re in danger,” Nara said, taking a step towards him. “We need to take you to a safe place as soon as possible. Secure you.” She turned to the rest of them. “The rest of you may come to Pythoness House if you want, but Tor should stay away.”

“That was already my plan,” Tor said.

“Good.” Nara nodded. “It’s impossible to know now how widely known Kabel’s presence at Pythoness House is now known. Or who might be watching.”

Dominic gathered up a few of his belongings and they made their tearful and heartfelt farewells at this sudden and unexpected parting.

And then Dominic was gone.

THE SECOND MEETING OF ALL THINGS

The rest of them labored long into the night. Tee and Ranthir produced voluminous papers – lore of the Banewarrens, chaos lorebooks, prophecies, alchemical manuals, stolen correpondences, and the like. They sorted, compared, and studied these until their minds were numbed and their sense of purpose overwhelmed.

They had an almost impossible number of possible courses to pursue. First, there were the Banewarrens: They had been hired by Jevicca to seal them and by Rehobath to retrieve the Sword of Crissa.

“Why does he want it, again?” Agnarr asked.

“It’s a religious relic. He’ll use it to solidify his claim to the novarchy,” said Tor.

“Just like he used Dominic,” Tee said with a slightly wistful tone.

“Then we’re not going to do it, right?” Elestra said. Tee nodded.

In some ways, however, it felt as if they had been stymied in the Banewarrens.

The green-skinned creature that had escaped through the sealed door into the deeper portions of the Banewarrens had not returned and, short of mounting a round-the-clock watch, there didn’t seem to be anything else they could do about that. And their only other solid lead pointed them towards Alchestrin’s Tomb, which they were somewhat wary of approaching without Dominic’s divine strength.

Then, of course, there were the myriad activities of the cultists and the strange prophecies of the Night of Dissolution. Tee couldn’t quite shake the feeling that they were somehow responsible for it. (“Or were we supposed to be stopping it?” Elestra asked. “Is that what we were doing?”)

They knew of at least three active cultist sites: The unexplored depths of the Temple of Deep Chaos in Oldtown (which had almost certainly been reinforced since their assault), the Temple of the Ebon Hand, and the Temple of the Rat God.  There was also the matter of the Dwarvenhearth Research and Aknar Ratalla research they had discovered. And where was Wuntad in all of this?

Nor could they afford to ignore the strife within the Order of the Dawn. The entire affair seemed to have swallowed up Dominic, the true Silver Fatar was on his way from Seyrun, Kabel was gathering loyalists at Pythoness House, and there didn’t seem to be anything any of them could do about it.

On top of that, they had the matter of the Iron Mage’s letter (telling them to meet the Freeport’s Sword, a ship due the next day), the opening of their Hammersong Vaults within the week, the missing Idol of Ravvan, and the need to find new housing. (“Everybody knows where we live,” Tee said.)

Ranthir then reminded them of what Ribok had done to the researchers from House Erthuo. He wanted to claim vengeance on the Surgeon in the Shadows. Tee was somewhat skittish of getting involved with someone they knew to have connections with the Balacazars, but she agreed that a debt was owed.

And – above it all – there was always the omnipresent loss of their memories.

But out of the morass of information they also began to draw some conclusions:

Ranthir postulated that the bone-rings identified members of the Brothers of Quaan based on two facts: First, they had found a letter written by Ibulli (who had worn one of the rings) addressed to the Brothers of Quaan. Second, because in the letter she had written, “I think it truly possible that we have gained the key for both subjugating the scum of the natural races.” “And,” Ranthir explained, “We haven’t seen the rings on any human. Lamias, beholders, orcs, spider-things… (Platypuses.) No humans.”

Agnarr raised the possibility of following up on Demassac Tovarian (assuming that Jevicca hadn’t already done so). They knew he was experimenting with chaositech. “He might even be the one who supplied the items that let the bone rings into the Banewarrens,” Ranthir said.

Based on other letters they had found and their interrogation of Uranik, it seemed as if “Illadras” was running the Temple of Deep Chaos. If that was the case, where had she been when they were tearing up the place? How substantial were the parts of that complex they hadn’t explored?

Could the Freedom’s Key from Pythoness House be used to open their bank vault sooner? They also discussed the possibility of using the key to open the sealed door in the Banewarrens or the bluesteel doors in Ghul’s Labyrinth, but were stymied by the fact that those doors lacked keyholes.

And they’d also concocted a rough plan of action.

THE DREAMS OF TEE

While they had worked, Tee’s thoughts had returned to the conversation she had had with the Commissar on the walls of the Dalenguard. She new that he would want to know what Sir Kabel was planning.

So when the others had gone to bed, Tee slipped out of the Ghostly Minstrel and headed to the Dalenguard, intent on meeting with him. Unfortunately, the hour was late. Too late, in fact. The Commissar was abed and his guard would not disturb him for Tee.

Resolving to return in the morning, Tee returned to the Ghostly Minstrel. Settling upon her bed, she turned her thoughts to meditation and cast them into the Dreaming.

She sent her thoughts abroad, using her recent training with Doraedian to reach out for the dreams of Wuntad. She hoped to spy upon them and glean some insight into his plans or thoughts.

She found them – or at least she felt she did. But she found those dreams wrapped in a fog of black fury and blue lightening. They were blocked to her.

Disappointed she returned her thoughts to her own body and awoke.

Running the Campaign: The Adventure Not TakenCampaign Journal: Session 37B
In the Shadow of the Spire: Index

Image of a custom GM screen for Night's Black Agents.

Should the GM hide their rolls behind a GM screen or should they roll openly where the players can see the results?

A lot of people actually think that hiding their dice rolls is the primary or even ONLY reason for a GM to use a screen, and this can even mire discussions about using GM screens in a debate about whether or not the GM should be hiding their rolls. And the debate about whether or not a GM should be hiding their rolls can often be entirely swallowed up in an argument about whether or not a GM should be fudging their rolls. (Which is, according to these debates, the only possible reason a GM would have for hiding their rolls.)

At this point, as you can see, the argument is already several layers deep in largely unexamined premises.

Let’s see if we can unpack things a bit.

First, I discuss a bunch of great reasons for using a GM screen in On the Use of GM Screens, and hiding your dice rolls doesn’t even make the list. In fact, it’s fully possibly to use a GM screen and NOT hide your dice rolls. So let’s lay aside the idea that these are intrinsically linked.

Second, for the purposes of this post, let’s take it as a given that the GM should never fudge their rolls.

Having discarded fudging as a motivation, why would a GM want to hide their rolls? In my experience, there are three factors:

Convenience. As I mentioned, there are a lot of great reasons for using a GM screen. Therefore, although I don’t always us a screen, I do often use a screen. And while it’s possible to use a screen without hiding your dice rolls, it’s frequently inconvenient.

So when I’m using a screen, I mostly roll behind the screen because it’s easier. In most systems, it would be a huge pain in the ass to stand up and roll the dice on the far side of the screen every time I needed t roll.

Secrecy. There’s a wide variety of situations in which a dice roll is generating information which the players’ characters don’t have access to. (Or, at least, not immediately.) Therefore, it often makes sense also hide that information form the players.

Examples of this includes Stealth checks, random encounter checks, saving throws against illusions, and any number of other possibilities.

Dramatic Effect. When properly framed so that everyone at the table knows what number needs to be rolled on the dice — without doing any additional math; just “I need a 17 or better” — there can be an immense amount of suspense placed on the die roll and a hugely effective and emotional moment that happens when the dice are rolled and the result is immediately seen!

When a dramatic moment like this is happening, you certainly don’t want to under cut it by rolling the dice in secret! And you may even want to make a special effort to make sure the dramatic moment can happen (e.g., precalculating the die result needed even in a system where you typically don’t do that)!

D&D generally doesn’t frame rolls like this, but critical hits are an exception — everyone knows immediately what a natural 20 means! — and can give a little taste of what it can be like. On the other hand, Monte Cook’s Cypher System, if you run it properly, is set up so that almost every die roll works like this unless there’s a reason for secrecy (which, of course, provides its own dramatic impetus).

IN CONCLUSION

On that note, we can see how these three factors can be weighed for each roll to determine how we want to handle it.

So, for example, if I’m not using a GM screen, then I generally don’t care and just roll the dice, unless there’s a specific reason why secrecy is significant for a particular roll.

On the other hand, when I am using a screen, then I’ll generally roll behind the screen for convenience, unless the stakes are high enough that dramatic effect makes it worth the bother of standing up and rolling on the far side of the screen.

Other GMs, groups, or even game systems can easily have different opinions on the relative importance of these factors.

For example, maybe you’re playing a game with very few rolls and, therefore, every roll is a big, dramatic moment:

On the other hand, a GM might feel strongly about not giving their players the metagame knowledge that “there’s a reason this roll should be hidden, and therefore I’m hiding it,” and therefore they’d prefer to hide as many of their rolls as possible. (And this might be something that the GM only cares about because this particular group is prone to metagaming that knowledge. Or they may have had one of the players ask them to mask the metagame information because that will help them enjoy the game more.)

The point is that there’s not really a One True Way™ here. But hopefully a clear understanding of these factors will help you think clearly about when and why you’re hiding your dice rolls, and find the right solution for you, your group, and your game!

BONUS PLAYER TIP: GET DRAMATIC!

If you’re a player, you can set up your own dramatic dice rolls!

Remember that the basic concept is that (a) the stakes of the dice roll are clear, (b) everyone at the table knows what number you need to roll on the dice (with no additional modifiers); and (c) the roll is made in the open so that everyone can immediately see the result!

The stakes of the check put pressure on the roll; and the result of the roll being immediately known provides an instantaneous release of that pressure, regardless of whether the result is jubilant or catastrophic!

It is not, of course, unusual for the stakes of a roll to be known before the roll is made. Assuming you have access to all the other numbers involved, all you need to do to create your own dramatic dice roll is precalculate the result, announce it to the table, and then roll!

In some systems, as we’ve discussed, this will basically be done for you automatically. But in others, including D&D, you’ll need to jump through a couple extra hoops. (You might also need to ask the GM to give you an additional piece of information, like the DC of the check in D&D.)

The other thing to note, of course, is that if you try to make every single roll ultra-dramatic, the net effect will often be to make nothing dramatic. Excitement and emphasis can all too easily turn into tedium.

But if you choose your moments well, you can enhance the game for everyone at the table!

Tomb Spider - (c) 2008, Wizards of the Coast

This adventure was originally developed as part of my In the Shadow of the Spire campaign. When I posted the campaign journal describing what happened when my players encountered the crypt (which you can read here), several people asked where they could find a copy of the crypt for their own campaigns.

The False Tomb was originally designed for D&D 3rd Edition. It has been updated to 5th Edition here. (Members of my Patreon will receive a copy of my original 3rd Edition adventure notes as special bonus content.)

The adventure uses the tomb spider, along with the associated broodswarms and web mummies, from Monster Manual IV. Tomb spiders also appeared in Monster Manual 2 for D&D 4th Edition, but have not received an official 5th Edition update. You can find fan conversions here and here.

The original adventure used copyrighted content from two different RPG publishers. Both publishers have fan content licenses, but for legal reasons I’m uncertain both can be used at the same time. I am using Wizards of the Coast’s Fan Content Policy and have, therefore, stripped the other IP from the adventure.

BACKGROUND

Sagrathea's Sigil

Sagrathea’s Sigil

The PCs are searching for the burial compound of an archmage named Sagrathea. At some point in the past, several of the stone sarsens above Sagrathea’s tomb were taken from the site and reused to build the walls of a small crypt. These sarsens were marked with Sagrathea’s sigil, which may result in the crypt being misidentified as her tomb.

IDENTIFYING THE FALSE TOMB:

  • DC 15 Intelligence (Mason’s tools) or Intelligence (History): Recognizes that the walls were built using repurposed sarsens, suggesting that the presence of Sagrathea’s arcane sigil is coincidental.

Once the tomb has been identified as false, finding the actual tomb by searching the surrounding area is relatively easy.

THE FALSE TOMB

The False Tomb - Map

ENTRANCE

This crudely built crypt has thick walls formed from heavy stone slabs. Several of these slabs have the distinctive — yet heavily worn — sigil of Sagrathea worked into them. On one side of the crypt there is a badly rusted iron door.

DOOR: The door is rusted shut.

  • Batter Down: DC 20 Strength check.
  • Repair: DC 15 Dexterity (tool proficiency) check.

STAIRS: On the other side of the door there is a flight of gloom-shrouded stairs leading down about twenty feet into the crypt. At the top of the stairs — propped up against the walls — are the shattered stone remnants of the crypt’s original door.

AREA 1 – ENTRY HALL

The floor is strewn with rubbled stone from the broken walls and ceiling. Thick cobwebs are strung from the walls, although there is a more or less clear path to the door on the far side of the chamber. This heavy door of stone hangs half-open, its bottom half smashed apart.

Difficult Terrain: Due to the broken floor and webs.

The False Tomb - Entrance Hall (c) 2006, Wizards of the CoastAREA 2 – CORPSE HUSK

An upright sarcophagus stands against the far wall of this burial chamber. It has been smashed apart. The corpse of its former inhabitant lies on the floor in the middle of the chamber. Thick webs seem to manacle the dried husk to the walls. The chest of the corpses appears to have been ripped open.

BODY — DC 10 Intelligence (Investigation) / Wisdom (Medicine): Something burst OUT of the corpse’s chest.

AREA 3 – LURKING BROODSWARM

The webs are much thicker in this chamber. They almost look like snowdrifts as they crawl their way up the walls. You can see what appears to be an upright sarcophagus standing against the far wall.

BROODSWARM: There is a broodswarm lurking in the webs in the corner of the room (Stealth +7). It will attack if anyone who gets caught in the webs

WEBS: Difficult terrain. DC 10 Dexterity check to cross the room. On failure, become restrained in webs and must make a DC 12 Strength check to escape. (AC 10; hp 5; vulnerability to fire damage; immunity to bludgeoning, poison, and psychic damage.)

SARCOPHAGUS: A large hole has been punched in the front of the sarcophagus. Inside the sarcophagus is a corpse wearing a ruined mithril shirt — its chest has been ripped open.

  • DC 10 Intelligence (Investigation) / Wisdom (Medicine): Something burst OUT of the corpse’s chest.
  • Mithril Shirt: Although useless, the raw mithril is still worth 1,000 gp.

AREA 4 – WEB-CHOKED ROOM

This burial chamber is choked with webs. They literally fill every inch of open space. The far side of the room is completely obscured by them.

WEB MUMMY: A web mummy lurks in the webs. If the PCs disturb the webs in this room or Area 5, it will attack. Otherwise, it will wait until the PCs are confronted by the tomb spider in Area 6, emerging from this room while dragging webs behind it.

WEBS: Difficult terrain. DC 10 Dexterity check to cross the room. On failure, become restrained in webs and must make a DC 12 Strength check to escape. (AC 10; hp 5; vulnerability to fire damage; immunity to bludgeoning, poison, and psychic damage.)

SARCOPHAGUS: A sarcophagus stands against the back wall of the room. It has been broken open. (And is where the web mummy comes from.)

AREA 5 – WEB-CHOKED ROOM

This burial chamber is choked with webs. They literally fill every inch of open space. The far side of the room is completely obscured by them.

WEB MUMMY: A web mummy lurks in the webs. If the PCs disturb the webs in this room or Area 5, it will attack. Otherwise, it will wait until the PCs are confronted by the tomb spider in Area 6, emerging from this room while dragging webs behind it.

WEBS: Difficult terrain. DC 10 Dexterity check to cross the room. On failure, become restrained in webs and must make a DC 12 Strength check to escape. (AC 10; hp 5; vulnerability to fire damage; immunity to bludgeoning, poison, and psychic damage.)

SARCOPHAGUS: A sarcophagus stands against the back wall of the room. It has been broken open. (And is where the web mummy comes from.)

  • A +1 longsword lies inside the broken sarcophagus.

AREA 6 – THE TOMB SPIDER

ANTECHAMBER:

Through the broken door you can see an antechamber. A mosaic of glittering lapis lazuli has been worked into the floor, depicting a bursting star. Twin statues with red gemstones in their eyes flank a door leading into the tomb beyond. Each statue raises its right hand before it, as if to ward off trespassers.

THE BURIAL CHAMBER:

In the tomb itself lies an iron sarcophagus worked in the likeness of knight with a sword and shield laid upon his chest. Thick webs are draped from this sarcophagus, shrouding the far corners of the room in darkness.

TOMB SPIDER: The tomb spider is on the ceiling of the burial chamber. It will wait to attack until someone either stumbles into the entry web or enters the burial chamber. It cannot be seen until someone is standing in the doorway of the tomb chamber (Stealth +7, with advantage).

  • Tactics: As soon as it gets a chance, the tomb spider will throw a web across the exit.

ENTRY WEB: There is a finely-woven web draped across the antechamber just inside the broken door. DC 18 Wisdom (Perception) check to notice it; otherwise the character entering the antechamber will automatically stumble into it.

WEBS – BURIAL CHAMBER: Difficult terrain. DC 10 Dexterity check to cross the room. On failure, become restrained in webs and must make a DC 12 Strength check to escape. (AC 10; hp 5; vulnerability to fire damage; immunity to bludgeoning, poison, and psychic damage.)

THE KNIGHT: The iron sarcophagus could not be broken by the tomb spider. The heraldry on the knight’s shield can be recognized as belonging to the Order of the Rosy Cross. The knight wears elven chain and a +1 longsword.

The Tomb Spider (c) 2006, Wizards of the Coast

The False Tomb is unofficial Fan Content permitted under the Fan Content Policy. Not approved/endorsed by Wizards. Portions of the material used are property of Wizards of the Coast. © Wizards of the Coast LLC.

Kraken of the Deep - feaspb (modified)

Go to Table of Contents

Just like the other sections of the campaign described in Part 2 and Part 3, the Hekaton investigation is ultimately organized around a revelation list, although it may be useful to think of it in separate parts.

SETTING THE STAGE

Even before the PCs get directly involved with the Kraken Society, you’ll almost certainly want to set the stage with some key revelations:

  • Storm Court is no longer in charge of the other giants
  • King Hekaton is Missing / Queen Neri is Missing
  • Serissa is acting as Regent of the Storm Court
  • Optional: Storm Giant Raids (if these are happening)
  • Optional: Mirran and Nym are opposed to Serissa’s regency

Basically, you want the PCs to know that the storm giants are in a state of crisis and confusion — and, importantly, who King Hekaton and Queen Neri are — so that when the PCs start encountering Hekaton-related revelations while investigating the Kraken Society they’ll immediately recognize the significance of what they’ve found.

Several of the clues we set up in Part 3D can serve double duty here, but you’ll want to make sure these revelation lists are fully stocked. It probably wouldn’t hurt for some/all of these to be seeded fairly early in the campaign.

STRUCTURAL REVELATIONS: THE KRAKEN SOCIETY

The core structural revelations are the ones we’ve already discussed — e.g., point-crawl accessible nodes → Involved nodes → Purple Rocks → the Morkoth. These are the leads that will take the PCs through the various Kraken Society nodes. The exact breakdown of this revelation list will depend on the options you’ve chosen.

In addition to the standard revelation list (i.e., the leads pointing to a node from other nodes), I would also make a list of pointcrawl-acccessible nodes for easy reference. “Encountered on Pointcrawl” is, of course, a legitimate vector pointing to a node and can also be included on the node’s revelation list, satisfying one of the three clues for the Three Clue Rule.

You’ll also want to include any leads from the Three City hooks or faction missions pointing to Kraken Society nodes. It can be useful to sketch these out ahead of time, but keep in mind that you don’t need to fully flesh out the faction missions until you know which (if any) of the factions your group is getting involved with. If you want to do this systematically, include a Kraken Society lead in each of the Three Cities and for each of the factions.

Friendly factions can, of course, give the PCs direct leads to Kraken Society nodes as missions, but missions can also point to the Kraken Society indirectly — i.e., the PCs are given a mission to do X, which is unrelated to the Kraken Society, but doing so will tangentially bring them into contact with the Society. (An easy example of this is, “go do X, which is coincidentally in the same location as a pointcrawl-accessible Society node, thus triggering the Kraken Society encounter.”)

Along similar lines, even enemy factions can deliver Kraken Society leads: The PCs target the faction, and discover that faction’s Kraken Society-related intelligence (e.g., “Why are the Zhentarim so interested in the activities of Lord Drylund of Yartar?”).

CORE CONCEPT REVELATIONS: WHAT THE HELL IS HAPPENING?

In addition to just moving from one Kraken Society node to another, there are several key concepts that the PCs should be learning so that they can figure out what’s really going on:

  • The Kraken Society kidnapped Hekaton.
  • Hekaton is on the Morkoth.
  • How to locate the Morkoth.

You’ll likely want to make sure that the clues for “the Kraken Society kidnapped Hekaton” are seeded into the entry point nodes for the Kraken Society: Learning this will give the PCs a very specific goal for continuing their investigation of the Society. Without establishing a goal like this, the only thing motivating the PCs to continue investigating the Society will be simple curiosity. This can work, but it tends to be less reliable and less compelling. (Of course, it’s also quite possible that the PCs — or perhaps their factions — will end up providing their own anti-Kraken Society motivators.)

THE IYMRITH CONSPIRACY

Strictly speaking, the PCs can probably end up rescuing King Hekaton from the Kraken Society without ever figuring out the deeper conspiracy involving Iymrith, Mirran, and Nym. But ideally they’ll figure out this deeper truth, so we should set up a revelation list:

  • The Kraken Society is collaborating with someone in the Storm Court.
  • The Kraken Society’s collaborator is Iymrith.
  • Mirran & Nym are conspiring with Iymrith.
  • Iymrith is actually a blue dragon.
  • Optional: The location of Iymrith’s lair.

It’s likely a lot of clues on this list will be pulling double duty (i.e., a clue that indicates that Iymrith is conspiring with the Kraken Society AND that the Kraken Society know she’s really dragon). The clues in Part 3D, once again, include several more clues that are pulling double duty for these revelations. Also remember that clues pointing to these revelations can also be seeded into the Storm Court itself.

One structural note here is that any clue pointing to “the Kraken Society’s collaborator is Iymrith” will almost certainly also reveal that “that Kraken Society is collaborating with someone in the Storm Court,” but the latter is listed as a separate revelation because — while it’s not strictly necessary — it’s probably more effective to establish the mystery of “Who is the collaborator?!” before providing the clues that resolve the mystery.

In other words, you want three distinct clues for “Kraken Society is collaborating with someone in the Storm Court” that don’t overlap with “their collaborator is Iymrith,” and you’ll want to seed those clues into “earlier” nodes. (For example, maybe “there’s a collaborator” clues can be found in the pointcrawl-accessible nodes, but “it’s Iymrith” clues can only be found in nodes that can only be reached by investigating the pointcrawl-accessible nodes.)

Since node-based scenarios are, obviously, nonlinear, it’s still quite possible that the PCs will learn Iymrith is the collaborator at the same time they learn there IS a collaborator. They might also learn, from other vectors, that Mirran, Nym, and Iymrith are all collaborating together before they learn that they’re working for the Kraken Society and/or are involved in Hekaton’s disappearance! That’s just fine. Our goal isn’t to lock things down. We’re just seeding our clues in the most effective way possible.

The final thing to consider here is designing a proactive node for Iymrith and/or the sisters. In other words, if/when Iymrith learns of the PCs’ efforts, what action might she take to oppose them? Some or all of them might choose intervene directly. Or, alternatively, send agents who can be tracked back to them. In addition to being a fun encounter, this is obviously also a perfect opportunity to include some Iymrith Conspiracy clues.

Go to Part 5: The Final Act

Archives

Recent Posts


Recent Comments

Copyright © The Alexandrian. All rights reserved.